
DevOps: GitHub Team Provisioning & Sync with n8n
Automating GitHub team provisioning with n8n is a powerful way to standardize access, speed up onboarding, and reduce manual work for your DevOps team. In this guide, you will learn how to use an n8n workflow template to create GitHub teams, sync members, and send Microsoft Teams notifications, all from a single webhook call.
What you will learn
By the end of this tutorial-style article, you should be able to:
- Explain why automating GitHub team creation and synchronization is valuable for DevOps.
- Understand how each n8n node in the workflow contributes to team provisioning.
- Trigger the workflow with a webhook that carries project and organization details.
- Automatically create a GitHub team, add members, verify membership, and send a Teams notification.
- Apply best practices for security, error handling, and idempotency in n8n workflows.
- Extend the baseline workflow to match your organization’s needs.
Why automate GitHub team provisioning?
In many organizations, GitHub team management is still handled manually. Someone in DevOps or platform engineering creates a team, adds members, checks permissions, and then informs stakeholders. This approach has several problems:
- Slow onboarding – new projects wait on manual steps before developers can push code.
- Inconsistent access – different teams might use different naming conventions or membership rules.
- Higher risk of errors – manual steps increase the chance of missing a user or granting the wrong access.
- Unnecessary overhead – DevOps engineers spend time on repetitive, low-value tasks.
By automating GitHub team provisioning with n8n, you can:
- Standardize how teams are created across all projects.
- Improve security by enforcing consistent membership and permissions.
- Accelerate developer onboarding for new repositories and services.
- Integrate with other systems like Microsoft Teams, HR, or identity providers.
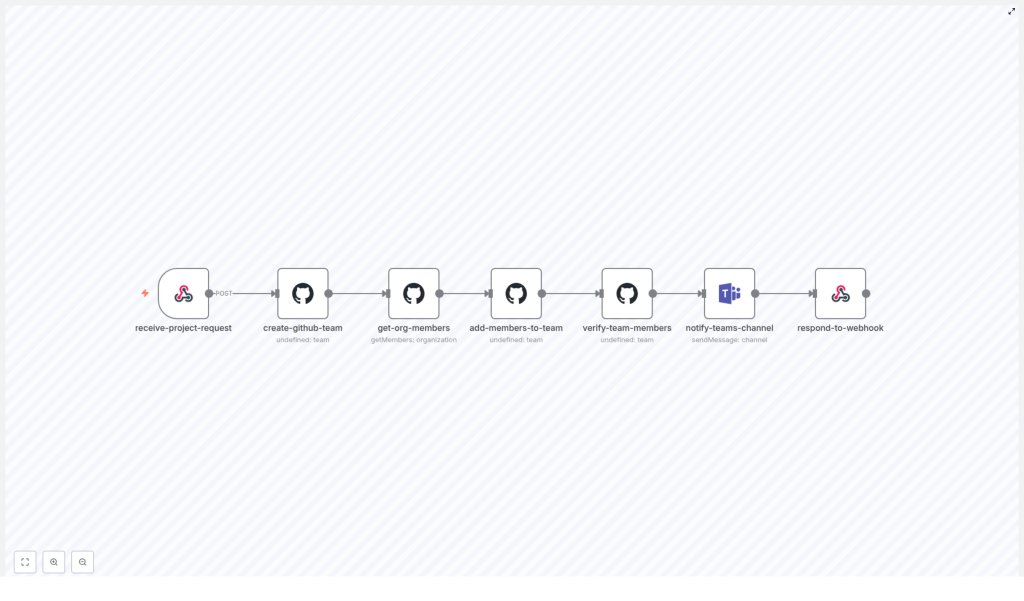
How the n8n workflow works at a high level
The sample n8n workflow is triggered by a single webhook and then runs through a series of automated steps. At a high level, it:
- Receives a project provisioning request through a webhook.
- Creates a new GitHub team in the specified organization.
- Retrieves organization members or a filtered list of users to add.
- Adds those members to the newly created GitHub team.
- Verifies that the team membership is correct.
- Sends a summary notification to a Microsoft Teams channel.
- Returns a structured JSON response to the original caller.
Next, we will walk through each part of the workflow in n8n, node by node, so you can understand exactly what is happening and how to adapt it to your environment.
Step-by-step: Building the GitHub team provisioning workflow in n8n
Step 1 – Accept provisioning requests with a Webhook node
The entry point to this automation is a Webhook node, often named something like receive-project-request. This node exposes an HTTP POST endpoint that other systems or scripts can call whenever a new project needs a GitHub team.
A typical JSON payload looks like this:
{  "organization": "acme-corp",  "projectName": "my-new-project",  "description": "Optional description",  "teamsChannelId": "19:general-channel-id"
}
Key fields:
organization– the GitHub organization where the team should be created.projectName– the name of the new project, which will also be used as the GitHub team name.description– an optional description for the team, useful for documentation and audits.teamsChannelId– the Microsoft Teams channel ID that should receive the notification.
Production tip: validate the incoming payload to ensure required fields are present and correctly formatted before continuing. You can do this using an additional Function node or n8n’s built-in validation patterns.
Step 2 – Create a GitHub team
Once the webhook has received the request, the workflow moves to a GitHub node configured to create a team, often called create-github-team.
In this node, you typically configure:
- Operation – Create Team.
- Organization – pulled from the webhook payload.
- Team name – usually the project name from the request.
- Privacy – set to
closed(the default) so membership is controlled. - Description – from the request description or an autogenerated string.
Example n8n expressions to map data from the webhook to the GitHub node:
organization: ={{ $json.body.organization }}
name: ={{ $json.body.projectName }}
You can also generate a description dynamically, for example:
description: ={{ $json.body.description || `Team for project ${$json.body.projectName}` }}
Step 3 – Get organization members
After the team is created, the workflow needs to know which users to add. This is handled by a node often named get-org-members.
Typical behavior for this step:
- Use a GitHub node operation like List Members for the organization.
- Optionally filter members by role (for example, only members, not outside collaborators).
- In more advanced setups, derive the target member list from:
- An identity provider (Okta, Azure AD, etc.).
- An LDAP or directory sync.
- A field in the original provisioning request (for example, a list of user handles).
For a basic implementation, using all organization members is a simple starting point. Later, you can refine this to match your access control policies.
Step 4 – Add members to the GitHub team
The next step is to add the selected users to the new team. This is handled by a node such as add-members-to-team, which iterates over the member list and invites each user to the team.
Important configuration points:
- Role – usually:
memberfor regular team members.maintainerfor users who should manage team membership and settings.
- Error handling – you do not want the entire workflow to fail if one user is already a member or cannot be added:
- Use
continueOnFailwhere appropriate. - Or wrap the operation in try/catch logic using a Function or Error Workflow pattern.
- Use
This step typically runs in a loop, where each item from get-org-members is processed and added to the team. n8n handles this item-by-item execution automatically when you connect the nodes in sequence.
Step 5 – Verify team membership
After adding members, it is useful to confirm that the team now reflects the expected state. A node like verify-team-members reads the team membership from GitHub to confirm the additions.
Common reasons to include this verification step:
- Produce accurate counts for reporting and notifications.
- Detect missing invites or failures that may require manual follow-up.
- Support idempotent behavior, where re-running the workflow does not create duplicates but still returns correct information.
The output of this node typically includes the final member list and a count of how many users are on the team.
Step 6 – Notify a Microsoft Teams channel
Once the GitHub team is ready, the workflow sends a summary message to Microsoft Teams using a node such as notify-teams-channel.
The notification usually includes:
- Team name and project name.
- Organization name.
- Number of members added to the team.
- Direct URL to the GitHub team.
This gives project stakeholders immediate visibility that the team has been provisioned and is ready to use. The Teams node is configured with an OAuth2 connection that has permission to post messages to the specified channel ID from the webhook payload.
Step 7 – Respond to the webhook caller
Finally, the workflow returns a JSON response to the original caller using a Webhook Response or Respond to Webhook node, often called respond-to-webhook.
A typical response payload might look like this:
{  "success": true,  "teamName": "my-new-project",  "teamSlug": "my-new-project",  "membersCount": 12,  "teamUrl": "https://github.com/orgs/acme-corp/teams/my-new-project"
}
The caller can then use this data to continue their own automation, such as updating a project catalog, notifying another system, or attaching the team URL to a ticket.
Security and permissions for the workflow
Because this workflow creates teams and manages access, it must be designed with security in mind. Keep the following guidelines in place:
- GitHub permissions
Use a GitHub App or a fine-scoped personal access token that is limited to:- Managing teams and memberships only within the target organization.
- Avoiding unnecessary repository or admin scopes.
- Microsoft Teams permissions
Configure an OAuth2 connection with only the scope required to:- Post messages to the target channel.
- Avoid broader tenant-wide permissions where possible.
- Webhook security
Protect the webhook so that only authorized systems can trigger provisioning:- Use HMAC signatures, API keys, or mutual TLS.
- Validate authentication before processing the request.
- Secret management
Store all tokens and API keys in n8n’s credential system:- Do not hard-code secrets in workflow JSON or expressions.
- Restrict who can view or edit credentials in n8n.
Designing for reliability: error handling, idempotency, and rate limits
Idempotency
Idempotency means that running the same request more than once results in the same final state. For this workflow, that typically involves:
- Checking if a team with the requested name already exists.
- Returning the existing team details instead of creating a duplicate.
- Treating “already a member” responses as success when adding users.
Error handling and retries
APIs occasionally fail due to transient issues. To make the workflow more robust:
- Use n8n’s retry settings or implement exponential backoff for temporary errors.
- Enable
continueOnFailwhen adding members so one failure does not stop the entire run. - Capture error messages from GitHub and Teams for troubleshooting.
Handling GitHub rate limits
GitHub enforces rate limits on API calls. When processing large member lists:
- Monitor the
X-RateLimit-Remainingheader in responses. - Batch operations or introduce small delays between requests.
- Design the workflow so it can resume or be retried without creating inconsistent states.
Testing and validating the workflow
Before you enable this workflow for production use, run through a careful testing process.
- Use a sandbox GitHub organization
Test the workflow in a non-critical organization so you can experiment without affecting real teams. - Start with a small member list
Limit the number of users initially to confirm that:- The team is created correctly.
- Members are added as expected.
- The Teams notification and webhook response look right.
- Simulate failure scenarios
Intentionally trigger edge cases like:- A user who is already a team member.
- API rate limits.
- Invalid organization or project names.
Confirm that retries, idempotency, and
continueOnFailbehave as intended. - Enable logging and auditing
Log key steps and responses:- Webhook inputs.
- GitHub team creation responses.
- Member addition results.
- Teams notification outcomes.
This helps with debugging and compliance.
Extending the workflow for real-world DevOps needs
The baseline workflow is a strong starting point, but most organizations will want to extend it. Here are common enhancements:
- Assign repository permissions
After creating the team, automatically grant it permissions on one or more repositories:- Read, triage, write, maintain, or admin.
- Promote maintainers
Identify a subset of members who should be team maintainers and set their role accordingly. - Integrate with HR or identity providers
Instead of using all organization members:- Pull member lists from Okta, Azure AD, or another identity provider.
- Map project or team attributes to specific groups in those systems.
- Schedule periodic audits
Create a separate n8n workflow that:- Runs on a schedule.
- Compares GitHub team membership to an authoritative source.
- Reconciles differences or raises alerts.
- External logging and compliance
Send audit logs to systems like:- Amazon S3.
- Elasticsearch.
- A database or data warehouse.
This supports historical tracking and compliance reporting.
Best practices for automated GitHub team provisioning
- Use minimal privileges
Give automation tokens only the permissions they absolutely need. - Adopt clear naming conventions
Use descriptive team names and slugs, for example:proj-my-new-project-devproj-my-new-project-maintainers
This makes audits and troubleshooting much easier.
- Keep workflows idempotent and observable
Ensure re-running a request does not create duplicate teams or inconsistent access, and that you can see what happened at each step. - Notify stakeholders on both success and failure
Send actionable messages that include:- What was provisioned.
- Who requested it.
- What to do if something went wrong.
Troubleshooting common issues
If something does not work as expected, these checks can help you quickly identify the problem.
