
Enrich HubSpot Contacts with ExactBuyer & n8n: A Workflow Story
By the time Emma opened her laptop that Monday morning, her sales team had already sent three frantic messages.
“This lead has no job title.”
“Is this company even real?”
“Can someone please find a phone number before my call?”
Emma was the marketing operations manager at a fast-growing SaaS company, and HubSpot was her team’s lifeline. But every week the same problem returned: new contacts were flooding in with half-empty records. Missing company names, no job titles, no phone numbers, barely any location data. The sales team was wasting hours researching LinkedIn and company websites, and marketing could not segment properly for campaigns.
Emma knew one thing for sure. If she did not fix their contact enrichment problem, their funnel would stay leaky and their revenue would suffer.
The Pain Of Incomplete HubSpot Contacts
Emma’s dashboards looked promising at first: lead volume was up, form submissions were steady, and HubSpot was capturing emails reliably. But when she drilled into individual contacts, the reality was obvious.
- Leads were missing job titles, so lead scoring was guesswork.
- Company information was sparse or inconsistent, which broke account-based campaigns.
- Phone numbers and locations were often blank, making outbound outreach slow and clumsy.
Her team tried manual research, spreadsheets, and one-off enrichment uploads, but it never kept up with the pace of new leads. The more the company grew, the more obvious the gap became.
Emma needed a way to automatically enrich every new HubSpot contact with reliable company and person data, right when they entered the system, without adding more tools for her team to babysit.
Discovering n8n And ExactBuyer
One afternoon, while searching for “automate HubSpot contact enrichment,” Emma stumbled on an n8n workflow template that promised exactly what she needed: a way to enrich HubSpot contacts with ExactBuyer using a fully automated flow.
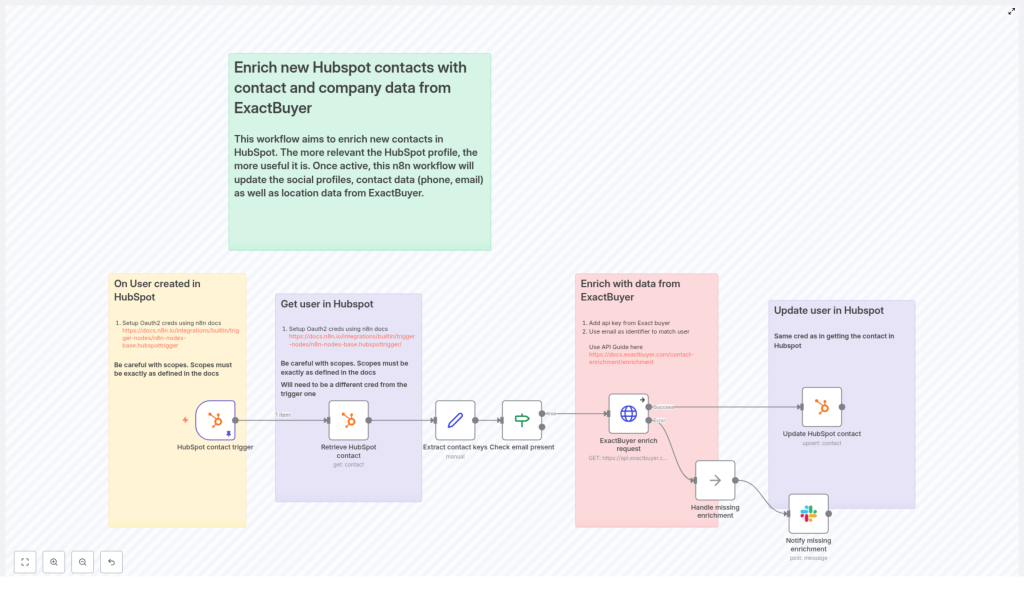
The idea was simple but powerful:
- Listen for new HubSpot contacts with an n8n trigger.
- Fetch the full contact record from HubSpot.
- Use the contact’s email to call ExactBuyer’s enrichment API.
- Write the enriched fields back into HubSpot.
- Alert the team in Slack if enrichment failed or returned nothing.
This was more than a script. It was a reusable n8n workflow template designed to keep HubSpot contact records rich, accurate, and always up to date. Exactly what her sales and marketing teams had been begging for.
Setting The Stage: What Emma Needed First
Before she could turn the template into a working automation, Emma gathered the essentials.
- An n8n instance, either cloud-hosted or running on her company’s own infrastructure.
- A HubSpot account with a developer app and OAuth credentials, configured with the correct scopes.
- An ExactBuyer API key for the enrichment endpoint.
- A Slack webhook or Slack API credential for sending alerts to her team (optional but highly recommended).
- Basic familiarity with how n8n nodes and expressions work.
She also took a moment to read n8n’s HubSpot documentation. One important detail stood out: the HubSpot trigger and the HubSpot get/update nodes might require different scopes or even separate OAuth credentials, depending on how the HubSpot app is set up. She made a note to handle those as separate credentials if needed.
Rising Action: Building The Automated Enrichment Flow
Emma opened n8n, imported the template, and began walking through each node. Instead of feeling like she was wiring up a random collection of steps, she started to see a clear story in the workflow itself.
1. The Moment A Lead Enters: HubSpot Contact Trigger
Everything began with the HubSpot Trigger node. Emma configured it to fire on the contact creation event. Whenever a new contact was created in HubSpot, HubSpot would send a webhook payload to n8n.
She connected her OAuth2 credential to the trigger and configured the webhook in her HubSpot developer settings. Now, n8n would “hear” every new lead entering their CRM in real time.
2. Getting The Full Picture: Retrieve HubSpot Contact
The next step in the workflow was a standard HubSpot node set to the get operation. It used the contactId from the trigger payload to fetch the full contact record from HubSpot.
In the example template, the contactId was pinned in the workflow so Emma could test against a known contact. That helped her validate the flow before she pointed it at live traffic. Once it was working, the node would always pull the latest properties for each new contact.
3. Preparing The Data: Extract Contact Keys
Next came a Set node, which Emma realized was the bridge between HubSpot and ExactBuyer. This node was responsible for extracting the key pieces of data that downstream nodes would depend on, especially the HubSpot internal id and the contact email.
Inside the Set node, the template used n8n expressions like:
user_id = {{$json.vid}}
email = {{$json.properties.email?.value}}
By isolating user_id and email early, Emma could keep the rest of the workflow cleaner and avoid repeating complex property paths later.
4. A Critical Gate: Check Email Present
Emma knew that ExactBuyer’s enrichment depended on having an email. So the workflow included a guardrail: an If node that checked whether the email field was present and not empty.
If the email existed, the flow continued to the enrichment step. If not, the workflow could either stop or send a notification for manual review. That meant no wasted API calls and no mysterious failures caused by missing primary identifiers.
5. The Turning Point: ExactBuyer Enrichment Request
This was the moment Emma had been waiting for. The HTTP Request node called ExactBuyer’s enrichment endpoint using the email that had just been extracted.
She configured the node with a generic HTTP header credential to pass her ExactBuyer API key, then set the URL to the enrichment endpoint, for example:
https://api.exactbuyer.com/v1/enrichThe workflow used query parameters like:
?email={{ $json.email }}&required=work_email,personal_email,emailOne detail in the template made Emma breathe easier: the node was set to continue on error. In n8n terms, that meant using onError: continueErrorOutput. Instead of crashing the workflow when ExactBuyer returned no result or a non-2xx response, the flow would keep going and handle the situation gracefully.
This was the turning point in her story. For the first time, new HubSpot contacts would automatically get enriched with company and person data, or if something went wrong, her team would be notified instead of being left in the dark.
6. Writing Back Rich Profiles: Update HubSpot Contact
When ExactBuyer responded with enrichment data, the workflow moved to another HubSpot node configured for upsert or update. Here, Emma mapped ExactBuyer’s fields into HubSpot properties using n8n expressions that referenced the HTTP Request result.
Examples from the template looked like this:
gender = {{$json.result.gender}}
school = {{$json.result.education?.[0]?.school?.name}}
country = {{$json.result.location?.country}}
jobTitle = {{$json.result.employment?.job?.title}}
lastName = {{$json.result.last_name}}
firstName = {{$json.result.first_name}}
companyName = {{$json.result.employment?.name}}
companySize = {{$json.result.employment.size}}
phoneNumber = {{$json.result.phone_numbers?.[0]?.E164}}
She also made sure that HubSpot knew exactly which contact to update. Instead of relying on a fresh lookup, she reused the email captured earlier from the “Extract contact keys” node:
{{$('Extract contact keys').item.json.email}}With this mapping in place, every successful ExactBuyer response would instantly transform a barebones HubSpot record into a detailed, sales-ready profile.
7. When Things Go Wrong: Handling Missing Enrichment & Notifications
Of course, Emma knew that not every contact would match in ExactBuyer. Some emails would be too new, too obscure, or simply not present in the enrichment database.
The template handled that reality head-on. If ExactBuyer returned an error or an empty result, the workflow routed to a NoOp (or similar handling node) and then into a Slack node.
In Slack, the message would land in a channel like #alerts with key details such as:
- The contact’s email address.
- The HubSpot contact id.
- Any relevant error information.
That way, her team could quickly review edge cases, decide whether to enrich manually, or adjust their data strategy. No more silent failures, and no more wondering why a contact looked incomplete.
Staying Safe And Stable: Error Handling & Best Practices
Before Emma flipped the switch to production, she hardened the workflow using a few best practices that the template recommended.
- Fail-safe behavior: She kept the HTTP Request node set to continue on error, so failed ExactBuyer calls would not crash the entire flow. Instead, they would be logged and optionally sent to Slack for review.
- Rate limits: She checked ExactBuyer’s API rate limits and made a plan to implement batching or queuing if lead volume spiked. n8n’s flexibility made it easy to add rate-limit handling later.
- Retry logic: For transient 5xx errors, she added a small Retry or Wait pattern so the workflow would reattempt the request a few times before escalating to her team.
- Separate HubSpot credentials: To avoid scope issues, she used distinct OAuth credentials for the webhook trigger and for the HubSpot get/update operations, aligned with her HubSpot app’s configuration.
- Logging: She configured logging of response payloads and status codes into an audit store, which helped with debugging, reporting, and compliance reviews.
Respecting Privacy: Compliance In The Enrichment Flow
As the person responsible for marketing operations, Emma also had to think about data protection. Enriching personal data is powerful, but it comes with obligations.
She documented how the workflow aligned with GDPR, CCPA, and other relevant regulations, making sure they only enriched and stored data for which they had a lawful basis.
- Recording consent where required, especially for EU contacts.
- Maintaining an audit log of enrichment events and their purpose.
- Limiting the storage of sensitive personal data and focusing on fields that were necessary for sales and marketing operations.
By building these considerations into the workflow design, Emma avoided future headaches with compliance and internal reviews.
Testing The Flow Before Going Live
Emma refused to let a half-tested automation touch production contacts. She followed a structured testing path before flipping the final switch.
- She used a staging HubSpot app and a test ExactBuyer key where possible, isolating experiments from real customer data.
- She manually created test contacts in HubSpot to trigger the webhook and watched each run in n8n’s execution log.
- She inspected the HTTP Request node’s response to ensure the field mappings were correct and that the right data was flowing into HubSpot.
- She enabled a “dry run” mode by temporarily routing enriched data to a log or test node instead of updating live HubSpot contacts, until she was completely confident.
Only after several successful test runs did she connect the workflow to the production HubSpot app and ExactBuyer credentials.
Leveling Up: Advanced Improvements Emma Considered
Once the basic enrichment workflow was running smoothly, Emma started thinking about how to make it even smarter.
- Multiple emails: Some of their contacts had both personal and work emails. She planned to add logic to choose the best email for enrichment, prioritizing work over personal when available.
- Caching enrichments: For stable attributes like company and job, she considered adding a cache layer. If ExactBuyer had already enriched a particular email recently, the workflow could reuse stored results and avoid extra API calls.
- Triggering on updates: Instead of enriching only on contact creation, she thought about adding a trigger for key property changes, such as email updates, to keep profiles fresh.
- Standardized field mappings: Before rolling out to more teams, she worked with RevOps to standardize HubSpot custom properties so that every enrichment field had a clear and consistent destination.
With these enhancements, the workflow would grow from a simple enrichment tool into a core part of their customer data foundation.
The Resolution: What Changed For Emma’s Team
A few weeks after deploying the n8n workflow template, the tone in Emma’s Slack channels changed.
Instead of complaints about missing data, sales reps were sharing screenshots of perfectly enriched contact records. Marketing campaigns were segmented by job title, company size, and country with confidence. SDRs had phone numbers and locations ready before the first outreach.
The once chaotic “Who owns this lead?” conversations were replaced by focused strategy discussions. Manual research time dropped sharply, and the team’s conversion rates began to climb.
All of that came from a workflow that quietly listened for new HubSpot contacts, enriched them with ExactBuyer, and kept everyone informed when something needed attention.
Put This Story To Work In Your Own Stack
This n8n workflow template is more than a technical example. It is a dependable, automated bridge between HubSpot and ExactBuyer that keeps your contact profiles rich, accurate, and ready for action.
By adopting it, you can:
- Reduce manual enrichment work for sales and marketing teams.
- Improve segmentation, personalization, and lead qualification.
- Catch enrichment failures early with Slack alerts instead of hidden errors.
- Maintain data quality and compliance as your lead volume grows.
Ready to follow Emma’s path? Import the n8n workflow template into your own instance, add your HubSpot OAuth credentials and ExactBuyer API key, and start by testing in a staging HubSpot portal.
If you want help customizing the flow, you can extend it with retries, batched enrichment, advanced rate limiting, or additional GDPR controls tailored to your organization.
Further reading: ExactBuyer enrichment docs · n8n HubSpot Trigger docs
Call to action: Import this template into n8n and start enriching your HubSpot contacts today, or subscribe to our newsletter for more automation recipes and workflow templates.
