
Expose Google Sheets as an HTML Table with n8n
Imagine turning any Google Sheet into a clean, responsive web page in a few minutes, without spinning up a server or touching a traditional backend. With n8n, you can do exactly that. In this guide, you will learn how to build an automation that reads a Google Sheet, transforms it into a Bootstrap-styled HTML table, and serves it through a simple webhook URL.
This is more than a technical trick. It is a small but powerful step toward a more automated, focused way of working, where your tools quietly handle the busywork so you can stay present for the work that really matters.
The problem: data stuck in spreadsheets
Spreadsheets are often where ideas start. You track leads, inventory, content calendars, event registrations, or internal reports in Google Sheets because it is fast and familiar. Yet, when you want to share that data with others in a simple, polished way, you quickly hit friction:
- You do not want to manually export and format data every time something changes.
- You do not want to maintain a separate web server or write a full web app.
- You want a simple, always up to date view that anyone can open in a browser.
That is where automation becomes a catalyst for change. Instead of repeatedly copying, pasting, and formatting, you can build a small n8n workflow that does the work for you whenever someone calls a URL.
Shifting your mindset: from manual tasks to reusable automations
When you start thinking in workflows instead of one-off tasks, your relationship with tools like Google Sheets and n8n changes. Every repetitive step becomes an opportunity to automate. Every small automation becomes a building block for something bigger.
The workflow in this tutorial is intentionally simple. It is a public endpoint that reads a sheet and returns a styled HTML table. Yet this simplicity is powerful:
- You gain a reusable pattern for exposing data as web content.
- You free yourself from manual exports and formatting.
- You build confidence to create more advanced automations later.
Think of this template as a starting point. Once it is running, you can extend it with filters, authentication, multiple formats, or even dashboards. The important part is taking the first step and seeing that you can automate more than you might expect.
What this n8n workflow will do for you
By the end of this tutorial, you will have a working n8n workflow that turns any supported Google Sheet into a lightweight HTML page. It will:
- Expose a Webhook endpoint that anyone (or any system) can call.
- Use a Google Sheets node to read data from a specific sheet.
- Transform that data with a Function node into a Bootstrap-styled HTML table.
- Return the final HTML directly from a Respond to Webhook node so a browser can render it instantly.
You will not need a separate web server or backend. n8n becomes your lightweight publishing layer for spreadsheet data.
What you need before you start
To follow along and get your first automated HTML table live, make sure you have:
- An n8n instance, either cloud-hosted or self-hosted.
- A Google account with access to the Google Sheet you want to expose.
- n8n Google Sheets credentials configured using OAuth2.
Once these are ready, you are set to build a workflow that can grow with you as your automation needs evolve.
From idea to reality: building the workflow step by step
1. Create the entry point with a Webhook node
Start by adding a Webhook node in your n8n workflow. This is the public endpoint that will trigger the automation.
Configure it as follows:
- Set the Path to something easy to remember, for example
/sheet-html. - Choose the HTTP Method as GET if your sheet is read-only and publicly accessible.
For production setups, you may want to switch to POST and add authentication. For now, keep it simple so you can see the workflow in action quickly.
2. Connect to Google Sheets and read the data
Next, add a Google Sheets node and connect it to your Webhook node. This is where your spreadsheet becomes structured data that you can transform.
Configure the node:
- Select your Google Sheets OAuth2 credentials.
- Set the Operation to Read.
- Set the Resource to Sheet.
- Provide the Sheet ID, which you can copy from the Google Sheet URL.
- Optionally, specify a range if you want to limit which cells are read.
The output from this node will be a list of JSON objects, where each row is an item and each column header becomes a key. This structure makes it easy to build a table programmatically.
3. Transform rows into a responsive HTML table
Now you will turn that raw data into a complete HTML document using a Function node. This is where the magic happens: your workflow takes structured data and turns it into a shareable, styled web page.
Add a Function node after the Google Sheets node and paste the following code:
Example Function node code
// Get the column names from the first row
const columns = Object.keys(items[0].json);

const html = `

  <head>  <meta charset="utf-8">  <meta name="viewport" content="width=device-width, initial-scale=1">  <title>Sheet Table</title>  <link href="https://cdn.jsdelivr.net/npm/bootstrap@5.2.0/dist/css/bootstrap.min.css" rel="stylesheet">  </head>  <body>  <div class="container mt-4">  <h1>Spreadsheet Table</h1>  <table class="table table-striped table-bordered">  <thead>  <tr>  ${columns.map(e => '<th scope="col">' + e + '</th>').join('\n')}  </tr>  </thead>  <tbody>  ${items.map(row => '<tr>' + columns.map(col => '<td>' + (row.json[col] ?? '') + '</td>').join('\n') + '</tr>').join('\n')}  </tbody>  </table>  </div>  <script src="https://cdn.jsdelivr.net/npm/bootstrap@5.2.0/dist/js/bootstrap.bundle.min.js"></script>  </body>

`;

return [{ json: { html } }];
What this code does:
- It reads the column names from the first row so your table headers match the sheet headers.
- It loops through each row and each column to build a proper HTML table body.
- It uses the nullish coalescing operator
??so empty cells display as blank strings instead of undefined. - It includes Bootstrap via CDN so you instantly get a responsive, nicely styled table without writing custom CSS.
With this node in place, your Google Sheet is now transformed into a complete HTML document, ready to be sent to the browser.
4. Return the HTML with a Respond to Webhook node
The final step is to send the generated HTML back to whoever called the webhook. Add a Respond to Webhook node and connect it after the Function node.
Configure it so that:
- The Response body uses the
htmlfield from the Function node output. - The Response headers include:
Content-Type: text/html; charset=UTF-8 - The node is set to respond with text so browsers render the HTML directly.
At this point, your workflow is complete. A single URL now reads your sheet, converts it into a responsive table, and returns it as a web page.
How the complete n8n workflow flows
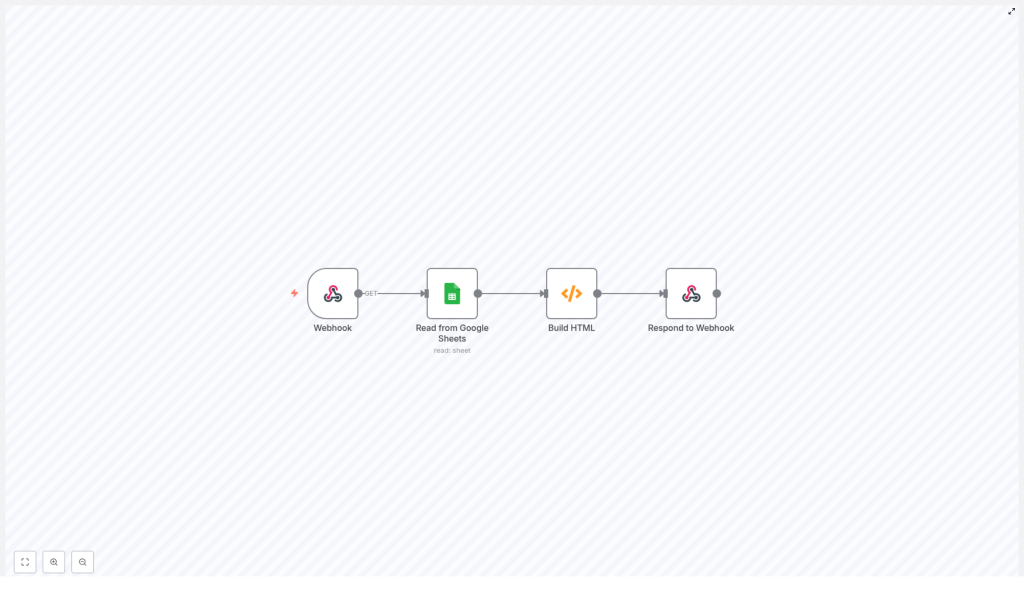
Your finished workflow follows a clear, logical path:
Webhook (incoming request) → Google Sheets (read data) → Function (build HTML) → Respond to Webhook (send HTML back)
This simple pattern is powerful and reusable. You can import a prebuilt n8n JSON template that follows this exact layout, then just plug in your own Sheet ID and credentials.
Once you see this working, you will likely start to imagine other places where the same pattern could save you time, whether you are sharing internal reports, public data, or simple internal tools.
Keeping your workflow safe and efficient
Protecting your webhook
Public webhooks are convenient, but you also want to be thoughtful about access, especially in production. To keep your automation secure, consider:
- Adding Basic Auth to the webhook or validating a secret query parameter.
- Restricting access by IP allowlists or cloud firewall rules.
- Serving the webhook over HTTPS, ideally behind a custom domain or proxy that enforces TLS.
Improving performance with caching
If your Google Sheet is large or you expect many requests, you can reduce load and speed up responses by adding a caching layer. Options include:
- Using in-memory caching inside n8n to reuse recent results.
- Relying on an external cache or key-value store to store rendered HTML.
Caching helps you respect Google Sheets API limits and keeps the experience snappy for your users.
Handling large sheets and pagination
For very large datasets, HTML tables can become heavy for both your workflow and your users. In that case, consider:
- Implementing pagination with limit and offset parameters.
- Providing alternative endpoints that return CSV or JSON instead of HTML when clients do not need a visual table.
These strategies keep your automation responsive as your data grows.
Troubleshooting your n8n Google Sheets HTML workflow
If something does not work on the first try, that is part of the learning journey. Here are some common issues and how to approach them:
- No data returned
Double check the Sheet ID and sharing settings. Make sure the OAuth client or account used in n8n has access to the sheet. - Malformed HTML
Open the response in the browser and use “View Source” to inspect the generated HTML. You can also log thehtmlfield in the Function node for easier debugging. - Slow responses
Look at Google Sheets API rate limits and network latency. Adding caching or limiting the range you read can greatly improve performance.
Each small fix you make builds your confidence with n8n and helps you move faster on future workflows.
Ideas to extend and personalize your template
Once your basic HTML table is working, you can turn it into something uniquely suited to your team or business. Here are some enhancements to explore:
- Multiple formats
Return CSV or JSON when a query parameter such as?format=jsonor?format=csvis provided, and keep HTML as the default. - Server-side sorting and filtering
Accept query parameters (for example?sort=column,?status=active) and filter or sort the rows inside the Function node before rendering. - Custom styling and interactivity
Swap Bootstrap for your own CSS or add interactive JavaScript libraries like DataTables for client-side search, sorting, and pagination. - Static snapshots
Generate static HTML snapshots at intervals and host them on a CDN for very fast delivery, while keeping the workflow for scheduled updates.
Each improvement is a chance to learn, experiment, and tailor your automation to the way you actually work.
