
Greenhouse Climate Controller with n8n & AI
Imagine your greenhouse looking after itself. Sensors quietly send data, an AI checks what has happened in the past, compares it with your notes and best practices, then calmly decides what to do next. That is exactly what this n8n workflow template helps you build.
In this guide, we will walk through how to set up a smart greenhouse climate controller using:
- n8n for low-code automation
- Hugging Face embeddings for semantic understanding
- Pinecone as a vector store for historical context
- A LangChain-style agent for decision making
- Google Sheets for logging and traceability
We will cover what the template does, when it is worth using, and how to set it up step by step so you can move from basic rules to context-aware decisions.
What this n8n greenhouse template actually does
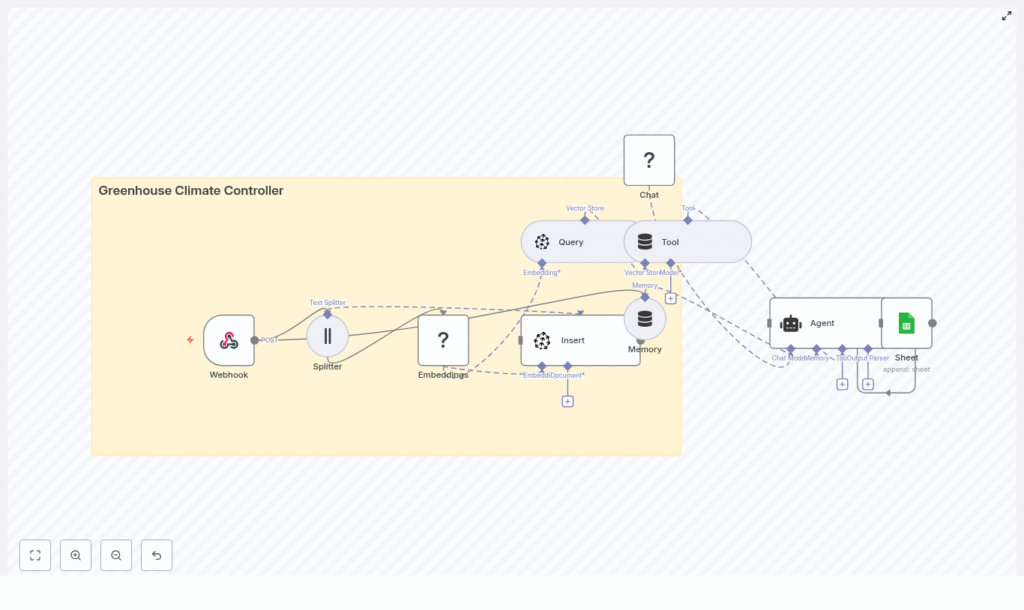
At a high level, this workflow listens to sensor data, turns your logs and notes into embeddings, stores them in Pinecone, then uses an AI agent to make decisions based on both live readings and historical patterns. Every decision gets logged to Google Sheets so you can review, audit, or improve it later.
Here is the flow in plain language:
- Greenhouse sensors (or a scheduler) send a POST request to an n8n Webhook.
- Relevant text (notes, logs, combined data) is split into chunks.
- Each chunk is converted into vector embeddings using Hugging Face.
- Those embeddings are stored in a Pinecone index called
greenhouse_climate_controller. - When new sensor data arrives, the workflow queries Pinecone for similar past events and documentation.
- An AI agent, powered by a language model, uses that context plus short-term memory to decide what to do.
- The final recommendation and raw sensor payload are appended to a Google Sheet for record keeping.
Why combine n8n, embeddings, and a vector store?
Most greenhouse automations are rule-based. You set thresholds like:
- If humidity > 80%, open vent.
- If temperature < 18°C, turn on heater.
That is fine for simple setups, but it ignores rich context like:
- Past mold issues in a specific corner
- Maintenance notes and SOPs (standard operating procedures)
- Patterns that only become obvious over time
By adding embeddings and a vector store, you give your automation a way to search through all that unstructured information semantically, not just by keywords. The agent can then reason over that context and make smarter decisions.
Key benefits
- Context-aware decisions – The agent can look at historical events, notes, and documentation before recommending actions.
- Fast semantic search – Vector similarity search lets you quickly find relevant logs and SOPs, even if wording is different.
- Low-code orchestration with n8n – Easily connect sensors, APIs, and tools without writing a full backend.
- Persistent logging – Google Sheets keeps a clear, human-readable trail of what happened and why.
In practice, this means your system can do things like: “We have high humidity and condensation on the north wall again. Last time this happened, mold developed within a week when ventilation was not increased enough. Let us open the vents a bit more and recommend a manual inspection.”
When should you use this template?
This workflow is a good fit if:
- You already have (or plan to have) greenhouse sensors sending data.
- You are tired of hard-coded rules that do not adapt to real-world behavior.
- You keep logs, notes, or SOPs and want your automation to actually use them.
- You want an audit trail of why each decision was made.
If you are just starting with automation, you can still use this template as a “smart layer” on top of simpler controls, then gradually lean more on the AI agent as you gain confidence.
Core building blocks of the workflow
Let us break down the main n8n nodes and what each one is responsible for.
Webhook – entry point for sensor data
The Webhook node receives incoming POST requests with sensor payloads, such as:
- Temperature
- Humidity
- CO2 levels
- Current actuator states (vents, heaters, etc.)
- Optional notes or observations
Example Webhook configuration
- Method:
POST - Path:
/greenhouse_climate_controller
Example JSON payload
{  "device_id": "greenhouse-01",  "timestamp": "2025-08-31T09:40:00Z",  "temperature": 26.8,  "humidity": 82,  "co2": 420,  "actuators": {"vent": "closed", "heater": "off"},  "notes": "heavy condensation on North wall"
}
Text Splitter – preparing data for embeddings
Long messages or combined logs are not ideal for embeddings directly. The Text Splitter node breaks them into manageable, semantically coherent chunks.
A typical configuration might be:
chunkSize = 400chunkOverlap = 40
This overlap helps preserve context across chunks and improves embedding quality.
Embeddings (Hugging Face) – turning text into vectors
Next, the Hugging Face embeddings node converts each text chunk into a vector representation. You will need:
- A Hugging Face API key
- A suitable model for semantic understanding of short text, logs, and notes
These embeddings are what allow the vector store to perform semantic similarity searches later.
Pinecone Insert – storing your greenhouse memory
The Insert node pushes each embedding into a Pinecone index. In this workflow, the index is named greenhouse_climate_controller.
Along with the vector, include rich metadata, for example:
device_idtimestamp- Sensor types or values
- Original text or note
This metadata is extremely useful later for filtering, debugging, and interpretation.
Pinecone Query + Vector Store Tool – retrieving context
Whenever a new payload comes in, the workflow creates a short “context query” that describes the current situation, for example:
high humidity and condensation in north wall, temp=26.8, humidity=82
The Query node then searches the greenhouse_climate_controller index for similar past events and relevant documentation or SOP snippets.
The results are exposed to the agent through a Vector Store Tool, which the agent can call when it needs more context. This is how the agent “looks up” historical patterns instead of guessing in isolation.
Memory – keeping short-term context
The Memory node maintains a short buffer of recent interactions. This lets the agent remember what happened in the last few runs, which can be helpful if you have multi-step processes or want to track evolving conditions.
Chat / Agent (LM via Hugging Face) – making the decision
The Agent node is where everything comes together. It receives:
- Raw sensor data from the Webhook
- Relevant context from the vector store tool
- Short-term memory from the Memory node
Using a language model (via Hugging Face), the agent synthesizes a recommendation. Typical outputs might include:
- “Open vents 30% for 15 minutes.”
- “Start heater on low to reduce relative humidity.”
- “Repeated condensation on north wall, recommend manual inspection.”
To keep things reliable, you will want to carefully design the agent prompt with:
- Clear role instructions (safety, thresholds, actionability)
- A description of the vector tool and how to use it
- A structured output format that is easy to parse and log
Google Sheets – logging for traceability
Finally, the Sheet node appends a new row to a Google Sheet that acts as your logbook. Typical fields might include:
- Timestamp
- Device ID
- Sensor values
- Agent action
- Reason and confidence
- Relevant Pinecone result IDs
This log is invaluable for audits, debugging, and improving your prompts or models later. It also gives you data you can use for supervised fine-tuning down the road.
Step-by-step: building the workflow in n8n
1. Set up the Webhook
In n8n, add a Webhook node:
- Method:
POST - Path:
/greenhouse_climate_controller
Point your sensors or gateway to this URL and send JSON payloads similar to the example above. This is your main ingestion point.
2. Split incoming text or logs
Add a Text Splitter node to handle long notes or combined logs. Configure it with something like:
chunkSize = 400chunkOverlap = 40
This ensures your embeddings are based on coherent slices of text instead of one giant blob.
3. Generate embeddings with Hugging Face
Next, drop in a Hugging Face Embeddings node and connect it to the Text Splitter. Configure:
model = your-HF-model(choose one suited for semantic similarity)credentials = HF_API(your Hugging Face API key)
Each text chunk will now be converted into a vector representation.
4. Insert embeddings into Pinecone
Add a Pinecone Insert node and configure it as follows:
mode = insertindexName = greenhouse_climate_controller
Along with the vector, attach metadata like:
device_idtimestamp- Sensor-type info
- Original text
This creates your long-term memory of greenhouse events.
5. Query the vector store for similar situations
For each new sensor payload, build a short, descriptive query string that captures the current state (for example “high humidity and condensation in north wall”).
Use a Pinecone Query node configured with:
indexName = greenhouse_climate_controller
The query results are then wrapped as a Tool (Vector Store) node that the agent can call to fetch relevant past events and SOP snippets.
6. Configure the agent and memory
Add a Memory node to keep a small buffer of recent context, then connect it and the Vector Store Tool to a Chat/Agent node, for example using lmChatHf as the language model.
In the agent configuration:
- Define its role, for example “You are an automation agent for a greenhouse climate controller.”
- Explain what the vector tool provides and when to use it.
- Specify a strict, machine-readable output format.
Designing the agent prompt and output format
A well-structured prompt makes your workflow far more reliable. You want the agent to be predictable and easy to parse programmatically.
Here is a simple example prompt snippet:
You are an automation agent for a greenhouse climate controller.
Given sensor data and relevant historical context, output JSON with fields: action, reason, confidence (0-1), notes.
And an example of the kind of JSON you might expect back:
{  "action": {"vent_open_pct": 30, "duration_min": 15},  "reason": "High humidity (82%) with condensation observed; similar past events led to mold when ventilation was insufficient.",  "confidence": 0.87,  "notes": "Recommend manual wall inspection after ventilation cycle."
}
Because the output is structured, you can safely parse it in n8n, log it, and even trigger downstream actions (like controlling actuators) without guesswork.
7. Log everything to Google Sheets
Last step: add a Google Sheets node configured to append rows to a “Log” sheet using OAuth2.
Typical configuration:
- Operation:
Append - Target: your greenhouse log sheet
Write fields such as:
- Raw sensor payload
- Agent decision (parsed JSON)
- Reason and confidence
- Pinecone match IDs or scores
This gives you a complete, human-friendly history of how your greenhouse AI behaved over time.
Quick reference: n8n node mapping
- Webhook:
POST /greenhouse_climate_controller - Splitter:
chunkSize = 400,chunkOverlap = 40 - Embeddings:
model = your-HF-model,credentials = HF_API - Insert:
mode = insert,indexName = greenhouse_climate_controller(Pinecone) - Query:
indexName = greenhouse_climate_controller - Tool:
name = Pinecone(vector store wrapper) - Memory: buffer window for short-term context
- Chat/Agent:
lmChatHf+ agent node to run decision logic - Sheet: append row to “Log” sheet (Google Sheets OAuth2)
Operational considerations
Security
- Protect the Webhook with IP allowlists, HMAC signatures, or an API key.
- Store all secrets in n8n credentials and limit who can access the UI.
Costs and rate limits
- Embedding generation and Pinecone storage both incur usage costs, so batch and deduplicate inputs when you can.
- Consider caching frequent queries and only hitting Pinecone for non-trivial or anomalous events.
Scaling
- Run n8n with autoscaling if you expect high sensor event volume.
- Use Pinecone sharding and capacity settings to meet your latency and throughput needs.
Troubleshooting and tuning tips
- If search results feel irrelevant, try increasing chunk overlap and double-check your embedding model choice.
- If the agent output is vague, tighten the prompt, add clearer constraints, and enforce structured JSON output.
- Include rich metadata (device_id, zone, sensor_type) when inserting embeddings so you can filter and debug more easily.
Ideas for next-level enhancements
Once the basic workflow is stable, you can start layering on more advanced features:
