
How to Build a Simple Random Data Generator in n8n
Why You Might Want a Random Data Generator in n8n
If you have ever tried to test a workflow without good sample data, you know how frustrating it can be. You tweak a node, hit execute, then realize you do not really have enough data to see how it behaves in real life.
That is where a random data generator in n8n comes in handy. With a simple workflow, you can spin up realistic mock data on demand, without writing complex scripts or connecting to external tools. It is perfect for:
- Testing new n8n workflows before going live
- Creating demo data for clients or teammates
- Experimenting with different node setups and logic
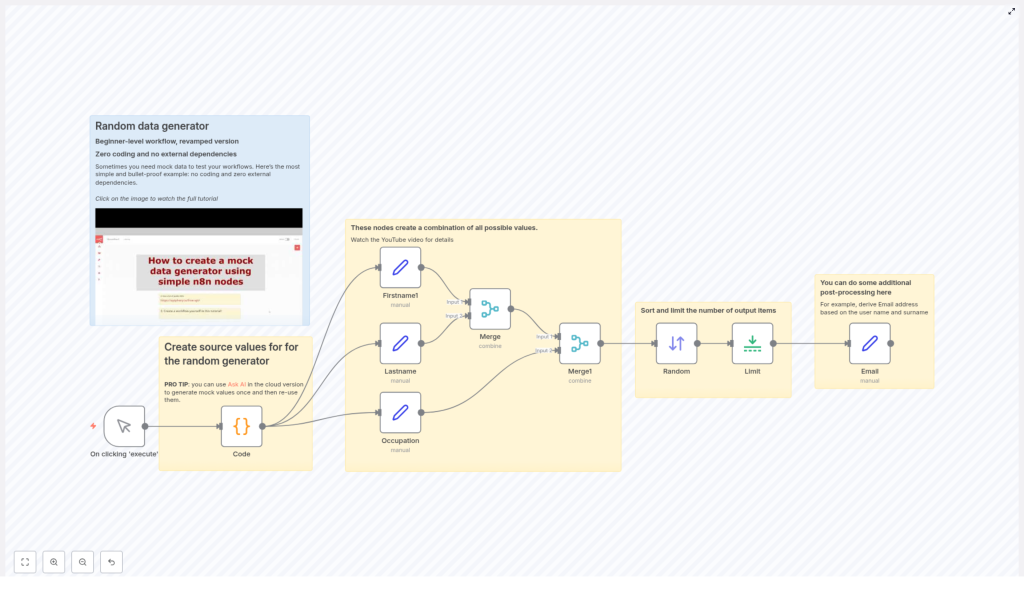
In this guide, we will walk through a beginner-friendly n8n template that creates random combinations of first names, last names, and occupations, then lets you limit and post-process that data. You will still get all the technical details, but in a relaxed, step-by-step format you can follow while sipping your coffee.
What This n8n Template Actually Does
Let us zoom out for a second before diving into the nodes. This workflow:
- Starts manually whenever you click execute
- Uses a Code node to hold some simple seed data (like names and jobs)
- Splits that data into separate fields so you can mix and match values
- Combines all possible first name, last name, and occupation combinations
- Randomizes the order of results
- Limits how many items you get back
- Optionally adds extra fields, like an email address based on the generated name
The result is a flexible, reusable random data generator in n8n that you can adapt to your own use cases.
Step 1: Start With a Manual Trigger
You begin the workflow with a Manual Trigger node, labeled something like "On clicking ‘execute’". This is the simplest way to control when your generator runs.
Whenever you want new mock data, you just open the workflow and hit Execute. No schedules, no webhooks, just a quick manual trigger that is perfect for testing and development.
Step 2: Define Your Seed Data in a Code Node
Next up is the heart of the generator: a Code node that holds your base data. Do not worry, you are not writing complex logic here. You are simply defining a small array of objects that represent people with a first name, last name, and occupation.
Here is the example used in the template:
return [  {firsname:"Name 1",lastname:"Surname 1", occupation:"Job 1"},  {firsname:"Name 2",lastname:"Surname 2", occupation:"Job 2"},  {firsname:"Name 3",lastname:"Surname 3", occupation:"Job 3"}
];
This little snippet is your source data. The workflow will later remix these values into many different combinations.
You can easily customize this node with your own fields, more items, or different types of data. The key idea is that the Code node stores the raw values that all your random results will be built from.
Step 3: Split Out Individual Fields With Set Nodes
Once the Code node returns its array of items, the workflow moves on to a few Set nodes that focus on specific properties. In the template, there are three Set nodes:
- Firstname1
- Lastname
- Occupation
Each Set node pulls out one field from the Code node output and organizes it so n8n can later mix and match them. By separating first names, last names, and occupations, you are preparing the data for combinatorial magic in the next step.
This structure also makes it simple to add more fields later. Want departments, locations, or product names? Just add more seed values and more Set nodes as needed.
Step 4: Generate All Possible Combinations With Merge Nodes
Now for the fun part. To turn a few simple values into a large pool of mock data, the workflow uses Merge nodes in combineAll mode.
Here is what happens:
- The first Merge node takes two sets of data (for example, first names and last names) and combines them so that every first name is paired with every last name.
- The second Merge node then brings in the third field (occupations) and combines it in the same way.
Using the combineAll mode means n8n will generate every possible combination of first names, last names, and occupations. So even if your seed data is small, your output can be surprisingly rich.
This is incredibly useful for testing, because you can see how your workflow behaves with a variety of different input combinations without manually crafting each one.
Step 5: Shuffle the Results and Limit the Output
All combinations are great, but sometimes you do not need all of them at once. That is where a Sort node and a Limit node come in.
Randomizing the order
The Sort node is configured to sort items in a random order. This means each time you execute the workflow, the order of generated records changes, which makes your test data feel less predictable and more realistic.
Keeping the dataset manageable
After sorting, the Limit node caps how many items you actually keep. For example, you might limit the output to 10 items. You still get the benefit of a large combination pool, but you only work with a small slice at a time.
This is especially helpful when you are testing workflows that might send emails, create records, or trigger external calls. You do not want to accidentally flood your systems with hundreds of test entries.
Step 6: Post-process Your Mock Data (Example: Email Generation)
Once you have your random combinations, you can shape them into whatever format you need. In the template, there is an example of a simple post-processing step using an Email Set node.
This node creates an email address from the generated first name and last name. Typically, this involves:
- Taking the first name and last name fields
- Concatenating them into a single string
- Formatting them (for example, lowercasing, removing spaces)
- Appending a domain like
@example.com
The result might look like name1.surname1@example.com. It is a simple touch, but it turns abstract mock data into something that looks much more like real user records.
You can extend this idea to generate usernames, IDs, display names, or any other derived fields your workflows need.
Why This n8n Random Data Generator Makes Your Life Easier
Let us recap why this template is so practical, especially if you are just getting comfortable with n8n automation.
- No deep coding skills needed
The Code node only holds basic JavaScript objects that act as seed data. You do not have to write loops, conditionals, or complex logic. Just edit the values and you are good to go. - Highly modular and easy to tweak
Each field has its own Set node, and combinations are handled by Merge nodes. That modular setup means you can:- Add or remove fields
- Insert extra processing steps wherever you like
- Great with AI-generated values
If you are using AI-powered assistance in n8n cloud, you can even generate your seed values dynamically and feed them into this same structure. That way, you can refresh your source data whenever you want while keeping the rest of the workflow intact. - Perfect for testing and demos
Whether you are preparing a client demo, experimenting with new nodes, or stress testing a flow, having a ready-made random data generator saves you time and keeps things consistent.
When To Use This Template
You will find this template especially useful when you:
- Need mock user or contact data to test a CRM or email integration
- Want to validate logic that depends on different field combinations
- Are building internal tools and need sample records to see how everything looks
- Prefer to keep all test data generation inside n8n rather than relying on external services
Instead of manually creating test items over and over, you just click execute and let n8n handle the rest.
Want to See It in Action?
If you are more of a visual learner, you are covered. The workflow includes a link to a YouTube tutorial that walks you through the whole setup step by step. You can watch how each node is configured and follow along in your own n8n instance.
Try the Template Yourself
Ready to build your own mock data generator in n8n? Open the template, run it a few times, and start customizing the seed data so it matches your real-world scenarios.
If this kind of workflow helps you work faster, share it with your team and keep exploring more automation ideas. The more you experiment, the easier it becomes to prototype and test new flows.
