
Irrigation Schedule Optimizer: Save Water & Boost Yields
Use smart scheduling, sensor data, and n8n automation to stop guessing, stop overwatering, and finally give your crops exactly what they need.
Imagine never having to guess “Did I water too much?” again
You know that moment when you stare at your fields or lawn and try to decide if it needs water, then shrug and turn the system on “just in case”? That tiny guesswork habit adds up to higher water bills, stressed plants, and the occasional mud pit where your crops should be thriving.
An irrigation schedule optimizer exists so you never have to play that game again. Instead of you juggling weather apps, soil readings, and local watering rules in your head, automation quietly does the heavy lifting in the background.
Even better, with an n8n-style workflow template, all of this can run on autopilot. You get smarter irrigation schedules, better yields, and more time to do literally anything other than manually tweaking timers.
What this irrigation schedule optimizer actually does
At its core, an irrigation schedule optimizer is a smart system that figures out when to water and how much to apply, based on actual data instead of vibes.
It pulls in inputs like:
- Soil moisture from sensors that tell you how wet the root zone really is.
- Weather data including rainfall, temperature, wind, and solar radiation.
- Crop type and growth stage so young plants do not get the same treatment as mature ones.
- Evapotranspiration (ET) so you know how much water is being lost to the atmosphere.
- System constraints like pump capacity, irrigation zones, max run times, and local watering restrictions.
Using all of that, it calculates how thirsty your plants actually are, subtracts what nature already provided, and then generates an irrigation schedule that is precise instead of wasteful.
Why bother optimizing irrigation with automation?
If you are still running fixed schedules “because that is how we have always done it,” you are probably watering your budget along with your crops. An optimized irrigation schedule helps you:
- Save water by matching irrigation to real crop needs instead of overcompensating.
- Cut costs with lower water bills and reduced energy use for pumps.
- Boost yields by keeping soil moisture in the sweet spot for plant growth.
- Stay compliant by generating logs and records for regulators or sustainability programs.
In short, you get healthier plants, less waste, and automation that quietly fixes a repetitive task you probably never enjoyed doing anyway.
Under the hood: how a modern n8n-style optimizer works
This kind of optimizer maps nicely to an n8n workflow template. Think of it as a low-code pipeline that collects data, makes decisions, and sends commands to your irrigation system without you clicking around dashboards all day.
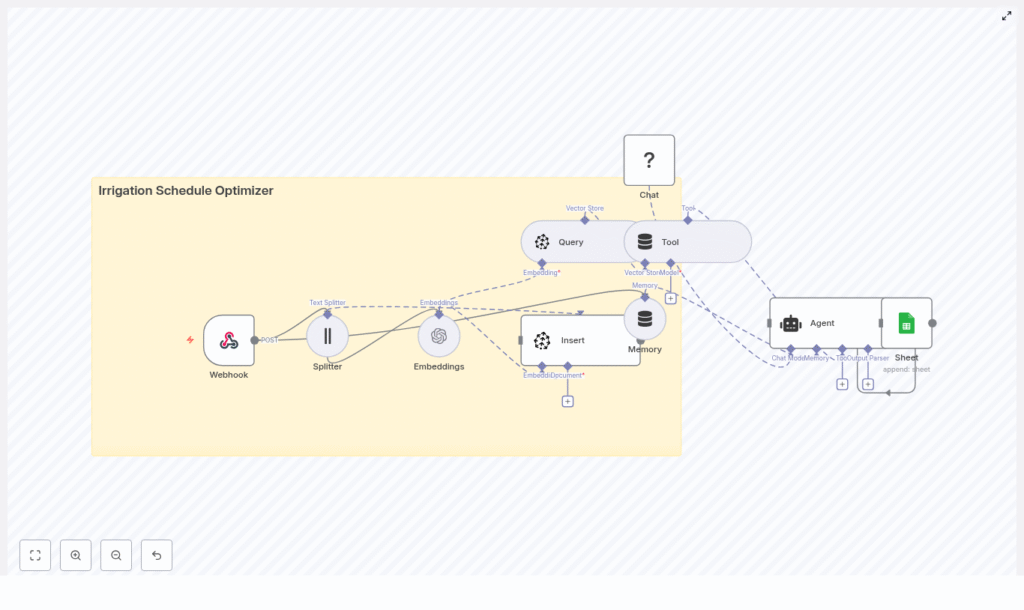
Here is how a typical architecture looks:
1. Data ingestion with a Webhook
Field devices such as soil moisture sensors, weather stations, or third-party APIs send data to a webhook endpoint. Each POST request includes sensor readings, timestamps, zone IDs, and any extra metadata you want to track.
In n8n terms, this is your starting trigger: the Webhook node that wakes up the workflow whenever new data arrives.
2. Preprocessing and splitting the payload
Raw data is rarely neat. Incoming payloads are normalized and split if they include long logs or multiple sensor arrays. A Splitter-style step lets the rest of the workflow handle each chunk cleanly and efficiently, instead of dealing with one giant blob of data.
3. Feature transformation into embeddings
Next, relevant time-series and contextual data are converted into embeddings (numerical vectors). These embeddings capture relationships over time, which is especially helpful when you mix field history with weather forecasts.
This step makes it possible to use vector search for:
- Finding similar historical conditions.
- Retrieving past outcomes for similar crops, soils, or weather patterns.
- Giving the decision logic richer context to work with.
4. Storage and retrieval with a vector store
The embeddings and related documents are stored in a vector database such as Pinecone. When it is time to generate a new irrigation schedule, the workflow queries the vector store to pull:
- Comparable historical scenarios.
- Known good strategies for that crop and soil type.
- Context about previous adjustments under similar weather.
5. Decisioning with an agent and language model
An LLM-based decision agent then steps in. It takes the fresh sensor data, the retrieved context from the vector store, and your rules (like ET calculations and pump limits). From there it proposes a concrete irrigation schedule.
The agent can generate:
- Human-readable reasoning, so you understand why it made that call.
- Actionable run times for each zone.
Memory buffers allow the system to learn from past tweaks and outcomes, so future suggestions get smarter instead of staying static.
6. Action and logging to controllers and sheets
Finally, the workflow sends an instruction set to your irrigation controllers or APIs so the schedule is actually applied in the field. At the same time, all actions and explanations are logged to a sheet or database.
This gives you:
- A full audit trail.
- Data for continuous improvement.
- Easy reporting for compliance and performance tracking.
The math behind the magic: core concepts and ET
Although the workflow feels magical, it is powered by solid irrigation science. Here are the core concepts it uses behind the scenes.
Key inputs at a glance
- Soil moisture: Real-time volumetric water content from sensors in the field.
- Weather data: Forecast precipitation, temperature, wind, and solar radiation.
- Crop type and growth stage: Crop coefficients (
Kc) that adjust water demand as plants develop. - Evapotranspiration (ET): The combined water loss from soil evaporation and plant transpiration.
- System constraints: Pump capacity, irrigation zones, allowed run times, and any local watering restrictions.
The basic ET-driven logic
The optimizer calculates crop water requirement using the classic formula:
ETc = ET0 × Kc
Where:
ET0is the reference evapotranspiration.Kcis the crop coefficient for the specific crop and growth stage.
From there, it subtracts effective rainfall and current soil moisture, then applies your delivery constraints to answer two key questions:
- How often should irrigation run?
- How long should each run last?
More advanced setups also use feedback loops and historical responses so the system can adapt over time instead of repeating the same plan forever.
Sample scheduling logic your workflow can follow
To make this less abstract, here is a simplified decision flow that an n8n irrigation schedule optimizer can implement:
- Calculate daily crop evapotranspiration with
ETc = ET0 × Kc. - Subtract effective rainfall and any irrigation that was already applied.
- Compare required root zone water with measured soil moisture, and if it is below your threshold, schedule irrigation.
- Split watering into multiple shorter cycles to reduce runoff and improve infiltration.
- Respect pause windows for upcoming rain or municipal watering restrictions.
The result is a schedule that feels like it was planned by a very patient irrigation specialist, not someone rushing through a control panel at 6 a.m.
Quick setup roadmap for an n8n-style irrigation optimizer
Here is a streamlined way to get from “manual watering” to “fully automated irrigation schedule optimizer” without getting lost.
Step 1: Assess and map your current system
- Review your existing irrigation setup and map all zones.
- Note pump capacities, known problem areas, and any local watering rules.
Step 2: Install sensors and connect telemetry
- Deploy soil moisture sensors at representative locations and depths.
- Integrate reliable weather data, including hourly or daily forecasts and radar-based precipitation where possible.
- Configure the devices so they send data to an n8n webhook or similar endpoint.
Step 3: Build or deploy the optimizer workflow
- Set up a flow that covers the full pipeline:
- Data ingestion via webhook.
- Preprocessing and splitting.
- Embedding generation and vector store storage.
- LLM-based decisioning with your ET and constraint rules.
- Controller commands and logging to sheets or a database.
Step 4: Run a pilot and compare schedules
- Start with a single zone as a pilot.
- Run optimized vs baseline schedules in parallel for 4 to 8 weeks.
- Measure water use, plant health, runoff, and any operational issues.
Step 5: Scale, refine, and extend automation
- Roll out the optimizer across more zones once you are happy with the results.
- Refine crop coefficients, thresholds, and constraints based on what you learn.
- Add extra automation such as pump control or fertigation if needed.
Implementation checklist so you do not miss anything
Use this checklist as a quick sanity check while you set up your irrigation schedule optimizer:
- Soil moisture sensors installed at representative depths and locations.
- Weather forecasts and radar-based precipitation integrated and reliable.
- Crop coefficients (
Kc) defined for each crop and adjusted by growth stage. - System constraints documented:
- Maximum run times.
- Zone capacities.
- Sequencing rules.
- Logging and versioning in place for both schedules and sensor readings.
- Pilot run completed on at least one zone before scaling across the whole property.
Best practices for saving water without stressing your crops
To squeeze the most value out of your new automated irrigation workflow, keep these practices in mind:
- Use deficit irrigation strategies where acceptable so you save water without hurting yield.
- Water in the morning or evening to reduce evaporative losses.
- Check sensors regularly and use redundant sensors in critical zones.
- Base decisions on soil moisture thresholds instead of fixed calendar schedules.
- Continuously feed system results back into the model so recommendations improve over time.
The more feedback you give the system, the less you will have to micromanage it later.
Real-world impact: what you can expect
When an irrigation schedule optimizer is properly implemented, results usually look something like this:
- 15 to 40 percent water savings, depending on your starting practices.
- Less runoff and reduced nutrient leaching.
- More consistent crop or turf health across zones.
- Detailed logs that make compliance and performance monitoring much easier.
In other words, fewer surprises, fewer soggy spots, and more predictable yields.
Will it work with your existing irrigation hardware?
In most cases, yes. Modern irrigation controllers usually support:
- APIs that accept REST commands.
- MQTT messages for IoT-style communication.
- Relay-based control for direct hardware switching.
The optimizer can output whichever format your system needs. For older or legacy controllers, you can use schedule translation services that convert decisions into timed relay events, so you still get smart scheduling without replacing everything at once.
Bringing it all together
An irrigation schedule optimizer combines sensor data, weather intelligence, and automation workflows to deliver precise watering with minimal waste. Whether you manage a farm, a golf course, or a large landscape portfolio, moving from manual guesswork to data-driven scheduling is one of the easiest upgrades you can make.
With an n8n-style automation template handling the repetitive decisions, you get more predictable yields, lower water use, and a lot less time spent fiddling with irrigation controllers.
Ready to optimize your irrigation? You can start with a pilot using the workflow approach described above, then scale once you see the water savings and yield improvements.
