
n8n Chatbot for Orders: LangChain + OpenAI POC
This guide teaches you how to build a proof-of-concept (POC) conversational ordering chatbot in n8n using LangChain-style nodes and OpenAI. You will learn how each node in the workflow works together so you can understand, customize, and extend the template with confidence.
What you will learn
By the end of this tutorial, you will be able to:
- Explain how a conversational ordering chatbot works inside n8n
- Use the n8n chat trigger to start a conversation with users
- Configure an AI Agent powered by OpenAI and LangChain-style tools
- Use memory, HTTP requests, and a calculator inside an AI-driven workflow
- Handle three core flows: viewing the menu, placing orders, and checking order status
- Apply best practices for configuration, testing, and security
Why build this n8n chatbot POC?
Conversational ordering systems can increase conversions and make customer interactions smoother. Instead of building a full backend application, you can use n8n with LangChain-style tools and OpenAI to quickly prototype an intelligent assistant.
This POC focuses on a simple pizza-ordering assistant called Pizzaro. It is intentionally easy to extend and demonstrates how to:
- Use OpenAI for natural language understanding
- Maintain short-term memory across messages
- Connect to external services using HTTP endpoints
- Perform simple calculations such as totals or quantity checks
What the workflow can do
The final n8n workflow supports three main user scenarios:
- Menu inquiries – When a user asks what is available, the assistant calls a product endpoint and returns up-to-date menu details.
- Placing an order – When a user specifies their name, pizza type, and quantity, the assistant confirms the order, calls an order webhook, and provides a friendly confirmation.
- Order status requests – When a user asks about an existing order, the assistant calls an order status endpoint and returns information like order date, pizza type, and quantity.
Concepts and architecture
Before we walk through the steps, it helps to understand the core components used in this POC.
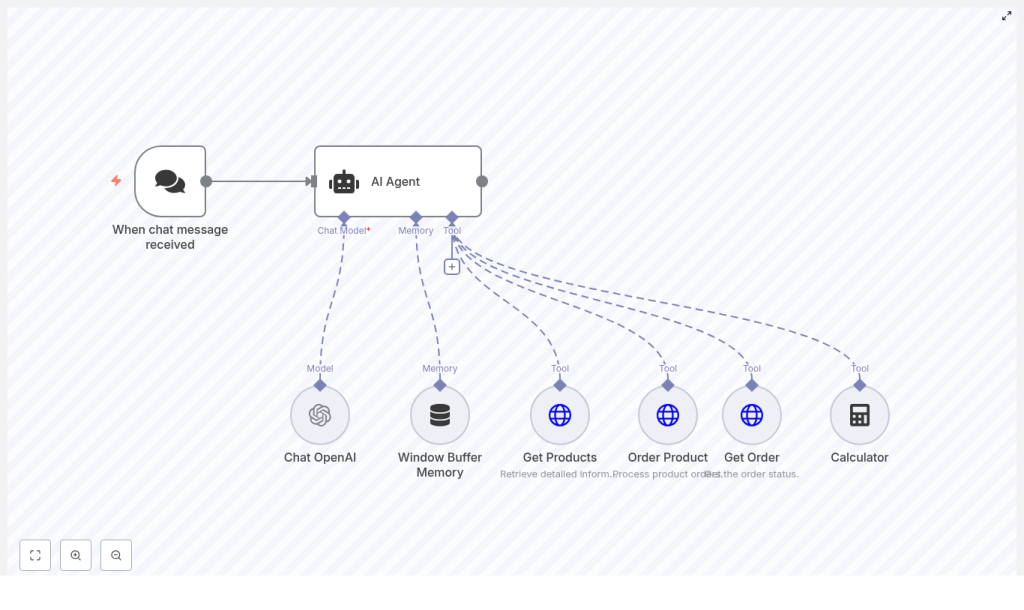
Main building blocks in n8n
- When chat message received – A chat trigger node that exposes a webhook and starts the workflow whenever a user sends a message.
- AI Agent – The orchestrator of the conversation. It uses a system prompt and a set of tools (nodes) to decide what to do next.
- Chat OpenAI – The language model node that generates responses and interprets user intent.
- Window Buffer Memory – A memory node that stores recent messages so the agent can maintain context.
- Get Products – An HTTP Request node that fetches the current menu from a product endpoint, for example
GET /webhook/get-products. - Order Product – An HTTP Request node that creates a new order using a POST request, for example
POST /webhook/order-product. - Get Order – An HTTP Request node that retrieves order status, for example
GET /webhook/get-orders. - Calculator – A tool node that performs arithmetic operations used by the agent when it needs accurate numeric results.
All of these parts are wired together through the AI Agent. The agent decides which tool to call based on the user’s message and the system instructions you provide.
Step-by-step: Build the workflow in n8n
Step 1: Set up the chat trigger
Start with the When chat message received node. This is the entry point for your chatbot.
- Webhook: The node exposes a URL that your frontend or test client can send messages to.
- Access: Choose if the webhook should be public or protected based on your environment.
- Initial message: Configure an optional
initialMessagesvalue to greet users and explain how to order.
Example initial message used in the POC:
"Hellooo! 👋 My name is Pizzaro 🍕. I'm here to help with your pizza order. How can I assist you?

📣 INFO: If you’d like to order a pizza, please include your name + pizza type + quantity. Thank you!"
Once this node is configured, any new chat message will trigger the workflow and pass the text into the AI Agent.
Step 2: Configure the AI Agent
The AI Agent node is the core of the workflow. It connects the language model, memory, and tools (HTTP requests and calculator) into a single decision-making unit.
In the AI Agent node:
- Set the system message that defines the assistant’s role and behavior.
- Attach the tools (Get Products, Order Product, Get Order, Calculator) so the agent can call them when needed.
- Connect the memory node so the agent can keep track of the conversation.
Example system message used in the POC (simplified):
Your name is Pizzaro, and you are an assistant for handling customer pizza orders.

1. If a customer asks about the menu, provide information on the available products.
2. If a customer is placing an order, confirm the order details, inform them that the order is being processed, and thank them.
3. If a customer inquires about their order status, provide the order date, pizza type, and quantity.
This prompt tells the agent exactly when to fetch menu data, when to place an order, and when to check order status.
Step 3: Connect the Chat OpenAI model
Next, configure the Chat OpenAI node that the AI Agent will use as its language model.
- API credentials: Add your OpenAI API key in n8n’s credentials manager and select it in the node.
- Model choice: Pick a model that fits your cost and performance needs, for example
gpt-4,gpt-4o, orgpt-3.5-turbo. - Security: Keep your API key secret and avoid hard-coding it in the workflow.
The AI Agent will send user messages and system prompts to this node, then use the responses to drive the conversation and decide which tools to call.
Step 4: Add Window Buffer Memory
The Window Buffer Memory node gives the agent short-term memory so it can remember what was said earlier in the conversation.
- Window size: Choose how many recent messages to keep. A larger window preserves more context but uses more tokens.
- Usage: This memory helps the agent recall details like the user’s name, the pizza type they mentioned, or an order it just created.
Connect this memory node to the AI Agent so that each new message includes the recent chat history.
Step 5: Configure the Get Products HTTP request
When a user asks about the menu, the AI Agent should call the Get Products tool. This is an HTTP Request node that returns available products.
Set it up as follows:
- Method:
GET - URL: Your product endpoint, for example
https://yourdomain.com/webhook/get-products - Response format: The endpoint should return a JSON list of product objects.
Typical fields in each product object might include:
name– product namedescription– short description of the pizzaprice– price per unitsku– unique product identifier
The AI Agent then uses this data to answer menu-related questions in natural language.
Step 6: Configure the Order Product HTTP POST
To place an order, the AI Agent uses the Order Product node. This is an HTTP Request node configured to send a POST request to your order endpoint.
Typical configuration:
- Method:
POST - URL: Your order endpoint, for example
https://yourdomain.com/webhook/order-product - Body: JSON payload with order details
In the basic template, the entire chat input can be sent as the message body. For more reliability, you can have the agent extract structured fields and send a clear JSON object, such as:
{  "customer_name": "Jane Doe",  "product_sku": "MARG-001",  "quantity": 2,  "notes": "Extra cheese"
}
Design your endpoint so that it returns a unique order ID and status. The agent can then confirm the order back to the user, for example: “Your order has been placed. Your order ID is 12345.”
Step 7: Configure the Get Order HTTP request
For order status checks, the AI Agent uses the Get Order node to query your orders service.
Configure it like this:
- Method: usually
GET - URL: for example
https://yourdomain.com/webhook/get-orders - Parameters: you may require an order ID, phone number, or email as an identifier.
The endpoint should return details such as:
- Order date
- Pizza type
- Quantity
The agent then formats this information in a user-friendly way when answering questions like “What is the status of my order?”
Step 8: Use the Calculator tool
The Calculator node is used as a tool by the AI Agent when it needs precise numeric results.
Typical use cases include:
- Adding up the total price for multiple pizzas
- Applying discounts or coupons
- Calculating tax or delivery fees
By delegating math operations to the Calculator node, you reduce the chance of the language model making arithmetic mistakes.
How the three flows work together
1. Menu inquiry flow
- User asks a question like “What pizzas do you have?”
- Chat trigger forwards the message to the AI Agent.
- AI Agent identifies a menu request based on the system prompt and user message.
- AI Agent calls the Get Products HTTP node.
- Products are returned as JSON.
- AI Agent summarizes the menu items using Chat OpenAI and replies to the user.
2. Placing an order flow
- User sends a message like “My name is Alex, I want 2 Margherita pizzas.”
- AI Agent uses memory and the model to extract name, pizza type, and quantity.
- Agent confirms the order details with the user if needed.
- Agent calls the Order Product HTTP POST node with structured JSON.
- Order endpoint returns an order ID and status.
- Agent thanks the user and shares the confirmation details, for example order ID and current status.
3. Order status flow
- User asks “What is the status of my order?” or “Where is order 12345?”
- AI Agent identifies a status request.
- If needed, the agent asks for the order ID or other identifier.
- Agent calls the Get Order HTTP node with the identifier.
- Order service returns date, pizza type, and quantity.
- Agent responds with a clear status update to the user.
Configuration tips and best practices
- Validate user input: Sanitize and validate data before sending it to your order endpoint to avoid malformed or malicious requests.
- Use structured JSON: When calling the Order Product endpoint, send a well-defined JSON object instead of raw text to reduce ambiguity.
- Control webhook access: If your chatbot can place real orders or handle payments, limit access to the chat webhook or protect it with tokens.
- Monitor token usage: Choose models and memory window sizes that balance cost and performance. Track usage so you do not exceed your budget.
- Log responses: Log HTTP responses and agent decisions to simplify debugging and improve the assistant’s behavior over time.
Testing and debugging the workflow
Test each core flow separately before combining them.
- Menu lookup: Send a menu question and confirm that the Get Products node is called and returns the expected JSON.
- Placing an order: Try different order phrasings and verify that the Order Product node receives clean, structured data.
- Order status: Check that the Get Order node is called with the correct identifier and that the response is correctly summarized.
Use n8n’s execution logs to inspect:
- Inputs and outputs of each node
- How the AI Agent chooses tools
- Where errors or misunderstandings occur
If the agent misinterprets user intent or order details:
- Refine the system prompt with clearer instructions.
- Add a clarification step where the agent confirms extracted fields before placing an order.
- Use a structured parser or schema-based extraction to enforce required fields.
Security considerations
Since this workflow connects to external APIs and uses an LLM, treat it as you would any other production-ready integration.
- Protect credentials: Store your OpenAI key and backend service keys in n8n credentials, not in plain text.
- Validate payloads: Check incoming data on your order endpoint and reject invalid or suspicious requests.
- Rate limiting: Add rate limits on your public endpoints to prevent abuse or accidental overload.
- Verify requests: If the chat webhook is public, use a verification token or HMAC to ensure requests originate from your frontend or trusted source.
Next steps and ways to extend the POC
This chatbot is designed to be modular, so you can easily add new capabilities as your use case grows.
Ideas for extending the workflow include:
- Payment processing: Add Stripe or PayPal nodes after order confirmation to collect payments.
- Notifications: Trigger SMS messages (Twilio) or email confirmations (SMTP) when an order is placed or updated.
- Inventory and dynamic menus: Connect to a Google Sheet or database to manage inventory and update the menu in real time.
- Multilingual support: Adjust the prompt so the model responds in the user’s language or detect language automatically.
Recap and FAQ
Quick recap
- You built an n8n chatbot POC called Pizzaro that can handle menu questions, orders, and order status checks.
- The core components are the chat trigger, AI Agent, Chat OpenAI, memory
