
n8n + E-goi: Create, Update & Get a Subscriber
Picture this: you are copying the same email, first name, and list ID into E-goi for the hundredth time, wondering if this is really what your life has become. Good news – it does not have to be. With an n8n workflow and the E-goi node, you can make the robots do the boring stuff while you pretend it was all part of your grand strategy.
In this guide, we will walk through an n8n workflow template that handles three classic E-goi subscriber operations for you:
- Create a new subscriber
- Update that subscriber
- Get the final contact details back out of E-goi
You will see how the nodes connect, how to configure each step, and how to use n8n expressions so data flows smoothly from one node to the next. This is useful whether you are a marketer trying to keep your lists clean or a developer who refuses to touch a manual export ever again.
Why automate E-goi subscriber management with n8n?
Manually managing subscribers is like doing data entry as a hobby. Automation is the opposite: it quietly handles the repetitive bits while you focus on campaigns, strategy, or literally anything else.
Using n8n with the E-goi node lets you:
- Create new contacts automatically when someone signs up, fills a form, or appears in another system.
- Update contact fields based on rules you define, like changing names, tags, or custom fields.
- Retrieve contact details and pass them to the rest of your workflow, your CRM, or your reporting tools.
The result is synced contact data across CRMs, landing pages, sign-up forms, and whatever other tools you have glued together.
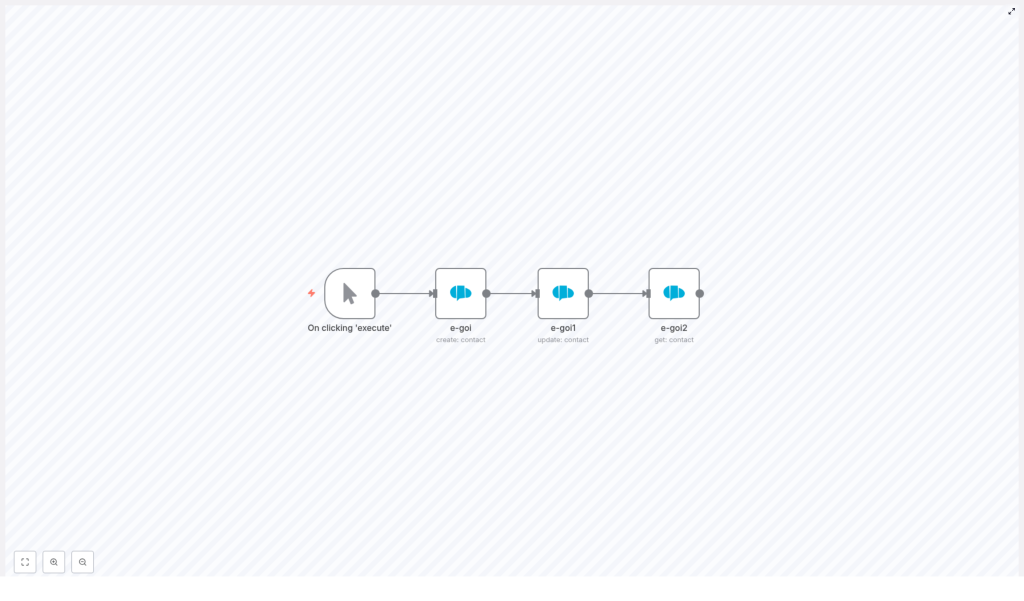
What this n8n + E-goi workflow template actually does
The template is a compact four-node workflow that looks simple on the outside but saves you from a lot of repetitive clicking:
- Manual Trigger – lets you run the workflow on demand while you test or debug.
- E-goi (create contact) – creates a new subscriber in a specific E-goi list.
- E-goi1 (update contact) – updates that same subscriber with new data.
- E-goi2 (get contact) – retrieves the final version of the contact so you can verify or use it downstream.
The workflow starts with a simple JSON payload that defines the subscriber you want to create:
{  "list": 1,  "email": "nathan@testmail.com",  "additionalFields": {"first_name": "Nathan"}
}
This object is used in the first E-goi node to create the contact. E-goi then returns a response that includes a contact_id. That contact_id is the star of the show, because the next nodes grab it via expressions and use it to update and fetch the same subscriber.
Node-by-node tour of the workflow
1. Manual Trigger – your testing remote control
The Manual Trigger node is simply there so you can run the workflow on demand while building and testing it. You click “Execute workflow,” it fires, and you see what happens.
Once everything works and you are ready for real automation, you can replace this with a:
- Webhook trigger for real-time sign-ups
- Schedule trigger for regular syncs
- Any other trigger that fits your use case
2. E-goi (create contact) – adding a new subscriber
This node creates your new E-goi subscriber. It uses three main parameters:
- list – the ID of the E-goi list where the contact should be added, for example
1. - email – the email address of the subscriber you want to create.
- additionalFields – extra attributes like first name, last name, phone number, and other custom fields.
The sample configuration in the template looks like this:
list: 1
email: nathan@testmail.com
additionalFields: { first_name: "Nathan" }
When this node runs, E-goi returns a response object that includes contact_id under json.base.contact_id. That value is crucial because the following nodes use it to identify which subscriber to update and fetch.
3. E-goi1 (update contact) – changing subscriber details
Next comes the E-goi1 node, which performs the update operation. Instead of hard-coding IDs, it uses n8n expressions to pull data from the previous E-goi node. That way, the workflow adapts to whatever contact was just created.
The important parameters in the template are:
list: ={{$node["e-goi"].parameter["list"]}}
contactId: ={{$node["e-goi"].json["base"]["contact_id"]}}
operation: update
updateFields: { first_name: "Nat" }
Here is what is going on:
{{$node["e-goi"].parameter["list"]}}reuses the exact same list ID that you configured in the create node.{{$node["e-goi"].json["base"]["contact_id"]}}reads thecontact_idreturned from the create operation response.
In this example, the subscriber’s first name is being updated from Nathan to Nat. You can extend updateFields with any other fields supported by your E-goi setup.
4. E-goi2 (get contact) – verifying the final result
The last node, E-goi2, retrieves the updated contact so you can confirm everything worked or send the data elsewhere.
Its configuration uses expressions again:
list: ={{$node["e-goi"].parameter["list"]}}
contactId: ={{$node["e-goi1"].json["base"]["contact_id"]}}
operation: get
This node:
- Reads the list ID from the first E-goi node.
- Uses the
contact_idfrom the update node response.
After this “get” operation, you have the definitive contact object. From here, you can:
- Log it for debugging
- Send it to another tool or database
- Trigger additional automations based on the contact’s data
How to set up and run the template in n8n
Ready to trade your copy-paste habit for automation? Here is the simplified setup guide.
- Import the workflow JSON
Open your n8n instance, go to the editor, and import the provided workflow JSON file. - Set up E-goi credentials
In n8n, add your E-goi API key and account details in the credentials section so the E-goi nodes can authenticate. - Adjust the create contact node
Open the first E-goi node and update:- list to match the correct list ID in your E-goi account
- email with a test email or dynamic value
- additionalFields with the fields you want to store, like
first_nameor others
- Confirm the expressions in update and get nodes
Check that the expressions in the update and get nodes still reference the right node names, such ase-goiande-goi1. If you rename nodes, update the expressions accordingly. - Run the workflow with the Manual Trigger
Execute the workflow. Inspect the output of each node to verify:- The contact is created successfully
- The update applies correctly
- The final get operation returns the expected contact data
Troubleshooting when things get grumpy
Sometimes APIs wake up on the wrong side of the server. If your workflow misbehaves, start with these checks:
- Invalid credentials
If requests fail or you see authentication errors, double-check your E-goi API key in n8n credentials and confirm that your E-goi account has API access enabled. - Missing
contact_idin the response
Make sure the create contact operation actually succeeds. Look at the raw JSON response from the first E-goi node. The template expectscontact_idatjson.base.contact_id. If E-goi’s response structure is different in your account or version, adjust the expression path accordingly. - List ID errors
If E-goi complains about the list, confirm that the list ID you are using really exists in your E-goi account and that your credentials have access to it. - Rate limits
Running many executions in a short time can trigger E-goi rate limits. If that happens, add some rate limiting or retry logic so your workflow is more polite. - Expression errors
If you rename a node and forget to update expressions, n8n will not find the referenced node. Update any expressions like{{$node["e-goi"].json[...]}}to match the new node names.
Best practices to level up your n8n + E-goi workflow
Once the basic template works, you can start improving it so it behaves more like a reliable teammate and less like a fragile demo.
- Use a webhook trigger for real-time sign-ups
Replace the Manual Trigger with a Webhook node to capture sign-ups from forms or landing pages instantly. - Add error handling
Use n8n’s Error Workflow or extra Function nodes to catch failed requests, log errors, and send notifications when something breaks. - Clean up data before sending it
Normalize fields in n8n first. For example, trim whitespace, validate email formats, or standardize name casing. - Use conditional updates
Add an IF node so you only call the update operation when values have actually changed. That keeps your API usage lean. - Store the
contact_idin your own systems
Save the returnedcontact_idin your database or CRM. That way, you can reference the E-goi contact later without extra lookup calls.
Adding simple retry logic for reliability
APIs occasionally time out, just to keep everyone humble. To make your workflow more resilient, you can introduce a basic retry pattern.
One approach is to combine a Function node, a Delay node, or n8n’s built-in retry options. A simple pseudo-flow might look like:
- Create contact node → on failure → Delay (5 seconds) → retry create contact (up to 3 attempts)
- If it still fails after retries, send an error notification via Slack or email so a human can investigate.
This small addition can save you from silent failures when E-goi is having a temporary hiccup.
Where this template really shines: use cases
This workflow is a great starting point for many automation scenarios that touch E-goi subscribers, such as:
- Syncing newsletter signups from a landing page or form directly into an E-goi list.
- Keeping CRM and E-goi in sync by mirroring contact properties and custom fields between systems.
- Enriching contact data from other services (for example, enrichment APIs or internal tools) and then updating E-goi with the latest information.
Wrapping up: a simple template with real impact
This n8n template gives you a clear, repeatable pattern for working with E-goi subscribers:
- Create a contact
- Update that contact
- Fetch the final contact record
By using expressions to pass the contact_id and list ID between nodes, the workflow stays flexible and robust, even as you customize it for your own data model and logic.
Once you are comfortable with the basics, you can extend the workflow with different triggers, more fields, better error handling, and additional integrations. The goal is simple: let automation handle the repetitive bits so you do not have to.
Next steps and call to action
Ready to try it out?
- Import the template into your n8n instance.
- Plug in your E-goi credentials and list IDs.
- Run a few tests, then connect it to your real sign-ups or CRM.
Want help customizing this n8n and E-goi workflow for your specific use case? Reach out to us or grab the template and experiment in your own environment. If you enjoy automation recipes like this, subscribe to our newsletter for more n8n templates and integration tutorials.
Tip: Have an E-goi response that looks nothing like the one in this example? Paste your E-goi response JSON and we can help you map the right expression paths to pull out contact_id or any other field you need.
