
n8n + OpenAI: Automate Image Edits from Google Drive
Learning goals
By the end of this guide, you will be able to:
- Understand how n8n, Google Drive, and the OpenAI Images API work together in a single workflow
- Build an n8n workflow that automatically generates and edits images using prompts
- Handle base64 image data, convert it to files, and send multipart/form-data requests
- Troubleshoot common issues like missing binaries, authorization errors, and Drive access problems
What this workflow does
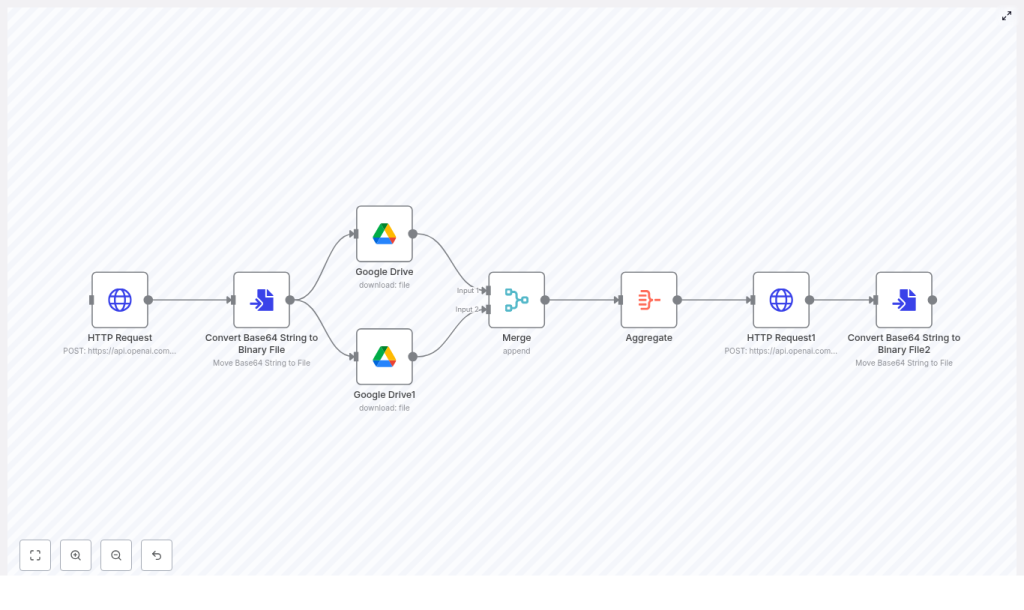
This n8n workflow template shows how to automate image editing using the OpenAI Images API (gpt-image-1) with reference images stored in Google Drive. The workflow:
- Calls the OpenAI Images API to generate an image from a text prompt
- Converts the base64 response into a binary file that n8n can handle as an image
- Downloads reference images from Google Drive as additional inputs
- Merges all images into a single item with multiple binaries attached
- Sends a multipart/form-data
/images/editsrequest to OpenAI, including multipleimage[]fields - Converts the edited image response back into a file for saving or further processing
Why automate image edits with n8n and OpenAI?
Manual image editing is slow and inconsistent, especially when you need many variations or frequent updates. By automating image edits with n8n, OpenAI, and Google Drive you can:
- Centralize and manage all reference assets in Google Drive
- Programmatically generate or edit images using prompts and templates
- Batch-process multiple images for marketing, e-commerce, or creative work
- Automatically store results or trigger follow-up workflows, such as publishing or notifications
Prerequisites
Before you start building the workflow, make sure you have:
- An n8n instance (cloud or self-hosted)
- An OpenAI API key with access to the Images API
- Google Drive credentials configured in n8n
- One or more reference images already uploaded to Google Drive (you will need their file IDs)
Key concepts before you build
1. OpenAI Images API basics
The workflow uses the OpenAI Images API with the gpt-image-1 model. You will interact with two main endpoints via HTTP Request nodes in n8n:
POST https://api.openai.com/v1/images/generationsfor creating a new image from a text promptPOST https://api.openai.com/v1/images/editsfor editing images using prompts and reference files
Both endpoints return image data in base64 format, usually in the field data[0].b64_json. This must be converted into a binary file in n8n so it can be treated as an image.
2. Base64 vs binary files in n8n
OpenAI responds with base64-encoded image data, which is text. n8n needs binary data for file uploads, downloads, and attachments. A dedicated conversion node in n8n transforms a base64 string into a binary file object that other nodes, such as Google Drive or HTTP Request (multipart/form-data), can use.
3. Handling multiple images in one request
To send multiple images to the OpenAI /images/edits endpoint, you must:
- Combine the different binary files into a single item using Merge and Aggregate nodes
- Send them as multiple
image[]fields in a multipart/form-data request
This structure is important so OpenAI receives all reference images and the generated image together in one edit request.
Step-by-step: building the n8n workflow
Step 1 – Generate a base image with HTTP Request
The first step is to generate or request an image from OpenAI. In n8n, add an HTTP Request node and configure it as follows:
- Method: POST
- URL:
https://api.openai.com/v1/images/generations(or/editsif you are starting from an existing image) - Headers:
Authorization: Bearer <YOUR_API_KEY>Content-Type: application/json
- Body: JSON with model, prompt, and size
Example JSON body for generating an image:
{  "model": "gpt-image-1",  "prompt": "A childrens book drawing of a veterinarian using a stethoscope to listen to the heartbeat of a baby otter.",  "size": "1024x1024"
}
When this node runs, the response will contain a field like data[0].b64_json holding the base64-encoded image.
Step 2 – Convert base64 to a binary image file
Next, you need to turn the base64 string into a binary file that n8n can send as a real image. Add a Convert Base64 String to Binary File node (or the equivalent conversion node in your n8n instance) after the HTTP Request.
Configure it to:
- Read the base64 string from
data[0].b64_jsonin the previous node’s output - Write the resulting binary data into a named binary property (for example,
data)
After this step, you will have a binary image created by OpenAI that can be included with other files.
Step 3 – Download reference images from Google Drive
The edits endpoint can use multiple images as references. In this example, two Google Drive images are used. Add two Google Drive nodes (or more if you want more references):
- Set each node to Download mode
- Provide the File ID for each reference image
- Ensure the node outputs the file as a binary property (for example,
data,data_1, etc.)
Each of these nodes will output a binary file. These files will later be merged with the generated image file.
Step 4 – Merge and aggregate all image binaries
At this point, you have multiple sources of binary image data:
- The generated image from the OpenAI generation call
- One or more reference images from Google Drive
To send them together in a single request, you need to:
- Add a Merge node and configure it to Append or combine multiple input streams (for example, the two Drive nodes).
- Then add an Aggregate node and enable an option like
includeBinariesso that all binary properties from the merged items are collected onto a single item.
After the Aggregate node, you should have one item that contains all binary images as separate binary properties. This is what the next HTTP Request node will use.
Step 5 – Send a multipart/form-data edit request to OpenAI
Now you are ready to call the /images/edits endpoint with multiple images. Add another HTTP Request node and configure it as follows:
- Method: POST
- URL:
https://api.openai.com/v1/images/edits - Headers:
Authorization: Bearer <YOUR_API_KEY>
- Content Type:
multipart-form-data(as set in the node options)
In the body configuration, you will add:
- Form fields (text):
model = gpt-image-1prompt = Generate a photorealistic image of a gift basket labeled "Relax & Unwind"
- Form binary data:
- Each entry should use the field name
image[] - Point each
image[]field to one of the binary properties from the Aggregate node, such as:image[]= binary propertydata(first Drive file)image[]= binary propertydata_1(second Drive file)- Optionally, another
image[]for the generated image binary
- Each entry should use the field name
When this node runs, OpenAI will receive a multipart/form-data request containing the model, prompt, and all images needed for the edit.
Step 6 – Convert the edited image back to a file
The /images/edits response will again contain base64-encoded image data, typically in data[0].b64_json. To store or use the edited image, add another Convert Base64 String to Binary File node after the edits HTTP Request.
Configure it to:
- Read the base64 string from the OpenAI edits response
- Write the binary output to a named property (for example,
edited_image)
From here, you can:
- Upload the edited image back to Google Drive
- Send it in an email or Slack message
- Trigger additional workflows, such as publishing to a CMS or e-commerce platform
Best practices for a reliable workflow
Credentials and security
- Store your OpenAI API key and Google Drive credentials in n8n’s Credentials Manager. Avoid hardcoding secrets directly in node parameters.
- Restrict Google Drive access with appropriate OAuth scopes or Service Account permissions so the workflow only sees what it needs.
Handling file sizes and image dimensions
- Check OpenAI’s file size limits before uploading large images. Compress or resize reference images when necessary.
- Use image sizes like
512x512or1024x1024depending on the balance you want between quality and speed.
Managing rate limits and retries
- OpenAI APIs have rate limits. Configure retry logic for transient errors, ideally with exponential backoff.
- Use n8n features such as Execute Workflow on Failure or Wait nodes to control retry timing and error handling.
Debugging and validation tips
- Inspect the raw responses of your HTTP Request nodes to confirm that
data[0].b64_jsonis present and correctly formatted. - Temporarily save intermediate binary files to Google Drive to verify that conversions from base64 to binary are working.
- Check that the Content-Type is correctly set to multipart/form-data when sending edit requests with files.
Use case examples
Marketing assets
Use curated product shots stored in Google Drive, then apply consistent prompts to generate seasonal or themed product images. This keeps brand styling uniform across many SKUs, while significantly reducing manual design work.
Creative prototyping
Combine rough sketches from Drive with photorealistic references. Automatically generate multiple variations of concept art, helping creative teams iterate faster without manually editing each version.
Common issues and quick fixes
- Problem: Missing binary data on form submission
Fix: Ensure the Aggregate node is configured to include binaries and that eachformBinaryDatafield in the HTTP Request node points to the correct binary property name. - Problem: Authorization errors from OpenAI
Fix: Verify theAuthorizationheader is set toBearer <API_KEY>in every HTTP Request node that calls OpenAI. - Problem: Google Drive access denied or file not found
Fix: Double check file IDs, confirm that your Drive credentials are correct, and make sure the Service Account or OAuth user has permission to access those files.
Prompt ideas to get started
- Photorealistic product scene:
“Generate a photorealistic image of a gift basket on a white background labeled ‘Relax & Unwind’ with a ribbon and handwriting-like font.” - Children’s illustration:
“A children’s book drawing of a veterinarian using a stethoscope to listen to the heartbeat of a baby otter.”
Recap
This workflow template shows how to:
- Use n8n to call the OpenAI Images API and generate images from prompts
- Convert base64 image data to binary files and back again
- Download reference images from Google Drive and combine them with generated images
- Send a multipart/form-data
/images/editsrequest with multipleimage[]fields - Store or reuse the edited image in downstream automation
By combining n8n, Google Drive, and OpenAI, you can build scalable, repeatable image-generation and editing pipelines that integrate directly into your existing processes.
FAQ
Can I add more than two reference images?
Yes. Add more Google Drive download nodes, merge their outputs, and include each binary as an additional image[] field in the multipart/form-data request.
Do I have to generate an image first, or can I only use Drive files?
You can do either. The template shows how to generate an image and then combine it with Drive references, but you can also skip the generation step and only send Drive images to the /images/edits endpoint.
Where should I store the final edited images?
A common pattern is to upload them back to Google Drive, but you can also send them to any other n8n integration, such as S3, a CMS, or a messaging platform.
Next steps
To try this out in your own environment:
- Import the n8n template linked below into your n8n instance
- Configure your OpenAI and Google Drive credentials in the Credentials Manager
- Update the Google Drive file IDs to match your own reference images
- Start with a simple prompt, run the workflow, and inspect each node’s output
- Adapt prompts, image sizes, and file handling to match your brand and use case
Need a custom workflow or implementation help? Reach out for support or subscribe to our newsletter to receive more templates, troubleshooting guides, and advanced n8n + OpenAI automation examples.
