
n8n + OpenRouter: Turn Any Chat Prompt Into a Gemini Image Preview Workflow
Imagine a world where a simple chat message can spark a visual idea, generate a preview image, and send it exactly where it needs to go – all without you lifting a finger after the first prompt. That is the power of combining n8n with OpenRouter and Gemini.
In this guide you will walk through a compact yet powerful n8n workflow that sends a chat prompt to OpenRouter’s Gemini 2.5 Flash image-preview model, receives a base64 image back, and converts it into a usable file you can save, attach, or feed into any part of your automation stack.
Think of this workflow as a stepping stone. Once you have it running, you can expand it into full image pipelines, automated content systems, or interactive chatbots that feel almost magical to your users.
The Problem: Great Ideas, Manual Image Work
You already know the feeling. A user sends a prompt. A teammate asks for a quick visual. Your chatbot needs to reply with an image, not just text. The ideas flow quickly, but the images do not.
Without automation, you might:
- Copy prompts into an external AI tool manually
- Download images, rename them, and upload them again to Slack, email, or cloud storage
- Break your focus jumping between apps and tasks
All of that context switching slows you down and distracts from higher value work. The real opportunity is to turn those moments into automated flows that quietly handle the busywork in the background.
The Possibility: A Mindset Shift Toward Automation
Every time you repeat a step by hand, you are looking at a potential automation. This workflow is not just about generating a single image. It represents a mindset shift:
- From manual copy paste to seamless n8n workflows
- From one-off experiments to reusable templates
- From reactive work to proactive systems that support your creativity and business growth
By connecting n8n with OpenRouter’s Gemini image preview model, you can turn any chat input into a visual output in seconds. No more exporting, converting, or downloading files manually. You design the flow once, then let it run as often as you need.
What This n8n + OpenRouter Workflow Gives You
This specific workflow is ideal when you need a fast, automated way to turn a user prompt into a downloadable preview image. It fits perfectly into:
- Prototypes and MVPs that need quick image previews
- Chatbots and chat UIs that respond with visuals
- Image generation pipelines that require an intermediate file
- Content systems that attach images to emails, Slack messages, or cloud storage
By the end, you will have a workflow that:
- Receives a chat prompt via webhook or chat trigger
- Sends that prompt to OpenRouter using the Gemini 2.5 Flash image-preview model
- Extracts and normalizes the base64 image from the API response
- Converts the base64 data into a real file n8n can pass to any other node
From there, you are free to attach, upload, save, or transform the file in any way your process requires.
Before You Start: What You Need in Place
To follow along and get this working in your own environment, make sure you have:
- An n8n instance (cloud or self-hosted)
- An OpenRouter API key, stored as credentials in n8n
- Basic familiarity with JSON and simple JavaScript in the n8n Code node
With these pieces ready, you are set to build a workflow that can save you time every time you or your users need an image preview.
The Journey: From Chat Prompt To Image File
Let us walk through the workflow as a story. A user sends a prompt, your system calls Gemini through OpenRouter, the image comes back as base64, and n8n quietly turns it into a file ready for whatever comes next.
Step 1 – Capture the Idea: Chat Trigger or Webhook
Every automation needs an entry point. In this case, your workflow begins when a chat message or HTTP request arrives.
Configure a chat trigger or webhook node in n8n that:
- Receives the user input (for example, from a chat UI or a custom frontend)
- Stores the prompt in a field such as
chatInput - Passes that prompt along as part of the JSON data to the next node
For example, you might reference the user prompt as {{$json.chatInput}} in later nodes. This node is your starting line, the moment an idea enters your system.
Step 2 – Ask Gemini: HTTP Request To OpenRouter
Next you connect that user prompt to OpenRouter so Gemini can generate an image preview.
Add an HTTP Request node and configure it to:
- Use the POST method
- Call OpenRouter’s chat completions endpoint
- Send a JSON body that specifies the Gemini 2.5 Flash image-preview model
- Use your OpenRouter credentials stored in n8n
An example request body looks like this:
{  "model": "google/gemini-2.5-flash-image-preview:free",  "messages": [  {  "role": "user",  "content": [  {  "type": "text",  "text": "{{ $json.chatInput }}"  }  ]  }  ]
}
In this setup, the user’s prompt flows directly from the trigger node into the HTTP Request node. The response from OpenRouter is expected to contain an images array inside choices[0].message, which will hold the image data as a URL or data URI with base64 content.
This is the turning point where your idea becomes a visual asset.
Step 3 – Clean The Data: Code Node For Base64 Extraction
Gemini, through OpenRouter, often returns the image as:
- A data URI such as
data:image/png;base64,..., or - An object with a URL that embeds base64 data
To use this in n8n’s file nodes, you want a clean base64 string without any prefixes. A Code node is perfect for this transformation.
Add a Code node and use JavaScript similar to the following:
// Get the base64 string from the response path
let base64String = $input.first().json.choices[0].message.images[0].image_url.url;

// Remove the data URI prefix if it exists
if (typeof base64String === 'string' && base64String.startsWith('data:image/')) {  const commaIndex = base64String.indexOf(',');  if (commaIndex !== -1) {  base64String = base64String.substring(commaIndex + 1);  }
}

return [{ json: { base64_data: base64String } }];
Helpful notes while you work:
- If OpenRouter returns a slightly different structure, inspect the raw JSON in the n8n node preview and adjust the response path accordingly.
- Consider validating that
base64Stringis defined and long enough before returning it. If not, you can add error handling or retries.
This step is where your workflow becomes robust. Instead of relying on fragile manual copy paste, you normalize the response automatically so the next node always receives clean data.
Step 4 – Create The Asset: Convert To File
Now it is time to turn that base64 string into a real file that other tools understand.
Add a Convert to File node and configure it as follows:
- Operation:
toBinary - Source property:
base64_data - Filename: something like
generated_image.png(you can also build this dynamically from the prompt) - MIME type:
image/png
The node will output a binary file that n8n can pass to any downstream node. From here you can:
- Attach it to an email
- Upload it to AWS S3 or Google Cloud Storage
- Send it to Slack or another chat platform
- Save it locally for later processing
At this point, your entire path from chat prompt to downloadable image is automated.
Keeping It Reliable: Error Handling and Practical Tips
As you start to rely on this workflow, a few safeguards will help it run smoothly in production.
- Rate limits: Monitor your OpenRouter usage. For 429 responses, add retries with backoff or a Wait node.
- Large responses: If images get large, ensure your n8n instance has enough memory and adjust payload limits if you are self-hosting.
- Security: Store your OpenRouter API key in n8n credentials, not in plain text inside nodes. If your webhook is public, consider restricting access or adding authentication.
- Validation: Before the Convert to File node, you can insert a Conditional node that checks if the base64 data is present to avoid runtime errors.
These small steps turn your workflow from a quick experiment into a dependable part of your automation toolkit.
Leveling Up: Advanced Improvements To Explore
Once your basic flow is stable, you can start to shape it around your specific needs. Here are some ideas to evolve this into a more powerful system:
- Dynamic filenames: Include timestamps or a sanitized version of the user prompt in the filename for easier tracking.
- Cloud storage integration: Store generated images in S3 or Google Cloud Storage using n8n’s storage nodes instead of keeping files in memory.
- Multiple images: If the API returns several images, iterate over the
imagesarray with an Item Lists node or IF loop, and run Convert to File for each image. - Logging and analytics: Push metadata to a database or logging service so you can analyze prompts, image usage, and performance over time.
Each enhancement you add makes the workflow more aligned with your real-world processes and brings you closer to a fully automated image pipeline.
Troubleshooting: When Things Do Not Look Right
As you experiment, you might run into a few common issues. Here is how to quickly diagnose and fix them:
- No image in the response: Double-check the model name and request body format. Inspect the raw response from the HTTP Request node to confirm where the image data lives.
- Base64 decode errors: Make sure you removed the data URI prefix and that the base64 string length is valid (typically a multiple of 4). If it is truncated, you may need to pad with
=. - 401 or permission denied: Verify that your OpenRouter API key is correct, stored as credentials, and correctly selected in the HTTP Request node.
Treat these moments as learning opportunities. Each fix deepens your understanding of how n8n and OpenRouter work together.
Big Picture: How The Full n8n Flow Fits Together
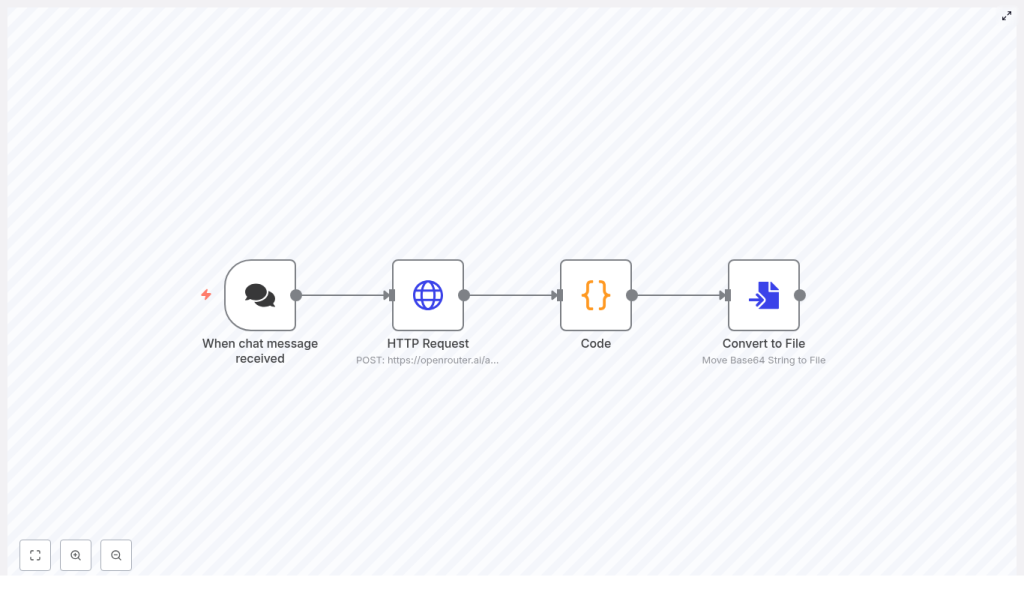
To recap, here is the complete journey your data takes:
- A chat trigger or webhook receives the user prompt.
- An HTTP Request node sends that prompt to OpenRouter’s Gemini 2.5 Flash image-preview model.
- A Code node extracts and normalizes the base64 image data from the response.
- A Convert to File node turns the base64 into a binary file ready for any downstream use.
From there, you are free to extend the workflow in any direction: notifications, storage, additional processing, or integration with other tools.
Taking Action: Your Next Step Toward Smarter Automation
This n8n + OpenRouter pattern is deliberately simple, yet it unlocks a powerful new habit: letting automation handle the repetitive steps between idea and outcome.
Whether you are:
- Prototyping a chatbot that returns images alongside text
- Building content previews for marketing or product teams
- Automating image uploads and file handling in your backend
this workflow gives you a repeatable way to turn AI image output into a usable file in just a few nodes.
You do not have to build it all from scratch. You can start from a ready-to-use template, customize it, and grow it over time.
Try it now:
- Clone the workflow template in n8n.
- Add your OpenRouter API key in the n8n credentials section.
- Trigger the webhook with a prompt such as "A minimalistic flat icon of a rocket in blue and white."
Watch the workflow run, see the image file appear, and then ask yourself: where else could I let automation do the work for me?
If you want a preconfigured template or guidance on adapting this flow for Slack, email attachments, or cloud storage, keep exploring, reach out for help, or subscribe for more automation-focused tutorials. Every small workflow you build is another step toward a more focused, creative, and scalable way of working.
