
Nano Banana Influencer Ad Creative Generator: Automate Influencer-Style Ads With n8n & Google Gemini
Ever wished you could get a whole batch of influencer-style ads without booking a single photoshoot? That is exactly what the Nano Banana Influencer Ad Creative Generator workflow is built for.
This n8n template connects a simple web form, Google Drive, and Google Gemini (or another image generation API) to turn your product photo into natural-looking influencer images. No endless manual editing, no waiting on creatives. Just upload your product once and let the workflow do the rest.
In this guide, we will walk through what the template does, when to use it, how the main n8n nodes work, and a few practical tips to tune it for your brand and ad strategy.
What this n8n workflow actually does
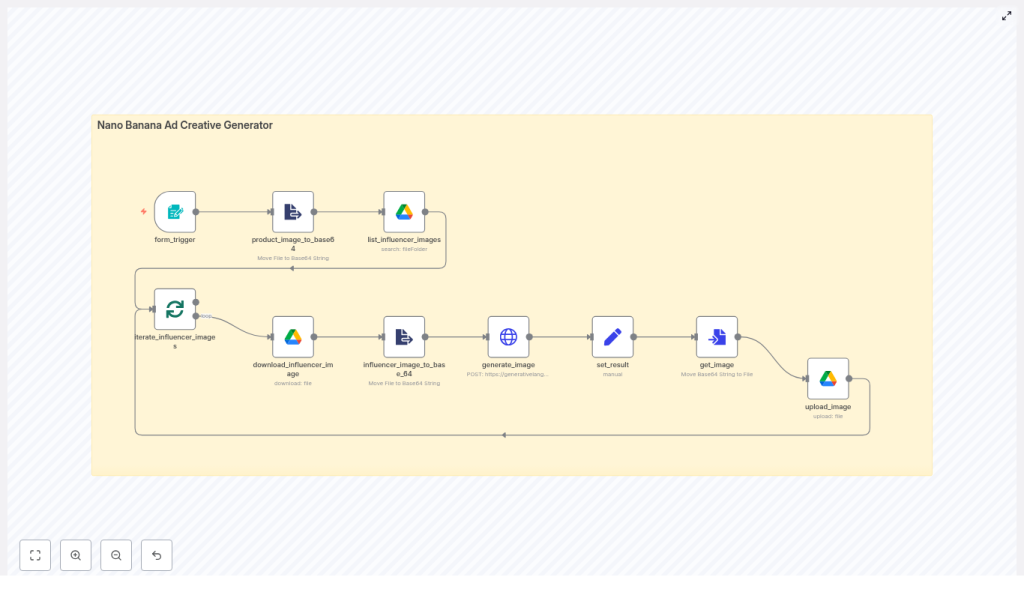
At a high level, the Nano Banana workflow takes your product image, blends it with pre-shot influencer photos, and spits out fresh ad creatives that look like real people are holding or using your product in a casual, cafe-style setting.
Here is the basic flow in plain language:
- You upload a product image through a lightweight form.
- The workflow converts that image into base64 so it can be sent to an API.
- It grabs a list of influencer photos from a folder in Google Drive.
- For each influencer image, it:
- Downloads the photo
- Converts it to base64
- Calls Google Gemini (or another image generator) with both images and a detailed prompt
- Receives a new composite image in base64 format
- Finally, it converts the generated image back into a file and uploads it to a “final creatives” folder in Google Drive.
The result: a batch of influencer-style images featuring your product, ready to plug into your ad account or creative testing workflow.
Why automate influencer ad creative at all?
Influencer-style content works because it feels real. It looks like something your friend might post, not a glossy studio shoot. The problem is that producing that kind of creative at scale usually means:
- Coordinating multiple influencers and shoots
- Doing a lot of manual Photoshop or retouching
- Repeating the same editing steps for every product variant
Automation with n8n helps you cut through that. With a workflow like Nano Banana, you can:
- Produce consistent, on-brand images quickly without rebuilding the process each time.
- Scale creative production for new products, colors, or campaigns with minimal extra effort.
- Test different angles, settings, and expressions to see what actually converts, not just what looks pretty.
If you are running a lot of A/B tests or managing multiple SKUs, this kind of automation can be the difference between “we have a few images” and “we have dozens of tailored creatives ready to go.”
Inside the Nano Banana workflow: the key n8n nodes
Let us break down the main pieces so you know exactly what is happening under the hood and where you can tweak things.
1. Form trigger – how you start each run
Node: form_trigger
This is the entry point. It is a simple UI where you upload your product image. Every time you submit the form, the workflow kicks off a new run.
2. Converting images to base64 for the API
Node: extractFromFile (used as product_image_to_base64 and influencer_image_to_base_64)
APIs like Google Gemini often expect images as base64 strings. These nodes handle that conversion for both:
- Your uploaded product image
- Each influencer photo downloaded from Google Drive
You do not have to touch base64 manually, but it is useful to know that this is what lets you send images directly in the API request body.
3. Managing files in Google Drive
Node: googleDrive (used as list_influencer_images, download_influencer_image, upload_image)
Google Drive is your asset library in this setup. The workflow uses Google Drive nodes to:
- List influencer images from a source folder (
list_influencer_images). - Download each influencer photo before sending it to the API (
download_influencer_image). - Upload the final generated creatives into a destination folder (
upload_image).
Keeping everything in Drive makes it easier to stay organized by campaign, influencer, or product line.
4. Processing influencers in batches
Node: splitInBatches (iterate_influencer_images)
This node is what lets you handle multiple influencer photos in a controlled way. Instead of hitting the API with everything at once, splitInBatches processes the list one chunk at a time.
You can adjust the batch size to control:
- How many creatives you generate per run
- How aggressively you use your image generation API quota
5. Calling Google Gemini (or another image generator)
Node: httpRequest (generate_image)
This is where the magic happens. The httpRequest node sends a request to the Google Gemini image endpoint (or another compatible generative image API) with:
- The base64-encoded product image
- The base64-encoded influencer image
- A structured prompt that explains how to combine them
The response is a new composite image, returned as base64, which the workflow then passes to the next step.
6. Turning the result back into an image file
Node: convertToFile (get_image)
The API response is not a file yet, it is just text. convertToFile converts the base64 string into a proper image file that can be stored in Google Drive, shared, or uploaded to your ad platform.
How the image generation prompt is designed
The quality of your output depends heavily on how you talk to the model. This workflow sends a structured payload that combines:
- Text instructions
- The base64 product image
- The base64 influencer image
The prompt typically guides the model to:
- Place the cup or tumbler from image 1 into the influencer’s hand from image 2.
- Set the scene in a casual cafe environment with a natural, “friend-shot” vibe.
- Vary the angle slightly between outputs so your creatives do not look like carbon copies.
- Keep the influencer’s expression warm, friendly, and camera-facing.
These constraints help keep the results consistent enough for ads, but still flexible enough that you get variety across your creative set.
When to use this template in your marketing stack
This workflow is especially useful if you:
- Run paid social campaigns that rely heavily on influencer-style imagery.
- Need fast creative iteration for A/B testing across different audiences or placements.
- Manage a catalog of products and want to avoid repeating the same manual editing for each one.
Instead of waiting on new shoots every time you launch a campaign, you can generate a bank of “influencer holding product” images in advance, then update them as your product line or branding evolves.
SEO & marketing tips for better influencer-style creatives
Once you are generating images reliably, the next step is making sure they actually perform. A few points to keep in mind:
- Keep visuals consistent
Use similar color grading, lighting, and framing across your images so ad sets feel cohesive. This also helps with brand recognition. - Test small changes
Tiny tweaks in angle, background, or facial expression can have a big impact on click-through and conversion rates. Use the workflow to create multiple variants and test them. - Respect platform rules
Make sure your generated influencer-style images follow the policies of each ad platform and local regulations around influencer disclosures.
Best practices & easy customizations
The template works out of the box, but you will get more value if you tailor it to your brand and process. Here are some practical ways to customize it.
Organize your Google Drive folders
Folder structure
Set up your influencer source images in Drive with a structure that matches how you target:
- By demographic or persona
- By campaign or funnel stage
- By product category
This way, you can point the workflow to specific folders when you need creatives tailored to a certain audience or campaign.
Experiment with different prompts
Prompt variations
Create a small library of prompt templates, for example:
- Different cafe styles (minimalist, cozy, outdoor terrace, busy city cafe)
- Lighting setups (golden hour, soft indoor, bright daylight)
- Angles (close-up, medium shot, over-the-shoulder)
You can rotate between them to keep your creative output fresh without rebuilding the workflow.
Control scale and API usage
Batching strategy
Use the splitInBatches node to fine-tune how many images you generate per run. This helps you:
- Stay within budget on image generation APIs
- Avoid hitting rate limits
- Plan production around your testing schedule
Add branding and quality checks
Watermarking & branding
You can add a post-processing step after image generation to overlay a logo, watermark, or other brand asset on the final creatives.
Quality checks
Before images go live, consider adding:
- A human review step, such as sending images to a Slack channel or dashboard
- An automated classifier or rule-based filter to catch obvious issues
Privacy, safety, and legal considerations
Any time you are working with real people in images, even in generated or edited form, you should be careful about permissions and compliance.
- Get explicit permission
Make sure your agreements with influencers clearly allow you to edit and reuse their photos in this way. - Disclose synthetic content where required
Follow local regulations and platform rules, such as FTC guidelines in the U.S., regarding edited or synthetic influencer content. - Protect your credentials
Store API keys and Google Drive credentials securely in n8n’s credentials settings and limit access to only those who need it.
Managing testing and costs with generative APIs
Generative image APIs are powerful, but they are not free. A bit of planning helps keep costs under control.
- Start small
Test the workflow with a small batch of influencer images before scaling up. - Use low-res proofs first
While you are tuning prompts, generate lower-resolution images. Once you are happy with the style and composition, switch to higher quality for final assets. - Watch your logs
Use n8n logs to monitor how often the workflow runs, how many images you generate, and spot any unexpected spikes in usage.
Step-by-step setup checklist
Ready to get this running in your own stack? Here is a quick setup checklist you can follow.
- Set up n8n
Run n8n either self-hosted or using n8n Cloud. - Prepare Google Drive folders
Create one folder for influencer source photos and another for final generated images. - Configure credentials in n8n
Add and test your:- Google Drive credentials
- Google Gemini or other generative image API credentials
- Import the Nano Banana template
Bring the workflow template into your n8n instance and update:- Google Drive folder IDs
- Credential references in each relevant node
- Run a test
Use the form to upload a sample product image and confirm that:- Influencer images are listed and processed
- New composite images are generated
- Final images appear in your designated Drive folder
What teams are seeing in real-world use
Teams using similar n8n automations for creative production typically report:
- Faster creative cycles since they can generate new variants in hours instead of waiting days or weeks.
- Higher testing throughput with dozens of influencer-style images per product to plug into A/B and multivariate tests.
- Better insights into what actually drives performance, because they can systematically test different visual cues.
Instead of treating creative as a bottleneck, this workflow turns it into something you can iterate on as quickly as you adjust ad copy or targeting.
Wrapping up
The Nano Banana Influencer Ad Creative Generator is a practical way to blend automation with generative AI so you can scale influencer-style ads without losing authenticity.
By combining n8n, Google Drive, and a generative image model like Google Gemini, you get a repeatable workflow that is:
- Easy to audit and adjust
- Flexible enough to match your brand voice
- Powerful enough to support serious creative testing
Try the Nano Banana template
If you want to see what it can do with your own products, here is a simple next step:
- Import the Nano Banana workflow into your n8n instance.
- Connect your Google Drive and image generation API credentials.
- Upload a product image through the form and review the generated creatives.
If you would like help refining prompts, tuning the workflow for specific ad platforms, or integrating it into a bigger automation stack
