
OpenAI Citations for File Retrieval (RAG)
This guide walks you through an n8n workflow template that adds clear, file-based citations to answers generated by an OpenAI Assistant that uses file retrieval or a vector store. You will learn how to extract citation metadata from OpenAI, turn file IDs into readable filenames, and format the final response as Markdown or HTML for reliable Retrieval-Augmented Generation (RAG).
What you will learn
By the end of this tutorial, you will be able to:
- Explain why citations are important in RAG workflows.
- Understand how OpenAI assistants expose file annotations and metadata.
- Build an n8n workflow that:
- Sends user questions to an OpenAI Assistant with a vector store.
- Retrieves the full assistant thread to capture all annotations.
- Parses messages to extract citation objects and file IDs.
- Looks up file metadata from the OpenAI Files API.
- Formats the final answer with human-readable citations.
- Customize the citation format, for example inline notes, footnotes, or links.
Why add citations to RAG responses?
Retrieval-Augmented Generation combines a language model with a vector store of documents. The model retrieves relevant content from your files and then generates an answer based on those snippets.
Out of the box, the assistant may know which files and text fragments it used, but the user often only sees a plain natural language answer. It may be unclear:
- Which file a specific sentence came from.
- Whether the answer is grounded in real documents.
- How to verify or audit the response later.
Adding structured citations solves this. It improves:
- Transparency – users can see where each fact came from.
- Traceability – you can trace text snippets back to source files.
- Trust – especially important for documentation, compliance, or any system that needs source attribution.
Concepts you need to know first
OpenAI Assistant with vector store (file retrieval)
In this setup, your OpenAI Assistant is connected to a set of uploaded files. When a user asks a question, the assistant:
- Retrieves relevant file chunks from the vector store.
- Generates an answer using those chunks as context.
- Attaches annotations to the generated text that point back to:
file_id– the OpenAI ID of the source file.text– the exact fragment extracted.- Offsets or positions of the fragment in the message.
Thread messages and annotations
OpenAI assistants work with threads. A thread contains all the messages exchanged between the user and the assistant. The assistant’s summarized reply that you see in n8n may not include all the raw annotation data, so you typically need to:
- Call the OpenAI API to retrieve the full thread messages.
- Inspect each message’s
contentfield. - Locate annotation arrays such as
text.annotations.
File metadata lookup
An annotation contains a file_id, but users need something more readable, like a filename. To bridge that gap you:
- Call the OpenAI Files API with each
file_id. - Retrieve metadata such as
filename. - Use that filename in your citation text.
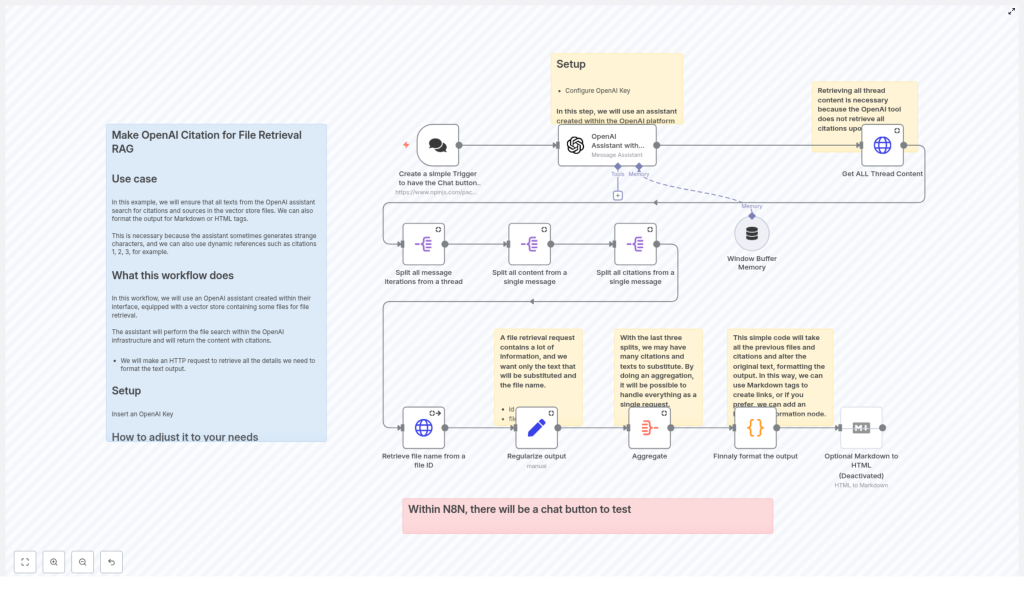
How the n8n workflow is structured
This tutorial is based on an n8n workflow that follows this high-level flow:
- User sends a question via a Chat Trigger in n8n.
- n8n sends the question to an OpenAI Assistant with a vector store.
- After the assistant responds, n8n retrieves the full thread messages from OpenAI.
- n8n splits and parses the messages to extract annotations and file IDs.
- For each file ID, n8n calls the OpenAI Files API to get the filename.
- All citation data is normalized and aggregated into a consistent structure.
- A Code node formats the final answer, inserting citations and optionally converting Markdown to HTML.
Step-by-step: building the citation workflow in n8n
Step 1 – Capture user questions with a Chat Trigger
Start with a Chat Trigger node. This node creates a chat interface inside n8n where users can type questions. When the user submits a message:
- The chat trigger fires.
- The workflow starts and passes the question to the next node.
Step 2 – Send the query to the OpenAI Assistant with vector store
Next, add an OpenAI Assistant node that is configured with your vector store (file retrieval). This node:
- Receives the user question from the Chat Trigger.
- Forwards it to the OpenAI Assistant that has access to your uploaded files.
- Gets back an answer that may contain annotations referencing:
file_idfor each source file.- Extracted
textsegments used in the answer.
At this point, you have a usable answer, but the raw response might not fully expose all the annotation details that you need for robust citations.
Step 3 – Retrieve the full thread content from OpenAI
To get all the citation metadata, you should retrieve the complete thread from OpenAI. Use an HTTP Request node that:
- Calls the OpenAI API endpoint for thread messages.
- Uses the thread ID returned by the Assistant node.
- Returns every message in the thread, including all annotations.
This step is important because the assistant’s immediate reply may omit some annotation payloads. Working with the full thread ensures you do not miss any citation data.
Step 4 – Split and parse the thread messages
Once you have the full thread, you need to extract the annotations from each message. In n8n you can:
- Use a Split In Batches or similar split node to iterate over each message in the thread.
- For each message, inspect its
contentstructure. - Locate arrays that hold annotations, for example
text.annotations.
Each annotation typically contains fields like:
file_id– the OpenAI file identifier.text– the snippet extracted from the file.- Offsets or positions that indicate where the text appears.
Step 5 – Look up file metadata from the OpenAI Files API
Now that you have a list of annotations with file_id values, the next step is to turn those IDs into human-friendly filenames. For each annotation:
- Call the OpenAI Files endpoint with the
file_id. - Retrieve the associated metadata, typically including
filename. - Combine that filename with the extracted text to build a richer citation object.
Step 6 – Normalize and aggregate citation data
Different messages may reference the same file or multiple fragments from that file. To make formatting easier:
- Standardize each citation as a simple object, for example:
{ id, filename, text }. - Collect all citation objects into a single array so you can process them in one pass.
At this stage you have:
- The assistant’s answer text.
- A list of citation records that link fragments of that answer to specific filenames.
Step 7 – Format the final output with citations
The last main step is to inject citations into the assistant’s answer. You typically do this in an n8n Code node and optionally follow it with a Markdown node if you want HTML output.
Common formatting options include:
- Inline citations such as
(source: filename). - Numbered footnotes like
[1], with a reference list at the end. - Markdown links if your files are accessible via URL.
Example n8n Code node: simple inline citations
The following JavaScript example shows how a Code node can replace annotated text segments in the assistant’s output with inline filename references. It assumes:
- The assistant’s answer is stored at
$('OpenAI Assistant with Vector Store').item.json.output. - The aggregated citation data is available as
$input.item.json.data, where each entry hastextandfilename.
// Example n8n JS (Code node)
let saida = $('OpenAI Assistant with Vector Store').item.json.output;

for (let i of $input.item.json.data) {  // replace the raw text with a filename citation (Markdown-style)  saida = saida.replaceAll(i.text, ` _(${i.filename})_ `);
}

$input.item.json.output = saida;
return $input.item;
This logic walks through each citation, finds the corresponding text in the assistant response, and appends an inline reference such as _(my-file.pdf)_.
Example: numbered citations and reference list
If you prefer numbered citations, you can extend the logic. The idea is to:
- Assign a unique index to each distinct
file_id. - Replace each annotated text segment with a marker like
[1]or[2]. - Append a formatted reference list at the end of the answer.
// Pseudocode to create numbered citations
const citations = {};
let idx = 1;
for (const c of $input.item.json.data) {  if (!citations[c.file_id]) {  citations[c.file_id] = { index: idx++, filename: c.filename };  }  // replace c.text with `[${citations[c.file_id].index}]` or similar
}
// append a formatted reference list based on citations
In a real implementation, you would perform the string replacements in the answer text and then build a block such as:
[1] my-file-1.pdf
[2] another-source.docx
Formatting choices for your UI
Depending on your front end, you can adjust the final citation style. Here are some options:
- Simple inline citation Replace the text with something like
(source: filename)if you want minimal changes to the answer structure. - Numbered footnotes Use numeric markers in the text and list all sources at the bottom. This keeps the main answer clean while still being traceable.
- Markdown to HTML If your UI is web based, run the final Markdown through an n8n Markdown node to convert it to HTML.
- Clickable links When files are accessible via URL, format citations as Markdown links, for example:
[filename](https://.../file-id).
Best practices for reliable citations
1) Always retrieve the complete thread
Do not rely only on the immediate assistant reply. Make a separate request for the full thread messages so you have all annotation payloads needed to resolve citations accurately.
2) Normalize text before replacement
Annotation text may include variations in whitespace or punctuation. To avoid incorrect replacements:
- Trim and normalize whitespace where appropriate.
- Consider using character offsets from the annotation instead of naive string matching.
3) Deduplicate repeated citations
The same file or fragment can appear multiple times in an answer. To keep citations tidy:
- Deduplicate entries by
file_id. - Reuse the same citation index for repeated references.
4) Handle partial and ambiguous matches
Short text fragments can accidentally match unrelated parts of the answer if you use a simple replaceAll. To reduce this risk:
- Use offsets when available to target exact positions.
- Wrap replacements in unique markers during processing, then clean them up.
- Be cautious with very short snippets that could appear in many places.
Troubleshooting common issues
- No annotations returned Check that your OpenAI Assistant is configured to include file metadata in its tool outputs. If needed, verify that you are using the thread retrieval approach and not only the immediate reply.
- File lookup fails Confirm your OpenAI API credentials and permissions. Make sure the
file_idactually exists in the assistant’s vector store and that you are querying the correct project or environment. - Corrupt or broken output after replacement Inspect the original text and the annotation snippets. If replacements are misaligned, switch from naive
replaceAllto offset-based replacements or more precise string handling.
Security and privacy considerations
Citations expose details about your source files, so treat them with care:
- Only display filenames or metadata that are safe to show to end users.
- If files contain sensitive information, consider masking or redacting parts of the filename or path.
- Review your data handling policies to ensure compliance with internal and external regulations.
Recap and next steps
You have seen how to build an n8n workflow that:
- Captures user queries through a Chat Trigger.
- Uses an OpenAI Assistant with a vector store to answer questions.
