
Send Embedded Images with n8n & Gmail API (Without Losing Your Mind)
Ever copied the same email, pasted the same image link, and crossed your fingers that it would not break for the hundredth time? If you are tired of wrestling with email clients or manually adding images that mysteriously disappear, this n8n workflow template is here to save your sanity.
In this guide, you will learn how to use n8n plus the Gmail HTTP API to send emails with embedded (CID) images. No more “image blocked” icons, no more broken URLs. The workflow grabs a public image, converts it to base64, wraps it in a multipart/related MIME message, and sends it through Gmail – all on autopilot.
Why bother with embedded images in emails?
Embedded images are perfect for:
- Transactional emails that need charts, receipts, or screenshots inline
- Marketing campaigns where the design should look the same everywhere
- Any email where “image missing” is not the vibe you are going for
Instead of relying on external image URLs that email clients might block or strip, CID images are bundled directly into the email MIME structure. That means the image travels with the message.
Why use the Gmail HTTP API instead of the n8n Gmail node?
n8n already has a Gmail node, and it is great for simple emails. But when you want fine-grained control over the MIME structure, especially for inline images using Content-ID, you need access to the raw message.
That is where the Gmail HTTP API comes in. It lets you send a fully handcrafted MIME message to:
POST https://www.googleapis.com/gmail/v1/users/me/messages/send
With this approach you can:
- Download an image from a URL
- Convert that image to base64 in n8n
- Build a multipart/related MIME message with a CID image
- Send it using the Gmail API endpoint
users/me/messages/send
In short, the Gmail HTTP API gives you full control, which is exactly what you need for embedded images.
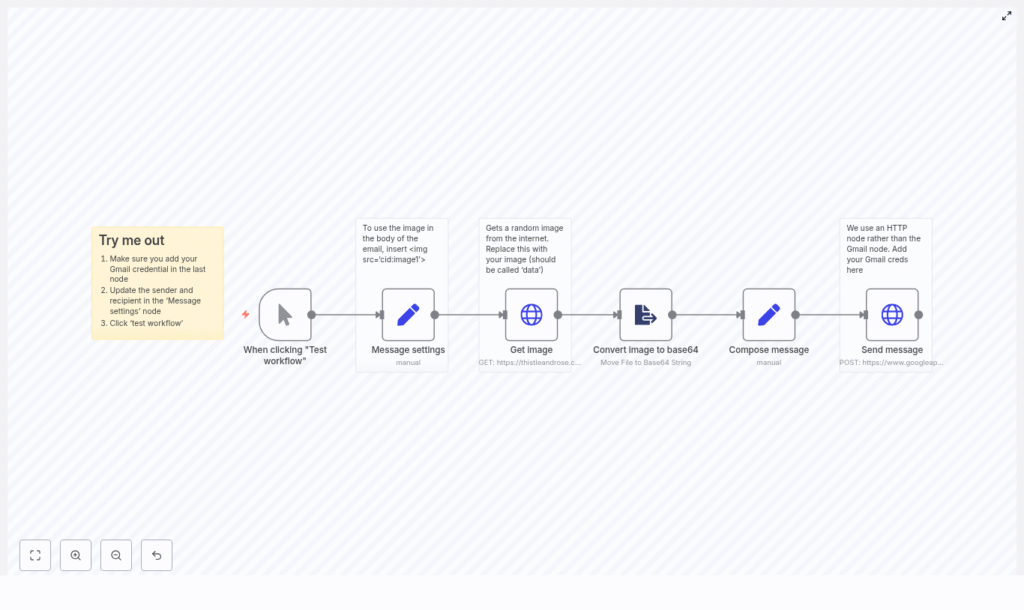
What this n8n workflow template actually does
The template wires everything together so you can go from “plain text email” to “HTML email with embedded image” without hand-writing MIME every time. Here is the high-level flow:
- Trigger the workflow manually while you are building and testing
- Define who the email is from, who it goes to, the subject, and the HTML body
- Fetch an image from a URL using an HTTP Request node
- Convert the binary image into a base64 string using an ExtractFromFile node
- Assemble a multipart/related MIME message with the HTML and image parts
- Send that MIME message through the Gmail HTTP API with proper encoding
Under the hood, n8n handles the data passing between nodes so you can focus on what the email should say, not how to glue bytes together.
Step-by-step: building the workflow in n8n
1. Start with a Manual Trigger
In development you probably do not want this firing every 5 minutes. Use a Manual Trigger node so you can click “Test workflow” whenever you are ready.
Later, once everything works, you can replace the Manual Trigger with:
- A Schedule node (for regular reports)
- A Webhook or other trigger (for event-based emails)
2. Set your message details (Set node)
Next, use a Set node to define the basic email metadata and the HTML content. Typical fields are:
from:sender@example.comto:recipient@example.comsubject:Email with embedded imagebody_html:<p>This email contains an embedded image:</p> <p><img src='cid:image1'></p>
The important part is the HTML image tag:
<img src='cid:image1'>
The cid:image1 value must match the Content-ID of the image part in your MIME message. If you rename it, remember to update it in both places or the image will not show up.
3. Grab the image with an HTTP Request node
Now it is time to fetch the image you want to embed.
Add an HTTP Request node and point it to the image URL you want to use. In the template a sample URL is already included so you can test right away.
Make sure the node is configured to return binary data. Check the node settings to confirm that the response is stored as binary (usually under binary.data or similar).
4. Convert the image to base64 (ExtractFromFile node)
Gmail expects the image data in base64 inside the MIME message, so we need to convert the binary file.
Use an ExtractFromFile node with the operation “Move File to Base64 String”. This node:
- Takes the binary image from the HTTP Request node
- Converts it into a base64 string
- Stores the result in a property, for example
chart1
In the template, the destinationKey is set to chart1. That property will later be injected into the MIME body.
5. Compose the raw MIME message (Set node)
This is where the magic and the slightly nerdy part happens. Use another Set node to build the complete raw MIME message as a single string.
The template uses an expression that pulls values from previous nodes and assembles something like this:
From: {{$node["Message settings"].json.from}}
To: {{$node["Message settings"].json.to}}
Subject: {{$node["Message settings"].json.subject}}
MIME-Version: 1.0
Content-Type: multipart/related; boundary=boundary1

--boundary1
Content-Type: text/html; charset=UTF-8

<html>
<body>
{{$node["Message settings"].json.body_html}}
</body>
</html>

--boundary1
Content-Type: {{$node["Get image"].item.binary.data.mimeType}}
Content-Transfer-Encoding: base64
Content-Disposition: inline
Content-ID: <image1>

{{$json.chart1}}

--boundary1--
Keep an eye on these details:
- Boundary consistency: The same boundary value (
boundary1) must be used everywhere in the MIME body. - Content-ID: Set to
<image1>with no quotes. This must matchcid:image1in your HTML. - Base64 content: Insert the property from the ExtractFromFile node, for example
{{$json.chart1}}. - HTML charset: The HTML part uses
charset=UTF-8to avoid weird character encoding issues.
At this point you have a complete MIME email with an HTML part and an inline image part, ready to ship.
6. Send the email using the Gmail HTTP API
Finally, add another HTTP Request node to call the Gmail API endpoint:
POST https://www.googleapis.com/gmail/v1/users/me/messages/send
The body must be JSON with a raw field that contains the MIME message, base64url-encoded. The template uses an expression like this:
{ "raw": "{{ $json.raw.base64Encode() }}" }
Key points here:
- Encoding: Gmail expects base64url. n8n’s
base64Encode()handles this correctly so you do not have to manually tweak characters. - Authentication: Use an OAuth2 credential with at least the
https://www.googleapis.com/auth/gmail.sendscope. - Credential type: In the template, the
nodeCredentialTypeisgmailOAuth2. Replace it with your own Gmail OAuth credentials configured in n8n.
Once this node is configured correctly, hitting “Test workflow” should send a shiny HTML email with an embedded image straight from your Gmail account.
Troubleshooting and pro tips
Automation is great until one tiny field name breaks everything. Here are some common gotchas and how to avoid them.
- Image binary field name: The ExtractFromFile node stores the base64 in a property defined by
destinationKey(for examplechart1). If you rename this, make sure to update the reference in the “Compose message” Set node, otherwise your email will have an empty image part. - Base64 vs base64url: Gmail wants base64url in the API payload. n8n’s
base64Encode()handles the conversion correctly. If you ever manipulate the string manually, remember that base64url replaces+and/and trims padding. - Character encoding: Keep
charset=UTF-8in your HTML Content-Type header. It avoids random hieroglyphics appearing in your email body. - Large images: Huge images can push your message over Gmail’s size limits. Compress or resize images before embedding if you are sending detailed charts or high resolution assets.
- Gmail sending limits: If you plan to send a lot of emails, keep Gmail API quotas and per-account daily sending limits in mind. Automation is fun until you hit a quota wall.
Security and compliance basics
Even if this is “just a workflow,” you are still sending real email on behalf of real accounts, so treat it like production infrastructure.
- Store OAuth2 credentials securely using n8n’s credential system, not in plain Set nodes.
- Use verified sender addresses where required by your provider or organization.
- Follow email best practices like DKIM, SPF, and handling unsubscribe requests if you are sending newsletters or marketing campaigns.
Alternative ways to send images in email
If this approach feels a bit too “MIME-lab” for some use cases, you have options.
- Use the built-in Gmail node Perfect for simple messages where you do not need custom MIME or CID images. Easier to configure, but less flexible for inline embedding.
- Host images and use absolute URLs Just drop a standard
<img src="https://...">in your HTML. This is simpler, but images are fetched externally and can be blocked or require the recipient to “click to load images.” - Use a transactional email API Providers like SendGrid or Mailgun have their own APIs and SDKs for attachments and inline images. If you prefer provider-managed sending, you can integrate those with n8n instead of Gmail.
Where to go from here
Once you have this template working, you can:
- Swap in your own images and HTML templates
- Embed multiple CID images in one email
- Connect this workflow to other systems in n8n for dynamic reports, invoices, or dashboards
Embedding images with n8n and the Gmail HTTP API gives you full control over the MIME structure and how inline images are delivered. No more manual hacks, no more guessing why the image disappeared in transit.
Call to action: Download the template, plug in your Gmail OAuth credential, set your sender and recipient, and hit “Test workflow.” If this helped you escape repetitive email tasks, subscribe for more n8n automation guides and troubleshooting tips.
