
Sync Google Sheets to Salesforce with n8n: A Step-by-Step Learning Guide
Automating data entry between Google Sheets and Salesforce is one of the most practical ways to save time and reduce errors. In this guide, you will learn how to use an n8n workflow template that:
- Reads rows from a Google Sheet
- Checks Salesforce for existing Account records
- Creates missing Accounts and avoids duplicates
- Upserts Contacts in Salesforce using Email as the external ID
- Sends Slack notifications for each upserted Contact
What you will learn
By the end of this tutorial, you will be able to:
- Explain how a Google Sheets to Salesforce sync works in n8n
- Configure nodes that read, search, merge, and deduplicate data
- Set up Salesforce Account creation and Contact upsert logic
- Add Slack notifications for visibility and tracking
- Apply best practices for field mapping, rate limits, and error handling
Why automate Google Sheets to Salesforce with n8n?
Many teams keep leads, sign-ups, or customer lists in Google Sheets. Manually copying that data into Salesforce takes time and often introduces mistakes. An automated workflow in n8n helps you:
- Onboard contacts and accounts faster
- Keep field mapping consistent across imports
- Prevent duplicate Accounts and Contacts
- Improve data quality and reduce manual errors
- Get automatic Slack notifications for better traceability
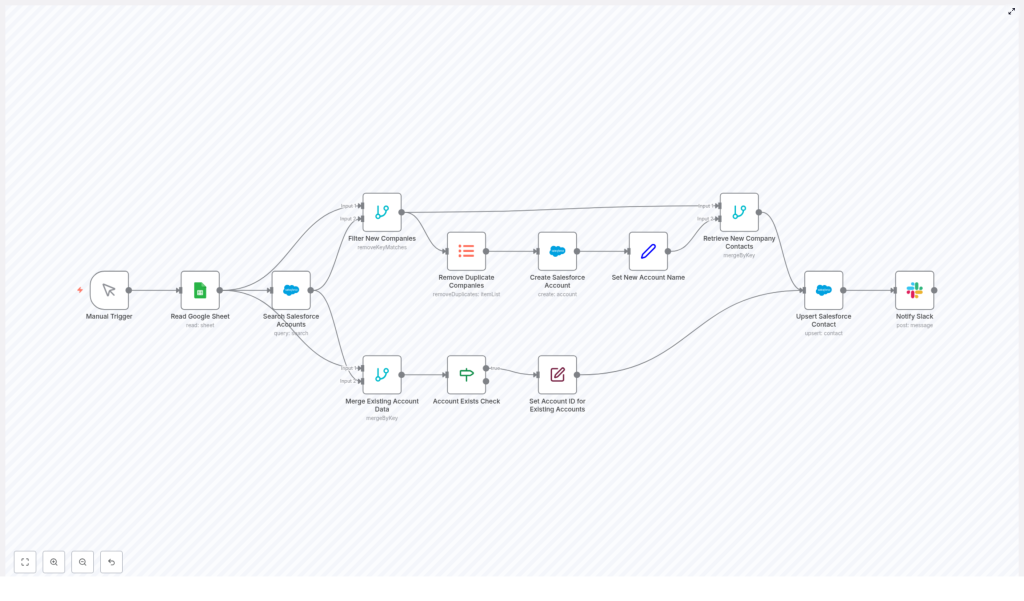
How the n8n workflow template works
At a high level, the workflow follows this pattern:
- Trigger the workflow (manually or on a schedule)
- Read rows from a Google Sheet
- Search Salesforce for Accounts that match each company
- Separate new companies from existing Accounts and remove duplicates
- Create missing Salesforce Accounts
- Attach the correct Account ID to each contact row
- Upsert Contacts in Salesforce using Email as the external ID
- Notify a Slack channel when a Contact is upserted
Next, we will walk through the workflow node by node, in the order you would configure and understand it inside n8n.
Step-by-step walkthrough of the n8n workflow
Step 1: Trigger the workflow (Manual Trigger or schedule)
The template starts with a Manual Trigger node. This lets you run the workflow on demand while you are learning and testing.
Once you are confident the sync works correctly, you can replace the Manual Trigger with a Cron node to run the workflow on a schedule, for example every hour or every night.
Step 2: Read data from Google Sheets
The next node is a Google Sheets node configured to read rows from a specific sheet and range. Typical required columns include:
Company NameFirst NameLast NameEmail
In n8n, you set the Sheet ID and range (for example, Sheet1!A:D). Each row from the sheet becomes an item in the workflow that will be processed downstream.
Step 3: Search Salesforce for matching Accounts
For every row read from Google Sheets, the workflow uses a Salesforce node to search for an Account whose Name matches the Company Name from the sheet.
This is done with a SOQL query. The template uses an expression that safely escapes single quotes so that company names like O'Reilly Media do not break the query:
=SELECT id, Name FROM Account WHERE Name = '{{$json["Company Name"].replace(/'/g, '\\\'')}}'Result:
- If Salesforce finds a match, the Account data (including
Id) is returned. - If no Account is found, the result is empty for that row and the company is treated as new.
Step 4: Separate new companies from existing Accounts
After the search, the workflow needs to split the data into two paths:
- Rows where an Account already exists in Salesforce
- Rows where the company is not yet in Salesforce
The template uses a Merge or remove-key-matches style node to compare the Google Sheet rows with the Salesforce search results. This creates a branch that contains only the rows where no matching Account was found. Those rows represent new companies that require Account creation.
Step 5: Remove duplicate companies before creating Accounts
It is common for a sheet to contain multiple contacts from the same company. If you create an Account for every row, you might end up with duplicates in Salesforce.
To avoid this, the workflow includes a deduplication step for the “new companies” branch. This step:
- Compares rows based on the
Company Namefield - Keeps only one row per unique company
- Prevents multiple Account records for the same company when there are several contacts in the sheet
Step 6: Create Salesforce Accounts for new companies
Now that you have a unique list of new companies, the workflow uses a Salesforce node to create an Account record for each one.
In this node you typically map:
Namein Salesforce toCompany Namefrom the sheet
After the Account is created, the node outputs the new Account data, including the Id. The workflow then passes this data forward and ensures that the Account Name and Id are available for linking contacts later.
Step 7: Attach Account data to existing companies
For rows where an Account already existed in Salesforce, the workflow needs to merge the Account information with the original row from Google Sheets.
This is handled by a Merge node that combines:
- The Salesforce Account data (including
Id) - The original row data from the Google Sheet
After merging, an If node checks whether the Id field is present. If it exists, the workflow renames this field to Account ID (or similar) so that the Contact upsert step has a clearly labeled field for AccountId.
Step 8: Combine new and existing Account data for Contacts
At this point you have:
- Newly created Accounts with their Ids
- Existing Accounts that were found in Salesforce, also with their Ids
The workflow now merges these paths so that every contact row from the sheet has an associated Account ID. This merged data becomes the final payload that will be used to create or update Contacts in Salesforce.
Step 9: Upsert Salesforce Contacts by Email
With Account IDs attached, the workflow uses a Salesforce node configured for an upsert operation on the Contact object.
The key configuration is:
- externalId:
Email - externalIdValue: the
Emailvalue from the sheet - Other mapped fields typically include:
FirstNamefromFirst NameLastNamefromLast NameEmailfromEmailAccountIdfrom the mergedAccount IDfield
Upserting by Email has two benefits:
- If the Contact does not exist, Salesforce creates it.
- If a Contact with that Email already exists, Salesforce updates it instead of creating a duplicate.
Step 10: Send Slack notifications for each Contact upsert
After a successful Contact upsert, the workflow uses a Slack node to post a message to a chosen channel, for example #general.
This message can include information such as the contact’s name, email, and Account, which gives your team real-time visibility into new or updated records.
Best practices for this Google Sheets to Salesforce automation
1. Field mapping and data validation
Reliable imports depend on clean and complete data. Before the upsert step, consider adding:
- A Set node to ensure required fields like
EmailandLast Nameare present - A Function or Set node to normalize emails (for example, trim spaces and convert to lowercase)
Validating and normalizing data early reduces failed upserts and keeps your Salesforce records consistent.
2. Handling Salesforce rate limits and large imports
Salesforce enforces API usage limits. If your Google Sheet contains many rows:
- Process data in smaller batches instead of all at once
- Insert short delays between batches to avoid hitting limits
- Consider using the Salesforce Bulk API with n8n for large-scale imports
n8n provides batching features and supports the Salesforce Bulk API, which is ideal for big data loads.
3. Dealing with ambiguous or duplicate company names
The template matches Accounts using the Company Name field. This is simple but can cause collisions, for example:
AcmevsAcme Inc.
For more accurate matching, you can:
- Use additional fields or heuristics, such as email domain matching
- Leverage Salesforce duplicate rules to catch potential conflicts
4. Error handling and logging
Production-grade workflows should handle failures gracefully. In n8n, you can add error-handling branches that:
- Capture failed Account or Contact upserts
- Write error details to a separate Google Sheet
- Send alert emails or post error messages to a dedicated Slack channel
- Log the row data and API responses for easier troubleshooting
Advanced ways to extend the template
Once the basic sync works, you can enhance the workflow further:
- Map additional Salesforce fields such as industry, phone, or lead source by extending the create and upsert nodes
- Use a Merge node to attach metadata, for example an import batch ID or import date
- Replace the Manual Trigger with a Cron node for fully automated scheduled syncs
- Experiment with a two-way sync where Salesforce updates are written back to the Google Sheet
Testing checklist before going live
Before using this automation in production, walk through this checklist:
- Run tests with a small sample Google Sheet and a Salesforce sandbox environment
- Add duplicate rows to the sheet and confirm that Account deduplication works as expected
- Verify that Contacts are linked to the correct
AccountIdafter Account creation - Simulate API errors or invalid data to confirm your retry and error-handling nodes behave correctly
Frequently asked questions
Do I have to trigger the workflow manually every time?
No. The template uses a Manual Trigger for easy testing, but you can switch to a Cron node to run the sync automatically on a schedule.
How does the workflow prevent duplicate Contacts?
The Salesforce Contact node uses an upsert operation with Email as the external ID. If a Contact with that Email already exists, Salesforce updates it instead of creating a new record.
What if my Google Sheet has multiple contacts from the same company?
The workflow deduplicates new companies by Company Name before creating Accounts. This way, only one Account is created for each unique company, even if multiple contacts share that company name.
Can I add more fields from Google Sheets to Salesforce?
Yes. You can edit the Salesforce nodes in n8n to map additional fields as long as those fields exist in your Salesforce configuration and are available in your Google Sheet.
Conclusion and next steps
This n8n workflow template gives you a structured, maintainable way to sync Google Sheets to Salesforce. It handles key tasks such as:
- Reading and preparing data from Google Sheets
- Creating Accounts only when needed
- Upserting Contacts by Email to avoid duplicates
- Sending Slack notifications for better visibility
The workflow is flexible and can be extended with custom field mappings, bulk import strategies, and richer notification or logging logic.
To get started, clone the template, test it against a Salesforce sandbox, and iterate on the mappings and logic to match your data model. If you need help customizing the flow, refining deduplication, or adding bulk support, you can reach out to automation specialists for guidance.
Call to action: Try this Google Sheets to Salesforce workflow in n8n today, or contact us for a custom integration service tailored to your Salesforce setup.
