LinkedIn Profile Discovery with n8n (Google Sheets + AirTop)

LinkedIn Profile Discovery with n8n (Google Sheets + AirTop)

This guide documents a reusable n8n workflow template that automates LinkedIn profile discovery using Google Sheets as the data source and AirTop as the web extraction layer. The workflow reads person identifiers from a sheet, performs a Google search for each entry, extracts the corresponding LinkedIn profile URL, and writes the result back to the original row.

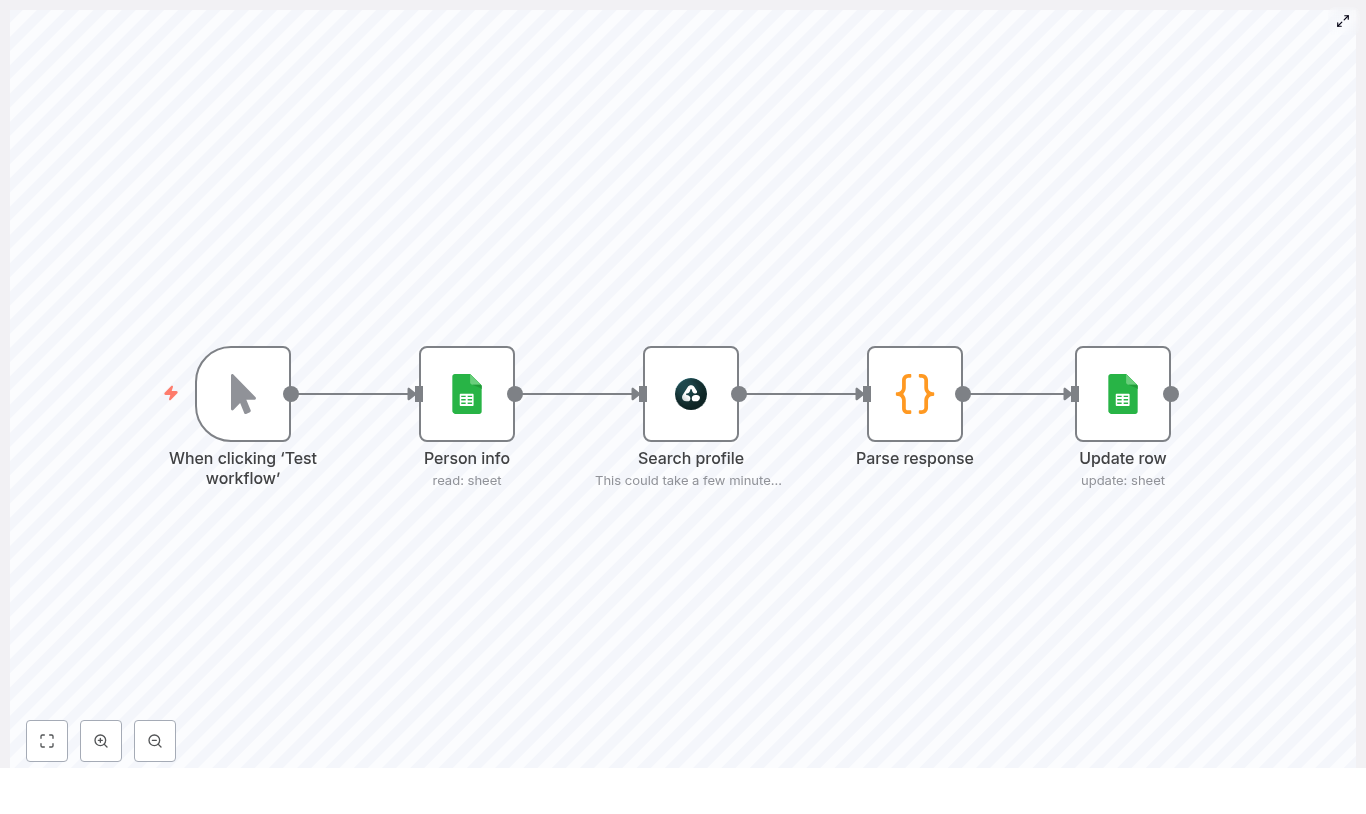
1. Workflow Overview

The automation is implemented as a linear n8n workflow composed of five nodes:

  1. Manual Trigger – Starts the workflow on demand for testing or ad hoc runs.
  2. Google Sheets (Read) – Fetches rows from a sheet that contains a Person Info column or equivalent search string.
  3. AirTop (Google Search Extraction) – Executes a Google search query and extracts the LinkedIn profile URL.
  4. Code (JavaScript) – Normalizes and merges the AirTop output with the original row data.
  5. Google Sheets (Update) – Writes the discovered LinkedIn URL and any status flags back to the correct row.

The workflow is designed as a low-code enrichment pipeline that can be used for lead generation, recruiting, CRM hygiene, or any process that requires LinkedIn profile URLs tied to existing records.

2. Use Cases & Benefits

2.1 Why automate LinkedIn profile discovery

Manually searching LinkedIn for each contact does not scale. This n8n template helps you:

  • Process hundreds or thousands of contacts with minimal supervision.
  • Apply a consistent search pattern and extraction logic across all records.
  • Store LinkedIn URLs directly in Google Sheets, ready for downstream tools such as CRMs or outreach platforms.

2.2 Typical scenarios

  • Enriching marketing or sales lead lists with LinkedIn profile links.
  • Building recruiting pipelines from spreadsheets of potential candidates.
  • Cleaning and standardizing existing contact databases where LinkedIn URLs are missing or inconsistent.

3. Architecture & Data Flow

3.1 High-level flow

  1. The Manual Trigger node starts execution.
  2. The Google Sheets (Read) node retrieves rows containing person information (typically name plus company).
  3. For each row, the AirTop node:
    • Builds a Google Search URL from the Person Info field.
    • Fetches the search results page.
    • Extracts the LinkedIn profile URL that matches a specific pattern.
  4. The Code node:
    • Reads the AirTop response.
    • Combines it with the original row payload.
    • Outputs a unified JSON object containing both the original fields and a new LinkedIn URL field.
  5. The Google Sheets (Update) node:
    • Identifies the target row using row_number or another unique key.
    • Writes the LinkedIn URL into the appropriate column.
    • Optionally sets a Validated flag or similar status indicator.

3.2 Data model

A minimal sheet configuration typically includes:

  • Person Info – A free-text field such as First Last Company used to construct the Google search query.
  • LinkedIn URL – A column that will be populated automatically by the workflow.
  • Validated – Optional status column (e.g., empty / Yes / No) for manual review tracking.
  • row_number – Hidden or technical column used by n8n to update the correct row deterministically.

4. Prerequisites & Setup

4.1 Required accounts and services

  • An n8n instance (n8n Cloud or self-hosted).
  • A Google account with access to a Google Sheets document that contains the contact list.
  • An AirTop account with credentials configured in n8n, or another compatible web extraction tool configured in a similar way.

4.2 n8n configuration prerequisites

  • Configured Google Sheets OAuth2 credentials in n8n with read/write permissions to the target sheet.
  • Configured AirTop credentials in n8n for the extraction node.
  • Basic familiarity with:
    • n8n credentials management.
    • Node parameters and expression syntax (e.g., {{ ... }} expressions).
    • Handling JSON data across nodes.

5. Node-by-Node Breakdown

5.1 Manual Trigger

Purpose: Run the workflow manually for testing or on-demand processing.

  • Node type: Manual Trigger
  • Configuration: No special parameters required.
  • Behavior: Execution starts when you click Test workflow in the n8n UI.

In production, you can later replace or complement this with a Cron node for scheduled runs, but the manual trigger is the safest way to validate configuration before automating.

5.2 Google Sheets – Read Rows

Purpose: Retrieve the list of people or search queries to process.

  • Node type: Google Sheets
  • Operation: Typically Read or Read Rows.

Key configuration parameters:

  • Credentials: Select your configured Google Sheets OAuth2 credentials.
  • Spreadsheet ID: Choose the target spreadsheet from the dropdown or specify the ID explicitly.
  • Sheet Name or GID:
    • Set Sheet Name to the tab that contains your data.
    • Alternatively, use the GID if you prefer a more explicit reference.
  • Range / Columns:
    • Ensure the column that contains the search string (for example Person Info) is included.
    • Include row_number or similar technical column if you plan to update rows by index later.

Data expectations:

  • Person Info values should ideally be structured as FirstName LastName Company or similar to improve search accuracy.
  • Empty rows or rows without Person Info should be removed or filtered out to avoid unnecessary API calls.

5.3 AirTop – Google Search Extraction

Purpose: For each row, perform a Google search and extract a LinkedIn profile URL from the search results.

  • Node type: AirTop (web extraction / model-based extraction).

Search URL expression:

The node constructs a Google search query URL using the Person Info field from the incoming JSON:

=https://www.google.com/search?q={{ encodeURI($json['Person Info']) }}

Extraction prompt:

The AirTop configuration instructs the model or extractor to return only the LinkedIn URL that matches the pattern:

  • https://www.linkedin.com/in/

This ensures the output is a single URL string rather than a full HTML page or a more complex structure.

Important considerations:

  • Query quality: Keep queries concise but specific. Including the full name and company usually improves matching. Overly long or noisy queries can reduce accuracy.
  • Compliance: Respect robots.txt and site terms. LinkedIn prohibits direct scraping of its pages. This workflow uses public Google search results, but you are still responsible for complying with legal and terms-of-service restrictions.
  • Rate limiting:
    • Configure reasonable concurrency and delays in n8n to avoid triggering Google rate limits or temporary IP blocks.
    • Consider using n8n retry logic with backoff for transient failures.

Output shape (conceptual):

The AirTop node returns a JSON object that includes a field such as data.modelResponse, which contains the extracted LinkedIn URL as a string. The exact property name (data.modelResponse) is used in the following Code node, so it must match your AirTop configuration.

5.4 Code Node – Parse & Normalize Response

Purpose: Merge the original row data from Google Sheets with the LinkedIn URL returned by AirTop, and output a clean object for the update step.

  • Node type: Code
  • Language: JavaScript.

Example implementation:

const linkedInProfile = $json.data.modelResponse
const rowData = $('Person info').item.json
return { json: { ...rowData, 'LinkedIn URL': linkedInProfile }};

What this code does:

  • Reads the AirTop output: $json.data.modelResponse is expected to contain the extracted LinkedIn profile URL.
  • Accesses the original row: $('Person info').item.json references the JSON payload from the earlier node that holds the raw Google Sheets row, including fields like Person Info and row_number.
  • Merges data: The spread operator ...rowData copies all existing fields, then adds a new field 'LinkedIn URL' with the extracted value.
  • Outputs a single object: The returned object is structured as { json: { ... } }, which n8n expects for subsequent nodes.

Edge cases & handling tips:

  • If $json.data.modelResponse is undefined or empty (no URL found), you may want to:
    • Set 'LinkedIn URL' to null or an empty string.
    • Optionally add a 'Lookup Status' field (for example 'not_found') for later review.
  • If the selector $('Person info') does not match your actual node name, adjust it to reference the correct Google Sheets node in your workflow.

5.5 Google Sheets – Update Row

Purpose: Write the discovered LinkedIn URL back into the original Google Sheets row.

  • Node type: Google Sheets
  • Operation: Update or Update Row.

Key configuration parameters:

  • Credentials: Use the same Google Sheets credentials as the read node.
  • Spreadsheet ID / Sheet Name: Target the same document and sheet tab used for reading.
  • Row identification:
    • Use row_number or another unique identifier from the merged JSON to ensure the correct row is updated.
    • Map this field explicitly in the node configuration if required.
  • Column mapping:
    • Map 'LinkedIn URL' from the Code node output to the LinkedIn URL column in the sheet.
    • Optionally map a Validated column to Yes, No, or leave it blank depending on your verification process.

Behavior notes:

  • Ensure that the column headers in Google Sheets match the field names you are using in the Code node output to avoid mapping issues.
  • If the row cannot be found (for example due to a missing or incorrect row_number), the update operation will fail for that item. Configure error handling or logging as needed.

6. Data Hygiene & Quality Practices

6.1 Input normalization

  • Standardize the Person Info format (for example FirstName LastName Company) across all rows for more consistent search results.
  • Normalize capitalization and remove obvious noise or extra punctuation.
  • Clear out empty rows or rows missing essential fields before running large batches.

6.2 Validation & manual review

Search-based discovery is probabilistic. Not every result will be correct.

  • Use a Validated column to track which rows have been manually checked.
  • For high-value contacts, introduce a manual verification step outside of n8n to confirm that:
    • The name matches.
    • The company or job title is consistent.
    • The location, if visible, aligns with your expectations.
  • Optionally perform fuzzy matching on name and company to flag likely mismatches for manual review.

7. Error Handling, Retries & Logging

7.1 Node-level retries

  • Use n8n built-in retry settings on nodes that call external services, especially the AirTop and Google Sheets nodes.
  • Set a limited number of retries with backoff for transient network issues or temporary rate limits.

7.2 Failure tracking

  • Log failed rows to a dedicated Google Sheet or another data store for manual follow-up.
  • Include diagnostic fields such as:
    • The original Person Info value.
    • Error messages from AirTop or Google Sheets.

7.3 Common issues

  • No results returned:
    • Manually test the generated Google search URL in a browser.
    • Confirm that AirTop is receiving and parsing the page content correctly.
    • Add logging in the Code node to inspect the raw AirTop response.
  • Wrong profile returned:
    • Refine the Person Info format by adding company or job title.
    • Avoid overly generic names without additional qualifiers.
  • API errors:
    • Verify Google Sheets API quotas and credentials in the Google Cloud console.
    • Check AirTop usage limits, authentication configuration, and status dashboards.

8. Rate Limits, Compliance & Privacy

8.1 Rate limiting and scheduling

  • Respect Google search rate limits by

n8n Twitter/X Scraper: Setup & Guide

n8n Twitter/X Scraper Template – Setup, How It Works, and Enhancements

Imagine this: you are copying Tweets into a spreadsheet like it is 2009, your coffee is cold, and your soul has left the chat. If that sounds familiar, it is time to let automation do the boring stuff while you pretend it was your plan all along.

This n8n Twitter/X Scraper template does exactly that. It grabs Tweets (X posts) using an API, cleans up the data, and drops everything neatly into a Google Sheet. It handles pagination, counting, and basic safety around rate limits so you do not have to babysit your browser or your spreadsheet.

Below is a friendly walkthrough of what the template does, how the key nodes work, how to set it up, and how to take it from “fun experiment” to “reliable production workflow.”

What this n8n Twitter/X Scraper template actually does

At a high level, this workflow:

  • Calls a Twitter/X search endpoint (or a compatible API exposing an advanced_search style endpoint).
  • Uses a cursor-based pagination loop with a counter so you can pull multiple pages of results without going infinite.
  • Normalizes the data into clean fields like Tweet ID, URL, content, likes, retweets, and created date.
  • Appends those fields into a Google Sheet using the Google Sheets node.

The result is a repeatable, configurable Tweet scraping pipeline that you can run on demand or on a schedule, without ever manually copying and pasting again.

Before you start: prerequisites

To get this n8n workflow template running, you will need:

  • An n8n instance (cloud or self-hosted).
  • Access to a Twitter/X API endpoint or a service that exposes a compatible advanced_search endpoint, along with API credentials.
  • A Google account with:
    • A Google Sheet ready to receive Tweet data.
    • OAuth credentials configured in n8n for the Google Sheets node.
  • Basic familiarity with n8n:
    • Using expressions like {{ $json.fieldName }}.
    • Working with Function / Code nodes for light JavaScript logic.

How the Twitter/X Scraper workflow is structured

Instead of one giant mystery node, the template uses several small, understandable building blocks. Here is how the main pieces fit together:

1. Manual Trigger – starting things up

The template starts with a Manual Trigger. You hit “Test workflow” in n8n, it runs once, and you see what happens. For production use, you will typically swap this out for a Cron or Webhook trigger, but manual mode is perfect while you are still tweaking queries and sheet mappings.

2. Set Count – initializing the counter

This node sets up an initial counter value, usually starting at 1. That counter acts as your “number of pages processed” tracker. It is used later to decide when the workflow should stop looping so you do not accidentally scrape half of X in one go.

3. Counter – keeping state in the loop

The Counter node stores the current counter and cursor values and passes them around the loop. It is the little backpack of state that travels through each iteration, so every request knows:

  • Which page you are on (counter).
  • Which cursor to use for the next page (cursor).

4. Get Tweets (HTTP Request) – talking to the API

The Get Tweets node is an HTTP Request that calls your Twitter/X search endpoint. In the template, it uses query parameters such as:

  • query=OpenAI – the search term.
  • queryType=Top – the type of results.
  • cursor – used for pagination between result pages.

Make sure you configure this node with the correct authentication credentials that match your API or service. If auth is wrong, you will know quickly, because nothing will come back except error messages and regret.

5. Extract Info (Code Node) – cleaning and shaping the data

The raw API response is usually not something you want to drop straight into a spreadsheet. The Extract Info Code node:

  • Normalizes the API response into n8n items.
  • Maps useful fields like:
    • tweetId
    • url
    • content
    • likeCount
    • retweetCount
    • createdAt (formatted as a readable date)

This is the step that turns messy JSON into structured rows that play nicely with Google Sheets.

6. Add to Sheet (Google Sheets) – writing to your spreadsheet

Next, the Add to Sheet node appends the formatted Tweet data to your target Google Sheet. The columns in this node are configured to match the fields coming out of Extract Info. Once configured, every run adds new rows with fresh Tweet data.

7. If (Checking Count) – deciding when to stop

To avoid endless loops, an If node checks the counter value against a threshold. For example, the template may stop after 3 pages of results:

  • If counter == 3, the workflow stops.
  • Otherwise, it keeps looping and pulls the next page.

This is your safety net so the workflow behaves and does not keep scraping forever.

8. Limit – pacing your requests

The Limit node is used for pacing and controlling concurrency. It helps you:

  • Limit how many items get processed in a single run.
  • Slow down rapid-fire API calls to avoid hitting rate limits.

Think of it as the “take a breath” node for your workflow.

9. Increasing Count & Cursor – advancing the loop

Inside the “Increasing Count & Cursor” sub-flow, you will find a small cluster of nodes that update your loop state:

  • Set Increase – preps values that will be updated.
  • Increase Count (Function/Code node) – increments the counter by 1.
  • Set Count and Cursor – writes the updated counter and new cursor back into the loop state for the next iteration.

This keeps your pagination moving forward page by page, without manually tracking anything.

Pagination and state handling in n8n

Twitter/X style APIs often use a cursor to move between pages instead of simple page numbers. The template is built around this cursor-based pagination model.

Here is what happens on each loop:

  1. The API response includes a next_cursor (or similarly named field).
  2. The Extract Info or Increase Count logic grabs that cursor value.
  3. The updated cursor is stored in the loop state (via the Counter-related nodes).
  4. On the next iteration, the Get Tweets HTTP Request sends that cursor as a parameter.

This way, the workflow walks through pages sequentially instead of guessing page numbers or refetching the same data.

Key expressions used in the template

The template uses some common n8n expressions to reference values like the counter and cursor:

{{ $('Counter').item.json.counter }}
{{ $json.cursor }}
{{ $json.count }}

These expressions help nodes read from and write to the shared loop state so everything stays in sync.

Step-by-step: setting up and testing the workflow

1. Import and connect your accounts

  1. Import the Twitter/X Scraper template into your n8n instance.
  2. Open the Get Tweets HTTP Request node and:
    • Configure your Twitter/X or compatible API credentials.
    • Adjust query parameters such as query and queryType to match what you want to search.
  3. Open the Add to Sheet node:
    • Select your Google Sheets credentials.
    • Choose the target spreadsheet and worksheet.
    • Map the columns to fields produced by Extract Info.

2. Do a safe test run

To avoid flooding your sheet on the first try:

  • Use the Manual Trigger to run the workflow.
  • Set the stopping threshold in the If node to something small, like 1 or 2, so you only fetch a couple of pages.
  • Check your sheet to confirm that:
    • Columns line up with the data you expect.
    • Dates look right.
    • Content with emojis or long text is stored correctly.

3. Inspect and debug the API response

If anything looks off, use the Extract Info node to temporarily log or inspect the full API payload. This helps you verify:

  • Field names and nesting in the response.
  • Differences between single-tweet and multi-tweet responses.
  • Where the cursor or next page token actually lives.

Make sure your code handles both single and multiple Tweet structures so it always outputs a consistent format to Google Sheets.

Handling rate limits and making the workflow reliable

APIs are not huge fans of being hammered with requests. To keep your n8n Twitter/X Scraper friendly and stable, consider these best practices:

  • Respect rate limits:
    • Use the Limit node to control how many items or pages you process in one run.
    • Add explicit delays or pacing logic if your API plan is strict.
  • Implement retries with backoff:
    • Configure retries directly in the HTTP Request node if supported.
    • Or add extra logic nodes to retry on 4xx/5xx responses with increasing delay.
  • Persist state externally:
    • Store cursors or last-run timestamps in a database (SQLite, Redis) or a dedicated Google Sheet.
    • This prevents refetching the same pages after a restart or deployment.
  • Use environment variables for secrets:
    • Keep API keys and secrets in n8n credentials and environment variables.
    • Avoid hardcoding credentials directly in nodes or code.
  • Deduplicate before writing:
    • Use Tweet ID as a unique key.
    • Check for existing entries in the sheet before appending to avoid duplicates.

Production-ready improvements and extensions

Once your test runs look good and your sheet is filling up nicely, you can start upgrading the workflow for real-world use.

1. Replace Manual Trigger with Cron

Instead of manually clicking “Test workflow,” use a Cron trigger to schedule scraping:

  • Run hourly for active monitoring.
  • Run daily for slower-moving topics.

Always align your schedule with your API rate limits so you do not run into errors or throttling.

2. Persist state between runs

To avoid fetching the same Tweets again and again, store your cursor and last-run metadata somewhere external, such as:

  • A lightweight database like SQLite or Redis.
  • A configuration tab in Google Sheets.

This lets the workflow resume exactly where it left off and keeps your data collection tidy.

3. Add robust error handling

For a more resilient workflow:

  • Wrap the HTTP Request logic in a try/catch style pattern using additional nodes.
  • Detect 4xx and 5xx responses and:
    • Trigger alerts via Slack or email if failures repeat.
    • Apply retry logic with increasing delay between attempts.

4. Use official Twitter API v2 endpoints if available

If you have access to the official Twitter API v2, consider moving the template to those endpoints to unlock richer fields like:

  • Media information.
  • Context annotations.
  • Detailed public metrics.

When you do this, update the Extract Info node to map any new fields you care about into your sheet.

5. Enrich your data

You can also add extra processing steps between extraction and Sheets, such as:

  • Sentiment analysis to tag Tweets as positive, negative, or neutral.
  • User metrics lookups for additional profile context.
  • Topic or category classification via external APIs.

This turns your sheet from “raw Tweets” into a lightweight analytics dataset.

Security, compliance, and being a good API citizen

Even when automation makes life easier, it is important to stay on the right side of platform rules and privacy expectations:

  • Follow the platform’s Terms of Service and any API usage guidelines.
  • Avoid scraping private content or using data in ways that could violate user privacy.
  • Rotate API keys when needed, and always store secrets securely using n8n credentials.

Troubleshooting common issues

If something is not working, here are some typical problems and where to look first:

  • No results returned:
    • Check your search query syntax.
    • Confirm your account has the required API permissions.
    • Verify that pagination is returning valid cursors.
  • Rate limit errors:
    • Reduce how often the workflow runs.
    • Increase delays between requests.
    • Process fewer items per run.
  • Incorrect date or field mapping:
    • Inspect the API payload in the Extract Info node.
    • Update your date formatting helper or remap keys to match the actual response.
  • Duplicate rows in Sheets:
    • Implement a lookup step before appending new rows.
    • Use a sheet or logic that supports update or merge by Tweet ID.

Sample code snippet for incrementing the counter

Here is an example Function node used to increase the count value in the loop:

// n8n Function node (Increase Count)
const items = $input.all();
return items.map(item => { if (!item.json

n8n Twitter/X Scraper: Automate Tweets to Google Sheets

n8n Twitter/X Scraper: Automate Tweets to Google Sheets

In this tutorial you will learn how to use an n8n workflow template to scrape tweets from Twitter/X and store them automatically in Google Sheets. We will walk through each node, explain how pagination and counters work, and show you how to run the workflow safely within rate limits.

Learning goals

By the end of this guide, you will be able to:

  • Import and configure a ready-made n8n Twitter/X scraper template.
  • Connect Twitter/X (via HTTP) and Google Sheets credentials.
  • Customize the tweet search query for your own keywords or accounts.
  • Understand and adjust pagination, counters, and loop limits.
  • Map tweet data into a Google Sheet with structured columns.
  • Handle common errors and respect API rate limits.

Why use n8n for Twitter/X scraping?

n8n is an open-source automation platform that lets you connect APIs and services using a visual workflow editor. It is well suited for building a Twitter/X scraper because you can:

  • Design workflows visually and reuse them as templates.
  • Control pagination and rate limiting with dedicated nodes.
  • Send scraped tweets directly to Google Sheets, databases, or other tools.
  • Use code nodes to clean, transform, and enrich tweet data.

This template takes advantage of those strengths so you do not have to write a full integration from scratch.


How the template works at a high level

The workflow uses the Twitter API (through twitterapi.io or another compatible endpoint) to run an advanced search, then writes each tweet to a Google Sheet. The core logic includes:

  • A starting counter to control how many pages of tweets to fetch.
  • Cursor-based pagination using the API’s next_cursor value.
  • A transformation step to normalize the API response into clean JSON items.
  • A Google Sheets step that appends each tweet as a new row.
  • A loop with an If condition that stops after a set number of iterations.

In practical terms, the workflow repeats this cycle:

  1. Fetch a page of tweets for your search query.
  2. Extract and format the tweet data.
  3. Append the tweets to Google Sheets.
  4. Update the counter and cursor to get the next page.
  5. Check if the loop should continue or stop.

Overview of the key nodes

Before we configure anything, it helps to understand what each node does in the loop.

Core control and loop nodes

  • Set Count – Initializes the starting counter value for testing and controls how many iterations you run.
  • Counter – Holds the current counter and cursor values and passes them into each loop cycle.
  • If – Checks whether the counter has reached your configured maximum. If the condition is met, the loop stops; otherwise, it continues.
  • Limit – Used to throttle or control the flow between iterations. This is helpful for staying within Twitter/X rate limits.
  • Increase Count – A code node that increments the counter and updates the cursor for the next API request.

Data fetching and transformation nodes

  • Get Tweets – An HTTP Request node that calls the advanced search endpoint. It sends parameters such as query=OpenAI and the cursor for pagination.
  • Extract Info – A code node that converts the raw API response into uniform JSON items. It outputs fields like tweetId, url, content, engagement counts, and createdAt.
  • Add to Sheet – A Google Sheets node that appends each tweet as a new row in your spreadsheet, using mapped columns.

Once you understand these roles, the configuration steps will make more sense.


Step-by-step setup in n8n

Step 1: Import the workflow template

Start in your n8n instance:

  1. Open n8n and go to the workflow import area.
  2. Import the provided template JSON file.

If the import screen shows a loading spinner for a long time, try:

  • Waiting a short while, then refreshing the browser.
  • Doing a hard refresh or opening n8n in a different browser.
  • Confirming that the n8n server is running and accessible.

Step 2: Configure credentials

The workflow uses two main credentials that you must set up before running it:

  • Twitter API (HTTP Header Auth)
    • Create or edit an HTTP Header auth credential in n8n named something like Twitter API.
    • Provide the required header token or API key for your chosen Twitter/X API provider.
    • If you use twitterapi.io or Twitter API v2, check their documentation to match the exact header names and values.
  • Google Sheets (OAuth2)
    • Set up a Google Sheets OAuth2 credential in n8n.
    • Use a Google account that has access to the spreadsheet where you will store tweets.
    • Authorize n8n to read and write to Google Sheets when prompted.

Step 3: Customize the Twitter/X search query

Next, decide what tweets you want to scrape. Open the Get Tweets HTTP Request node:

  • Locate the query parameter in the node settings.
  • Replace the default value (for example, OpenAI) with your own search expression.

You can use simple keywords, hashtags, or advanced search syntax. For example:

query=from:elonmusk -is:retweet lang:en

This would search for English tweets from a specific account, excluding retweets. Adjust the query to match your monitoring or research needs.

Step 4: Configure Google Sheets mapping

Open the Add to Sheet node to connect it to your spreadsheet:

  • Select the correct documentId (the spreadsheet) and sheetName.
  • Review the field mapping. The template typically maps:
  • Tweet ID
  • URL
  • Content
  • Likes
  • Retweets
  • Replies
  • Quotes
  • Views
  • Date

Adjust the mapping if your sheet has different column names or if you want to add or remove fields.

Step 5: Tune pagination and loop limits

The workflow uses cursor-based pagination. The Twitter/X API returns a next_cursor value, which points to the next page of results. The loop logic uses this cursor along with a simple counter to avoid infinite runs.

Key elements to adjust:

  • Counter node – Holds the current iteration count.
  • If node – Contains a condition like counter == 3.

By default, the template stops after 3 iterations. To change this:

  1. Open the If node.
  2. Update the comparison value (for example, from 3 to 10) to allow more pages.

Alternatively, you can extend the logic to stop when next_cursor is null or missing, which means there are no more pages. That approach prevents unnecessary requests when the API has no additional data.


Important code nodes explained

Extract Info node (formatting tweet data)

The Extract Info code node is responsible for turning the raw HTTP response into a clean list of tweets that n8n can send to Google Sheets. It typically:

  • Checks that the response contains a tweets array.
  • Maps each tweet into a separate n8n item.
  • Normalizes field names and sets default values.
  • Formats createdAt into a human-readable date string.

A simplified version of the logic looks like this:

// Simplified logic
if (input.json.tweets && Array.isArray(input.json.tweets)) {  return input.json.tweets.map(tweet => ({  json: {  tweetId: tweet.id || '',  url: tweet.url || '',  content: tweet.text || '',  likeCount: tweet.likeCount || 0,  retweetCount: tweet.retweetCount || 0,  replyCount: tweet.replyCount || 0,  quoteCount: tweet.quoteCount || 0,  viewCount: tweet.viewCount || 0,  createdAt: formattedDate  }  }));
}

You can customize this node to:

  • Filter out unwanted tweets (for example, by language or minimum engagement).
  • Remove duplicates before they reach Google Sheets.
  • Add enrichment, such as sentiment scores, keyword extraction, or tags.

Increase Count node (managing the loop)

The Increase Count code node updates the loop state after each iteration. It usually does two things:

  • Reads the current counter value and increments it by 1.
  • Pulls the next_cursor from the latest API response and stores it so the next Get Tweets call can use it.

This is what allows the workflow to move from page 1 to page 2, and so on, while also keeping track of how many times it has looped.


Handling rate limits and improving reliability

Twitter/X APIs typically enforce rate limits, so your n8n workflow should be configured to respect them and recover gracefully from errors.

  • Add delays between requests
    Insert a Wait node or use the Limit node to slow down the loop. Increasing the delay between calls reduces the risk of hitting 429 errors.
  • Use error handling
    Wrap custom code in try/catch blocks where appropriate and consider using n8n’s On Error workflow to retry failed requests or log them separately.
  • Log raw responses
    Before the Extract Info node, add a Set node or similar step to store the raw HTTP response. This makes debugging easier if the structure changes or unexpected data appears.

Troubleshooting common issues

Issue: Template import shows a persistent loading spinner

If the import screen or the n8n interface keeps showing a loading spinner:

  1. Refresh the browser and clear the cache.
  2. Verify that your n8n server is running and that you can reach its URL.
  3. Try a different browser or a private/incognito window.
  4. Open the browser’s Developer Tools and check the Console for JavaScript errors.

Issue: Empty results or API errors from Twitter/X

If the workflow runs but no tweets appear, or you see errors in the Get Tweets node:

  • Confirm that your Twitter/X API keys or headers are correct and not expired.
  • Check the execution log of the Get Tweets node for HTTP status codes and error messages.
  • If you see status code 429 (too many requests), increase delays or reduce the number of loop iterations.
  • Review your query parameter to ensure it is valid and returns results when tested directly with your provider.

Extending and customizing the workflow

Once the basic scraper is working, you can adapt it to more advanced use cases.

  • Store data in a database
    Instead of (or in addition to) Google Sheets, connect nodes for Postgres, MySQL, or another database to store JSON output for analytics or production use.
  • Deduplicate tweets
    Maintain a list of tweet IDs already saved and skip any that match existing ones. This prevents duplicate rows in Sheets or your database.
  • Add NLP and enrichment
    Insert nodes for sentiment analysis, keyword extraction, or entity recognition to analyze tweet content before saving it.
  • Send alerts
    Connect Slack, email, or another notification service to alert you when a tweet matches high-priority criteria, such as specific keywords or high engagement.

Security, compliance, and best practices

When scraping or collecting data from Twitter/X:

  • Follow Twitter/X terms of service and API usage policies.
  • Respect rate limits to avoid suspension or throttling.
  • Be mindful of personal data and local privacy regulations.
  • If you plan to run scraping at scale or distribute the workflow, make sure you have the appropriate API access level and permissions.

Quick checklist before your first run

Before clicking “Execute Workflow” in n8n, verify that:

  • Twitter/X API credentials (HTTP Header Auth) are configured and tested.
  • Google Sheets OAuth2 is connected, and the correct spreadsheet ID and sheet name are set.
  • The search query in the Get Tweets node matches your target tweets.
  • The loop limit and counter values are set to a safe number for initial testing (for example, a small number of pages).
  • You have done at least one test run and reviewed each node’s output in the execution log.

FAQ

Can I change the columns stored in Google Sheets?

Yes. Open the Add to Sheet node and adjust the field mapping. You can remove fields you do not need or add new columns if you modify the Extract Info node to output additional data.

Do I have to use twitterapi.io?

No. The template is designed around a generic HTTP Request node. You can use any compatible Twitter/X API provider, as long as you update the URL, headers, and query parameters to match that provider’s requirements.

How can I stop the loop when there are no more tweets?

Extend the logic in the Increase Count or If node to check whether next_cursor is null or missing. If it is, you can stop the loop instead of relying only on a fixed counter.

What if I want to run this on a schedule?

Add a Cron node at the start of the workflow to trigger it at regular intervals, such as every hour or every day. Make sure your rate limiting and deduplication logic are suitable for repeated runs.


If you would like help tailoring this template, you can:

  • Ask for a version customized for a specific search query or account.
  • Add deduplication logic so your Google Sheet never receives duplicate tweet rows.
  • Convert the workflow to store results in a database instead of, or in addition to, Google Sheets.

Once you are ready, import the template, connect your credentials, run a small test, and then gradually increase the loop limits as you confirm everything works correctly. If you encounter errors, check the node execution logs and adjust the configuration or rate limits as needed.

Call to action:

Think Tool: Improve Multi-Step Automation

Think Tool: Improve Multi-Step Automation

In complex n8n and AI-assisted workflows, a short, explicit reasoning step often makes the difference between a safe, predictable automation and a fragile one. The Think Tool pattern introduces an internal reasoning phase, typically implemented as a dedicated node that works with Claude or other LLMs in an n8n-style flow.

This node does not mutate external systems, call APIs, or modify records. Instead, it records structured reasoning, validates assumptions, and produces a concrete execution plan before any state-changing node is triggered. This reference-style guide explains the concept, the architecture in an n8n + Claude setup, node-by-node behavior, configuration patterns, and practical usage guidelines for robust multi-step automations.

1. Conceptual Overview

1.1 What is the Think Tool?

The Think Tool acts as an internal notebook or reasoning buffer for your AI agent inside an n8n workflow. It is typically implemented as a dedicated LLM node (for example, Claude) configured to:

  • Capture intermediate reasoning steps and validation checks during multi-step tasks.
  • Verify that required inputs, constraints, and business rules are satisfied before continuing.
  • Produce a clear, ordered plan of subsequent tool calls (for example, fetch contact, check calendar, create event, send email).
  • Maintain an auditable log that explains why specific actions were executed, skipped, or blocked.

Unlike standard operational nodes (such as “Send Email”, “Create Calendar Event”, or CRM actions), the Think Tool node:

  • Only appends reasoning to a log or returns a structured plan.
  • Does not call external services or change any external state.

This makes it particularly suitable for multi-step workflows where early mistakes tend to propagate, such as scheduling, CRM updates, or email workflows.

1.2 Key Benefits in n8n Workflows

  • Improved accuracy – By explicitly listing rules, inputs, and checks before calling other nodes, the agent reduces incorrect or premature actions.
  • Policy and compliance alignment – A dedicated reasoning step ensures that domain rules, safety constraints, and organizational policies are evaluated before any state change.
  • Deterministic planning – The Think Tool outputs a step-by-step plan (for example, fetch contact → check calendar → create event → send email), reducing ambiguity in tool selection and ordering.
  • Auditability and debugging – The reasoning log becomes a traceable artifact that explains how and why a particular tool path was chosen.
  • Low operational risk – Since it only writes to an internal log and returns reasoning, it is safe to run frequently and cannot accidentally modify external systems.

2. Workflow Architecture in n8n

2.1 High-Level Flow

In a typical n8n + Claude automation template, the Think Tool node is placed between the initial user request and any tool that changes external state. A common high-level pattern looks like this:

  1. Trigger: A user sends a request to the agent (for example, via chat, webhook, or another trigger node).
  2. Think Tool node: The LLM is instructed to:
    • List all applicable rules and constraints.
    • Check for missing or ambiguous inputs.
    • Design a step-by-step plan of tool calls.
    • Return a decision flag (for example, ready to act / need clarification / blocked).
  3. Clarification branch:
    • If required information is missing, the workflow routes to a node that asks the user clarifying questions.
  4. Execution branch:
    • Once the Think Tool confirms that checks have passed, the flow continues to operational nodes such as:
      • Contact retrieval (for example, Slack, CRM).
      • Calendar operations (Get, Create, Update, Remove).
      • Email operations (Get Emails, Send, Reply).

The template described includes:

  • Contact nodes for multiple sources (Slack and CRM).
  • Calendar nodes for operations like Get, Create, Update, and Remove.
  • Email nodes for retrieving and sending messages, including threaded replies.
  • A Think node that is required to run before any of these external actions are invoked.

This architecture enforces rules such as:

  • “Always check if an event already exists at the requested time before creating a new one.”
  • “Always fetch contact information if the email address is missing.”

2.2 When to Use the Think Tool Node

The Think Tool node is most effective when the automation meets one or more of these conditions:

  • Multiple dependent tool calls are required (for example, fetch contact → check calendar → create event → send email).
  • There are domain-specific rules or policies that must be evaluated (for example, privacy constraints, approval requirements, internal SLAs).
  • User inputs are incomplete, ambiguous, or inconsistent (for example, missing date/time, no recipient email, unclear subject).
  • The operation has high cost or risk (for example, deleting events, sending client communications, modifying CRM records).

It is usually unnecessary for trivial, single-step tasks where a direct node call is safe and unambiguous.

3. Node-by-Node Breakdown

3.1 Think Tool Node (Reasoning Node)

Purpose: Perform internal reasoning, validation, and planning before any state-changing tools run.

Typical configuration:

  • Model / Provider: Claude or another LLM node integrated into n8n.
  • Prompt / System instructions:
    • Embed all domain rules, safety constraints, and policies.
    • Provide a checklist of what must be verified (for example, required fields, conflict checks).
    • Instruct the model to output:
      • A concise checklist of checks performed.
      • A step-by-step plan of tool calls.
      • A decision flag (ready / need clarification / blocked).
      • A user-facing explanation if blocked or unclear.
  • Side effects: None on external systems. The node only writes to:
    • The internal reasoning log.
    • Structured JSON or text fields used for branching.

Data flow:

  • Input: User request content and relevant context (for example, previous messages, metadata).
  • Output:
    • List of applied rules and checks.
    • Flags for missing or ambiguous inputs.
    • Planned sequence of tool calls and expected outputs (for example, IDs, timestamps).
    • Status: ready / need clarification / blocked.

3.2 Contact Nodes (Slack and CRM)

Purpose: Resolve people or entities referenced in the user request into concrete contact records, including email addresses.

Typical behavior in the template:

  • If a user mentions “Sarah” without an email, the Think Tool instructs the workflow to:
    • Query Slack for user information.
    • Query the CRM for matching contacts.
  • If the email is already present and verified, the Think Tool may skip additional contact lookups.

Data flow:

  • Input: Name or identifier extracted from the user request.
  • Output: Contact object(s) with email, name, and possibly IDs used later by calendar or email nodes.

3.3 Calendar Nodes (Get, Create, Update, Remove)

Purpose: Manage events in the user’s calendar, while adhering to conflict and duplication rules defined in the Think Tool prompt.

Typical behavior in the template:

  • Get: Retrieve events for a specified time range to detect conflicts.
  • Create: Add a new event, often with attendees, once the Think Tool has:
    • Confirmed that date and time are present.
    • Confirmed there are no conflicting events.
    • Ensured required attendees have email addresses.
  • Update / Remove: Modify or delete events, typically gated by stricter rules in the Think Tool due to higher risk.

Data flow:

  • Input: Time slot, attendee information, event metadata (title, description, location).
  • Output: Event objects, including IDs used for later updates or cancellations.

3.4 Email Nodes (Get Emails, Send, Reply)

Purpose: Retrieve email threads and send or reply to messages with correct threading and recipients.

Typical behavior in the template:

  • Get Emails / Get by Sender:
    • Used when the Think Tool determines that the user wants to reply to an existing thread.
    • Locates the target message and extracts its ID or thread identifier.
  • Send:
    • Used for new emails where no existing thread is referenced.
  • Reply:
    • Used when the Think Tool classifies the request as a reply.
    • Ensures that the correct message ID and threading information are used.

Data flow:

  • Input: Recipient email(s), subject, body, and optionally message ID for replies.
  • Output: Sent message metadata, including IDs for logging or further automation.

4. Configuration & Implementation Notes

4.1 Embedding Rules in the System Prompt

The reliability of the Think Tool depends heavily on the system prompt or agent configuration in the LLM node. Recommended practices:

  • Define domain rules and checks explicitly, such as:
    • Always check for calendar conflicts before creating an event.
    • Always fetch contact information if the email address is missing.
    • Do not delete or modify events without explicit confirmation.
  • Include a checklist of required fields:
    • Date and time for scheduling.
    • Recipient email addresses for emails or invites.
    • Subject and content for messages.
  • Instruct the model to:
    • Use concise, enumerated reasoning.
    • Output a clear decision state (ready / need clarification / blocked).

4.2 Checklist: What the Think Tool Should Verify

Before the workflow proceeds to operational nodes, the Think Tool should systematically verify:

  • All applicable rules and policies for the current request.
  • Presence of required fields:
    • Date and time for scheduling tasks.
    • Recipient email(s) for communication tasks.
    • Subject and message body for emails.
  • Contact lookup strategy:
    • Confirm which sources to query (for example, Slack and CRM by default).
  • Calendar conflict checks:
    • Verify that no existing event occupies the requested slot before creating a new one.
  • Tool call plan:
    • Define the exact sequence of nodes to call.
    • Note expected outputs such as IDs, timestamps, or thread references.
  • Limitations and blockers:
    • Identify steps that cannot be performed.
    • Prepare a clear, user-facing explanation when blocked.

4.3 Branching Logic & Error Handling

To make the Think Tool actionable, the workflow should branch based on its output:

  1. Ready to act:
    • The Think Tool confirms that requirements and rules are satisfied.
    • n8n routes directly to the planned sequence of nodes (contacts, calendar, email, etc.).
  2. Need clarification:
    • Required fields are missing or ambiguous (for example, no date/time, unclear recipient).
    • The workflow sends a follow-up question to the user and waits for a response before re-running the Think Tool or continuing.
  3. Blocked:
    • A rule violation or policy constraint prevents execution (for example, insufficient permissions, disallowed operation).
    • The workflow returns a clear explanation to the user and does not call any state-changing nodes.

This pattern ensures fail-safe behavior by default. When in doubt, the workflow asks for confirmation or stops instead of executing potentially harmful actions.

5. Practical Usage Scenarios

5.1 Example: Scheduling a Meeting with Sarah

Consider a user request: “Schedule a meeting with Sarah tomorrow afternoon.”

  1. Think Tool node:
    • Checks if the user provided a specific date and time.
    • Verifies whether Sarah’s email address is available.
    • Determines whether to fetch contacts from Slack and CRM.
    • Plans to query the calendar for events in the requested time range.
  2. If date/time is missing:
    • The workflow routes to a clarification step that asks the user to specify an exact date and time.
  3. Contact resolution:
    • If Sarah’s email is not known, the workflow calls Slack and CRM contact nodes to retrieve it.
  4. Calendar conflict check:
    • The calendar “Get” node retrieves events for the requested slot.
    • The Think Tool’s plan ensures that any conflict results in a different suggestion or a clarification request.
  5. Event creation and invite:
    • If no conflict is found, the calendar “Create” node creates the event (for example, “Create with Attendee”).
    • An email or calendar invite is then sent to Sarah using the appropriate email node.

5.2 Example: Replying to an Email Thread

For a user request like “Reply to the last email from Sarah

n8n AI Scraping Pipeline: From RSS to Markdown

n8n AI Scraping Pipeline: How One Marketer Turned RSS Chaos Into a Clean Markdown Library

On a rainy Tuesday morning, Mia stared at the dozen browser tabs open across her screen. As the content marketing lead for a fast-growing startup, she had one job that never seemed to end: stay on top of industry news, competitors, and fresh ideas for content.

Every day she copied articles from RSS readers, stripped out ads and navigation, pasted text into a doc, tried to clean up the formatting, and then saved everything into a Google Drive folder. It was slow, repetitive, and easy to mess up. Some days she missed stories. Other days she discovered she had saved the same article three times under slightly different names.

She knew there had to be a better way to automate content extraction, but every scraping solution she tried felt brittle, hard to maintain, or too aggressive for her comfort. She wanted something respectful of site rules, structured, and reliable. That is when she discovered an n8n workflow template called the “AI Scraping Pipeline: From RSS to Markdown”.

The Problem: Drowning in Feeds and Manual Copy-Paste

Mia’s team used RSS feeds for news monitoring, research collection, and competitive intelligence. The feeds were great at surfacing fresh content, but everything after that was manual:

  • Checking multiple RSS feeds several times a day
  • Opening each article in a new tab
  • Copying and pasting the main text into a document
  • Removing headers, menus, ads, and unrelated sections
  • Saving each article in Google Drive, hoping the naming made sense later

Her goals were clear. She needed to continuously collect new articles from multiple RSS feeds, extract only the main content, store everything as standardized Markdown files, and schedule the whole process so it ran without her.

The question was how to build a scraping pipeline that did all of this without breaking, overloading sites, or turning into a maintenance nightmare.

The Discovery: An n8n Template Built for RSS-to-Markdown Automation

While searching for “n8n scraping RSS to Google Drive”, Mia found a template that sounded like it had been written exactly for her use case: an n8n-based AI scraping pipeline that reads RSS feeds, calls Firecrawl to scrape article content, converts the result to Markdown, and uploads each article into a Google Drive folder.

What caught her attention was not just the automation itself, but the structure:

  • RSS feeds as the starting point instead of raw homepage scraping
  • Firecrawl used to extract only the main content and return Markdown
  • Automatic conversion into .md files
  • Uploads directly into a dedicated Google Drive folder
  • Support for scheduled runs so she would never again forget to check a feed

She realized this was more than a quick hack. It was a repeatable scraping pipeline that could become the backbone of her research archive.

The Plan: Turning a Template Into a Daily Workflow

Mia decided to test the template in her own n8n instance. Her goal was simple: by the end of the week, she wanted a fully automated content collection process that would:

  • Pull fresh items from multiple RSS feeds
  • Scrape only the primary article content
  • Save everything as clean Markdown files
  • Store those files in a single, well-organized Google Drive folder

To get there, she followed a clear sequence of steps that the template already laid out, but she wove them into her own workflow logic.

Rising Action: Building the Pipeline Step by Step

Step 1 – Scheduling the Workflow With n8n Schedule Triggers

The first thing Mia configured was timing. The template used Schedule Trigger nodes to control how often the pipeline runs. By default, it was set to trigger every 3 to 4 hours.

That suited her needs. She wanted regular updates, but she also wanted to respect the target sites’ crawling rules. So she:

  • Kept the interval at every 4 hours for high-volume feeds
  • Set longer intervals for smaller or less frequently updated sources

Now, instead of remembering to check feeds, n8n would wake up on its own and start the process.

Step 2 – Fetching RSS Feeds as JSON With HTTP Request Nodes

Next, she configured the HTTP Request nodes that read each RSS feed. The template expected the RSS feeds to be available as JSON, often via a service like rss.app, with a structure that included an items array.

For each feed she used, she:

  • Set the request URL to the JSON version of the RSS feed
  • Confirmed that the response contained an items array
  • Verified that each item had a url field pointing to the article

Using RSS instead of scraping homepages meant the pipeline focused only on fresh content. It reduced server load on the sites and cut down on unnecessary scraping.

Step 3 – Splitting Out Each Feed Item for Individual Processing

Once the JSON was in place, Mia needed to process each article separately. That is where the Split Out nodes came in.

These nodes took the items array and turned each entry into its own execution path. In other words, each RSS item became a separate “job” in the workflow. This allowed the scraper to:

  • Call the article URL independently
  • Run several article scrapes in parallel if needed
  • Handle errors for individual items without breaking the entire run

For Mia, this meant her workflow could scale as she added more feeds and more items without becoming tangled.

Step 4 – Calling Firecrawl With scrape_url to Extract Main Content

At the heart of the pipeline was the content extraction itself. The template used a scrape_url HTTP Request node that made a POST call to Firecrawl, a scraping service designed to pull structured content from web pages.

The request body was configured to ask Firecrawl for multiple formats and to focus only on the main content. The simplified request looked like this:

{  "url": "{{ $json.url }}",  "formats": ["json","markdown","rawHtml","links"],  "excludeTags": ["iframe","nav","header","footer"],  "onlyMainContent": true
}

The key details Mia paid attention to:

  • formats requested JSON, Markdown, raw HTML, and links
  • excludeTags filtered out elements like iframe, nav, header, and footer
  • onlyMainContent was set to true, so Firecrawl focused on the primary article body
  • A prompt and schema in the full template ensured the API returned the exact main content in a structured markdown field

This was the turning point for her. Instead of wrestling with raw HTML and random page elements, she now had clean Markdown content for each article, ready to be stored and reused.

Step 5 – Converting Scraped Markdown Into Files

Once Firecrawl returned the Markdown, n8n needed to treat it like an actual file. The template used a ConvertToFile node to transform the Markdown string into a binary attachment.

Mia configured it to create filenames like news_story_1.md, with the possibility to later add more descriptive naming based on titles or publication dates. This step was crucial, because it turned each article into a portable Markdown file that any downstream tool or workflow could understand.

Step 6 – Uploading Markdown Files to Google Drive

Finally, the Google Drive node took over. It uploaded each generated Markdown file to a designated folder in her company’s shared Drive.

Mia created a dedicated folder for these scraped articles, which made it easy to:

  • Share content with her team
  • Connect other tools to that folder for further processing
  • Keep all research files in one consistent location

By the time she finished this step, she had a complete pipeline: from RSS to scraped content to Markdown files stored in Google Drive, all running on a schedule without her direct involvement.

The Turning Point: From Fragile Manual Process to Reliable Automation

The first full run of the workflow felt like a small miracle. Every few hours, n8n woke up, fetched RSS feeds, split out items, sent URLs to Firecrawl, converted the main content into Markdown, and dropped new files into her Drive folder.

But Mia knew that a solid automation is not just about the happy path. She needed to make sure it was ethical, robust, and scalable. So she refined the pipeline using a set of best practices built into the template.

Making the Pipeline Robust and Responsible

Respecting robots.txt and Terms of Service

Before ramping up, Mia reviewed the robots.txt files and terms of service for each site that appeared in her RSS feeds. She confirmed that:

  • The sites allowed automated access or RSS-based retrieval
  • There were no explicit prohibitions on scraping
  • She used the content primarily for internal research and monitoring

For any ambiguous cases, she decided to either request permission or skip those sources entirely. She wanted her automation to be both powerful and respectful.

Throttling Requests and Handling Rate Limits

To avoid looking like abusive traffic, Mia tuned her workflow settings:

  • She kept schedule intervals sensible instead of running every few minutes
  • She used n8n’s built-in retry parameters like maxTries and waitBetweenTries to gracefully handle temporary failures
  • She paid attention to any rate limit headers from APIs and backed off accordingly

This ensured the pipeline stayed friendly to target servers and did not break whenever there was a temporary network issue.

Filtering and Deduplicating Content

After a few days, Mia noticed that some feeds occasionally re-sent older items. She did not want duplicates cluttering her archive.

So she added a simple deduplication layer before the Firecrawl call:

  • She stored a unique identifier for each article, such as the URL or RSS GUID, in a small database or spreadsheet
  • Before scraping, the workflow checked if that ID had already been processed
  • If it had, the pipeline skipped the item

This “hasBeenProcessed” check kept her Drive folder clean and free of repeated files.

Handling Errors and Getting Alerts

To avoid silent failures, Mia configured the onError behavior in several nodes using continueRegularOutput, so the workflow would not completely stop if one article failed.

She also considered adding a small error-handling branch that would:

  • Log failures in a separate sheet or database
  • Send her an email or Slack message when repeated issues appeared

That way, she could quickly investigate problems without constantly watching the workflow dashboard.

Security, Credentials, and Peace of Mind

As the workflow matured, security became another key concern. The template encouraged using n8n’s credentials system rather than hardcoding any secrets into the flow JSON.

Mia stored her sensitive information as:

  • A Firecrawl API key using bearer or header authentication
  • Google Drive OAuth2 credentials for the upload node

She limited the scope of each credential to only what the workflow needed and set a reminder to rotate keys periodically. She also made sure no secrets appeared in logs or in any shared version of the template.

Scaling the Pipeline as Her Needs Grew

After a successful pilot, other teams in her company wanted in. Product, sales, and research all saw the value in a centralized news and article archive. That meant more feeds, more content, and more load on the pipeline.

To scale beyond a handful of sources, Mia looked at three strategies:

  • Running multiple n8n workers or using n8n cloud or a beefier self-hosted instance
  • Batching items and adding backoff logic to respect target servers during peak times
  • Moving metadata like processed IDs and timestamps into a fast datastore such as Redis or a lightweight database

With these adjustments, the workflow remained stable even as the number of monitored feeds increased.

Enhancing the Workflow With AI and Publishing Integrations

Once the core pipeline was stable, Mia started to think beyond simple archiving. The template suggested several enhancements that mapped neatly to her roadmap.

  • AI-generated tags and summaries After confirming license and usage rights for specific sources, she experimented with using an LLM to auto-generate summaries and tags for each Markdown file.
  • Publishing directly to a CMS For curated content, she considered pushing selected Markdown files into the company’s CMS via API to support quick “news roundup” posts.
  • Vector search across archived articles She explored indexing the Markdown files into a vector database so her team could run semantic search across months of collected content.

What started as a simple “save articles to Drive” automation was slowly becoming a powerful content intelligence layer for her organization.

Troubles Along the Way and How She Solved Them

The journey was not entirely smooth. A few recurring issues surfaced as she experimented with new feeds and sources. The template’s troubleshooting mindset helped her debug quickly.

  • Empty feed items When certain feeds returned no content, she checked that the RSS provider actually returned valid JSON and that the items array existed and matched the template’s expectations.
  • Scrapes returning HTML or missing content For pages where Firecrawl did not isolate the main article correctly, she refined the prompt and adjusted excludeTags to better filter out unwanted elements.
  • Google Drive upload failures When uploads occasionally failed, she verified OAuth consent settings and folder permissions and confirmed that the correct Drive account was used.
  • Duplicate files Any time she spotted duplicates, she improved her pre-check against stored metadata to ensure no article was processed twice.

Each fix made the pipeline more resilient and gave her more confidence to rely on it daily.

Ethical and Legal Considerations She Kept in Mind

Throughout the process, Mia stayed mindful that automated scraping is not just a technical challenge. It also touches copyright, privacy, and platform policies.

She decided on a few rules for her team:

  • Use scraped content primarily for internal research, monitoring, and analysis
  • Only archive or republish content when they had the right to do so
  • Always link back to original sources when referencing content externally
  • Comply with local laws and each target site’s terms of service

This kept her automation aligned with both legal requirements and the company’s values.

How You Can Follow Mia’s Path: Getting Started Checklist

If Mia’s story sounds familiar and you are ready to transform your own RSS chaos into a structured Markdown archive, you can follow a similar path. The template makes it straightforward to get started.

  1. Fork or import the n8n AI scraping pipeline template into your n8n instance.
  2. Configure your credentials:
    • Add your Firecrawl API key via n8n credentials (bearer or header auth).
    • Set up Google Drive OAuth2 and connect it to the upload node.
  3. Set the RSS feed URLs in the HTTP Request nodes, using JSON-based feeds that return an items array.
  4. Choose schedule intervals that match feed frequency and respect target sites.
  5. Run a test with a single feed item, inspect the generated Markdown file, then enable full runs once you are satisfied.

The Resolution: From Overwhelm to a Searchable Markdown Library

Within a week, Mia no longer spent her mornings copying and pasting articles into documents

UGC Ad Creator — n8n Video Automation

UGC Ad Creator – n8n Video Automation

Imagine turning a simple customer photo into a scroll-stopping vertical video ad in just a few minutes, without opening a video editor. That is exactly what this n8n UGC Ad Creator workflow template is built to do.

Using Telegram, a couple of AI models, and a VEO-style video generator, this template takes a user-supplied image and transforms it into a short, natural-looking UGC-style video ad. The result feels like something a real person could have filmed with their phone, not a polished studio production.

What this n8n UGC Ad Creator actually does

At a high level, the workflow:

  • Accepts a photo from a user via Telegram
  • Uses an image-capable LLM to understand what is in the picture
  • Generates a short, filmable UGC script tailored to that image
  • Sends the script and image to a VEO-style video rendering API
  • Delivers the finished vertical video back to the user on Telegram

So instead of manually writing scripts, briefing editors, and waiting for drafts, you can go from idea to ready-to-share UGC video in a single automated flow.

When you should use this template

This UGC Ad Creator workflow is especially helpful if you:

  • Run lots of social ad experiments and need quick variations for A/B tests
  • Offer UGC services to clients and want a semi-automated production pipeline
  • Manage creator or ambassador programs and want an easy way for them to submit photos and get back videos
  • Work on an in-house marketing team and need to turn customer photos into ad concepts fast

Basically, if you are tired of bottlenecks between “cool customer photo” and “live UGC-style ad,” this template will make your life easier.

Why UGC-style video ads matter

UGC-style ads tend to feel more trustworthy and relatable than heavily produced spots. People are used to seeing friends, creators, and everyday users talking to the camera, unboxing products, or casually showing what they use in real life.

This template leans into that. It keeps the process efficient and automated, but still gives you control over:

  • The tone and style of the script
  • How many segments you want in the video
  • Which LLMs and rendering services you plug in

You get speed and scale, without giving up creative direction.

How the workflow is structured in n8n

Inside n8n, the workflow is organized into three main zones. You can think of them as stages in a mini production pipeline.

1. Generate Image

  • Listens for photos sent to your Telegram bot
  • Fetches and prepares the image for processing and preview
  • Passes the image to an image-capable LLM for description

2. Video Generation Prompts

  • Combines the user’s instructions with the AI-generated image description
  • Uses a prompt chain (such as Anthropic or Claude-style model) to create a two-part UGC script
  • Outputs a structured JSON object that is ready for the video renderer

3. Generate & Output Video

  • Sends the script and original image URL to a VEO-style video generation API
  • Polls the service until rendering finishes
  • Merges clips if needed and returns the final video to the user on Telegram

Let us walk through each step in more detail so you know exactly what is happening behind the scenes.

Step-by-step walkthrough of the n8n workflow

Step 1: Telegram trigger and image intake

Everything starts in Telegram. The workflow uses a Telegram Trigger node that listens for incoming photos sent to your bot.

When someone sends an image, the workflow:

  • Uses a Set node to store your Telegram bot token so the workflow can access files correctly
  • Calls the Telegram “Get a file” node to retrieve the file path for the uploaded photo
  • Sends a confirmation message back to the user and asks for extra instructions such as:
    • Preferred style (casual, energetic, informative, etc.)
    • Product or brand to highlight
    • Desired tone or target audience

Those user instructions are later combined with the AI-generated image description to shape the final script.

Step 2: Describe the image with an image-capable LLM

Next, the workflow passes the image to an image-capable language model. This could be an endpoint from providers like OpenRouter or Gemini that can “see” the image and describe it in detail.

The model is prompted to identify things such as:

  • The setting or background (kitchen, office, outdoors, etc.)
  • Visible people or subjects
  • Objects and products in the frame
  • Colors, lighting, and any clear actions

One important constraint is baked into the prompt: the script must only reference elements that are actually present in the image. No imaginary props, no random locations, nothing that would make the final video feel off or unrealistic.

Step 3: Generate a filmable UGC script

Now comes the fun part. A chained LLM step, typically using an Anthropic or Claude-style model, receives:

  • The user’s Telegram instructions
  • The structured description of the image

Based on that, it creates a two-segment UGC script designed to be filmable and realistic. Each segment is roughly 7 to 8 seconds long and includes:

  • Camera movement directions
  • Specific actions that only use visible elements in the original image
  • Natural-sounding dialogue written in single quotes

The response is not just free text. A structured output parser node in n8n ensures the LLM output follows a strict JSON schema. That structure is what makes it easy to hand off the script to the video renderer without manual cleanup.

Step 4: Generate and deliver the video

Once the script is ready, the workflow sends it to a VEO-compatible video generation endpoint. In the template, this is configured with a KIE/VEO-style API, but you can swap in other compatible renderers.

The node passes along:

  • The structured two-segment script
  • The original image URL, so the renderer can align lighting and composition
  • Video settings such as aspect ratio (9:16 for vertical videos by default)

From there, the workflow:

  • Polls the video generation endpoint until the rendering task completes
  • Collects the resulting video URLs
  • Merges multiple clips when needed
  • Sends the final video back to the user directly in Telegram

From the user’s perspective, they just send a photo, answer a quick prompt, and receive a short UGC-style ad in return.

What you need to run this n8n template

Before you hit “Execute workflow,” make sure you have the following pieces ready.

  • n8n instance – either self-hosted or n8n cloud
  • Telegram bot token from BotFather to accept image uploads
  • API access to an image-capable LLM such as OpenRouter, Gemini, or similar
  • An LLM for script generation, for example Anthropic/Claude or another chainable model
  • A video rendering API that accepts an image plus script input in a VEO-style format

Configuration tips

  • Store your Telegram bot token in the Edit Fields or Set node so file downloads use the correct path.
  • Use short wait or poll intervals while testing, then increase them in production to avoid hitting rate limits on the video or LLM providers.
  • Set the video aspect ratio to match your main platform. The template defaults to 9:16 for vertical social content.

Ideas to customize the workflow

Out of the box, the template works well, but you are not locked into the defaults. Some easy customizations include:

  • Swap LLM models to balance speed, cost, and quality. Use a lower-latency model for quick iterations or a higher-end one for final assets.
  • Change the script length by adjusting the prompt to create 3 segments instead of 2 for longer ads, or shorter segments for Reels and Stories.
  • Add a moderation step that checks for disallowed content such as nudity, weapons, or policy-violating text before generating videos.
  • Localize dialogue by prompting the LLM to output in different languages or adapt to regional expressions.
  • Insert a human review stage, for example sending draft scripts to a review channel, before they are passed to the renderer for brand-sensitive work.

Best practices for high quality UGC-style videos

Want your automated UGC ads to feel as real as possible? A few simple habits make a big difference.

  • Use clear, well-lit photos. The video renderer relies heavily on what it can see. Better input images mean more believable motion and interactions.
  • Keep actions physically plausible. The prompts are designed so subjects only interact with visible elements, which avoids weird or impossible movements.
  • Ask users for context. Encourage them to mention the product name, target audience, or desired mood in their Telegram message to improve script relevance.
  • Iterate on prompts. Small tweaks to wording can lead to more natural dialogue or better camera directions, so do not be afraid to refine over time.

Troubleshooting common issues

Things do not always work on the first try. Here are some frequent issues and how to fix them.

  • No file path from Telegram: Check that:
    • Your bot token is correct
    • You are using the right photo index (for example photo[2] or photo[3]) depending on the size you want
  • LLM returns unstructured text instead of JSON: Make sure the structured output parser node is properly connected and that the prompt clearly specifies the required JSON schema and format.
  • Video generation fails or times out: Try increasing polling intervals, verify your video provider’s API limits, and confirm that the image URL is publicly accessible to the renderer.
  • Rendered actions look strange: Tighten the LLM prompt to avoid impossible actions and optionally request more explicit camera movement instructions.

Real-world use cases

Here are a few ways teams typically use this UGC Ad Creator workflow:

  • Rapid prototyping for social ads – Generate multiple UGC variations from a batch of customer photos and quickly test which angles perform best.
  • Automated UGC for creator marketplaces – Let creators submit a single image and receive a ready-to-share vertical video they can post or pitch to brands.
  • In-house marketing automation – Turn idea-to-execution into a same-day process for TikTok, Instagram, and Shorts campaigns.

Privacy and compliance considerations

Since this workflow processes user images and potentially personal data, it is important to think about privacy from the start.

  • Be transparent. Tell users how their images will be used and get consent where required.
  • Limit storage. Avoid keeping images or temporary files longer than necessary. Clean up after processing.
  • Sanitize personal data. Make sure LLM outputs do not unnecessarily echo sensitive details and confirm that your setup aligns with platform and regional policies.

Bringing it all together

This n8n UGC Ad Creator template removes a huge amount of friction between “someone sent us a photo” and “we have a usable UGC-style video ad.” It combines:

  • Conversational input via Telegram
  • AI-powered image understanding
  • Structured, filmable script generation
  • Automated video rendering and delivery

Instead of juggling tools and waiting on manual edits, you get a streamlined, repeatable workflow that still leaves room for creative control and brand safety.

Try the template in your own n8n setup

Ready to see it in action? Here is a simple way to get started:

  1. Import the UGC Ad Creator template into your n8n instance.
  2. Connect your Telegram bot token and API credentials for the LLMs and video renderer.
  3. Send a test image via Telegram, add a short brief, and watch the workflow generate your first UGC video.

If you want help tuning the prompts, picking the right models, or integrating a specific rendering service, feel free to reach out or drop a comment. It is often just a few tweaks to tailor the workflow to your brand, budget, and platform mix.

Call to action: Import the UGC Ad Creator template into n8n, connect your APIs, and generate your first UGC-style video today. Need help with setup or custom integration? Get in touch for a guided walkthrough.

Fixing “Could not load workflow preview” in n8n

If you have ever opened an n8n workflow or custom node and been greeted with the message “Could not load workflow preview. You can still view the code and paste it into n8n”, you know how annoying it can feel, especially when you are in the middle of building or debugging. The good news is that this error is usually very fixable with a few targeted checks.

In this guide, we will walk through what is actually going on behind that message, why previews sometimes fail, and a practical checklist you can follow to get your custom nodes (including ones like n8n-nodes-mcp) showing up properly again. Think of it as a friendly debugging companion you can keep open next to your editor.

What this n8n error really means

When n8n shows “Could not load workflow preview”, it is basically saying: “I can see the workflow JSON and node references, but I cannot safely render them inside the editor.”

The preview you see in the n8n editor is generated from two main things:

  • Your workflow JSON
  • The node definitions that n8n is able to load from your installed or custom node packages

If anything goes wrong while loading those node bundles or resolving their metadata, the editor gives up on the preview and falls back to letting you view the raw JSON instead.

Most common reasons the workflow preview fails

There are a handful of issues that cause the majority of these preview errors. In almost every case, the root problem is related to how your custom node bundle is built, loaded or configured.

  • Missing or invalid node bundle – the custom node package did not compile, or the main entry is wrong or missing, so n8n cannot load the node metadata.
  • Dependency mismatch – your node package is using a different Node.js runtime version or incompatible versions of n8n-workflow or other peer dependencies.
  • Build / TypeScript issues – TypeScript was never compiled to JavaScript, or the bundler failed and left you with no usable JS output.
  • Runtime errors on import – the node throws an error as soon as n8n tries to require or import it, for example due to syntax errors or missing imports.
  • Incorrect placement or configuration – n8n simply cannot find your custom node because it is in the wrong folder or not referenced correctly in your n8n setup.

The rest of this article is about how to narrow down which of these is happening in your case and how to fix it as quickly as possible.

First things to check when you see “Could not load workflow preview”

Before diving into deep debugging, a couple of quick checks can often point you straight to the problem.

  • Check your browser devtools console
    Open the console on the page where the preview fails. Look for the first error message or stack trace. It often points directly to a missing bundle, a failing import or a bad script.
  • Look at your n8n server logs
    Check the terminal where n8n is running or your Docker logs. If needed, increase verbosity by setting:
    N8N_LOG_LEVEL=debug

    Then restart n8n and watch what happens when you open the workflow.

  • Confirm your Node.js version
    Make sure your runtime matches what n8n and your custom node expect. For modern n8n versions, Node 18 or higher is usually required.
  • Verify the custom node build output
    Open the folder for your custom node package and confirm:
    • A build folder (often dist) exists.
    • There is a package.json with a valid main or module field pointing to compiled JavaScript.

Step-by-step troubleshooting guide

Let us walk through a practical sequence you can follow. You do not have to do every step in every situation, but going down this list usually uncovers the issue.

1. Make sure Node and n8n versions are compatible

Version mismatches are a very common source of strange, hard-to-understand errors. Start by confirming which Node.js version you are actually using:

node -v
# If using nvm
nvm use 18

For many setups in 2024 and beyond, Node 18 or newer is expected by n8n and by most custom node bundles. If you are on an older version, upgrade or switch via nvm and restart n8n.

2. Inspect package.json and check the built output

Your custom node package, for example n8n-nodes-mcp, needs to expose a JavaScript file that n8n can require. That is controlled by package.json and your build step.

Open package.json in your custom node and verify:

  • main points to a JavaScript file, such as dist/index.js.
  • A build or dist folder exists and actually contains compiled JS files.

If your repository only has .ts files and no compiled .js, n8n will not be able to load your node.

Typical build steps for a TypeScript-based node look like this:

# Install dependencies
npm install

# Build the project
npm run build

# Or, if the project uses tsc directly
npx tsc

If the build fails, read through the error messages carefully. Common culprits include missing type definitions, incorrect import paths or misconfigured Babel / TypeScript settings. Fix those, rebuild, and check that the expected JS files appear in the output folder.

3. Check peerDependencies and n8n-workflow compatibility

Many custom n8n nodes declare peerDependencies so they can rely on the versions already installed by n8n instead of bundling their own copies. A mismatch here can easily cause runtime errors that break the preview.

What to look at:

  • Open package.json (and optionally your lockfile) and find the peerDependencies section.
  • Check the declared version of n8n-workflow and confirm it is compatible with the n8n version you are running.
  • If versions are out of sync, align them by upgrading or downgrading the custom node package or by adjusting the peer dependency range.

For example, you might see something like:

peerDependencies: { "n8n-workflow": "*" }

A wildcard like this can work, but you should still be sure the actual runtime version of n8n-workflow matches what your code expects.

4. Rebuild your node and restart n8n

Once you have fixed any build or dependency issues, rebuild the package and restart n8n so it can rescan the custom nodes. This step is easy to forget, and then nothing seems to change.

# Local development example
npm run build
npm restart n8n

# Docker example (replace container name if needed)
docker restart n8n

If you are using n8n Desktop or another GUI-based setup, stop the server, start it again, then refresh the editor page with a hard reload (for example, Ctrl+F5) to clear cached bundles.

5. Turn on detailed logging and watch for runtime errors

Sometimes the preview fails because of an error that only shows up in logs, not directly in the UI. In those cases, enabling debug logging is incredibly helpful.

export N8N_LOG_LEVEL=debug
n8n start

Then trigger the problem again by opening the workflow preview. Watch the logs for any errors that mention your custom node or its files.

At the same time, keep an eye on the browser console. Look for messages like:

  • Uncaught ReferenceError
  • TypeError

These often include a stack trace pointing to your node bundle or a specific import that could not be resolved. That first error is usually the most important clue.

6. Validate your node metadata and description structure

n8n uses metadata that each node exports to render the node in the editor. If the description object is malformed or throws an error during import, the preview cannot be rendered.

A couple of guidelines for safe node metadata:

  • Make sure the exported description object is valid and does not rely on code that might throw during module import.
  • Avoid running heavy or asynchronous logic at the top level of the module. Keep side effects inside the execute() method or other runtime functions.

If metadata loading fails, the editor cannot safely show your node, which leads to the preview error you are seeing.

Example checklist for a typical TypeScript custom node

If you are working with a TypeScript-based custom node, here is a quick checklist you can use as a sanity check:

  1. Run node -v and confirm Node is version 18 or higher.
  2. Run npm ci or npm install and ensure it completes without errors.
  3. Run npm run build and verify that it succeeds and produces a dist folder.
  4. Open package.json and confirm main points to something like dist/index.js.
  5. Restart the n8n server after building so it reloads the updated bundle.
  6. Check server logs and the browser console to make sure there are no require/import errors related to your node.

Special considerations for monorepos and workspace setups

If your project lives inside a monorepo or uses tools like pnpm or Yarn workspaces, resolution can get a bit more complex. Your lockfile or template snippet might show a long list of packages and versions, which is a sign that the dependency graph is being managed at the workspace level.

In these setups, make sure that the environment running n8n can actually resolve your custom node package correctly. A few tips:

  • Confirm that the compiled package is accessible from the n8n runtime, not just from the workspace root.
  • Consider bundling or publishing the compiled node package, then placing that built version directly into the directory where n8n expects custom nodes.
  • Double-check that symlinks or workspace paths are resolved correctly inside Docker or other containerized environments.

When it is ok to just copy the workflow JSON into n8n

Sometimes you just need to keep moving, even if the preview is broken. That is where the “You can still view the code and paste it into n8n” message comes in handy.

Copying the workflow JSON into n8n directly lets you continue testing the workflow logic, even if the editor cannot render the preview. It is a useful workaround when you are blocked, but keep in mind:

  • This does not fix the underlying problem with your custom node bundle.
  • You will still want to go through the build and compatibility checks above to restore a fully working preview.

Quick summary of the most effective fixes

If you want a short recap of what usually solves the “Could not load workflow preview” error, here it is:

  • Make sure the project is built and that JavaScript output is available.
  • Verify that main in package.json points to compiled JS, not raw TypeScript.
  • Check your Node.js version and match it with n8n’s requirements, typically Node 18+.
  • Ensure peer dependencies like n8n-workflow are compatible with your n8n version.
  • Inspect n8n server logs and the browser console, and focus on the first error or stack trace.
  • Restart n8n after making changes so it reloads your custom node bundles.

What to share when asking for help

If you have gone through the checklist and the preview still refuses to load, you might want to ask for help on GitHub, Discord, Stack Overflow or similar communities. To make it easier for others to help you quickly, include:

  • Your n8n version and Node.js version.
  • The first relevant error messages from the server logs and browser console, including stack traces.
  • A snippet of your package.json showing main, scripts and peerDependencies.
  • A short description of your build output, for example a list of files inside your dist folder.

Wrapping up

In most cases, “Could not load workflow preview” in n8n comes down to a loading or runtime issue with your custom node bundle rather than anything wrong with the workflow itself. By confirming your Node and n8n versions, checking the build output, aligning dependencies and reviewing logs, you can usually track down the problem and get your previews working again.

If you are stuck on a specific setup, feel free to share the first browser console error and the relevant part of your package.json or build log. Walking through those details step by step often reveals the exact line that needs to change.

Want a quick sanity check? Share the top two or three lines from your n8n server log or browser console error, and we can pinpoint the minimal fix so you can get back to building.

Automate SERP Analysis with n8n & SerpApi

Automate SERP Analysis with n8n & SerpApi

Every SEO team knows the feeling of chasing rankings by hand. Endless tabs, repeated Google searches, copy-pasting URLs into sheets, trying to keep up with competitors who publish faster than you can analyze. It is tiring, and it pulls you away from the strategic work that really moves the needle.

Automation gives you a different path. Instead of spending hours collecting data, you can design a system that does it for you, every time, in the same reliable way. This n8n workflow template is one of those systems. It automates SERP data collection with SerpApi, crawls top-ranking pages with Crawl4ai, uses OpenAI for competitor analysis, and stores everything neatly in Google Sheets for your team.

Think of it as a starting point for a more focused, data-driven, and calm SEO workflow. Once it is running, you can reclaim your time for strategy, creativity, and growth.

The Problem: Manual SERP Analysis Slows You Down

Manually checking search results feels simple at first, but it does not scale. As your keyword list grows, you quickly run into limits:

  • Checking desktop and mobile results separately is repetitive and easy to forget.
  • Copying URLs, titles, and snippets into spreadsheets takes time and invites mistakes.
  • Digging into each top-ranking page for content and keyword analysis is slow and draining.
  • Sharing findings with your team means more manual formatting, screenshots, and explanations.

Over time, this manual work becomes a bottleneck. It delays content decisions, slows down testing, and makes it harder to respond quickly to competitors.

The Possibility: An Automated SERP Engine Working For You

Now imagine a different setup. You type in a focus keyword and a country, and a few minutes later you have:

  • Desktop and mobile SERP data collected in one run.
  • Top-ranking pages crawled and their content cleaned and ready to analyze.
  • Competitor content summarized and broken down into focus keywords, long-tail keywords, and n-grams.
  • FAQs and related questions extracted and stored for content ideas and schema.
  • Everything saved into organized Google Sheets that your whole team can access.

This is what the SERP Analysis Template in n8n gives you. It is not just a workflow. It is a mindset shift. You move from “I have to do this every time” to “I have a system that does this for me.” Once that shift happens, you start to see other parts of your work that can be automated too.

The Tool: Inside the n8n SERP Analysis Template

The template is designed as a modular pipeline that you can understand quickly and customize over time. It uses:

  • Form Trigger to start the workflow with a focus keyword and country.
  • SerpApi to fetch desktop and mobile SERP results in parallel.
  • n8n Set and Merge nodes to extract and combine organic results and FAQs.
  • Limit and Remove Duplicates to keep your crawl and analysis efficient.
  • Crawl4ai to crawl top results and return cleaned HTML plus metadata.
  • Markdown conversion to turn HTML into readable text.
  • OpenAI to generate summaries, focus keywords, long-tail keywords, and n-gram analysis.
  • Google Sheets to store SERP and FAQ data for collaboration and reporting.

You can use it as-is to get quick wins, then iterate and adapt it to your own SEO processes.

Step 1: Start With a Simple Trigger

Every powerful workflow starts with a clear, simple input. In this template, that is a form trigger.

The form collects two fields:

  • Focus Keyword
  • Country

This design keeps the workflow flexible. Anyone on your team can launch a new SERP analysis by submitting the form. There is no need to touch the flow logic or edit nodes. You remove friction, which makes it easier to use the workflow daily or on demand.

Step 2: Capture Desktop and Mobile SERPs With SerpApi

Search results are not the same across devices. Rankings, rich snippets, and People Also Ask boxes can differ between desktop and mobile. To stay accurate, the template calls SerpApi twice:

  • One HTTP Request node for device=DESKTOP
  • One HTTP Request node for device=MOBILE

Each request uses the keyword and country from the form:

// Example query params
q = "={{ $json['Focus Keyword'] }}"
gl = "={{ $json.Country }}"
device = "DESKTOP" or "MOBILE"

This dual collection gives you a more complete view of your search landscape and sets you up to make device-aware content decisions.

Step 3: Turn Raw SERP Data Into Structured Insights

Raw API responses are powerful, but they are not yet usable insights. The template uses n8n Set nodes to extract:

  • organic_results for URLs, titles, and snippets.
  • related_questions to capture FAQs and People Also Ask style queries.

It then merges desktop and mobile FAQs into a unified list and removes duplicates. This ensures you keep only unique URLs and unique questions, which makes your analysis cleaner and your Sheets easier to scan.

Step 4: Focus Your Effort With Limits and Deduplication

Smart automation is not about doing everything. It is about doing the right things at scale.

To control cost and processing time, the template uses a Limit node to cap the number of pages you crawl, for example the top 3 results per device. It then uses a Remove Duplicates node so you do not crawl the same URL twice.

This gives you a focused set of pages to analyze while keeping API usage predictable. As you gain confidence, you can increase the limit or adjust it per use case.

Step 5: Crawl Top Pages With Crawl4ai

Once you know which URLs matter, the workflow sends each unique URL to a /crawl endpoint powered by Crawl4ai.

The process looks like this:

  1. Submit crawl jobs for the selected URLs.
  2. Periodically poll the task status with a wait loop.
  3. When a task completes, retrieve:
    • result.cleaned_html
    • Page title
    • Meta description
    • Canonical URL and other useful metadata

The cleaned HTML is key. It removes noise and prepares the content for high quality text analysis with OpenAI.

Step 6: Convert to Markdown and Analyze With OpenAI

Next, the workflow converts the cleaned HTML into Markdown. This gives you readable, structured text that OpenAI can process more effectively.

The OpenAI node, configured as a content-analysis assistant, receives this text and returns:

  • A short summary of the article.
  • A potential focus keyword.
  • Relevant long-tail keywords.
  • N-gram analysis, including:
    • Unigrams
    • Bigrams
    • Trigrams

In one automated pass, you get a structured view of each competitor article. This turns what used to be 30 to 60 minutes of manual reading and note taking into a repeatable, scalable analysis step.

Step 7: Store Everything in Google Sheets for Easy Collaboration

Insights are only useful if your team can see and act on them. The final part of the workflow writes results into Google Sheets.

The template appends SERP analysis to a sheet named SERPs, including columns such as:

  • Position
  • Title
  • Link
  • Snippet
  • Summary
  • Focus keyword
  • Long-tail keywords
  • N-grams

FAQs and related questions are written to a separate sheet for FAQ mining and schema planning. This structure makes it easy to filter, sort, and share insights with content strategists, writers, and stakeholders.

Best Practices to Get the Most From This Template

Protect and Centralize Your API Credentials

Store all credentials in n8n, including SerpApi, Crawl4ai, OpenAI, and Google Sheets. Avoid hard-coding keys inside nodes or templates. This keeps your workflow secure and easier to maintain as your team grows.

Start Small, Then Scale With Confidence

When you first test the workflow, use the Limit node to cap crawled pages to 1 to 3 URLs. This keeps API costs low and makes debugging faster. Once you are happy with the results, gradually increase the limit to match your SEO needs.

Respect Rate Limits and Site Policies

Check the rate limits for SerpApi and Crawl4ai and configure sensible delays. The template includes a 5 second wait loop to prevent throttling and to stay aligned with robots.txt and good crawling practices.

De-duplicate Early to Save Time and Tokens

Use Remove Duplicates nodes before crawling or writing to Sheets. De-duplicating URLs and FAQ questions early reduces processing time, cuts down OpenAI token usage, and keeps your data clean.

Customize the OpenAI Prompt for Your Strategy

The OpenAI node is a powerful place to tailor the workflow to your business. Adjust the system message and prompt to fine-tune:

  • The tone and depth of summaries.
  • The level of keyword detail you want.
  • The structure of the n-gram output.

You can also configure OpenAI to return JSON for easier parsing into Sheets or downstream tools. Treat this prompt as a living asset you improve over time.

Troubleshooting: Keep the Automation Flowing

If something does not work as expected, use this quick checklist:

  • No results from SerpApi: Check that your query parameters are formatted correctly and that your SerpApi plan has remaining quota.
  • Crawl tasks never finish: Confirm that the Crawl4ai endpoint is reachable from n8n and that your polling logic matches the API response structure.
  • Duplicate entries in Google Sheets: Review the Remove Duplicates node configuration and verify that you are comparing the correct field, such as URL or question text.
  • OpenAI errors or timeouts: Reduce input size by trimming non-essential HTML or sending only the main article content to OpenAI.

Practical Ways to Use This SERP Automation

Once this workflow is live, it becomes a reusable engine for multiple SEO tasks:

  • Competitive content research – Summarize top-ranking articles and extract the keywords and n-grams they rely on.
  • Article briefs – Turn competitor n-grams and long-tail keywords into focused outlines for your writers.
  • FAQ and schema discovery – Collect common questions from SERPs to power People Also Ask optimization and FAQ schema.
  • Ranking monitoring – Schedule recurring runs for your target keywords and export trend data to Sheets.

Each of these use cases saves you time, but more importantly, they give you a clearer view of your market so you can make better decisions faster.

Implementation Checklist: From Idea to Running Workflow

To turn this template into a working part of your SEO stack, follow this path:

  1. Import the n8n SERP Analysis Template into your n8n instance.
  2. Configure credentials for:
    • SerpApi
    • Crawl4ai
    • OpenAI
    • Google Sheets
  3. Create Google Sheets with:
    • A SERPs sheet for ranking and analysis data.
    • A separate sheet for FAQs and related questions.
  4. Run an initial test with:
    • One focus keyword.
    • Country=us or Country=de.
    • Limit node set to 1 to 3 URLs.
  5. Review the Google Sheets output, then refine:
    • The OpenAI prompt.
    • The columns you store.
    • The number of results you crawl.

With each iteration, your workflow becomes more aligned with your strategy and more valuable to your team.

Your Next Step: Build a More Automated SEO Workflow

Automating SERP analysis with n8n, SerpApi, Crawl4ai, and OpenAI transforms a manual, repetitive task into a repeatable system. The template gives you a launchpad to:

  • Collect SERP data at scale.
  • Crawl and analyze competitor content with consistency.
  • Generate actionable insights and store them in Google Sheets for easy access.

This is not the final destination. It is a powerful first step. Once you experience how much time and mental energy you save, you will start to see new opportunities to automate briefs, content audits, reporting, and more.

Ready to experiment? Import the template, set up your credentials, and run your first keyword. See the data appear in your Sheets, adjust the prompt, and make it your own. If you want a pre-configured version, a walkthrough, or help tailoring the prompts and credentials to your stack, reach out. We can help you integrate this workflow into your existing processes and optimize it for your SEO goals.

Start with one automated workflow today, and let it be the foundation for a more focused, automated, and growth-oriented way of working.

Build an SEO Data Analyst with n8n & LangChain

Build an SEO Data Analyst with n8n & LangChain

The day Mia realized her SEO strategy could not keep up

Mia stared at the Search Console dashboard for the third time that morning. As the lead SEO strategist for a fast-growing SaaS company, she had more data than ever before. Impressions were rising, new queries were appearing daily, and the content team kept shipping new pages.

Yet traffic growth had stalled.

Every month she ran the same routine: export Search Console data, push it into Google BigQuery, manually compare keywords to page content, then write long recommendation docs for writers. It worked, but it was slow, repetitive, and impossible to scale across hundreds of URLs.

She knew there were high-impression keywords buried in the data that her content did not properly target. She knew some pages were ranking despite being under-optimized. She also knew she did not have the hours to keep auditing everything by hand.

That was the moment she decided she needed something more than spreadsheets and manual audits. She needed an automated SEO Data Analyst.

Discovering a different way to do SEO audits

Mia had heard of n8n before, mostly as an automation tool developers liked. One afternoon, while searching for ways to automate SEO workflows, she stumbled on a template that promised to do exactly what she needed: combine n8n, LangChain or another LLM integration, Google BigQuery, and a Website Agent to act as a tireless SEO analyst.

The idea sounded almost too good to be true. This automated workflow would:

  • Pull high-impression queries from Search Console data stored in BigQuery
  • Crawl pages and analyze their actual content with n-gram analysis
  • Compare what users search for with what the page says
  • Generate prioritized, human-friendly recommendations for keyword integration
  • Run at scale without repeating the same manual work every week

If it worked, Mia could stop drowning in exports and instead focus on strategy. So she decided to test the template on a handful of her most important landing pages.

Meet the cast: the tools behind Mia’s SEO Data Analyst

Before she could bring this automated analyst to life, Mia had to understand the main components that would power it.

n8n as the conductor of the workflow

n8n would be the central orchestrator. Every step in the SEO audit would be represented as a node: triggers, API calls, LLM prompts, database queries, and crawler actions. With n8n she could:

  • Trigger the workflow from a chat-like interface, a schedule, or a manual input
  • Connect to OpenAI or another LLM via LangChain
  • Run BigQuery queries to fetch Search Console data
  • Call a Website Agent to crawl and analyze pages

Instead of juggling multiple tools separately, n8n would stitch them together into one cohesive automation.

LangChain or LLM integration as the analyst brain

The heart of Mia’s new system would be a language model. Through LangChain or a similar LLM integration, it would behave like an SEO analyst that never got tired. Inside the n8n workflow, this LLM would be invoked as an “agent” that could:

  • Interpret Mia’s requests, such as “analyze this URL” or “give me a site-wide report”
  • Summarize crawled page content into concise overviews
  • Perform n-gram analysis on page text to detect common 1-3 word phrases
  • Compare search queries to page content to find keyword gaps
  • Produce clear, prioritized recommendations in natural language

Instead of handing Mia raw SQL or dense data tables, the LLM would translate everything into business-friendly insights.

Google BigQuery as the SEO data warehouse

Mia already had her Search Console exports flowing into Google BigQuery. This made it the ideal source of truth for search performance. In the new workflow, BigQuery would:

  • Store aggregated query data from Search Console
  • Provide metrics like impressions, clicks, CTR, and associated pages
  • Allow filtering by date range, country, device, and anonymization flags
  • Return only the most relevant queries for each URL or for the entire site

Instead of Mia manually writing SQL each time, the workflow would run standardized queries and feed summaries to the LLM.

Website Agent as the on-demand crawler

To understand how well a page matched search intent, Mia needed more than just keywords. She needed to see what was actually on the page. The Website Agent in her n8n workflow would:

  • Scrape a given URL
  • Extract the title and meta description
  • Capture the main body content
  • Run n-gram analysis to surface common 1-3 word phrases

This combination of structural data and phrase frequencies would make it easy for the LLM to see which search queries were already covered and which were missing entirely.

Rising action: Mia runs her first automated SEO audit

With the template connected to her BigQuery project and crawling service, Mia was ready. She decided to start small with five key landing pages that drove most of her signups.

Step 1 – A simple request starts the workflow

Instead of opening a spreadsheet, Mia opened n8n. The workflow was configured to accept different types of triggers:

  • A chat-style message like “Analyze this URL”
  • A scheduled job for weekly or monthly audits
  • A manual input where she could paste a list of URLs

She entered one of her highest value URLs. Behind the scenes, the first node identified that she wanted a single-page analysis rather than a full site-wide report, then passed the URL to the next steps.

Step 2 – The Website Agent crawls and analyzes the page

Next, the Website Agent node spun into action. For that URL it returned:

  • The current page title
  • The meta description
  • A summary of the main content
  • N-gram frequencies showing the most common 1-3 word phrases

Mia had done this kind of analysis manually before, but now it appeared automatically in the workflow output. She could already see which phrases the page leaned on most heavily.

Step 3 – BigQuery reveals what users are actually searching

Then the BigQuery node kicked in. Using her Search Console exports, the workflow pulled:

  • Top queries associated with that URL or the broader site
  • Impressions and clicks for each query
  • Filters based on her chosen date range, country, and device
  • Exclusion of anonymized queries and discover data for cleaner insights

The workflow focused on high-impression, meaningful search terms. These were the keywords that represented real demand, and they would form the basis of the opportunity analysis.

Step 4 – The LLM compares content and queries

This was the part Mia had always wanted to automate. The LLM agent received two key inputs:

  • The n-gram data from the crawled page
  • The query performance data from BigQuery

It then compared the two, searching for gaps. If a query had high impressions but appeared rarely or not at all in the page content, it flagged it as a missed opportunity. If a query already matched the page well, it marked it as aligned and lower priority.

Instead of Mia manually scanning columns and highlighting cells, the LLM handled this comparison at machine speed.

Step 5 – Turning data into a human-friendly SEO report

The final step of the workflow was to deliver insights that Mia and her content team could actually act on. The LLM generated a structured, business-friendly report that included:

  • A quick page analysis with title, meta description, and summary
  • The top n-grams that defined the current content
  • Top Search Console queries for the URL with clicks and impressions
  • A list of recommended keywords to integrate
  • Suggested locations to add those keywords, such as title, H2s, body copy, or meta description
  • Priority scores based on impressions, clicks, and how poorly or well each query was currently covered

Instead of raw SQL or dense tables, Mia saw sentences like:

  • “Queries with high impressions but low presence in page content: ‘SEO checklist’, ‘seo audit’ – suggested to add in H2 and a FAQ.”
  • “Top-performing queries driving clicks to this page: ‘best seo tools’ (500 impressions, 30 clicks) – add related terms and an internal link to your tools comparison.”

All the technical data stayed inside the automation. What surfaced to Mia and her writers were clear, action-oriented recommendations.

The turning point: from manual audits to a scalable SEO analyst

After running the workflow on her first five landing pages, Mia noticed something important. The recommendations were not just accurate, they were consistent. The LLM suggested natural keyword integration, not awkward stuffing. It respected page context and tone, and it highlighted opportunities she had missed in previous manual audits.

She started to refine the workflow with a few best practices in mind:

  • Filtering anonymized data: She made sure anonymized queries and discover data were excluded so recommendations focused on actionable keywords.
  • Smart date ranges: By comparing the last 28 to 90 days, she could see recent trends and growth opportunities instead of outdated queries.
  • Impressions and clicks as signals: High impressions told her where demand existed, while clicks showed relevance and potential.
  • Natural language in content: She instructed the LLM to recommend organic keyword placement in headings, intros, and FAQs, not to push aggressive keyword stuffing.
  • Regular audits at scale: She scheduled the workflow to run periodically so it could re-evaluate pages as user behavior changed.

With these refinements, Mia’s SEO Data Analyst became a trustworthy assistant she could rely on every week.

How Mia used the workflow across different SEO use cases

Closing content gaps on priority landing pages

First, Mia focused on her highest converting landing pages. By running the workflow, she quickly spotted high-impression queries that were not mentioned on those pages at all. Within a few days, her writers updated titles, headers, and body copy to match those search terms more closely, without sacrificing readability.

Finding new content ideas from under-served queries

Next, she pointed the workflow at a broader set of pages. By aggregating queries that appeared frequently in Search Console but were weakly covered across the site, she uncovered entire topic clusters that deserved new content. These gaps turned into new guides, FAQs, and comparison pages that targeted real user demand.

Automated SEO monitoring and quality assurance

Finally, Mia configured a scheduled version of the workflow. Every week, it checked key URLs and alerted her when:

  • Important queries started losing visibility
  • New high-impression queries appeared that the content did not yet cover

Instead of reactive firefighting, she had an early warning system that kept her SEO strategy aligned with evolving search behavior.

Lessons learned: implementing the n8n SEO Data Analyst template

Looking back, Mia was glad she did not try to automate everything at once. She followed a few practical guidelines that made the rollout smoother:

  • Start small: She began with a handful of high-priority pages to validate that the workflow, BigQuery queries, and LLM prompts produced useful results.
  • Secure credentials: She stored all BigQuery and crawling service credentials securely inside n8n so the automation could run safely.
  • Deterministic LLM settings: She set a lower temperature for the LLM to keep the analysis consistent from run to run.
  • Map URLs to owners: Internally, she kept a mapping of page URLs to content owners so the workflow’s recommendations could be routed directly to the right person.

With these foundations in place, scaling to more pages became straightforward.

Resolution: a repeatable, scalable SEO analyst in your stack

In a matter of weeks, Mia had turned a painful, manual audit process into an automated system that worked around the clock. Her SEO Data Analyst built with n8n and LangChain transformed raw Search Console signals into clear, prioritized content improvements.

By combining page-level content analysis with query performance data from BigQuery and a Website Agent crawler, she gained a reliable roadmap for integrating high-value keywords and improving organic performance. Her team stopped guessing which terms to target and started implementing changes backed by data and automation.

If you see yourself in Mia’s story, you can follow a similar path:

  • Pick 5 high-priority landing pages
  • Connect your Search Console data to Google BigQuery
  • Use the n8n SEO Data Analyst template to run your first automated audit

Within a single afternoon, you can have your own SEO analyst quietly working in the background, surfacing opportunities you might otherwise miss.

Call to action: If you want a ready-to-run template or hands-on help adapting it to your stack, reach out to our team to customize and deploy the SEO Data Analyst workflow for your site.

Automate RAG with n8n: Google Drive to Pinecone Chatbot

Automate RAG with n8n: Turn Google Drive PDFs into a Pinecone-Powered Chatbot

Imagine dropping a PDF into a Google Drive folder and, a few minutes later, being able to ask a chatbot questions about it like you would a teammate. No manual copy-paste, no tedious indexing, no complicated scripts.

That is exactly what this n8n workflow template gives you. It watches Google Drive for new PDFs, extracts and cleans the text, creates embeddings with Google Gemini (PaLM), stores everything in Pinecone, and then uses that knowledge to power a contextual chatbot via OpenRouter. In other words, it is a complete retrieval-augmented generation (RAG) pipeline from file upload to smart answers.

What this n8n RAG workflow actually does

Let us start with the big picture. The template automates the full document ingestion and Q&A loop:

  • Watches a Google Drive folder for new PDFs
  • Downloads each file and extracts the text
  • Cleans and normalizes that text so it is usable
  • Splits long documents into chunks that work well with LLMs
  • Creates embeddings with Google Gemini (PaLM) and stores them in Pinecone
  • Listens for user questions through a chat trigger
  • Retrieves the most relevant chunks from Pinecone
  • Feeds that context into an LLM (OpenRouter -> Google Gemini) to generate a grounded answer

The result is a chatbot that can answer questions using your PDFs as its knowledge base, without you having to manually process or maintain any of it.

Why bother automating RAG from Google Drive?

Most teams have a graveyard of PDFs in shared folders: policies, research reports, contracts, training material, you name it. All that information is valuable, but it is effectively locked away.

Doing RAG manually usually means:

  • Downloading files by hand
  • Running ad-hoc scripts to extract and clean text
  • Manually pushing embeddings into a vector database
  • Trying to wire up a chatbot on top

That gets old fast. With this n8n automation, you can instead:

  • Continuously monitor a Google Drive folder for new PDFs
  • Normalize and index content without touching each file
  • Keep Pinecone up to date as documents change or get added
  • Offer a chat interface that returns context-aware answers from your own content

It is ideal when you want a self-updating knowledge base, or when non-technical teammates keep dropping documents into Drive and you want that knowledge to be instantly searchable via chat.

How the architecture fits together

Under the hood, this is a classic RAG setup assembled with n8n nodes. Here is the flow at a high level:

  1. Google Drive trigger watches a specific folder for fileCreated events.
  2. Google Drive download fetches the new PDF.
  3. PDF extraction converts the file into raw text.
  4. Text cleaning removes noise and normalizes the output.
  5. Document loader & splitter breaks the text into manageable chunks.
  6. Embeddings generation uses Google Gemini (PaLM) to create vectors.
  7. Pinecone insert stores embeddings plus metadata for fast similarity search.
  8. Chat trigger listens for incoming user questions.
  9. Query embedding + Pinecone query finds the most relevant chunks.
  10. LLM response (OpenRouter / Gemini) answers using the retrieved context.

Let us walk through each phase in more detail so you know exactly what is happening and where you can tweak things.

Phase 1: Ingesting and cleaning PDFs from Google Drive

1. Watching Google Drive for new files

The workflow starts with a Google Drive Trigger node. You configure it to listen for the fileCreated event in a specific folder. Whenever someone drops a PDF into that folder, n8n automatically kicks off the workflow.

2. Downloading and extracting PDF text

Next comes a regular Google Drive node that downloads the file contents. That file is passed into an Extract From File node, configured for PDFs, which converts the PDF into raw text.

At this point you usually have messy text, with odd line breaks, stray characters, and inconsistent spacing. That is where the cleaning step comes in.

3. Cleaning and normalizing the text

To make the text usable for embeddings, the workflow uses a small Code node (JavaScript) that tidies things up. It removes line breaks, trims extra spaces, and strips special characters that might confuse the model.

Here is the example cleaning code used in the template:

const rawData = $json["text"];
const cleanedData = rawData  .replace(/(\r\n|\n|\r)/gm, " ")  // remove line breaks  .trim()  // remove extra spaces  .replace(/[^\w\s]/gi, "");  // remove special characters
return { cleanedData };

You can adjust this logic if your documents have specific formatting you want to preserve, but this gives you a solid baseline.

Phase 2: Chunking, embeddings, and Pinecone storage

4. Loading and splitting the document

Once the text is cleaned, the workflow feeds it into a document data loader and then a splitter. Long documents are split into chunks so the LLM can handle them and so Pinecone can retrieve only the relevant pieces later.

A common setup is something like:

  • Chunk size around 3,000 characters
  • With some overlap between chunks so you do not cut important sentences in half

You can experiment with these values based on your document type and how detailed you want retrieval to be.

5. Generating embeddings with Google Gemini (PaLM)

Each chunk is then sent to the Google Gemini embeddings model, typically models/text-embedding-004. This step converts each chunk of text into a numerical vector that captures its meaning, which is exactly what Pinecone needs for similarity search.

6. Inserting embeddings into Pinecone

Finally, the workflow uses a Pinecone insert node to push each embedding into your Pinecone index. Along with the vector itself, it stores metadata such as:

  • Source file name
  • Chunk index
  • Original text excerpt

This metadata is handy later when you want to show where an answer came from or debug why a particular chunk was retrieved.

Phase 3: Powering the chatbot with RAG

7. Handling incoming user questions

On the chat side, the workflow uses a Chat Message Trigger (or similar entry point) to receive user queries. Whenever someone asks a question, that text flows into the RAG part of the pipeline.

8. Retrieving relevant context from Pinecone

The query is first turned into an embedding using the same Google Gemini embeddings model. That query vector is sent to Pinecone with a similarity search, which returns the most relevant chunks from your indexed documents.

Typically you will fetch the top few matches, such as the top 3 chunks. These provide the context the LLM will use to ground its answer.

9. Building the prompt and calling the LLM

Next, a Code node assembles a prompt that includes the retrieved chunks plus the user’s question. It might look something like this:

Using the following context from documents:

Document 1:
<text chunk>

Document 2:
<text chunk>

Answer the following question:
<user query>

Answer:

This combined prompt is then sent to the LLM via OpenRouter, typically using a Google Gemini model as the backend. Because the model has the relevant document context right in the prompt, it can answer in a way that is grounded in your PDFs instead of guessing.

Prompt engineering and context strategy

A big part of good RAG performance is how you assemble the context. Here are a few practical tips:

  • Limit the number of chunks you include, for example the top 3, so you stay within token limits and keep the prompt focused.
  • Preserve ordering of chunks if they come from the same document section, so the LLM sees a coherent narrative.
  • Use clear separators (like “Document 1:”, “Document 2:”) so the model can distinguish between different sources.

The provided code node in the template already follows this pattern, but you can refine the wording or add instructions like “If you are not sure, say you do not know” to improve reliability.

Best practices for a solid n8n RAG setup

Once you have the basic pipeline running, a few tweaks can make it much more robust and cost effective.

Chunking and overlap

  • Experiment with 1,000 to 3,000 character chunks.
  • Try 10% to 20% overlap so important sentences are not split awkwardly.
  • For highly structured docs, you may want to split by headings or sections instead of raw character count.

Metadata for better answers

  • Store file name, section or heading, and page numbers in Pinecone metadata.
  • Use that metadata in your final answer to provide source attribution like “According to Policy.pdf, page 3…”.

Cost control

  • Batch embeddings when ingesting many documents to reduce overhead.
  • Pick the most cost-effective embedding model that still meets your accuracy needs.
  • Monitor how often you call the LLM and adjust prompt length or frequency if needed.

Security and access

  • Use least-privilege credentials for Google Drive so n8n only sees what it needs.
  • Store API keys and secrets in environment variables or secret stores, not hard-coded in nodes.

Monitoring and observability

  • Log how many files you process and how many embeddings you create.
  • Set up alerts for ingestion failures or unusual spikes in document volume.

Troubleshooting common issues

PDF extraction gives messy or incomplete text

Some PDFs are basically images with text on top, or they have poor OCR. If extraction returns gibberish or blanks:

  • Add an OCR step (for example Tesseract or a cloud OCR service) before the Extract From File node.
  • When possible, get text-native PDFs or DOCX files instead of scanned documents.

Embeddings feel off or results are not relevant

If the chatbot is returning unrelated chunks, check:

  • That you are using the correct embedding model consistently for both documents and queries.
  • Your chunk size and overlap. Too big or too small can hurt retrieval.
  • Whether you need to index more chunks or increase the number of results you fetch from Pinecone.

Slow Pinecone queries

If responses feel sluggish:

  • Confirm the vector dimension in your Pinecone index matches your embedding model.
  • Consider scaling replicas or choosing a more suitable pod type for your traffic.

Security and compliance: handle sensitive data carefully

When you are embedding internal documents and exposing them via a chatbot, it is worth pausing to think about data sensitivity.

  • Encrypt data in transit and at rest across Google Drive, Pinecone, and your n8n host.
  • Mask or redact PII before embedding if it is not needed for retrieval.
  • Audit who has access to the Google Drive folder and keep a change log for compliance.

Costs and scaling your RAG pipeline

Your main cost drivers are:

  • API calls for embeddings and LLM completions
  • Pinecone storage and query usage
  • Compute resources for running n8n

To keep things scalable and affordable:

  • Batch embedding requests during large backfills of documents.
  • Choose embedding models with a good price-to-quality tradeoff.
  • Monitor Pinecone metrics and tune pod size as your data grows.
  • Use asynchronous processing in n8n for big ingestion jobs so you do not block other workflows.

When this template is a great fit

This n8n RAG workflow shines when you:

  • Have important PDFs living in Google Drive that people constantly ask questions about.
  • Want a self-updating knowledge base without manual indexing.
  • Need a chatbot grounded in your own documents, not just a generic LLM.
  • Prefer a no-code / low-code way to orchestrate RAG instead of building everything from scratch.

You can extend the same pattern to other file sources, databases, or even streaming document feeds once you are comfortable with the basics.

Getting started: from template to working chatbot

Ready to try it out? Here is a simple way to get from zero to a working pipeline:

  1. Import the template into your n8n instance.
  2. Connect credentials for:
    • Google Drive
    • Pinecone
    • OpenRouter / Google Gemini
  3. Point the Google Drive trigger to a test folder.
  4. Run a small test with a few representative PDFs to validate:
    • PDF extraction quality
    • Chunking and embeddings
    • Relevance of Pinecone results
    • Answer quality from the chatbot

As you iterate, you can refine chunk sizes, prompt wording, and metadata to better fit your documents and use cases.

Need a bit more guidance?

If you want to go a step further, you can:

  • Follow a step-by-step checklist to import and configure the workflow correctly.
  • Fine-tune chunk size, overlap, or prompt templates based on your document types.
  • Draft an ingestion policy that covers PII handling and access control.

Next move: import the workflow into n8n, hook it up to Google Drive, Pinecone, and OpenRouter / Gemini, and start indexing your documents. Once you see your first accurate, context-aware answer come back from your own PDF collection, you will wonder how you ever lived without it.