Archive Empty Notion Pages with n8n

Archive Empty Notion Pages with n8n

Your Notion workspace is where ideas are born, projects move forward, and teams stay aligned. Yet over time, it can quietly fill up with blank or half-started pages that never went anywhere. These empty database entries slow you down, clutter your searches, and make it harder to focus on what truly matters.

The good news is that you do not have to clean this up by hand. With a simple n8n automation, you can let your system take care of the mess for you, day after day. In this guide, you will walk through an n8n workflow template that scans your Notion databases, finds pages with empty properties or empty content blocks, and archives them automatically. Along the way, you will see how this one workflow can be a stepping stone toward a calmer, more intentional, and much more automated workspace.

From clutter to clarity: why automate empty page cleanup?

Every unused page is a tiny distraction. One or two are harmless, but hundreds slowly erode your focus. Automating the archiving of empty Notion pages is not just about tidiness, it is about creating an environment that supports deep work and faster decisions.

With this n8n workflow template, you can:

  • Keep your Notion databases clean so search results surface what you actually use.
  • Cut down on manual maintenance and reclaim time for real work.
  • Help your team see only meaningful, actionable items instead of noise.
  • Stay safe while you declutter, since archived pages can be restored in Notion at any time.

Think of this workflow as your personal digital housekeeping assistant. It quietly runs in the background while you stay focused on strategy, creativity, and growth.

Adopting an automation mindset

Before diving into the technical steps, it helps to approach this template with the right mindset. You are not just installing a one-off script, you are starting a journey toward a more automated, self-maintaining workspace.

As you work through this template, consider:

  • What else feels repetitive in your Notion workflows? This template can be your starting point for many more automations.
  • What does “empty” really mean for your team? A page with only a title might be useful for you, or it might be clutter. You get to define the rules.
  • How often do you want your system to self-clean? Daily, weekly, or on demand, n8n lets you choose.

The goal is not perfection on the first try. The goal is to set up something useful, test it safely, learn from the results, and keep refining it until it feels like a natural extension of how you already work.

How the n8n Notion cleanup workflow works

The provided n8n template runs on a schedule and moves through your Notion data in a careful, step-by-step way. It checks both database properties and page content blocks before deciding to archive anything.

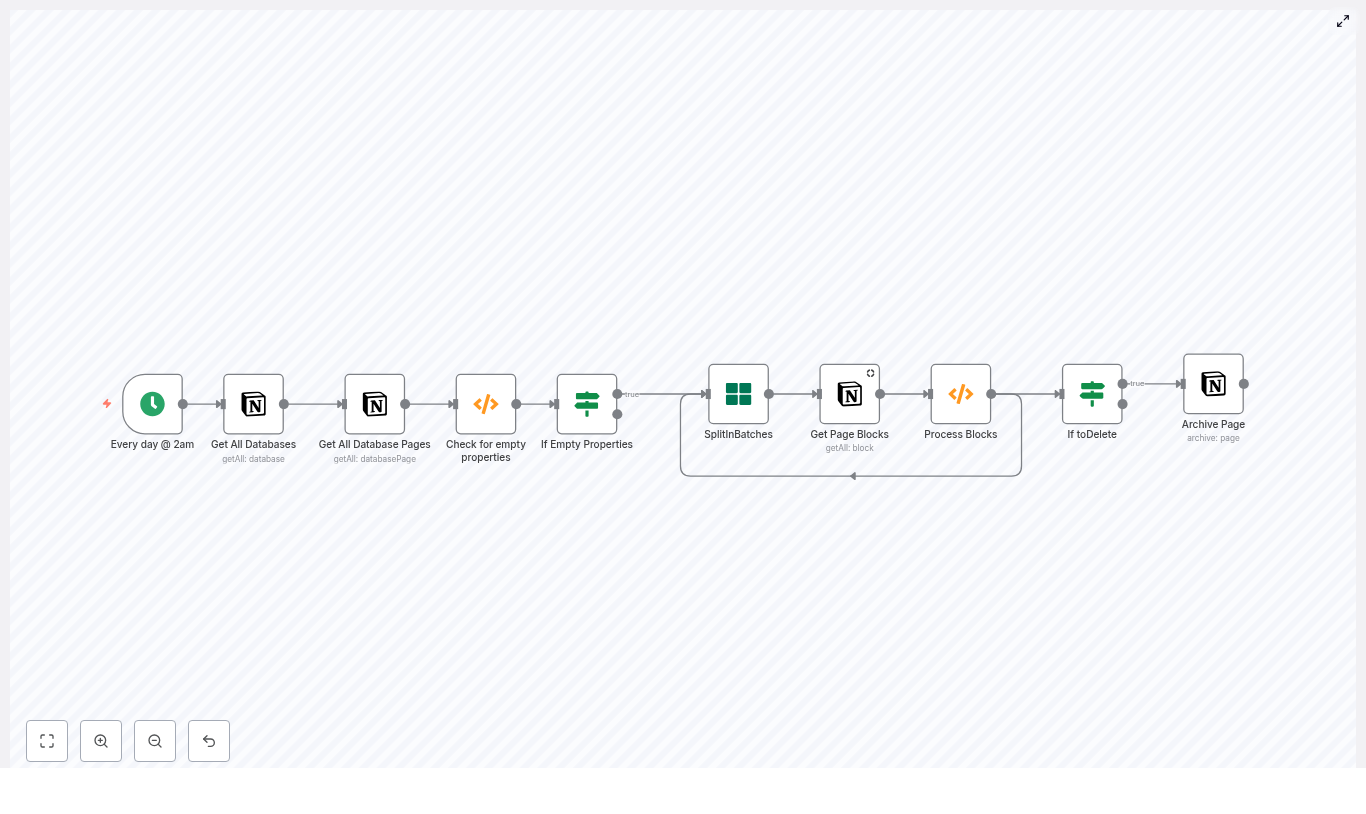
Here is the high-level journey your data takes through the workflow:

  1. Cron Trigger – wakes the workflow on a schedule, for example every day at 2am.
  2. Get All Databases – lists every Notion database accessible to your integration.
  3. Get All Database Pages – pulls all pages from each database, with pagination support.
  4. Check for empty properties (Function) – flags pages whose properties are all empty.
  5. If Empty Properties – routes only those flagged pages to deeper content checks.
  6. SplitInBatches – processes pages one at a time to respect Notion rate limits.
  7. Get Page Blocks – fetches the content blocks that make up the page body.
  8. Process Blocks (Function) – decides whether the page truly has no content and sets a toDelete flag.
  9. If toDelete + Archive Page – archives the page in Notion when it meets your “empty” criteria.

Each of these nodes is configurable, which means you can adapt the template to your own definition of clutter and your own comfort level with automation.

Step 1: Scheduling the cleanup with Cron

Cron node (Every day at 2am by default)

The journey begins with the Cron node. It is the alarm clock that tells your workflow when to run.

In the template, the Cron node is configured to run every day at 2am. This is a safe time for many teams, but you are free to adjust it:

  • Run it weekly if you prefer a slower, more conservative cleanup rhythm.
  • Run it on demand while testing, so you can trigger it manually inside n8n.

By choosing a schedule that fits your team, you turn cleanup into a predictable, low-friction habit instead of a stressful one-off task.

Step 2: Exploring your Notion space with database nodes

Get All Databases

Next, the workflow uses the Get All Databases node to retrieve every database your Notion integration can see. This is your broad sweep across the workspace.

You can refine this behavior by:

  • Adding filters to limit which databases are processed.
  • Creating a dedicated integration that only has access to specific databases you want to clean.

Get All Database Pages

Once the databases are identified, the Get All Database Pages node goes one level deeper and returns the pages inside each database.

Key details:

  • It supports pagination, so large databases are handled safely.
  • When you set returnAll to true, it will fetch all pages in each database.

At this point, you have a complete list of pages that the workflow can evaluate. The next step is to decide which ones are truly empty.

Step 3: Detecting pages with empty properties

Check for empty properties (Function node)

The first filter is based on database properties. This function node loops through each page and checks whether all of its properties are empty. Only those pages get flagged as candidates for deeper inspection.

The template code looks like this:

// Template: Check for empty properties
for (item of items) {  let toDelete = false;  for (const key in item.json.properties) {  let type = item.json.properties[key].type;  let data = item.json.properties[key][type];  if (!data || data.length == 0) {  toDelete = true;  } else {  toDelete = false;  break;  }  }  item.json.toDelete = toDelete;
}

return items;

How it works in practice:

  • The node iterates over each property in item.json.properties.
  • For each property, it checks the value based on its type, for example title, rich_text, select, multi_select, people, files, date, checkbox, and others.
  • If all properties are empty or missing, it sets item.json.toDelete = true.

You can adapt this logic to your own schema. For example, if you have a specific property that always indicates a “real” page when filled, you can prioritize that property in your checks.

If Empty Properties

The If Empty Properties node acts as a gate. Only pages where toDelete is true move on to the next phase, where their content blocks are inspected.

If, for your use case, properties alone are enough to decide that a page is empty, you could even choose to skip the block-level checks and archive immediately. The template gives you both options so you can match your own definition of “empty.”

Step 4: Inspecting page content block by block

SplitInBatches

To protect your Notion API limits and keep the workflow stable, the template uses the SplitInBatches node. It processes pages one at a time, which is especially helpful in larger workspaces.

This node feeds each page into the content inspection step, making sure you do not overwhelm the Notion API with too many calls at once.

Get Page Blocks

For each page that passed the property check, the Get Page Blocks node fetches the actual content blocks that make up the body of the page.

Important behavior to keep in mind:

  • If a page has no blocks, some Notion API versions simply return an empty array.
  • Your processing function needs to handle this case and treat it as an empty page if that matches your rules.

Original Process Blocks function

The first version of the Process Blocks function checks the blocks to see if there is any text content. It sets a pageID and a toDelete flag based on what it finds.

let returnData = {  json: {  toDelete: false,  pageID: $node["SplitInBatches"].json["id"],  }
};

if (!items[0].json.id) {  returnData.json.toDelete = true;  return [returnData];
}

for (item of items) {  let toDelete = false;  let type = item.json.type;  let data = item.json[type];  if (!toDelete) {  if (data.text.length == 0) {  toDelete = true;  } else {  returnData.json.toDelete = false;  break;  }  }  returnData.json.toDelete = toDelete;
}

return [returnData];

This approach works in many cases, but it can fail for pages that contain images, embeds, or non-text blocks. To make your automation more reliable, you can upgrade to a more robust function.

Improved Process Blocks function for richer content

The improved version below is designed to handle more block types and edge cases safely. It checks for non-empty text, media, files, and embeds before deciding that a page is empty.

// Improved block processing
const pageId = $node["SplitInBatches"].json["id"];
let returnData = {  json: { pageID: pageId, toDelete: false }
};

if (!items || items.length === 0) {  // No blocks found -> consider empty  returnData.json.toDelete = true;  return [returnData];
}

// If any block contains non-empty text or is a non-empty media block, keep the page
for (const blockItem of items) {  const block = blockItem.json;  const type = block.type;  const data = block[type];  if (!data) continue;  // Handle rich_text arrays  if (data.rich_text && Array.isArray(data.rich_text) && data.rich_text.length > 0) {  const hasText = data.rich_text.some(rt => rt.plain_text && rt.plain_text.trim().length > 0);  if (hasText) {  returnData.json.toDelete = false;  return [returnData];  }  }  // Media/Files/Embeds count as content  if ((data.files && data.files.length > 0) || (data.external && Object.keys(data.external).length > 0) || (data.url && data.url.length > 0)) {  returnData.json.toDelete = false;  return [returnData];  }  // For paragraph-like blocks, check text  if (data.text && Array.isArray(data.text) && data.text.some(t => t.plain_text && t.plain_text.trim().length > 0)) {  returnData.json.toDelete = false;  return [returnData];  }
}

// No non-empty blocks found
returnData.json.toDelete = true;
return [returnData];

With this function in place, your workflow can confidently distinguish between truly empty pages and pages that contain useful content in different formats.

Step 5: Archiving pages safely with Notion

If toDelete and Archive Page

After both property and block checks, any page that is still flagged with toDelete = true reaches the final step.

Here, the If node checks the flag, and when it is true, the Archive Page node calls the Notion API to archive the page. This removes it from everyday view while keeping it recoverable if you ever need it again.

If you want extra reassurance, you can easily replace the Archive Page node with a “dry run” action at first, for example:

  • Send a Slack message listing the pages that would be archived.
  • Send an email summary to yourself or your team.

Once you are confident in the results, you can switch back to the Archive Page node and enjoy fully automated cleanup.

Testing your workflow with a safe dry-run strategy

Thoughtful testing is what turns this template into a trustworthy part of your system. Here is a simple approach that keeps you in control:

  • Duplicate the workflow in n8n so you have a safe copy for experimentation.
  • Swap the Archive Page node for a Slack or Email node that reports candidate pages instead of archiving them.
  • Run the workflow manually or schedule it for a low-traffic time in your workspace.
  • Review the reported pages and confirm that they are truly empty or unneeded.
  • Adjust the property and block checks if you see false positives, for example treat “title only” pages as valid if you want to keep them.
  • Re-enable Archive Page once you are satisfied and set a schedule that matches your comfort level.

This test-first approach lets you build trust in your automation, step by step, while keeping your data safe.

Customizing the template for your workflow

One of the biggest advantages of using n8n is that you are never locked into a one-size-fits-all setup. You can treat this template as a starting point and shape it around your own rules and priorities.

Ideas to tailor the workflow

  • Protect special pages with tags or checkboxes
    Add a property such as a “Protected” checkbox or a specific tag. In your function nodes or If nodes, skip archiving whenever this property is set.
  • Only archive older pages
    Add a Date property check and compare it to the current date. You might decide to archive only pages older than a certain number of days that are also empty.
  • Move pages to a dedicated “Archive” database
    While the Notion API does not support moving pages directly, you can create a copy in an Archive database and then archive the original. This gives you a curated archive space plus the safety of Notion’s own archive.
  • Log all archived pages
    Send details about each archived page to a Google Sheet or a Slack channel. This creates an easy audit trail and helps you spot patterns in how your workspace is used.

Every small customization makes the workflow feel more like a natural extension of how you already manage projects and knowledge.

Common issues and how to troubleshoot them

As you refine your automation, you might run into some predictable challenges. Here are a few to watch for and how to handle them.

  • Notion rate limits
    If you see 429 errors, add delays or rely on the SplitInBatches node to slow down requests. Processing pages one by one is safer for large workspaces.
  • Different property shapes
    Notion property structures vary by type. Inspect a sample page output from the Get All Database Pages node so you can adapt your checks for title, rich_text, select, multi_select, and other types.
  • Pages with only a title
    Decide whether a title alone counts as content for your use case. If you want to keep such pages, adjust your functions so a non-empty title prevents archiving.

n8n + ERPNext: AI Candidate Shortlisting Workflow

n8n + ERPNext: AI-Powered Candidate Shortlisting Workflow

This reference guide documents an n8n workflow template that integrates ERPNext, automated resume parsing, and an AI evaluation agent (Google Gemini or OpenAI style) to perform first-pass candidate shortlisting. It is written for technical users who want to understand the workflow structure, node configuration, and data flow in detail.

1. Workflow Overview

The workflow automates screening of job applicants created in ERPNext by:

  • Receiving Job Applicant events from ERPNext via webhook
  • Validating that a resume exists and that the applicant is linked to a Job Opening
  • Downloading and extracting resume text (PDF or plain text)
  • Fetching the corresponding Job Opening record and job description from ERPNext
  • Sending resume + job description to an AI agent for fit evaluation
  • Mapping the AI output to ERPNext-specific fields
  • Updating the applicant status (Accepted / Rejected / Hold) and triggering notifications

The template is designed as a reusable automation pattern that can be imported into any n8n instance (self-hosted or cloud) and connected to an existing ERPNext deployment.

2. Architecture & Data Flow

2.1 High-Level Process

  1. Trigger: ERPNext sends a POST request to an n8n Webhook node when a Job Applicant is created.
  2. Validation: If / Switch nodes verify:
    • Presence of a resume file or URL
    • Association with a valid Job Opening
  3. Resume Processing: The workflow downloads the resume and extracts text from PDF or plain text files.
  4. Job Data Retrieval: An ERPNext node retrieves the Job Opening document and its job description.
  5. AI Evaluation: A LangChain / Gemini / OpenAI style node compares resume text with the job description and returns a structured evaluation.
  6. Field Mapping: A Code node parses the AI response and maps values to ERPNext fields (rating, score, fit level, justification).
  7. Status & Notification: Based on score thresholds, the workflow updates the applicant status in ERPNext and optionally sends notifications through email, WhatsApp, SMS, or Outlook nodes.

2.2 Core Integrations

  • ERPNext: Used for Job Applicant and Job Opening records, webhooks, and applicant status updates.
  • n8n: Orchestrates triggers, branching logic, file handling, API calls, and AI integration.
  • AI Provider: Google Gemini or OpenAI, accessed via an agent node (LangChain or native AI node) to perform resume-to-job matching.
  • File Handling: Built-in n8n file and PDF nodes for resume download and text extraction.

3. Node-by-Node Breakdown

3.1 Webhook Node (Trigger)

Purpose: Initiates the workflow when ERPNext creates or updates a Job Applicant and fires a webhook.

  • Input: HTTP POST from ERPNext containing Job Applicant payload (e.g., applicant name, email, resume link, job opening reference).
  • Configuration:
    • Method: POST
    • Path: Custom path configured in ERPNext webhook settings
    • Recommended: Pin the webhook URL during development to avoid changes while testing.
  • ERPNext Setup: Configure a webhook on the Job Applicant DocType, pointing to the n8n webhook URL and sending relevant fields (including resume link and job opening reference).

Edge cases:

  • If ERPNext sends incomplete data (missing job opening or resume link), subsequent validation nodes will handle this and can move the applicant to a Rejected or Hold state.

3.2 Validation Nodes (If / Switch)

Purpose: Ensure that the workflow only proceeds when required data is present.

  • Checks performed:
    • Resume link or file is present in the Job Applicant payload.
    • Applicant is associated with a specific Job Opening document.
  • Typical configuration:
    • If node: Evaluate expressions like:
      • ={{ $json["resume_link"] !== undefined && $json["resume_link"] !== "" }}
      • ={{ $json["job_opening"] !== undefined && $json["job_opening"] !== "" }}
    • Switch node: Optionally used to route different failure modes (missing resume vs missing job opening) to different status updates.
  • Outcomes:
    • If checks pass, the workflow continues to resume download and job opening retrieval.
    • If a check fails, the template can:
      • Set applicant status to Rejected or Hold in ERPNext.
      • Optionally skip AI evaluation and notifications.

3.3 Resume Download & Text Extraction

Purpose: Retrieve the applicant’s resume file and convert it to plain text for AI processing.

  • Supported formats in the template:
    • PDF (non-scanned, text-based)
    • Plain text files
  • Typical node usage:
    • HTTP Request / Binary Download node: Downloads the file from a URL provided by ERPNext.
    • PDF Extract node or similar: Extracts text from PDF files.
    • Text handling node: Handles plain text resumes without conversion.

Important limitation:

  • Scanned image PDFs are not converted by default. They require OCR.

OCR handling (optional extension):

  • If you expect scanned resumes:
    • Add OCR-specific nodes or services to convert JPG/PNG or image-based PDFs to text.

3.4 ERPNext: Get Job Opening

Purpose: Retrieve the Job Opening document that the candidate applied for, including the full job description.

  • Node type: ERPNext node (or HTTP Request node configured with ERPNext API).
  • Input: Job Opening identifier from the Job Applicant payload (e.g., job_opening field).
  • Configuration:
    • DocType: Job Opening
    • Operation: Get record
    • Record ID: Expression referencing the applicant’s job opening field.
  • Output:
    • Job title, job description, and any other relevant fields used for AI evaluation.

The job description is used as the reference text for skills, responsibilities, and requirements that the AI agent compares against the resume.

3.5 Recruitment AI Agent (LangChain / Gemini / OpenAI)

Purpose: Evaluate the candidate’s resume against the job description using an AI model and return a structured assessment.

  • Node type: AI agent node (e.g., LangChain integration) configured to call Google Gemini or OpenAI.
  • Inputs:
    • Extracted resume text.
    • Job description from the Job Opening record.
  • Expected structured output fields:
    • Fit Level: Strong / Moderate / Weak
    • Score: 0-100
    • Rating: 0-5
    • Justification: Concise explanation of the evaluation.
  • Prompt design:
    • Use a clear system prompt that:
      • Defines scoring thresholds and what Strong / Moderate / Weak mean.
      • Specifies the numeric ranges for score and rating.
      • Enforces a consistent response format that the Code node can parse.
    • The template includes a ready-made prompt optimized for recruitment analysis.

Error handling considerations:

  • If the AI provider returns an error (rate limit, timeout, invalid credentials), you can:
    • Use n8n error workflows or additional nodes to log the failure.
    • Fallback to a default status (e.g., Hold) in ERPNext until the issue is resolved.
  • Changes to the prompt or model can alter the response format. This may require updates to the parsing logic in the Code node.

3.6 Code Node: Convert AI Output to ERPNext Fields

Purpose: Transform the AI agent’s textual or JSON-like output into concrete fields compatible with ERPNext.

  • Node type: Code node (JavaScript).
  • Typical tasks:
    • Parse the AI response, which may be structured text or JSON.
    • Extract:
      • fit_level
      • score
      • rating
      • justification
    • Map these values to ERPNext-specific field names:
      • applicant_rating
      • custom_justification_by_ai
      • custom_fit_level
      • custom_score
  • Implementation detail:
    • The template includes an example regex-based extractor to parse the AI output.
    • If you adjust the AI prompt or change the output format (e.g., switch from text to JSON), update the parsing logic accordingly.

Edge cases:

  • Missing or malformed fields from the AI response should be handled gracefully:
    • Use default values (e.g., score 0, fit level Weak) if parsing fails.
    • Optionally route such cases to a manual review queue.

3.7 Update Applicant Status & Notify Candidate

Purpose: Persist AI evaluation results in ERPNext and optionally inform the candidate.

  • Applicant status logic:
    • Based on the numeric score returned by the AI agent, the workflow applies simple rules, for example:
      • score >= 80 → Status = Accepted
      • score < 80 → Status = Rejected or Hold (depending on your configuration)
    • These thresholds are configurable and can be adjusted in the Code node or in a separate decision node.
  • ERPNext update:
    • Using ERPNext or HTTP Request nodes, the workflow:
      • Updates the Job Applicant document with:
        • applicant_rating
        • custom_justification_by_ai
        • custom_fit_level
        • custom_score
        • Updated status (Accepted / Rejected / Hold)
  • Notifications:
    • Once the ERPNext record is updated, you can connect:
      • Email node
      • WhatsApp Business Cloud node
      • SMS node
      • Outlook node
    • These nodes can send tailored messages based on the applicant’s status or score.

Note: Notification content and timing should align with your organization’s recruitment policies and local regulations.

4. Configuration & Setup Checklist

4.1 Prerequisites

  • Operational n8n instance:
    • Self-hosted or n8n cloud.
  • ERPNext environment with:
    • API access enabled.
    • Credentials configured in n8n Credentials Manager.
    • Webhook set up on the Job Applicant DocType, pointing to the n8n Webhook node.
  • AI provider credentials:
    • Google Gemini or OpenAI API key configured in n8n.
    • Agent node correctly linked to these credentials.
  • File extraction nodes:
    • PDF/text extraction nodes configured for resume parsing.
    • Optional OCR integration if you expect scanned-image PDFs or image files.

4.2 Required ERPNext Custom Fields

To store AI evaluation results, ensure the following fields exist on the Job Applicant DocType:

  • justification_by_ai (e.g., Text or Small Text)
  • fit_level (e.g., Select or Data)
  • score (e.g., Int or Float)
  • Existing or custom applicant_rating field (e.g., Int, Float, or Rating-type field)

Field names in the Code node should match these ERPNext fieldnames exactly.

5. Advanced Customization Options

5.1 Scoring Logic & Thresholds

  • Modify score thresholds to match your hiring criteria:
    • Example: 90+ for strong acceptance, 70-89 for review, below 70 for rejection.
  • Adjust how skills, years of experience, or specific technologies influence the score by updating the AI prompt.
  • Implement more complex branching in n8n to:
    • Route high-score candidates directly to interviews.
    • Send medium-score candidates to a manual review queue.

5.2 Additional File Types

  • Extend the workflow to support:
    • DOCX resumes using document parsing integrations.
    • PNG/JPEG resumes via OCR services.

Automated Candidate Shortlisting with n8n & ERPNext

Automated Candidate Shortlisting with n8n & ERPNext

Automate the first stage of recruitment by combining n8n workflows, ERPNext, and an AI-based scoring agent. This reference guide explains an n8n template that validates incoming job applicants, retrieves and parses resumes, evaluates candidate fit with an AI model, and updates ERPNext Job Applicant records, with optional notifications to candidates.

1. Workflow overview

This n8n workflow template is designed to plug directly into ERPNext and handle the initial candidate screening pipeline. At a high level, the workflow:

  1. Receives Job Applicant insert events from ERPNext through a Webhook node.
  2. Validates that a resume is available and that the application is linked to a specific Job Opening.
  3. Downloads the resume file and identifies its type.
  4. Extracts plain text from supported file types (PDF, text).
  5. Combines the job description with the resume text and sends them to an AI agent for scoring.
  6. Maps the AI output to ERPNext custom fields and updates the Job Applicant record via the ERPNext API.
  7. Applies an acceptance or rejection decision based on a score threshold and optionally notifies the candidate (email or WhatsApp).

The template focuses on robust data flow between ERPNext and n8n, clear field mappings, and repeatable AI-driven scoring logic.

2. Architecture & data flow

2.1 Core components

  • Source system: ERPNext (Job Applicant doctype with webhook on insert)
  • Orchestration: n8n workflow (self-hosted or n8n Cloud)
  • AI scoring: LLM provider such as Google Gemini or OpenAI configured in n8n
  • Persistence: ERPNext Job Applicant document fields, including custom fields for AI results

2.2 Event & payload flow

  1. ERPNext triggers a webhook when a new Job Applicant document is inserted.
  2. The n8n Webhook node receives the JSON payload, which typically includes:
    • Applicant name and contact details
    • resume_link or an attachment URL
    • Reference to the related Job Opening (e.g., job opening name or ID)
  3. Validation logic checks the presence of a resume and a linked Job Opening.
  4. The workflow downloads the resume file and identifies its type (PDF, text, etc.).
  5. Supported file types are converted to plain text for analysis.
  6. Job Opening details (especially the job description) are fetched or read from the incoming payload.
  7. Resume text and job description are combined and passed to the AI node.
  8. The AI response is normalized into a structured JSON object.
  9. ERPNext is updated via REST API with status and AI scoring fields.
  10. Optional notification nodes send acceptance or rejection messages to the candidate.

3. Node-by-node breakdown

3.1 Webhook node – receive Job Applicant events

Purpose: Entry point for ERPNext events.

Configuration highlights:

  • HTTP Method: Typically POST.
  • Path: Custom endpoint path, referenced in ERPNext webhook configuration.
  • Response: You can return a simple acknowledgment (e.g., {"status":"received"}) to ERPNext.

ERPNext setup:

  • Create a webhook on the Job Applicant doctype.
  • Trigger on Insert events.
  • Set the webhook URL to the n8n Webhook node URL.
  • Include fields such as:
    • Applicant name
    • resume_link or attachment URL
    • Job Opening reference

Edge cases: If ERPNext does not send the expected fields, downstream nodes may fail. For safer operation, add checks (e.g., IF nodes or Code nodes) to verify presence and format of critical fields before proceeding.

3.2 Validation nodes – resume availability & job assignment

Purpose: Ensure that the candidate has provided a resume and that the application is tied to a specific Job Opening.

Typical implementation:

  • IF / Conditional node:
    • Condition: resume_link or attachment URL is present and non-empty.
    • If false, branch to logic that updates ERPNext with status Rejected.
  • Second IF / Conditional node:
    • Condition: Job Opening reference field is present.
    • If false, set status to Hold for manual review.

ERPNext status handling:

  • No resume attached: set Job Applicant status to Rejected.
  • No specific Job Opening: set Job Applicant status to Hold (or similar) so a recruiter can review manually.

Error handling note: If status updates fail (for example due to invalid credentials or network issues), ensure the workflow logs the error and optionally sends an internal alert, so no applicant remains in an inconsistent state.

3.3 File download & type detection

Purpose: Retrieve the resume file and route it through the correct parsing path.

Typical node usage:

  • HTTP Request / Binary Data node: Downloads the resume from resume_link or attachment URL into binary data.
  • Switch / Router node: Inspects file extension or MIME type to determine the processing path, for example:
    • PDF
    • Plain text
    • Other formats (DOC, DOCX, JPG, etc.)

Included template paths:

  • PDF: Routed to PDF text extraction.
  • Text-based files: Routed to a text extraction node.

Extensibility: You can extend the Switch/Router logic to handle:

  • DOC / DOCX: Add a conversion step (for example, using a document conversion service) before text extraction.
  • Image formats (JPG, PNG, scanned PDFs): Integrate OCR (such as Tesseract or a cloud OCR API).

3.4 Resume text extraction

Purpose: Convert the resume into plain text for AI analysis.

Nodes commonly used:

  • PDF to Text node: For text-based PDFs.
  • Text Extract node: For plain text files or other supported text formats.

Important limitation:

  • Scanned PDFs are image-based and will not yield text with the standard PDF to Text node.
  • To handle scanned resumes, add an OCR step (for example:
    • Tesseract via a custom integration
    • Cloud OCR APIs exposed through HTTP Request nodes

Best practice: Normalize the extracted text (trim whitespace, remove binary artifacts) in a Code or Set node before passing it to the AI agent.

3.5 Job description retrieval & AI scoring

Purpose: Combine the job description with the resume text and obtain a structured evaluation from an AI model.

Data inputs:

  • Job Opening details from ERPNext (for example via:
    • Job description field from the webhook payload, or
    • Additional ERPNext API call using the Job Opening reference
  • Plain text representation of the candidate’s resume.

AI node configuration:

  • Use an LLM node in n8n, such as:
    • Google Gemini
    • OpenAI (GPT-based)
    • Another supported provider
  • Define the system or instruction prompt to act as a recruitment specialist that:
    • Compares candidate skills, experience, and education against the job description.
    • Identifies relevant keywords and domain-specific expertise.

Expected AI output structure:

  • Fit Level: e.g., Strong, Moderate, Weak
  • Score: numeric score from 0 to 100
  • Rating: numeric rating from 0 to 5
  • Justification: concise textual explanation of the score

Implementation note: Format the AI response as JSON where possible. This simplifies parsing and reduces the risk of errors compared to free-form text parsing.

3.6 Mapping AI output to ERPNext fields

Purpose: Transform the AI response into the exact field structure required by the ERPNext Job Applicant doctype.

Typical nodes:

  • Code node or Set node:
    • Parse AI response (JSON or text) into discrete variables.
    • Map variables to ERPNext custom fields, for example:
      • custom_score or score
      • custom_fit_level or fit_level
      • custom_justification_by_ai or justification_by_ai
      • applicant_rating
    • Prepare a JSON body suitable for the ERPNext REST API PUT or PATCH request.

Field naming considerations:

  • The template assumes certain custom fields exist in ERPNext, such as:
    • justification_by_ai
    • fit_level
    • score
    • applicant_rating
  • If your field names differ, adjust the mapping in the Code/Set node accordingly.

3.7 ERPNext update & automatic decisioning

Purpose: Persist AI results and set candidate status based on a configurable score threshold.

Decision logic:

  • Use an IF or Code node to compare the AI Score against a threshold.
  • The template uses a default threshold of 80 (out of 100):
    • Score >= 80 → Status set to Accepted
    • Score < 80 → Status set to Rejected

ERPNext API update:

  • Use an HTTP Request node configured with ERPNext credentials.
  • Perform an update on the specific Job Applicant document, including:
    • Status (Accepted or Rejected)
    • Score
    • Fit level
    • Rating
    • AI justification

Optional notifications:

  • Add Email or WhatsApp nodes to inform candidates about:
    • Acceptance for further stages, or
    • Rejection with a polite standardized message

Error handling: If the ERPNext update fails, log the error and consider adding a retry mechanism or a fallback branch that flags the candidate for manual review to avoid silent failures.

4. Prerequisites & configuration requirements

4.1 Platform & accounts

  • n8n instance: Self-hosted or n8n Cloud.
  • ERPNext instance: With API access enabled.
  • AI model provider: OpenAI, Google PaLM/Gemini, or another LLM provider supported by n8n.

4.2 Credentials in n8n

  • ERPNext credentials:
    • API key and secret, or
    • Configured credentials object in n8n with base URL and authentication details
  • AI provider credentials:
    • API key or service account depending on provider
    • Configured in the corresponding n8n credentials type (e.g., OpenAI, Google Gemini)

4.3 ERPNext configuration

  • Webhook: On Job Applicant insert events, pointing to the n8n Webhook URL.
  • Custom fields (recommended):
    • justification_by_ai
    • fit_level
    • score
    • applicant_rating (or adapt the mapping if the field name differs)

5. Best practices & operational guidance

5.1 Data privacy & compliance

  • Resume content is personal data. Treat it as sensitive information.
  • Transfer only the data required for scoring to external AI providers.
  • Ensure compliance with regulations such as GDPR or CCPA where applicable.
  • Consider masking or minimizing personal identifiers before sending data to third-party services.

5.2 AI model tuning & bias control

  • Iteratively refine prompts and scoring rules based on historical hiring outcomes.
  • Monitor the distribution of scores to detect potential bias against specific groups or profiles.
  • Use the justification field to understand and audit model behavior.

5.3 Logging, auditability & transparency

  • Log AI outputs, prompts, and decision criteria for each applicant.
  • Retain workflow execution logs in n8n for traceability.
  • Ensure you can reconstruct how a decision was made if challenged by stakeholders or regulators.

5.4 Fallbacks & manual review

  • Provide a manual review path for:
    • Borderline scores (for example, near the threshold).
    • Parsing or extraction failures.
    • Unsupported file types.
  • Use a dedicated status in ERPNext (for example, Hold

Build a Multi-Report Generator with n8n

Build a Multi-Report Generator with n8n

Imagine clicking a single button and getting a stack of polished reports – SEO summaries, project updates, even recipe sheets – all generated for you in minutes. No copy-pasting, no manual formatting, no “which version is the latest?” drama.

That is exactly what this n8n workflow template helps you do. In this guide, we will walk through how the multi-report generator works, when you would use it, and how to set it up step by step, using n8n nodes you probably already know.

Think of it as a central report factory. You trigger it once, it fans out, and each report type gets built by its own specialized mini-workflow.

What this n8n multi-report workflow actually does

At its core, this workflow takes one manual trigger and turns it into multiple automated report flows. From that single start point, it can generate different report types such as:

  • SEO reports
  • Recipe or content sheets
  • Project status reports

Each report type uses structured data, runs through its own “child” workflow, and can end up as HTML, PDF, or even a file uploaded to storage or emailed to your team or clients.

The workflow pattern is simple but powerful:

  1. Start with a Manual Trigger.
  2. Branch out into multiple Set nodes that hold mock data for each report type.
  3. Send each of those into an Execute Workflow node that calls a dedicated child workflow to actually build and deliver the report.

It is perfect for testing your report templates before you plug in real data sources like APIs, Google Sheets, or Airtable.

Why bother with a multi-report workflow?

You could build separate automations for each report type, but that gets messy fast. A unified multi-report workflow in n8n gives you a few big wins:

  • One trigger, many outputs – Kick off SEO, project, and recipe reports from the same entry point instead of juggling multiple workflows.
  • Clean separation of concerns – Keep your mock data and templates separate from the logic that generates and delivers the actual reports.
  • Easy to scale – Need invoices, analytics dashboards, or product catalogs later? Just add another branch and child workflow.
  • Smoother testing and debugging – With clear mock data per report type, it is easier to track down issues without touching live data.

If your team runs recurring reports for marketing, product, operations, or clients, this pattern saves you from duplicating the same logic over and over.

Quick tour of the sample workflow

The sample layout is simple to understand visually. Here is how the pieces fit together:

  • Manual Trigger node – The workflow starts “When clicking ‘Execute workflow’”. You run it on demand while building and testing.
  • Set (Raw) nodes – Three nodes hold mock data:
    • Mock SEO Report
    • Mock Recipe
    • Mock Project Data

    Each one contains a JSON payload that represents what real data will look like later.

  • Execute Workflow nodes – Three nodes (Generate Report 1, 2, and 3) each call a separate child workflow. Those child workflows handle formatting, rendering, exporting, and delivering the final report.

This pattern lets you completely design and refine the “report builder” workflows before you connect to live systems.

The JSON payload structure your child workflows expect

All the mock data follows the same basic shape. That way, every child workflow can rely on a consistent input format.

Here is an abbreviated example for an SEO report payload:

{  "title": "SEO Report July",  "filename": "seo_report",  "content": {  "website": "example-store.com",  "analysis_date": "2025-07-31",  "overall_score": 78,  "critical_issues": ["Missing meta descriptions","Slow page load times","Broken internal links"]  }
}

You will notice three key fields:

  • title – Human readable name for the report.
  • filename – Machine friendly base name for the file you generate.
  • content – The actual report data, which can be nested objects, arrays, and whatever your templates need.

As long as you keep keys like title, filename, and content consistent across report types, your child workflows can easily branch based on filename or something like content.type if you add it.

Step-by-step: building the multi-report generator in n8n

Let us walk through creating this workflow from scratch in n8n. You can follow along in your own instance and adapt it to your needs.

Step 1: Add a Manual Trigger node

Start by adding a Manual Trigger node to your workflow. Set it to run “When clicking ‘Execute workflow’”.

Why Manual Trigger first?

  • It is perfect for quick, repeatable testing while you build.
  • You can later swap it or complement it with a Cron node if you want scheduled report runs.

Step 2: Create Set nodes for each report template

Next, add a Set node for every report type you want to generate. For example:

  • Set – Mock SEO Report
  • Set – Mock Recipe
  • Set – Mock Project Data

In each Set node, define fields that hold your JSON payload. You can paste in realistic sample data that matches the structure you plan to use in production.

Keeping a separate Set node for each report type helps you:

  • Test and tweak one report at a time.
  • Avoid mixing fields or accidentally overwriting data between report types.
  • Experiment with different payloads, including edge cases and nested structures.

Step 3: Connect Execute Workflow nodes to each Set node

Now for the fun part. For each Set node, add an Execute Workflow node.

Each Execute Workflow node will:

  • Receive the mock JSON from its Set node.
  • Pass that data into a child workflow dedicated to generating that report.

Inside each child workflow, you will usually want to:

  • Validate incoming JSON so you catch missing or malformed fields early.
  • Map data into a template engine such as Handlebars, Liquid, or EJS.
  • Render HTML and optionally convert it to PDF using an HTML-to-PDF node or external service.
  • Upload the report to a storage provider like Amazon S3 or Google Drive.
  • Deliver the result via email or webhook to the right people or systems.

This separation keeps your main workflow nice and clean while each child workflow handles the specifics of its report type.

Step 4: Standardize inputs and outputs across child workflows

To keep everything maintainable as you add more reports, treat each child workflow like a small API with a clear contract.

Inputs should at minimum include:

  • title
  • filename
  • content

Outputs should return a consistent structure, for example:

  • status (such as success or error)
  • url (link to the generated report)
  • file_size (optional but useful for logging and monitoring)

When every child workflow follows the same pattern, it becomes trivial to build follow-up automations, like:

  • Centralized logging to a database.
  • Notifications to Slack or Microsoft Teams.
  • Dashboards that show report status and history.

Scaling your workflow: adding more report types

Once the basic pattern is in place, adding a new report type is straightforward. You do not need to redesign anything, just extend what you already have.

To add another report type:

  1. Create a new Set node with mock data, or replace it with a live data source node such as:
    • HTTP Request (for APIs)
    • Google Sheets
    • Airtable
  2. Connect that node to a new Execute Workflow node that calls the corresponding child workflow.
  3. Make sure the new child workflow respects the same input contract (title, filename, content) and returns standardized output fields.

This way, your “report factory” grows in a predictable, modular way instead of turning into a giant tangle of special cases.

What a child workflow typically does

Each child workflow is responsible for turning raw data into a finished, shareable report. Here are common steps you might include:

  • Use a Function node to validate input and return clear error messages if something is missing or invalid.
  • Render HTML with a Template node or an external rendering service.
  • Convert HTML to PDF using a headless browser service or a PDF conversion API.
  • Upload the generated file to S3, Google Drive, or another storage provider.
  • Send a success webhook, email, or message to confirm the report is ready.

You can mix and match these steps depending on how your team prefers to receive and store reports.

Best practices to keep your automation robust

Use environment variables and n8n Credentials

Any time you are working with API keys, S3 credentials, or other secrets, keep them out of your Set nodes and Function nodes.

  • Store sensitive values in environment variables or the built-in n8n Credentials system.
  • Reference them from your nodes instead of hard-coding them.

This is safer, easier to manage, and much friendlier for teams that share workflows.

Add error handling and retries

Real-world networks are flaky. File uploads fail, email services time out, and APIs occasionally misbehave. Plan for that.

  • Wrap critical steps such as uploads or email sends in error handling logic.
  • Use retry strategies for transient errors.
  • Add fallback paths that send alerts to Slack or Teams when something repeatedly fails.

This keeps your reporting automation reliable instead of silently failing in the background.

Test with realistic mock data

Your Set nodes are not just placeholders. They are your sandbox.

  • Fill them with payloads that match real-world length and complexity.
  • Include nested arrays, large text blocks, and edge cases.
  • Simulate “weird” but possible inputs to see how your templates behave.

When you later swap Set nodes for live data sources like Google Sheets, Airtable, or APIs, you will get far fewer surprises.

Keep report templates modular

Instead of one giant template file for each report type, break things into reusable pieces:

  • Header and footer partials.
  • Branding components such as logos and colors.
  • Content blocks for sections like summaries, tables, or charts.

Using a template engine with partials lets you share branding across all reports while still customizing the content for each type.

Troubleshooting common issues

Even with a solid setup, a few common problems tend to pop up. Here is how to handle them.

1. Child workflow returns an error

If an Execute Workflow node fails, check:

  • That the workflow ID or name in the Execute Workflow node is correct.
  • That the child workflow is active and accessible.
  • Execution logs inside the child workflow to see exactly which node failed.

It also helps to add detailed logging inside Function nodes so you can see the payload and internal state when something goes wrong.

2. File upload fails

When uploads break, it is usually one of these:

  • Incorrect or expired credentials.
  • Network connectivity issues.
  • File size limits or wrong content-type headers.

Double-check your credentials configuration, verify network access, and make sure you are respecting any size limits. Add retry logic for intermittent failures.

3. Unexpected data shape

If your templates or Function nodes are complaining about missing fields, add a validation step at the start of each child workflow:

  • Use a Function node to check for required keys like title, filename, and content.
  • If validation fails, return a clear error message and log the original payload.

This makes it much easier to diagnose issues when you plug in real data sources later.

Security and governance for sensitive reports

If your reports include PII or other sensitive data, you will want a few extra safeguards in place:

  • Mask or redact sensitive fields before sending data to any third-party services.
  • Use role-based access control for n8n credentials and keep audit logs enabled.
  • Encrypt stored outputs and use expiring or restricted URLs instead of public links.

This helps you stay compliant and reduces the risk of accidental data exposure.

Putting it all together

So what you end up with is a clean, modular pattern:

  • One trigger that fans out into multiple report branches.
  • Dedicated Set or data source nodes for each report type.
  • Child workflows that generate, store, and deliver standardized report outputs.

Start by prototyping with Set nodes and mock payloads, then refine your child workflows until they consistently return the same output structure. Once everything feels solid, you can layer on monitoring, retries, and scheduling for production use.

Next steps: from prototype to production

Ready to take this pattern further? Here is how you can evolve it:

  • Replace Set nodes with live inputs such as APIs, Airtable, or Google Sheets.
  • Add a Cron node to run recurring reports on a schedule.
  • Log results to a database or Elastic for better observability and auditing.

Call to action: Try building this multi-report generator in your own n8n instance. Import the sample payload structure above into Set nodes, hook them up to Execute Workflow nodes that call your child report builders, then run the Manual Trigger and watch the reports roll out.

If you prefer to start from something ready-made or want guidance turning this into a fully production-ready automation, feel free to reach out to our team or drop a comment. We are always happy to help you ship better automations faster.

Happy automating, and let your reports take care of themselves.

AI Social Media Publisher for WordPress

AI Social Media Publisher for WordPress: n8n Workflow Template Overview

This article explains how to deploy an end-to-end n8n workflow that turns WordPress articles into AI-generated, channel-optimized social posts and images, then publishes them automatically to X (Twitter), LinkedIn, Facebook, and Instagram. The automation combines WordPress, Google Sheets, OpenRouter or OpenAI, and native social APIs to deliver consistent, scalable social media publishing with minimal manual intervention.

Use Case: Why Automate Social Publishing From WordPress?

Marketing teams, agencies, and individual creators often struggle with two repetitive tasks:

  • Drafting unique, channel-specific copy for each platform.
  • Producing on-brand images that match the content and format constraints of each network.

The AI Social Media Publisher for WordPress template in n8n addresses these challenges by:

  • Reading WordPress content and generating tailored captions for each platform automatically.
  • Creating AI image prompts and images optimized for different social formats.
  • Using Google Sheets as a central control and audit interface for campaigns.
  • Publishing directly through social APIs for X (Twitter), LinkedIn, Facebook, and Instagram.

The result is a repeatable workflow that preserves brand voice, shortens turnaround time, and allows non-technical stakeholders to participate through a simple spreadsheet interface.

Architecture and Core Components

The workflow is built around n8n as the orchestration layer and connects several key services:

n8n as the Orchestration Engine

  • Coordinates triggers and scheduling.
  • Fetches WordPress posts based on IDs stored in Google Sheets.
  • Invokes language and image generation models.
  • Handles posting to each social network and writes back status information.

Content Source: WordPress

WordPress acts as the single source of truth for long-form content. The workflow uses the WordPress node in n8n to retrieve the post title and body based on a Post ID that is configured in Google Sheets.

Control Plane: Google Sheets

Google Sheets functions as a lightweight operations dashboard:

  • You add the WordPress Post ID in a predefined column.
  • The workflow reads rows to determine which posts to process.
  • Publishing results and API response identifiers are written back to the same row for tracking and auditing.

Language Models: OpenRouter (Gemini) or OpenAI

The workflow uses a chat model via OpenRouter or OpenAI to generate:

  • Platform-specific captions that follow tone and length guidelines.
  • Image prompts that reflect the article topic and brand style.

Prompts are structured so that LinkedIn receives a professional tone, Instagram emphasizes visual storytelling, X (Twitter) focuses on concise messaging, and Facebook uses a more community-oriented voice.

Image Generation: OpenAI

OpenAI image APIs are used to create visuals from AI-generated prompts. The workflow selects sizes and aspect ratios appropriate for each channel, for example:

  • Square or 1024×1024 images for Instagram.
  • Wider formats for LinkedIn and Facebook feeds.

Publishing Layer: Social APIs

Dedicated nodes for each platform handle the final distribution:

  • X (Twitter) API for text and media posts.
  • LinkedIn API for organization or personal posts.
  • Facebook Graph API for Facebook pages.
  • Instagram publishing via Facebook Graph endpoints using publicly accessible image URLs.

Workflow Lifecycle: From Post ID to Published Content

The following sections walk through the workflow execution path as implemented in the n8n template.

1. Triggering the Workflow and Selecting a Post

The workflow starts in one of two ways:

  • Manual trigger for testing and validation within n8n.
  • Scheduled execution (for example, every hour) to process new rows in Google Sheets automatically.

The Google Sheets node reads the relevant row, extracts the WordPress Post ID, and passes it to downstream nodes.

2. Retrieving Content From WordPress

The WordPress node uses the Post ID to fetch the article title and full content. This data forms the basis for both caption generation and image prompt creation. The workflow then forwards this structured content to the AI nodes.

3. Generating Channel-Specific Captions With AI

An OpenRouter or OpenAI chat model is invoked with a carefully designed system prompt that:

  • Defines tone and style guidelines for each platform.
  • Specifies character or length constraints where relevant.
  • Outlines formatting rules so captions are ready for direct publishing.

The model returns a multi-part response that includes distinct captions for LinkedIn, Instagram, Facebook, and X, each optimized for engagement on that specific channel.

4. Enforcing Structure With a JSON Output Parser

To ensure reliability downstream, the AI output is parsed into a fixed JSON schema. The structured output parser validates that the response includes keys such as:

  • twitter
  • facebook
  • linkedin
  • instagram

This predictable structure simplifies mapping captions to the appropriate social nodes and reduces failure rates caused by inconsistent AI responses.

5. Creating Platform-Optimized Images

Next, image-related nodes construct prompts by combining:

  • WordPress post metadata, such as the title or key themes.
  • AI-generated image prompt suggestions.
  • Standardized style directives, for example, “flat-style illustration, bright brand colors, clean typography”.

These prompts are sent to OpenAI image generation APIs. The workflow configures image dimensions to align with best practices for Instagram and other platforms, and stores the resulting media URLs or binary data for use in the publishing step.

6. Publishing to Social Platforms and Writing Back to Google Sheets

Once captions and images are prepared, the workflow:

  • Calls the X, LinkedIn, Facebook, and Instagram nodes with the appropriate caption and media payload.
  • Handles each platform independently so that a failure on one channel does not block others.
  • Captures response data such as post IDs or URLs.

After each successful publish, the workflow updates the corresponding row in Google Sheets, marking which platforms were posted and storing any identifiers needed for analytics or later reference.

Configuration Checklist for Deployment

Before running the template in production, ensure that the following configuration steps are complete:

  • Google Sheets
    • Clone the provided Google Sheet template.
    • Insert WordPress Post IDs in the designated column.
    • Confirm that n8n has access to the correct spreadsheet and worksheet.
  • Social API Credentials
    • Create app credentials for X (Twitter), LinkedIn, and Facebook/Instagram.
    • Add each set of credentials to n8n using the built-in credentials manager.
    • Configure organization IDs for LinkedIn and page IDs for Facebook as required by the template.
  • AI Provider Credentials
    • Set up OpenRouter or OpenAI API keys for language generation.
    • Configure OpenAI image generation credentials separately if needed.
  • WordPress Integration
    • Provide WordPress site URL and authentication details in n8n credentials.
    • Verify that the WordPress node can access posts by ID.

Best Practices for High-Quality Automation

Prompt Design for Social Captions

Prompt engineering is central to consistent results. When configuring the language model:

  • Specify tone, audience, and objective for each platform.
  • Include examples of preferred brand voice if available.
  • Keep the system prompt concise but explicit about constraints such as hashtags, mentions, or links.

The template ships with a “social media manager” style prompt that already embeds platform guidance. Update this content periodically as your messaging strategy evolves.

Image Prompt Strategy

For visual consistency across campaigns:

  • Incorporate the article title or main topic into the prompt.
  • Add a short visual concept, such as “data-driven marketing dashboard” or “team collaborating in modern office”.
  • Include style instructions to match your brand, for example “minimalist, bright brand colors, clean typography”.

Standardizing these elements helps maintain a coherent visual identity even as content scales.

Handling Rate Limits and Errors

Social APIs enforce rate limits and may return transient errors. In n8n you should:

  • Configure retries with exponential backoff where appropriate.
  • Log API responses to Google Sheets or a dedicated logging service for post-mortem analysis.
  • Include conditional logic to skip or reschedule posts when limits are reached.

Security and Access Control

Security is critical in production workflows:

  • Store all API keys and tokens in n8n credentials, which are encrypted at rest.
  • Restrict access to the n8n instance and its credentials to authorized team members only.
  • Rotate tokens regularly and prefer app-level or organization-level permissions, for example for LinkedIn company pages.

Testing, Validation, and Observability

Before broad rollout, validate each integration path individually:

  • Use the manual trigger with a dedicated test row in Google Sheets.
  • Verify that the WordPress node retrieves the correct post data.
  • Inspect AI outputs to ensure captions and prompts align with brand guidelines.
  • Confirm that each social platform successfully receives and displays posts as expected.

The template includes confirmation nodes that write back status markers such as “X OK”, “Facebook OK”, “LinkedIn OK”, and “Instagram OK” into the sheet. These markers make it straightforward to see which channels succeeded and where remediation may be required.

Troubleshooting Common Issues

  • No image created
    • Check that OpenAI image generation credentials are valid and active.
    • Verify that the image prompt field is not empty and is mapped correctly.
    • Confirm that the configured image size matches supported dimensions.
  • Publishing failures on social platforms
    • Inspect API error responses for details.
    • Validate that tokens are not expired and that the app has sufficient permissions.
    • For Instagram via Facebook Graph, ensure that the media URL is publicly accessible and follows platform requirements.
  • Malformed or missing captions
    • Review and refine the system prompt to enforce structure and content rules.
    • Confirm that the structured output parser schema exactly matches the expected keys (twitter, facebook, linkedin, instagram).
    • Log the raw AI response to diagnose formatting issues.

Operational Benefits for Teams

Implementing this n8n-based AI social media publisher provides several advantages for teams managing multi-channel distribution:

  • Reduced manual workload by automating repetitive captioning and image creation tasks.
  • Consistent brand voice enforced through centralized prompts and templates.
  • Scalable operations that support higher publishing frequency without linear increases in headcount.
  • Centralized approvals using Google Sheets as a staging interface, or through additional approval steps in n8n before final publishing.

Teams can extend the template with additional logic such as content review gates, custom scheduling rules, or integration with analytics platforms for closed-loop performance tracking.

Next Steps and Implementation Guidance

The AI Social Media Publisher for WordPress template offers a robust starting point for automated content distribution. It integrates n8n orchestration, WordPress content, Google Sheets control, and AI-driven text and image generation into a single, maintainable workflow.

To get started:

  • Clone the provided Google Sheet and add your WordPress Post IDs.
  • Configure your WordPress, AI, and social platform credentials in n8n.
  • Run the workflow manually for a test post, validate outputs, then enable scheduling.

If you require assistance with refining prompts, aligning image styles with your design system, or adding custom approval and governance steps, consider engaging with a specialist team for a tailored implementation or a guided walkthrough.

Keywords: AI social media publisher, WordPress automation, n8n workflow, OpenAI, OpenRouter, Google Sheets, social media automation.

Consistent Characters Video Generation Template

Consistent Characters Video Generation Template

Imagine sitting down with a single idea for a short story and, a few minutes later, watching a fully rendered, character-driven video come to life without touching a video editor. That is the kind of shift this n8n workflow makes possible. It turns scattered manual tasks into a smooth, automated pipeline so you can focus on creativity, storytelling, and growth instead of repetitive production work.

This consistent characters video generation template uses n8n to connect an LLM, image generation models, Google Sheets, Google Drive, text-to-speech, and a video rendering service. Together, they create four-scene, YouTube Shorts style videos where your characters stay visually consistent from one scene to the next. The result is a repeatable system that can power a growing content engine, not just a one-off experiment.

From manual production to an automated creative system

If you have ever tried to create short-form animated content, you know the pain points:

  • Characters look slightly different from scene to scene.
  • Every video requires fresh prompts, new images, separate voiceovers, and manual editing.
  • Tracking assets and versions quickly becomes messy and time consuming.

These challenges limit how often you publish and how far your ideas can scale. The goal is not just to generate one good video, but to build a dependable workflow that lets you create many, consistently, with less effort each time.

This is where automation shines. By turning your process into an n8n workflow, you shift from one-off tasks to a reusable, improvable system. You gain time, mental space, and the freedom to experiment with more stories, more characters, and more channels.

Adopting an automation mindset

Before diving into the technical steps, it helps to approach this template with the right mindset. Think of it as your first building block in a larger automation strategy:

  • Start small, think big – Begin with one video, learn from the results, then gradually scale to daily or batch production.
  • Iterate on prompts and structure – Your first prompts will not be perfect. That is expected. Use the workflow to quickly test, refine, and improve.
  • Build a reusable asset library – Once you have strong, consistent characters, you can reuse them across many stories, series, or campaigns.
  • Let automation handle the routine – Offload rendering, file management, and polling to the workflow so you can focus on story, style, and strategy.

With that perspective, this template becomes more than a single n8n workflow. It becomes a stepping stone to a more automated, focused, and scalable creative process.

How the template works at a glance

The workflow is organized into three main sections that mirror a natural storytelling pipeline:

  • Plan Video – Captures your input, uses an LLM to design the story structure, and stores everything in Google Sheets.
  • Generate Characters – Creates two consistent, anime-style characters and saves their images for later use.
  • Generate Scenes, Dialogs, and Videos – Produces scene images that reference each character, generates voiceovers, adds subtle animation, and assembles the final video.

Each section is modular. You can swap providers, refine prompts, or extend the pipeline without breaking the core logic. That flexibility is what makes this a powerful template to build on as your automation skills grow.

Deep dive into the n8n workflow

1. Trigger and planning – turning ideas into structure

The journey begins with a chat trigger, typically a webhook that receives your input. You might send a short description of the story, characters, or theme you want.

An LLM (such as an OpenAI chat model) then takes over. It receives a concise instruction set and returns a structured JSON payload that includes:

  • Two character prompts (Character A and Character B).
  • Four scene prompts for a short, four-part narrative.
  • Brief dialogue lines for each scene, usually limited to 75 characters.

This JSON is parsed and written into Google Sheets. That sheet becomes your single source of truth for prompts and metadata. It gives you:

  • Auditability for each video generated.
  • An easy way to review and tweak prompts over time.
  • A persistent record that can be reused for future experiments or reruns.

2. Google Drive and Sheets – building a reliable backbone

While the creative magic happens in models and prompts, the operational backbone lives in Google Sheets and Google Drive:

  • Google Sheets stores:
    • Character prompts and scene prompts.
    • Dialogue lines.
    • API job IDs and final asset URLs.
  • Google Drive stores:
    • Character renders.
    • Scene images.
    • Voiceover audio files.
    • Intermediate and final video files.

By centralizing everything in Sheets and Drive, you create a transparent production log that is easy to inspect, share with collaborators, and scale across multiple projects.

3. Character generation – designing consistent protagonists

Next, the workflow moves into character creation. Two separate image generation jobs are triggered, one for Character A and one for Character B, using Replicate or a similar image model.

The prompts are intentionally constrained to support consistency:

  • Front-facing, full-body characters.
  • Anime-inspired 2D cel-shading, clean linework, smooth color fills.
  • No props and a blank background.
  • Modest, clearly described clothing.

The workflow polls the job status until the renders are complete. Once ready, it aggregates the outputs and saves them to Drive. These images then act as subject references for the scene generation step so that the characters keep their look across multiple images and videos.

4. Scene generation – keeping characters consistent across shots

With your characters defined, the workflow turns to the four scenes that make up the short video. It alternates between Character A and Character B, combining:

  • The scene-specific prompt from the LLM.
  • A subject_reference that points to the chosen character image.

The image model uses this combination to generate vertical images suitable for short-form platforms. The workflow can produce a 9:16 or 3:4 aspect ratio depending on the step and your preferences.

As with character generation, n8n polls the image jobs until they are complete, then uploads the resulting images to Google Drive. Each image is linked back to the corresponding row in Google Sheets so you always know which file belongs to which scene.

5. Dialog and voiceover – giving your characters a voice

The short dialogue lines created earlier are now transformed into audio. The template integrates a text-to-speech service such as ElevenLabs to generate voiceover files for each scene.

Key details:

  • Dialogue is kept concise, usually under 75 characters, to match the fast pace of Shorts style content.
  • Each voiceover file is uploaded to Google Drive and linked to its scene in Google Sheets.
  • You can swap ElevenLabs for another TTS provider without changing the overall workflow design.

With visuals and audio ready, your scenes are almost complete.

6. Image-to-video and final rendering – bringing everything to life

To move from static images to engaging video, the workflow uses an image-to-video model or video generation API. Each scene image receives subtle, natural motion such as:

  • A character gesture.
  • Hair swaying gently.
  • Environmental movement like drifting petals.

Tasks are queued, then polled until the video outputs are ready. The resulting clips are downloaded and stored in Google Drive.

Finally, a composition service such as Creatomate assembles:

  • The four animated scene clips.
  • The corresponding voiceover audio tracks.

into a single, short-form video. At this point, your initial idea has traveled through a fully automated pipeline and emerged as a polished, shareable asset.

Key features that unlock growth

This n8n template is designed not just for one-time use, but for ongoing content production. Some of the most impactful benefits include:

  • Consistent characters across scenes using subject references, careful prompt design, and a structured generation flow.
  • End-to-end automation from initial prompt to final rendered short, saving hours of manual work per video.
  • Modular architecture that lets you swap image, video, or TTS providers without rewriting the core logic.
  • Centralized tracking via Google Sheets so you can review prompts, track versions, and maintain a clear production history.

As you refine this workflow, you can repurpose it for new series, campaigns, or clients, turning your automated system into a strategic asset for your brand or business.

Prompt design and character consistency best practices

Consistent characters are the foundation of this workflow. To improve results and reduce rework, follow these guidelines:

  • Describe characters head to toe, including:
    • Hair color and style.
    • Face shape and notable facial features.
    • Body type and posture.
    • Outfit materials, colors, and shoes.
  • Specify a clear art style, for example:
    • “2D anime-inspired, cel-shaded, clean linework, smooth color fill”.
  • Always use a subject_reference or seed image produced by the character generation step when calling scene generation APIs.
  • Keep clothing consistent or define a small, controlled wardrobe list to avoid accidental redesigns.
  • Limit background detail in character prompts and reserve environment descriptions for the scene prompts.

These habits not only improve visual consistency but also make it easier to scale your characters across multiple episodes or series.

Operational tips for reliability and scale

As you move from a single test video to a larger content pipeline, operational details become more important. Use these practices to keep your workflow robust:

  • Rate-limit parallel jobs so you do not hit API throttling when generating many images or videos at once.
  • Implement robust polling with exponential backoff when checking async job statuses for image, video, or TTS tasks.
  • Maintain an audit trail in Google Sheets, including prompts, API job IDs, timestamps, and final file links.
  • Cache successful character renders and reuse them across multiple videos that feature the same characters to save credits and time.

These improvements turn your workflow into a production-ready system that can support daily or batch video generation with confidence.

Privacy, safety, and legal considerations

When you automate content creation, you also need to automate responsibility. Keep these guidelines in mind:

  • Do not recreate or impersonate real people without explicit, documented consent.
  • Ensure that clothing, themes, and scenes are appropriate for your audience and comply with platform terms of service.
  • Follow the license terms and content policies of all third-party models and APIs you use.

Building ethical, compliant workflows from the start protects your brand and gives you a solid foundation for long-term growth.

Troubleshooting common issues

Characters look different between scenes

First, confirm that the scene generation step is correctly using the subject_reference for the intended character. Then, review your scene prompts and remove any repeated character descriptions that might override the reference. Focus those prompts on environment, pose, and mood instead.

Jobs stuck in pending or status mismatches

Check your API keys, quotas, and rate limits for each provider. Next, review your polling logic to ensure you are correctly handling status fields and response paths. A small adjustment in how you detect “succeeded” or “failed” states often resolves these issues.

Real-world use cases and growth paths

Once you have this template running, you can adapt it to many scenarios:

  • YouTube Shorts creators producing daily micro-stories with recurring characters and consistent visual branding.
  • Indie studios and agencies rapidly prototyping character-driven ads, social content, or pitch concepts.
  • Educational channels building short, character-first explainers that make complex topics more engaging.

Each use case can start with this exact template, then evolve with your own prompts, art styles, and extensions as your automation skills grow.

Your next step in the automation journey

If you are ready to free up more creative time and build a repeatable video pipeline, you can get started with this n8n template in just a few steps:

  1. Import the n8n workflow file into your n8n instance.
  2. Configure API keys for:
    • OpenAI or your preferred LLM provider.
    • Replicate or your chosen image generation model.
    • ElevenLabs or an alternative text-to-speech service.
    • Your video rendering or composition service, such as Creatomate.
  3. Connect your Google Drive and Google Sheets credentials, then test the workflow with a single story idea or topic.

Once you see your first automated short come to life, you can start iterating. Adjust prompts, refine character descriptions, test new voices, or plug in different models. Every small improvement compounds, turning this template into a powerful engine for ongoing content creation.

Try the template now

If you would like a guided walkthrough or help adapting this workflow to your style, such as changing the art direction, adding lip-sync, or enabling batch processing, reach out or join our newsletter. You will receive monthly automation templates, n8n tips, and prompt engineering guides to keep expanding what you can automate next.

n8n Guide: Clone & Adapt Facebook Ads Ethically

n8n Guide: Clone & Adapt Facebook Ads Ethically

Imagine being able to take the best ideas from your competitors’ Facebook ads, remix them with your own product, and spin out fresh creatives in minutes instead of days. That is exactly what this n8n workflow template helps you do, as long as you use it ethically and within the rules.

In this guide, we will walk through the “Recap AI – Facebook Ad Thief” n8n template in plain language. You will see what each node does, how images and prompts move through the pipeline, and where the AI magic happens. We will also talk about the legal and ethical guardrails you really should not skip.

What this n8n workflow actually does

Let us start with the big picture so you know what you are getting into.

This n8n workflow automates a full mini-pipeline for creative research and ad adaptation. It:

  • Scrapes the Facebook Ad Library using an Apify actor
  • Downloads ad images and saves them for reference
  • Combines those reference images with your product image
  • Uses Google Gemini (image-generating endpoints) to create new ad visuals
  • Replaces competitor branding and packaging with your own product
  • Stores everything neatly in Google Drive

Under the hood, n8n handles the orchestration: form triggers, loops, merges, condition checks, file conversions, and API calls. You just drop in a Facebook Ad Library URL, upload your product image, and let the workflow do the heavy lifting.

When to use this template (and when not to)

This workflow is ideal if you:

  • Run Facebook ads and want to speed up creative testing
  • Study competitor ads for structure, layout, and messaging
  • Need a faster way to generate variation after variation for A/B tests
  • Want a repeatable, documented process that your team can run on demand

It is not a good fit if your goal is to copy competitors outright. The whole point is to use their ads as inspiration, not as something to lift word-for-word or pixel-for-pixel.

Why this workflow makes your life easier

If you have ever tried to reverse engineer a competitor ad manually, you know the drill:

  • Search the Facebook Ad Library
  • Screenshot or download assets
  • Brief a designer or prompt an AI model by hand
  • Go back and forth until something looks right

This n8n template automates almost all of that. It:

  • Handles scraping and downloading for you
  • Pairs each competitor ad with your product image automatically
  • Builds structured prompts for Gemini instead of making you write them from scratch
  • Checks for prohibited content responses before storing anything
  • Uploads final images to Google Drive so your team can review and use them

The result is a faster, more consistent creative exploration process that still leaves room for human judgment and review.

How the workflow runs from start to finish

Let us walk through the pipeline step by step so you can see how everything connects.

1. form_trigger – kick off the workflow

Everything starts with a simple form. A non-technical teammate can trigger the workflow by filling in:

  • Facebook Ad Library URL – the page or search results you want to analyze
  • Your product image – the image you want to feature in the adapted ads

This keeps the entry point friendly and low friction. No one needs to touch the workflow logic itself.

2. convert_product_image_to_base64 – prepare your product image

AI image-generation endpoints typically do not accept raw binary files. They want images as base64-encoded data so they can be passed inline in JSON.

This node:

  • Takes the uploaded product image
  • Converts it to base64
  • Stores it as inline_data for later HTTP requests to Gemini

You will not see this step in the UI, but it is crucial for the API calls to work.

3. scrape_ads (Apify) – pull data from Facebook Ad Library

Next, n8n calls an Apify actor that knows how to scrape the Facebook Ad Library.

This node:

  • Uses the URL from your form input
  • Scrapes a structured dataset of ad cards
  • Returns image URLs, titles, and other metadata
  • Respects a configured limit so you are not pulling thousands of ads at once

Now you have a clean list of competitor ads to work with, instead of manually saving screenshots.

4. iterate_ads & download_image – process ads in batches

Rather than handling all ads at once, the workflow processes them in manageable chunks.

These nodes:

  • Loop through each ad in the result set
  • Pick the highest-quality image URL available
  • Download the image so it can be used as a visual reference

The downloaded file can be saved for reference and is also passed along to later nodes for conversion and AI input.

5. upload_ad_reference & convert_ad_image_to_base64 – archive and encode

Once each competitor ad image is downloaded, the workflow does two things:

  • Uploads it to Google Drive as an archive copy you can revisit later
  • Converts it to base64 so it can be sent to Gemini as inline_data

This means Gemini receives both:

  • Your product image (base64)
  • The competitor reference image (base64)

That combination lets the model keep the overall look and feel, while swapping in your product and branding.

6. aggregate & build_prompt – craft a smart AI prompt

Next up, the workflow gathers everything it knows about the current batch and builds a detailed instruction prompt for the AI model.

The prompt typically tells Gemini to:

  • Recreate the style and composition of the competitor ad
  • Remove or replace competitor branding, logos, labels, and CTAs
  • Insert your product name, packaging, and messaging
  • Apply any specific copy or design tweaks you want

This is one of the best places to experiment. The clearer your instructions here, the better your final results will be.

7. generate_ad_image_prompt & generate_ad_image (Gemini) – call the AI

Instead of sending a single rough prompt to Gemini, the template uses a two-step approach.

  1. generate_ad_image_prompt
    This node asks Gemini to refine and structure the prompt. It analyzes the inputs and outputs a more polished set of instructions for image generation.
  2. generate_ad_image
    Using that refined prompt, this node calls the actual image-generation endpoint. It sends:
    • Your base64 product image
    • The base64 competitor reference image
    • The refined prompt text

    Gemini returns generated content candidates that include image bytes or inline_data.

The result is a new ad-style image that borrows the composition and vibe of the original, but features your product instead.

8. check_if_prohibited – enforce safety rules

Not every AI response is safe to use. Models can sometimes return content that is blocked by policy.

This node checks the Gemini response for any prohibited content flags. If something is flagged:

  • The workflow branches away from the upload path
  • The image is not stored or used
  • You avoid accidentally pushing disallowed content into your asset library

Think of this node as a built-in safety net.

9. set_result, get_image, upload_image – save your new creatives

If the generated creative passes the safety check, the workflow wraps things up by:

  • Converting the base64 image data back into a binary file
  • Preparing the final result payload
  • Uploading the finished image to a designated Google Drive folder

The loop can run multiple times per source ad, so you can generate several variations for testing and review.

Ethical and legal guidelines you should not ignore

Automating competitor-ad analysis is powerful, but it comes with responsibilities. To stay on the right side of the law and keep your brand reputation intact, keep these points in mind:

  • Respect copyright and trademarks
    Do not reproduce logos, brand marks, or other trademarked elements as-is. The goal is to replace them with your own branding, not copy them.
  • Follow Facebook ad policies
    Your generated ads still need to comply with Facebook’s rules around claims, sensitive topics, health products, and imagery.
  • Use competitor ads as inspiration only
    Focus on learning from layout, structure, and messaging patterns. Avoid copying unique creative ideas that could be considered derivative works.
  • Stay honest in your messaging
    Any claims you adapt into your own ads must be accurate for your product. Do not inherit promises that do not apply to you.

Note: The template name is intentionally provocative. In practice, you should treat competitor ads as a research input, not something to literally steal.

Tips to get better results from the template

Once you have the workflow running, here are a few practical tweaks that can dramatically improve your outputs.

Refine your prompts

Be specific about what should change and what should stay the same. You might explicitly mention:

  • Elements to replace: logos, on-pack text, CTA buttons, brand colors
  • Elements to preserve: composition, lighting, camera angle, overall style

Use clean product images

Gemini will have a much easier time if your product image is:

  • An isolated product shot
  • Preferably a transparent PNG or a clean white / background-removed image

Start with small batches

When you are experimenting with prompt wording or styles, run smaller batches first. Once you are happy with the consistency, scale up and process more ads at once.

Keep human review in the loop

Even with safety checks, you should always have a person look at generated assets before they go live in paid campaigns. Use this step to catch:

  • Brand inconsistencies
  • Awkward compositions
  • Any messaging that feels off or misleading

Log everything for traceability

It is smart to store:

  • The original reference ad
  • All generated variations
  • Metadata about prompts, dates, and decisions

Keeping this history in Google Drive helps you track what came from where and how your creative strategy evolved.

Security and privacy: handle data carefully

Even though you are working with publicly visible ads, you should still treat the workflow with care:

  • Use secure credentials in n8n for Apify, Google, and Gemini
  • Limit access to your Google Drive folders to relevant team members
  • Follow your company policies around data storage and retention

This is especially important if you integrate the workflow into broader marketing or analytics systems.

Ideas for extending or customizing the workflow

Once you are comfortable with the base template, you can extend it in a few different directions.

  • Connect to testing platforms
    Instead of running ads directly from Drive, you can push variants into dedicated creative-testing tools that handle serving and performance tracking.
  • Swap out the scraper
    Prefer a different data source? Replace Apify with another scraper or the official Facebook Ad Library API where available, especially if you want tighter compliance control.
  • Add human-in-the-loop review
    Send generated images to Slack or email for sign-off. That way, a designer or marketer can approve or reject assets before they are used anywhere else.

Legal disclaimer

This article describes an automation pattern, not legal advice. You are responsible for making sure your use of scraped content and AI-generated creatives complies with copyright law, trademark protections, and platform policies. If you are unsure where the line is, talk to legal counsel before deploying this at scale.

Wrapping up: what you get from this n8n template

To recap, this n8n template helps you:

  • Scrape relevant ads from the Facebook Ad Library
  • Pair competitor visuals with your own product imagery
  • Use Gemini to generate adapted, test-ready ad creatives
  • Store and manage everything in Google Drive

Used thoughtfully and ethically, it can dramatically speed up your creative iteration cycle and keep a steady stream of fresh ideas flowing into your ad tests.

Next steps

Curious to try it out?

  • Download the n8n template and plug in a few safe sample ads to experiment with.
  • Iterate on your prompts until you are happy with the look and feel.
  • Share the workflow with your team so anyone can kick off a new creative batch from a simple form.

If you would like a checklist or a prompt library tailored to your specific product and niche, you can absolutely build one on top of this workflow. Use it to standardize how you brief the AI and get more consistent, on-brand results every time.

Rank Tracker Postgres Template for n8n

Rank Tracker Postgres Template for n8n: Turn SEO Data Into Daily Momentum

From Manual Checks To A Calm, Automated SEO Rhythm

If you have ever spent your morning clicking through rank trackers, exporting CSVs, and stitching together reports, you know how quickly SEO work can turn into busywork. The more keywords you care about, the more time you spend checking them instead of acting on them.

The Rank Tracker Postgres template for n8n is built to change that rhythm. It takes the repetitive part of rank tracking off your plate and replaces it with a reliable, daily pipeline that quietly runs in the background while you focus on strategy, content, and experiments.

At its core, this template connects BigQuery (for search impressions and rankings) with PostgreSQL (for long term storage and analysis), then uses n8n to orchestrate everything. The result is a lean, automated system that:

  • Tracks rankings for a curated list of keywords in a tracked_keywords table
  • Stores daily ranking metrics in rank_tracking_by_keywords
  • Surfaces top ranking keyword opportunities in top_ranking_keywords

Instead of checking rankings manually, you get a steady flow of fresh, structured data ready to query, visualize, and act on.

Shifting Your Mindset: From Reactive Reporting To Proactive Growth

Automation is not just about saving time. It is about creating the space to think, plan, and make better decisions. When rank tracking runs itself, you can:

  • Spot quick wins where you already rank in Top 3, Top 10, or Top 20 but have not fully optimized yet
  • Build a consistent historical dataset that reveals trends, seasonality, and the impact of your experiments
  • Free your team from repetitive checks so they can invest energy in content, CRO, and technical improvements

This template is ideal if you want a repeatable, cost aware SEO pipeline that quietly powers your dashboards and decision making, without the overhead of a heavy enterprise tool.

What This n8n Rank Tracker Template Actually Does

Here is the high level journey your data takes through the workflow:

  1. n8n loops through a list of domains and BigQuery tables you define.
  2. It checks the last date you collected data so it only pulls new rows from BigQuery.
  3. It reads your tracked keywords from Postgres and builds a filtered query.
  4. BigQuery aggregates clicks, impressions, position, and CTR per date, keyword, URL, and device.
  5. n8n upserts those metrics into Postgres tables so you keep a clean, deduplicated history.
  6. A second BigQuery query finds keyword opportunities and stores them in a dedicated table.

From there, you can plug your Postgres data into Looker, Data Studio, Metabase, or any BI tool and start exploring.

Designing The Foundation: Required Postgres Tables

Before the workflow can become part of your daily stack, you need a solid storage layer. The template uses three Postgres tables to organize your data and keep it query friendly.

1. top_ranking_keywords – Your Opportunity Radar

This table stores aggregated keyword opportunities, including impressions, clicks, average position, and position buckets such as Top 3, Top 10, or Top 20.

CREATE TABLE IF NOT EXISTS public.top_ranking_keywords
(  data_date date NOT NULL,  query text NOT NULL,  url text NOT NULL,  device text,  result_type text,  total_impressions integer,  total_clicks integer,  avg_position double precision,  ctr_percentage double precision,  position_bucket text,  domain text,  CONSTRAINT ranking_primary_key PRIMARY KEY (data_date, query, url)
)

2. tracked_keywords – The Keywords You Care About Most

This table defines the curated list of keywords you want to follow. Keeping this list focused helps you stay aligned with business goals.

CREATE TABLE IF NOT EXISTS public.tracked_keywords
(  domain text NOT NULL,  keyword text NOT NULL,  created_at timestamp with time zone DEFAULT CURRENT_TIMESTAMP,  CONSTRAINT tracked_keywords_primary_key PRIMARY KEY (domain, keyword)
)

3. rank_tracking_by_keywords – Your Daily Rank History

This table holds the daily performance snapshot for each keyword, URL, and device. It becomes the backbone of your trend analysis and reporting.

CREATE TABLE IF NOT EXISTS public.rank_tracking_by_keywords
(  data_date date NOT NULL,  url text NOT NULL,  device text,  keyword text NOT NULL,  clicks integer,  impressions integer,  "position" double precision,  ctr double precision,  domain text,  CONSTRAINT tracked_keyword_primary_key PRIMARY KEY (data_date, url, keyword)
)

Inside The Workflow: How The n8n Template Flows

Once your tables exist, the n8n workflow takes over the daily heavy lifting. The template is built around two primary flows on the n8n canvas: Get Tracked Keywords Ranking and Get Keyword Opportunities. Together, they keep your rank tracking loop running with minimal manual touch.

Flow 1: Get Tracked Keywords Ranking

  • Start / Domains / Split Out – You provide a list of domains and their associated BigQuery tables. The workflow loops through each domain so you can scale across multiple sites without rewriting anything.
  • get_date_of_last_run – This node queries Postgres to find the most recent data_date already stored. That date becomes your lower bound, which keeps BigQuery costs in check by only pulling new data.
  • get_keywords_to_track – Here, n8n reads from the tracked_keywords table and builds a keyword list for the SQL WHERE clause. You are in full control of what gets tracked.
  • Get Ranking Keywords by URL – A BigQuery node that aggregates clicks, impressions, position, and CTR for each date, keyword, URL, and device. It filters the dataset by your tracked keywords and the new date range.
  • insert_keywords_ranking_by_tracked_keywords – Finally, n8n upserts the results into rank_tracking_by_keywords in Postgres, keyed by data_date, url, and keyword. This keeps your history clean and consistent.

Flow 2: Get Keyword Opportunities

  • Get Keyword Opportunities – A separate BigQuery node focuses on discovering opportunity queries. It aggregates performance, calculates average position, and buckets queries into ranges such as Top 3, Top 10, or Top 20.
  • Those aggregated rows are then upserted into top_ranking_keywords, giving you a dedicated table to mine for quick wins.

Together, these flows turn raw search impression data into a living rank tracking system that supports both daily monitoring and long term insights.

Step By Step: Turning The Template Into Your Daily Workflow

You do not need to rebuild anything from scratch. Follow these steps and you will have a working automated rank tracker that runs on its own schedule.

  1. Provision Postgres
    Create the three tables shown above in your Postgres instance. This is where your rankings, tracked keywords, and opportunities will live.
  2. Configure BigQuery Access
    Make sure the BigQuery project and tables that store your search impressions and sum_position data are accessible from the n8n service account. Proper permissions here are essential for smooth automation.
  3. Import The Template Into n8n
    Download the JSON workflow and import it into your n8n instance. The entire pipeline, including both flows, will appear on your canvas ready for configuration.
  4. Set Credentials
    In n8n, add your Postgres and Google BigQuery credentials. Assign these credentials to the corresponding nodes in the workflow so n8n can read and write data securely.
  5. Populate The Domains Node
    In the Domains node, define each domain you want to track along with the BigQuery table paths, for example:
    • searchdata_url_impression
    • searchdata_site_impression

    This is what allows the workflow to scale across multiple sites with one template.

  6. Add Tracked Keywords
    Insert the keywords you care about into the tracked_keywords Postgres table for each domain. This is your chance to focus the system on terms that matter most for revenue, leads, or strategic topics.
  7. Run A Test
    Start with a single domain and run the workflow manually. Confirm that:
    • BigQuery queries run without errors
    • Credentials are valid
    • Data is correctly upserted into rank_tracking_by_keywords and top_ranking_keywords

    This quick test gives you confidence before you scale.

  8. Schedule For Daily Automation
    Once everything looks good, enable a schedule in n8n. A daily run is recommended so you always have a fresh, up to date view of your rankings and opportunities.

Smart SQL Choices: How The Template Keeps Data Useful And Costs Controlled

The BigQuery nodes in this template are written with performance and practicality in mind. They use a filtered approach so you get the data you need without unnecessary cost.

  • Date based filtering – Only queries newer than the last stored data_date are pulled, which keeps each run incremental.
  • Data quality filters – Only non anonymized queries and rows with impressions above a minimum threshold are considered, so you focus on meaningful traffic.
  • Position handling – Position is derived and rounded to make trend analysis and reporting easier.

You can adjust thresholds such as minimum impressions or maximum position to match your own data quality standards and reporting goals.

Best Practices To Get The Most From Your Automated Rank Tracker

Once the template is running, a few intentional choices will help you turn raw data into consistent growth.

  • Stay focused with tracked_keywords
    Do not track everything. Keep tracked_keywords limited to queries that map directly to your business goals or key content clusters.
  • Monitor BigQuery costs
    The incremental date filter already helps, but you can further manage costs by tightening impression thresholds or limiting the scope of domains and tables.
  • Lean on batching
    The workflow uses splitInBatches so it can scale per domain without overwhelming Postgres or BigQuery. This makes it safer to grow the number of domains or keywords over time.
  • Backfill with intention
    If you want historical data, run controlled backfills by date range instead of a single massive query. This keeps costs and runtime predictable.
  • Tag by device
    Use the device field (mobile, desktop) to spot platform specific differences. Often, mobile and desktop rankings behave differently, and this view can uncover new optimization angles.

Troubleshooting: Turning Roadblocks Into Learning Moments

Every automation journey includes a bit of debugging. Here are some common issues and how to resolve them so you can keep moving forward quickly.

  • Missing credentials
    If nodes fail due to authentication, double check your BigQuery and Postgres credentials in n8n. Re run a single domain test once they are fixed.
  • SQL syntax errors
    Verify that the BigQuery table paths and column names in the template match your actual dataset, especially fields like sum_position and impressions.
  • Duplicate keys on upsert
    Ensure that the matchingColumns settings in the Postgres upsert nodes align with your primary keys, for example (data_date, query, url) or (data_date, url, keyword).
  • Slow performance on large datasets
    Tighten filters, reduce batch sizes, or increase BigQuery compute slots. A few small adjustments can dramatically improve speed and reliability.

Going Further: Extend The Template To Fit Your Stack

Once your core rank tracking loop is stable, you can turn this template into a central piece of your SEO automation system.

  • Notify your team in real time
    Add a Slack or email node to alert stakeholders whenever new Top 3 keyword opportunities appear. This keeps everyone aligned and ready to act.
  • Build live dashboards
    Connect your Postgres tables to tools like Looker, Data Studio, or Metabase. Visualize trends by keyword, URL, device, or domain and share them across your organization.
  • Enhance result_type insights
    Join your data with schema that identifies FAQ, HowTo, or review result types per URL. This can help you understand how rich results are affecting visibility and CTR.

Each small extension compounds the value of your automated pipeline and brings you closer to a fully integrated SEO data environment.

Your Next Step: Turn This Template Into A Daily Habit

The Rank Tracker Postgres template for n8n gives you a practical, cost aware path to daily keyword rank tracking. With a short one time setup, you unlock a long term asset:

  • Automated rank collection for your most important keywords
  • A clean historical dataset for trend and impact analysis
  • A dedicated opportunity table that highlights near term wins

You do not have to overhaul your entire stack to start. Begin with a single domain, a focused keyword list, and a daily schedule. As the workflow proves itself, you can expand, refine, and build additional automations on top of it.

Ready to put your rank tracking on autopilot?

  • Import the template into n8n
  • Create the Postgres tables
  • Configure credentials and run a test for one domain

From there, iterate. Adjust thresholds, refine keywords, plug in dashboards, and keep improving. Every small tweak makes your SEO process more scalable, more focused, and more resilient.

Replicate Competitor Ads with n8n — Ethical Guide

Replicate Competitor Ads with n8n – Technical & Ethical Implementation Guide

This guide documents a production-ready n8n workflow template (The Recap AI – Facebook Ad Thief) that automates the process of analyzing Facebook ads and generating new ad images that feature your own product. It explains the workflow architecture, node-by-node behavior, configuration requirements, and ethical constraints so that advanced users can deploy and adapt it safely.

1. Workflow Overview

The n8n template automates a full pipeline from Facebook Ad Library URL input to generated ad creatives stored in Google Drive. At a high level, the workflow:

  • Receives a Facebook Ad Library URL and a product image via a form trigger.
  • Invokes an Apify actor to scrape ad metadata and images from the provided URL.
  • Downloads the reference ad images, archives them to Google Drive, and converts them to base64.
  • Combines the reference images with your product image to build a structured prompt.
  • Calls Google Gemini generative endpoints through HTTP Request nodes to:
    • Generate or refine an image prompt.
    • Create new ad images that visually resemble the reference ad but feature your product and branding.
  • Performs prohibited-content checks on the model output.
  • Converts the generated base64 images back to binary and uploads them to Google Drive.

The objective is to accelerate creative experimentation and A/B testing by programmatically generating ad variants that are inspired by competitor ads, while intentionally replacing competitor branding with your own.

2. System Architecture & Data Flow

The workflow orchestrates multiple external services and n8n nodes. The data flow is roughly:

  1. Input collection
    • User submits:
      • Facebook Ad Library URL (source ad).
      • Product image (your brand asset).
  2. Ad scraping
    • n8n calls an Apify Facebook Ad Library scraper actor with the URL.
    • Actor returns ad metadata and image URLs.
  3. Reference image handling
    • Workflow downloads the ad images.
    • Uploads them to a designated Google Drive folder for archival.
    • Converts images to base64 for use in Gemini API requests.
  4. Prompt construction
    • Product image is also converted to base64.
    • Reference and product images are aggregated.
    • A structured text prompt is generated to instruct Gemini how to:
      • Replace competitor branding.
      • Preserve layout and style.
      • Maintain ad copy and calls to action, except for brand-specific elements.
  5. Image generation
    • HTTP Request nodes call Google Gemini (gemini-2.5 endpoints) to:
      • Draft or refine the image-generation prompt.
      • Generate one or more ad image variants.
  6. Safety checks
    • Response is inspected for prohibited content flags.
    • Flagged outputs are not stored or used.
  7. Output storage
    • Valid generated images are decoded from base64.
    • Binary files are created and uploaded to an output folder in Google Drive.

3. Node-by-Node Breakdown

3.1 Entry & Input Handling

form_trigger

  • Role: Primary trigger for the workflow.
  • Inputs collected:
    • Facebook Ad Library URL (string field).
    • Product image (file upload field).
  • Behavior: When a user submits the form, n8n starts the workflow and passes both the URL and the file reference to downstream nodes.

convert_product_image_to_base64

  • Role: Convert the uploaded product image into a base64-encoded string.
  • Reason: Image-generation APIs typically accept image data as base64 within JSON payloads rather than as multipart file uploads.
  • Output: A base64 string representing your product image, used later in prompt construction and Gemini requests.

3.2 Scraping & Reference Image Preparation

scrape_ads (Apify actor)

  • Type: Apify integration node calling a Facebook Ad Library scraper actor.
  • Credentials: Requires configured Apify OAuth credentials.
  • Key parameters:
    • Actor ID: Set to the Facebook Ad Library scraper actor ID.
    • Input: Includes the Facebook Ad Library URL from form_trigger.
    • limitPerSource: Controls the number of ads scraped per URL.
  • Output: JSON structure containing:
    • Ad metadata (e.g., creative details, cards).
    • Image URLs for each scraped ad.
  • Notes:
    • If the URL is invalid or the actor fails, this node will error. Handle by testing with a single known-good URL first.
    • Respect Apify usage limits and Facebook terms of service.

iterate_ads

  • Role: Iterate through each ad returned by the Apify actor.
  • Behavior:
    • Loops over the list of scraped ads.
    • For each ad, extracts the primary image URL or card image URL.
  • Output: One execution per ad, with ad-level context passed to downstream nodes.

download_image

  • Type: HTTP Request or dedicated file-download node, depending on template version.
  • Role: Download the reference image from the ad image URL.
  • Output: Binary image data for the reference ad image.
  • Edge cases:
    • Broken or expired URLs will cause download failures.
    • Non-image MIME types should be treated as errors or filtered out.

upload_ad_reference (Google Drive)

  • Role: Archive the downloaded reference ad image to Google Drive.
  • Credentials: Uses Google Drive OAuth credentials.
  • Configuration:
    • Target folder: A dedicated folder for reference ads.
    • File name: Often derived from ad ID or timestamp for traceability.
  • Purpose: Maintain a record of the original reference creatives for auditing and later review.

convert_ad_image_to_base64

  • Role: Convert each downloaded reference ad image into base64.
  • Output: Base64-encoded string for each reference ad image, used as part of the Gemini prompt context.

3.3 Aggregation & Prompt Construction

aggregate

  • Role: Aggregate multiple inputs:
    • Product image (base64) from convert_product_image_to_base64.
    • Reference ad images (base64) from convert_ad_image_to_base64.
  • Behavior:
    • Combines data into a single structure that can be used to construct a unified prompt.
    • May limit the number of reference images to avoid very large payloads.

build_prompt

  • Role: Generate the textual instructions that will be sent to the image-generation model.
  • Prompt strategy:
    • Brand replacement rules:
      • Explicitly instruct the model to replace competitor brand text (for example, “AG1”) with your brand (for example, “ThriveMix”).
      • Include partial-token handling such as “A”, “AG”, or “G1” so that partial branding is also removed or replaced.
    • Style and layout preservation:
      • Describe lighting, shadows, color grading, and overall mood to match the original ad.
      • Instruct the model to maintain composition and layout where possible.
    • Product placement rules:
      • If multiple products appear in the reference image, instruct the model to place your product in the primary, visually dominant position.
    • Copy and CTA handling:
      • Retain the original ad copy and call-to-action structure.
      • Replace only the brand names and brand-specific terms with your own.
  • Output: A finalized text prompt string, plus references to the base64 images that will be provided to Gemini.

3.4 Gemini Integration (Prompt & Image Generation)

generate_ad_image_prompt (Google Gemini)

  • Type: HTTP Request node.
  • Role: Call Gemini generative language or multimodal endpoint to refine or validate the prompt before image generation.
  • Endpoint: Configured to use gemini-2.5 API endpoints.
  • Authentication:
    • Uses a Google Cloud API key or similar credential configured in n8n via httpHeaderAuth.
  • Behavior:
    • Sends the constructed prompt and relevant context.
    • Receives a refined prompt or additional structured instructions to improve final image quality.

generate_ad_image (Google Gemini)

  • Type: HTTP Request node.
  • Role: Request final image generation from Gemini using the refined prompt and base64 images.
  • Endpoint: Gemini image-generation endpoint for the gemini-2.5 model family.
  • Inputs:
    • Text prompt from build_prompt or generate_ad_image_prompt.
    • Base64-encoded product and reference images.
  • Output:
    • Base64-encoded generated image(s).
    • Metadata that may include safety or content flags.
  • Edge cases:
    • Large base64 payloads can cause request size issues.
    • Unsupported image dimensions or formats may result in API errors.

3.5 Safety & Output Storage

check_if_prohibited

  • Role: Evaluate Gemini’s response for prohibited or sensitive content.
  • Inputs:
    • Model safety metadata or flags from the Gemini response.
  • Behavior:
    • If the result indicates disallowed content, the workflow branches to a path that skips storage and downstream use.
    • Otherwise, execution continues to image decoding and upload.
  • Purpose: Enforce platform and internal safety policies before any asset is persisted or used in campaigns.

get_image

  • Role: Convert base64-encoded generated images back into binary format.
  • Output: Binary image files suitable for upload to Google Drive or other storage systems.

upload_image (Google Drive)

  • Role: Store generated ad images in a dedicated Google Drive folder.
  • Credentials: Uses the same Google Drive OAuth credentials as the reference upload node.
  • Configuration:
    • Output folder: A separate folder for generated creatives, distinct from reference ads.
    • File naming: Can include timestamp, campaign ID, or source ad identifier.
  • Result: A collection of generated ad images ready for manual review and potential deployment.

4. Setup & Configuration Checklist

4.1 Prerequisites

  • Running n8n instance (self-hosted or cloud).
  • Access to:
    • Apify account with Facebook Ad Library scraper actor.
    • Google Drive API with OAuth credentials.
    • Google Cloud project with access to Gemini generative endpoints.

4.2 Installation Steps

  1. Import the template
    • Install n8n.
    • Import the provided workflow JSON into your n8n canvas.
  2. Configure Apify
    • Create or configure Apify OAuth credentials in n8n.
    • Open the scrape_ads node and set:
      • Actor ID to the Facebook Ad Library scraper actor.
      • Any required input fields for the actor (including the URL from form_trigger).
    • Set limitPerSource to control how many ads you scrape per run.
  3. Configure Google Drive
    • Create Google Drive OAuth credentials in n8n.
    • In upload_ad_reference, set:
      • Credential to the new Google Drive OAuth.
      • Folder ID or path for storing reference ads.
    • In upload_image, set:
      • Same or different credential, as needed.
      • Folder ID or path for storing generated creatives.
  4. Configure Gemini API access
    • In Google Cloud, provision an API key or appropriate credential that can call Gemini gemini-2.5 endpoints.
    • In n8n, create an HTTP Header Auth or

Mailing List Analysis with n8n Automation

Mailing List Analysis with n8n Automation

Systematic analysis of mailing lists is essential for identifying B2B opportunities, prioritizing outreach, and maintaining clean subscriber data. Doing this manually does not scale. In this article, you will learn how to use an n8n workflow template to fully automate mailing list analysis: from retrieving subscribers in MailerLite, through domain and website enrichment, to AI-driven classification and final storage in Google Sheets.

The workflow described here is based on the “Mailing List Analysis” template and is designed for automation engineers, growth teams, and data professionals who want a robust, repeatable process.

Business case and automation goals

Manual review of large subscriber lists is slow, inconsistent, and often misses valuable signals. By orchestrating this process in n8n, you can:

  • Quickly distinguish business emails from consumer email providers to surface B2B leads.
  • Enrich email domains with website metadata that reveals company focus, services, and market segment.
  • Feed AI models with structured content to classify website niche and offerings.
  • Persist enriched records in Google Sheets or downstream CRMs for segmentation and sales workflows.

Automation also improves repeatability. Once configured, the workflow can run on a schedule, continuously updating your lead intelligence without manual intervention.

High-level workflow architecture

The n8n template implements a multi-stage pipeline that can be summarized as follows:

  1. Retrieve subscribers from MailerLite and filter to active contacts.
  2. Extract and aggregate email addresses for downstream processing.
  3. Classify each email as consumer vs business (custom domain).
  4. Persist consumer emails for reference and route business domains to enrichment.
  5. Ping and crawl each business domain using an external crawler (for example, crawl4ai).
  6. Extract website metadata and content needed for analysis.
  7. Use an AI model (OpenAI via LangChain or similar) to infer niche and services.
  8. Write enriched subscriber data into Google Sheets for ongoing use.

The following sections walk through the main components of this workflow, along with configuration considerations and best practices for production deployments.

Triggers and list acquisition

Workflow trigger strategy

The template ships with a Manual Trigger node so you can run and debug the workflow interactively. For production environments, it is recommended to replace or complement this with a scheduled trigger, such as a Cron node, to execute the pipeline on a recurring basis (for example hourly or nightly). This keeps your mailing list intelligence continuously up to date.

Subscriber retrieval from MailerLite

The Get All Subscribers (MailerLite) node is responsible for fetching subscribers from your MailerLite account. You must configure your MailerLite API credentials in n8n before this node can operate.

Once subscribers are retrieved, the workflow applies a filter:

  • Filter Active Subscribers – only records where status == "active" are passed downstream. This avoids processing unsubscribed, bounced, or inactive contacts, which would waste crawler and API capacity.

After filtering, an Aggregate (Get Email Addresses) node collects email values into a structured list. This aggregation enables batch processing and simplifies later logic in the code and batch nodes.

Email classification and routing logic

Domain inspection with custom JavaScript

The workflow uses a Code node to classify email domains. This node runs custom JavaScript that inspects each email, extracts the domain, and determines whether it belongs to a common consumer provider or a custom/business domain.

The logic relies on a predefined list of consumer providers such as Gmail, Yahoo, Outlook, and similar services. Domains not in this list are treated as potential business domains and routed to the enrichment path.

// Simplified example used in the Code node
const commonDomains = ['gmail','yahoo','outlook','hotmail','aol','icloud','protonmail','zoho','yandex','live','msn','gmx'];
const result = [];
for (const item of $input.all()) {  for (const email of item.json.email) {  const domain = email.split('@')[1].toLowerCase();  const baseDomain = domain.split('.')[0];  result.push({ email, isCustomDomain: !commonDomains.includes(baseDomain) });  }
}
return result;

In production, you can expand this list or connect a domain intelligence API to improve classification quality. Some teams also add MX record checks or WHOIS lookups for additional signals.

Branching paths for consumer vs business emails

After classification, the workflow splits into two main branches:

  • Business emails (custom domains) – routed to a sequence of nodes that ping the associated domain, trigger a crawl, and perform AI analysis of the website.
  • Common provider emails – stored directly in Google Sheets (or another datastore) for record keeping. These are typically excluded from web crawling and AI analysis because they rarely map directly to a company website.

This routing ensures that expensive operations such as crawling and AI inference are reserved for high-value business leads.

Controlled processing with batching and rate management

SplitInBatches for concurrency control

The SplitInBatches node is central to managing throughput. It processes a configurable number of items at a time, which allows you to:

  • Respect rate limits imposed by crawlers and third-party APIs.
  • Prevent overloading your infrastructure or external services.
  • Tune performance by adjusting batch sizes as your data volume grows.

For larger lists, it is common to combine SplitInBatches with Wait or Sleep nodes to introduce pauses between batches and to avoid burst traffic to external services.

Domain validation, crawling, and content extraction

Domain ping and crawl initiation

For each business domain, the workflow performs a validation and crawl sequence. Typical nodes in this segment include:

  • Ping Website – checks whether the domain is reachable before initiating a full crawl.
  • Crawl Website – triggers an external crawler, such as crawl4ai, to fetch the site content.
  • Get Crawl Status – polls the crawler API until the crawl completes.

A combination of Wait/Sleep nodes and status checks ensures that the workflow does not proceed to analysis before the crawler has finished. This pattern is important for long-running or asynchronous crawls.

Metadata extraction for downstream analysis

Once the crawl is complete, a Set node (Get Metadata) structures the relevant information from the crawler response. Typical fields include:

  • Page title.
  • Meta description.
  • og:locale (or equivalent locale information).
  • Scraped markdown or HTML content that will be fed into the AI model.

By standardizing these outputs, you simplify the prompt and schema expected by the AI node and ensure consistent data going into your enrichment layer.

AI-driven website analysis

Using OpenAI or LangChain for classification

The Analyze Website step uses an AI model to transform raw website content into structured insights. The template uses an OpenAI model (optionally orchestrated through LangChain) to process the metadata and content captured from the crawler.

The AI node typically receives a prompt that asks it to return a JSON object describing:

  • What the website is about (short description).
  • The primary niche or industry.
  • The key services or products offered.

The AI response is parsed into fields such as about, niche, and services. These attributes are then attached to the corresponding email or domain record and passed to the storage layer.

Data persistence and downstream integration

Storing enriched records in Google Sheets

The final step in the template writes all relevant information into a Google Sheet using the Google Sheets node. Typical fields include:

  • Email address.
  • Flag indicating isCustomDomain.
  • Website description (about).
  • Niche or industry classification.
  • List of services or offerings.

The sheet effectively becomes your canonical dataset for segmentation, outreach planning, or further processing in a CRM. You can also use this sheet later for deduplication and caching to avoid reprocessing already analyzed domains.

Credential configuration requirements

Before running the workflow, ensure that the following credentials are configured in n8n:

  • MailerLite API credentials – used by the Get All Subscribers node.
  • Google Sheets OAuth2 credentials – required to write and update rows in your spreadsheet.
  • Crawler authentication – for example, HTTP header authentication for crawl4ai or any other crawler you use.
  • OpenAI API credentials – needed for AI analysis if you use OpenAI-based nodes or LangChain integrations.

Review access scopes and key rotation policies to align with your organization’s security standards.

Operational best practices

Throttling and rate control

Combine SplitInBatches with Sleep/Wait nodes to keep API usage within allowed limits. Adjust batch sizes and delays based on:

  • Limits defined by MailerLite, your crawler, and OpenAI.
  • Expected list size and desired throughput.
  • Infrastructure capacity on your n8n instance.

Deduplication and caching

To optimize cost and performance, avoid reprocessing subscribers or domains you have already analyzed. A common pattern is to:

  • Use a CompareDatasets node to compare newly fetched emails against rows stored in Google Sheets.
  • Skip emails or domains that already exist in your enriched dataset.
  • Cache website analysis results and reuse them if the domain appears again.

Improving domain classification

The initial consumer domain list is intentionally simple. For more reliable classification:

  • Maintain an up-to-date list of public email providers.
  • Integrate a third-party enrichment API to get company vs personal signals.
  • Use DNS queries (MX records) or WHOIS information to identify corporate domains.

Email deliverability checks

Integrating an email verification provider early in the workflow can significantly improve data quality. Consider connecting services such as ZeroBounce or Mailgun’s verification API to:

  • Remove invalid or risky addresses before crawling and AI analysis.
  • Reduce bounce rates in subsequent campaigns.

Error handling and observability

Production workflows should handle failures gracefully. In n8n, you can:

  • Use retryOnFail options on nodes that depend on external APIs.
  • Implement onError branches to capture failed crawls, unreachable domains, or AI timeouts.
  • Log errors to a separate Google Sheet or notify your team via Slack or email.

This approach gives you visibility into issues without interrupting the entire pipeline.

Security, privacy, and compliance

Mailing list analysis involves handling personally identifiable information, especially email addresses. To remain compliant with regulations such as GDPR and CCPA, keep the following checklist in mind:

  • Restrict access to the Google Sheet or any datastore containing PII.
  • Use secure credential management in n8n and rotate API keys regularly.
  • Mask or hash email addresses if you generate public reports or dashboards.
  • Document which external services (crawlers, AI providers) receive subscriber data and under what legal basis.
  • Ensure that your data processing agreements cover the use of AI and crawling services for this purpose.

Scaling and cost optimization

As your mailing list grows, so do crawl and AI inference costs. To scale efficiently:

  • Prioritize high-value domains such as those with recent engagement or strong lead scoring signals.
  • Sample large lists when first rolling out the workflow, then expand coverage as you validate ROI.
  • Store concise metadata and AI summaries rather than full page content to reduce storage needs.
  • Leverage caching so that domains are crawled and analyzed only when necessary.

Next steps: deploying and customizing the template

To put this workflow into practice:

  • Import the Mailing List Analysis n8n template and configure the required credentials (MailerLite, Google Sheets, crawler, OpenAI).
  • Run the workflow on a small subset of subscribers to validate outputs in your Google Sheet.
  • Iterate on:
    • Domain classification logic and consumer domain lists.
    • Crawl depth and allowed paths for your crawler.
    • AI prompts and output schema to better match your target industries and service categories.

Once validated, schedule the workflow and integrate the enriched data with your CRM or marketing automation platform to operationalize lead scoring and segmentation.

Import the workflow in n8n, connect your services, and start generating structured insights from your mailing list with minimal manual effort.