Automated Customer Insights from Trustpilot with n8n
Trustpilot reviews contain rich qualitative data about customer experience, product quality, and recurring issues. Manually reading and tagging hundreds or thousands of reviews is slow, inconsistent, and difficult to scale. This reference guide documents a reusable n8n workflow template that automates the full pipeline:
Scrape Trustpilot review pages for a specific company
Store vectors and metadata in Qdrant (vector database)
Cluster semantically similar reviews with K-means
Use an LLM to generate concise insights, sentiment labels, and improvement suggestions
Export the final insights to Google Sheets or downstream dashboards
The result is a repeatable, scalable workflow for automated customer insights that can be re-used across multiple brands or products with minimal configuration.
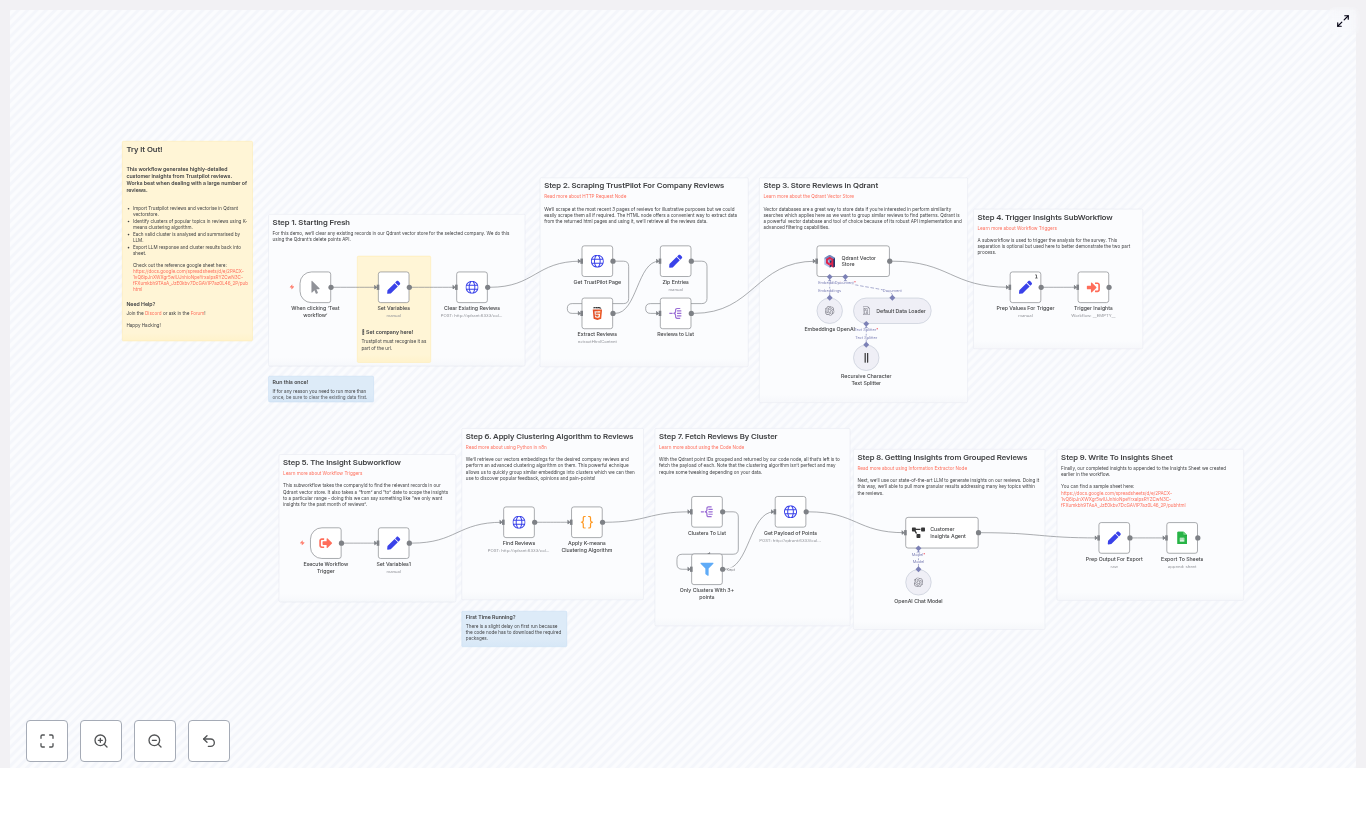
1. Workflow Overview
The n8n template implements an end-to-end pipeline with eight main phases:
Initialization – Set the target company identifier (Trustpilot URL slug).
Scraping – Use an HTML-capable node to fetch Trustpilot review pages.
Parsing – Extract structured fields such as author, date, rating, title, text, URL, and country.
Embedding & Storage – Generate embeddings with OpenAI and insert them into a Qdrant collection.
Insights Trigger – Invoke a sub-workflow with a specified date range for analysis.
Clustering – Retrieve embeddings from Qdrant and run a K-means clustering algorithm.
Cluster Aggregation – Fetch the original reviews for each cluster.
LLM Insights & Export – Use an LLM to generate insights, sentiment, and improvement suggestions, then export to Google Sheets.
Each step is implemented as one or more n8n nodes, connected in sequence to form a reproducible pipeline. The workflow can be run on demand or scheduled, depending on your monitoring needs.
2. Architecture & Data Flow
The workflow is orchestrated entirely within n8n, using external services for embeddings, vector storage, and spreadsheet export.
2.1 High-level components
n8n – Core automation engine that coordinates triggers, scraping, data transformation, and downstream integrations.
Trustpilot – Source of customer reviews, accessed via HTML scraping.
OpenAI Embeddings – Converts review text into dense semantic vectors for clustering and similarity analysis.
Qdrant – Vector database that stores embeddings plus rich metadata for filtered queries.
Clustering logic (K-means) – Groups similar reviews into a small number of coherent clusters.
LLM (e.g., OpenAI gpt-4o-mini) – Consumes grouped reviews and generates insights, sentiment labels, and improvement recommendations.
Google Sheets – Destination for exporting the final insights in a tabular format.
2.2 Data pipeline sequence
Input – The workflow starts with a companyId that corresponds to the Trustpilot slug (for example, www.freddiesflowers.com).
Scraping & Parsing – HTML content is fetched from Trustpilot and parsed into structured JSON objects, one per review.
Embedding – The review body (and optionally title) is passed to an OpenAI embeddings model such as text-embedding-3-small.
Vector storage – The resulting embeddings, along with review metadata, are stored in a Qdrant collection (for example, trustpilot_reviews).
Query & clustering – Based on a date range or other filters, a subset of points is retrieved from Qdrant and clustered via K-means.
Cluster aggregation – For each cluster, all associated reviews are grouped to form a coherent input set for the LLM.
Insight generation – The LLM processes each cluster and outputs a structured JSON with insight text, sentiment label, and suggested improvements.
Export – The results are combined with cluster metadata and written to Google Sheets for reporting or further analysis.
3. Node-by-Node Breakdown
The exact node naming may vary in your instance, but the logical responsibilities are consistent across implementations.
3.1 Initialization Nodes
Start / Manual Trigger Used to kick off the workflow. In production you may also attach a Cron node for scheduled runs.
Set Company Parameters A Set or Function node defines:
companyId – Trustpilot slug, for example www.freddiesflowers.com.
Optional additional parameters such as page range, maximum reviews, or date filters (if you extend the template).
3.2 Scraping & Parsing Nodes
HTTP Request / HTML Node (Trustpilot Scraper) Fetches HTML for one or more Trustpilot review pages. Typical responsibilities:
Construct Trustpilot URLs using companyId and page indices.
Handle pagination by iterating over pages until a configured limit.
Respect rate limits and delays between requests.
HTML Parsing / Code Node (Review Extractor) Parses the HTML response and extracts structured review data. The node outputs one item per review with fields such as:
author
review_date
rating (typically numeric)
title
text (main review body)
review_url
country
company_id (propagated from companyId)
This normalization step is crucial for reliable downstream embedding and metadata-based filtering.
3.3 Embedding & Qdrant Storage Nodes
OpenAI Embeddings Node Uses your OpenAI credentials to create embeddings for each review. Typical configuration:
Model: text-embedding-3-small (or another embedding model you select).
Input field: review text, optionally concatenated with the title.
The node outputs a vector representation for each review item.
Qdrant Insert Node Writes the embedding vectors and metadata into Qdrant. Configuration details:
Collection name: for example trustpilot_reviews.
Vector field: the embedding output from the previous node.
Payload / metadata: fields such as:
company_id
review_date
author
rating
country
review_url
raw or cleaned text
Optionally, an earlier node can clear existing points for a specific company or date range before inserting new ones.
3.4 Insights Sub-workflow Trigger
Workflow Trigger / Sub-workflow Node A separate sub-workflow is responsible for generating insights from stored vectors. It typically accepts:
companyId
start_date and end_date (date range for analysis)
These parameters are passed to Qdrant queries to scope which reviews are included in clustering.
3.5 Qdrant Retrieval & Clustering Nodes
Qdrant Search / Retrieve Node Queries Qdrant for embeddings matching the given filters. Common filters:
company_id == companyId
review_date within the provided range
The node returns vectors and associated metadata for all matching reviews.
Clustering Node (K-means via Code / Python) A Code or Python node runs a K-means clustering algorithm over the retrieved embeddings. Implementation details:
Configured for up to 5 clusters in the reference template.
Clusters with fewer than 3 reviews are filtered out to reduce noise.
Output items typically include:
Cluster identifier (for example, cluster_id)
Associated review IDs or indices
Optional cluster centroid vector (if you persist it)
3.6 Cluster Aggregation Nodes
Grouping / Code Node (Cluster Review Aggregator) For each cluster, this node:
Collects the full review texts and metadata belonging to that cluster.
Prepares a structured payload for the LLM, often as an array of reviews with rating, date, and text.
This ensures the LLM receives enough context to identify recurring themes rather than isolated comments.
3.7 LLM Insight Generation Nodes
LLM Node (Customer Insights Agent) Uses a model such as OpenAI gpt-4o-mini to analyze each cluster. The node is typically configured with:
A system prompt describing the role: for example, “You are a customer insights analyst summarizing Trustpilot reviews.”
Instructions to output a JSON object with:
Insight – a short paragraph summarizing the theme of the cluster.
Sentiment – one of strongly negative, negative, neutral, positive, strongly positive.
Suggested Improvements – concise, tactical recommendations based on the feedback.
The node returns structured data for each cluster that can be easily consumed by downstream tools.
3.8 Export to Google Sheets Nodes
Google Sheets Node Writes the LLM output and metadata into a spreadsheet. Typical columns include:
Cluster ID
Insight
Sentiment
Suggested Improvements
Company ID
Date range used for the analysis
Optional aggregate metrics such as average rating per cluster
This makes it easy to share insights with non-technical stakeholders and integrate with BI dashboards.
4. Setup & Configuration Checklist
Before running the template, complete the following configuration steps.
4.1 n8n Environment
Deploy an n8n instance (cloud or self-hosted).
Ensure outbound network access to:
Trustpilot (for scraping)
OpenAI API
Your Qdrant instance
Google APIs for Sheets
4.2 Credentials
OpenAI
Add OpenAI credentials in n8n.
Select an embeddings model, for example text-embedding-3-small.
Qdrant
Provision a Qdrant instance (cloud or self-hosted).
Create a collection, for example trustpilot_reviews, with vector size matching your embedding model.
Configure Qdrant credentials in n8n.
Google Sheets
Connect a Google account in n8n.
Configure the Google Sheets node with:
Target spreadsheet
Worksheet name
Column mapping for the exported fields
4.3 Workflow Parameters
Set companyId to the Trustpilot slug of the company to analyze, for example:
www.freddiesflowers.com
Optionally configure:
Number of pages or maximum reviews to scrape.
Date range for the insights sub-workflow.
Whether to clear existing Qdrant points for this company before inserting new ones.
After configuration, run the workflow once to validate scraping, embeddings, and Qdrant insertion, then schedule it or trigger it as needed.
5. Best Practices & Implementation Notes
5.1 Rate Limiting & Polite Scraping
When scraping Trustpilot, follow good scraping hygiene:
Respect robots rules and site usage policies.
Use n8n’s pagination features to control the number of requests per run.
Introduce delays between page requests to avoid overloading the site.
Consider caching or deduplicating already-processed reviews to minimize repeated scraping.
5.2 Metadata Strategy in Qdrant
Rich metadata significantly improves query flexibility and insight quality. At minimum, store the following fields as Qdrant payload:
company_id
review_date
author
rating
country
review_url
text (or a cleaned version)
This enables:
Date-range scoped analyses.
Filtering by rating or geography.
Linking back to the original review for manual inspection.
5.3 Cluster Size & Validation
The reference workflow uses K-means with up to 5 clusters, then filters out clusters containing fewer than 3 reviews. Practical guidelines:
For small datasets, too many clusters lead to noisy, low-signal groups.
For larger datasets, increasing the cluster count can surface more granular themes.
Create an iCalendar Invite and Email It Automatically with n8n
Picture this: you just scheduled a meetup, and now you are stuck in calendar-invite purgatory, copying dates, pasting Zoom links, and praying you did not typo the time zone. Again.
Good news, you do not have to live like that. With a tiny but mighty n8n workflow, you can generate an iCal .ics file and email it out automatically. No more repetitive clicking, no more “wait, which time is correct?” messages, just a neat invite landing in everyone’s inbox.
In this guide, we will walk through a simple 3-node n8n workflow that:
Creates an iCalendar .ics event file
Attaches it to an email
Sends it using your SMTP provider
All of that with a single manual trigger. Your future self will be very grateful.
Why bother automating iCal invites in n8n?
Besides protecting your sanity, there are some very practical reasons to let n8n handle calendar invites for you:
Save time – Stop manually creating individual calendar events and emails. Let the workflow do it in one go.
Consistent formatting – iCal .ics files play nicely with Google Calendar, Outlook, Apple Calendar, and most other calendar apps.
Highly flexible – Add event descriptions, locations, reminders, recurrence rules, and more. You can even plug this into other systems like CRMs or form tools.
In short, you get fewer repetitive tasks and more time for everything else you actually want to do.
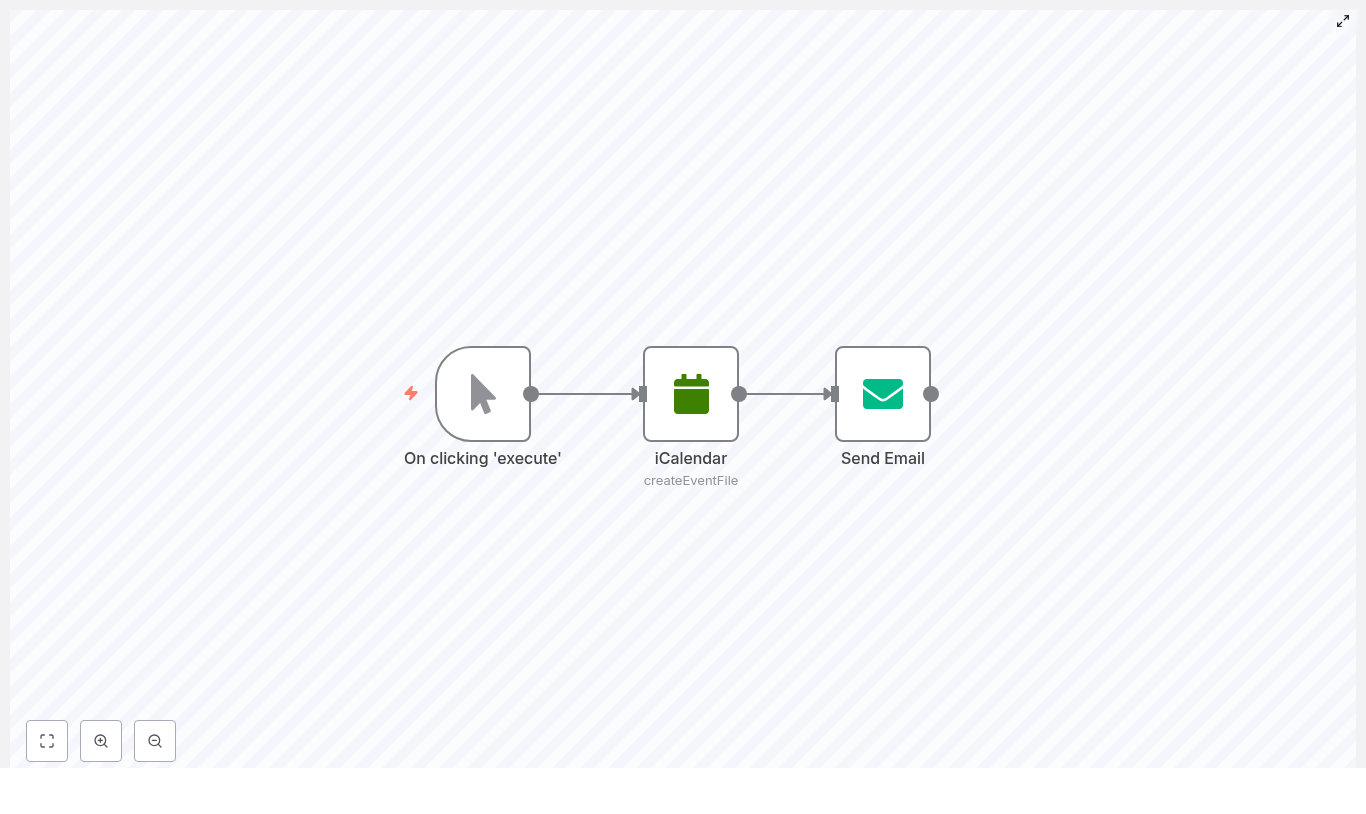
What this n8n workflow actually does
The workflow is intentionally simple, so you can understand it at a glance. It uses just three nodes:
Manual Trigger – Lets you start the workflow with a click from the n8n editor, great for testing or one-off runs.
iCalendar – Generates an .ics file that contains your event details.
Send Email – Sends an email via SMTP and attaches that freshly created .ics file.
Visually, you get a simple chain:
Manual Trigger → iCalendar → Send Email
The iCalendar node outputs a binary file, which the Send Email node picks up as an attachment. That is the secret sauce that turns “just an email” into “proper calendar invite.”
Before you start: what you need
Set yourself up with the basics first:
An n8n instance, either cloud or self-hosted.
SMTP credentials for your email provider, such as Gmail, Outlook, or any SMTP-compatible service.
Basic familiarity with n8n, like how to add nodes and execute a workflow from the editor.
Once you have those, you are ready to build.
Quick overview: how to build the workflow
We will go through each node in detail, but here is the high-level game plan:
Add a Manual Trigger node so you can start the workflow on demand.
Configure an iCalendar node to create the .ics event file.
Configure a Send Email node, attach the generated .ics, and send it via SMTP.
Now let us put it together step by step.
Step 1 – Add and name the Manual Trigger node
Start a new workflow in n8n and add a Manual Trigger node.
This node does exactly what it sounds like: when you click “Execute workflow” in the editor, it fires. Perfect for testing and for workflows you want to trigger by hand.
Give it a descriptive name, for example:
On clicking 'execute'
That way, when you revisit the workflow later, you will remember what kicks it off.
Step 2 – Create the event with the iCalendar node
Next, add an iCalendar node and connect it to the Manual Trigger node.
In the iCalendar node settings:
Set the Operation to createEventFile.
This tells n8n that you want to generate an event as an .ics file. Now fill in the key fields:
Title – The event name, for example n8n Community Meetup.
Start – Event start time in ISO format, for example 2021-06-11T15:30:00.000Z.
End – Event end time in ISO format.
Additional fields (optional) – Add extra details such as:
Location
Description
Reminders
UID
Timezone
Recurrence rules (RRULE)
Here is an example configuration for a meetup:
<Title>: n8n Community Meetup
<Start>: 2021-06-11T15:30:00.000Z
<End>: 2021-06-11T16:15:00.000Z
<AdditionalFields.description>: "Join us for an n8n community meetup to share projects and tips."
When this node runs, it outputs a binary .ics file in the node data. That binary output is what you will attach in the next step.
Step 3 – Attach and send with the Send Email node
Now add a Send Email node and connect it after the iCalendar node.
Configure it with your email details:
SMTP credentials – Select or create an SMTP credential in n8n for your provider, such as Gmail or Outlook.
To – The recipient email address. For testing, send it to yourself first.
Subject – For example: n8n Community Meetup 🚀
Text – The body of the email. Something like:
Hey,

We are excited to invite you to the n8n community meetup!

With this email you will find the invite attached.

Looking forward to seeing you at the meetup!

Cheers,
Team
The crucial part is the attachment setting:
Attachments – Set this to data (or the correct binary property name from the iCalendar node).
The iCalendar node usually outputs the binary file under a property like data or file, depending on your setup. Make sure the Send Email node is pointing to that exact property so it knows what to attach.
Run the workflow and confirm everything works
Time for the satisfying part.
In the editor, click the Manual Trigger node and hit Execute.
Check the inbox you used in the To field.
Verify that:
The email arrived successfully.
The .ics file is attached.
Opening the .ics in your calendar app shows the correct title, start and end times, and description.
If everything looks good, you have just automated the most annoying part of scheduling.
Common issues and how to fix them
If something misbehaves, here are the usual suspects and how to deal with them.
No attachment in the email Check that:
The iCalendar node is actually outputting binary data.
The Send Email node Attachments setting is pointing to the correct binary property, typically data.
Email fails to send
Test your SMTP credentials outside n8n if possible.
Double-check the SMTP host, port, and TLS/SSL options.
For Gmail, make sure you have enabled app access or created an app-specific password.
Calendar app refuses the .ics file
Open the .ics file in a text editor.
Confirm it contains valid VCALENDAR and VEVENT sections.
Ensure your timestamps are in UTC or include proper timezone information.
Level up: advanced n8n iCal tricks
Once the basic workflow is working, you can start making it smarter and more dynamic.
Use expressions and other nodes Pull event data from sources like Google Sheets, Airtable, or a form submission node, then use expressions in the iCalendar node to fill in title, time, and description automatically.
Add attendees in the iCal event Use the attendee fields in the iCalendar node’s Additional Fields. Some calendar apps will interpret these and send built-in invitations to those attendees.
Schedule recurring events Need a weekly training or monthly check-in? Use RRULEs in the iCal node to define recurrence rules.
Bulk invites Loop over a list of recipients and:
Create personalized .ics files per attendee, or
Reuse a single event and add multiple attendee entries in the iCal data.
This is where the workflow stops being “just a shortcut” and starts feeling like your personal scheduling assistant.
Real-world use cases for this workflow
Here are some practical ways to put this n8n iCal template to work:
Webinars and online events – Automatically send calendar invites after someone registers via a form.
Hiring and interviews – Trigger an invite when an interview is scheduled in your internal tool.
Training sessions – Batch-generate invites for recurring training and email them to all participants.
If you already have a process where you think “I keep sending the same calendar invite over and over,” this workflow probably fits.
Security best practices
Even simple automations deserve good security habits:
Store SMTP credentials in n8n Credentials Never hardcode usernames or passwords directly in workflow fields. Use n8n’s credential manager instead.
Sanitize user input If event titles or descriptions include user-supplied text, sanitize or validate it first to avoid potential injection issues.
Wrapping up
With just three nodes – Manual Trigger, iCalendar, and Send Email – you can fully automate the creation and distribution of calendar invites in n8n. It is a small workflow with a big impact on your day-to-day efficiency.
Use this as a starting point, then connect it to forms, CRMs, or other calendar systems to build more advanced automations. You can also export your workflow JSON and reuse it across different environments if you want a consistent setup everywhere.
Next steps: try the template
Ready to retire manual calendar invites? Spin up this workflow in your n8n instance and customize it for your own events. If you get stuck or want to adapt it for a specific use case, reach out, ask questions, and keep iterating until it fits your automation stack perfectly.
AI Sub-Agent Demo with n8n: Modular Workflow Guide
Imagine being able to sit down, type a single topic, and watch a complete, researched, SEO-friendly blog post appear on its own – title, structure, sections, citations, and even a featured image. That is the kind of leverage this n8n template is designed to give you.
This guide walks you through an AI Sub-Agent Demo workflow in n8n that connects a set of specialized AI agents and tools into one cohesive content-production pipeline. You will see how a Blog Writer Agent, Research Agent, Title and Structure Tool, Perplexity and Tavily integrations, and an image generator all work together so you can automate more, focus on higher-value work, and gradually build your own scalable content engine.
The starting point: content overload and scattered tasks
If you create content regularly, you know how fragmented the process can feel:
Researching a topic across multiple tabs
Trying to find the right angle and SEO-friendly title
Outlining, drafting, and editing each section
Searching for or generating images that match your story
Keeping everything consistent and ready to publish
Each step on its own is manageable, yet together they quickly consume time and energy. The more you publish, the harder it becomes to stay consistent without burning out or dropping quality.
This is where automation with n8n and a modular AI workflow can completely change how you work. Instead of doing every step manually, you can design a system that handles the heavy lifting and lets you step in as the editor, strategist, and creative director.
Shifting your mindset: from manual work to modular automation
Powerful automation rarely starts as a single massive, perfect workflow. It grows from small, well-defined pieces that you can test, refine, and reuse. This template embodies that mindset by using a modular AI sub-agent architecture rather than one giant prompt that tries to do everything.
In this approach, each part of the process has a clear responsibility:
Search and research
Title and structure generation
Section writing
Image generation
Memory and context handling
Instead of a monolithic prompt that quickly becomes brittle, you get a collection of focused agents and tools that you can evolve step by step. That modularity is what turns this template into a long-term asset for your content automation strategy.
Why a modular AI sub-agent architecture unlocks growth
Breaking your workflow into sub-agents and tools gives you multiple advantages that compound over time:
Clear separation of concerns for easier debugging, experimentation, and iterative improvement.
Flexibility to swap models or tools like Perplexity, Tavily, OpenAI, Anthropic, or Replicate without rewriting your entire workflow.
Reusability of components across other n8n workflows, such as repurposing the Research Agent or Image Tool for different projects.
Better observability and cost control, since each node has a focused role and you can monitor where time and tokens are being spent.
With this architecture, your automation becomes something you can steadily refine instead of something you fear touching. Each improvement to a sub-agent benefits everything that uses it.
From idea to output: how this n8n template supports your journey
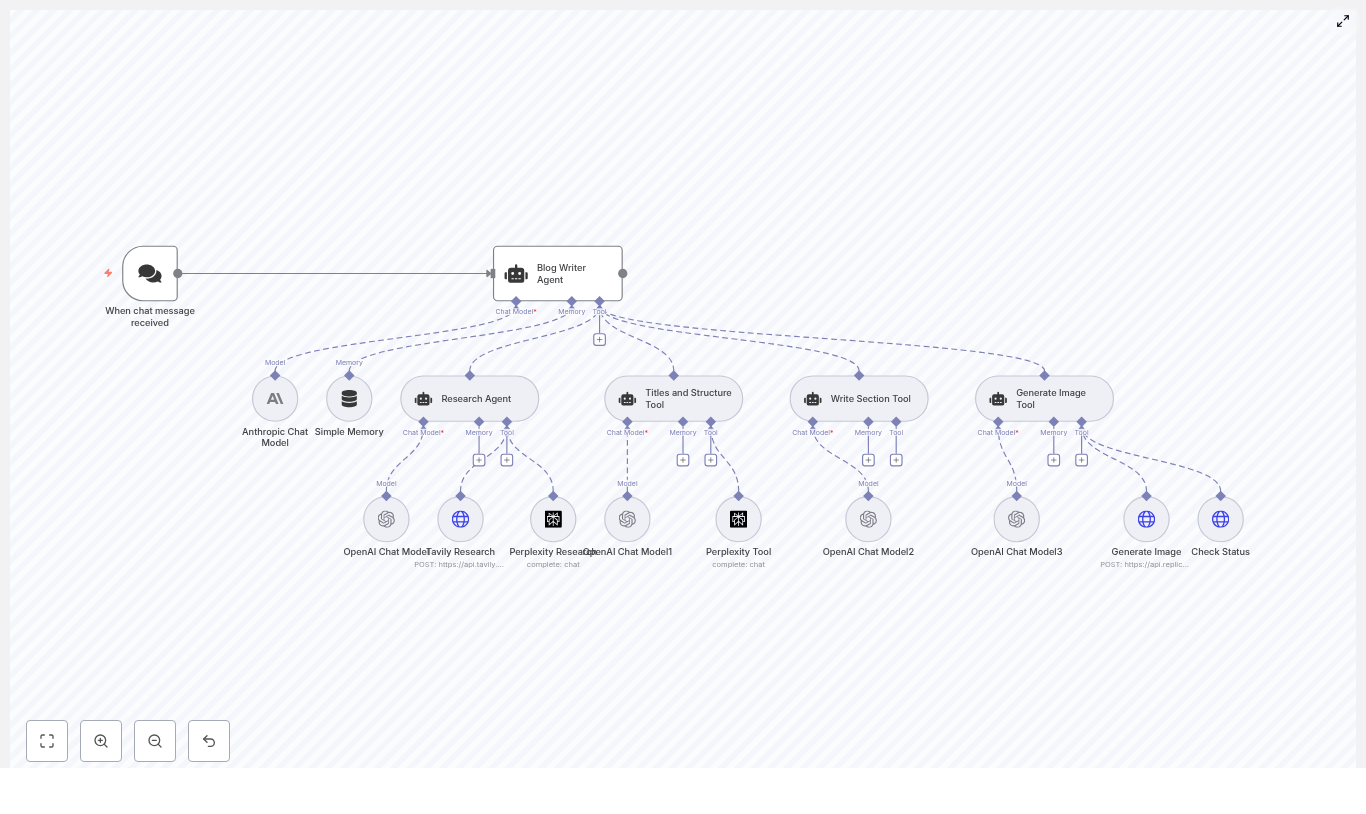
The AI Sub Agent Demo template connects a chat-based trigger to a central Blog Writer Agent, which then coordinates a network of specialized tools and sub-agents. Think of it as your automated editorial team, working together behind the scenes every time a new topic comes in.
Key nodes and what they do for you
When chat message received – A webhook or chat trigger that starts the workflow whenever a user sends a topic or keyword.
Blog Writer Agent – The orchestrator that calls research, structure, drafting, and image tools to assemble a complete blog post.
Anthropic Chat Model and multiple OpenAI Chat Model nodes – The language models that handle reasoning, drafting, and refinement for different sub-tasks.
Simple Memory – A buffer memory node that keeps a rolling window of recent context so the system can handle multi-turn conversations and edits.
Research Agent + Tavily Research + Perplexity Research – A research trio that pulls in fresh, grounded information and sources for accurate, citation-ready content.
Titles and Structure Tool – Generates SEO-optimized titles, H2 and H3 headings, and a concluding section outline using Perplexity and an LLM.
Write Section Tool – Drafts each H2 or H3 section based on research, prompts, and memory, iterating until the quality is acceptable.
Generate Image Tool + Generate Image (Replicate) + Check Status – Creates a featured image prompt, sends it to Replicate, and polls until the final image URL is ready.
All of these pieces work together to turn a single input message into a publish-ready blog post. The beauty is that you can tune or replace any part as your needs evolve.
Walking through the workflow: step-by-step execution
To really see the potential, it helps to understand what happens under the hood when the workflow runs. Here is the typical path from trigger to final output.
Trigger the workflow A chat message or webhook event hits the When chat message received node. This carries the topic or keyword that you want to write about into the workflow.
Let the Blog Writer Agent orchestrate The Blog Writer Agent receives the topic and calls the Titles and Structure Tool. This tool uses Perplexity and an LLM to propose a compelling, SEO-friendly title and a structured outline of H2 and H3 headings, including a conclusion.
Research each section For each section in the outline, the Blog Writer Agent calls the Research Agent. That agent uses Tavily and Perplexity nodes to gather current information, summaries, and source links so your content is grounded in real data rather than guesswork.
Draft the content The Write Section Tool takes the research output, the section heading, and the memory context, then uses the configured language models to write each section. It can iterate until the content reaches the quality level defined in the prompts.
Generate a featured image Once the text draft is ready, the Generate Image Tool creates an image prompt and sends it to the Generate Image node powered by Replicate. The Check Status node then polls the job until the image is complete and returns a final image URL to embed.
Compile the final article The Blog Writer Agent brings everything together: H1 title, introduction, body sections, conclusion, and featured image URL. The result is an HTML-ready blog post that you can publish directly or send to platforms like WordPress.
Once you understand this flow, you can start to tweak each stage to match your voice, brand, and publishing workflow.
Agents and tools: how the pieces fit together
Agents vs tools in n8n
In this template, it helps to distinguish between agents and tools:
Agents are higher-level entities that use language models to plan and execute tasks end to end. The Blog Writer Agent and Research Agent are examples. They decide what to do and which tools to call.
Tools are specialized connectors or actions, such as HTTP requests, Perplexity queries, Tavily searches, or image generation calls. They perform specific operations on behalf of agents.
By designing clear, concise tool contracts, you make your system easier to maintain and extend. When you want to improve performance or switch providers, you often only need to change the tool node, not the entire agent logic.
Perplexity and Tavily for grounded research
The Perplexity and Tavily integrations are crucial for keeping your AI-generated content accurate and trustworthy. Instead of relying purely on model memory, these tools:
Fetch up-to-date information from the web
Provide summaries and structured results
Return original source links for citations and verification
The Research Agent aggregates this data, then sends both summarized content and source URLs back to the Blog Writer Agent and Write Section Tool. This lets you include citations and reduces the risk of hallucinated facts.
Using memory to support longer interactions
The Simple Memory node acts as a rolling context buffer. It stores a limited window of recent interactions so the workflow can:
Handle iterative edits and clarifications
Maintain context across multiple turns
Keep prompts within a manageable size for cost and performance
In this template, the contextWindowLength is set to 10. You can adjust this value to balance relevance against token usage. A larger window keeps more history at a higher cost, while a smaller one is cheaper but more focused.
Configuring the template for your own automation journey
Before you run this workflow in your n8n instance, take a moment to configure the essentials. This is where you align the template with your tools, budget, and brand.
API keys and credentials Add credentials for OpenAI, Anthropic, Perplexity, Tavily, and Replicate in n8n. Make sure each node references the correct credential entry.
Trigger and chat integration Configure the webhook URL and connect it to your preferred chat interface, such as Slack, Discord, or a custom chat UI. This is how you will send topics into the workflow.
Model selections Adjust the model choices for each Chat Model node. For example, you might use gpt-4.1-mini or gpt-4.1-nano for drafts and reserve larger models or Anthropic variants for more complex reasoning, depending on your latency and cost targets.
Image generation style Tune the Replicate prompt style, aspect ratio, megapixels, and steps so that the generated images match your visual identity.
Research depth and memory size Configure Tavily and Perplexity search limits, as well as the memory window size, to keep runtime and data volume aligned with your needs.
These adjustments turn a generic template into a workflow that truly reflects your goals and constraints.
Optimizing your n8n AI workflow for scale and quality
Once the template is running, you can start optimizing. The goal is to keep improving quality while protecting your time and budget.
Use smaller models for early drafts Start with cheaper, faster models for initial content and reserve higher-capacity models for final polishing or complex reasoning steps.
Keep sub-agent prompts narrow Give each agent a focused, specific responsibility. Narrow prompts reduce hallucinations and produce more consistent results.
Control research intensity Limit search depth and number of results when speed or cost is a concern. For recurring topics, consider caching frequently used sources.
Log outputs for learning and reuse Store research snippets, generated text, and image URLs. This helps with auditing, prompt tuning, and building a knowledge base for future workflows.
Manage rate limits Use rate limiting or queues for external APIs so your workflow stays stable even as you scale up content production.
Think of optimization as an ongoing process. Every small improvement you make to a node or prompt can pay off across dozens or hundreds of future articles.
Troubleshooting: turning roadblocks into refinements
As you experiment with automation, occasional issues are normal. They are also valuable signals that help you strengthen your system.
Missing API keys or 401 errors Double-check that all credentials are correctly added in n8n and that each node is using the right credential entry.
Long runtimes or timeouts Reduce research depth, limit search results, or switch to faster model variants. For larger jobs, consider splitting the work into smaller batches.
Hallucinated or inaccurate facts Lean more heavily on the Research Agent, ensure citations are included, and verify that Tavily and Perplexity are configured correctly.
Image generation failures Check your Replicate quota, confirm the selected model, and review prompt parameters. The polling logic in Check Status should handle temporary delays gracefully.
Each resolved issue moves your workflow closer to a stable, production-ready content pipeline.
Security and privacy: building automation you can trust
As you scale your n8n workflows, it is important to protect both your data and your users.
Treat all API keys and credentials as sensitive information.
Use environment variables or n8n’s credentials storage rather than hardcoding keys.
Restrict access to your n8n instance and logs to only those who need it.
Define data retention policies for generated content, research snippets, and logs.
If you process personal data, ensure compliance with regulations like GDPR and CCPA.
Good security practices let you scale confidently without compromising trust.
Bringing it all together: your next step in automation
The AI Sub Agent Demo template is more than a one-off workflow. It is a modular blueprint for building production-ready content pipelines in n8n. By separating research, structure, drafting, and image generation into coordinated sub-agents and tools, you gain a system that is easier to understand, improve, and scale.
Every time you run it, you reclaim time that you can invest back into strategy, creativity, and growth. Over time, this becomes a powerful advantage for you or your business.
Call to action: Import the AI Sub Agent Demo template into your n8n instance, plug in your API keys, and run a sample topic. Watch the full automated blog generation flow in action, then start tweaking it to match your voice and workflow. From there, keep experimenting, extending, and integrating it with your CMS or other systems so it becomes a cornerstone of your automated content strategy.
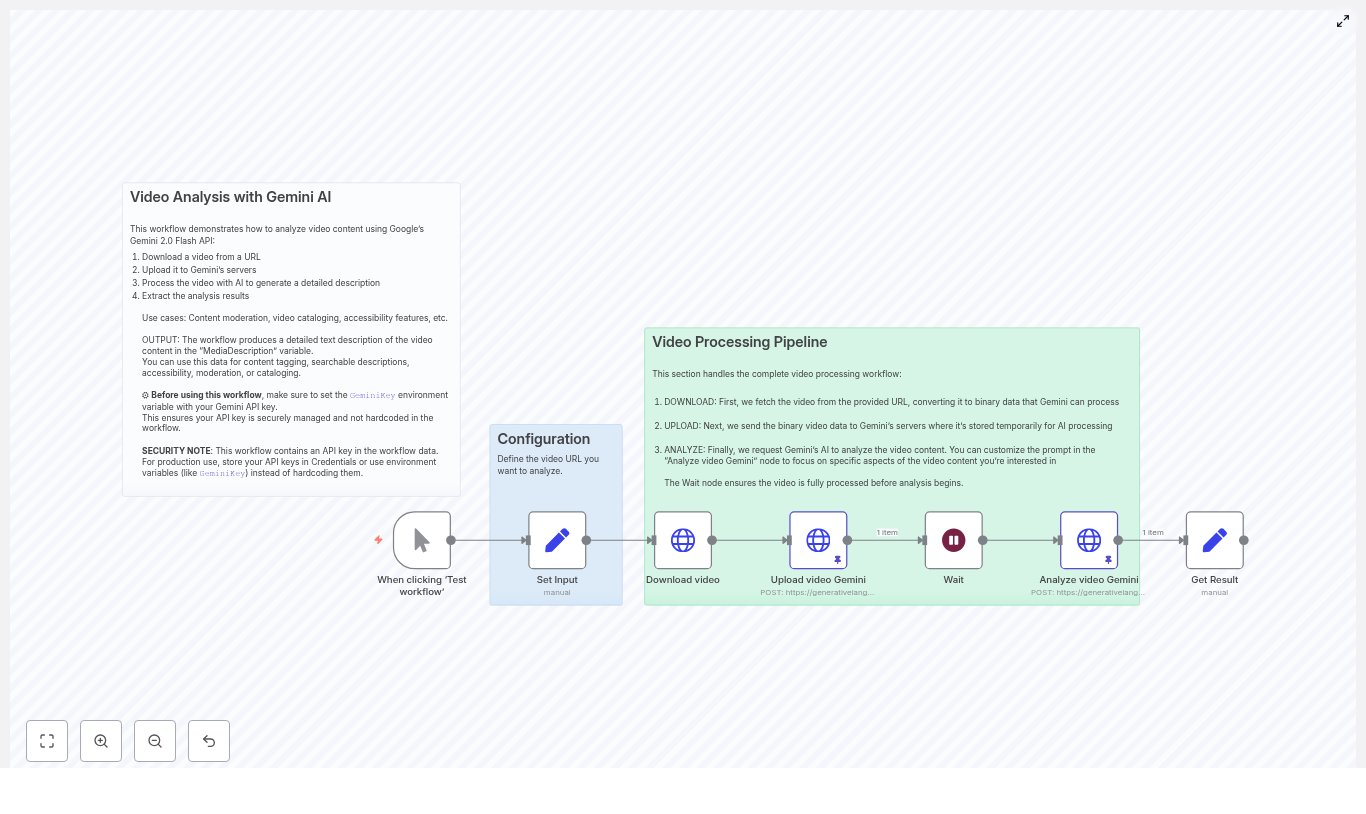
This article explains how to design a robust, production-grade video analysis workflow in n8n using Google Gemini (Generative Language API). It covers the end-to-end pipeline, node configuration, prompt-engineering strategies, and operational best practices for handling large video files and sensitive visual content.
Architecture of the Gemini video analysis workflow
At a high level, the n8n workflow automates the full lifecycle of video analysis with Gemini:
Accept a video input or URL
Download the video file as binary data
Upload the binary to Gemini’s file endpoint
Wait for Gemini to complete file processing
Invoke the Generative Language API with a tailored prompt
Store, route, or enrich downstream systems with the generated metadata
Each step is implemented as one or more n8n nodes, which makes the pipeline modular, debuggable, and easy to extend with additional integrations such as CMSs, databases, or messaging tools.
Why use Gemini for automated video analysis?
Gemini is well suited for video understanding tasks because it can convert raw visual content into descriptive, human-readable metadata. Typical outputs include:
Scene and shot descriptions
Lists of objects, people, and environments
Visual style and color characteristics
Branding, logos, and creative techniques
Combined with n8n, this capability becomes a fully automated pipeline. Videos can be ingested from storage, CDNs, or public URLs, analyzed by Gemini, and the results automatically pushed into your data stack for search, moderation, accessibility, or marketing analytics.
Core workflow components in n8n
The workflow typically consists of the following key nodes, which you can adapt to your own environment and integrations.
1. Trigger and input handling
Start with a Manual Trigger or any other trigger node appropriate for your system, such as a webhook, schedule, or event from your storage provider. The trigger should provide or resolve the video location, for example a URL to a video file.
Input: Video URL or file reference
Best practice: Validate that the URL is reachable and correctly formatted before proceeding
2. Downloading the video (HTTP Request – binary)
Next, configure an HTTP Request node to download the video and store it as binary data that n8n can pass to Gemini.
Method: GET
URL: The video URL provided by the trigger
Response handling: Enable binary data, map the binary property name (for example data)
Operational considerations:
Implement error handling for HTTP status codes such as 404 and 403
Enforce a maximum file size to protect your n8n instance from large payloads
Configure appropriate timeouts for slow networks or large files
3. Uploading the video to Gemini (HTTP Request – multipart/binary)
Once the video is available as binary data, use another HTTP Request node to upload the file to Gemini’s file upload endpoint. This typically uses a multipart or raw binary upload pattern.
Key configuration points in n8n:
Method: POST
Body: Binary data from the previous node
Content type: Set to handle binary data and map the correct binary field
Make sure the mimeType and content length reflect the actual video file. The upload response will contain a file identifier or URI that you will reference in subsequent analysis requests.
4. Waiting or polling for Gemini file processing
Gemini may process uploaded files asynchronously. Before requesting analysis, ensure that the file has reached a ready state.
There are two common strategies:
Fixed wait: Use a Wait node to pause the workflow for a few seconds. This is suitable for small files and simple prototypes.
Polling loop: For larger files or production workloads, implement a short polling loop that repeatedly queries the file status until it transitions from PROCESSING to SUCCEEDED.
Best practices:
Use sensible backoff intervals to avoid excessive API calls
Implement a maximum number of retries and a timeout to prevent workflows from hanging indefinitely
5. Requesting video analysis from Gemini (HTTP Request – JSON)
After the file is processed, use another HTTP Request node to call the Gemini Generative Language API. This node sends a prompt and the file reference and receives a structured textual description in response.
Example JSON request body:
{  "contents": [  {  "role": "user",  "parts": [  {  "fileData": {  "fileUri": "https://generativelanguage.googleapis.com/v1beta/files/FILE_ID",  "mimeType": "video/mp4"  }  },  {  "text": "Describe in detail what is visually happening in the video, including key elements, actions, colors, branding, and notable creative techniques."  }  ]  }  ],  "generationConfig": {  "temperature": 1.0,  "topK": 40,  "topP": 0.95,  "maxOutputTokens": 2000,  "responseModalities": ["Text"]  }
}
Key configuration parameters:
fileUri: The URI or ID returned from the upload step
mimeType: The video MIME type, for example video/mp4
temperature: Controls creativity vs determinism. Lower values yield more consistent, factual outputs. Higher values produce richer, more expressive descriptions.
maxOutputTokens: Limits the length of the generated response and directly affects cost and latency.
6. Storing and routing the results
Once Gemini returns the analysis, use a Set node to extract and structure the relevant fields, for example:
response.candidates[0].content.parts[0].text for the primary textual description
From there, connect to:
A database node (PostgreSQL, MySQL, etc.) to persist structured metadata
A CMS node to enrich media records with tags and descriptions
Messaging integrations such as Slack or email nodes for notifications and review workflows
Prompt-engineering strategies for expert-level video descriptions
The quality and usability of the output depend heavily on the prompt design and the expected output structure. For automation professionals, it is important to design prompts that are both human-readable and machine-parseable.
Designing structured outputs
Explicitly request the format you need, for example:
Bullet points grouped by scene
Timestamped descriptions for key events
JSON with fields like scenes[], objects[], timestamps[]
Include a brief schema in the prompt when you intend to parse results programmatically.
Use consistent wording and structure across workflows to simplify downstream parsing and analytics.
Controlling level of detail and cost
Use phrases such as “brief summary”, “high level description”, or “frame-by-frame description” depending on your needs.
Align maxOutputTokens with the required granularity. Shorter outputs reduce cost and processing time.
Adjust temperature and topP for more deterministic outputs in compliance or moderation scenarios.
Privacy-aware prompt design
Instruct the model to avoid naming or identifying private individuals.
Use neutral labels such as “person”, “group of people”, or “public figure” instead of personal names.
Clarify that the analysis is intended for benign purposes such as accessibility, cataloging, or safety checks.
Handling privacy, safety, and compliance
Video content frequently includes people, personal environments, and potentially sensitive scenes. When designing Gemini-based analysis pipelines, align with your organization’s privacy, safety, and regulatory requirements.
Configure prompts to avoid unnecessary personal identification or inference.
Restrict use cases to acceptable scenarios such as captioning, alt-text generation, content discovery, or policy-compliant moderation.
Ensure that storage and sharing of analysis results comply with local data protection laws and internal governance policies.
Consider retention policies for generated metadata and intermediate artifacts such as file IDs.
Reliability, error handling, and observability
To operate this workflow reliably at scale, invest in robust error handling and monitoring within n8n.
URL validation: Verify that remote URLs are reachable and valid before attempting downloads.
Retries with backoff: For transient network or API errors, implement retries with exponential backoff on HTTP nodes.
State checks: Only request analysis when the Gemini file state indicates readiness, such as SUCCEEDED.
Auditability: Log or store request IDs, timestamps, and file IDs for debugging and compliance.
Rate limiting: Limit concurrent uploads and respect Gemini API quotas to avoid throttling or quota exhaustion.
Cost and performance optimization
Video analysis is resource-intensive and can generate significant API usage. Several strategies help optimize cost and performance without degrading quality.
Pre-trim content: Cut videos server-side to only analyze relevant segments or key scenes.
Adjust token limits: Reduce maxOutputTokens when only concise metadata is required.
Sampling strategies: For coarse analysis, downsample frame rates or use shorter clips that still capture the essential content.
Batch processing: If your use case allows, group smaller clips or process them in controlled batches to manage throughput.
Representative use cases for Gemini video analysis with n8n
This workflow pattern is applicable across multiple domains and teams:
Content cataloging: Automatically enrich media libraries with searchable descriptions, tags, and scene-level metadata.
Accessibility: Generate alt-text and caption suggestions to improve accessibility for video content.
Moderation and compliance: Extract scene descriptions to help flag potentially sensitive, unsafe, or policy-violating content.
Marketing and creative intelligence: Identify branding, composition patterns, and creative techniques across promotional or campaign videos.
Preflight checklist for the n8n Gemini workflow
Before running the workflow in a production or staging environment, verify the following configuration items:
Define an environment variable, for example GeminiKey, to store your API key securely. Avoid hardcoding credentials in nodes.
Confirm that your n8n instance has sufficient disk space for temporary binary files and that cleanup policies are in place.
Configure appropriate timeouts on download and upload HTTP nodes to handle large video files.
Customize the analysis prompt to match your required output structure, including any JSON schemas or field names you plan to parse.
Persisting results to a CMS or database
To operationalize the analysis, connect the workflow directly to your content or data platforms:
Use a Set node to map Gemini’s response fields, for example:
description from response.candidates[0].content.parts[0].text
Derived tags, categories, or timestamps if requested in the prompt
Send the structured payload into:
A CMS node to update video entries with descriptions and tags
A database node to store metadata for search, analytics, or downstream ML models
Notification channels (Slack, email) for human review or approval workflows
From prototype to production
Combining n8n with Gemini provides a flexible and extensible approach to extracting rich semantic metadata from video content. A recommended adoption path is:
Start with small, representative videos to tune prompts, generation parameters, and wait times.
Iterate on prompt structure and output schemas until they align with your parsing and reporting needs.
Introduce robust polling, retries, and logging as you move towards production-scale workloads.
Continuously review privacy, safety, and cost implications as you expand coverage.
Call to action: Deploy the workflow in your n8n instance, set the GeminiKey environment variable, provide a sample video URL to the input node, and run the flow. From there, experiment with routing the results into a spreadsheet, your CMS, or Slack to demonstrate immediate value to stakeholders.
Need help tailoring prompts, output schemas, or integrations for your specific stack? Share your use case and we can outline a configuration optimized for your environment.
How a former Meta engineer and a lean team are using AI to help sales teams find better leads, personalize outreach, and close more deals with less manual work.
Why Lace AI is getting so much attention
If you work in sales or RevOps, you have probably felt the pressure to do more with less. More pipeline, more meetings, more revenue, but with the same (or smaller) team. That is exactly the problem Lace AI is trying to solve.
Lace, founded by a former Meta engineer, just raised a $14 million funding round to speed up the development of its AI-powered revenue generation platform. Instead of being yet another random tool in your stack, Lace is designed to sit on top of your existing sales systems and quietly do the heavy lifting in the background.
The idea is simple: surface the right accounts, send smarter outreach, and plug directly into your CRM and sales workflows so your team spends less time guessing and more time actually selling.
What Lace AI actually does for revenue teams
Think of Lace as an AI-powered revenue layer that lives on top of your current sales stack. It pulls in signals from multiple sources, scores and prioritizes accounts, and then helps you craft and send personalized messages at scale.
Under the hood, Lace combines:
Signal aggregation from public web data, firmographic information, and your own first-party CRM data
Predictive models that score and prioritize accounts based on intent and likelihood to convert
Generative AI that writes tailored outreach messages for each prospect
The result is a platform that does a lot of the thinking for you, while still letting your team stay in control of the strategy and human touch.
Key capabilities at a glance
Lead prioritization with predictive scoring models so your SDRs know who to talk to first
AI-generated outreach that creates personalized email and message templates for each prospect
Native workflow integrations with major CRMs and sequencing tools so you do not have to reinvent your process
Performance analytics that show which messages and channels are actually driving conversions
Real-world use cases: How teams can use Lace day to day
So what does this look like in practice? Here are some concrete ways sales and RevOps teams can put Lace to work:
Account prioritization Lace surfaces accounts showing rising intent signals, so SDRs can focus on high probability targets instead of cold guessing.
Personalized outbound at scale The platform generates tailored email and LinkedIn sequences that feel one-to-one, not copy-pasted, which helps lift reply rates.
Smart, automated follow-ups You can trigger context-aware follow-ups based on what a prospect does (or does not do), rather than relying on manual reminders.
Performance insights Lace tracks which message variants and channels convert best, so your team can double down on what is working and retire what is not.
In short, it is built to support the entire revenue motion: from identifying who to go after, to what to say, to understanding what is actually moving the needle.
Why the $14M funding round matters
Now, about that $14 million. Why is it a big deal? Beyond the headline, this kind of early-stage capital gives Lace the breathing room to build the things revenue teams really care about, instead of cutting corners.
With this funding, Lace can:
Grow its engineering and product teams to ship features faster
Scale data pipelines so intent signals and scoring models stay accurate and fresh
Invest in compliance, privacy, and security, which are essential for any serious revenue AI platform
Expand integrations with CRMs and enterprise tools so it fits cleanly into existing sales workflows
For buyers, the raise is also a signal. Investors are betting that AI tools directly tied to revenue growth are not just a trend, but a new standard for modern sales teams.
Why revenue-focused AI is such a hot space right now
There are a lot of AI tools out there, but not all of them have a clear link to ROI. Revenue AI is different. It gets judged on hard numbers like:
Pipeline created
Meetings booked
Deals closed
Average deal size
That direct connection to revenue makes this category especially attractive to both startups and investors. It is not just “AI for the sake of AI” but AI that either improves the funnel or it does not.
Where Lace fits in the market
Lace sits at the intersection of:
Sales engagement tools that help reps reach out and follow up
Revenue operations (RevOps) platforms that keep the go-to-market engine aligned
Predictive analytics that forecast which accounts are worth the effort
What sets Lace apart from older automation platforms is its use of generative AI for personalization. Instead of relying on static templates and coarse segmentation, it can craft outreach that is tailored to each prospect using real-time signals and context.
Benefits teams are hoping to see
Early adopters of revenue AI tools, including platforms like Lace, usually look for two big outcomes: more pipeline and more efficiency. When personalization and intent scoring actually work, the impact can be meaningful.
Potential advantages for sales and RevOps teams
Higher response rates thanks to outreach that feels relevant instead of generic
Less time wasted on low-value or low-intent accounts
Stronger alignment between marketing signals and sales actions, since both can lean on the same data and scoring
If Lace delivers on scalable personalization and accurate intent models, it can help teams reach “first meaningful touch” faster and improve the conversion from meeting to closed deal.
Risks and challenges Lace will have to navigate
Of course, no AI product is a magic button. Revenue AI comes with its own set of challenges, and Lace is not exempt from them.
Data quality and integrations Connecting to different CRMs and tools is messy, and poor data in means poor predictions out.
Balancing automation with humanity Too much automation can feel spammy. Lace has to help teams scale outreach without losing the human touch that actually builds trust.
Privacy, consent, and compliance Using external signals, scraping public sources, and handling customer data all come with regulatory and ethical responsibilities.
Model drift over time Intent models can get stale if they are not monitored and retrained. Keeping predictions accurate is an ongoing job, not a one-time project.
Winning in this space will require robust engineering, transparent model behavior, and strong security practices that enterprise buyers can trust.
What to watch in the next 6 to 18 months
If you are curious whether Lace becomes a must-have in the revenue tech stack, here are some signals to keep an eye on:
New integrations with major CRMs and sales engagement platforms
Customer case studies that show measurable improvements in pipeline and conversion rates
Features for explainability and control so revenue teams can understand and adjust how the AI is making decisions
Regulatory or privacy changes that might affect how external data and signals can be sourced and used
If Lace can show clear ROI and keep up with compliance and integration demands, it will be well positioned in a crowded market.
Key takeaways
Lace AI’s $14M raise is a strong sign of how much appetite there is for AI that directly drives revenue, not just productivity in the abstract. By focusing on real outcomes for sales teams and fitting into existing workflows instead of replacing them, Lace is aiming for a very practical sweet spot.
The big questions ahead are:
Can it maintain high data quality across complex sales stacks?
Will it help teams scale without losing the human, relationship-driven side of selling?
Can it consistently prove ROI through customer results and case studies?
If the answers are yes, Lace could become a core part of how modern revenue teams prioritize accounts, personalize outreach, and measure what is actually working.
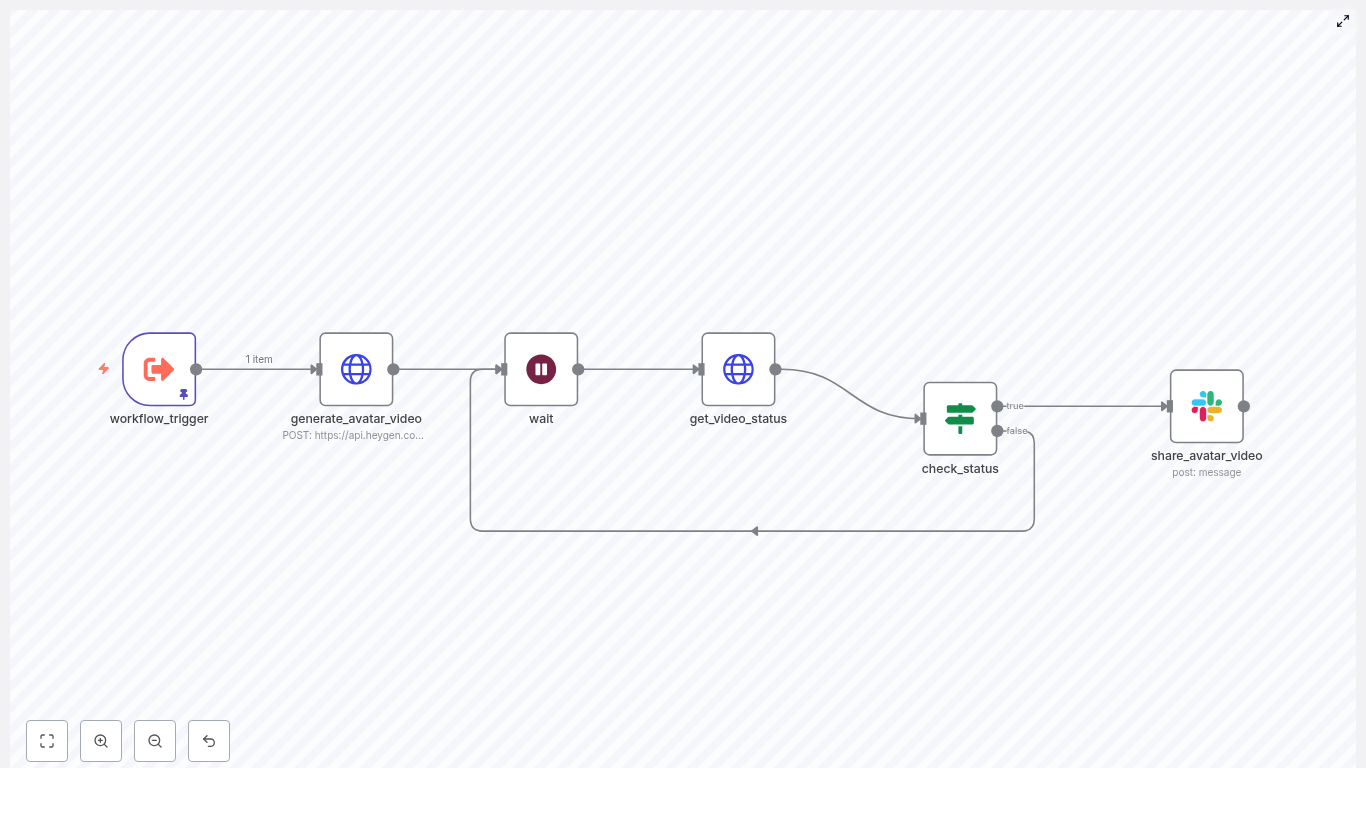
n8n + HeyGen: How One Marketer Stopped Manually Creating Talking Avatar Videos
By the third time Jenna recorded the same onboarding message, she knew something had to change.
As the only marketer at a fast-growing startup, Jenna was juggling launch campaigns, product updates, and internal announcements. Her team loved the idea of talking avatar videos for onboarding and training, but manually producing each one for every new hire, customer segment, or feature release was eating her entire week.
She would write a script, log into HeyGen, configure the avatar, wait for rendering, copy the video link, then paste it into Slack. Over and over. It was powerful, but it did not scale.
One late night, staring at a list of yet-to-be-created videos, Jenna opened her browser and typed a simple question: “How to automate HeyGen avatar videos to Slack with n8n?”
The problem: great idea, broken process
Talking avatar videos were already working for Jenna’s company. They used them for:
Customer onboarding and product walkthroughs
Internal training and quick how-to guides
Announcements from leadership that felt more personal than text
The problem was not the format. It was the manual production. Every time someone needed a new video, Jenna had to:
Take a text script from a doc, form, or Slack message
Set up the HeyGen video with the right avatar and voice
Wait for rendering to finish, refreshing until it was done
Grab the final video link and share it in the right Slack channel
As the company scaled, requests multiplied. A process that felt fun at first turned into a bottleneck. The more they used HeyGen, the more Jenna became the “video machine” instead of a marketer.
That is when she found an n8n workflow template that promised to do exactly what she needed: take a script, call HeyGen’s API, wait for the video to render, then automatically post the final link to Slack.
Discovery: an n8n workflow that could do the work for her
Jenna had heard of n8n as a flexible automation tool but had never built a serious workflow. The template she found showed a simple but powerful pattern:
Receive a script payload
Send it to HeyGen’s video generation endpoint
Loop while the video renders
Post the completed video into Slack the moment it is ready
If she could get this working, teammates could submit scripts via a form or webhook, and n8n would handle everything behind the scenes. No more manual copy-paste. No more waiting in front of a progress bar.
Setting the stage: what Jenna needed before she started
Before building anything, Jenna checked her prerequisites. The template described exactly what she would need:
An n8n instance where she could create and run workflows
A HeyGen API key, stored securely in n8n credentials (as HTTP Header Auth or environment credential)
A Slack workspace with a bot token configured in n8n
At least one sample text script to turn into a talking avatar video
Within an hour she had n8n up, her HeyGen key saved as a credential, and a Slack bot ready to post into a dedicated channel called #avatar-videos.
Rising action: building the automated talking avatar pipeline
Jenna opened the n8n editor and began to wire together the workflow. Instead of feeling like a dry list of steps, it felt like building a story engine: text goes in, a character speaks it, and the result appears in Slack.
1. The trigger: where scripts enter the story
First, she needed a way to feed scripts into the workflow. The template suggested a node called workflow_trigger.
In her case, she configured it as a webhook trigger that accepted JSON with a single key: script. That meant anyone on her team could send a POST request with text like:
{  "script": "Welcome to our platform! In this short video, we will walk you through your first steps."
}
The workflow_trigger node would then make that script available to the rest of the workflow as {{ $json.script }}.
2. The HeyGen call: turning text into a video request
Next came the part Jenna had always handled by hand: telling HeyGen to generate a talking avatar video.
She added an HTTP Request node and named it generate_avatar_video. This node would send a POST request to HeyGen’s video generation endpoint at /v2/video/generate, including the script and avatar options as JSON.
The template provided a sample body, which she adapted:
She replaced YOUR_AVATAR_ID and VOICE_ID with values from her HeyGen account, then used n8n’s expression editor so that input_text pulled directly from the trigger node:
{{ $json.script }}
Now, each time the workflow ran, it would send the incoming script to HeyGen and receive a response containing a video_id. That ID was the key to knowing when the video was ready.
3. The wait: giving HeyGen time to work
In the manual process, Jenna would stare at the HeyGen interface, refreshing until the video was done. The workflow needed a more patient approach.
She added a wait node after generate_avatar_video. This node paused the workflow for a short interval, such as 15 to 30 seconds, to give HeyGen time to start rendering.
The exact interval would depend on queue times and video complexity, but the idea was simple: do not hammer the API, just wait a bit before checking status.
4. The status check: polling HeyGen until completion
After the initial pause, it was time to ask HeyGen, “Is the video ready yet?”
Jenna added another HTTP Request node named get_video_status. This one called HeyGen’s status endpoint at:
/v1/video_status.get?video_id=...
Using the video_id returned from generate_avatar_video, the status endpoint would respond with data that included data.status and, once complete, a video_url.
Now she needed a way to loop until that status became completed.
5. The decision point: loop or post to Slack
To control the logic, Jenna dropped in an If node and named it check_status. This node would inspect the response from get_video_status and decide what to do next.
She configured a condition using an expression like:
{{ $json.data.status === 'completed' }}
In words, if the status equals completed, the workflow should continue to the final step. If not, it should loop back to the wait node, pause again, and then re-check the status.
This simple polling loop looked like this in her mind:
Store video_id from the generation response
Wait for 10 to 30 seconds
Call the status endpoint with video_id
If data.status is completed, move forward
Otherwise, go back to wait and repeat
Instead of manually refreshing a browser, n8n did the checking for her, politely and predictably.
6. The payoff: sharing the avatar video in Slack
At last, once the check_status node confirmed that the video was complete, the workflow needed to deliver the result where her team actually worked: Slack.
Jenna added a Slack node called share_avatar_video. She configured it to send a message into #avatar-videos and used the output from get_video_status to include the final video link:
Here's the talking avatar video you requested:

{{ $('get_video_status').item.json.data.video_url }}
She set the node to post as the bot user tied to her Slack credentials and added a short description so people understood what they were seeing. If she wanted to, she could later extend this to send direct messages or post to different channels based on the script content.
The turning point: from fragile script to production-ready workflow
With the core flow working, Jenna ran a test using a short sample script. The result was exactly what she had hoped:
She sent a JSON payload with script to the webhook.
n8n called HeyGen, got a video_id, and began polling.
A few loops later, the status turned to completed.
Seconds after that, a message appeared in Slack with the video URL.
What used to take her several minutes of manual effort now happened on its own. But she knew that for real-world use, she needed to harden the workflow.
Security and reliability: Jenna’s checklist
To make the automation safe and stable, Jenna followed a set of best practices baked into the template:
Secure credentials: She stored the HeyGen API key and Slack token in n8n credentials, never in plaintext inside nodes. For self-hosted setups, she used environment variables.
Responsible polling: She tuned the wait interval to avoid hitting rate limits and considered an exponential backoff strategy if the status endpoint returned errors.
Content validation: Before sending scripts to HeyGen, she added basic checks to avoid disallowed content and aligned with HeyGen’s content moderation guidelines.
Error handling: She added branches that would notify an internal admin channel if a video failed to generate or if no video_id was returned, and logged errors for later review.
Storage decisions: She decided whether to archive videos elsewhere or simply rely on the HeyGen-hosted link, depending on the use case.
At this point, the workflow was no longer a quick experiment. It was a reliable part of her marketing infrastructure.
When things go wrong: how she debugged and improved
In the first few days, Jenna encountered a few bumps. Instead of abandoning the automation, she leaned on some simple troubleshooting patterns.
No video_id returned: She checked the generate_avatar_video node’s response, verified the request body, and confirmed that authentication with HeyGen was correct. Often the issue was a typo in avatar or voice IDs.
Rendering took too long: She increased the wait interval between polls and set a maximum retry count to avoid infinite loops if a video got stuck.
Slack messages did not appear: She confirmed that the Slack credential had permission to post in #avatar-videos and that the bot was invited to the channel.
Unexpected formatting: She tested with very short scripts first, then gradually scaled up to longer content to see how they behaved.
Each fix made the workflow more robust. After a week, she barely had to think about it.
Beyond the basics: how Jenna scaled her avatar video automation
Once the core template was stable, Jenna started to see new possibilities. The workflow was not just about replacing her manual steps. It could unlock entirely new use cases.
Some of the extensions she planned or implemented included:
Batch generation from spreadsheets or databases: She connected the trigger to a spreadsheet, generating one video per row for personalized outreach or onboarding.
Richer Slack messages: Instead of only sharing a URL, she experimented with attaching thumbnails or even downloading and uploading the video file directly to Slack.
Dynamic personalization: By templating scripts, she could insert names, dates, or other dynamic data into the text before sending it to HeyGen.
Smart routing: She created branches that sent videos to different Slack channels based on content type or priority, such as #sales-enablement vs #product-updates.
The same structure – trigger, generate, wait, poll, post – remained, but the inputs and outputs became more flexible as her team’s needs evolved.
Jenna’s implementation checklist
If someone on her team wanted to replicate what she had done, Jenna summarized the process into a simple checklist:
Store HeyGen API credentials in n8n credentials.
Create a trigger node (Webhook or manual) that accepts a JSON payload with a script field.
Configure the generate_avatar_video HTTP Request node to POST to /v2/video/generate with the script mapped as {{ $json.script }}.
Capture the returned video_id and pass it along in the workflow context or JSON output.
Add a wait node with a reasonable polling interval.
Use a get_video_status HTTP Request node to call the HeyGen status endpoint with the video_id.
Configure an If node, check_status, to test whether data.status equals completed and either continue to Slack or loop back to wait.
Finish with a Slack node that posts the video URL from get_video_status into the desired channel.
Test end to end with a short script and review logs to catch any errors early.
Resolution: from bottleneck to invisible automation
Within a few weeks, the impact was obvious. Instead of fielding constant “Can you make this into a video?” requests, Jenna directed teammates to a simple form that fed scripts into the n8n webhook.
Minutes later, Slack would quietly post a new talking avatar video, complete with the requested message. The team got the personalized content they loved, and Jenna got her time back for strategy, experimentation, and campaigns.
The core message of her journey was simple: by combining n8n, HeyGen, and Slack, she turned a manual, repetitive process into a scalable, reliable workflow.
If you are in a similar position – whether you are a marketer, founder, or developer – you do not have to choose between powerful personalized video and your own sanity. Let an automation handle the busywork so you can focus on the message.
Start your own talking avatar workflow
You can follow Jenna’s path and build this workflow from scratch in n8n, or jumpstart the process with a ready-made template.
The Recap AI: How One Marketer Turned RSS Feeds Into a Daily Podcast With a Single n8n Workflow
On a rainy Tuesday morning, Mia stared at her content calendar and sighed.
She was a solo marketer at a growing SaaS startup, and her CEO had a simple request: “Can we have a short daily podcast that recaps the most important news in our space? Nothing fancy, just 5 minutes, every morning.”
It sounded simple. Until Mia tried to do it manually.
Every day looked the same: open RSS feeds, skim headlines, click through articles, copy text into a doc, summarize, write a script, record, edit, export, upload. By the time she finished, the “daily brief” felt more like a full-time production job. She knew there had to be a better way to turn RSS updates and web content into production-ready podcast episodes.
That is when she discovered an n8n template called The Recap AI – Podcast Generator.
The Problem: A Great Podcast Idea, No Time To Produce It
Mia’s idea was solid. She wanted a short, friendly, daily audio brief that:
Pulled from trusted RSS feeds with industry news and product updates
Included full article context, not just truncated RSS summaries
Sounded like a real host, not a robotic voice reading headlines
Could be produced in minutes, not hours
The manual workflow simply did not scale. As the company’s campaigns ramped up, she had less and less time for repetitive tasks like copying text, drafting scripts, and recording voiceovers.
She needed automation, not another to-do list item.
After some research on n8n workflows and AI podcast tools, she found exactly what she was looking for: a template that connected RSS feeds, a scraping API, an LLM scriptwriter, and ElevenLabs text-to-speech into one continuous, automated pipeline.
The Discovery: An n8n Template Built For Automated Podcast Production
The template was called The Recap AI – Podcast Generator. Its promise was simple but powerful:
“Turn RSS updates and web content into production-ready podcast episodes with a single n8n workflow.”
As Mia dug into the description, she realized it was designed exactly for creators like her who wanted:
RSS-to-audio automation – ingest RSS feeds and output finished show audio
Flexible scraping – pull full article text when RSS summaries were not enough
AI scriptwriting – concise, friendly scripts written for a single host
If it worked, she could go from “idea” to “daily show” with almost no manual production work.
Setting the Stage: What Mia Needed Before Pressing Play
Before turning this into her new daily engine, Mia prepared the basics:
An n8n instance, hosted in the cloud so it could run on its own
A curated RSS feed URL that matched her niche, focused on product launches and SaaS news
A Firecrawl API key, added as an HTTP header credential in n8n
An LLM credential (she chose her preferred model and connected it to n8n)
An ElevenLabs API key, configured as an HTTP header credential, with audio output set to mp3_44100_192
With those in place, she imported the workflow JSON for The Recap AI, opened it in n8n, and began walking through the nodes one by one.
Rising Action: Watching the Workflow Come to Life
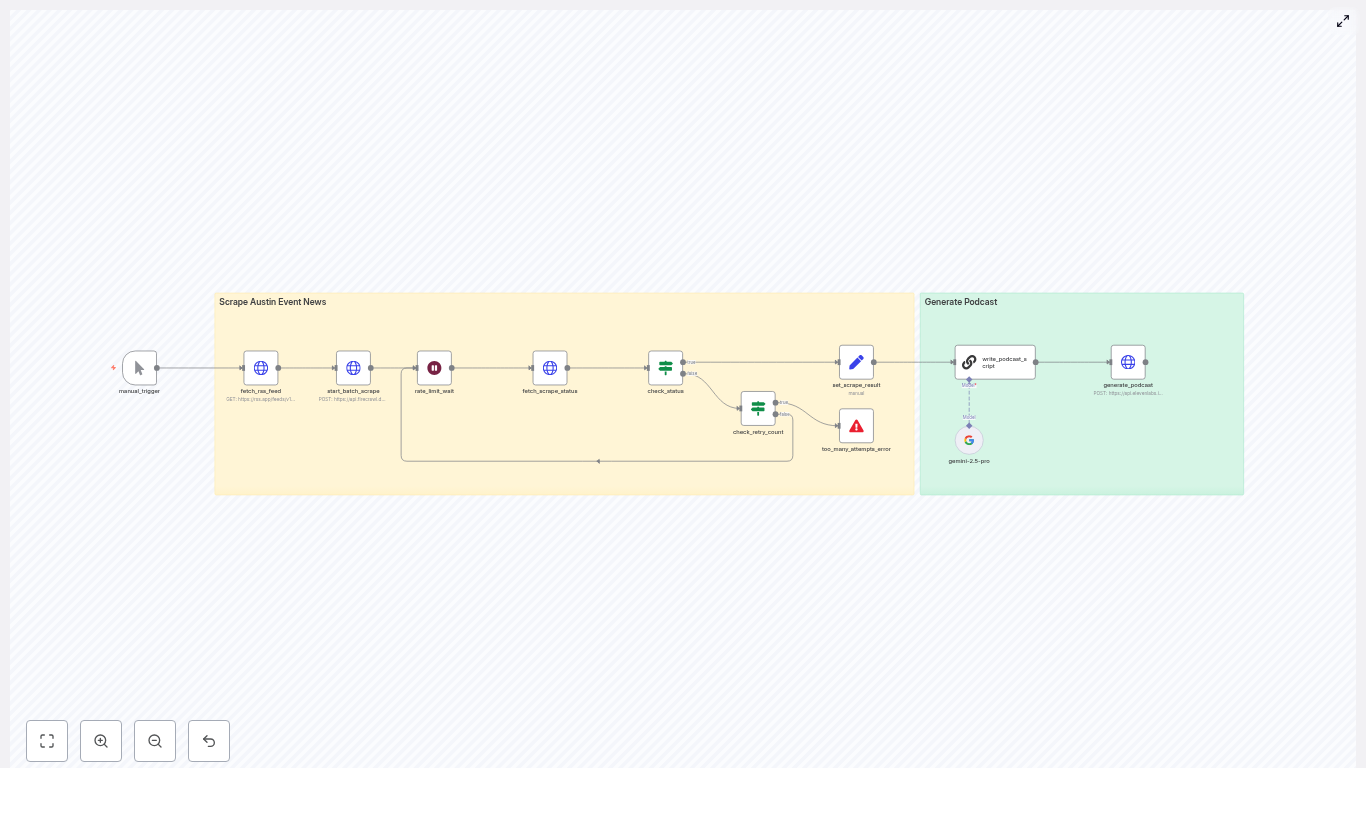
1. The Manual Trigger – Her Safe Test Button
Mia started with the Manual Trigger node. It became her “safe test button,” letting her run the workflow on demand while she tuned prompts and parameters.
Later, she planned to schedule it with n8n’s cron for daily episodes, but for now, she wanted full visibility into every step.
2. Fetching the RSS Feed – Raw Material for Her Show
The next piece was the Fetch RSS Feed node. Here, she pasted the URL from her curated SaaS news feed. n8n pulled in a list of items with titles, summaries, and URLs.
She quickly realized that feed selection was part of her editorial control. By choosing the right RSS sources, she could decide whether her show focused on local events, industry announcements, or product release notes.
Once the feed returned clean items, she was ready for the next step.
3. Starting the Batch Scrape With Firecrawl
Mia had always been frustrated by RSS summaries that ended with “…” right when it got interesting. The template solved that with a Start Batch Scrape (Firecrawl) node.
The workflow automatically:
Collected all article URLs from the RSS feed
Built a JSON payload
Sent it to Firecrawl’s API
Requested the full-page content for each article in Markdown format
This ensured that when the AI wrote her script, it was working with complete, readable source text, not half-finished snippets.
4. Handling Scrape Status and Rate Limits
Firecrawl’s scraping happens asynchronously, so the template included a smart system for waiting and checking.
The workflow used:
Fetch Scrape Status to periodically poll Firecrawl for completion
A rate_limit_wait node to respect API rate limits and pause between checks
Built-in retry logic and a capped retry counter meant Mia did not have to babysit long-running scrapes. If a site was slow, the workflow would patiently retry within safe limits.
5. The First Moment of Tension: What If Scraping Fails?
During her first test, one of the articles came from a site with an odd redirect. She wondered what would happen if Firecrawl struggled.
That is when she appreciated the Check Status & Error Handling logic.
An IF node checked the scrape status. If everything completed, the workflow moved forward. If the number of retries exceeded the configured threshold, a stop-and-error node halted the workflow and surfaced a clear error message.
No silent failures, no mystery bugs. Just a precise signal that she could route to alerts later via Slack or email.
The Turning Point: From Raw Articles To a Polished Script
6. Merging Scraped Content Into a Single Source
Once Firecrawl finished its work, the Set Scrape Result node took over. It merged all the Markdown content into a single field called scraped_pages.
That consolidated text was the input for the AI scriptwriter. Instead of juggling multiple items, the LLM could see the full context in one place and choose the best stories for that day’s episode.
7. The AI Scriptwriter Node – Giving Her Show a Voice
The heart of the template was the AI Scriptwriter (LangChain / LLM) node. This is where Mia’s show truly started to sound like a real podcast.
The node combined:
The raw scraped content from scraped_pages
A carefully crafted system prompt
The included prompt was optimized to:
Select 3 to 4 non-controversial, audience-relevant events
Write concise, natural-sounding copy for a single host
Insert ElevenLabs v3 audio tags like pacing, emphasis, and subtle emotional cues
She tweaked the prompt to match her brand, turning the generic host into a specific persona: a friendly, slightly witty guide for SaaS founders who wanted a quick morning brief.
She changed the instructions to keep the tone light, avoid divisive topics, and stay focused on product launches and actionable news. In other words, she used prompt tuning to make the show hers.
Resolution: Hearing the First Automated Episode
8. Generating the Podcast With ElevenLabs v3
Now came the moment she had been waiting for. The script, already annotated with ElevenLabs v3 audio tags, flowed into the Generate Podcast (ElevenLabs v3) node.
The workflow posted the text to ElevenLabs’ TTS endpoint and requested an mp3 file. Because the script included tags like [excitedly], [chuckles], and carefully placed pauses, the result sounded surprisingly human.
No flat, robotic monotone. Instead, it felt like a real host guiding listeners through the day’s top SaaS stories.
Within minutes, Mia had a production-ready MP3 that she could upload to her podcast host or publish directly in her company’s content hub.
Customizing The Recap AI To Match Her Brand
Once the core flow worked, Mia started to refine it.
Fine-Tuning the Script and Show Format
Prompt tuning: She adjusted tone, host persona, and event selection rules so the show felt like an “insider brief” for SaaS founders.
Show length control: She tweaked the instructions so the LLM produced slightly longer summaries on major launches and shorter notes for minor updates.
Content filtering: She added logic to skip politics and highly divisive topics, keeping the show focused and broadly appealing.
Choosing the Right Voice
In ElevenLabs, Mia experimented with different voices and stability settings. She tried both Natural and Creative modes, listening for the one that best matched her imagined host.
Once she found it, she locked in that voice profile and kept the tags from the template to maintain pacing and expression.
Making It Reliable: Monitoring and Best Practices
As the podcast became part of the company’s content strategy, Mia treated the workflow like a small production system.
She added:
Alerts for scraping failures or too-many-retries errors, routed to Slack
Respectful rate limit handling for Firecrawl and ElevenLabs, with caching where possible
A simple human-in-the-loop review step for the first few episodes, so she could approve scripts and audio before publishing
Privacy safeguards, redacting any personally identifying information before sending text to TTS
After a few successful runs, she grew confident enough to let the workflow publish on a schedule with only spot checks.
Scheduling and Automation: From Manual Trigger To Daily Show
Once everything looked solid, Mia swapped the Manual Trigger for a scheduled one.
Using n8n’s cron node, she configured the workflow to run early each weekday morning. By the time her audience woke up, the new episode was already live.
The full checklist she followed looked like this:
Import The Recap AI workflow into her n8n instance
Connect RSS, Firecrawl, LLM, and ElevenLabs credentials
Run several manual tests and refine prompts and filters
Set up alerts and basic observability
Enable daily scheduling via cron
Real-World Uses: How Others Could Apply the Same Template
As the show gained traction, Mia realized this template could work for much more than SaaS news. She shared some ideas with her team:
Local news brief: A daily episode covering community events, local politics filters applied, and cultural highlights.
Industry roundup: A weekly digest of product launches and blog posts, with expert synthesis tailored to a specific vertical.
Newsletter-to-audio: Turning an existing written newsletter into a spoken version for subscribers who prefer listening on the go.
In each case, the core engine stayed the same: RSS feed in, scraping and scriptwriting in the middle, expressive TTS out.
When Things Go Wrong: Mia’s Troubleshooting Checklist
During early tests, she hit a few snags, so she kept a quick troubleshooting list on hand:
Verify all API keys and credential mappings in n8n
Check that RSS item URLs are valid and not stuck in redirect loops
Confirm Firecrawl is returning content in Markdown and that the LLM receives clean plain text
Look for ElevenLabs rate limit issues or voice compatibility problems with v3 audio tags
With those checks, most issues were easy to diagnose and fix.
The Outcome: A Consistent, High-Quality Podcast Without a Studio
Within a few weeks, Mia’s “small experiment” had turned into a reliable channel. The Recap AI – Podcast Generator template gave her:
A consistent, branded daily brief
Minimal manual work after initial setup
Production-ready audio that sounded human and engaging
Room to focus on strategy and editorial decisions instead of repetitive tasks
The combination of n8n automation, Firecrawl scraping, LLM synthesis, and expressive ElevenLabs TTS made it possible to run a professional-sounding show without a studio or a full audio team.
Your Next Step: Turn Your Feeds Into a Show
If you are sitting on great content sources but do not have the time to produce a podcast manually, Mia’s story is a blueprint you can follow.
Here is how to start:
Import The Recap AI – Podcast Generator workflow into your n8n instance.
Connect your RSS feeds, Firecrawl, LLM, and ElevenLabs API keys.
Run a manual test, tweak the prompt to match your host persona, and review the first script and audio file.
Set up basic monitoring and scheduling for daily or weekly episodes.
With a bit of prompt tuning and light human review, you can publish sharp, short, and highly shareable episodes on a regular schedule.
Ready to try it? Import the Recap AI workflow now and start generating your first automated episode today.
AI Project Management with n8n & Asana: Turn Simple Requests into Structured Projects
Every new project starts with a spark: a message in chat, a quick idea from a stakeholder, a client request that suddenly becomes urgent. Too often, that spark is followed by hours of manual setup, task creation, and coordination. It is necessary work, but it can also drain your energy and slow down momentum.
What if that same spark could instantly become a fully structured Asana project, complete with milestones, epics, tasks, and smart assignments to the right people? What if you could reclaim that setup time and invest it in strategy, creativity, and deep work instead?
This is where AI project management with n8n and Asana comes in. With this n8n workflow template, a simple chat request can trigger an AI agent that discovers requirements, designs a phased plan, and builds a complete project in Asana for you. It is not just automation, it is a shift in how you work and what you choose to focus on.
From Manual Setup to Momentum: Rethinking Project Management
Most teams accept that project setup is tedious. You gather requirements, create a project, define milestones, break work into epics and tasks, and then figure out who should own what. It is repetitive, detailed, and easy to get inconsistent across teams or projects.
By introducing an AI-driven project manager inside n8n, you start to change that pattern. Instead of manually translating conversations into plans, you let automation do the heavy lifting, while you guide and refine.
With this n8n template you can:
Transform chat conversations into fully structured Asana projects.
Automatically generate epics, task breakdowns, and subtasks for each phase of work.
Use an AI agent to select the best assignee for each task based on team context and Asana user data.
Keep short-term memory during a session so the agent can reference earlier answers and avoid asking the same questions twice.
The result is more than saved clicks. You gain consistency, speed, and a more scalable way to launch and manage initiatives across your organization.
Cultivating an Automation Mindset
Adopting this template is not only about using AI, it is about stepping into a new way of working. Instead of treating each project as a one-off setup, you start to think in terms of reusable patterns, templates, and systems.
With n8n as your automation platform and Asana as your execution layer, this workflow becomes a practical starting point for:
Standardizing how projects are structured across teams.
Onboarding new initiatives in minutes instead of hours.
Empowering non-technical stakeholders to spin up projects simply by chatting with an AI agent.
As you work with the template, you will likely see more opportunities to automate: notifications, documentation, reporting, capacity planning, and more. Think of this workflow as your first step on a longer journey toward an automated, focused, and less reactive way of managing work.
How the n8n + Asana AI Project Manager Works
Under the hood, this template brings together conversational triggers, powerful language models, lightweight memory, and Asana API nodes. The flow is designed to feel natural: you talk, the AI agent asks smart follow-ups, and n8n quietly builds your project behind the scenes.
1. A chat message starts the journey
Everything begins with a chat trigger node in n8n. This node listens for an incoming message that contains your project brief or high-level request. Once the message arrives, n8n passes the content to the AI Project Manager agent.
This is where your normal way of working connects with automation. You can keep using your preferred chat interface, while n8n turns that input into structured actions.
2. The Project Manager AI agent orchestrates the plan
The Project Manager node is the intelligent core of this template. It is an AI agent configured with a system prompt that describes how it should behave, including:
Running a discovery process to clarify goals, scope, and risks.
Designing a phased delivery approach.
Asking targeted follow-up questions when information is missing.
First, the agent generates a Phase 1 JSON that summarizes the project, outlines key milestones, and highlights risks. Once you confirm that this direction looks right, the agent moves on to produce detailed, epic-by-epic breakdowns that can be turned directly into Asana tasks and subtasks.
3. Multiple language models, each with a clear role
To balance cost, performance, and quality, the template uses more than one language model:
An Anthropic Claude model handles detailed planning and natural, human-like dialogue with users.
An OpenAI model focuses on specialized tasks such as selecting the right Asana user for each task.
By splitting responsibilities like this, you gain more control over tone, accuracy, and resource usage, while still benefiting from the strengths of each provider.
4. Simple Memory keeps the conversation grounded
A windowed buffer memory node gives the agent short-term memory over the session. It can remember recent messages, the project name, and earlier answers to discovery questions.
This small but powerful feature makes the interaction feel more natural. The agent does not need to repeat questions, and it can build on your previous responses as it refines the project structure.
5. The Think tool for internal reasoning
The template also includes a Think tool that the agent can use for internal reasoning. This tool lets the agent plan, synthesize, and make intermediate decisions that do not need to be shown to the user directly.
For example, the agent might use the Think tool to decide how to group tasks into epics, or how to structure milestones before it outputs the final plan. This keeps the user-facing conversation clear, while still benefiting from deeper reasoning behind the scenes.
6. Asana nodes bring the project to life
Once Phase 1 is confirmed, the agent starts using Asana nodes to create the actual project. The workflow:
Creates a new Asana project with the right name and description.
Attaches milestones and risk notes to keep everyone aligned.
Iteratively creates epics as tasks, with nested subtasks that reflect the breakdown defined by the agent.
A dedicated “Find user from Asana” agent uses the Get many users node to review available profiles and return the best match for each task. That user GID is then passed into the Create task and Create subtask nodes, so ownership is assigned automatically.
The result is a complete, structured Asana project that is ready for your team to execute, without you touching the Asana interface during setup.
Getting Ready: What You Need to Use the Template
Before you import and run this workflow in n8n, make sure you have the basics in place. Setting things up correctly from the start will help you move faster later and avoid configuration issues.
An n8n instance (cloud or self-hosted), where you can import and run workflows.
API credentials for Asana, either a personal access token or an OAuth client.
API keys for your chosen language models, such as Anthropic and OpenAI, or other supported providers you prefer.
Key configuration steps
Import the workflow template into your n8n instance.
Connect your Asana credentials to all Asana nodes and set the correct workspace and team IDs that your projects should live in.
Attach your Anthropic and/or OpenAI credentials to the model nodes and make sure the configured usage stays within your rate limits.
Open the Project Manager node and adjust the system prompt so it reflects your company process, naming conventions, and preferred terminology.
Run a test using a short project brief, review the generated Asana project, and iterate on the prompts until the structure and tone match your expectations.
Think of this first setup as an investment. A few minutes spent tuning the workflow can save hours every week once your team starts using it regularly.
Shaping the Agent’s Behavior: Prompts that Reflect Your Process
One of the most powerful aspects of this template is how customizable the Project Manager agent is. By refining the system message, you can align the AI with how your team already works, instead of forcing your team to adapt to the AI.
When tuning the prompt, consider defining:
A project naming pattern, including prefixes for RFPs, pilots, internal initiatives, or client projects.
Default sprint length and estimation units, such as story points or hours.
Team roles and typical assignees by role, so the agent knows who usually owns what type of work.
The preferred format for task acceptance criteria, to keep quality and expectations consistent.
For example, you might add this instruction to the agent:
“When creating epics, always include acceptance criteria with a testable result and tag dependencies explicitly.”
This one line can unlock downstream automation, such as automated reporting, test case generation, or QA workflows that rely on clearly defined acceptance criteria.
Staying Safe and Confident: Best Practices & Security
As you scale automation and rely more on AI, it becomes even more important to keep security and governance in mind. This template is designed to integrate cleanly with best practices you may already follow.
Store all API keys in secure credential stores in n8n. Avoid hardcoding them into the workflow JSON.
Limit the permissions of your language model accounts and use system prompts to set clear guardrails around internal data.
Validate Asana workspace and team IDs in a staging environment before using the workflow in production.
Use a dedicated Asana service account for automation so ownership, audit trails, and access control remain clear.
Log the outputs of each step to a secure audit log, such as n8n execution logs or external logging tools, for traceability and troubleshooting.
These practices help you move fast without losing control, especially when multiple teams start relying on the workflow.
Where This Template Shines: Use Cases & Impact
Once configured, this n8n + Asana AI project manager can support many different teams and functions. Here are some of the most impactful scenarios:
Product teams: Quickly scaffold feature launches with epics and testable tasks, so product managers and engineers can focus on design and delivery instead of setup.
Agencies: Turn client discovery chats into structured project scopes and delivery plans, making onboarding faster and more predictable.
Sales and implementation teams: Automatically create implementation projects in Asana as soon as a deal is marked as closed-won, aligning delivery teams without delay.
Teams that adopt this template often see project setup time drop from hours to minutes, along with more consistent structure across projects. Non-technical stakeholders can trigger new projects via chat, which reduces bottlenecks and keeps momentum high.
Testing, Troubleshooting, and Continuous Improvement
Like any powerful automation, this workflow will benefit from a bit of experimentation and iteration. Use small tests to gain confidence, then expand.
If tasks are missing assignees, review the “Find user from Asana” agent decisions and confirm that the Get many users node is returning the expected user profiles.
If the language model output feels off, adjust the agent prompt to be more specific, and if available, tweak temperature or other generation controls to reduce randomness.
Start with small test projects to validate that the Asana side effects (projects, tasks, subtasks) match your expectations before running bulk or high-impact workflows.
Each iteration helps you refine the experience and move closer to a workflow that feels tailor-made for your team.
Extending the Template as Your Automation Matures
Once this core workflow is running smoothly, you can treat it as a foundation and layer on more automation to support your entire delivery lifecycle.
Popular extensions include:
Adding Slack or Microsoft Teams notifications whenever a new project or epic is created in Asana, so stakeholders stay informed in real time.
Connecting a product requirements document (PRD) generator that creates a Google Doc for each epic and links it back into Asana.
Integrating time estimates with capacity planning tools or sprint planners, so project setup directly supports resource management.
As you add these enhancements, your n8n instance becomes a central automation hub that ties together planning, communication, and execution.
Before You Go Live: A Quick Launch Checklist
To move from experimentation to reliable production use, walk through this quick checklist:
Confirm that all API keys, Asana workspace IDs, and team IDs are correctly set in n8n credentials.
Run several dry-run tests using a staging Asana workspace to validate the full workflow from chat to project creation.
Train stakeholders on how to phrase their project briefs so the AI agent can generate accurate and useful project structures.
Monitor early executions, review logs, and adjust prompts, memory window sizes, and model settings as needed.
This small amount of preparation helps you launch with confidence and sets the stage for smooth adoption across teams.
Stepping Into AI-Driven Project Management
AI-driven project management with n8n and Asana bridges the gap between informal conversations and structured execution. Instead of manually translating every request into tasks, you let an AI agent and an automation workflow do the heavy lifting, while you stay focused on vision, strategy, and high-value decisions.
This template is a powerful starting point. It shows what is possible when conversational inputs, language models, memory, and the Asana API all work together. From here, you can keep experimenting, refining prompts, and extending the workflow to match your unique way of working.
Ready to take the next step? Import the template into your n8n instance, connect your Asana and model credentials, and run a short project brief through the workflow. Watch how quickly it turns a simple request into a structured, actionable plan.
If you want support customizing prompts, integrating enterprise models, or designing your broader automation strategy, reach out to your team or automation experts for guidance. Each improvement you make compounds over time, freeing your team to focus on the work that matters most.
Call to action: Import the template, test it with a sample brief, and then explore how you can extend it. Join our next webinar on advanced prompt tuning, or contact us at [your-team@example.com] and visit our documentation to go deeper into AI-driven project management with n8n.
Build a RAG Agent with Memory using n8n, Supabase & Postgres
Ever had a user ask, “Wait, what did I say earlier?” and your chatbot just stares back like it has the memory of a goldfish? Or spent way too much time copy-pasting docs into prompts like some kind of highly paid human OCR?
This is exactly the kind of repetitive pain this n8n workflow template is here to fix. With it, you can build a Retrieval-Augmented Generation (RAG) agent that:
Remembers past conversations using Postgres chat memory
Finds the right information using a Supabase vector store
Ingests binary files from Google Drive and turns them into searchable embeddings
In other words, you get a chat agent that is not only smart, but also remembers what you told it and actually reads your documents. Let’s walk through what this template does, how the pieces fit together, and how to get it running without losing your weekend.
What this n8n RAG template actually does
The workflow is split into two main superpowers, each represented as its own section in n8n:
1. RAG Agent with Memory (the conversational brain)
This part of the workflow is what users interact with. It:
Receives incoming chat messages
Uses an OpenAI chat model (like gpt-4o-mini or another supported model) to generate answers
Saves and loads chat history from Postgres so the agent remembers previous turns
Queries a Supabase vector store to pull in relevant document snippets at response time
The result is a context-aware RAG agent that can answer questions using your own knowledge base instead of hallucinating its way through life.
2. Loading Binary Data from Google Drive (the document pipeline)
This is the behind-the-scenes ingestion flow. It:
Downloads files from Google Drive
Splits them into manageable text chunks using a Default Data Loader and a Recursive Character Text Splitter
Generates embeddings for each chunk using OpenAI Embeddings
Stores those embeddings in Supabase so they can be retrieved later by the RAG agent
You can think of this as your “feed the brain” pipeline. Every time you run it, your agent gets a little smarter about your documents.
Meet the key workflow components
Let’s quickly introduce the main nodes so you know who is doing what inside the n8n workflow.
When chat message received
This trigger node is the front door. Whenever a user sends a chat message, this node fires and hands the message to the RAG agent. It is the starting point for every conversation.
RAG Agent
The RAG Agent node is the coordinator. It:
Calls the OpenAI chat model to generate responses
Loads and saves chat history using Postgres chat memory
Uses the Supabase vector store as a tool to fetch relevant documents based on the user’s query
It is the node that ties together language model, memory, and retrieval so your agent can respond with context.
OpenAI Chat Model
This node runs the conversational LLM. It uses:
The user’s latest message
Relevant document snippets from Supabase
Previous conversation turns from Postgres memory
to generate a coherent reply that feels like one continuous conversation rather than a series of disconnected one-liners.
Postgres Chat Memory
This node is responsible for remembering what was said. It persistently stores:
Conversation ids
Roles (user, assistant, system)
Message text
Timestamps
Future messages in the same session can reference this stored history, which improves personalization and keeps the agent from asking “Can you repeat that?” every 30 seconds.
Supabase Vector Store
This is where your document embeddings live. The vector store:
Stores embedding vectors along with metadata such as filename, chunk id, text snippet, and timestamp
Supports nearest-neighbor search for fast retrieval of relevant passages
Whenever the RAG agent needs context, it queries Supabase for the most relevant chunks to ground its answer.
Embeddings OpenAI
This node takes plain text or extracted content and turns it into vector embeddings. Those vectors are then written into Supabase so the RAG agent can find them later during retrieval.
Loading binary data flow (Google Drive to Supabase)
This part of the workflow is all about ingestion. It:
Downloads a file from Google Drive using your OAuth2 credentials
Uses a Default Data Loader to extract text
Applies a Recursive Character Text Splitter to break the text into usable chunks
Generates embeddings via OpenAI Embeddings
Inserts those embeddings into your Supabase vector table
Once this is done, your documents are fully searchable by the RAG agent.
How the end-to-end RAG flow works
Here is how everything comes together when the system is running.
The user sends a message. The When chat message received node triggers and forwards the message to the RAG Agent.
The RAG Agent:
Asks Postgres chat memory for recent conversation history
Queries the Supabase vector store to find the most relevant document passages
The OpenAI Chat Model:
Combines the user’s message, retrieved documents, and chat memory
Generates a context-aware response
The RAG Agent can then update Postgres memory with the latest user message and assistant reply.
Separately, when you want to add new documents to your knowledge base, you:
Click Test workflow on the ingestion part of the flow
Download a file from Google Drive
Split the text into chunks
Compute embeddings
Insert those vectors into Supabase
Once both the chat and ingestion flows are configured, you have a full loop: ingest docs, embed them, store them, then query them during conversations.
Before you start: setup and prerequisites
You do not need a PhD in MLOps to use this template, but you do need a few things ready:
n8n instance (cloud or self-hosted)
Supabase project with the vector extension enabled or a configured vector table
Postgres instance for chat memory (this can be the same Postgres that backs Supabase if you prefer)
OpenAI API key for both chat and embeddings
Google Drive OAuth2 credentials to download binary files
On the database side, make sure your schemas are ready:
Supabase vector table Needs columns for:
Embedding vector
Metadata like filename
Chunk id
Text snippet
Timestamp
Postgres chat memory Should support:
Conversation id
Role
Message text
Timestamps
Quick configuration checklist
Once your infrastructure is ready, follow this simplified setup guide inside n8n.
Import the template into n8n. Use the provided workflow template so you start with all nodes wired together.
Configure your credentials. Fill in the credentials for each relevant node:
OpenAI API key in:
OpenAI Chat Model node
OpenAI Embeddings node
Supabase credentials in:
Supabase Vector Store node
Add to Supabase or equivalent insert nodes
Postgres credentials for the Postgres Chat Memory node
Google Drive OAuth2 credentials for the file download node
Tune the RAG Agent behavior. Review the RAG Agent’s:
System prompt
Retrieval configuration (for example number of documents to fetch)
Memory window size
Tool permissions (so it can actually call the vector store)
Test binary ingestion. Use the Test workflow trigger on the ingestion flow:
Download a sample file from Google Drive
Confirm that text is split into chunks
Check that embeddings are generated and successfully stored in Supabase
Simulate chat queries. Try multi-turn conversations, for example:
Ask a question about a document you uploaded
Follow up with “And what about the second section?”
Verify that the agent remembers earlier messages and uses the correct document context
Troubleshooting: when your RAG agent acts weird
If something feels off, here are common issues and how to fix them without rage-quitting.
Irrelevant or low-quality retrievals Try:
Increasing the number of nearest neighbors returned from the vector store
Adjusting your text splitter settings so chunks are more semantically coherent
Embedding insertion errors in Supabase Double-check:
Embedding dimensionality matches the vector column definition
The Supabase vector column type is correctly configured for your embedding model
API rate limit issues If OpenAI or Supabase start complaining:
Monitor usage and rate limits
Add retry or backoff logic in n8n
Introduce rate-limiting if you expect high traffic
Slow or overloaded chat memory For Postgres performance:
Ensure the memory table is indexed on conversation id and timestamps
Optimize queries if you plan to support many concurrent sessions
Security and privacy: keep your data (and keys) safe
RAG agents are great, but you still need to treat data carefully:
Store API keys in secure places like environment variables or n8n credentials, not in random notes or screenshots
Use least-privilege roles for Supabase and Postgres so each service only has access to what it needs
If you handle sensitive user data:
Define data retention policies
Consider redacting sensitive fields before storage
Use encryption at rest for stored messages and document contents where appropriate
Best practices for a solid production RAG setup
Once everything is working, a few tweaks can make your life easier in the long run.
Use a text splitter tuned to your content. Legal contracts, support tickets, PDFs, and technical docs all benefit from different chunking strategies. Better chunks usually mean better retrieval.
Refresh embeddings when documents change. If your docs are updated regularly, schedule re-ingestion so the vector store does not serve outdated information.
Design memory retention rules. Keep long-term facts and important history, but truncate or archive casual chatter to control storage and keep retrieval focused on what matters.
Log behavior safely. With appropriate privacy safeguards, log:
What was retrieved
What the model responded with
This helps you debug, improve prompts, and refine retrieval strategies.
Next steps: where to go after the first version
Once your n8n RAG agent with Supabase and Postgres is up and running, you can start leveling it up:
Add role-based access and multi-tenant routing. Serve multiple teams or customers from the same infrastructure while keeping data separated.
Introduce a feedback loop. Let users rate responses and use that feedback to:
Re-rank retrieved documents
Improve prompts and retrieval settings over time
Connect more tools to the RAG Agent. Extend it with:
Search APIs
Database queries
Function calls or other utilities
so your agent can handle richer, task-oriented workflows instead of just Q&A.
Wrapping up
This n8n template gives you a practical starting point for building a RAG agent that is both conversational and grounded in your actual data. By combining:
OpenAI chat models
Postgres-based chat memory
Supabase vector search
Google Drive ingestion for binary files
you get a robust, production-ready workflow that turns repetitive manual tasks into automated magic.
Ready to try it? Import the workflow into your n8n instance, plug in your credentials, and hit Test workflow to start loading documents from Google Drive. Once the embeddings are in Supabase, your RAG agent is ready to chat with real context.
If you want help customizing the template for your use case, you can always reach out to the n8n community or check the documentation linked inside the workflow.
Call to action: Try the template now and subscribe to our newsletter for more tips on building production-grade RAG systems and automation patterns that save you from repetitive work.
Crop Anomaly Detection Tool: How One Agronomist Used n8n, Qdrant & Voyage AI To Catch The Unknown
On a hot afternoon at the edge of a sprawling farm, Priya, an agronomist and data lead for a precision agriculture startup, stared at a dashboard that would not stop blinking red.
Her team had just rolled out a new field scouting app. Farmers were sending in thousands of crop photos every week. The idea was simple: classify each image into known crop types, then flag anything unusual for closer inspection. In practice, it was chaos.
Some images were mislabeled. Others contained pests and diseases that the training dataset had never seen. A few were not even farm crops at all. Her models tried to force every image into one of the known classes, and the result was a dangerous mix of overconfident predictions and missed anomalies.
What she needed was not just better classification. She needed a production-ready crop anomaly detection system that could say, with confidence, “this image does not belong to any known crop class.”
That search led her to an n8n workflow template built on Qdrant and Voyage AI.
The Problem: When “Unknown” Is The Most Important Class
Priya’s team managed a 29-class crop image dataset, covering staples and cash crops such as:
Their classifiers were decent at telling wheat from maize or cotton from tobacco. What they could not do reliably was answer a different, far more critical question:
Is this photo a completely unknown plant species that slipped into the frame?
Does it show a pest, disease, or damage pattern that was not part of the original training data?
Is the image itself mislabeled or corrupted in the dataset?
In other words, they needed a system that could say, “this looks unlike anything we know,” instead of bending reality to fit a known label. That is where anomaly detection came in.
Discovering a Different Approach: Medoids, Embeddings and Vector Search
During a late-night search through developer forums and automation communities, Priya found a reference to an n8n-based workflow that combined Voyage AI multimodal embeddings with a Qdrant vector database.
The idea clicked immediately.
Instead of forcing each new image through a classification model, the workflow would:
Turn the input image into a high dimensional embedding vector using a Voyage AI multimodal model.
Compare that embedding against cluster centers (medoids) for each crop class stored in a Qdrant collection.
Use per-cluster similarity thresholds to decide whether the image was close enough to any known crop type.
If no medoid passed its threshold, mark the image as anomalous, likely a new or undefined crop.
This was not just classification. It was a compact and explainable anomaly detection pipeline, and it could be automated end to end inside n8n.
Setting the Stage: Building the Crop Collection in Qdrant
Before Priya could rely on the anomaly detector, she needed a solid foundation in Qdrant. That meant preparing the dataset and computing medoids for each crop class.
Step 1 – Preparing the dataset
Her team started with a public dataset, similar to the Kaggle “agricultural crops” dataset. They:
Downloaded all crop images.
Uploaded them to a cloud storage bucket accessible from their pipelines.
Kept labels and metadata intact for each image.
Step 2 – Populating Qdrant with embeddings
Using a separate n8n pipeline, they:
Generated Voyage AI embeddings for each image.
Uploaded these embeddings, along with labels and metadata, into a Qdrant collection.
Used a free tier Qdrant Cloud cluster for initial experiments.
At this stage, Qdrant stored all points, but Priya knew the anomaly detection workflow would work best with medoids and cluster thresholds per crop class.
Step 3 – Computing medoids and thresholds
A dedicated “medoids setup” pipeline calculated, for each crop class:
The medoid point that best represented the class center.
A cluster threshold, a similarity score cutoff that a new image must reach to be considered part of that class.
In Qdrant, each medoid point received two crucial payload fields:
is_medoid (boolean) – marks the point as the medoid/centroid of its cluster.
is_medoid_cluster_threshold (float) – the minimum similarity score required for a match to that cluster.
This design meant that each crop class could have its own tolerance for variability. Classes with diverse images could have lower thresholds, while highly consistent crops could demand higher similarity. The system would stay robust even if the dataset was imbalanced.
The Turning Point: Wiring It All Together in an n8n Workflow
With Qdrant populated and medoids defined, Priya turned to the heart of the system: an n8n workflow template that would take any new image URL and decide if it belonged to a known crop or if it was anomalous.
How the n8n pipeline flows
Instead of a tangled mess of scripts, the workflow was clean and modular. Each node had a clear role.
Execute Workflow Trigger – The entry point. It receives the incoming image URL from another workflow, a webhook, or a scheduled job.
Set (Image URL hardcode) – Normalizes or hardcodes the image URL so downstream nodes always receive it in a consistent format.
Voyage Embeddings Request – Calls the Voyage AI multimodal embeddings API and transforms the image into an embedding vector suitable for vector search.
Qdrant Query – Sends the embedding to the Qdrant collection, requesting only points marked with is_medoid == true. This keeps queries efficient and focused on cluster centers.
Compare Scores (Code) – A small but critical code node. It inspects each returned medoid, compares its similarity score with the stored is_medoid_cluster_threshold, and decides whether the image is anomalous.
Helper nodes supported this core logic by:
Counting how many crop classes existed in the collection.
Setting the Qdrant query limit to match the number of medoids.
The decision logic that makes or breaks anomaly detection
In the Compare Scores node, Priya implemented the logic that would finally solve her original problem.
For each query:
Qdrant returns a set of medoids with their similarity scores to the input image.
The code node checks, for every medoid:
If similarity_score >= is_medoid_cluster_threshold, the image is considered a match for that cluster.
If at least one medoid passes its threshold, the workflow:
Marks the image as not anomalous.
Reports the best matching crop class.
If no medoid meets its threshold, the workflow:
Flags the image as a potential new or undefined crop.
Emits an alert for follow up by agronomists or data scientists.
In human readable form, the Compare Scores node returns one of two messages:
"Looks similar to {crop_name}" – when at least one medoid’s score is above its threshold.
"ALERT, we might have a new undefined crop!" – when none of the medoids meet their thresholds.
For Priya, this was the moment the system became truly useful. The workflow did not just output numbers. It gave clear, actionable decisions.
Deploying the Workflow: From Prototype to Production
Once the logic was tested on a few sample images, Priya needed to make it reliable and secure enough for daily use across farms.
Credentials and configuration
She configured the following in n8n:
Voyage AI API key using HTTP header authentication for the embeddings request node.
Qdrant Cloud credentials including the collection name and cloud URL.
Environment variables and n8n credential stores so that no secrets were hardcoded in the workflow.
With these in place, deploying the anomaly detection workflow was as simple as:
Pointing the workflow to the correct Qdrant collection.
Ensuring the medoid payload fields (is_medoid and is_medoid_cluster_threshold) matched the configuration.
Connecting the workflow to upstream systems that provided image URLs, such as field apps or internal labeling tools.
Security and privacy in the field
Because the system processed real farm images, Priya enforced a few rules:
Only pass image URLs that the team was authorized to process.
Keep all API keys and credentials secure in n8n’s credential store or environment variables.
Restrict access to the workflow to trusted services and internal users.
Living With the Workflow: Troubleshooting and Tuning
Once farmers started sending thousands of images through the system, some patterns emerged. The workflow worked, but there were edge cases. Priya used a few key strategies to tune performance.
Common issues and how she fixed them
Low similarity scores for almost every image When embeddings looked uniformly low, she verified that:
The same Voyage AI model and version were used for both the original collection and the live queries.
No embedding drift had occurred due to a silent model upgrade.
Too many false positives (normal images flagged as anomalies) Priya:
Analyzed the similarity score distributions per cluster.
Adjusted medoid thresholds upward where needed.
Used cluster-wise ROC curves to find better thresholds per crop class.
Missing or misidentified medoids When some classes never matched, she checked that:
Medoids had been correctly flagged with is_medoid == true.
The is_medoid_cluster_threshold field was present and correctly named.
Scaling up As the dataset grew, she:
Kept queries efficient by always filtering on is_medoid == true.
Relied on Qdrant’s ability to scale a single collection while keeping medoid-only queries fast.
Measuring Success: Evaluation and Monitoring in Production
Priya knew that an anomaly detector is only as good as its long term behavior. To keep confidence high, she set up a simple evaluation and monitoring loop.
Validation set evaluation She used a held-out set of labeled images, including known anomalies, to:
Measure detection accuracy.
Track true positives and false negatives for anomalies.
Monitoring similarity distributions Over time, she:
Tracked the distribution of medoid similarity scores.
Set alerts when distributions shifted, a sign of concept drift or changing field conditions.
Human review of flagged anomalies For a sample of flagged images, domain experts:
Reviewed whether they were truly unknown crops.
Identified misclassifications or mislabeled data.
Fed confirmed new examples back into the dataset for future model updates.
What This Enabled: Real Use Cases on Real Farms
Once in place, the n8n, Qdrant and Voyage AI workflow changed how Priya’s team handled incoming images.
Field data capture Photos from scout walks were automatically checked against known farm crops. Anything unfamiliar was flagged for agronomists to review.
Quality control for datasets Before training new models, the pipeline scanned image datasets to detect mislabeled or corrupted images.
Species discovery and rare events Images that did not match any crop class surfaced possible new species, invasive weeds, or rare disease patterns that were not in the original dataset.
Multi modal extensions Where contextual metadata or text descriptions were available, Priya explored combining image and text embeddings to improve detection accuracy.
What had started as a problem of noisy labels and unknown plants turned into a flexible, extensible anomaly detection framework.
The Resolution: From Red Alerts to Reliable Insights
Weeks after deploying the workflow, the red alerts on Priya’s dashboard looked different. They were fewer, clearer, and far more meaningful.
Instead of random spikes from mislabeled data, the system highlighted images that truly did not belong to any known crop cluster. Some were new pest outbreaks. Others were weeds that had crept into fields. A few revealed labeling mistakes that would have poisoned future training runs.
Most importantly, the workflow was explainable. For every decision, Priya could see:
Which medoids were closest.
What the similarity scores were.
How those scores compared to per cluster thresholds.
It was no longer a black box model. It was a transparent, data driven pipeline that her team could trust, tune, and extend.
Try the Same n8n Template in Your Own Stack
If you already have a Qdrant collection and embeddings, you can plug this n8n crop anomaly detection workflow into your environment in minutes and start flagging unknown crops or anomalous images.
To reproduce Priya’s setup:
Prepare a crops dataset and upload images to a cloud bucket.
Create a Qdrant collection and upload image embeddings and metadata.
Run a medoids setup pipeline to compute medoids and per cluster thresholds, setting is_medoid and is_medoid_cluster_threshold payload fields.
Configure n8n credentials for Voyage AI and Qdrant securely.
Deploy the anomaly detection workflow and point it to your Qdrant collection and cloud URL.
From there, you can:
Run the workflow on a sample image.
Tune per cluster thresholds using a validation set.