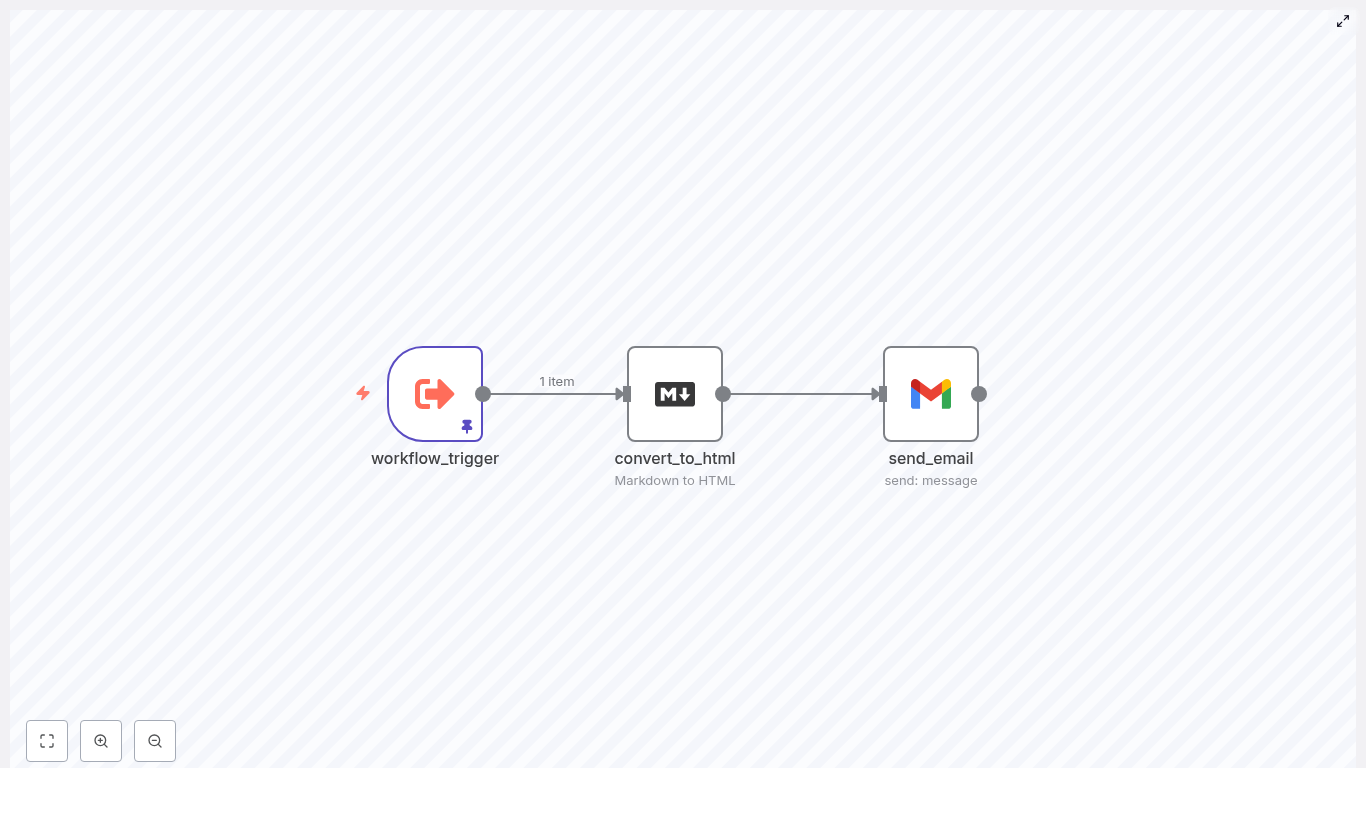
n8n AI Agent Tutorial: Multi-Level Workflow
This article presents an advanced n8n workflow template that implements three progressively sophisticated AI agent levels: a Level 1 Expense Tracker, a Level 2 Research Assistant, and a Level 3 Multi-step Content Factory. The workflow combines LangChain-style agents, OpenAI models, conversational triggers, memory buffers, Google Sheets and Google Docs, image generation, and multiple research tools to automate real-world business processes end to end.
Overview: Why this multi-level template is important
AI-driven automation is rapidly becoming a core capability for modern operations, from finance and knowledge work to marketing and communications. This n8n template demonstrates how to design and orchestrate reusable AI agents that:
- Accept natural language input through chat-style triggers
- Leverage OpenAI models in a controlled and auditable way
- Integrate with productivity tools like Google Sheets, Google Docs, and Gmail
- Use external research and search tools such as Perplexity, Tavily, and Wikipedia
- Generate visual assets through Replicate for content workflows
The result is a practical, extensible blueprint that can be adapted to a variety of use cases, including expense logging, research and reporting, and multi-channel content production.
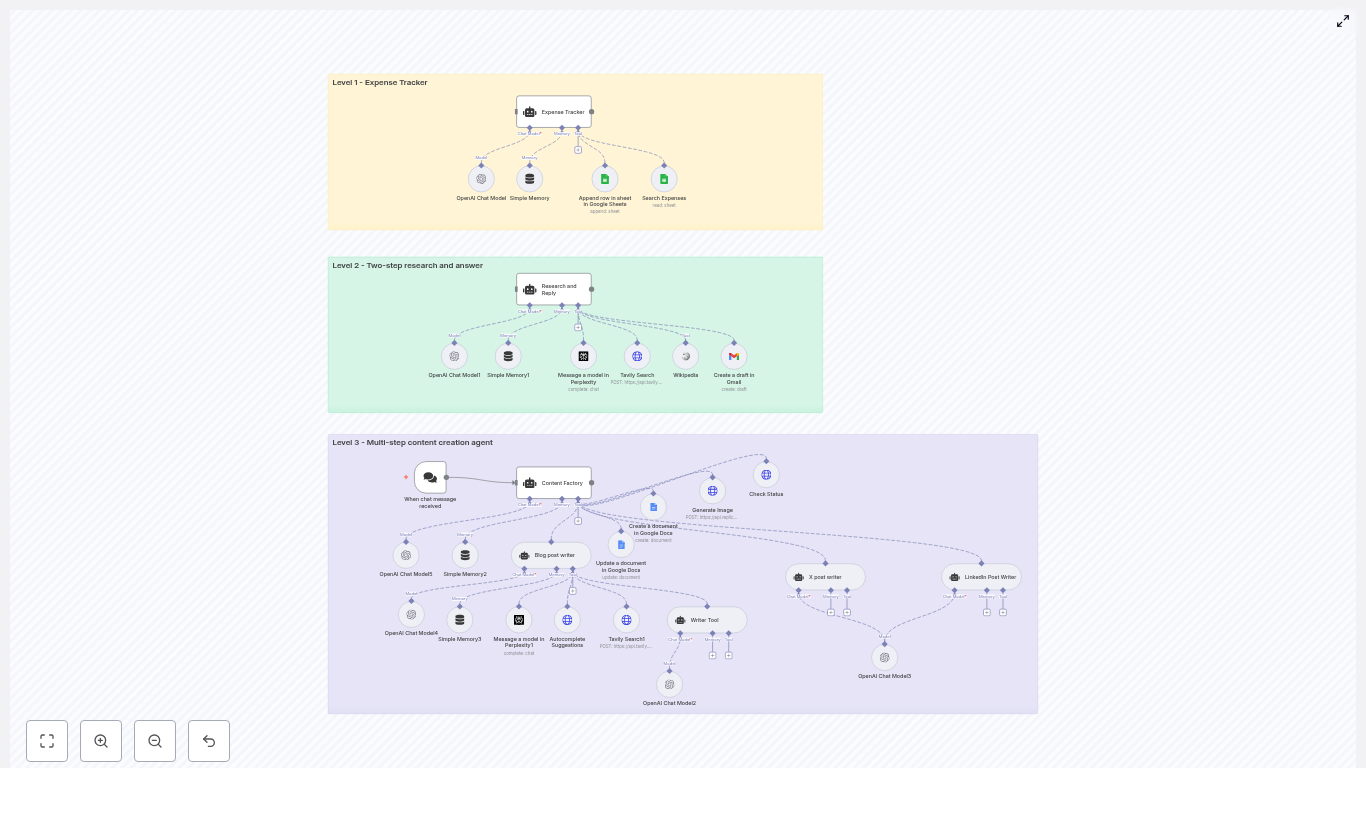
Architecture: Three levels of AI agents in one n8n workflow
The template is structured as a layered architecture. Each level represents a distinct automation pattern and responsibility, while still following consistent design principles for prompts, tools, and memory.
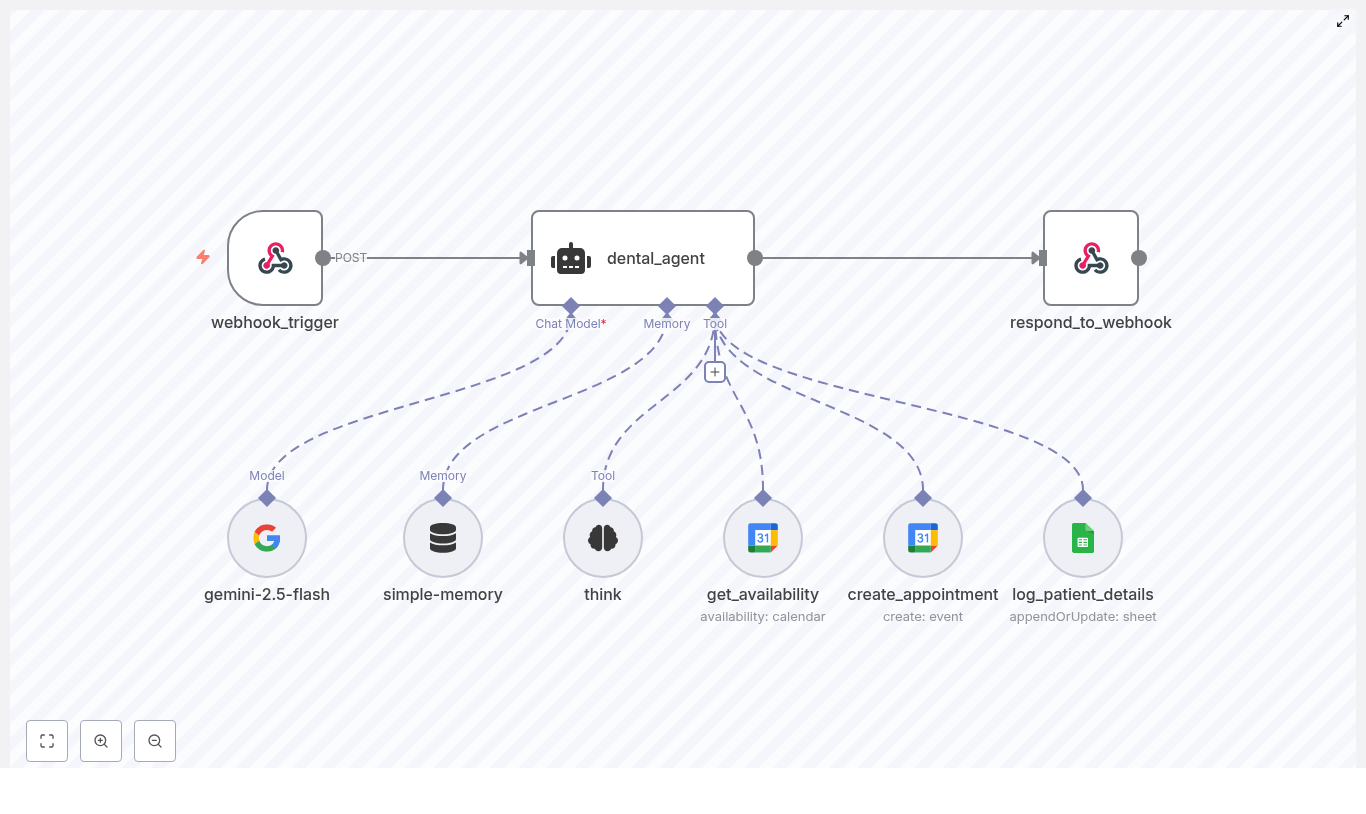
Level 1 – Expense Tracker Agent
Objective: Provide a fast, conversational way to record and retrieve expenses using a chat interface connected to Google Sheets.
Primary components:
- Trigger: When chat message received (chat trigger node)
- Core model: OpenAI Chat Model node
- Context management: Simple Memory buffer
- Data store: Google Sheets tools for:
- Searching existing expenses
- Appending new rows to a shared sheet
Behavior and constraints:
The agent is configured with a strict system message that limits its scope to expense-related actions only. When a user sends a message such as an expense description, the agent:
- Extracts structured fields, including:
- Month
- Year
- Date
- Notes
- Amount
- Category
- Automatically categorizes the expense (for example, Eating Out, Travel, Software)
- Appends a new row to a designated Google Sheet with the parsed data
- Supports retrieval of past entries via filters on the same sheet
By constraining the system prompt and tools, this Level 1 agent is safe, predictable, and ideal for operational logging tasks.
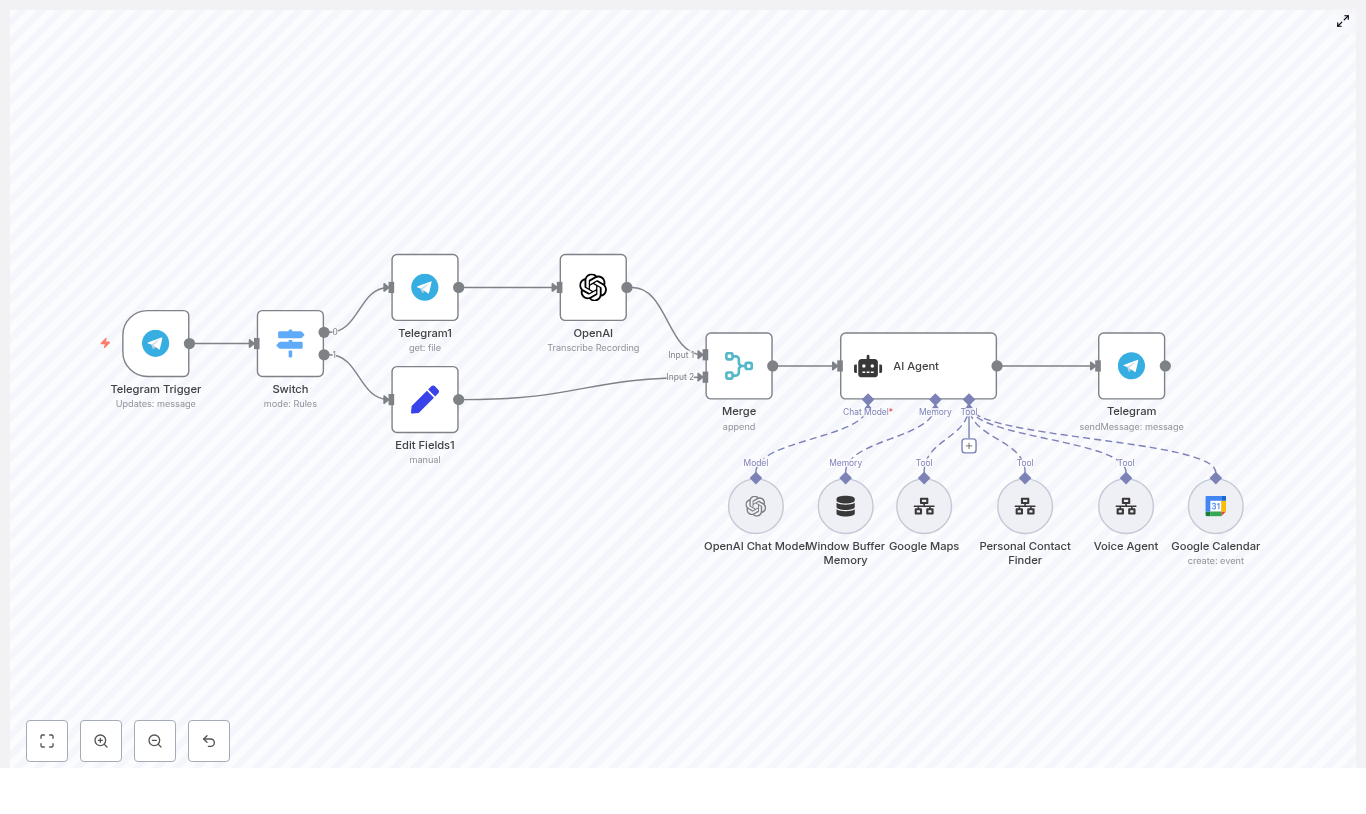
Level 2 – Research and Reply Agent
Objective: Execute a robust two-step research workflow that gathers information from multiple sources, synthesizes findings, and prepares a draft email response.
Primary components:
- Core model: OpenAI Chat Model node
- Context management: Simple Memory node to maintain short-term conversation history
- Research tools:
- Wikipedia
- Tavily Search
- Perplexity
- Output channel: Gmail node for creating email drafts
Behavior and constraints:
The agent is instructed, via its system prompt, to systematically use all three research tools for every user query. The workflow enforces a multi-source research pattern:
- Run queries against Wikipedia, Tavily, and Perplexity
- Aggregate and compare results to cross-check facts
- Produce a structured research summary, including:
- Key findings
- Supporting details
- Explicit citations or source references
- Generate a concise email draft summarizing the research
- Save the draft to Gmail for later human review and sending
This approach improves accuracy and traceability, which is critical in professional research, analysis, and client communication workflows.
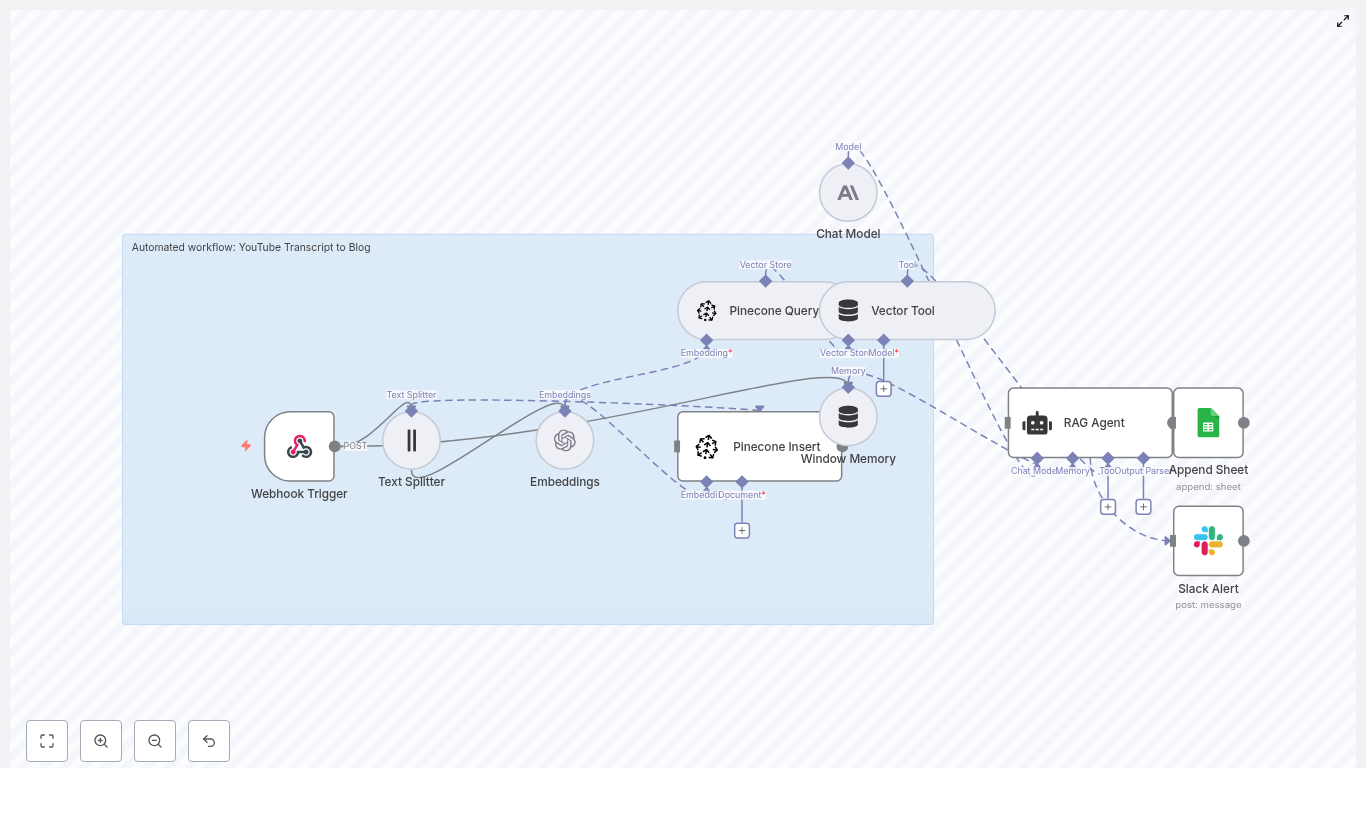
Level 3 – Content Factory: Multi-step Content Creation Agent
Objective: Deliver a fully automated content production pipeline that creates long-form blog content, X (Twitter) posts, LinkedIn posts, and associated images, then consolidates all assets into a single Google Doc.
Primary components:
- Trigger: Chat trigger node that initiates the content workflow
- Orchestrator: Content Factory agent node that coordinates subtools
- Sub-agents and tools:
- Blog post writer agentTool
- Writer Tool for short-form copy
- Tavily and Perplexity for topic research and SEO context
- SerpAPI autocomplete for keyword exploration and SEO optimization
- X post and LinkedIn post writer agents for social copy
- Content repository: Google Docs (create and update nodes)
- Image generation: Replicate image generation plus a status checker node to poll for completion
- Models and memory: Multiple OpenAI Chat Model nodes and memory nodes to manage multi-step context
Behavior and orchestration flow:
Given a topic, the Content Factory agent orchestrates a sequence of steps:
- Create or initialize a Google Doc that will act as the central artifact
- Run research and keyword discovery using Tavily, Perplexity, and optionally SerpAPI
- Generate images for the blog and social posts using Replicate, polling until each asset is ready
- Produce a long-form, SEO-focused blog article, typically with H2 and H3 structure
- Generate platform-specific copy for X and LinkedIn, tailored to each channel
- Append all generated text and image URLs to the Google Doc in a structured format
The final output to the user is a single Google Doc URL containing the complete content package, which can then be reviewed, edited, and published.
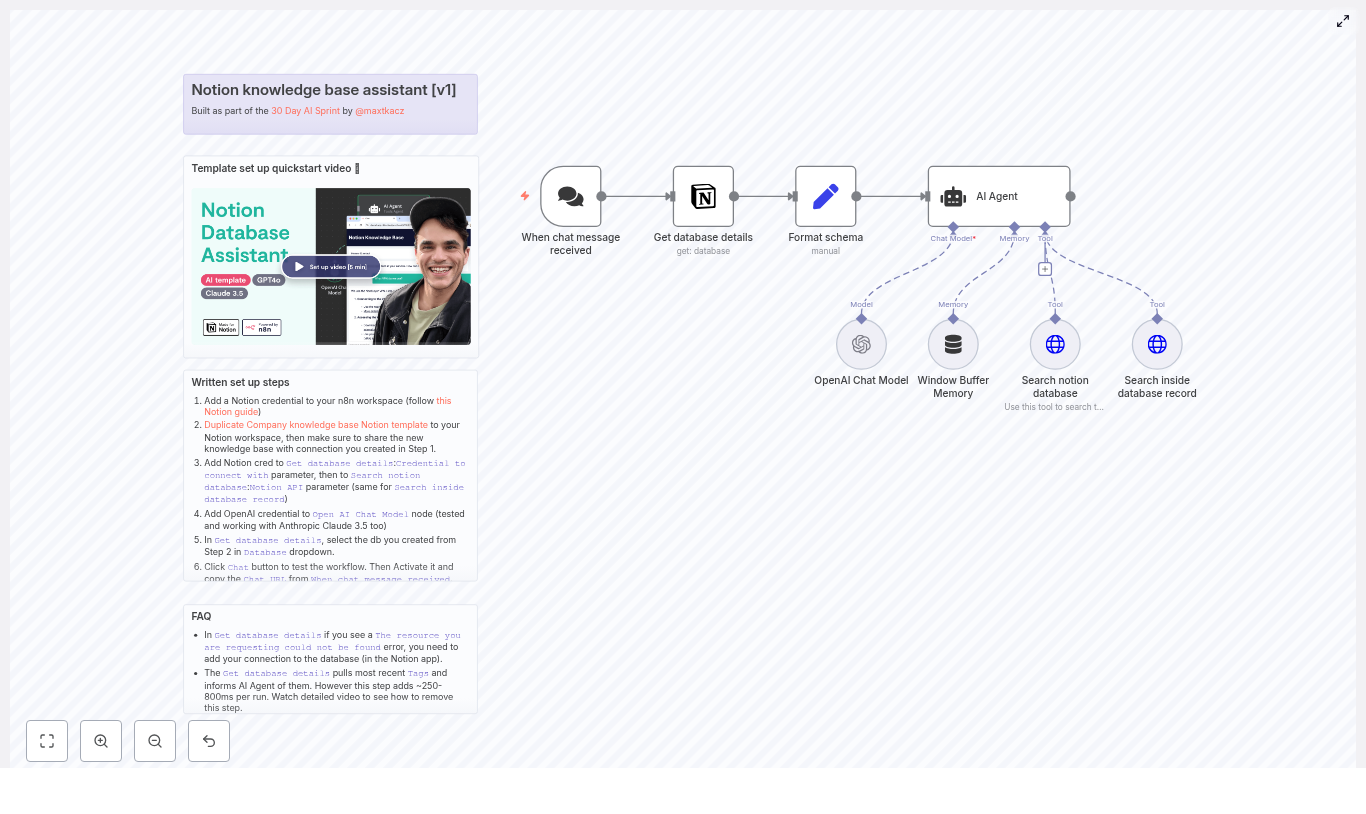
Core building blocks: Node-by-node explanation
Chat Trigger
The workflow is typically initiated by the When chat message received node. This node can be connected to a webhook endpoint that integrates with:
- Slack
- Discord
- Custom chat or web UI
The incoming message payload becomes the primary input to the relevant agent, which then uses its tools and prompts to decide the next actions.
OpenAI Chat Models and LangChain-style Agents
Across all three levels, multiple OpenAI Chat Model nodes are used. These are wrapped in agent nodes that follow a LangChain-style pattern:
- A system prompt defines the agent’s role, constraints, and allowed tools
- Tool nodes (such as Google Sheets, Tavily, Replicate) are exposed to the agent
- Each agent is bound to a specific use case, for example:
- Expense-only classification and logging
- Mandatory multi-tool research and summarization
- Coordinated content creation across formats
This encapsulation ensures that the language model behaves in a predictable, policy-compliant way and only interacts with the appropriate tools.
Memory Nodes
Memory buffer nodes provide short-term conversational context for each agent. They are particularly important when:
- Users refine expense entries or ask follow-up questions
- Research sessions involve iterative queries and clarifications
- Content generation requires multiple passes or revisions on the same topic
By storing recent messages in a windowed buffer, the workflow maintains continuity without persisting unnecessary long-term data.
Tool Integrations and their roles
- Google Sheets Tool:
- Searches existing expense entries
- Appends new rows for each parsed expense
- Acts as a simple, auditable ledger for Level 1
- Google Docs Tool:
- Creates a central document for the Content Factory
- Updates and appends content as each step completes
- Provides a single reference document link for stakeholders
- Gmail Tool:
- Generates email drafts from Level 2 research outputs
- Allows human review and approval before sending
- Perplexity and Tavily:
- Perform web-scale research and information retrieval
- Help surface sources, citations, and recent information
- Wikipedia:
- Provides structured, encyclopedic background information
- Useful as a stable reference point in research flows
- SerpAPI (optional):
- Offers autocomplete and search insights
- Improves keyword discovery for SEO in the blog writer flow
- Replicate:
- Generates images for blog posts and social posts
- Works with a status-check node to poll for completion of long-running jobs
Credential configuration and integration setup
Before running the workflow, configure the following credentials in n8n:
- OpenAI:
- Store your OpenAI API key in n8n credentials
- Select the appropriate model variants, for example:
gpt-4.1-minigpt-4.1gpt-5-mini(as used in the template)
- Google Sheets, Google Docs, and Gmail:
- Configure OAuth2 credentials for the chosen Google account
- Ensure the target Sheets and Docs IDs are accessible to that account
- Grant only the necessary scopes for security
- Perplexity, Tavily, Replicate:
- Add API keys or header-based authentication in n8n
- Verify any CORS or IP whitelisting requirements if applicable
- SerpAPI (optional):
- Store the SerpAPI key in n8n credentials
- Use it in the autocomplete and keyword research parts of the content flow
Customization strategies for advanced teams
This template is designed as a starting point. Automation and AI teams can extend and adapt it in several ways:
- Expense Tracker enhancements:
- Customize expense categories to match internal accounting codes
- Introduce multi-currency handling and conversion logic
- Add tax tags or cost center fields for financial reporting
- Research layer extensions:
- Connect to internal knowledge bases or wikis
- Integrate a vector database for semantic search across internal documents
- Apply stricter citation formatting for compliance-heavy domains
- Content Factory integrations:
- Push finalized content directly to CMS platforms such as WordPress or Ghost
- Trigger publication workflows or approval chains in project management tools
- Swap Replicate for another image generation provider or a self-hosted model
Best practices for secure and reliable AI automation
Combining AI with external tools and APIs requires careful attention to security, governance, and reliability. The following practices are recommended when deploying this template in production environments:
- Least privilege access:
- Limit OAuth scopes to only what is required
- Restrict Google Sheets and Docs access to specific documents wherever possible
- Secrets management:
- Store all API keys and tokens in n8n credentials
- Avoid embedding secrets directly in node parameters or shared templates
- Input validation and guardrails:
- Use system prompts to clearly define allowed actions and topics
- Add validation or pre-check nodes to sanitize user input
- Prevent data exfiltration by constraining accessible tools and outputs
- Rate limiting and resilience:
- Respect rate limits for OpenAI, Replicate, and research tools
- Configure retry and backoff strategies in HTTP Request and tool nodes
- Auditability and logging:
- Maintain logs of agent activity and tool calls
- Use Google Sheets or Docs metadata to track who triggered which workflow and when
Troubleshooting common issues
- Authentication or permission errors:
- Verify OAuth tokens are valid and not expired
- Confirm that the Google account has access to the specified Sheets and Docs
- Reauthorize credentials if scopes or accounts have changed
- Inconsistent or low-quality model responses:
- Refine system prompts to be more explicit about style and constraints
- Adjust temperature and other model parameters
- Test alternative model variants for your specific use case
- Tool chaining failures:
- Inspect intermediate node outputs using n8n’s execution logs
- Add conditional branches and fallback logic when tools return empty or error responses
- Introduce error handling nodes for more graceful degradation
- Slow or long-running image generation:
- Use the included status-check node to poll Replicate until assets are ready
- Set sensible timeouts and notify users when generation may take longer
Real-world usage scenarios
Example 1 – Expense capture via chat:
User message: “Spent $12.50 on lunch at SuperCafe today”
The Level 1 agent:
- Parses the message into structured fields
- Classifies the category as Eating Out
- Writes a row into Google Sheets such as:
- Year: 2025