Build an AI Personal Assistant with n8n
Imagine having a single automated system that can read and reply to emails, schedule meetings, track your expenses, research topics, draft blog posts, and even plan your travels – all coordinated from one place in n8n.
This guide explains how to build that AI personal assistant using an n8n workflow template. You will see how tools like GPT models, Perplexity, Tavily, Gmail, Google Calendar, Airtable, SerpAPI, WeatherAPI, and Replicate work together in a modular architecture that you can adapt to your own needs.
What you will learn
By the end of this tutorial-style article, you will understand:
- Why n8n is a strong choice for building an AI personal assistant
- The overall architecture: an Orchestrator Agent plus specialized sub-agents
- How each agent (email, calendar, finance, content, research, travel, etc.) works
- How to set up the n8n workflow step by step, including memory and research flows
- How a full example (publishing a blog post) runs from start to finish
- Best practices for security, monitoring, costs, and scaling
You can follow this guide whether you are starting from the existing n8n template or recreating the architecture in your own instance.
Why use n8n for an AI personal assistant?
n8n is an open source workflow automation platform that is especially well suited for building AI assistants made of multiple agents and tools. It gives you:
- Visual flow design – you can connect nodes for Gmail, Google Calendar, Airtable, LLMs, and more in a drag-and-drop canvas.
- Extensible integrations – n8n supports many cloud APIs and AI providers such as OpenAI, Anthropic, Perplexity, Tavily, SerpAPI, WeatherAPI, and Replicate.
- Security and self-hosting – you can run n8n on your own infrastructure, store credentials securely, and control what data leaves your environment.
Instead of building a monolithic chatbot, n8n lets you compose small, focused agents into one orchestrated assistant. This modular approach makes the system easier to debug, extend, and maintain.
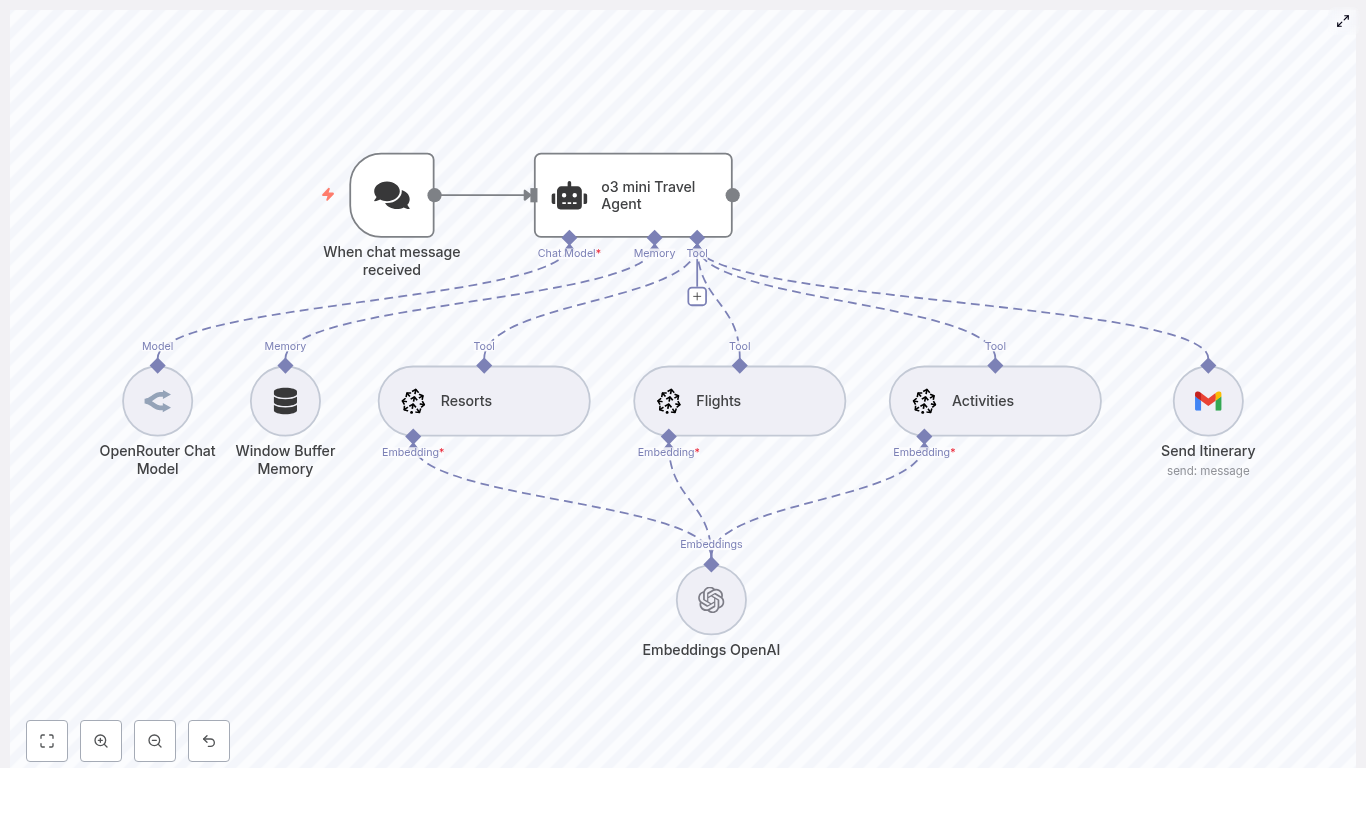
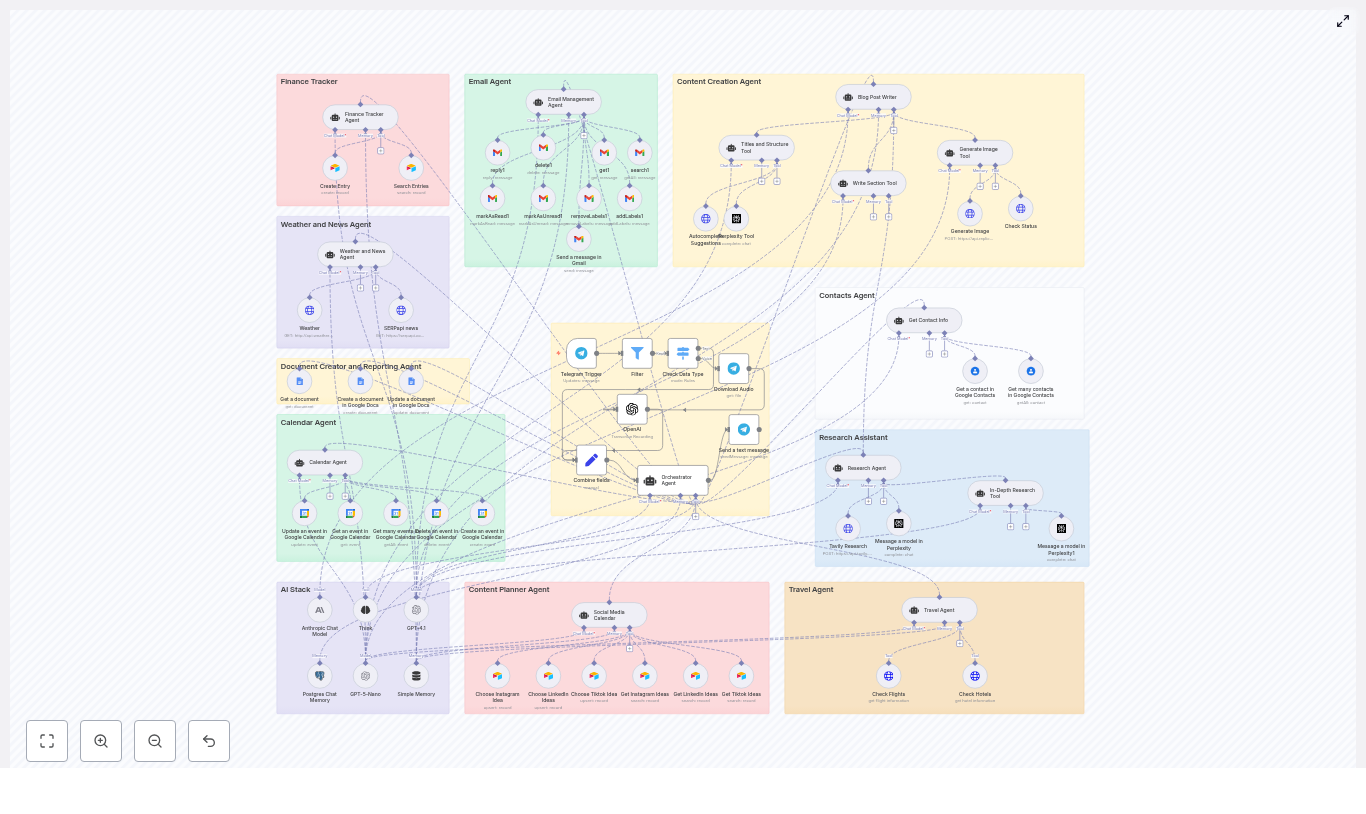
Core architecture: Orchestrator plus modular agents
The workflow is organized around a central Orchestrator Agent that coordinates several domain-specific agents. Each agent has a clear responsibility and a defined way to communicate with the orchestrator.
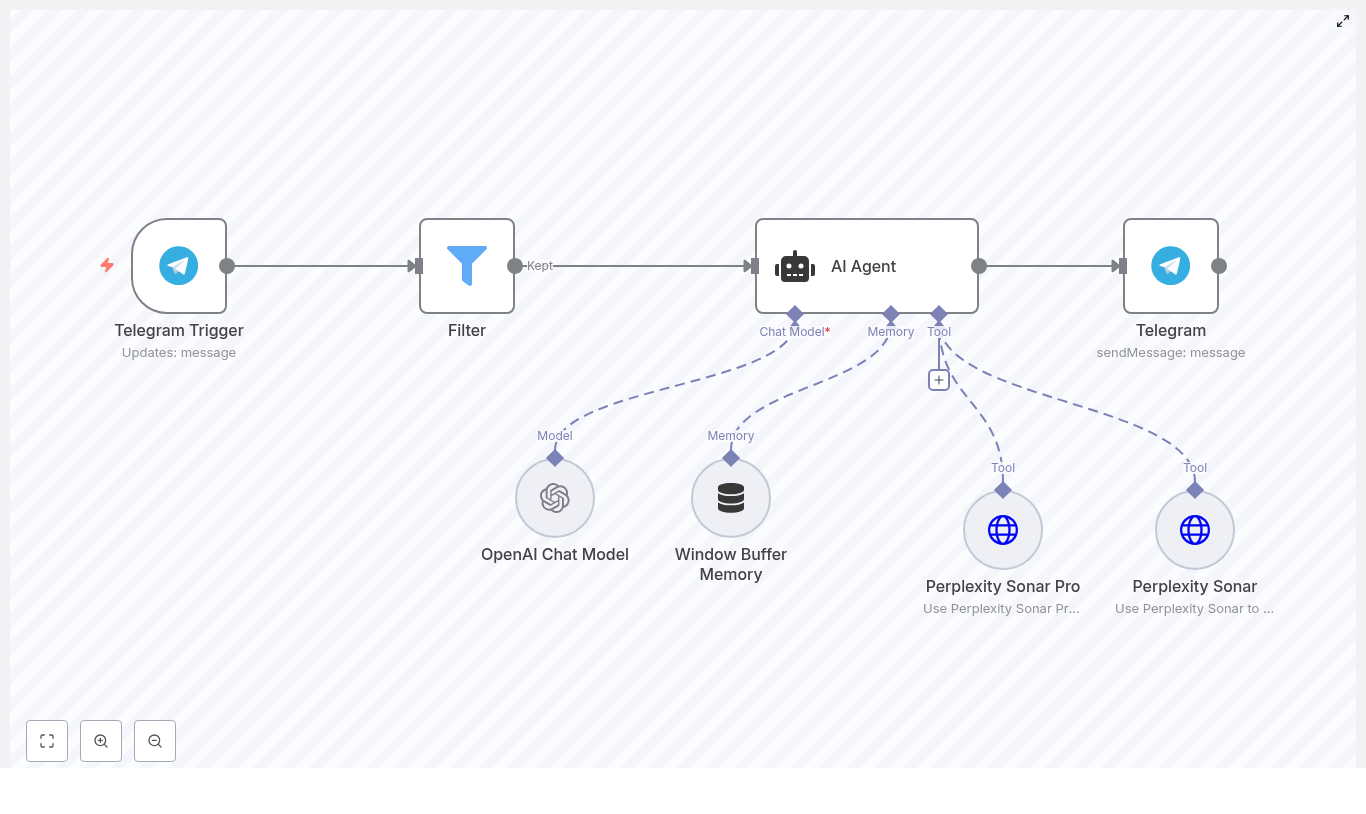
1. Orchestrator Agent (the “brain” of the workflow)
The Orchestrator Agent is the central node that:
- Receives user input from channels like Telegram or HTTP webhooks
- Understands the intent behind the request (for example “schedule a meeting” or “track this expense”)
- Routes the request to the correct specialized agent
- Collects and formats the final response for the user
You can think of the orchestrator as a conductor directing different sections of an orchestra. It does not do the heavy work itself. Instead, it delegates to agents such as Email, Calendar, Finance, Content, Research, and Travel.
2. Specialized agents (the “skills” of your assistant)
Each agent is implemented as a modular subflow in n8n. Below is an overview of the main agents in this architecture and what they do.
Finance Tracker Agent
- Logs and queries expenses in Airtable
- Useful for quick expense tracking and categorization (for example food, travel, personal)
- Can answer questions like “How much did I spend on travel this month?” by querying Airtable
Weather & News Agent
- Uses WeatherAPI to fetch local weather data and forecasts
- Uses SerpAPI to pull news headlines
- Returns short, summarized updates, for example “Today in Berlin: 18°C and cloudy. Top news: …”
Email Management Agent
- Uses Gmail nodes in n8n to read, label, reply to, or draft messages
- Can automate inbox triage, such as labeling newsletters or flagging urgent items
- Can generate AI-powered draft replies with LLMs based on email content and user instructions
Calendar Agent
- Works with Google Calendar to create, update, and fetch events
- Helps with scheduling meetings, checking availability, and sending event summaries
- Can be combined with the Contacts Agent to invite the right people
Content Creation Agent
- Performs multi-step content creation for blog posts and long-form writing
- Uses Perplexity or Tavily for research and source gathering
- Uses GPT models (for example GPT-4.x or GPT-5-Nano) to draft sections of the content
- Creates a final document in Google Docs for editing and publishing
- Calls Replicate to generate a featured image, which can be embedded in the document or HTML
Research Agent
- Combines Perplexity and Tavily to perform web research
- Returns concise, source-backed answers or more detailed research summaries
- Can be used standalone (for user questions) or as a helper for the Content Creation Agent
Social Media Calendar Agent
- Uses Airtable as a central database of social media content ideas
- Updates, organizes, and selects ideas for channels like Instagram, LinkedIn, and TikTok
- Can trigger content generation workflows that turn ideas into ready-to-post drafts
Travel Agent
- Uses SerpAPI to search for flights and hotels
- Builds shareable suggestions for trips, including dates, options, and links
- Can work with the Calendar Agent to propose travel dates that fit your schedule
Contacts Agent
- Integrates with Google Contacts
- Looks up email addresses and phone numbers based on names or partial information
- Supports other agents, for example when scheduling meetings or drafting outreach emails
Key integrations and tools used in the workflow
This n8n personal assistant template connects several APIs and AI tools. Understanding them helps you customize or extend the workflow.
- OpenAI / GPT-4.x / GPT-5-Nano – for natural language generation, conversation handling, summarization, and drafting content such as emails and blog sections.
- Perplexity & Tavily – for web research, answering questions with sources, and providing background information to the LLMs.
- Google APIs (Gmail, Docs, Calendar, Contacts) – for mail management, event scheduling, document creation, and contact lookups.
- Airtable – as a lightweight database for expenses and social media content ideas.
- SerpAPI – for news headlines, search results, and travel-related lookups like flights and hotels.
- WeatherAPI – for weather reports and forecasts.
- Replicate – for AI image generation, such as featured images for blog posts.
- Telegram – used as an example chat interface; you can swap this for Slack, email, or a simple web UI by changing the trigger node.
Before you start: prerequisites
To implement this workflow in n8n, you will need:
- A self-hosted or cloud-hosted n8n instance with persistent storage
- API keys and credentials for:
- OpenAI and/or Anthropic (for LLMs)
- SerpAPI
- WeatherAPI
- Replicate
- Airtable
- Google OAuth (Gmail, Calendar, Docs, Contacts)
- Basic familiarity with:
- n8n nodes and how to connect them
- Webhook or chat triggers
- Setting up and using n8n credentials
Step-by-step: building the workflow in n8n
In this section, we will walk through the main steps to assemble the AI personal assistant inside n8n. You can adapt each step to your own environment or use it to understand how the template works under the hood.
Step 1 – Set up the input trigger and orchestrator
- Add a trigger node
Choose how users will talk to your assistant. Common options:- Telegram Trigger – for chat-based interaction
- Webhook Trigger – for web apps, forms, or custom frontends
- Create the Orchestrator Agent node or subflow
This central node should:- Receive the raw user message or payload from the trigger
- Parse the intent (for example “check weather”, “draft email”, “log expense”)
- Decide which specialized agent to call
- Optionally use an LLM to classify the request and build a structured internal command
- Keep the orchestrator lightweight
The orchestrator should focus on:- Routing requests
- Combining responses
- Formatting the final output
Heavy logic, external calls, and domain-specific rules belong in the individual agents.
Step 2 – Build each agent as a modular subflow
In n8n, it is good practice to implement each agent as its own workflow or sub-workflow. This keeps things clean and reusable.
When creating each agent subflow (for example Calendar, Email, Finance, Content), follow these guidelines:
- Define a clear input and output
Decide what data the orchestrator will send in, and what the agent will return. For example:- Input: { “action”: “create_event”, “title”: “…”, “start”: “…”, “end”: “…” }
- Output: { “status”: “success”, “eventId”: “…” }
- Use n8n credentials for authentication
Configure:- Google OAuth credentials for Gmail, Calendar, Docs, Contacts
- Airtable API key or personal access token
- API keys for OpenAI, SerpAPI, WeatherAPI, Replicate, Perplexity, Tavily
Store them in n8n’s credential store and reference them from nodes instead of hardcoding secrets.
- Log actions and responses
Add simple logging with:- Function nodes that print key variables
- n8n’s built-in execution logs
This makes debugging much easier when something goes wrong in a specific agent.
Step 3 – Add memory and state for conversational flows
To make your assistant feel more like a real personal assistant, you need some form of memory. This allows multi-step interactions where the system remembers context, such as:
- The last drafted email
- An in-progress blog post
- Recent user preferences
In n8n, you can add memory in several ways:
- Database-based memory
Use a Postgres node or another database to store:- Session IDs
- Conversation history
- Partial results (for example sections of a blog post)
- Buffer or variable-based memory
For short-term context, you can use:- Static data nodes
- Workflow variables
- Simple key-value storage
The orchestrator can read and update this memory as it processes each new request, which enables more natural back-and-forth interactions.
Step 4 – Connect research tools and content generation
When the assistant needs to research a topic or create content, it uses a two-step pattern:
- Research step
Call Perplexity or Tavily from a Research or Content agent to:- Search the web for the requested topic
- Collect relevant links, summaries, and citations
- Prepare structured notes that can be passed to an LLM
- Generation step
Feed the research results into a GPT model to:- Draft sections of a blog post
- Write an email based on the research
- Answer a question with references
For blog posts, the workflow typically:
- Generates a title and outline (H2/H3 headings)
- Writes each section based on the research
- Calls Replicate to generate a featured image
- Creates a Google Doc with the final HTML or formatted content
Example walkthrough: publishing a blog post with the assistant
To see how the pieces fit together, let us walk through a concrete example that this workflow template supports: “Write and publish a blog post.”
- User triggers the blog workflow
The user sends a message such as “Write a blog post about remote work productivity” via Telegram or submits a web form. The trigger node passes this request to the Orchestrator Agent. - Orchestrator calls a Titles & Structure tool
The orchestrator forwards the request to the Content Creation Agent, which:- Calls a Titles & Structure tool backed by Perplexity or similar research
- Proposes a title and a H2/H3 outline for the article
The user can review and approve or adjust this structure.
- Sections are drafted with research and GPT
Once the outline is approved:- A “Write Section” tool takes each H2 (and possibly H3) heading
- It combines prior research results with a GPT model to draft that section
- This process repeats for every section until the full article is written
- Generate a featured image
The workflow calls Replicate with a prompt describing the blog topic. Replicate returns a generated image URL. The workflow then:- Inserts the image above the first H2 in the HTML or document
- Optionally