Imagine this: it is 6:47 PM, you are still at your desk, and you are on line item 143 of an invoice that says “work on matter” for the fifth time. Your eyes are glazing over, your dinner is getting cold, and you are starting to question every life choice that led you to manually reviewing time entries.
Now imagine instead that an automated n8n workflow quietly chews through those invoices, flags the weird stuff, summarizes the issues, and neatly logs everything in a Google Sheet. You just skim the results, make decisions, and go home on time. That, in a nutshell, is what the Legal Billing Analyzer n8n template is here to do.
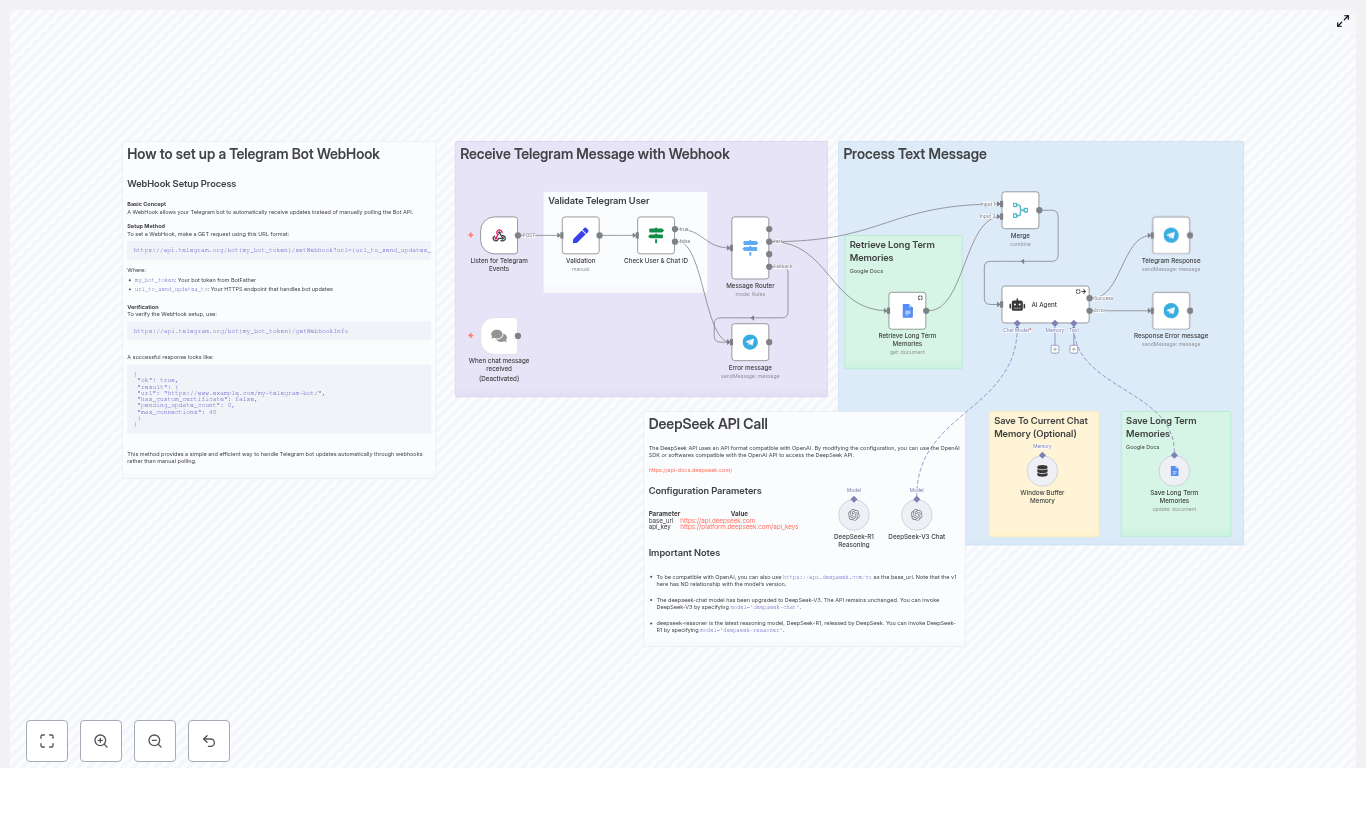
This ready-to-run workflow turns invoices and time entries into searchable embeddings, lets an LLM agent analyze them, and automatically records the findings. Less copy-paste, fewer missed anomalies, more sanity.
What the Legal Billing Analyzer actually does
This n8n template takes your billing data – invoices, time-entry exports, or even transcript text – and runs it through a full review pipeline:
Receives billing data via a webhook (CSV, JSON, plain text, or OCR output).
Splits long documents into smaller chunks so the model can understand what is going on.
Creates vector embeddings using Cohere for semantic search.
Stores those embeddings in Redis under a dedicated index for legal billing.
Uses a LangChain agent with an LLM (Anthropic by default) to query, analyze, and summarize issues.
Appends clean, structured results to a Google Sheet tab called Log for auditing and partner review.
The result: a repeatable, auditable billing review system that does the boring parts for you and leaves the judgment calls to humans.
How the workflow is stitched together (n8n node tour)
Here is a quick tour of the key nodes in this n8n template and what each one contributes to your new robot billing assistant.
Webhook – The entry point. It receives incoming billing data via POST. This is where you send exported CSVs, invoice text, or OCR results from your document scans.
Splitter – A character-based splitter with chunkSize: 400 and chunkOverlap: 40. It breaks long documents into overlapping pieces so embeddings capture local context instead of one giant wall of text.
Embeddings (Cohere) – Converts each text chunk into a vector embedding for semantic search. You plug in your Cohere API key, and this node handles the rest.
Insert (Redis vector store) – Stores embeddings in a Redis index named legal_billing_analyzer. This is your searchable memory of all billing content.
Query (Redis) – When the agent needs supporting context, this node queries the same legal_billing_analyzer index and pulls back the most relevant chunks using nearest-neighbor retrieval.
Tool (Vector Store) – Wraps the Redis vector store as a tool for the LangChain agent, enabling retrieval-augmented reasoning. In plain English, it lets the LLM “look things up” instead of guessing.
Memory (Buffer Window) – Maintains a recent context window so the agent remembers what has already been discussed across related queries, instead of acting like every question is the first date.
Chat (Anthropic) – The LLM that performs the actual analysis and writes human-readable summaries and recommendations. You configure it with your Anthropic API key.
Agent – The conductor. It orchestrates retrieval and LLM reasoning, takes in the input JSON, uses the tools and memory you have given it, and returns a structured result.
Sheet (Google Sheets) – Appends the agent output to a Google Sheet tab named Log. This gives you an audit trail, reporting, and an easy place for partners to review flagged items. It uses Google Sheets OAuth2 credentials to connect.
From invoice to insight: typical data flow
Here is how data moves through the Legal Billing Analyzer workflow when it is running in n8n:
Your client system or an internal automation sends billing data to the webhook via POST. This can be CSV, JSON, or OCR-converted text.
The Splitter node divides long text into overlapping 400-character chunks so each piece has enough context.
Each chunk is embedded using Cohere, then inserted into Redis under the legal_billing_analyzer index.
When analysis is triggered, the Query node pulls relevant chunks from Redis. The Agent uses the Chat model plus the Vector Store tool to analyze the entries and generate findings.
The workflow appends these results to your Google Sheet log for tracking, reporting, and partner sign-off.
Instead of scrolling through pages of timesheets, you get a structured summary of what needs attention.
Quick setup checklist
Before you hit “Execute workflow” in n8n, make sure you have the following pieces ready:
An n8n instance (Cloud or self-hosted).
A Cohere API key for generating embeddings.
A Redis instance with vector similarity enabled (Redis Vector Similarity or RedisStack).
An Anthropic API key, or another LLM provider if you choose to swap the Chat node.
Google Sheets OAuth2 credentials and the target SHEET_ID where the Log tab lives.
Secure access to the webhook endpoint, for example an auth token or IP allowlist, so random strangers are not sending you their grocery receipts.
Step-by-step: getting the template running
1. Import and connect your services
Import the Legal Billing Analyzer template into your n8n instance.
Open the Cohere Embeddings node and add your Cohere API key.
Configure the Redis nodes with your Redis host, port, credentials, and confirm the index name is legal_billing_analyzer.
Set up the Chat (Anthropic) node with your Anthropic API key or swap to another LLM provider node if preferred.
Authorize the Google Sheets node with OAuth2 and point it to your destination sheet and Log tab.
2. Secure and test the webhook
Protect the webhook with a secret token, basic auth, or IP allowlist.
Send a small sample invoice or time-entry export via POST to confirm that n8n receives the data correctly.
Check the execution log to see the data flowing into the Splitter and Embeddings nodes.
3. Validate analysis and output
Trigger an analysis run and make sure the Query node is pulling from the legal_billing_analyzer index in Redis.
Inspect the Agent output to confirm it is returning structured results (for example JSON fields that map cleanly to Sheet columns).
Verify that Google Sheets is receiving new rows in the Log tab after each run.
Once these steps work with test data, you are ready to feed it real invoices and save your team from spreadsheet purgatory.
Teaching the agent what to look for
The real magic comes from the prompt and instructions you give the LangChain agent. You want it to behave like a very diligent billing reviewer who has read the firm’s policy manual, not like a poet free-styling about invoices.
Here is a recommended set of behaviors to encode in your prompt:
- Check for duplicate time entries (same attorney, same time range, same description)
- Flag entries with unclear task descriptions (less than X characters or vague verbs)
- Identify apparent client-billed non-billable activities
- Summarize over- or under-billing by task category
- Return a short summary, severity (low/medium/high), and recommended action
To reduce hallucinations, include a few concrete examples of good and bad entries. Make sure the output format is structured and machine friendly, such as JSON or CSV-like fields, so the Google Sheets node can map each field to a column without gymnastics.
Keeping things safe: privacy, security, and compliance
Billing data is often packed with sensitive information, so a bit of up-front hygiene goes a long way.
PII handling – If your firm policy requires it, redact or tokenize personally identifiable information before sending billing data to external LLM providers. This can include client names, matter numbers, or other identifiers.
Encryption – Configure Redis with TLS for encryption in transit and enable disk encryption at rest. Restrict access using IP allowlists and strong credentials.
Access control – Protect the webhook with a secret token, basic auth, or client certificates. Limit who and what can trigger the workflow.
Retention policy – Decide how long embeddings and logs should live. Implement a process to delete or anonymize older data that is no longer needed.
With these in place, you get the benefits of automation without waking up your security team in a cold sweat.
Troubleshooting when automation throws a tantrum
Webhook not receiving data
If nothing seems to arrive:
Double-check webhook credentials and any auth you configured.
Review firewall rules in front of your n8n instance.
Confirm that the POST body is valid JSON or in the expected format.
Inspect n8n execution logs to see if requests are hitting the workflow at all.
Embeddings failing
If the Cohere node is unhappy:
Verify that the Cohere API key is correct and active.
Check for rate limits or quota issues with Cohere.
Consider whether chunk size is too large. Oversized chunks can reduce embedding quality. Smaller chunks with overlap, like the default 400 with 40 overlap, usually perform better.
Redis insert or query errors
When Redis complains:
Confirm the Redis credentials, host, and port are correct.
Make sure the indexName is exactly legal_billing_analyzer in both Insert and Query nodes.
If you are using Redis Stack, verify that vector similarity modules are enabled and configured.
Agent outputs are inconsistent or messy
If the LLM seems to improvise a bit too much:
Strengthen the prompt and add more concrete examples of desired behavior and format.
Increase the retrieval k value so the agent gets more context chunks from Redis.
Feed more relevant history through the Memory node to maintain continuity.
Log intermediate retrieval results to see which passages are being passed to the model.
Performance tuning so your workflow does not crawl
Once everything works, you can fine-tune for speed, cost, and accuracy.
Chunk size – A range of 300 to 600 characters is a solid starting point. The template defaults to 400 with 40-character overlap, which balances context and retrieval quality.
Top-k retrieval – Increasing k gives the agent more context for complex invoices, but also increases token usage. Adjust based on your use case and LLM pricing.
Model selection – Anthropic is the default, but you can swap in other LLM providers if you prefer different trade-offs in cost, latency, or compliance.
Vector database – Redis is a great fit for speed and simplicity. If you later need advanced vector features, you can consider Pinecone or Weaviate and adapt the template.
Where this template really shines: use cases
Some practical ways firms and legal ops teams can put the Legal Billing Analyzer to work:
Automated pre-bill review – Flag suspect entries before partner sign-off so partners focus on judgment, not data entry.
Historical billing audits – Analyze older invoices to uncover patterns of overcharging or time-keeping issues.
Client-facing reporting – Generate plain-language explanations of large invoices that clients can actually understand.
Internal QA for junior attorneys – Review time entries for clarity and policy compliance as part of training and quality control.
Example of structured output
Here is a sample of the kind of JSON output you can expect the agent to produce, which then maps nicely into your Google Sheet:
{  "matter": "ACME Corp - Contract Matter",  "invoice_id": "INV-2025-0012",  "summary": "Found 2 duplicate entries and 1 vague description",  "issues": [  {"type":"duplicate","line_items": [5,6],"severity":"medium"},  {"type":"vague_description","line_item":12,"severity":"low"}  ],  "recommended_action": "Confirm duplication with timekeeper; clarify line 12 or reclassify as non-billable."
}
This structure makes it easy to filter, sort, and report on issues directly from your sheet or downstream tools.
Next steps: turn repetitive review into one-click automation
If you are ready to stop manually hunting for duplicate time entries and vague “work on matter” descriptions, here is how to get started:
Import the Legal Billing Analyzer n8n template into your n8n instance.
Add API keys for Cohere and Anthropic (or your chosen LLM provider).
Configure the Google Sheets node with your SHEET_ID and confirm the Log tab.
Secure the webhook with your preferred authentication method.
Run a few test invoices and review the Sheet log to validate the findings.
Once you are happy with the results, connect your real billing exports or OCR pipeline and let the workflow take over the repetitive parts.
If you would like, I can provide a sample n8n import file or a ready-to-use prompt pack tailored to your firm’s billing policies – just ask and you can plug it straight into this template.
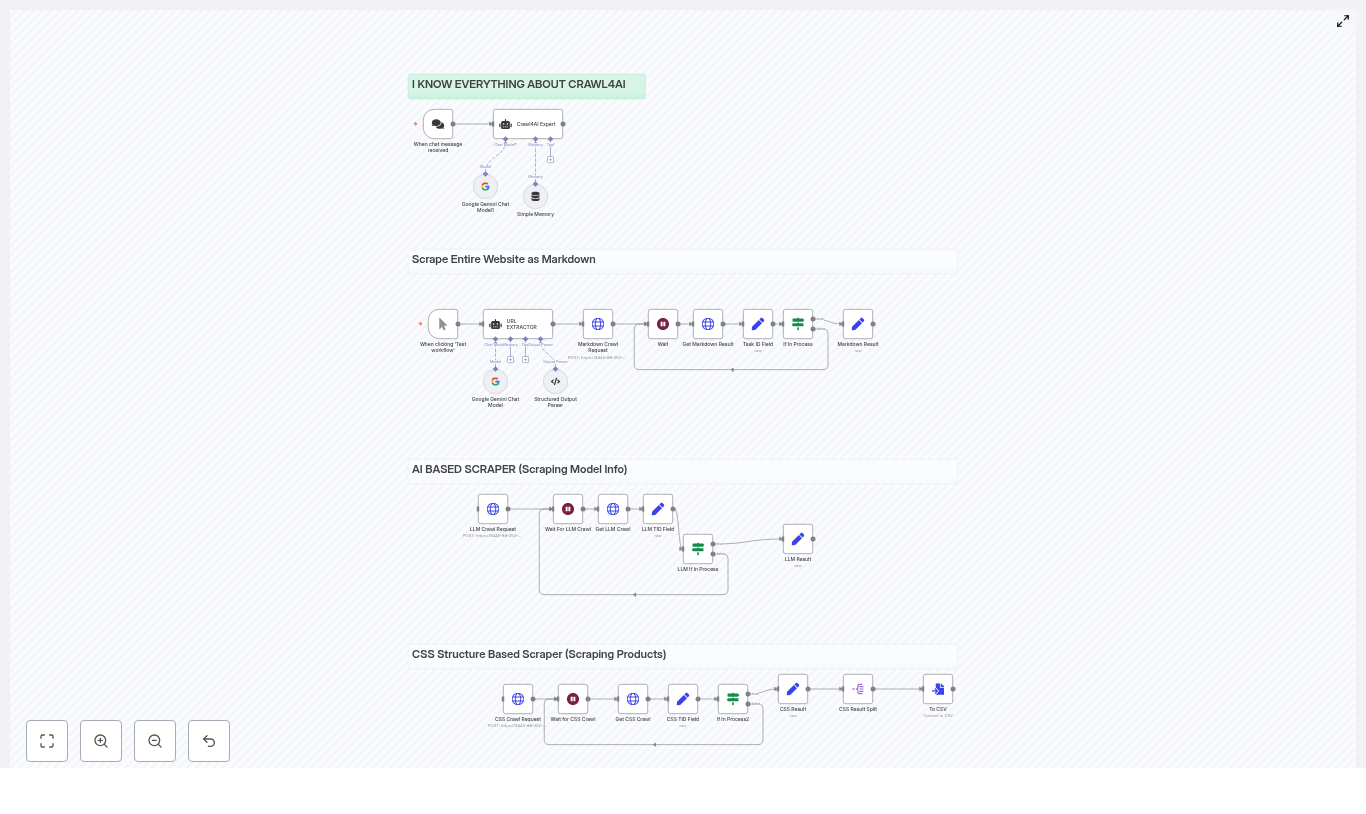
This guide will teach you how to build an AI-powered web scraper using an n8n workflow template and the Crawl4AI HTTP API. By the end, you will know how to:
Set up an automated scraping pipeline in n8n
Use Crawl4AI to crawl websites and extract data
Generate clean Markdown, structured JSON, and CSV outputs
Apply three practical scraping patterns:
Full-site Markdown export
LLM-based structured data extraction
CSS-based product/catalog scraping
The template workflow coordinates all of this for you: n8n handles triggers, waits, polling, and post-processing, while Crawl4AI does the crawling and extraction.
1. Concept overview: n8n + Crawl4AI as a scraping stack
1.1 Why use n8n for web scraping automation?
n8n is a low-code automation platform that lets you visually build workflows. For scraping, it provides:
Triggers to start crawls (manually, via webhook, or on a schedule)
Wait and loop logic to poll external APIs until jobs finish
Transform nodes to clean, map, and format data
Connectors to send results to databases, storage, or other apps
1.2 What Crawl4AI brings to the workflow
Crawl4AI is a crawler designed to work well with large language models and modern web pages. It can:
Handle dynamic and JavaScript-heavy pages
Generate Markdown, JSON, and media artifacts (like PDFs or screenshots)
Apply different extraction strategies, including:
Markdown extraction
CSS / JSON-based extraction
LLM-driven schema extraction
Combined, n8n and Crawl4AI give you a production-ready scraping pipeline that can:
Work with authenticated or geo-specific pages
Use LLMs for complex or messy content
Export data to CSV, databases, or any downstream system
2. What this n8n template does
The template is built around a single Crawl4AI HTTP API, but it runs three scraping patterns in parallel inside n8n:
Markdown Crawl Extracts full pages from a website and converts them to Markdown. Use case: content ingestion, documentation backups, and RAG (Retrieval Augmented Generation) pipelines.
LLM Crawl Uses an LLM extraction strategy to return structured JSON that follows a schema you define. Use case: extracting pricing tables, specifications, or other structured information.
CSS / Catalog Crawl Uses a JsonCssExtractionStrategy to scrape product cards or catalog items based on CSS selectors, then exports results to CSV. Use case: product catalogs, listings, or any regular page layout.
Each flow uses the same Crawl4AI API pattern:
POST/crawl to start a crawl job
GET/task/{task_id} to poll for status and retrieve results
n8n orchestrates:
Retries and wait times between polls
Parsing and transforming the response
Output formatting such as CSV generation
3. Prerequisites and setup
3.1 What you need before starting
An n8n instance Desktop, self-hosted server, or n8n cloud are all fine.
A running Crawl4AI server endpoint For example, a Docker-hosted instance or managed API that exposes the /crawl and /task endpoints.
API credentials for Crawl4AI Configure them as an n8n credential, typically through HTTP header authentication.
Basic familiarity with:
JSON objects and arrays
CSS selectors for targeting elements on a page
3.2 Connecting n8n to Crawl4AI
In n8n, you will typically:
Create an HTTP Request credential that holds your Crawl4AI API key or token
Use this credential in all HTTP Request nodes that talk to the Crawl4AI endpoint
Point the base URL to your Crawl4AI server
4. Understanding the workflow architecture
Although the template runs multiple flows, they share the same core structure. Here are the main n8n nodes and what they do in the scraping pipeline.
4.1 Core nodes and their roles
Trigger node Starts the workflow. This can be:
Manual runs via “Test workflow”
A webhook trigger
A scheduled trigger (for periodic crawls)
URL EXTRACTOR An AI assistant node that:
Parses sitemaps or input text
Outputs a JSON array of URLs to crawl
HTTP Request (POST /crawl) Creates a Crawl4AI task. The JSON body usually includes:
urls – a URL or array of URLs to crawl
extraction_config – which extraction strategy to use
Additional crawler parameters such as cache mode or concurrency
Wait node Pauses the workflow while the external crawl runs. Different flows may use different wait durations depending on complexity.
Get Task (HTTP Request /task/{task_id}) Polls Crawl4AI for the current status of the task and retrieves results when finished.
If In Process Checks the task status. If it is still pending or processing, the workflow loops back to the Wait node and polls again.
Set / Transform nodes Used to:
Extract specific fields from the Crawl4AI response
Split or join arrays
Compute derived fields, for example star_count
Prepare data for CSV or database insertion
Split / Convert to CSV Breaks arrays of records into individual items and converts them into CSV rows. You can then write these to files or send them to storage or analytics tools.
5. Example Crawl4AI requests used in the template
The template uses three main kinds of payloads to demonstrate different extraction strategies.
5.1 Basic Markdown crawl
This configuration converts pages to Markdown, ideal for content ingestion or RAG pipelines.
semaphore_count controls concurrency to avoid overloading the target site
6. Step-by-step walkthrough of a typical run
In this section, we will walk through how a single crawl flow behaves inside n8n. The three flows (Markdown, LLM, CSS) follow the same pattern with different payloads and post-processing.
6.1 Step 1 – Generate or provide the URL list
The workflow starts from the Trigger node.
The URL EXTRACTOR node receives either:
A sitemap URL that it parses into individual links, or
A list of URLs that you pass directly as input
The node outputs a JSON array of URLs that will be used in the urls field of the POST /crawl body.
6.2 Step 2 – Start the Crawl4AI task
An HTTP Request node sends POST/crawl to your Crawl4AI endpoint.
The body includes:
urls from the URL EXTRACTOR
extraction_config for Markdown, LLM, or JSON CSS
Any additional parameters like cache_mode or semaphore_count
Crawl4AI responds with a task_id that identifies this crawl job.
6.3 Step 3 – Wait and poll for completion
The workflow moves to a Wait node, pausing for a configured duration.
After the wait, an HTTP Request node calls GET/task/{task_id} to fetch the task status and any partial or final results.
An If In Process node checks the status field:
If the status is pending or processing, the workflow loops back to the Wait node.
If the status is finished or another terminal state, the workflow continues to the processing steps.
6.4 Step 4 – Process and transform the results
Once the crawl is complete, the response from Crawl4AI may include fields like:
result.markdown for Markdown crawls
result.extracted_content for LLM or JSON CSS strategies
n8n then uses Set and Transform nodes to:
Parse the JSON output
Split arrays into individual records
Compute derived metrics, for example star_count or other summary fields
Prepare the final structure for CSV or database insertion
Finally, the Split / Convert to CSV portion of the workflow:
Turns each record into a CSV row
Writes the CSV to a file or forwards it to storage, analytics, or other automation steps
7. Best practices for production scraping with n8n and Crawl4AI
7.1 Respect robots.txt and rate limits
Enable check_robots_txt=true in Crawl4AI if you want to respect site rules.
Use semaphore_count or dispatcher settings to limit concurrency and avoid overloading target servers.
7.2 Use proxies and manage identity
For large-scale or geo-specific crawls, configure proxies in Crawl4AI’s BrowserConfig or use proxy rotation.
For authenticated pages, use:
user_data_dir to maintain a persistent browser profile, or
storage_state to reuse logged-in sessions across crawls
7.3 Pick the right extraction strategy
JsonCss / JsonXPath Best for regular, structured pages where you can clearly define selectors. Fast and cost effective.
LLMExtractionStrategy Ideal when pages are messy, inconsistent, or semantically complex. Tips:
Define a clear JSON schema
Write precise instructions
Chunk long content and monitor token usage
Markdown extraction Good for content ingestion into RAG or documentation systems. You can apply markdown filters like pruning or BM25 later to keep text concise.
7.4 Handle large pages and lazy-loaded content
Enable scan_full_page for long or scrollable pages.
Use wait_for_images when you need images to fully load.
Provide custom js_code to trigger infinite scroll or load lazy content.
Set delay_before_return_html to give the page a short buffer after JavaScript execution before capturing HTML.
7.5 Monitor, retry, and persist your data
Implement retry logic in n8n for transient network or server errors.
Log errors and raw responses to persistent storage, such as S3 or a database.
Export final results as CSV or push them directly into your analytics or BI database.
8. Extending the template for advanced use cases
Once the basic scraping flows are working, you can extend the workflow to cover more advanced automation patterns.
Use this n8n workflow template to turn messy invoice intake into a simple, automated pipeline. Your invoices arrive in Telegram, get processed with OCR, key fields are parsed and stored in Google Sheets, the original file is archived in Google Drive, and an OpenAI-powered agent sends a confirmation back to the sender.
What you will learn
By the end of this guide, you will understand:
What the Telegram Invoice Agent workflow does and when to use it
How each n8n node in the template works, step by step
How to connect Telegram, OCR, Google Drive, Google Sheets and OpenAI in n8n
How to customize parsing, validation and security for your own invoices
How to troubleshoot common issues like poor OCR or failed Google Sheets writes
Why use this n8n Invoice Agent workflow?
This template is designed for anyone who regularly receives invoices as images or PDFs and wants a lightweight automation instead of manual data entry. It is especially useful for:
Small businesses that get invoices via chat apps
Freelancers who want a simple invoice inbox
Bookkeeping and finance teams that need quick, structured invoice data
Key benefits of this n8n invoice automation:
Faster invoice intake: Forward invoices to your Telegram bot and let n8n handle download, OCR, parsing and storage.
Accurate data capture: OCR plus parsing extracts fields like invoice number, date, total amount, due date, billing address and notes.
Centralized file storage: Original invoice files are archived in a Google Drive folder.
Structured logging: Parsed invoice data is appended to a Google Sheets spreadsheet for filtering, reporting and follow-up.
User-friendly confirmation: An OpenAI-powered agent summarizes the invoice and confirms successful storage directly in Telegram.
Concept overview: How the workflow fits together
At a high level, the n8n template follows this flow:
Capture: A Telegram Trigger node listens for incoming invoice files.
Extract: The file is downloaded and sent to an OCR service to extract text.
Parse: A Code node uses regular expressions to pull out key invoice fields.
Store: Parsed data goes into Google Sheets, while the original file is saved to Google Drive.
Confirm: An OpenAI agent summarizes the invoice and replies to the sender in Telegram.
In n8n, these concepts are implemented as connected nodes that pass data along in JSON format. The template ships with all the logic wired up. You mainly need to plug in your credentials and adapt parsing rules if needed.
Prerequisites and setup checklist
Before you enable the workflow, make sure you have the following pieces ready and connected to n8n.
1. Telegram bot
Create a Telegram bot using @BotFather.
Copy the bot token and add it as credentials in n8n.
Configure the Telegram Trigger node in the template to use these credentials.
2. OCR provider
Obtain an API key for OCR.space or another OCR provider such as Google Vision, AWS Textract or a self-hosted Tesseract instance.
If you use OCR.space, the included HTTP Request node is already configured for a standard POST request.
If you use a different provider, adjust the HTTP Request node URL, headers and body format accordingly.
3. Google Drive and Google Sheets
Set up OAuth credentials for Google in n8n.
Create a Google Sheets spreadsheet that will act as your invoice database.
Create or choose a Google Drive folder where invoice files will be stored.
Configure the Google Sheets and Google Drive nodes to use your Google account and point them to the correct sheet and folder.
4. OpenAI account
Get an OpenAI API key.
Add it to n8n as credentials and select it in the OpenAI node used for the Invoice Agent.
Review or tweak the system prompt to match your preferred tone and summary style.
5. Test data and parsing rules
Collect a few sample invoices that represent the formats you usually receive.
Run them through the workflow and refine the regular expressions in the parsing Code node if needed.
Step-by-step: How the n8n invoice workflow works
In this section, we walk through each node in the template in the order data flows through the system.
Step 1 – Capture invoices with the Telegram Trigger
The workflow starts with a Telegram Trigger node. It listens for messages sent to your Telegram bot.
For this template, you typically send:
Invoice images (JPG, PNG)
Invoice PDFs
When a user sends a document, the trigger node receives the message payload, including the file_id that Telegram uses to reference the file. This reference is then passed to the next node so the file can be downloaded.
Step 2 – Download the invoice file
Next, a Telegram API node (often called Download File in the template) uses the file_id to fetch the actual file from Telegram.
Key details:
The node retrieves the file as binary data.
This binary data is stored in the n8n execution context, ready to be sent to the OCR service.
Step 3 – Extract text with OCR
Once the file is downloaded, a HTTP Request node (labeled something like Analyze Image (OCR)) sends the binary file to your OCR provider.
In the default template:
The workflow uses OCR.space via a POST request.
The binary file is attached and the API key is passed in the headers or query parameters.
The OCR service processes the image or PDF and returns a response that contains the extracted text. The node parses this response and exposes the text for the next step.
You can swap OCR.space with other services by adjusting:
The endpoint URL
Authentication headers or parameters
The way you read the extracted text from the response body
Step 4 – Parse invoice fields from OCR text
OCR gives you a big block of text. The next step is to turn that into structured data. A Code node (for example in JavaScript) performs this parsing.
This node typically:
Receives the raw OCR text as input.
Uses regular expressions to find patterns such as:
Invoice number (e.g. Invoice #12345 or Invoice No. 12345)
Invoice date
Total amount
Due date
Billing address
Additional notes or descriptions
Builds a JSON object with clearly named fields, for example:
invoiceNumber
invoiceDate
totalAmount
dueDate
billingAddress
notes
This transformation is what allows downstream nodes like Google Sheets and OpenAI to work with clean, structured invoice data instead of free-form text.
Step 5 – Append structured data to Google Sheets
With the parsed JSON in hand, the workflow moves to a Google Sheets node, often labeled Update Database.
In this step:
The node is configured in Append mode to add a new row to your invoice sheet.
Each JSON field is mapped to a specific column, such as:
Invoice Number
Date
Total Amount
Billing Address
Due Date
Notes
Optionally, you can also log metadata like timestamp and Telegram user ID for auditing.
The result is an ever-growing, filterable list of invoices that you can use for reporting and tracking unpaid amounts.
Step 6 – Archive the original invoice in Google Drive
In parallel or as a subsequent branch, another part of the workflow handles file storage using a Google Drive node.
This step:
Uploads the original binary file received from Telegram to a chosen Drive folder.
Sets a human-readable file name, often including the current date or invoice number.
Optionally stores or returns the file URL or ID so it can be referenced later.
This gives you a secure, centralized archive of all original invoices alongside your structured sheet data.
Step 7 – Generate a confirmation with OpenAI and reply in Telegram
The final stage uses an OpenAI node, often referred to as the Invoice Agent, followed by a Telegram reply node.
The OpenAI node receives:
The parsed invoice fields (total, due date, notes, etc.)
The file name or link, if you choose to include it
Any relevant context, such as the location of the Google Sheets database
The system prompt instructs the model to:
Thank the user for sending the invoice
Summarize key details like total amount and due date
Confirm that the invoice file and data were stored successfully
The OpenAI response text is then passed to a Telegram node that sends a message back to the original sender. This closes the loop and gives the user immediate feedback that their invoice has been processed.
Quick node mapping reference
To help you visualize the flow in n8n, here is a concise node sequence:
Main data path: Telegram Trigger → Download File → Analyze Image (OCR) → Parse Text → Update Database (Google Sheets)
File and confirmation path: Download File → Upload to Drive → Set file name → Invoice Agent (OpenAI) → Reply (Telegram)
Customizations and best practices
Improving OCR accuracy
Preprocess images to improve quality, such as deskewing or increasing contrast, before sending them to OCR.
Switch to a higher accuracy OCR provider if OCR.space does not handle your invoice formats well.
Encourage users to send higher-resolution scans or PDF exports instead of low-quality photos.
Enhancing parsing logic
Replace single regex patterns with a list of patterns that cover variations like Invoice #, Invoice No., or Invoice Number.
Add fallback logic so if one pattern fails, another one is tried.
If you process many vendor-specific templates, consider building vendor-specific parsing branches or using a small ML-based classifier.
Data validation and quality checks
Add an extra node that validates numerical formats for amounts and checks that dates are within reasonable ranges.
Flag suspicious or incomplete entries by sending alerts to Slack, email or another Telegram chat.
Require manual review for invoices above a certain threshold by routing them to a separate approval workflow.
Handling multiple file types
Use conditional nodes in n8n to detect whether the file is a PDF, JPG, PNG or a multipage document.
Route different file types to slightly different OCR configurations if needed.
Security and access control
Use least-privilege OAuth scopes for Google Drive and Google Sheets, granting only the permissions the workflow really needs.
Avoid storing full payment card numbers or CVV codes in Drive or Sheets. If invoices contain such data, redact or omit it before saving.
Restrict access to the Drive folder and spreadsheet to only those who need it.
Enable two-factor authentication on accounts used by n8n, such as Google, Telegram and OpenAI.
Auditing and traceability
Add timestamp fields for when the invoice was received and processed.
Log the Telegram user ID or username in the Google Sheet so you can trace the source of each invoice.
Troubleshooting common issues
OCR returns messy or incomplete text
Possible fixes:
Try a different OCR provider or change OCR settings.
Improve the quality of the source images by asking users for clearer photos or PDFs.
Add pre-processing steps in n8n or upstream tools to enhance contrast or correct skew.
If invoices are very low resolution, consider asking users via the Telegram bot to send higher quality scans or enable PDF uploads.
Parsed fields are empty or incorrect
Focus on the Code node that parses text:
Review and update regex patterns to match the labels used on your invoices, for example:
Invoice # vs Invoice No.
Total vs Amount Due
Implement multiple patterns for each field and use fallback logic.
Test the regexes against real OCR output from your invoices and adjust until they consistently match.
Google Sheets append fails
If the Google Sheets node fails to append rows:
Verify that your Google Sheets OAuth credentials in n8n are valid and not expired.
Check that the spreadsheet ID and sheet name (or gid) are correct.
Make sure the authenticated Google user has edit access to the sheet.
Confirm column mappings in the node configuration match your actual sheet structure.
Security & compliance considerations
Avoid storing sensitive payment data, such as full card numbers or CVV codes, in plain text in either Google Drive or Google Sheets.
If invoices contain sensitive details, consider redacting them or limiting access to the storage locations.
Enable two-factor authentication for all accounts used by n8n, including Google, Telegram and OpenAI.
Limit OAuth scopes for Drive and Sheets to the minimum required for this workflow.
Implement an approval step for high-value invoices so that a human reviews them before payment is made.
Recap and next steps
This n8n Invoice Agent template gives you a complete, modular pipeline for invoice automation:
Invoices arrive via Telegram and are captured by a Telegram Trigger node.
Files are downloaded, passed through OCR and converted into plain text.
A Code node parses key fields like invoice number, dates, amounts and billing details.
Structured data is logged in Google Sheets and original files are archived in Google Drive.
An OpenAI-powered agent summarizes the invoice and confirms processing back to the user in Telegram.
Ever starred a Slack message thinking, “I’ll totally remember this later,” then watched it vanish into the black hole of your workspace? If your Slack is a graveyard of forgotten stars and your Notion is suspiciously empty, this workflow is here to save you from yourself.
With this n8n template, every starred Slack message can automatically turn into a clean, structured Notion note or a tidy log entry. No more copying, pasting, formatting, or promising yourself you’ll “do it at the end of the day.” Spoiler: you won’t.
What this n8n workflow actually does
This “Starred Slack to Notion” automation takes your starred Slack messages, enriches them with embeddings and context, stores them in a vector database, and lets a RAG-enabled assistant (Retrieval Augmented Generation) help you make sense of it all.
At a high level, the workflow:
Listens for starred Slack messages via a webhook trigger
Splits long messages into smaller chunks for better embeddings
Generates vector embeddings using Cohere (or another embedding provider)
Saves those embeddings and metadata into Weaviate
Uses RAG tools (Weaviate Query, Vector Tool, RAG Agent, Window Memory, and an OpenAI chat model) to process and enrich the content
Logs the result in a Google Sheet or creates a Notion page with structured data
Sends a Slack alert if something breaks so you are not debugging in the dark
In other words, you star a message, and the workflow quietly turns it into something useful while you go back to pretending you are caught up on all your channels.
How the architecture fits together
Here is the full cast of characters in this n8n template and how they play together:
Webhook Trigger – Receives a POST request when a Slack message is starred.
Text Splitter – Breaks long message text into smaller chunks for higher quality embeddings.
Embeddings (Cohere) – Converts each chunk into a vector embedding so it can be semantically searched later.
Weaviate Insert – Stores embeddings plus metadata like Slack channel, timestamp, and who starred it.
Weaviate Query + Vector Tool + RAG Agent – Retrieves relevant context, then lets an LLM (OpenAI) summarize, categorize, or extract action items.
Window Memory – Keeps short-term context for multi-step or conversational processing.
Append Sheet (Log) or Notion – Either appends everything to a Google Sheet log or creates a Notion page with structured properties.
Slack Alert – Pings you in Slack if an error occurs, so silent failures do not quietly pile up.
The result is a production-ready, extendable workflow that can grow with your stack, not just your collection of starred messages.
Before you start: what you need configured
To get this template running without tears, make sure you have the following:
n8n instance – Self-hosted or n8n cloud.
Slack Bot token – With scopes to read reactions or stars and send messages.
Cohere API key – For embeddings, or an equivalent embedding provider supported by n8n.
Weaviate endpoint and API key – Or a reachable local instance.
OpenAI API key – For the chat model used by the RAG agent, or another LLM supported by n8n.
Notion integration token – If writing to Notion, plus access to the target database.
Google Sheets OAuth – If you prefer logging to a sheet instead of Notion.
Step-by-step setup: from Slack star to Notion note
1. Create the webhook trigger in n8n
First, you need a way for Slack to tell n8n, “Hey, someone starred this.”
In n8n:
Add a Webhook node.
Set it to accept POST requests.
Use a path like /starred-slack-to-notion.
In Slack:
Create a Slack App or use an existing bot.
Configure it to call your n8n webhook URL when a user stars a message.
You can use event subscriptions or a reaction hook to detect star events.
Once set up, every time you star a message, Slack will send a POST to your n8n webhook, and the workflow kicks off.
2. Split long Slack messages into chunks
Some messages are short. Others are “someone pasted their entire brain into Slack.” For embeddings, shorter chunks usually perform better, so the workflow uses a Text Splitter node.
In the Text Splitter node, the template uses:
Chunk size: 400 characters
Chunk overlap: 40 characters
These values help keep context between chunks without making them huge. You can tweak them depending on your embedding model or typical message length.
3. Generate embeddings with Cohere
Next, each chunk is turned into a vector embedding so you can later search and retrieve similar content by meaning, not just keywords.
In n8n:
Add a Cohere Embeddings node (or your preferred embedding provider).
Use the model embed-english-v3.0 as in the template.
Provide your Cohere API key in n8n credentials.
The embeddings will be used by Weaviate to power semantic search and RAG retrieval.
4. Store embeddings and metadata in Weaviate
Now that you have vector embeddings, you need somewhere smart to keep them. That is where Weaviate comes in.
In the Weaviate Insert node:
Configure an index (class) name, for example starred_slack_to_notion.
Store each chunk as a document, including:
The embedding vector
The chunk text
Metadata like Slack channel, message timestamp, and star author
Ensure your Weaviate instance is reachable and credentials are set correctly.
At this point, your Slack stars are no longer just stars. They are searchable, structured knowledge.
5. Enable retrieval and RAG processing
Once a chunk is inserted into Weaviate, the template can optionally run retrieval-augmented generation. Translation: it looks up related content, feeds it to an LLM, and lets the model produce something smart and useful.
The RAG section of the workflow typically includes:
Weaviate Query – Retrieves the top-k similar vectors from the vector store.
Vector Tool – Wraps the vector store as a tool that the agent can call.
Window Memory – Keeps short-term conversational context, helpful for multi-step enrichment or follow-up processing.
Chat Model (OpenAI) – The LLM that generates summaries, tags, or action items.
RAG Agent – Orchestrates the LLM and the vector tool to produce final output, like a clean note, categories, or extracted tasks.
This is where the magic happens. Instead of just storing raw text, you can have the agent:
Summarize the starred message
Extract key points and to-dos
Generate tags or topics
6. Log results or create a Notion page
After the RAG Agent finishes its work, you decide where the final result lives.
Option 1: Log to Google Sheets (as in the template):
Use an Append Sheet node.
Append the RAG output plus metadata to a “Log” sheet for traceability and auditing.
Option 2: Create a Notion page instead:
Replace the Google Sheets node with a Notion node.
Create a Notion integration and share the target database with it.
Map:
Title field to the main note title
Content/body to the RAG Agent’s generated summary or enriched text
Tags to topics or categories extracted by the agent
Channel, timestamp, and author to corresponding Notion properties
Now every starred Slack message can become a fully structured Notion page, not just another forgotten reaction icon.
Best practices for a smooth, non-chaotic workflow
To keep this automation reliable, cost effective, and friendly to your security team, keep these tips in mind:
Secure your webhook – Use a secret or verification token so only Slack can trigger it.
Optimize chunk size – Too large and vector quality drops, too small and you increase cost and metadata noise. Start with 400/40 and adjust.
Limit what you store – Redact or obfuscate PII before embedding if your policies require it.
Monitor costs – Embeddings and LLM calls add up. Use filtering and batching where possible.
Enable onError handling – The Slack Alert node in the template lets you know immediately when something fails.
Troubleshooting when things misbehave
If your stars are not making it to Notion or your log, work through this quick checklist:
Webhook not firing – Confirm Slack event subscriptions are set correctly and the app is sending POST requests to the correct n8n URL and path.
Embeddings failing – Double check your Cohere API key and see if you have hit rate limits.
Weaviate insert errors – Verify your index (schema) configuration and that your network or ACLs allow writes.
RAG Agent output is weak – Increase retrieval top-k, ensure Window Memory has useful context, and tune the system message or prompts in the agent node.
Security and privacy: important but not boring
Vector stores feel harmless, but they can contain sensitive semantic representations of your data. Treat them like any other sensitive storage layer:
Redact or obfuscate sensitive fields before embedding.
Use private networking for n8n and Weaviate (VPN, private VPCs, restricted access).
Rotate API keys regularly and apply least privilege to all integrations.
Audit stored entries periodically and apply retention policies for old content.
Ideas for extending the workflow
Once you have the base “Starred Slack to Notion” setup running, you can start adding upgrades like a productivity-obsessed tinkerer.
Automatic tagging – Have the RAG Agent extract topics from the content and map them to Notion tags.
Task creation – If a message contains action items, automatically create tasks in Trello, Asana, or your favorite task manager.
Daily digests – Aggregate all starred messages from the day and send a summary to a Slack channel or via email.
The template is modular, so you can mix, match, and extend nodes without rebuilding everything from scratch.
Testing and validation: make sure it actually works
Before trusting this workflow with your precious brain bookmarks, run through a quick test cycle:
Manually star a test message in Slack and confirm that Slack sends a POST to your n8n webhook.
Open n8n’s execution view and inspect each node to confirm:
Text is being chunked correctly by the Text Splitter.
Embeddings are generated successfully.
Check Weaviate to ensure embeddings and metadata are inserted into the correct index.
Verify the RAG Agent output and confirm that:
A new row appears in your Google Sheet log, or
A Notion page is created with the mapped properties.
Wrap up: from Slack chaos to Notion clarity
This template gives you a production-ready way to capture, enrich, and retrieve starred Slack content using n8n, Cohere embeddings, Weaviate, and a RAG-enabled assistant. Whether you prefer a simple Google Sheets log or fully structured Notion pages, the workflow is flexible enough to adapt to your stack.
Once set up, starring a Slack message becomes more than a hopeful gesture. It is a reliable pipeline into your knowledge base.
Ready to try it?
Import the provided workflow JSON into your n8n instance.
Add your credentials for Slack, Cohere, Weaviate, OpenAI, and Notion or Google Sheets.
Run a few test stars in Slack and watch them appear in your log or Notion.
If you want help customizing the workflow, improving prompts, refining Notion mapping, or tightening privacy filters, you can try the template directly in your n8n instance or reach out for a tailored version.
Automate Leads to HubSpot With n8n and RAG: A Story From Chaos to Clarity
On a rainy Tuesday evening, Maya stared at her HubSpot dashboard and felt that familiar knot in her stomach. As the marketing operations lead at a fast-growing SaaS startup, she was drowning in inbound leads.
Forms from the website, replies to campaigns, chat transcripts, long emails packed with questions – they all flowed in. Yet, by the time those leads made it into HubSpot, they were often:
Missing context from long messages
Duplicated across multiple entries
Stuck in “New” with no clear next step
Her sales team complained that leads were “thin” and hard to prioritize. Leadership complained that high-intent prospects slipped through the cracks. Maya knew the problem was not a lack of data. It was the way that data moved – or failed to move – into HubSpot.
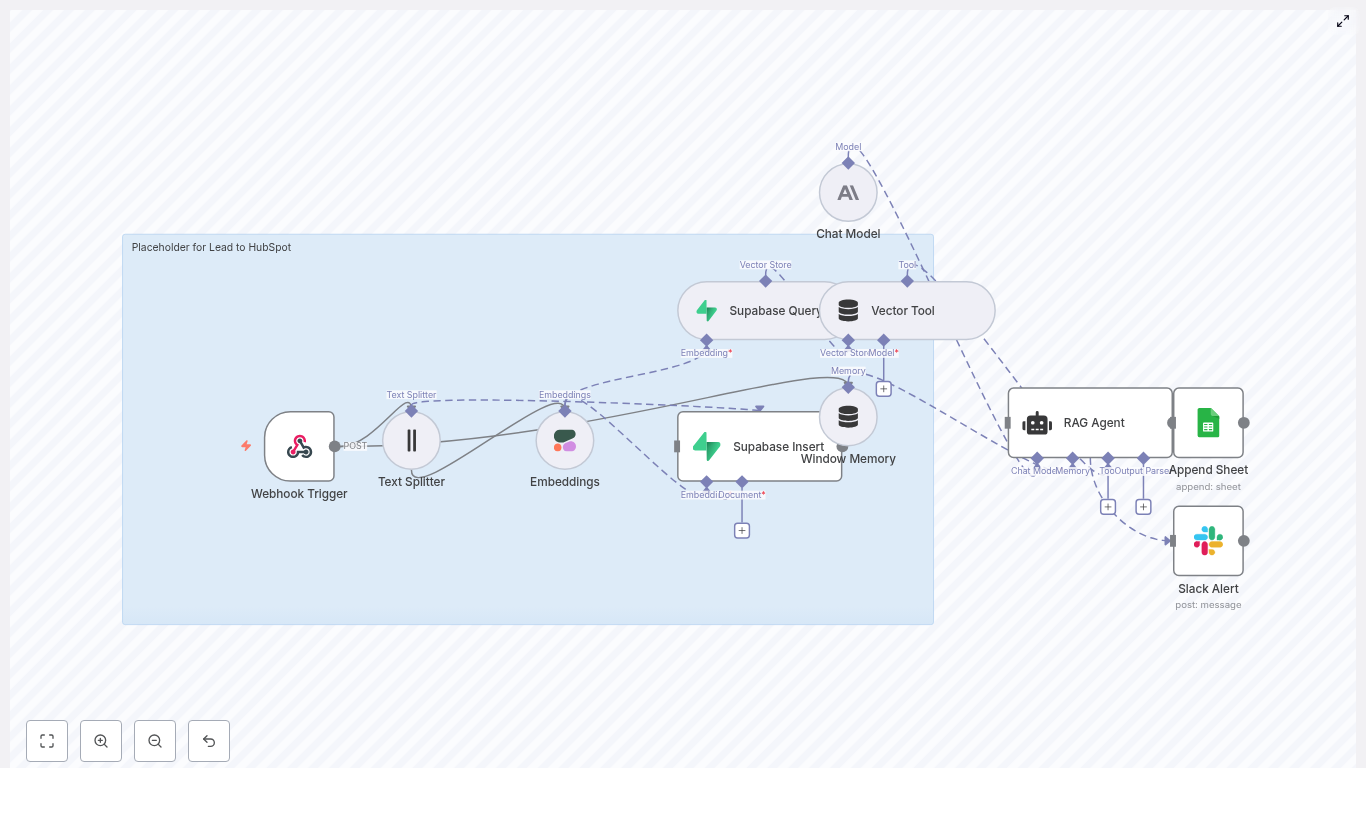
That night, she decided to build something better. The solution would eventually become an n8n workflow template that captured inbound leads, created semantic embeddings, stored them in a Supabase vector database, used a RAG (retrieval-augmented generation) agent to enrich and route them, logged everything in Google Sheets, and alerted her team in Slack when anything broke.
This is the story of how she did it.
The Breaking Point: Why Maya Needed n8n + RAG
The trouble started when the company’s lead volume doubled in a quarter. Maya’s “good enough” setup – a few simple integrations that pushed form data straight into HubSpot – began to crumble.
She saw three recurring problems:
No semantic understanding – The system treated every message as plain text. It could not match “we are evaluating enterprise pricing” to a previous email from the same company or detect that “interested in a demo for 50 seats” was high intent.
No context-aware automation – Automation rules only looked at static fields. They had no way to generate summaries, suggest next steps, or capture nuance from long, unstructured messages.
No clear audit trail – When something broke, it was a black box. She had no simple log of which leads were processed, what the AI decided, or when a failure occurred.
Maya needed more than a direct CRM insert. She needed a context-aware lead pipeline that could:
Use semantic similarity to find related leads, detect duplicates, and surface previous conversations
Feed rich context into an AI agent that could decide what to do next
Keep a transparent log of every decision and send instant alerts when errors appeared
That is when she turned to n8n, Cohere embeddings, Supabase pgvector, and a RAG agent powered by Anthropic.
The Plan: A Smarter Lead Pipeline, Not Just Another Integration
Maya sketched the high-level design on a whiteboard first. Instead of pushing raw text directly into HubSpot, she wanted a pipeline that would:
Accept incoming leads via an HTTP POST webhook in n8n
Split long messages into chunks for embeddings
Create semantic embeddings with Cohere
Store those vectors in a Supabase table for similarity search
Feed relevant context into a RAG agent using Anthropic
Let the agent enrich, summarize, and decide on next actions
Log every processed lead to Google Sheets
Send Slack alerts on any error or failed HubSpot call
In other words, she wanted a retrieval-augmented lead ingestion workflow that understood what prospects were saying, not just what fields they filled out.
Before she could build it, she gathered the tools and credentials she would need.
Setting the Stage: What Maya Needed Before Building
Maya made a checklist of prerequisites to avoid getting stuck halfway:
n8n instance – either self-hosted or cloud, where the workflow would live
Cohere API key – to generate text embeddings with the embed-english-v3.0 model
Supabase project with pgvector enabled – to store and query vectorized lead snippets in a table like lead_to_hubspot
Anthropic API key – or another supported large language model to power the RAG agent
Google OAuth credentials for Sheets – to maintain an audit log
Slack app webhook or API token – for real-time error alerts
HubSpot API key or access token – if she wanted the agent to trigger direct writes into HubSpot
With those in place, she opened n8n and started building the workflow node by node, weaving the technical pieces into a system that would finally make sense of her inbound leads.
Rising Action: Building the n8n Workflow, Step by Step
1. Catching Every Lead With a Webhook Trigger
The first node in Maya’s workflow was the gatekeeper: a Webhook Trigger.
She configured an HTTP POST webhook with the path:
/lead-to-hubspot
Marketing forms, landing pages, and other systems would all send their payloads here. A typical JSON body included fields like name, email, message, and some metadata.
To test it, she ran a simple cURL command:
<!-- Example cURL to test webhook -->
curl -X POST https://your-n8n.example/webhook/lead-to-hubspot \  -H 'Content-Type: application/json' \  -d '{"name": "Jane Doe", "email": "jane@example.com", "message": "Interested in pricing and enterprise features"}'
When she saw the payload appear in n8n, she knew the first step was working. But the real magic would start after this node.
2. Taming Long Messages With a Text Splitter
Some leads wrote essays. Others pasted entire email threads into a single form field. If Maya tried to embed those huge blocks of text directly, costs would spike and context would blur.
So she added a Text Splitter node that broke the incoming message into manageable chunks. She used:
chunkSize: 400
chunkOverlap: 40
These settings kept sentences mostly intact while overlapping enough to preserve context between chunks. Each piece would be easier and cheaper to embed, while still retaining the meaning of the full message.
3. Giving Text a Shape With Cohere Embeddings
Next, Maya connected a Cohere Embeddings node. She selected the model:
embed-english-v3.0
For each chunk from the splitter, the node called Cohere and converted the text into a vector. She stored her Cohere API key securely in n8n credentials to avoid exposing it in the workflow.
Now, instead of a blob of text, every message was represented as a set of embeddings that could be searched semantically.
4. Building Memory With Supabase as a Vector Store
Embeddings alone were not enough. Maya wanted to compare new leads against older ones, detect duplicates, and give the AI agent historical context.
She set up two Supabase nodes:
Insert – to save embeddings into a Supabase table, using a vector index named lead_to_hubspot
Query – to retrieve semantically similar entries when a new lead arrived
Each row in Supabase included:
The embedding vector
Original text snippet
Metadata like lead_id, email, source, and timestamp
This gave her a persistent, searchable memory of all leads, powered by pgvector. When a new message looked similar to an older one, the system could detect it automatically.
5. Supplying Context With Vector Tool and Window Memory
To make the RAG agent useful, Maya needed a way to pass both retrieved vectors and recent conversation history into the model.
She added:
A Vector Tool node that exposed Supabase similarity search results as context
A Window Memory component that kept a short history of recent interactions inside the workflow
These pieces ensured that the AI agent would not operate in isolation. It would see relevant past leads, repeated questions, and previous decisions, which made its judgments more consistent and informed.
6. The Turning Point: Letting the RAG Agent Decide
Now came the heart of the system: the Chat Model + RAG Agent using Anthropic.
Maya configured the agent with a system message along the lines of:
“You are an assistant for Lead to HubSpot”
She passed in:
Vector search results from Supabase
Recent memory from the Window Memory node
The raw lead payload and message text
With that context, the RAG agent could:
Enrich the lead with a summary of intent
Suggest or compute a lead score
Decide if this was a duplicate or a net-new contact
Prepare a structured payload for HubSpot
Flag leads that required human review
Maya kept the prompts deterministic and added validation rules so the agent could not invent arbitrary fields or send malformed data. She treated it as a careful coworker, not a freewheeling chatbot.
7. Keeping an Audit Trail With Google Sheets
One of Maya’s biggest frustrations in the past was not knowing what happened to a lead once it entered the system. To fix that, she added a Google Sheets Append node.
Every time the workflow successfully processed a lead, it wrote a new row into a sheet called “Log” in a specific Google Sheet ID. Each row included:
Timestamp
Status (success, flagged, duplicate)
HubSpot ID, if a record was created
A short summary from the RAG agent
This gave her a simple, filterable audit log where she could trace every decision the workflow made.
8. Never Missing a Failure With Slack Alerts
Maya knew that no automation is perfect. APIs fail, keys expire, and models occasionally misbehave. So she wired in a Slack Alert node for error handling.
If the RAG agent threw an exception or the HubSpot API call returned an error, the workflow sent a message to a channel such as:
#alerts
The Slack message included the error details and, where possible, the lead email or ID. This meant her team could react quickly, fix the issue, and manually handle any affected leads.
Advanced Choices: How Maya Tuned and Secured Her Workflow
Once the basic flow was working, Maya turned to optimization and safety. She refined several parts of the setup to keep costs in check and protect data quality.
Chunk Size and Overlap
She experimented with chunkSize and chunkOverlap in the Text Splitter:
Shorter chunks improved recall and detail in similarity search
Larger chunks reduced the number of embedding calls but could blur context
She kept the defaults of 400 / 40 for most forms, but noted that longer enterprise messages might need tuning.
Indexing Strategy in Supabase
To make filtering easy, she added metadata columns to the lead_to_hubspot table, such as:
lead_id
email
source
timestamp
With these fields, she could quickly slice the dataset by campaign, timeframe, or channel, and use them as filters in vector queries.
Rate Limits and Retries
To avoid hitting API limits, Maya:
Batched embedding requests when possible
Respected Cohere and Supabase rate limits
Configured retry and backoff behavior in n8n so transient errors did not break the flow
Security and Validation
Security was non-negotiable. She:
Stored all API keys in n8n credentials or environment variables
Considered restricting the webhook endpoint with a shared secret or IP allowlist
Validated incoming payloads in the Webhook node to ensure required fields were present before inserting anything into Supabase
This kept both the vector store and downstream systems clean and safe.
Optional Twist: Letting the RAG Agent Push Straight to HubSpot
Once Maya trusted the workflow, she added an optional final act: direct writes into HubSpot.
In this version, the RAG agent returned a structured object containing fields like:
name
email
lead_score
summary
She then connected a dedicated HTTP Request node that called the HubSpot Contacts API. In pseudocode, the request looked like this:
<!-- Pseudocode -->
POST https://api.hubapi.com/crm/v3/objects/contacts?hapikey=YOUR_KEY
Content-Type: application/json
{  "properties": {  "email": "jane@example.com",  "firstname": "Jane",  "lastname": "Doe",  "lead_source": "website",  "hs_lead_status": "NEW",  "notes_summary": "Interested in enterprise features - asked about pricing"  }
}
For teams that preferred a more cautious approach, she kept the option to:
Run the RAG step in dry-run mode without writing to HubSpot
Trigger a separate n8n workflow to handle HubSpot inserts after review
Testing the Workflow: From First Request to Full Confidence
Before rolling it out company-wide, Maya tested the workflow methodically. Her checklist looked like this:
Send sample POST requests to the webhook and verify that the Text Splitter produced sensible chunks.
Confirm that embeddings were created correctly and that Supabase inserts returned success.
Run a vector query in Supabase to see if similar leads were actually being retrieved.
Execute the RAG Agent in dry-run mode, inspect the generated summaries and decisions, and tune prompts as needed.
Trigger intentional failures, like invalid HubSpot credentials, to confirm that Slack alerts fired properly.
By the time she was done, she trusted the workflow enough to let it handle real leads.
When Things Go Wrong: How Maya Troubleshoots
Inevitably, issues did arise. Over time, Maya built a mental playbook for common problems:
Missing embeddings – She checked the Cohere credentials and verified the model name embed-english-v3.0.
Supabase insert errors – She confirmed that the table schema matched the workflow and that the pgvector extension was enabled.
Imagine opening a pull request and getting thoughtful code review comments back in minutes, without waiting for a teammate to be free. That is exactly what this n8n workflow template helps you do.
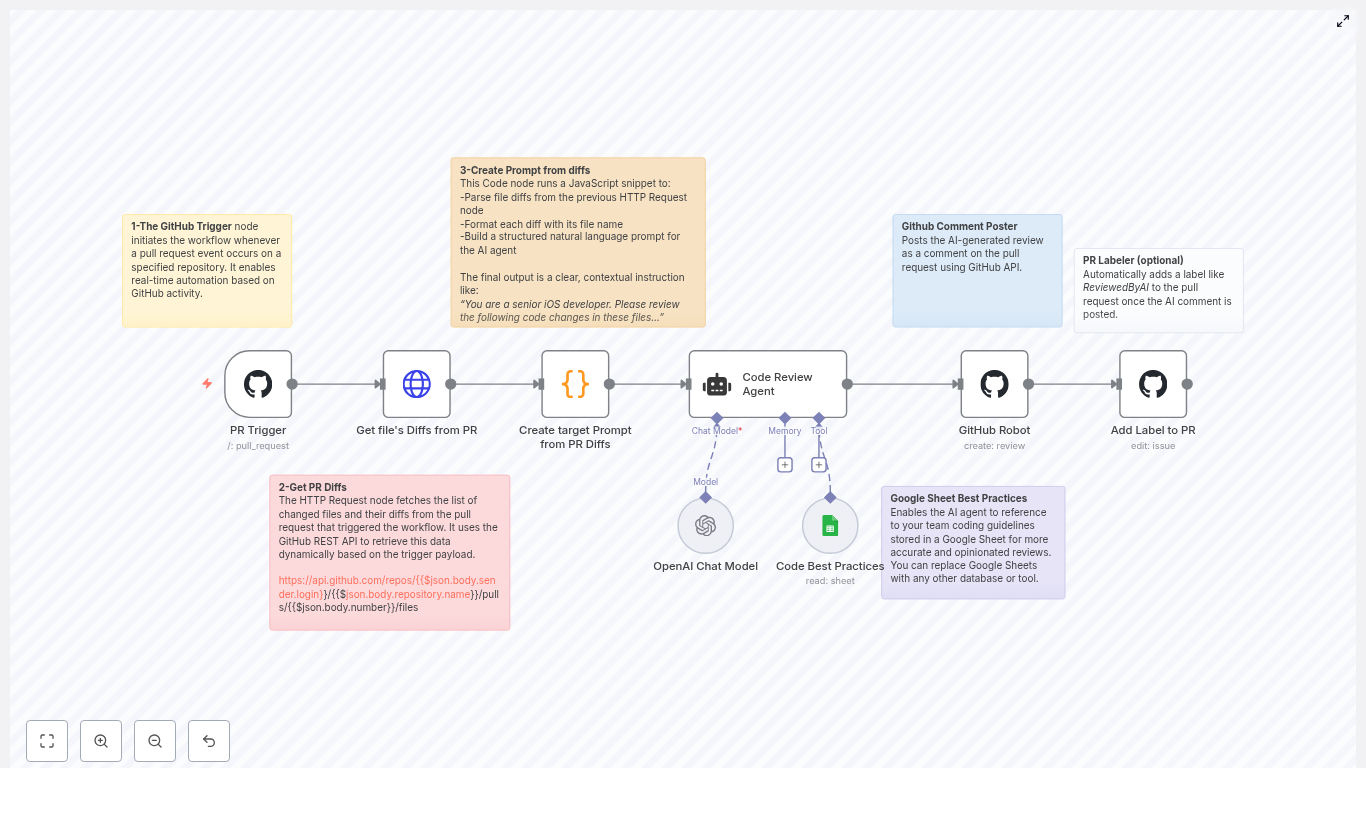
In this guide, we will walk through how the template listens to GitHub pull request events, grabs the file diffs, builds a smart prompt for an AI reviewer, and then posts contextual comments right back onto the PR. Under the hood, n8n acts as the automation engine, OpenAI (via a LangChain agent) is your “review brain,” and GitHub is the home for your pull requests.
If you are looking to scale lightweight code reviews and save developer time, this setup can quickly become one of your favorite tools.
Code review is non‑negotiable if you care about quality, shared understanding, and catching bugs before they hit production. The problem is that a lot of review time gets eaten up by routine stuff: style issues, small edge cases, minor bugs, or missing tests.
That is where an automated AI reviewer shines. Let the AI handle the obvious, repetitive checks so humans can focus on the fun and high‑value conversations: architecture decisions, product trade‑offs, and long‑term maintainability.
With this n8n workflow you can:
Get fast, consistent feedback on every pull request
Reduce reviewer fatigue on large or frequent PRs
Enforce team standards automatically
Keep humans in charge of final approvals
How the n8n AI code review workflow works
Let us zoom out for a second and look at the high‑level flow before diving into each node. The template follows this sequence:
GitHub PR trigger – n8n listens for pull_request events.
Fetch PR diffs – an HTTP Request node calls the GitHub REST API to get changed files and patches.
Build the AI prompt – a Code node turns those diffs into a clean, focused prompt for the AI reviewer.
AI review agent – a LangChain/OpenAI agent analyzes the changes and generates inline‑style comments.
Post review to GitHub – a GitHub node sends those comments back as a review on the PR.
Label the PR (optional) – the workflow can tag the PR with something like ReviewedByAI.
Optional knowledge base – a Google Sheets node (or other source) can feed team guidelines into the AI.
Now let us walk through each part in more detail, and talk about when and why you would use it.
Step-by-step: node-by-node walkthrough
1. GitHub PR trigger – starting the workflow
Everything begins with a GitHub webhook. The first node in the n8n workflow listens for pull_request events on your chosen repository.
Whenever a PR is opened or updated, GitHub sends a payload to n8n. That payload includes information like the repository, pull request number, and the action that was taken. The workflow then kicks off from there.
A couple of practical tips here:
Keep authentication secure – use GitHub OAuth credentials or a webhook secret rather than exposing anything sensitive.
Limit noise – configure the webhook to listen only to the events you actually care about, for example when a PR is opened or synchronized.
2. Fetching file diffs from the PR (HTTP Request node)
Once the workflow is triggered, the next job is to figure out what actually changed. For that, the template uses an HTTP Request node that calls the GitHub REST API endpoint:
/repos/{owner}/{repo}/pulls/{pull_number}/files
The URL is built dynamically from the webhook payload, so the workflow always hits the right repository and pull request.
The response from GitHub includes:
filename – the path of the changed file
status – for example modified, added, or removed
changes – how many lines changed
patch – a unified diff with the actual line‑level changes for text files
Those patch values are the raw material for your AI code review. Binary files or files without patch data are handled later so the AI does not get confused.
3. Turning diffs into a focused AI prompt (Code node)
Raw diffs are not something you want to just dump straight into an LLM. The template includes a JavaScript Code node that cleans, structures, and prepares the data for the AI agent.
This node:
Groups diffs by filename so the AI can reason about each file in context.
Preserves diff blocks to keep line‑level context intact.
Skips binary files or anything without a patch field.
Sanitizes problematic characters (for example, converting triple backticks) so you do not break the AI’s formatting or downstream parsing.
Includes clear instructions like:
Review changes file by file
Generate inline comments
Avoid restating the code snippet itself
The result is a structured, readable prompt that tells the AI exactly what its job is and how to format the output so you can easily map it back into GitHub comments.
4. Code review agent with LangChain & OpenAI
Next up is the brain of the operation: a LangChain agent backed by OpenAI. This node receives:
The prompt generated by the Code node
Any optional team guidelines from tools like Google Sheets
Some configuration tips for this step:
Pick a conversational model tuned for reasoning and code, such as a modern OpenAI chat model that handles code snippets well.
Give the agent a short set of rules that describe:
How to format comments (for example inline suggestions with file and line references)
What to focus on (bugs, edge cases, readability, tests, etc.)
What to avoid (restating large chunks of code, overly verbose explanations)
Keep response size under control. If the PR is large, you can:
Process it file by file
Split diffs into chunks
Limit the maximum number of comments per run
The agent then analyzes the diffs and outputs review comments in a structure that can be turned into GitHub review entries.
5. Posting AI review comments back to GitHub
Once the AI has done its thing, it is time to send those comments back where they belong: onto the pull request itself.
The GitHub node in the workflow uses the GitHub Reviews API to create a review on the PR. It maps the AI output into the fields GitHub expects, such as:
path – the file path the comment refers to
position or line – the location in the diff or file
body – the actual review comment text
The template is set up to send a single review payload that can contain multiple comments. If your agent returns a structured list of suggestions, you can easily adapt the mapping logic to post several inline comments in one go.
6. Adding an AI review label (optional but handy)
Want an easy way to see which PRs have already gone through the AI reviewer? The workflow can optionally add a label like ReviewedByAI to the pull request.
This uses the GitHub Issues/PR edit endpoint to apply the label. It is a small step, but it makes it much easier to:
Filter PRs that have had automated coverage
Track adoption over time
Quickly distinguish between AI‑reviewed and manually‑only reviewed changes
Feeding in team guidelines with Google Sheets
Out of the box, the AI can already give pretty good feedback. But it gets even better when it understands your team’s specific preferences and standards.
The template supports an optional Google Sheets node that acts as a lightweight knowledge base. You can store things like:
Coding conventions and style rules
Architecture decisions and patterns to follow
Linting rules or security guidelines
The LangChain agent can then use this sheet as a reference when generating comments, so its suggestions are more aligned with how your team actually works. If you prefer, you can swap Sheets for another knowledge source like Notion, an internal KB, or a database.
Crafting effective prompts for AI code review
Good prompts are the difference between “meh” suggestions and genuinely useful reviews. The template includes a prompt pattern designed to keep the agent focused and concise.
The instructions typically ask the agent to:
Focus on changed code only, not unrelated files
Return inline comments with exact line context and a short, actionable recommendation
Avoid repeating the code itself and instead explain what should change and why
Here is an example of the kind of high‑level guidance baked into the Code node:
The agent is a senior iOS developer. Please review the following code changes and generate inline comments per file. Do not repeat the code block or filename; create short, actionable suggestions.
You can adapt the role (“senior backend engineer,” “security reviewer,” “frontend specialist,” etc.) and tweak the expectations to better match your stack and priorities.
Security, privacy, and governance considerations
Sending code to an AI service always raises important security questions, and you should absolutely take them seriously. A few safeguards to keep in mind when running this kind of workflow:
Limit repository access – only enable the automation on repos or branches that are allowed to use external AI tools.
Redact secrets – run secret scanning or filtering on diffs before sending them to the LLM. Strip out tokens, passwords, or any credentials that might appear in code or config.
Keep an audit trail – store AI‑generated comments or logs so maintainers can review the history and spot any problematic suggestions.
With some basic governance in place, you can get the benefits of automation without compromising security or compliance.
Practical setup tips for running this in n8n
Before you hit “activate” on the workflow, here are a few practical things that will save you headaches later:
Handle secrets correctly Store GitHub OAuth tokens and OpenAI API keys using n8n credentials or your preferred secrets manager. Avoid hardcoding keys directly in nodes or code.
Respect rate limits Both GitHub and OpenAI have rate limits. For busy repos or large PRs, you may want to:
Batch API calls
Pause or queue processing for large pull requests
Limit how often the workflow runs for the same PR
Control token usage Large diffs can quickly blow through an LLM’s context window. A simple strategy is to:
Chunk work per file
Skip low‑value files (for example generated code)
Cap the number of lines sent per request
Test on small PRs first Start with a few small pull requests and iterate on:
Prompt wording
Output parsing logic
How comments are mapped back into GitHub
Once you are happy with the behavior, roll it out to more repositories or branches.
Rolling this out to your team: best practices
Dropping an AI reviewer into an existing workflow can be a big change. Here are some patterns that help adoption go smoothly:
Start opt‑in Begin with a few repositories or enable the bot only on contributor branches. That way you do not overwhelm teams that are not ready yet.
Show confidence hints Have the agent include a short confidence note or rationale with each suggestion. It gives reviewers a feel for how strongly the AI “believes” its own advice.
Keep humans in control Treat the AI as a first‑pass reviewer, not the final authority. Developers should still own approvals and decide which suggestions to accept.
Continuously refine prompts Watch for false positives or noisy comments and adjust prompts or examples. Over time, you will dial in a tone and level of strictness that fits your team.
Troubleshooting common issues
Things not working quite as expected? Here are a few quick checks that often resolve problems:
No review is posted on the PR
Confirm the GitHub webhook is firing and delivering to n8n.
Verify that the GitHub token has the right scopes (pulls, issues, repo).
Inspect the Code node’s output format to ensure it matches what the GitHub Reviews API expects.
AI responses are truncated
Chunk diffs into smaller pieces.
Switch to a model with a larger context window if available.
Reduce the number of files or lines processed in a single run.
API usage is unexpectedly high
Add throttling or rate limiting in your workflow.
Focus only on high‑priority paths such as src or tests.
Skip trivial or generated files where review adds little value.
When this template is a great fit
You will get the most value from this n8n + OpenAI + GitHub pattern if:
Your team has frequent PRs and limited reviewer time.
You want consistent enforcement of style and best practices.
You are comfortable using an AI assistant for low‑risk, first‑pass checks.
You are already using n8n or looking for a flexible automation layer around GitHub.
It is especially powerful for:
Junior onboarding, where the AI can highlight common pitfalls
Large codebases where humans cannot realistically review every small change in depth
Teams that want to document and enforce custom guidelines via a simple knowledge base
Wrapping up
This automated AI code review template ties together n8n, OpenAI (through LangChain), and GitHub to create a fast, consistent review layer on top of your existing workflow. It will not replace your senior engineers, but it will absolutely reduce their load by handling routine checks and reinforcing team standards.
Automate Blog Publishing with n8n, Google Sheets and OpenRouter
Overview
This reference guide documents an n8n workflow template that automates a complete blog publishing pipeline.
The workflow reads rows from a Google Sheets-based editorial schedule, generates or refines article content via a configurable LLM (through OpenRouter or OpenAI), and publishes posts to WordPress using XML-RPC.
All key parameters such as prompts, model choices, and output formats are stored in a configuration sheet, which allows you to adjust behavior without editing the workflow itself.
The template is designed for teams and power users who want a repeatable, auditable process for content creation and publishing, while still retaining full control over when and how posts go live.
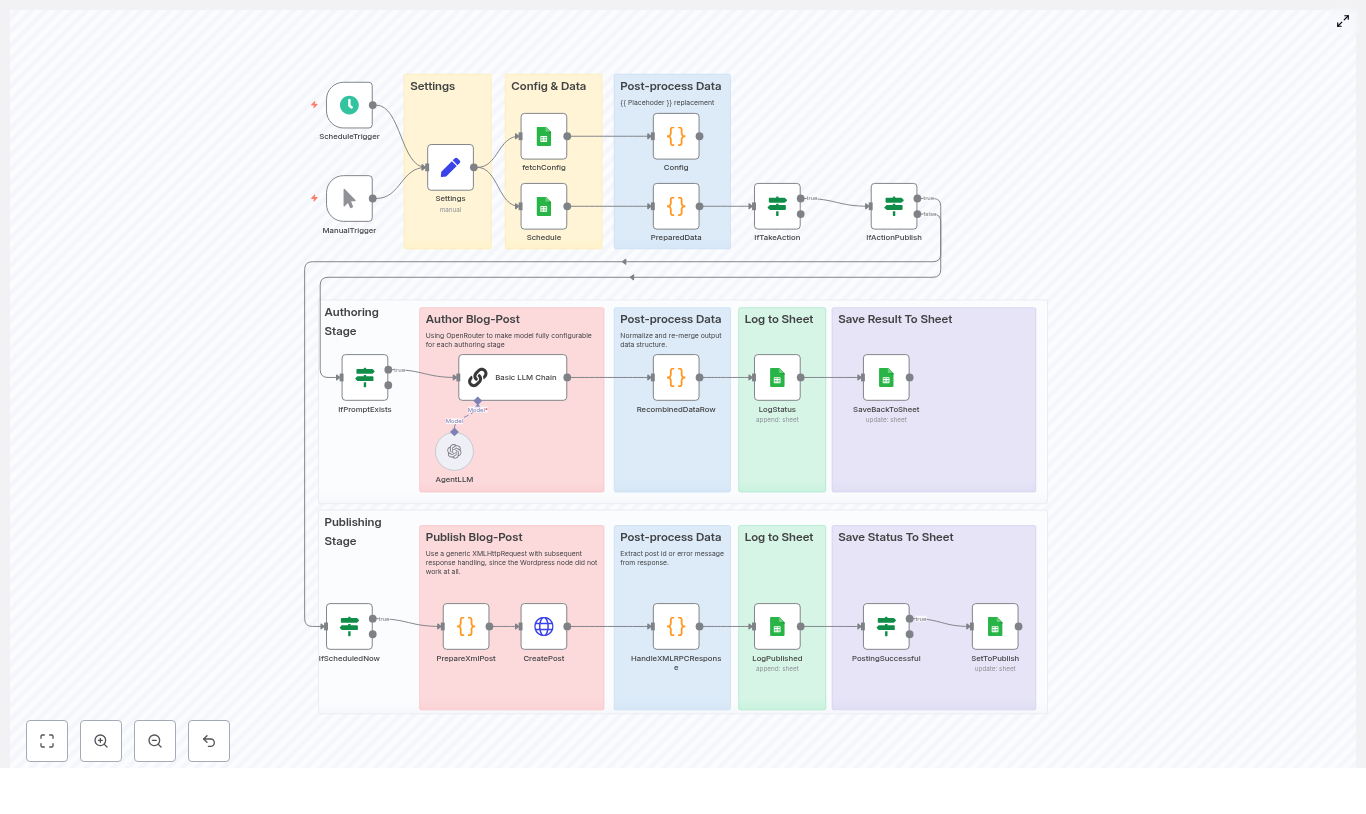
Architecture & Data Flow
At a high level, the workflow follows this sequence:
Trigger – Start the workflow on a schedule or manually.
Settings & fetchConfig – Load static settings and dynamic configuration from Google Sheets.
Schedule Google Sheet – Fetch rows that represent scheduled content to process.
PreparedData – Resolve placeholders in prompt templates and determine what action to perform (draft, update, publish, etc.).
LLM Chain (Basic LLM Chain + AgentLLM) – Generate or refine content using the chosen LLM model.
RecombinedDataRow – Normalize model output, clean up formatting, and merge new content into the original row.
SaveBackToSheet / LogStatus – Write generated content and status updates back into Google Sheets.
PrepareXmlPost / CreatePost / HandleXMLRPCResponse – Construct an XML-RPC payload, send it to WordPress, and parse the result.
Logging & Status Management – Append log entries and update post status and WordPress post IDs for traceability.
Node-by-Node Breakdown
1. Triggers
ScheduleTrigger
The ScheduleTrigger node is typically configured to run on an hourly cadence, although you can adjust it to any interval that matches your editorial workflow.
When it fires, it initiates a full run of the pipeline and processes all qualifying rows in the Schedule sheet.
ManualTrigger
The ManualTrigger node is used for ad-hoc or testing runs.
You can execute the workflow manually from within n8n, which is particularly useful when validating a new configuration, debugging prompt behavior, or processing a single row before enabling the scheduled execution.
2. Settings & Configuration
Settings node
The Settings node holds static configuration that rarely changes at runtime, for example:
Google Spreadsheet URL or ID.
Names of the sheets used for Schedule, Config, and Log.
WordPress subdomain or base URL.
WordPress username.
WordPress application password (preferably passed via n8n credentials or environment variables).
These values are referenced by downstream nodes so that the workflow can locate the correct spreadsheet, sheets, and WordPress endpoint without hard-coding them multiple times.
fetchConfig node
The fetchConfig node reads the Config sheet from Google Sheets.
This sheet centralizes runtime configuration such as:
Prompt templates (for example prompt_draft, prompt_publish).
Model selections (for example prompt_draft_model, prompt_publish_model).
Output format hints (for example prompt_publish_outputFormat).
Any other parameters that influence how the LLM should behave for specific actions.
By storing these settings in a sheet, you can adjust prompts, switch models, or tweak formatting rules without modifying the n8n workflow.
Each action type (draft, edit, final, publish) can have its own prompt and model key.
3. Schedule Sheet Integration
Schedule Google Sheet node
The workflow reads from a dedicated Schedule sheet that acts as your editorial calendar and execution controller.
Typical columns include:
Scheduled – Indicates if and when a row should be processed.
Status – Current processing state (for example pending, drafted, published).
Action – What the workflow should do with this row (for example draft, update, publish, ready_for_review).
Title – Target blog post title.
Context – Additional context, notes, or requirements for the LLM.
final – A field that can hold finalized or combined content.
row_number – Optional helper column to track the row index for updates.
These fields drive the decision logic in downstream nodes, especially in PreparedData, which decides if a row should be processed and how.
The PreparedData node is responsible for building the effective prompts and model names that will be sent to the LLM.
It performs two main tasks:
Placeholder replacement
Action and status evaluation
Placeholder replacement
Prompt templates in the Config sheet can contain placeholders in the form {{PlaceholderName}}.
The PreparedData node:
Scans the selected prompt template for {{ ... }} tokens.
Replaces each placeholder with the corresponding value from:
The current row (for example {{Title}}, {{Context}}).
The configuration sheet (for example {{GuidingPrinciple}} or other shared parameters).
This mechanism enables reusable prompt templates that adapt per row, without duplicating prompts for each post.
Action decision logic
PreparedData also determines if the workflow should perform any action for a given row.
It typically:
Compares the Action field with the current Status.
Skips rows that are already in the desired state (for example Action is publish but Status is already published).
Builds the correct prompt and selects the corresponding model key, based on the action type (for example use prompt_draft and prompt_draft_model when Action is draft).
If the resulting prompt is empty or the action is not applicable, the row can be filtered out before hitting the LLM, which conserves API usage and avoids unnecessary processing.
5. LLM Generation & Model Selection
Basic LLM Chain node
The Basic LLM Chain node is used for the core authoring tasks, for example:
Generating first drafts.
Expanding outlines into full posts.
Refining or rewriting existing content for final publication.
It consumes:
The fully resolved prompt text from PreparedData.
The model identifier, which is retrieved from the Config sheet (for example a specific OpenRouter route or OpenAI model name).
AgentLLM / OpenRouter integration
Model calls are routed through an AgentLLM node (or equivalent configuration) that connects to OpenRouter or OpenAI.
Because all model keys are stored in the Config sheet, you can:
Assign different models for draft, edit, and finalization stages.
Switch providers or models centrally without editing the workflow.
Tune cost and latency by picking lighter models for simple tasks (for example titles) and more capable models for full drafts.
If credentials or model names are misconfigured, the LLM node will typically return an error, which can be inspected via n8n execution logs.
LLM responses can be inconsistent, especially when you request JSON or structured output.
The RecombinedDataRow node implements several strategies to normalize this output before merging it back into the original row.
Normalization strategies
RecombinedDataRow attempts to:
Parse direct JSON when the response is valid JSON.
Fix over-escaped quotes when the LLM double-escapes quotation marks.
Strip escaped newlines (for example \\n) to restore readable text.
Isolate JSON-like segments if the LLM wraps JSON in additional commentary or markdown.
If one strategy fails, the node falls back to the next, which improves resilience against minor formatting issues in the LLM output.
Merging with original row
After normalization, RecombinedDataRow merges the generated fields back into the corresponding Schedule row.
Important behavior:
Generated content is typically appended rather than blindly overwriting existing text, so manual edits are preserved.
Fields such as final can hold the combined or finalized article body.
Other columns can be updated to reflect the current stage (for example switching Status from drafting to ready_to_publish).
7. Persistence & Logging in Google Sheets
SaveBackToSheet node
The SaveBackToSheet node writes updated content and metadata back into the Schedule sheet.
Typical updates include:
New or updated article content fields.
Updated Status values after successful drafting or publishing.
Any intermediate results that you want to retain for review.
LogStatus / Log sheet
The workflow appends log entries to a dedicated Log sheet at key steps, for example:
When a row is picked up for processing.
When an LLM call completes.
When a WordPress publish attempt succeeds or fails.
Each log entry typically includes the row reference, action type, timestamp, and a short message or error description.
This makes it straightforward to audit what happened for each post and to debug failures.
8. WordPress Publishing via XML-RPC
PrepareXmlPost node
The PrepareXmlPost node constructs the XML-RPC payload for the wp.newPost method.
Key responsibilities:
Escaping XML special characters in the post title and body.
Embedding the final content (for example from the final column) into the XML structure.
Setting WordPress fields such as title, content, and post status as required by your template.
Proper escaping is critical. If characters such as <, >, or & are not encoded correctly, WordPress will return an XML-RPC fault.
CreatePost node
The CreatePost node sends the XML-RPC request to the WordPress endpoint, typically:
https://your-subdomain.example.com/xmlrpc.php
This is implemented as a standard HTTP request rather than using the built-in WordPress node, which can be unreliable in some environments.
The request includes:
Authentication using the WordPress username and application password.
The prepared XML payload that wraps the wp.newPost call.
HandleXMLRPCResponse node
The HandleXMLRPCResponse node parses the XML-RPC response and extracts:
postId on success, which is then stored back in the Schedule sheet.
faultString and faultCode on error, which are logged for debugging.
If a fault is detected, the workflow can mark the row as failed or keep the status unchanged, depending on how you configure subsequent nodes.
9. Status Management & Post-Publish Updates
PostingSuccessful & SetToPublish nodes
After a successful publish:
PostingSuccessful records that the WordPress post was created and captures the returned Post ID.
SetToPublish updates the Status field in the Schedule sheet to reflect that the post is now live (for example setting Status to published).
These updates, combined with the Log sheet, provide a full audit trail from initial scheduling to final publication.
Configuration & Setup
Prerequisites
An n8n instance with access to Google Sheets and HTTP Request nodes.
A Google Spreadsheet with at least three sheets: Schedule, Config, and Log.
OpenRouter or OpenAI API access.
A WordPress site with XML-RPC enabled and an application password configured.
Step-by-step setup
Duplicate the workflow template Import or duplicate the provided n8n template into your own n8n instance.
Prepare the Google Spreadsheet Create a spreadsheet and define sheets with the names referenced in the Settings node, typically:
Schedule – editorial rows and workflow state.
Config – prompts, model keys, and output formats.
Log – execution log entries.
In the Schedule sheet, include columns such as Title, Context, Action, Status, row_number, final, and any other fields you reference in prompts.
Populate the Config sheet Add rows for your prompt and model configuration, for example:
prompt_publish
prompt_draft_model
prompt_publish_outputFormat
Make sure that the keys used here match what the PreparedData node expects.
Set credentials in n8n Configure:
Google Sheets OAuth2 credentials for read/write access to your spreadsheet.
OpenRouter / OpenAI API credentials used by the LLM node chain.
Configure WordPress access In the Settings node (or via n8n credentials), set:
wordpressUsername
wordpressApplicationPassword (use an application password, not your main account password).
The WordPress subdomain or base URL used to construct the
The day Maya realized her solar data was useless without a brain
Maya had a dashboard problem.
As the operations lead for a growing solar company, she was drowning in telemetry from dozens of sites. Power readings, timestamps, panel types, weather notes, one-off comments from field engineers – everything flowed into her systems every few minutes.
Yet whenever a stakeholder asked a simple question like, “What will output look like tomorrow for Site 123 with this cloud pattern?” she found herself opening spreadsheets, scrolling through logs, and guess-timating based on memory.
The data was there, but it had no memory, no context, no way to reason about similar past events. Each site had years of history that might contain the answer. She just could not get to it fast enough.
That changed the week she discovered an n8n workflow template called the Solar Output Forecaster, built on vector embeddings, memory, and an AI agent.
Why Maya needed more than time-series charts
At first, Maya assumed classic time-series analytics would be enough. But solar output is not just about a neat line chart over time. It is also about the story behind each drop or spike:
Which site and which string was affected?
What panel type was installed?
What did the technician write in the notes that day?
Was there intermittent shading, cleaning, or recalibration?
Her logs had all this contextual metadata, but it lived in free-text notes and loosely structured fields. Searching for “shading” or “cloudy” helped a bit, but it did not surface the most similar historical scenarios or let anyone reason over them in a structured way.
When she read that the Solar Output Forecaster template used n8n, embeddings, Supabase vector store, memory, and an AI agent to connect raw solar data to actionable forecasts, it felt like the missing piece. It promised a pipeline that could:
Capture incoming solar data via a webhook
Split messy notes into manageable semantic chunks
Turn those chunks into vector embeddings
Store them in a Supabase vector index
Run similarity search on demand
Let an agent with memory reason over the results
Log everything in Google Sheets for auditing
It sounded like giving her data a brain.
Setting the stage in n8n: wiring the workflow
Maya opened n8n, imported the Solar Output Forecaster template JSON, and saw a graph of nodes that told a story of their own. Instead of reading a dry spec, she clicked through each node as if following a character list in a script.
The Webhook: where the story begins
The first node was the Webhook, the gateway into the whole system. Its endpoint path was already defined as:
/solar_output_forecaster
It was configured to accept POST requests from data collectors, IoT gateways, or scheduled jobs. The expected JSON payload looked familiar, almost like the raw data she already had:
She added a quick validation step so malformed payloads would be rejected, and made a note to log origin IPs for security. For the first time, her incoming solar data had a clearly defined entrance into a forecasting pipeline.
The Splitter: breaking long stories into useful pieces
Next in the chain was the Splitter. Maya realized that a single “notes” field could contain paragraphs of text from technicians, weather observations, and one-off comments. That is hard for models to process directly.
The template suggested splitting large textual fields into 400-character chunks with a 40-character overlap. This overlap preserved enough context between chunks while keeping each one short enough for efficient embedding.
In her mind, this was like turning a long maintenance report into a set of short, searchable anecdotes, each with enough detail to be understood on its own.
Embeddings with Hugging Face: teaching the system what “shading” really means
The next node, Embeddings (Hugging Face), felt like the moment the system started to “understand” her data.
Instead of treating text as raw strings, this node turned each chunk into a vector representation that captured its semantic meaning. “Partly cloudy,” “intermittent shading,” and “dirty panels” were no longer just words. They became points in a high-dimensional space that could be compared for similarity.
She configured the node with an embeddings model compatible with her Hugging Face API key, and made a mental note of a crucial rule: use the same embedding model for both indexing and querying. That consistency keeps the embedding space stable so similarity searches remain accurate over time.
Supabase Vector Store: building a searchable memory
Once chunks were embedded, they flowed into the Insert (Supabase Vector Store) node. This was where her unstructured notes turned into a structured, queryable memory.
The template wrote each chunk into an index called:
solar_output_forecaster
For every vector, it stored fields like:
site_id
timestamp
chunk_id
original_text
Any additional tags or metadata
With Supabase providing a managed Postgres plus vector extension, she did not have to architect her own storage or indexing system. Her historical solar events were now in a true vector store, ready for similarity search.
The turning point: when a real incident put the workflow to the test
A week after deployment, Site 123 started showing erratic midday dips in power output. The operations team pinged Maya in a panic.
“Is this inverter failure or shading?” her CEO asked. “Do we have anything similar in the past that can guide us?”
In the past, Maya would have opened multiple dashboards, filtered dates, and skimmed old technician notes. This time, she turned to the new n8n workflow.
From payload to forecast, live
She triggered the process with a POST request that looked like this:
The Webhook received the POST with 24 hours of power telemetry and notes about intermittent shading.
The Splitter broke the notes and metadata into multiple 400-character chunks, each with a small overlap, so no important context was lost.
The Embeddings node converted those chunks into vectors that captured the nuances of “intermittent shading” and “partly cloudy.”
The Insert node stored these vectors along with site_id, timestamps, and original text in the Supabase vector index.
When Maya triggered a forecast request, the Query node searched for the most similar past events involving shaded conditions and similar panel types.
The Agent, using both the retrieved documents and Memory of recent troubleshooting messages, generated a human-readable forecast:
“Expect a 20% dip between 10:00-14:00 local due to intermittent shading. Recommended temporary cleaning of string C and follow-up inspection for nearby obstructions.”
Finally, the Google Sheets node logged the forecast, timestamp, and confidence estimate into a sheet the whole team could see. The answer that used to take hours of manual digging now appeared in seconds.
How the Query, Tool, Memory, and Agent work together
After that incident, Maya wanted to understand the “brain” of the system more clearly. She traced the path from question to forecast.
Query + Tool: turning history into an API
The Query node was configured to run similarity search against the Supabase vector store whenever a forecast or contextual history was requested. It pulled the top-k most similar chunks based on the embeddings.
Those query results were then exposed through a Tool node. In n8n, this Tool wraps the vector store as an agent-accessible resource. That means the AI agent can call it during reasoning, almost like asking, “Show me past events like this.”
In practical terms, it turned her historical telemetry and notes into an internal API that the language model could consult on demand.
Memory: keeping conversations grounded
The workflow also used a sliding window memory. This allowed the agent to remember recent exchanges, troubleshooting steps, or follow-up questions.
If a user asked, “Compare this week’s anomaly to last week’s,” the agent did not have to re-interpret everything from scratch. It could reference prior messages and build on earlier conclusions, which made the forecasts feel more coherent and context-aware.
The Agent (Anthropic chat model): from raw data to clear decisions
At the center of it all was the Agent, powered by an Anthropic chat model in the template. It took three main ingredients:
Results from the Tool (vector store queries)
Context from Memory
Any upstream sensor aggregates, such as averages or peaks
With a well crafted prompt, the agent acted like a specialized solar analyst. It produced forecasts, explanations, and next-step recommendations in plain language that non-technical stakeholders could understand.
Best practices Maya learned along the way
As the Solar Output Forecaster became part of her daily workflow, Maya refined the setup using a few practical guidelines.
1. Design a strong data schema and metadata strategy
She learned quickly that consistent metadata was critical for good retrieval. Each document in the vector store included fields such as:
site_id
timestamp
panel_type
Orientation and azimuth
Weather tags or notes
With these fields indexed, she could filter and refine similarity searches during query time, which improved both speed and relevance.
2. Crafting the right system prompt
Prompt engineering turned out to be as important as the data pipeline. She gave the agent a concise system prompt that defined:
Its role as a solar analyst
What to avoid, especially hallucinations and unsupported claims
How to format forecasts, including time windows, expected change, confidence levels, and recommended actions
How to cite retrieved documents or reference similar past events
This structure made the outputs more consistent and easier to compare over time.
3. Aligning models and embeddings
To keep the system stable, Maya followed a simple rule: do not mix and match embedding models without a plan.
She selected an embeddings model and stuck with it for both indexing and querying.
If she ever decided to change models for cost or latency reasons, she knew she would need to re-index her documents or accept a drop in similarity quality.
4. Security and scale from day one
As usage grew, she hardened the system:
Protected the webhook with API keys and optional IP allowlists
Applied rate limits to avoid overload from noisy devices
Bathed incoming telemetry in batches for higher throughput
Monitored Supabase vector index sizes and query latency to keep performance healthy
Supabase and Postgres scaled well for her use case, but the monitoring kept surprises at bay.
5. Monitoring, evaluation, and closing the loop
Maya also set up a simple evaluation loop:
Logged query hits and top-k relevance scores
Tracked agent output quality and confidence estimates
Periodically compared forecasts against actual measured output to compute forecast error
When errors were consistently high in certain scenarios, she adjusted prompts, retrieval strategies, or model choices to tighten accuracy.
Deploying the Solar Output Forecaster in your own n8n instance
By the time Maya’s team fully trusted the system, deploying it to new environments had become a repeatable playbook. The steps were straightforward:
Import the provided workflow JSON into your n8n instance.
Add credentials for:
Hugging Face (embeddings)
Supabase (vector store)
Anthropic or your preferred LLM provider (agent)
Google Sheets (logging)
Configure the webhook endpoint and expose it via n8n’s public URL or a reverse proxy.
Test with sample POST payloads and confirm that rows are correctly appended to your log sheet.
How Maya extended the system over time
Once the core pipeline was stable, Maya started to experiment.
She integrated weather APIs so each document included forecast variables like irradiance and cloud cover, which improved context for forecasts.
She planned scheduled re-indexing jobs to keep the vector store fresh as new data accumulated.
She connected the output logs in Google Sheets to visualization tools such as Looker Studio and Grafana to plot forecasts against actuals for each site.
What began as a single workflow turned into a broader decision support system for the entire solar portfolio.
The result: from raw telemetry to explainable forecasts
Looking back, Maya realized the biggest win was not just automation. It was explainability.
The Solar Output Forecaster template showed her how to combine:
Vector embeddings that make text searchable by meaning
Memory that preserves context across interactions
An agent that can reason over both documents and live data
n8n’s low-code nodes to orchestrate everything
Her team could now trace any forecast back to the historical events and notes that informed it, with audit-ready logs sitting in a shared Google Sheet.
Next step: make your solar data think for itself
If you are sitting on a pile of solar telemetry, technician notes, and scattered spreadsheets, you are in the same place Maya started. The difference now is that you do not have to design the architecture from scratch.
Action steps:
Import the Solar Output Forecaster template into your n8n instance.
Connect your Hugging Face, Supabase, LLM, and Google Sheets credentials.
Send a test POST and watch your first forecast land in your log sheet.
If you want a version tailored to your fleet of sites, custom metadata, or specific reporting needs, you can extend the template or work with a specialist to refine it.
Lead Scoring with MLS Data using n8n, OpenAI Embeddings, and Pinecone
This technical guide describes how to implement an automated, MLS-driven lead scoring system using an n8n workflow template in combination with OpenAI embeddings and Pinecone vector storage. The workflow converts MLS listing data and lead interaction data into semantic vectors, persists them in Pinecone, and then queries this vector store to generate lead scores that support better prioritization and higher conversion rates.
1. Solution Overview
The workflow is designed as an end-to-end pipeline that:
Ingests MLS listing data and lead events via an HTTP Webhook.
Splits long, unstructured text into chunks using a Text Splitter node.
Transforms text chunks into embedding vectors using the OpenAI Embeddings node.
Stores vectors and associated MLS metadata in a Pinecone index.
Runs vector similarity queries to evaluate and score new leads.
Wraps Pinecone queries in a Tool node and maintains conversational context with a Memory node.
Uses a Chat/Agent node (Hugging Face chat model in the template) to reason over vector results and generate a lead score.
Persists scored leads to Google Sheets for reporting and CRM ingestion.
The template focuses on semantic lead scoring, where MLS listing descriptions, property attributes, and free-text inquiries are embedded into a vector space. This enables similarity-based matching between new leads and historically successful listings, as well as intent detection from unstructured messages.
2. Why MLS Data is Valuable for Lead Scoring
MLS (Multiple Listing Service) data is a high-signal source for real estate lead qualification. It typically includes:
Contact and inquiry interactions tied to listings.
By embedding both MLS text fields (descriptions, agent notes, messages) and structured attributes (encoded into text or metadata), the workflow can:
Identify semantic similarity between new leads and high-converting listings.
Detect intent from free-text inquiries, emails, or notes.
Combine property characteristics, behavior, and communication into a composite lead score.
Automate lead prioritization so agents focus on the most promising opportunities.
3. Workflow Architecture in n8n
At a high level, the n8n template implements the following processing stages:
Data Ingestion The Webhook node receives MLS listing updates and lead events (typically via HTTP POST with JSON or CSV payloads).
Preprocessing & Chunking The Text Splitter node segments long descriptions and notes into manageable chunks for embedding.
Vectorization The OpenAI Embeddings node turns each text chunk into a high-dimensional vector.
Vector Storage The Pinecone Insert operation writes vectors and MLS metadata into the lead_scoring_with_mls_data index.
Similarity Query For new leads, a Pinecone Query operation retrieves the most similar vectors (listings or past leads).
Tool & Memory Integration A Tool node exposes the query capability to an LLM agent, and a Memory node maintains short-term conversational context.
Lead Scoring Agent A Chat/Agent node (Hugging Face chat model) interprets query results, combines multiple signals, and outputs a lead score.
Logging & Downstream Integration A Google Sheets node appends scored leads for analytics or for ingestion into a CRM.
4. Node-by-Node Breakdown
4.1 Webhook Node (Trigger)
Purpose: Entry point for MLS and lead data.
Method:POST
Typical payloads:
MLS listing updates (new listings, price changes, status updates).
Lead capture form submissions.
Batched CSV or JSON objects containing multiple listings or leads.
The Webhook node passes through:
Raw text fields, for example, listing descriptions, agent notes, inquiry messages.
Structured fields, for example, MLS_ID, address, price, bedrooms, buyer intent flags, timestamps.
Configuration notes:
Ensure the incoming payload structure is consistent, or add intermediate transformation nodes if the MLS provider or form system uses varying schemas.
Validate required fields (e.g., MLS_ID, description) before passing to the embedding pipeline to avoid incomplete records downstream.
4.2 Text Splitter Node
Purpose: Break long text fields into smaller units suitable for embedding.
Key parameters:
chunkSize = 400
chunkOverlap = 40
The node receives long property descriptions or combined notes, then produces overlapping chunks. The overlap preserves context across chunk boundaries while keeping each chunk within a reasonable token length for the embedding model.
Edge cases:
Very short descriptions may result in a single chunk, which is expected behavior.
Extremely large batched payloads may require additional pagination or pre-splitting before this node to prevent memory pressure.
4.3 OpenAI Embeddings Node
Purpose: Convert each text chunk into a numerical vector representation for semantic search.
For every chunk from the Text Splitter, the OpenAI embeddings node:
Calls a configured OpenAI embedding model.
Outputs a high-dimensional vector associated with the original text chunk.
Recommendations:
Use a modern OpenAI embedding model suitable for semantic search.
Batch embedding calls where possible to reduce latency and cost.
Monitor token usage and adjust chunkSize if costs are higher than expected.
Error handling considerations:
Implement retry logic or n8n error workflows for rate-limit or transient network errors.
Log failed embedding attempts and optionally skip problematic records instead of blocking the entire pipeline.
4.4 Pinecone Insert (Vector Store)
Purpose: Persist embeddings and MLS metadata in a Pinecone index for later retrieval.
Index name:lead_scoring_with_mls_data
Each vector is stored with associated metadata such as:
MLS_ID
address
price
bedrooms
buyer_intent_score (if available from upstream systems)
lead_source
timestamp
This metadata enables:
Filtering queries by city, price range, or other attributes.
Computing composite scores that combine similarity with structured signals.
Configuration notes:
Ensure the vector dimensionality in n8n matches the Pinecone index configuration.
Normalize numeric fields (e.g., price buckets) before storing them as metadata to simplify filtering and scoring.
Avoid storing raw PII directly in Pinecone; use hashed IDs where possible.
4.5 Pinecone Query + Tool Node
Purpose: Retrieve similar items from the vector store and expose this capability as a tool to the agent.
When a new lead arrives, the workflow:
Generates an embedding for the lead’s text (e.g., inquiry message, search behavior summary) using the same OpenAI embedding model.
Issues a similarity query against the lead_scoring_with_mls_data Pinecone index.
Returns top matches (e.g., similar listings or historical leads) along with metadata.
The Tool node wraps this query operation so that the agent can:
Call the vector search as an external function.
Use the results as evidence when generating a lead score and explanation.
Filtering examples:
Restrict queries to a specific city or neighborhood.
Limit results to properties within a given price range.
Edge cases:
If the vector store is sparsely populated (e.g., early in deployment), similarity results may be less reliable. Consider minimum match thresholds or fallback logic.
Handle empty or malformed lead text by skipping the query or assigning a default score.
4.6 Memory & Chat Agent Nodes
Purpose: Maintain conversational context and compute lead scores using an LLM.
The Memory node provides a short-term buffer of recent interactions, which enables the agent to:
Reference prior questions or clarifications about a lead.
Accumulate evidence over multiple messages or updates.
The Chat/Agent node uses a chat-capable LLM (the template uses a Hugging Face chat model) to:
Interpret Pinecone query results and their metadata.
Combine semantic similarity with known behavioral and property signals.
Generate a numerical lead score and optional explanatory notes.
Example signals that the agent can consider:
Similarity to listings that historically converted.
Contact frequency and recency of interactions.
Budget alignment with property prices.
Explicit intent phrases in messages.
Configuration notes:
Ensure the prompt to the agent clearly specifies the scoring scale and which metadata fields are available.
Use the Memory node judiciously to avoid unnecessary context bloat, especially in high-volume environments.
4.7 Google Sheets Node (Logging & Integration)
Purpose: Persist lead scores and supporting data for reporting and downstream systems.
The Google Sheets node appends a new row per scored lead with fields such as:
lead_id
score
top_similar_listing_ids
notes or explanation from the agent.
timestamp
This sheet can:
Serve as a simple reporting layer for non-technical teams.
Act as a staging area before pushing data into a CRM or BI tool.
Trigger additional automations based on score thresholds.
5. Lead Scoring Logic & Recommended Signals
The most effective lead scoring combines vector similarity outputs with rule-based business logic. Recommended signals include:
Semantic similarity to high-converting listings Weight: high. Leads whose text or behavior closely matches past successful listings should rank higher.
Search recency and number of property views Weight: medium. Recent and frequent engagement indicates active interest.
Price alignment Weight: medium. Evaluate how well the lead’s stated budget matches the price of similar properties.
Number of inquiries or contact attempts Weight: medium. Multiple touchpoints can signal stronger intent.
Explicit intent keywords Weight: high. Phrases like “ready to buy” or “pre-approved” are strong purchase signals.
Time on market and price reductions for similar properties Weight: low to medium. These can inform urgency or negotiation dynamics but are usually secondary to direct intent.
In practice, the agent can be instructed to compute a composite score that integrates these signals with the similarity results from Pinecone.
6. Best Practices for Operating the Workflow
Normalize input fields before embedding Standardize addresses, price ranges, and property types to reduce noise in both embeddings and metadata.
Protect sensitive data Avoid storing PII directly in vector metadata. Use hashed identifiers and keep sensitive attributes in secure, access-controlled systems.
Optimize cost and latency Batch embedding requests and tune chunkSize to balance semantic fidelity with token usage.
Use Pinecone filters Apply filters by city, school district, or price bracket to increase the relevance of nearest neighbors.
Refresh vectors periodically Re-index or update vectors when listing information changes, such as price adjustments or status updates.
Handle API rate limits Implement rate-limiting and exponential backoff strategies for OpenAI and Pinecone to handle traffic spikes.
7. Evaluation & Performance Metrics
To assess the impact of the semantic lead scoring workflow, track:
Lead-to-opportunity conversion rate Compare high-scored vs. low-scored leads.
Telegram AI Bot with Long-Term Memory (n8n + DeepSeek)
Building a Telegram AI assistant that can remember user preferences, facts, and context across multiple sessions turns a basic chatbot into a personalized conversational agent. This reference-style guide explains how to implement such a bot with n8n, Telegram webhooks, a DeepSeek AI agent (using an OpenAI-compatible API), and a Google Docs-based memory store.
The focus is on the technical architecture and node configuration so you can reliably reproduce, extend, and debug the workflow.
1. Solution Overview
This n8n workflow connects Telegram updates to a DeepSeek-powered AI agent and augments the agent with both short-term and long-term memory:
Telegram sends updates to an HTTPS webhook endpoint.
n8n receives the update, validates the user and chat, and routes the payload by content type (text, audio/voice, image).
Long-term memories are retrieved from a Google Doc and injected into the AI agent context.
A LangChain AI Agent node (configured for DeepSeek or any OpenAI-compatible API) generates responses and decides when to persist new memories.
A window buffer memory node maintains recent conversational turns for short-term context.
When requested by the agent, long-term memories are appended to a Google Doc.
Responses are returned to the user via Telegram.
This design separates concerns: Telegram transport, validation, routing, AI reasoning, and memory persistence are each handled by dedicated nodes or groups of nodes.
2. Functional Capabilities
The final automation pipeline supports:
Receiving Telegram updates via webhook (no polling required).
Validating user and chat identifiers before processing.
Routing messages by type:
Text messages
Audio or voice messages
Images
Fallback path for unsupported update types
Retrieving and using long-term memories from a Google Doc.
Maintaining a short-term window buffer of recent messages for session context.
Using a DeepSeek-based LangChain AI Agent for natural language responses.
Saving new long-term memories into Google Docs via an AI-triggered tool call.
3. Prerequisites
Telegram bot token obtained from @BotFather.
n8n instance, either self-hosted or n8n cloud.
DeepSeek API key (or any OpenAI-style compatible key) configured in n8n credentials.
Google account with:
Access to Google Docs.
At least one Google Doc created to store long-term memories.
Public HTTPS endpoint for the Telegram webhook, for example:
ngrok tunnel to your local n8n instance, or
a publicly hosted n8n deployment with HTTPS enabled.
4. High-Level Architecture
The workflow can be decomposed into the following logical components:
Telegram Webhook Ingress
Node types: Webhook
Receives POST requests from Telegram with update payloads.
Validation & Access Control
Node types: Set, If
Extracts and validates user and chat identifiers before further processing.
Message Routing
Node type: Switch
Branches the workflow based on update content (text, audio/voice, image, unsupported).
Long-Term Memory Retrieval
Node type: Google Docs
Fetches stored memories from a dedicated Google Doc.
AI Agent (DeepSeek via LangChain)
Node type: LangChain / AI Agent
Combines user input, short-term context, and long-term memories to generate responses.
Uses a tool binding to trigger long-term memory writes.
Short-Term Window Buffer
Node type: Window Buffer Memory
Maintains a rolling buffer of recent messages within the current session.
Long-Term Memory Persistence
Node type: Google Docs (tool)
Appends concise memory entries to the Google Doc when requested by the AI Agent.
Telegram Response Delivery
Node type: Telegram (or HTTP Request to Telegram API)
Sends the AI-generated reply back to the originating chat.
5. Telegram Webhook Configuration
5.1 Registering the Webhook with Telegram
Configure Telegram to deliver updates to your n8n endpoint using the setWebhook method. Replace placeholders with your bot token and public HTTPS URL:
pending_update_count – number of updates not yet delivered.
Using webhooks instead of polling is more efficient and scales better, especially when message volume is high.
6. Node-by-Node Breakdown
6.1 Webhook Node – Listen for Telegram Events
Role: Entry point for Telegram updates.
HTTP Method: POST
Path: e.g. /wbot
Response mode: Typically configured to return a basic acknowledgment or the final response, depending on your design.
Telegram sends updates as JSON in the request body. The Webhook node exposes this payload to subsequent nodes, including fields like message.text, message.voice, message.photo, and user metadata such as from.id and chat.id.
6.2 Set Node – Initialize Expected Values
Role: Prepare reference values for validation and normalize the incoming data structure.
Typical usage in this workflow:
Initialize fields such as:
first_name
last_name
id (user or chat identifier)
Optionally map Telegram payload fields into simpler keys for downstream nodes.
This node makes it easier to construct conditions and to debug the data being passed to the If node.
6.3 If Node – Validate User and Chat IDs
Role: Enforce access control and prevent unauthorized usage.
Common conditions include:
Check that chat.id matches a known test chat or an allowed list.
Check that from.id is in an allowed user set during early testing.
If the condition fails, you can:
Terminate the workflow for that execution.
Optionally send a generic rejection message.
This validation step is important to limit who can trigger the AI workflow and to protect your API quota and memory store.
6.4 Switch Node – Message Router
Role: Route updates based on the content type.
Typical Switch configuration:
Input expression: Evaluate the structure of the Telegram update, for example:
Check if message.text is defined.
Check if message.voice or message.audio is present.
Check if message.photo exists.
Outputs:
text – for standard text messages.
audio – for audio or voice messages.
image – for image messages.
fallback – for unsupported or unrecognized update types.
Each branch can run different preprocessing logic, such as transcription for audio or caption extraction for images. The example workflow defines these outputs but focuses mainly on the text path.
6.5 Google Docs Node – Retrieve Long-Term Memories
Role: Load existing long-term memory entries for the current user or chat.
Key configuration points:
Credentials: Use your Google account credentials configured in n8n.
Operation: Read from a specific Google Doc.
Document ID: Set to the ID of the Google Doc that stores memories.
The node returns the document content as text. In the workflow, this text is later merged into the AI Agent system prompt so the model can use these memories as context.
Note: The example workflow uses a single Google Doc as a global memory store. If you later extend this, you might introduce per-user documents or sections, but that is outside the scope of the original template.
Role: Maintain a limited, recent history of the conversation for the current session.
Typical configuration:
Window size: e.g. last 30 to 50 messages.
Storage: In-memory within the workflow execution context.
This node feeds recent turns into the AI Agent so it can respond coherently within an ongoing conversation, without persisting every detail to long-term memory.
6.7 LangChain AI Agent Node – DeepSeek Integration
Role: Central reasoning engine that combines user input, short-term context, and long-term memories to generate responses and decide when to store new memories.
Configuration highlights:
Model backend: Use DeepSeek via an OpenAI-compatible endpoint.
Credentials: DeepSeek or OpenAI-style API key configured in n8n.
System message: A detailed prompt that:
Defines the assistant role (helpful, context-aware chatbot).
Specifies memory management rules, including when to save new information.
Emphasizes privacy and what should not be stored.
Includes a block with recent long-term memories read from Google Docs.
Tools: Bind a Save Memory tool that maps to the node responsible for appending to the Google Doc.
Example system prompt snippet used in the workflow:
System: You are a helpful assistant. Check the user's recent memories and save new long-term facts using the Save Memory tool when appropriate.
The AI Agent node receives:
The user’s current message (potentially after routing and preprocessing).
The short-term window buffer context.
The long-term memory content from Google Docs, embedded in the system prompt.
The agent can then call the configured Save Memory tool when it identifies stable preferences or important facts that should be persisted.
6.8 Google Docs Tool Node – Save Long-Term Memories
Role: Persist new long-term memory entries into the Google Doc when invoked by the AI Agent.
Typical behavior in the template:
The AI Agent outputs a concise memory summary and a timestamp.
The Google Docs node appends a new line in a consistent format, for example:
Memory: {summary} - Date: {timestamp}
Design guidelines enforced in the system prompt and workflow:
Store only stable preferences, important dates, or recurring needs, for example:
Prefers vegan recipes
Birthday: 2026-03-10
Avoid saving sensitive personal information such as:
Passwords or credentials.
Social security numbers.
Private health details.
Summarize the information rather than storing entire chat transcripts.
The node is invoked only when the AI Agent decides that a new memory is worth persisting, based on its system instructions.
6.9 Telegram Response Node – Send Replies
Role: Deliver the AI-generated reply back to the user on Telegram.
Implementation options:
Use the dedicated Telegram node in n8n, or
Use an HTTP Request node that calls https://api.telegram.org/bot{TOKEN}/sendMessage with:
chat_id from the original update.
text set to the AI Agent’s response.
Ensure that the response node uses the correct chat ID so replies are routed to the originating conversation.
7. Configuration Notes & Edge Cases
7.1 Webhook and HTTPS
The webhook URL must be HTTPS for Telegram to accept it.
If using ngrok, ensure the tunnel is active before calling setWebhook.
If you change the webhook path or domain, update the Telegram webhook accordingly.
7.2 Validation Logic
During development, restrict the bot to a single test user or chat ID using the If node.
For production, consider:
Allowlisting multiple chat IDs.
Logging unauthorized attempts for monitoring.
7.3 Message Routing Edge Cases
Some Telegram updates might not contain a message field (for example, callback queries). These should fall into the fallback path.
For messages with multiple media fields, define clear routing precedence (for example, prioritize text if present).