Build an n8n AI Agent with LangChain & MCP

Build an n8n AI Agent with LangChain & MCP

What if every repetitive question, every manual lookup, and every tiny calculation could be handled for you, in the background, by an AI Agent that you control? The “MCP Learning” n8n template is designed to be that turning point. It connects a chat trigger, an AI Agent powered by LangChain and OpenAI, and a set of reliable tools (Calculator, HTTP requests, and an MCP client) so you can move from doing tasks yourself to orchestrating them with automation.

This guide walks you through that journey. You will start with the problem of scattered, manual work, shift into what becomes possible when you adopt an automation mindset, then learn how this n8n template gives you a practical, ready-to-use pattern you can adapt and grow over time.

The problem: manual tasks stealing your focus

Most teams face the same bottlenecks. A customer asks a question, and you jump into a system to check an order. A colleague wants a quick calculation, and you reach for a spreadsheet. An internal request appears, and you manually trigger an API call or microservice. Each action seems small, but together they drain time and attention that could be spent on strategy, creativity, or growth.

AI and automation can help, but only if they are connected in a safe and structured way. You need something that can:

  • Listen to real chat messages and act on them
  • Use a powerful LLM like OpenAI to understand intent
  • Call tools in a controlled, auditable way
  • Keep side effects isolated and traceable

This is exactly where the “MCP Learning” n8n workflow template comes in. It is not just a demo, it is a reusable pattern that you can apply to customer support, internal operations, and any workflow that benefits from an AI agent with real tools at its disposal.

Mindset shift: from doing the work to designing the system

Adopting automation is not only about technology, it is about mindset. Instead of asking, “How do I respond to this request?” you start asking, “How can I design a system that responds for me, safely and reliably?”

With n8n, LangChain, and MCP, you are not building a one-off chatbot. You are building an AI Agent that:

  • Understands natural language through an OpenAI Chat Model
  • Plans actions using LangChain agent logic
  • Calls well-defined tools like a Calculator, HTTP Request, or MCP Client
  • Executes side effects in a separate, controlled flow using an MCP Server Trigger

This template encourages you to think like an architect of your own workflows. You define which tools are available, you set the rules, and you decide how far the agent can go. Every improvement you make compounds over time, freeing more hours and mental energy for the work that actually moves you or your business forward.

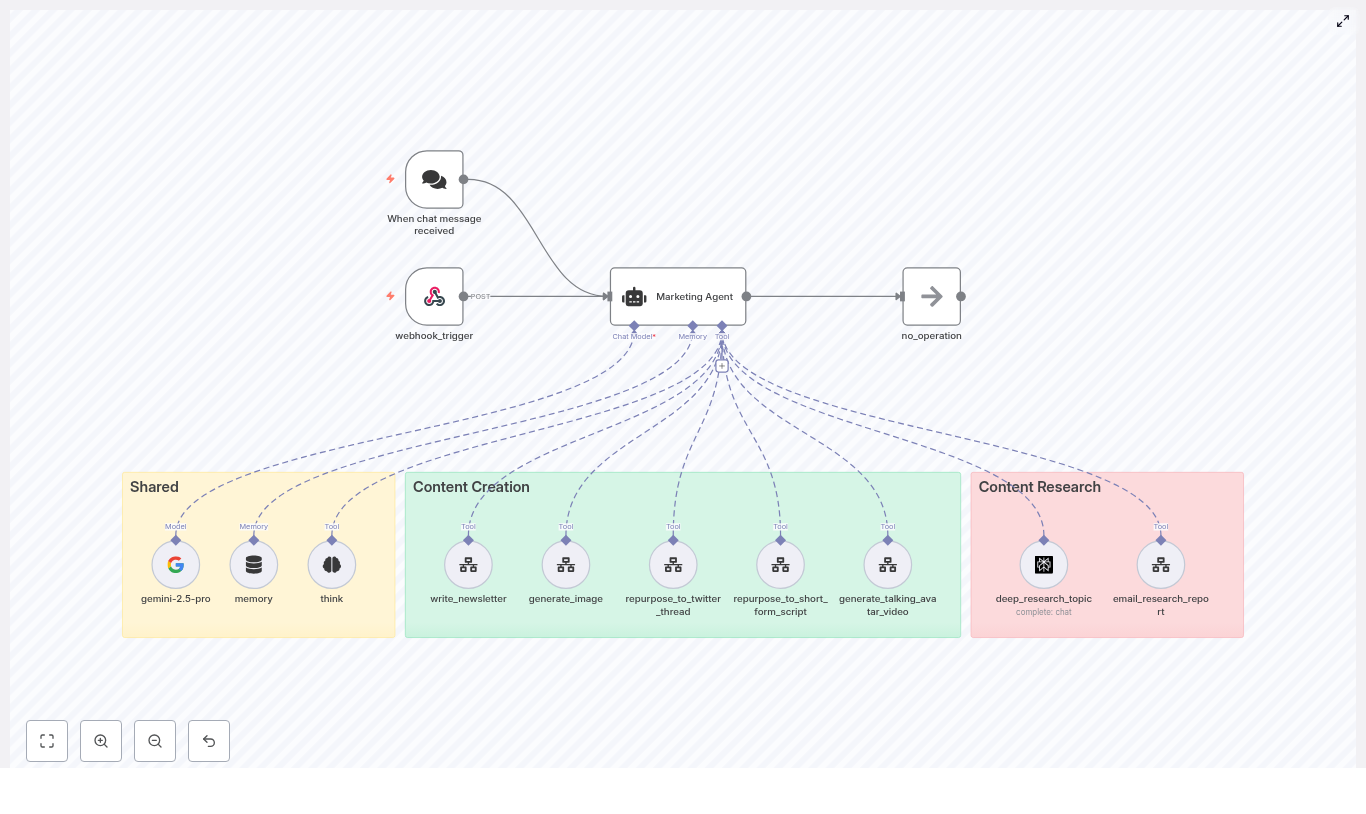
The n8n AI Agent template: your starting point

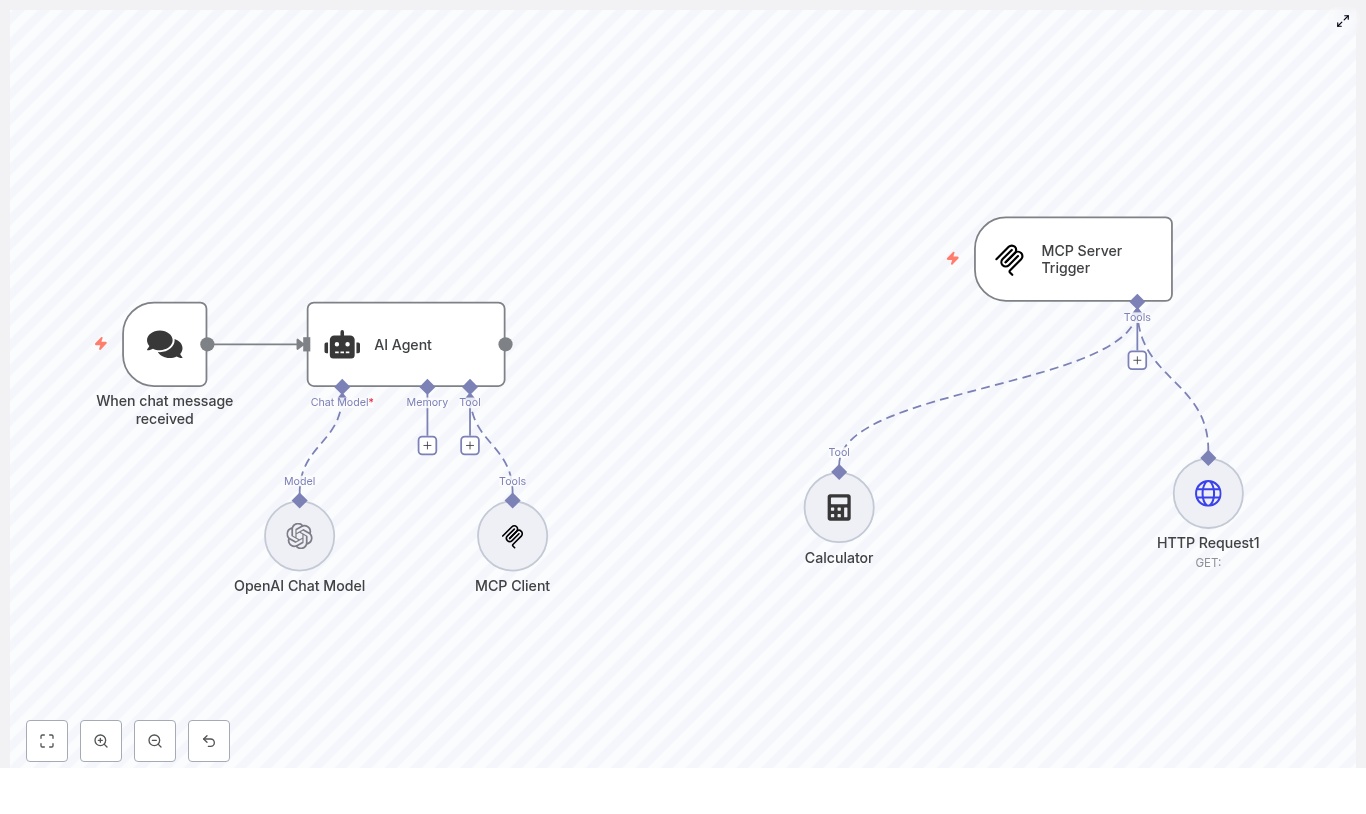
The “MCP Learning” template shows a modern way to orchestrate AI inside n8n. It connects:

  • A chat trigger that starts the workflow when a message is received
  • An AI Agent node powered by LangChain logic
  • An OpenAI Chat Model for language understanding and generation
  • Tools like a Calculator, HTTP Request, and MCP Client that the agent can call
  • An MCP Server Trigger that handles those MCP tool calls on a separate flow

Once set up, you can send a message to your chat entry point, watch the agent interpret it, decide whether it needs to call a tool, and then respond with a clear, verifiable answer. It is a powerful pattern that you can adapt to fit your specific use cases.

How the workflow behaves: from message to meaningful action

To understand the transformation this template enables, it helps to walk through the full journey of a single message:

  1. A user sends a chat message. This could be from a webhook or any supported platform integration.
  2. The message lands in the When chat message received node, which triggers the workflow and passes the content onward.
  3. The AI Agent node receives the message. Using LangChain logic and the configured OpenAI Chat Model, it interprets the user’s intent and plans its next steps.
  4. If the agent decides it needs extra information or a precise operation, it calls one of the tools available to it, such as:
    • Calculator for deterministic numeric calculations
    • HTTP Request (Tool) to reach external APIs or microservices
    • MCP Client to interact with tools managed via MCP
  5. Tools run in isolation. When the MCP Client is used, the request is handled by a separate flow that starts from the MCP Server Trigger. This trigger receives the tool call, executes the required action, and returns the result.
  6. The AI Agent gathers the tool outputs, composes a final response, and sends it back to your chat platform or any downstream system you connect.

The result is a loop where your AI Agent not only talks, but acts. It can compute, fetch data, and perform side effects in a controlled, observable way.

Node-by-node: what powers this template

When chat message received

This node is the entry point. It listens for incoming chat events, either via webhook or a platform-specific trigger. Every user message that reaches this node becomes a potential automated interaction handled by your AI Agent.

AI Agent

The AI Agent node is the coordinator of the entire experience. It:

  • Receives the incoming chat message
  • Runs your LangChain agent logic for planning and tool selection
  • Decides when to call tools and how to combine their outputs
  • Generates a final response for the user

In n8n, this node integrates directly with LangChain, connecting the chat model and your tool set into one cohesive agent behavior.

OpenAI Chat Model

The OpenAI Chat Model node provides the language intelligence. In the template, it is configured with a modern model such as gpt-4.1-nano, but you can choose the model that fits your needs and budget.

Before you enable this node, make sure your OpenAI credentials are correctly configured in n8n under Credentials → OpenAI API Key. This step unlocks the LLM that powers understanding, reasoning, and natural language responses.

MCP Client & MCP Server Trigger

The MCP pair is what makes structured tool orchestration possible. They work together as a client-server pattern inside your automations:

  • MCP Client appears to the AI Agent as a tool it can call. When chosen, the agent sends its request through this client.
  • MCP Server Trigger runs in a separate n8n flow. It listens for incoming MCP tool calls, executes the desired action, and returns the result.

This separation lets you run tools in isolation, keep side effects under control, and centralize how tool calls are logged and monitored. It is a scalable pattern for safe, auditable AI-driven actions.

Calculator

The Calculator node is a simple but powerful example of a deterministic tool. Instead of asking the LLM to approximate a calculation, the agent calls this node to perform exact numeric operations. This keeps results auditable and reduces the risk of hallucinated numbers.

HTTP Request (Tool)

The HTTP Request node, configured as a tool, lets your agent talk to the outside world. It can:

  • Send GET or POST requests
  • Call internal microservices or external APIs
  • Trigger background jobs or workflows in other systems

In the template, it serves as a hook for richer automations, like checking order statuses, updating records, or kicking off internal processes.

Getting started: bring the template into your n8n space

To turn this pattern into something you can test and customize, follow these steps in your own n8n instance:

  1. Import the template JSON Go to Workflow → Import from JSON and paste or upload the template file.
  2. Configure OpenAI credentials In Credentials, add or update your OpenAI API Key, then link it to the OpenAI Chat Model node.
  3. Set up the chat trigger Configure the webhook URL or connect the trigger to your chat platform integration so that incoming messages can reach the workflow.
  4. Align MCP settings Double check the MCP Server Trigger webhookId and the MCP Client sseEndpoint. Update them so they match your MCP deployment or local test instance.
  5. Adjust HTTP Request parameters If you plan to call specific APIs, customize the HTTP Request node body, headers, and endpoints to match your services.
  6. Activate and test Turn the workflow on, send a few sample messages, and watch how the agent calls tools and responds.

Within a few minutes, you will have a working AI Agent in n8n that you can observe, refine, and extend.

Best practices to keep your AI Agent safe and reliable

Security and credentials

Security is part of building mature automation. To keep your workflows safe:

  • Never hard-code API keys or tokens in workflow JSON
  • Use n8n Credentials to store secrets securely
  • Restrict the HTTP Request tool to trusted endpoints
  • Implement authentication and authorization where possible

Tool design

The more deterministic your tools are, the more predictable your agent becomes. Ideal tools include:

  • Calculators and numeric operations
  • Lookups against internal databases or APIs
  • Authenticated HTTP calls with clear input and output formats

This approach minimizes hallucinations and makes debugging far easier.

Agent prompts and safety

Strong system prompts are your guardrails. Use them to define:

  • The scope of what the agent should and should not do
  • Which tools it may call and in what situations
  • How it should refuse or escalate unsafe or unclear requests

For tools with side effects, consider adding a verification step. For example, you can require explicit confirmation from the user or a structured request format before the agent calls a tool that changes data or triggers external actions.

Observability and auditing

To grow your automation confidently, you need visibility into what the agent is doing. Combine:

  • Logs of all tool calls and agent plans
  • Model responses captured in n8n
  • The MCP Server Trigger pattern, which centralizes tool execution logs
  • n8n’s execution history for a full audit trail

This makes it much easier to troubleshoot, improve prompts, and demonstrate that your AI workflows are behaving as intended.

Real-world use cases: where this template can take you

Once you understand the pattern, you can apply it to many scenarios. A few common examples include:

  • Customer support assistants that compute refunds, check order statuses, or call backend APIs for account information
  • Automated data enrichment that uses HTTP tools to fetch external records and update your internal systems
  • Internal automation for scheduling tasks, running computations, or handling form submissions without manual intervention

Each new use case builds on the same foundation: a chat trigger, an AI Agent, and a set of well-designed tools.

Troubleshooting common issues

Agent not responding

If the agent seems silent, check:

  • That the chat trigger webhook or platform integration is correctly configured
  • That your OpenAI credential is valid and linked to the Chat Model node
  • That the AI Agent node is pointing to the correct model configuration

Tool calls failing

When tools fail, start with visibility:

  • Inspect node execution logs in n8n for errors
  • Verify that endpoints, authentication headers, and payloads in the HTTP Request node are correct
  • For MCP-related issues, confirm that SSE and server endpoints are reachable and that webhookId values match between the MCP Client and MCP Server Trigger

Extending the template into your own automation system

This template is intentionally designed as a foundation. Once it is running, you can expand it step by step:

  • Add new tools for database queries, calendar APIs, or internal microservices
  • Extend the LangChain configuration with memory, multi-step planning, or custom tool logic
  • Introduce persistent memory nodes to support longer, context-aware conversations
  • Implement rate limiting and retry logic for external APIs
  • Include validation and sanitization steps for user inputs before they reach critical tools

Each enhancement brings you closer to an automation ecosystem where your AI Agent becomes a trusted collaborator, not just a novelty.

Demo prompts to explore and experiment

Once the template is active, try messages like these to see the tools in action:

  • “Calculate the monthly payment for a $20,000 loan at 5% over 60 months.” This should invoke the Calculator tool for a precise result.
  • “Check status of order 12345 and notify me if it’s delayed.” This can trigger an HTTP Request to your order API and return a status.
  • “Please schedule a follow-up email in three days if the client doesn’t respond.” This can be wired to an internal scheduling API or microservice.

Use these as a starting point, then adapt them to your own data, systems, and workflows.

From template to transformation

The “MCP Learning” n8n template is more than a sample workflow. It is a practical, extensible pattern for building safe, auditable AI-assisted automations with LangChain and OpenAI. By separating language understanding in the LLM and Agent from deterministic tool execution through Calculator, HTTP, and MCP, you gain both flexibility and control.

As you refine prompts, design better tools, and add new integrations, this pattern can grow with you. It can support customer-facing bots, internal automations, and hybrid human-AI workflows that save time, reduce errors, and free your team to focus on what matters most.

Take the next step

If you are ready to move from manual tasks to designed systems, now is the moment to experiment. Import the template into your n8n instance, connect your OpenAI credentials, and try the demo prompts. Watch how the agent behaves, then iterate.

Use this template as a stepping stone toward a more automated, focused workflow. With each improvement, you will build an AI-powered automation layer that supports your goals instead of distracting from them.

If you want help adapting the template to your

Automated WordPress Content Workflow with n8n

Automated WordPress Content Workflow with n8n

Ever opened WordPress, stared at the “Add New Post” button, and felt your soul quietly leave your body at the thought of doing this again and again and again? If writing, formatting, hunting for images, and scheduling posts feels like a full-time job on top of your actual full-time job, this setup is for you.

In this guide, you will see how an n8n workflow can do the boring parts for you. It connects OpenAI, Google Sheets, Pexels, and WordPress so your blog keeps publishing SEO-ready posts while you do something more exciting, like literally anything else.

This automated WordPress content workflow will:

  • Generate long-form SEO content with OpenAI (GPT-4o)
  • Store and stage everything in Google Sheets
  • Pull high-quality images from Pexels
  • Publish posts in WordPress with a featured image
  • Add a random delay so your posting schedule looks human, not robotic

Why bother automating your WordPress content workflow?

Manually creating every post is like washing dishes by hand when you own a perfectly good dishwasher. It works, but why?

With an automated n8n workflow for WordPress content, you get:

  • Speed: Use AI to generate full-length articles in minutes instead of hours.
  • Consistency: Keep a steady publishing schedule with scheduled posts and randomized delays that mimic natural posting patterns.
  • Scalability: Increase your content output without cloning yourself or hiring an army of interns.
  • Visual quality: Automatically grab high-quality, landscape images from Pexels and use them as featured media.
  • Organization: Use Google Sheets as a central content staging area where you can review, tweak, and track everything.

In short, you let automation handle the repetition, while you focus on strategy, ideas, and quality control.

What this n8n workflow actually does (high-level overview)

This workflow strings together several tools into one smooth content pipeline:

  • OpenAI (GPT-4o): Writes the article and generates image search keywords.
  • Google Sheets: Stores the article title, HTML content, and a combined image keyword string.
  • Pexels API: Fetches a suitable landscape image based on the keywords.
  • WordPress API: Creates and publishes the post with the content and image URL.
  • Random wait: Adds a 0-6 hour randomized delay before publishing so your posts do not look like a bot dropped them all at once.

The end result is a fully automated WordPress content workflow that takes an idea, turns it into a post, attaches an image, schedules it, and hits publish – without you needing to babysit every step.

Inside the workflow: key n8n nodes and their jobs

1. OpenAI node – Generate AI content

This is the brain of the operation. The OpenAI node receives a structured prompt and returns a JSON object with three key elements:

  • title – a trend-aware H1 that targets relevant keywords
  • content – full HTML-formatted article, including H1, H2, H3, paragraphs, lists, and a CTA
  • keywords – an array of 3-5 concrete English image search keywords

To keep your life easy, your prompt should clearly say: output HTML, wrap everything in JSON, and follow a specific structure. That way, you avoid painful post-processing and can pass the data straight into Google Sheets and WordPress.

2. Google Sheets node – Save to Sheet

Next, the content is parked in Google Sheets, which acts as your staging area and content log. The workflow appends the following columns:

  • title
  • content (HTML)
  • Image search keyword

The image keywords array from OpenAI is joined using the + symbol so it becomes a single search query string. That combined keyword string is what the Pexels node uses to find an image.

3. HTTP Request node – Automated image retrieval from Pexels

Now we give your post something nice to look at. The HTTP request node calls the Pexels API with the joined keyword string and fetches the top matching landscape photo.

Do not forget to:

  • Add your Pexels API key to the request headers
  • Request landscape orientation so your images fit nicely into blog layouts

4. WordPress node – Create posts on WordPress

Once the content and image URL are ready, the WordPress node creates a new post. The HTML content is inserted into the post body, and the image URL is added inline in the content.

To turn that inline image into a featured image automatically, install and configure the Featured Image from URL (FIFU) plugin in WordPress. In the FIFU settings, enable the option that sets featured media automatically from content. That way, you do not have to manually set featured images for every single post.

5. Wait node – Scheduling and random delay

To make your posting pattern look human instead of “I am a script running on a server”, you can add a randomized wait node before the publishing step. This workflow uses a 0-6 hour random delay.

You can combine this with:

  • A Schedule Trigger for recurring weekly or daily publishing
  • A Manual Trigger while testing and tweaking your workflow

The result is a blog that steadily publishes over time, without obvious “I just batch-ran my automation” spikes.

Step-by-step setup checklist

Ready to escape the repetitive content grind? Here is a practical setup checklist for this n8n WordPress workflow.

  1. Install the required WordPress plugin
    In your WordPress site, install a plugin such as Featured Image from URL (FIFU). Enable the setting that automatically sets the featured image from content so that any image URL you place in the post body can become the featured media.
  2. Create your API credentials
    Gather the keys and tokens you need:
    • OpenAI API key
    • Pexels API key
    • Google Sheets access via OAuth
    • WordPress authentication, such as an application password or API key
  3. Build the n8n workflow
    In n8n, add and connect nodes for:
    • Trigger (Schedule or Manual)
    • OpenAI (content generation)
    • Google Sheets (append new rows)
    • Pexels (HTTP request node)
    • Wait node with randomized delay
    • WordPress (create post)
  4. Design your OpenAI prompt
    Your prompt should:
    • Ask for HTML output with H1, H2, H3, lists, conclusion, and CTA
    • Request a JSON wrapper with title, content, and keywords
    • Include SEO instructions, such as meta suggestions and keyword focus
    • Ask for 3-5 short, concrete English image keywords
  5. Map your sheet columns correctly
    In the Google Sheets node, make sure the headers match exactly:
    • title
    • content
    • Image search keyword

    Tiny typos here can cause big headaches later, so double-check the spelling.

  6. Test thoroughly before going live
    Use a manual trigger and run a few test posts. Confirm that:
    • Rows are added correctly in Google Sheets
    • Pexels returns a valid image URL
    • WordPress creates posts with proper HTML formatting
    • The featured image is set automatically via FIFU

    Once everything looks good, then you can safely enable your schedule.

Best practices for SEO and content quality

Automation is powerful, but you still want content that ranks and reads like a human wrote it. Here is how to keep your automated WordPress workflow SEO friendly and on-brand:

  • Write strong, keyword-focused titles: Keep H1 titles under 60 characters and place primary keywords near the beginning.
  • Use H2 and H3 subheadings wisely: Include long-tail keywords and question-style headings to capture more search intent.
  • Optimize meta data: Add meta descriptions and excerpts when publishing. You can even extend this workflow later to generate and set meta tags via WordPress fields.
  • Review and edit AI content: Use the Google Sheets staging area to skim, fact-check, and tweak tone so posts match your brand voice.
  • Leverage internal links: Add a post-processing step to insert links to your main pillar content, improving both SEO and user experience.

Troubleshooting and pro tips

Image not showing as featured?

If your post has an inline image but no featured image, check your FIFU settings. Make sure the option under “Auto” to Set Featured Media Automatically from Content is enabled.

If you prefer more control, you can also call the WordPress media endpoints directly via API and explicitly set the featured image instead of relying on a plugin.

Weird HTML or formatting issues?

If your content shows escaped HTML or broken formatting in WordPress, verify that:

  • The OpenAI node returns HTML in a string field without extra escaping.
  • The Google Sheets node stores the HTML as-is, without modifying or escaping it.
  • The WordPress node is mapped to the correct field and is not double-encoding anything.

Run a few small test cycles to confirm the full path from OpenAI to WordPress before scaling up.

Running into rate limits or quotas?

APIs like OpenAI and Pexels have usage limits. If you are generating a lot of posts, keep an eye on:

  • OpenAI request quotas and cost
  • Pexels API rate limits

The randomized wait in this workflow already spreads out requests a bit. For higher volumes, consider adding more advanced throttling and error-handling nodes to pause, retry, or queue requests when limits are hit.

Security and maintenance tips

Automation is fun until a leaked API key ruins your day. Keep your workflow secure and maintainable with a few simple habits:

  • Store credentials securely: Use n8n’s credential manager or your own secrets manager for API keys and tokens.
  • Rotate keys regularly: Update and rotate API keys on a schedule to reduce risk.
  • Log what you publish: Save each WordPress post ID alongside the source Google Sheets row so you can trace, audit, or roll back content if needed.
  • Keep backups: Maintain backup copies of your post content in Google Sheets or an external storage service.

Example OpenAI prompt you can start with

Here is a simple starter prompt that works well with this n8n workflow:


Generate an SEO-optimized article in HTML. Output must be a JSON object with keys: title, content, keywords.
- title: H1 title under 60 characters
- content: full HTML (H1, intro, H2/H3 headings, lists, conclusion, CTA)
- keywords: array of 3-5 short English image search keywords (concrete nouns or locations)

Write about: "Automated WordPress content workflows with n8n"

You can customize the topic, tone, and structure, but keep the JSON format and keys consistent so the rest of your workflow does not break.

Wrapping up: from repetitive tasks to automated publishing

With this automated WordPress content workflow in n8n, you trade copy-paste drudgery for a smooth, scalable pipeline. OpenAI handles the writing, Pexels supplies the visuals, Google Sheets keeps everything organized, and WordPress publishes on autopilot.

The result is a blog that stays fresh and SEO-friendly without you constantly fighting with editors, uploads, and schedules.

Ready to automate? Start by setting up a small test workflow, connect your API keys, and run a few sample posts. When you are happy with the output, scale it up and let automation do the heavy lifting. If you would like a copy of the example n8n workflow or a tailored prompt for your niche, contact us or grab the starter template below.

Get the Starter Template

Published by a team experienced in automation, content strategy, and WordPress operations.

n8n Document Ingestion to Supabase Vector DB

n8n Document Ingestion to Supabase Vector DB

Automating document ingestion into a vector database is a foundational capability for any modern AI or search platform. By continuously transforming unstructured files into embeddings stored in a vector store, your knowledge base becomes searchable at scale and ready for retrieval-augmented generation (RAG), semantic search, and agent workflows.

This article presents a production-oriented n8n workflow template that monitors a Google Drive folder, ingests PDFs and CSVs, performs text normalization and chunking, enriches content with LLM-generated metadata, creates embeddings, and writes the results into a Supabase vector table.

Why implement this ingestion pipeline with n8n?

Enterprise-grade AI systems depend on high quality embeddings and reliable data pipelines. Building the ingestion layer with n8n provides several advantages for automation professionals:

  • Consistent data preparation – Ensure standardized metadata, chunking, and embedding generation across all documents.
  • Visual orchestration – Design, debug, and extend workflows through n8n’s node-based interface.
  • Vendor flexibility – Swap LLM or embedding providers (OpenAI, Google Gemini, etc.) without redesigning the pipeline.
  • Operational robustness – Integrate rate limiting, error handling, and observability directly into the workflow.
  • Scalable retrieval – Supabase’s vector capabilities provide a solid backend for semantic search and RAG applications.

The result is a reusable ingestion framework that you can adapt to new file types, models, or downstream applications with minimal engineering effort.

Solution architecture overview

The workflow follows a straightforward but extensible architecture:

  • Trigger – Watch a Google Drive folder for newly created files.
  • Acquisition – Download the file, converting Google Docs to PDF when required.
  • Routing – Use MIME type switching to direct PDFs and CSVs to the appropriate extraction logic.
  • Text processing – Normalize text, consolidate into a standard field, and split into overlapping chunks.
  • Metadata generation – Use an LLM to generate titles, descriptions, and optional per-chunk context.
  • Embeddings – Create vector embeddings using OpenAI or Google Gemini embedding models.
  • Persistence – Store chunks, metadata, and embeddings in a Supabase vector table.

The sections below walk through the n8n nodes that implement this pipeline, along with configuration guidance and best practices.

Core n8n workflow: node-by-node

1. Google Drive Trigger: fileCreated

The workflow starts with a Google Drive Trigger node configured for the fileCreated event. Set the folder ID to the directory you want to monitor. Each time a new file appears in that folder, the workflow is initiated.

This approach ensures:

  • Near real-time ingestion when collaborators upload or modify documents.
  • Centralized control of which documents are indexed, simply by managing the folder.

2. Batch control: Loop Over Items (splitInBatches)

When the trigger returns multiple files, use the Split In Batches node (splitInBatches) so each file is processed independently. This pattern is important for:

  • Staying within API rate limits for LLMs and embedding providers.
  • Isolating errors to individual files so a single bad document does not halt the entire run.

3. Normalize identifiers: Set File ID

Introduce a Set node to capture key identifiers from the trigger output into predictable fields, for example:

  • file_id – the Google Drive file ID.
  • Optional additional metadata such as filename or path.

Standardizing these fields simplifies downstream mapping into Supabase and makes logging and debugging more straightforward.

4. File acquisition: Download File (googleDrive)

Next, a Google Drive node downloads the file using the stored file_id. Configure the node to handle format conversion where necessary:

  • Enable Google Drive conversion for Google Docs so they are exported to PDF.
  • Ensure the googleFileConversion options are set consistently to avoid heterogeneous outputs.

This step provides the binary content that subsequent nodes will analyze and extract.

5. Content routing: Switch on MIME type

Use a Switch node to branch processing based on MIME type. The workflow evaluates $binary.data.mimeType and directs the file to the appropriate extraction path:

  • PDF route for application/pdf.
  • CSV route for text/csv or related MIME types.

This design is naturally extensible. You can easily add cases for DOCX, PPTX, or images with OCR as your ingestion needs evolve.

6. Content extraction: PDF and CSV

For each route, use the Extract from File node to convert the binary file into structured data:

  • PDFs – Extract raw text or structured content from the document body.
  • CSVs – Parse rows into JSON objects, preserving column headers as keys.

If your PDFs are scanned images rather than text-based documents, insert an OCR step before extraction to ensure the text layer is available.

7. Standardize document payload: Document Data (Set)

After extraction, normalize the data into a consistent schema using a Set node. A common pattern is to consolidate the main text into a field such as data. For example:

  • For PDFs, map the extracted text directly to data.
  • For CSVs, you may choose to serialize rows into a single text block or retain them as structured JSON, depending on your retrieval strategy.

Having a single canonical field for downstream processing simplifies all subsequent nodes, especially chunking and LLM calls.

8. Document-level metadata: Title and Description via LLM

Before chunking, enrich the document with high quality metadata. Use a Chain LLM or similar LLM node to generate:

  • A concise title that captures the main topic of the document.
  • A short description summarizing key content and purpose.

The workflow can use Google Gemini or another LLM provider to produce structured output. These fields significantly improve retrieval quality and user experience when browsing search results or RAG responses.

9. Chunking logic: Split into overlapping segments (Code)

Large documents need to be split into smaller segments before embedding. A Code node runs JavaScript to chunk the text with overlap, prioritizing semantic boundaries where possible.

A typical configuration is:

  • chunkSize: 1000 characters.
  • chunkOverlap: 200 characters.

The core algorithm resembles:

// chunkSize = 1000; chunkOverlap = 200
while (remainingText.length > 0) {  // prefer paragraph breaks, then sentences, then words  splitPoint = remainingText.lastIndexOf('\n\n', chunkSize) ...  chunk = remainingText.substring(0, splitPoint).trim();  chunks.push(chunk);  remainingText = remainingText.substring(Math.max(0, splitPoint - chunkOverlap)).trim();
}

This heuristic maintains sentence integrity where possible and uses overlapping windows so embeddings maintain contextual continuity across chunks.

10. Chunk expansion and control: Split Out and Limit

Once the chunks are computed, use a Split Out node to convert the array of chunks into individual n8n items. Each item then represents a single unit for embedding and storage.

Follow this with a Limit node to restrict the number of chunks processed per run. This is particularly useful for:

  • Very large documents that may produce hundreds of chunks.
  • Managing API costs and staying within rate limits for LLM and embedding services.

11. Optional enrichment: Per-chunk context (LLM helper)

For advanced retrieval scenarios, you can enrich each chunk with a short contextual label. A dedicated LLM helper node, often named something like Process Context, takes the chunk text and generates:

  • A one-line summary or context string that describes the chunk.

This additional field can be extremely helpful for search result snippets, UI tooltips, or ranking signals in your retrieval logic.

12. Summarization and embedding generation

Depending on your design, you may introduce a summarization step for each chunk or for the full document. This can provide:

  • Short extracts suitable for display in search results.
  • Condensed representations that complement the raw chunk text.

After any optional summarization, the workflow calls an embeddings node. You can use:

  • OpenAI Embeddings node.
  • Google Gemini Embeddings node.

The template demonstrates both options as interchangeable components. Choose the provider that aligns with your stack, compliance requirements, and cost model.

13. Persistence layer: Insert into Supabase Vector Store

The final stage writes all relevant fields into a Supabase vector table, for example a table named documents. Each row typically includes:

  • id / file_id – a unique identifier for the originating file.
  • title / description – document-level metadata generated by the LLM.
  • chunk – the text content of the individual chunk.
  • context / summary – optional per-chunk context or summary string.
  • embedding – the vector representation suitable for similarity search.
  • raw_text – optional field retaining the original text for debugging or re-processing.

With Supabase’s vector capabilities configured, you can then perform similarity search queries directly against this table to power RAG pipelines and intelligent search experiences.

Configuration tips and automation best practices

Chunking strategy

  • Chunk size and overlap: A typical starting point is 800-1200 characters per chunk with 150-300 characters of overlap.
  • Trade-offs: Larger chunks reduce the number of vectors and API calls but may mix multiple topics, which can affect retrieval precision.

API limits and performance

  • Rate limiting: Use splitInBatches and Limit nodes to control concurrency and volume.
  • Retries: Implement exponential backoff or retry logic for transient errors from LLM or embedding providers.

Metadata quality

  • Invest in good LLM prompts for title and description generation.
  • Ensure metadata is consistently formatted to support filtering and ranking in your search UI.

Security and compliance

  • Store API keys and Supabase credentials using n8n’s credential system, not hardcoded in nodes.
  • Leverage Supabase row-level security policies to restrict access to sensitive documents.
  • Review data residency and compliance requirements when choosing LLM and embedding providers.

Cost management

  • Filter out low-value content before embedding, such as boilerplate or repeated legal text.
  • Use summarization to reduce token usage where possible.
  • Limit the number of chunks per document if only the most relevant sections need to be searchable.

Extensibility: additional file types

  • Extend the MIME type Switch node to handle DOCX, PPTX, and other office formats.
  • Integrate OCR for images or scanned PDFs to bring previously inaccessible content into your vector store.

Error handling and observability

For production environments, robust error handling is essential. Recommended patterns include:

  • Wrapping critical sections with try/catch logic in Code nodes where appropriate.
  • Configuring a dedicated error workflow in n8n that captures failed items.
  • Logging diagnostic details such as:
    • file_id and filename.
    • The node or stage where the failure occurred.
    • The raw payload or error message for analysis.

Persisting these logs in a monitoring table or external observability stack allows you to reprocess failed documents and continuously improve pipeline reliability.

Representative use cases

This n8n-to-Supabase ingestion pattern is suitable for a wide range of AI and automation initiatives, including:

  • Enterprise knowledge bases – Index internal documents so employees can perform semantic search across policies, procedures, and technical documentation.
  • Legal and compliance repositories – Ingest contracts, regulations, and compliance documents for robust similarity search and RAG-driven analysis.
  • Customer support intelligence – Feed manuals, FAQs, and support documents into a vector store to power chatbots and agent assist tools.

Next steps: from template to production

The described workflow provides a solid, reusable pattern for converting documents into vectors stored in Supabase. You can extend it with:

  • Custom extractors for domain-specific formats.
  • OCR integration for scanned documents and images.
  • Multi-language handling and language detection.
  • Alternative or additional embedding models as your stack evolves.

To deploy this pipeline in your environment:

  1. Export the workflow JSON from the template.
  2. Import it into your n8n instance.
  3. Configure credentials for Google Drive, your chosen LLM provider, and Supabase.
  4. Run a controlled set of test files to validate chunking, embeddings, and Supabase inserts.
  5. Iterate on prompts, chunk sizes, and metadata fields based on retrieval performance.

Call to action: If you need assistance tailoring this pipeline for your stack, such as integrating OCR, handling additional file types, or tuning model prompts and chunking strategy, reach out with your requirements and we can design a workflow that aligns with your architecture and operational constraints.

Repurpose Newsletters into Daily Twitter Threads

Turn Your Newsletters into Daily Twitter Threads (Without Losing Your Mind)

If you have ever copied chunks of your newsletter into Twitter, chopped them into 280-character bits, fixed broken links, rewrote the hook, then did it all again tomorrow, this guide is your new best friend.

Instead of manually turning long-form content into Twitter (ok, X) threads every day, you can let an n8n workflow and an LLM do the heavy lifting. You keep the editorial judgment and final say, the robots handle the repetitive stuff that slowly erodes your will to create.

Below is a practical, production-ready setup that combines:

  • n8n automation
  • An LLM via LangChain or a provider like Anthropic Claude Sonnet
  • Structured output parsing so the thread format does not implode
  • Slack publishing for human review before anything hits X

The result: reliable, daily Twitter threads from your newsletter with minimal manual effort and maximum control.

Why Turn Newsletters into Twitter Threads Anyway?

Your newsletter is already doing the hard work: curated links, original insights, commentary your audience actually cares about. Letting that live in inboxes only is like writing a book and then hiding it in a drawer.

Repurposing newsletters into Twitter threads helps you:

  • Boost reach by surfacing long-form ideas into fast-moving social feeds.
  • Bring new people in by driving traffic back to your newsletter and site.
  • Reuse what you already have instead of inventing new social content from scratch every day.

In other words, you get more output from the same input, without more caffeine or extra interns.

What This n8n Workflow Actually Does

This workflow mimics the core automation pipeline used by modern newsletters to publish daily news threads. Here is the high-level flow:

  1. Take in your newsletter content using a trigger that fits your stack.
  2. Feed the model examples of how you like your threads written.
  3. Build a precise prompt that tells the LLM exactly how to structure the thread.
  4. Call the LLM using LangChain or a provider node such as Anthropic Claude Sonnet.
  5. Parse the model output into clean, numbered tweets.
  6. Send the draft to Slack for editorial review, edits, and scheduling.

So instead of wrestling with character limits and formatting, your team just reviews, tweaks, and approves.

Meet the n8n Nodes Behind the Magic

The sample n8n template uses a handful of nodes, each doing a very specific job so the whole pipeline stays predictable and maintainable.

  • workflow_trigger – Entry point where your newsletter content arrives.
  • set_examples – Stores thread examples and style guidance for the LLM.
  • build_prompt – Combines newsletter text with your prompt template.
  • write_twitter_thread – Calls the LLM via LangChain or a provider node like Anthropic Claude Sonnet.
  • twitter_parser – Parses the LLM response into a structured, tweet-by-tweet format.
  • set_result – Saves the final thread text into the workflow payload.
  • share_twitter_thread – Posts the draft thread to Slack for your editors and schedulers.

Each node does one thing well, which makes debugging a lot easier when something inevitably goes off script.

Step-by-Step: Build the Newsletter-to-Twitter Workflow

Let us walk through the setup from start to finish. You can adapt the details to your tech stack, but the structure stays the same.

1. Choose How the Newsletter Enters n8n (Trigger & Input)

First, decide how the workflow gets your newsletter content. A few common options:

  • Manual trigger so editors can paste the final copy directly.
  • Webhook that receives HTML or text from your CMS once the newsletter is ready.
  • Scheduled trigger that pulls the latest edition from storage like S3 or Google Drive.

Pick the one that matches how your newsletter is produced today, not your fantasy future stack.

2. Teach the LLM Your Thread Style (Provide Examples)

LLMs are powerful, but they are not mind readers. Your set_examples node is where you spoon-feed them your preferred style.

In this node, include:

  • 2 to 3 examples of high-performing threads from your brand or niche.
  • Short, numbered tweets that are informative and easy to skim.
  • Guidance like:
    • “Use numbered tweets (1/ …)”
    • “Bold key terms”
    • “Keep paragraphs short”

Think of this as onboarding a very fast junior social media editor.

3. Build a Clear, Bossy Prompt

Next up, the build_prompt node. This is where you merge the newsletter text with a prompt template that tells the model exactly what to do.

Your prompt should instruct the LLM to:

  • Select the top 4 to 8 news items from the newsletter.
  • Write a strong hook tweet followed by a numbered thread (1/ – N/).
  • Use line breaks, minimal emojis, and include @mentions for well-known businesses when referenced.
  • Preserve URLs exactly as they appear in the newsletter.
  • Finish with a CTA that links back to your newsletter, for example https://recap.aitools.inc.

The more explicit you are here, the fewer surprises you will get in the output.

4. Call the LLM with LangChain or Provider Nodes

Now it is time to let the model cook. In the write_twitter_thread node, you call your chosen LLM through LangChain or a provider-specific n8n node.

In the example template, Claude Sonnet 4 is used, but you can swap in your favorite model. A few key settings to configure:

  • System role that defines the persona, for example:
    “expert AI tech communicator and social media editor.”
  • Max tokens so the model does not produce a novel instead of a thread.
  • Temperature between 0.0 and 0.4 for more deterministic, less chaotic output.
  • Inline inclusion of your prompt examples to keep style consistent.

Set it up once, then let the node quietly do its job in the background every day.

5. Parse the Thread into Clean Tweets

LLM output is naturally free-form, which is charming until you try to schedule it programmatically. The twitter_parser node fixes this.

Use a structured output parser, such as:

  • A JSON schema that defines the expected fields, or
  • A regex-based node that extracts the numbered tweets

This lets you:

  • Split the thread into individual tweets automatically.
  • Catch stray formatting, unexpected characters, or markup that might break the thread.
  • Keep the output predictable enough for review and scheduling tools.

The parsed result is stored by the set_result node so the rest of the workflow can use it cleanly.

6. Keep Humans in the Loop with Slack QA

Even the best automation should not have direct access to your social accounts without a human sanity check. That is where the share_twitter_thread node comes in.

This final node posts the full thread into an editorial channel in Slack (or similar) along with a permalink back to the original newsletter. Your editors can then:

  • Verify that facts and quotes are accurate.
  • Check that links and @mentions are correct and not hallucinated.
  • Edit copy, tighten hooks, and give the final approve-to-publish signal.

You get the speed of automation without the “why did the bot tag the wrong account” headaches.

Prompt Engineering Tips for Reliable Twitter Threads

A few tweaks to your prompts can make the difference between a clean, on-brand thread and something that looks like it escaped from a prompt playground.

  • Always ask for a header tweet with a clear hook and context, for example:
    “TODAY’S AI NEWS: …”
  • Force URL fidelity by telling the model to copy external links exactly as provided.
  • Limit tweet length with instructions such as:
    “No tweet > 250 characters”
    to keep things readable and leave room for quote tweets and comments.
  • Use @mentions carefully. Specify that mentions should only be used for known accounts explicitly referenced in the newsletter to reduce hallucinations.
  • Define formatting rules, such as:
    • Numbered tweets
    • Bold for emphasis
    • Markdown or plaintext depending on your publishing destination

Be specific, be repetitive, and do not assume the model will “just know” what you want.

Handling Edge Cases and Staying Safe in Production

Once this workflow is running daily, you will want it to be boringly reliable. That means handling the weird stuff up front.

  • Hallucinated links or quotes
    Flag any external URLs that were not in the original newsletter so editors can double-check before publishing.
  • Sensitive or private data
    Sanitize PII and anything confidential before sending content to the model.
  • Rate limits and retries
    Implement exponential backoff or queueing for LLM API calls, especially if you are running multiple newsletters or high volume.

A little defensive engineering here saves a lot of late-night debugging later.

Testing the Workflow Before Full Rollout

Instead of flipping the automation switch for everything on day one, treat this like any other experiment.

  • Run an A/B test:
    • Half of your threads created manually
    • Half generated by the n8n + LLM workflow
  • Measure:
    • Engagement uplift on X
    • Click-through rate back to the newsletter
    • Error rate, for example how many manual edits per automated thread

Use the results to refine your prompts, examples, and parsing until the automated threads perform at least as well as your hand-crafted ones.

What This Looks Like with Real Content

Here is a short newsletter excerpt that this workflow can turn into a full thread:

“AI models from Google and OpenAI achieved gold medal performance at the International Mathematical Olympiad, solving five of six problems with human-readable proofs. A separate incident highlighted risks: an AI coding assistant deleted production data, underscoring the need for guardrails.”

From this, the LLM should produce a 6 to 8 tweet thread that includes:

  • A hook tweet summarizing “today in AI” style news.
  • Bullets or tweets detailing the IMO achievement and what it means.
  • A cautionary note about AI agents and production data risks.
  • A closing CTA inviting readers to subscribe to the full newsletter.

All of that without you manually trimming sentences to fit the character limit.

What Success Looks Like When This Is Live

Once the pipeline is humming along, you should start to see:

  • Faster social distribution for each new newsletter edition.
  • More referral traffic from X back to your newsletter signup page.
  • Less manual grunt work for your social team, while still keeping editorial control via Slack review.

You get the consistency of automation plus the polish of human editors.

Quick Setup Checklist: From Zero to Automated Threads

Ready to try this with your own newsletter? Here is a simple path to get started:

  1. Clone or build the n8n workflow and connect your LLM credentials (Anthropic, OpenAI, or similar).
  2. Create 2 to 3 example threads that match your brand voice and add them to the set_examples node.
  3. Configure the parser node with a simple JSON schema such as:
    {"twitter_thread": "string"}
    to extract the full thread from the model output.
  4. Route the final output to Slack in an editorial channel where your social team can review, edit, and schedule.

Next Steps and Where to Get the Template

If you are ready to stop hand-crafting every thread and want a daily stream of high-impact Twitter content from your newsletter, this workflow is a solid starting point.

Try it with your next edition, monitor engagement, and iterate. For more workflows, prompts, and automation templates, subscribe at https://recap.aitools.inc and request the n8n template so you can get up and running quickly.

Author: The Recap AI – Practical guides on AI-driven publishing and automation. Follow our newsletter for weekly templates and prompt strategies.

n8n GraphQL Projects Template Explained

n8n GraphQL Projects Template Explained

This article provides an in-depth explanation of an n8n workflow template that integrates with an AppSync GraphQL Projects API. The workflow is designed to query project data, support AppSync-style pagination with nextToken, merge multiple input sources, and adapt its behavior based on incoming parameters. If you operate n8n in a production or near-production environment and need a robust pattern for querying GraphQL endpoints, this guide breaks down the complete node structure, data flow, and recommended improvements.

Use Case and Core Capabilities

The primary objective of this template is to automate the retrieval of project records from a GraphQL API in a controlled and reusable way. It is optimized for scenarios where workflows must:

  • Accept multiple input sources, such as a triggering workflow and a temporary session file
  • Combine those inputs into a single, coherent request payload
  • Handle AppSync pagination using nextToken
  • Apply conditional logic and post-processing based on response data

The result is a pattern that can be dropped into broader automation chains to reliably fetch and normalize project data for downstream processing, reporting, or synchronization tasks.

High-Level Workflow Architecture

At a conceptual level, the workflow executes the following sequence:

  1. Receives parameters from a parent workflow through an Execute Workflow Trigger
  2. Reads a JSON session or authentication file from disk
  3. Parses the file content to extract the authentication token and related metadata
  4. Deletes the temporary file for security and housekeeping
  5. Merges all input sources into a single item
  6. Executes a ListProjects GraphQL query against the AppSync endpoint
  7. Evaluates the presence of nextToken to determine if additional pages exist
  8. Prepares variables for subsequent paginated calls when required
  9. Aggregates all pages into a unified result set using a Code node

Trigger and Input Handling

Execute Workflow Trigger – Entry Point

The workflow is not intended to run in isolation. It is initiated by another n8n workflow through the Execute Workflow Trigger node. This node typically receives parameters that influence the GraphQL query, such as:

  • fileName – the name of the session or token file to read
  • status – a filter for project status
  • name – a filter for project name or partial match

These fields are later mapped into GraphQL variables and filters, which allows the calling workflow to dynamically scope which projects are retrieved.

Reading and Parsing Session Data

Read/Write Files from Disk

The next step is to load session-related information from disk. The Read/Write Files node reads a JSON file that contains session data, such as an auth_token. The file path is not hardcoded. Instead, it uses the fileName provided by the trigger or a fallback default.

This pattern is useful for short-lived credentials or tokens that are generated by an upstream process and persisted only for the duration of a single workflow execution.

Extract from File

Once the file has been read, the Extract from File step parses the JSON content and exposes individual fields as structured data within n8n. For example, the auth_token is extracted and made available to subsequent nodes so that the GraphQL request can set a dynamic Authorization header.

Secure Cleanup of Temporary Files

Execute Command

To avoid leaving sensitive material on disk, the workflow executes a shell command using the Execute Command node:

rm -rf {{ $json.fileName }}

This deletes the temporary session file after it has been read and parsed. While this is effective for cleanup, it must be used with caution. Filenames should always be validated or sanitized to mitigate the risk of command injection or accidental deletion outside the intended directory.

Unifying Inputs Before the GraphQL Call

Merge Node – Combining Multiple Sources

The workflow then uses an n8n Merge node to consolidate data from three different branches:

  • The initial trigger input (status, name, fileName, and any other parameters)
  • The parsed session data from the JSON file (for example auth_token)
  • The output of the command execution (if any relevant metadata is returned)

The Merge node is configured in combineByPosition mode, which aligns items from each input by index and merges their fields into a single item. This unified item is then used as the source of truth for the GraphQL node, ensuring all necessary variables and headers are available in one place.

GraphQL Integration With AppSync

ListProjects (GraphQL) Node

The core integration point is the ListProjects GraphQL node, which calls an AppSync endpoint with a ListProjects query. Key characteristics of this node include:

  • The query requests a comprehensive set of nested fields, such as project squads, client details, tags, and meetings.
  • GraphQL variables are constructed dynamically. If status or name are present in the merged input, they are included in the query filter. If they are omitted, the query runs without those constraints.
  • The Authorization header is populated using the auth_token extracted from the JSON session file. n8n expressions are used to inject this token into the node configuration at runtime.
  • The limit parameter is set to 999 to retrieve a large batch of projects per page. AppSync still returns a nextToken when more results are available, so subsequent pages can be fetched.

Pagination Logic and Control Flow

Conditional Routing Based on nextToken

If1 Node – Pagination Check

After each GraphQL request, the workflow needs to determine whether additional pages exist. This is handled by an If node that inspects the nextToken field in the GraphQL response.

  • If nextToken is empty or null, the workflow follows the true branch. This indicates that the current response already contains the final page of results.
  • If nextToken is present, the workflow follows the false branch, which prepares a new request cycle for the next page.

Edit Fields (Set Node) for Subsequent Pages

When pagination needs to continue, the Edit Fields (Set) node on the false branch constructs the parameters required for the next GraphQL call. It explicitly sets:

  • nextToken – taken from the current GraphQL response
  • auth_token – preserved from the initial session data
  • status and name – forwarded from the original input to maintain consistent filters across pages

These fields are fed back into the ListProjects node, allowing the workflow to request the next page of results using the same filter criteria and authentication context.

Aggregation of Paginated Results

Code Node – Pagination Collector

The final step in the pagination process is to consolidate all pages into a single coherent output. A Code node is used to:

  • Iterate over the outputs of both branches of the If node across multiple executions
  • Collect each project item from every GraphQL response
  • Stop once no nextToken is present on any branch, indicating that all pages have been retrieved

The Code node effectively implements a do/while-style loop over the paginated responses. It assumes that n8n is configured to provide branch outputs as separate streams, which can be indexed by page index. The final output of this node is a unified array of project objects that can be consumed by downstream workflows.

How AppSync Pagination Is Implemented

AppSync uses a nextToken mechanism for pagination. The template encapsulates this pattern as follows:

  • Each GraphQL request includes a nextToken variable when one is available from the previous response.
  • The If node evaluates the presence of nextToken after each call.
  • The Code node walks through the results of each iteration, aggregating items and checking for termination conditions.

This architecture gives you clear separation between the responsibilities of querying, branching, and aggregation, which is beneficial when you need to debug or extend the workflow.

Security, Reliability, and Best Practices

Security Considerations

  • Avoid storing long-lived secrets on disk. Temporary files should be used only for short-lived session data and must be deleted promptly, as this template does using the Execute Command node.
  • Always sanitize and validate filenames before passing them to shell commands. This reduces the risk of command injection and unintended file operations.
  • Limit the exposure of sensitive tokens in logs, error messages, and node output where possible.

Reliability and Rate Limiting

  • GraphQL or AppSync endpoints may enforce rate limits. Even with a high limit value such as 999, you may need to introduce delays or backoff strategies to avoid throttling.
  • Use the built-in retry configuration on the GraphQL or HTTP Request node to automatically handle transient errors such as 5xx or 429 responses.
  • For critical automations, consider adding global error handling via an Error Trigger workflow to capture and respond to failures consistently.

Recommended Enhancements and Customization Options

Retry and Backoff Strategies

For production workloads, you should wrap the GraphQL call with a resilient error handling pattern. Options include:

  • Configuring node-level retries with exponential backoff for network or rate limit errors
  • Using an Error Trigger to route failed executions to a remediation workflow

Refining the Pagination Pattern

If you prefer a different approach to pagination, you can:

  • Implement an explicit loop using the n8n “Execute Workflow” pattern where each iteration calls the same workflow until no nextToken is returned.
  • Use a webhook or function-based iterative loop that performs repeated HTTP requests from a single Code node.
  • Extract the pagination logic into a dedicated Function/Code node that is responsible solely for iterating until nextToken is absent.

More Secure Credential Management

While the template demonstrates reading an auth_token from disk, a more secure and maintainable approach is to use n8n Credentials or an OAuth2 integration if your GraphQL backend supports it. This provides:

  • Centralized management of tokens and secrets
  • Reduced reliance on temporary files
  • Better alignment with security and compliance requirements

Optimizing Response Size and Performance

The reference query requests many nested fields. In performance-sensitive environments, you should:

  • Request only the fields that are strictly required by downstream systems
  • Reduce payload size to lower bandwidth usage and improve response times
  • Consider lowering the limit if your endpoint is sensitive to large result sets

Troubleshooting and Diagnostics

  • Empty results: Verify that the Authorization header is correctly set and that the token is valid and not expired.
  • Infinite or unexpected pagination: Temporarily log or inspect nextToken values to ensure the API is returning valid tokens and that the Code node logic is correctly detecting termination.
  • File deletion issues: If the Execute Command node fails, check file paths, permissions, and the working directory used by the node.
  • General debugging: Use n8n’s Execution view to inspect node outputs step by step. This is particularly useful for catching misconfigured expressions, missing fields, or incorrect merge behavior.

When This Template Is a Good Fit

Consider using this n8n GraphQL Projects template when you need to:

  • Retrieve large lists of projects from an AppSync or similar GraphQL endpoint
  • Combine parameters from a triggering workflow with session data stored in a temporary file
  • Handle GraphQL pagination and return a single, merged collection of project records

Pre-Production Checklist

  1. Move authentication tokens and secrets into n8n Credentials or an external secret manager instead of disk-based session files.
  2. Validate and sanitize any filenames passed into the Execute Command node, and confirm that file paths are correct.
  3. Review and adjust the GraphQL query, including requested fields and limit, to meet your performance and data requirements.
  4. Implement an appropriate error handling and retry strategy to address rate limiting and transient network issues.

Conclusion

This n8n GraphQL Projects template provides a robust foundation for querying AppSync-based project data with support for pagination, multi-source inputs, and secure cleanup of temporary artifacts. By refining credential management, tightening security controls around file handling, and tailoring the GraphQL query to your exact data needs, you can confidently run this pattern in production environments.

Call to action: Import this template into your n8n instance, connect it to a non-production AppSync endpoint, and adapt the query filters and fields to match your project model. Once validated, integrate it as a reusable component in your broader automation architecture.

Automating Employee Leaves with n8n & GraphQL

Automating Employee Leaves with n8n & GraphQL

Every growing team eventually hits the same wall: manual leave tracking. Spreadsheets get messy, HR inboxes overflow, and managers spend more time chasing data than leading people. It is not just inefficient, it quietly drains focus from the work that really moves your business forward.

Automation changes that story. With a thoughtful workflow, your tools can handle the repetitive steps, your data can stay in sync, and you can reclaim time for higher value work. This is where n8n and GraphQL together become a powerful ally.

In this article, you will walk through a complete n8n workflow template that talks to an AWS AppSync GraphQL API, fetches employee leave data (regular and festival leaves), handles pagination behind the scenes, and cleans up temporary session files. Along the way, you will see how this template can become a building block for your HR automation stack, reporting pipelines, and broader integrations.

From manual tracking to scalable automation

Imagine never having to manually compile leave reports again, or copy data from an HR tool into a spreadsheet, or chase down who is off next week. This workflow is designed to be that quiet engine in the background, continuously feeding accurate leave data to wherever you need it.

At its core, the template:

  • Accepts input from another n8n workflow, so it easily plugs into your existing automations.
  • Reads a session file that contains an auth token and user email, then safely removes that file.
  • Calls an AWS AppSync GraphQL API using either the LeaveByEmployee or ListFestivalLeaves operation.
  • Handles pagination by looping through pages using nextToken until all items are collected.
  • Returns a clean, flat list of leave items ready for reports, dashboards, or notifications.

Real world uses include generating leave reports, syncing to Google Sheets or Airtable, feeding BI tools, or triggering Slack or email notifications when new leave entries appear. You can start small, then expand as your confidence with n8n grows.

Mindset first: building a reusable leave automation block

Instead of thinking of this as a single workflow that does one job, think of it as a reusable building block. You can call it from scheduled workflows, webhooks, or admin tools, and let it handle the heavy lifting of:

  • Authenticating with your AppSync GraphQL API
  • Choosing the right query based on what you want to fetch
  • Handling pagination reliably
  • Returning a predictable, structured list of leave items

This mindset is powerful. Once you have one solid building block like this, it becomes easier to chain multiple automations together. You start with leave reports, and before long, you have automated reminders, dashboards, and HR analytics, all powered by the same pattern.

The big picture: how the n8n workflow fits together

Here is the high level architecture of the template you will be working with:

  • Trigger: Another workflow invokes this one with inputs such as filename, adjustment_type, leave_type, and operation_name.
  • Session handling: A file is read from disk to get the auth token and email, then cleaned up once used.
  • Control flow: An If node decides which GraphQL operation to call, LeaveByEmployee or ListFestivalLeaves.
  • GraphQL requests: GraphQL nodes talk to AWS AppSync, send the Authorization header, and support pagination using nextToken.
  • Pagination merge: Custom Code nodes merge items from multiple pages into a single list.
  • Final mapping: Set nodes arrange fields and metadata so downstream workflows can consume them easily.

Let us now walk through the journey node by node, so you can understand how each piece contributes to a smoother, more automated leave process.

Step 1: Let another workflow trigger this one

When Executed by Another Workflow

The entry point is the When Executed by Another Workflow trigger. This is what turns your leave fetcher into a reusable module.

It expects these inputs:

  • filename – the session file name that stores authentication and user context.
  • adjustment_type – optional filter for leave adjustments.
  • leave_type – type of leave you are interested in.
  • operation_name – tells the workflow which GraphQL query to run.

You can call this trigger from a scheduled workflow, a webhook-driven endpoint, or any other n8n flow. For example, a daily scheduled workflow could pass a specific employee email and pull their latest leaves for reporting.

Step 2: Securely read and clean up the session file

Read/Write Files from Disk

The next step is a Read/Write Files from Disk node. It reads the session file whose name was provided by the trigger. If no name is provided, the template uses a default.

This session file usually contains:

  • auth_token – used as the Authorization header for AppSync.
  • email – the user email that becomes a GraphQL variable, such as employeeLeavesId or employeeFestivalLeavesId.

Extract from File

An Extract from File node then parses the JSON payload using fromJson. This is where the workflow cleanly pulls out the auth_token and email that will be used in subsequent GraphQL calls.

Execute Command (optional cleanup)

To keep your system tidy and reduce risk from leftover files, an Execute Command node runs a shell command to remove the session file:

rm -rf <fileName>

If you prefer to keep files or manage cleanup differently, you can disable or remove this node. However, timely cleanup is a healthy habit, especially when dealing with sensitive tokens.

Merge (combine mode)

A Merge node with combineByPosition mode then brings together three streams:

  • The original file read result
  • The extracted JSON data
  • The execute command output

By combining them by position, n8n keeps all related information aligned as a single stream that can be passed into the decision step.

Step 3: Choose which GraphQL operation to run

If (operation_name)

Next comes a key decision point. An If node checks the value of operation_name to determine which GraphQL query to execute.

  • True branch: Runs ListFestivalLeaves.
  • False branch: Runs LeaveByEmployee.

This simple condition makes the workflow flexible. The same template can serve both regular leave queries and festival leave queries, just by changing the input parameter.

Step 4: Call the AWS AppSync GraphQL API

GraphQL nodes (LeaveByEmployee and ListFestivalLeaves)

Each branch has its own GraphQL node configured for AWS AppSync. They share a common pattern, with some differences in variables and operation names.

Key configuration details:

  • Endpoint: something like https://…appsync-api.us-east-2.amazonaws.com/graphql.
  • Authorization header: the auth_token from the session file is injected into the header so AppSync can authenticate the request.
  • Variables:
    • The email is used to set employeeLeavesId or employeeFestivalLeavesId.
    • adjustment_type can be passed as a filter when present, so you can narrow down the results.
  • Pagination:
    • The API returns items and a nextToken for pagination.
    • The workflow sets limit: 999 to fetch up to 999 items at a time.
    • When nextToken is present, it is fed back into subsequent calls until no more pages remain.

This is where the workflow connects your automation to your live HR data. Once configured, you can rely on it to fetch accurate leave information on demand.

Step 5: Handle pagination and merge all results

If1 / If2 for pagination checks

To make sure you never miss data that lives on later pages, the workflow uses additional If nodes to check the value of nextToken.

Each If node checks whether nextToken is empty. Both true and false branches are kept to support n8n’s parallel pagination pattern. This structure allows the workflow to gracefully handle multiple pages of results without you needing to manually track where you left off.

Code / Code1 nodes for aggregation

The real magic of pagination happens in the Code nodes. They aggregate items returned from each paginated response into a single, flat array.

The general idea is:

const allData = [];
let counter = 0;
do {  // read both true/false branch responses at current counter  // extract items and append to allData  // track if any branch returned a nextToken  // break when no more tokens
} while (true);
return allData;

The code loops over the available branch items, extracts:

  • data.LeaveByEmployee.items for regular leaves, or
  • data.listFestivalLeaves.items for festival leaves,

then accumulates them into a single array. Downstream nodes receive this clean list, which makes it easy to export, analyze, or notify on.

Once you understand this pattern, you can reuse it in other workflows that need to handle GraphQL pagination or similar APIs.

Step 6: Map fields for downstream workflows

Edit Fields / Set nodes

After pagination and aggregation, the workflow uses Edit Fields or Set nodes to prepare the output for the next step in your automation chain.

These nodes place values such as:

  • nextToken
  • auth_token
  • operation_name
  • leave_type
  • email
  • adjustment_type

into the item JSON so that a parent workflow, or a final consumer, has full context.

Think of this as a small mapping layer that turns raw API responses into structured, automation friendly data.

How pagination works in practice

This template uses a practical approach for APIs that return nextToken. n8n executes repeated GraphQL calls until nextToken is empty, and the Code nodes merge all the results into a single list.

Here are some useful tips when working with this pattern:

  • Respect rate limits: If AppSync starts throttling requests, add a small delay between iterations or implement exponential backoff to keep things stable.
  • Adjust the limit: A limit of 999 is efficient, but if you expect very large result sets or have memory constraints, reduce the limit to something more conservative.
  • Secure your tokens: Avoid long term credentials in plain text files. Prefer n8n credentials or encrypted storage, and use temporary files only when necessary.

With this pattern in place, you no longer need to worry about how many pages of leave data exist. The workflow quietly fetches everything it needs.

Security and reliability best practices

As your automations grow, good security and reliability practices become essential. This template already nudges you in that direction, and you can take it even further.

  • Use n8n credentials where possible: Store auth tokens in n8n credentials instead of temporary files. If you use session files, encrypt them and clean them up promptly, as the Execute Command node does.
  • Scope your AppSync access: Use a dedicated AppSync API key or Cognito token with minimal privileges that only allow the required queries.
  • Plan for failures: Log failed requests and add retry logic. You can use an Execute Workflow node or a Function node to re-queue failed pages or rerun sections of the flow.

Building secure, resilient automations pays off quickly as more teams start relying on them.

Growing the workflow: common extensions and ideas

Once you have this leave fetcher working, you can extend it into a richer HR automation system. Here are some common directions people take:

  • Export to Google Sheets or Airtable: Add a transform node to map fields and then use the Google Sheets or Airtable node to push aggregated leave items for reporting.
  • Send summaries via email or Slack: Use a Code node to compute totals or summaries, then send them with the Email or Slack node to managers or HR.
  • Filter by dates or project: Either enhance the GraphQL filter input or apply array filtering in a Code node after aggregation.
  • Turn it into a microservice: Instead of relying on temporary files, expose a Webhook node as an entry point that accepts JSON payloads with auth and filter parameters.

Each extension builds on the same solid base, so you are not starting from scratch. You are iterating and improving, which is exactly how scalable automation grows.

Troubleshooting: quick checks when something feels off

As you experiment and customize, you might hit a few bumps. Here is a short checklist to help you move forward quickly:

  • 403 or 401 errors: Verify that the Authorization token is valid and correctly added to the GraphQL header.
  • Empty results: Confirm that employeeLeavesId or employeeFestivalLeavesId matches the email format expected by your AppSync keys.
  • Long running executions or timeouts: Lower the limit, introduce delays, or implement a resume-from-token pattern that stores nextToken in a database for later continuation.

Each issue you solve here deepens your understanding and makes future automations even easier to build.

Example: add a Google Sheets export in minutes

To see how simple it can be to extend this workflow, here is a quick example of adding a Google Sheets export after the aggregation step:

1) After the Code node (aggregated items), add a Set node to map fields such as:  - date  - name  - leave_length

2) Add a Google Sheets node and configure it to "Append row(s)" using the mapped fields.

3) Optionally, add a final Webhook or Email node to confirm completion or return a summary.

With just a few nodes, your automated leave fetcher becomes a live reporting pipeline into a spreadsheet that your team can use every day.

Bringing it all together

This n8n workflow template shows a robust pattern for working with a GraphQL API, choosing between operations at runtime, handling pagination, and managing temporary credentials responsibly. It is a practical foundation for HR automation, leave reporting, and any integration that needs to fetch and merge paginated lists.

The real opportunity lies in what you build on top of it. Start in a test environment, plug in your own AppSync endpoint and credentials, and run a few sample executions. Then, step by step, add error handling, exports, notifications, and filters that

The Recap AI: n8n Marketing Agent Template

Modern marketing organizations depend on automation, repeatable processes, and fast content delivery. The Recap AI – Marketing Team Agent is an n8n workflow template that centralizes daily content creation, repurposing, and research into a single, orchestrated system. This guide explains the use case, core architecture, node configuration, and operational best practices so you can confidently run this template in a production-grade n8n environment.

Overview: The Recap AI Marketing Agent Template

The Recap AI Marketing Agent acts as a central marketing automation layer in n8n. It listens to both webhook events and chat-based commands, then routes each request to a specialized AI agent that understands your brand, uses shared memory, and calls the appropriate tools.

Out of the box, the agent can:

  • Write a daily newsletter (write_newsletter)
  • Generate brand-aligned images (generate_image)
  • Repurpose newsletter content into Twitter threads (repurpose_to_twitter_thread)
  • Create scripts for short-form video content (repurpose_to_short_form_script)
  • Produce talking avatar videos for featured stories (generate_talking_avatar_video)
  • Conduct deep web research (deep_research_topic) and distribute findings via email (email_research_report)

This makes the template suitable for teams that want a consistent, AI-driven marketing engine with minimal manual coordination.

Architecture and Design Principles

The workflow is structured around three logical groups of nodes that reflect how a mature marketing automation system should be designed: shared intelligence, content production, and research operations.

1. Shared Components

The shared layer contains the foundational intelligence and state management:

  • Language model (gemini-2.5-pro) – The primary LLM used for copywriting, summarization, and script generation. It can be replaced with any compatible model available in your n8n environment.
  • Memory buffer (memoryBufferWindow) – Manages short-term context across interactions for a given day. The template uses a dynamic session key such as marketing-agent-YYYY-MM-DD-1 so that all tasks for that day share context while avoiding cross-day contamination.
  • Strategic planning tool (think) – A planning utility that helps the agent break down complex requests and decide which tools to call in sequence.

2. Content Creation and Repurposing

This group includes all tools responsible for generating and transforming content:

  • write_newsletter – Creates the daily newsletter, leveraging input such as date and optional previous content.
  • generate_image – Produces featured or supporting images aligned with your brand style.
  • repurpose_to_twitter_thread – Converts newsletter content into structured Twitter threads.
  • repurpose_to_short_form_script – Outputs concise scripts optimized for short-form video platforms.
  • generate_talking_avatar_video – Generates talking avatar videos, typically for the top story or key announcements.

3. Research and Reporting

The research layer integrates external intelligence and email delivery:

  • deep_research_topic – Uses Perplexity Sonar to perform in-depth research on a given topic.
  • email_research_report – Packages and sends research findings via email to designated recipients.

This separation of concerns makes the template easy to extend, monitor, and maintain.

Entry Points and Core Agent Logic

Webhook Trigger and Chat-based Trigger

The workflow exposes two primary entry mechanisms:

  • Webhook trigger – Ideal for scheduled or programmatic automation, for example a daily cron job that initiates newsletter production with a payload such as {"date":"2025-09-23"}.
  • When chat message received – Designed for interactive use via internal chat interfaces, enabling your team to request content, research, or repurposing tasks on demand.

Both triggers ultimately route into the same Marketing Agent node, which interprets intent and orchestrates the downstream tools.

The Marketing Agent Node

The Marketing Agent node is the central orchestrator. It is configured with a detailed system prompt that defines:

  • Agent identity and role as a marketing assistant
  • Available tools and when to use them
  • Memory usage rules and session behavior
  • Brand tone, style, and constraints

Based on the incoming request, the agent uses the planning tool and memory to determine which sub-workflows to call, in what order, and with which parameters. It also ensures that work is not duplicated across repeated requests within the same day.

Memory Configuration

The memoryBufferWindow node provides short-term, day-specific context. The template uses a session key pattern such as marketing-agent-YYYY-MM-DD-1 so that:

  • All content and decisions for a single day share context.
  • The agent can reference earlier outputs, such as the newsletter, when creating threads or scripts.
  • Cross-day drift is mitigated, keeping each day’s content coherent and focused.

You can adjust the session key format to align with your locale or internal conventions, but the daily scoping is a deliberate design choice to maintain content quality.

Tool Sub-workflows

Each tool node like write_newsletter or generate_image represents a sub-workflow with a clearly defined contract. The Marketing Agent passes structured inputs, and the sub-workflow returns standardized outputs that can be reused elsewhere.

For example:

  • write_newsletter expects a date and may optionally receive prior newsletter content or guidance.
  • repurpose_to_twitter_thread consumes the newsletter body and outputs a thread-ready sequence of tweets.
  • generate_talking_avatar_video receives a script and metadata needed to render a video.

Step-by-step Setup in n8n

To operationalize the Recap AI Marketing Agent in your own environment, follow these configuration steps.

  1. Import the template
    Load the workflow template into your n8n instance using the provided link or JSON import.
  2. Configure credentials
    In the n8n credential manager, add and link:
    • Language model credentials (Google PaLM / Gemini for gemini-2.5-pro)
    • Perplexity API credentials for deep_research_topic
    • Any additional services used by your sub-workflows (email provider, image generation APIs, video services, etc.)
  3. Set environment variables and memory keys
    Review environment values and confirm that the sessionKey formula in the memory node matches your date formatting and naming conventions.
  4. Test the webhook entry point
    Trigger the webhook with a sample payload such as {"date":"2025-09-23"} and verify that:
    • The Marketing Agent node is called successfully.
    • The language model responds properly.
    • Downstream tools are invoked as expected.
  5. Customize the system prompt and brand voice
    Adapt the agent’s system message to reflect your brand guidelines, legal requirements, tone, and any domain-specific constraints.

Example: Daily Operational Flow

The following illustrates a typical daily automation sequence using this template.

  1. A scheduler or external system calls the webhook with today’s date.
  2. The Marketing Agent loads the memory associated with today’s session key.
  3. The agent calls write_newsletter to generate the primary newsletter content.
  4. Once the newsletter is complete, the agent triggers:
    • repurpose_to_twitter_thread to create a Twitter thread
    • repurpose_to_short_form_script to output short-form video scripts
  5. If the workflow or user request specifies it:
    • generate_image produces featured images for the newsletter or social posts.
    • generate_talking_avatar_video generates a talking avatar video for the top story or key highlight.
  6. For research-driven tasks, the agent invokes deep_research_topic. If email delivery is requested, it then calls email_research_report to send a structured report to stakeholders.

Best Practices for Production Use

To run this template reliably in a professional or enterprise context, consider the following recommendations.

  • Scope memory per day
    Keep the memory window confined to a single day by using the daily session key pattern. This limits context drift and keeps outputs focused.
  • Refine the system prompt
    Explicitly encode legal, compliance, and brand requirements in the agent’s system message, especially in regulated industries.
  • Validate sub-workflows individually
    Before enabling full automation, test each sub-workflow (newsletter, images, research, etc.) in isolation to confirm inputs, outputs, and error handling.
  • Implement logging and observability
    Persist outputs and success or failure states to a database, logging service, or cloud storage. This supports auditing, troubleshooting, and rollback if needed.
  • Control API usage and costs
    Apply rate limits and usage budgets for external APIs and large language models. Estimate expected daily volume and configure safeguards accordingly.

Troubleshooting Common Issues

If you encounter issues during setup or execution, review the following checks.

  • No response from the agent
    Ensure that:
    • Language model credentials are valid and active.
    • The Marketing Agent node is correctly wired to the model node.
    • Network access to the model provider is not blocked.
  • Memory not loading or persisting
    Confirm that:
    • The sessionKey formula is correctly formatted and consistent across runs.
    • The memory window length is appropriate for your use case.
  • Sub-workflow failures
    Check the execution logs for the relevant sub-workflow and verify:
    • All required inputs are present and correctly mapped.
    • API credentials for external tools are configured and not expired.
    • Error handling nodes or conditions are behaving as intended.

Security and Compliance Considerations

Because the Marketing Agent may handle sensitive content and research topics, security and compliance should be considered part of the design, not an afterthought.

  • Secure credential management
    Store API keys and secrets exclusively in n8n’s credential manager. Avoid embedding secrets directly in nodes or workflow variables.
  • Access control
    Restrict workflow access using role-based permissions so that only authorized users can modify or trigger the automation.
  • Content review for regulated sectors
    In industries such as healthcare, finance, or legal, introduce manual review steps or approval queues before publishing AI-generated content.

Extending and Customizing the Template

The modular structure of this n8n workflow makes it straightforward to extend as your marketing operations evolve.

  • Connect to your CMS
    Integrate with platforms like WordPress or Contentful to automatically publish newsletters, articles, or landing pages once content passes review.
  • Integrate collaboration tools
    Use the chat trigger to surface drafts in Slack or Microsoft Teams, enabling human review, comments, and approvals within your existing communication channels.
  • Add analytics feedback loops
    Attach analytics nodes to capture performance metrics for newsletters, threads, and videos. Feed this data back into the agent’s planning process to refine future content.

Conclusion and Next Steps

The Recap AI Marketing Agent template provides a robust, production-ready foundation for AI-driven marketing operations in n8n. By combining a memory-aware agent, specialized content tools, and integrated research capabilities, it reduces manual work while maintaining brand consistency and daily continuity.

To get started:

  • Import the workflow into your n8n instance.
  • Configure all required credentials and environment values.
  • Run a test webhook with a sample date payload.
  • Iterate on the agent’s system prompt to align with your brand and compliance needs.

If you require a tailored implementation, custom tools, or guidance on adapting the system prompt to complex organizational requirements, consider scheduling a consultation. A brief setup session is often enough to align the template with your team’s workflows and governance standards.

Need a guided walkthrough or help customizing this n8n template for your marketing team? Reach out or schedule a consultation to fine-tune the agent and streamline your automation stack.

Reverse Engineer Short-Form Videos with n8n & AI

Reverse Engineer Short-Form Videos with n8n & AI

Short-form videos on Instagram Reels and TikTok are full of subtle creative decisions: framing, pacing, camera motion, lighting, and visual style. This guide shows you how to use an n8n workflow template to automatically download a Reel or TikTok, convert it to a base64 payload, send it to Google Gemini for detailed forensic analysis, and receive a structured “Generative Manifest” in Slack that you can reuse for AI video generation.

What you will learn

By the end of this tutorial-style walkthrough, you will be able to:

  • Explain why automating video reverse engineering is useful for content and AI workflows
  • Understand each part of the n8n workflow and how the nodes connect
  • Configure the Instagram and TikTok scraping branches using Apify
  • Send an MP4 video to Google Gemini as base64 and retrieve a “Generative Manifest”
  • Deliver the AI-generated manifest to Slack as a reusable prompt file
  • Design and improve the analysis prompt for more accurate, production-ready outputs

Why automate reverse engineering of short-form videos?

Manually breaking down a short-form video is slow and inconsistent. You have to watch frame by frame, guess lens choices, estimate timing, and describe motion in words. This is difficult to repeat across many videos or share with a team.

By automating the process with n8n and AI, you can:

  • Save time by letting a workflow handle downloading, converting, and analyzing videos
  • Produce consistent, structured descriptions every time
  • Generate highly detailed prompts that can be fed directly into generative video models
  • Create a repeatable pipeline for reverse engineering and recreating short-form content

High-level overview of the workflow

Here is what the n8n workflow template does from start to finish:

  • Collects a user-submitted Instagram Reel or TikTok URL from a form
  • Detects which platform the URL belongs to and routes it to the correct scraper
  • Uses Apify acts to extract the video asset and metadata
  • Downloads the MP4 file and converts it to a Base64-encoded string
  • Sends the encoded video plus a structured reverse engineering prompt to Google Gemini
  • Receives a detailed “Generative Manifest” from Gemini
  • Converts the manifest text into a file and posts it to Slack for review and reuse

Tools and services used in the template

  • n8n – visual automation platform that orchestrates triggers, conditions, and HTTP requests
  • Apify acts – scrapers for Instagram Reels and TikTok that return video URLs and metadata
  • Google Gemini – generative language model used to analyze the video and output the Generative Manifest
  • Slack – messaging platform used to deliver the resulting prompt file to your team

Prerequisites before you start

To run this workflow template successfully, you will need:

  1. An n8n instance, either self-hosted or n8n cloud
  2. An Apify API key with access to Instagram and TikTok scraping acts
  3. A Google Cloud API key with access to Gemini, or equivalent generative model credentials
  4. Slack OAuth app credentials with permission to post messages and upload files

How the n8n workflow is structured

The workflow is organized into three main stages:

  1. Input and platform routing
  2. Platform-specific processing (Instagram branch and TikTok branch)
  3. Delivery of the Generative Manifest to Slack

Let us walk through each stage step by step.

Stage 1 – Input and routing

Nodes involved: form_trigger → set_base_prompt → switch_platform

1. Form input

The form_trigger node is where the workflow begins. It exposes a simple form with one required field:

  • A single URL input where the user pastes either an Instagram Reel link or a TikTok link

Once the user submits the form, the URL is passed into the rest of the workflow.

2. Base analysis prompt

The set_base_prompt node prepares the core instructions that will be sent to Google Gemini later. It:

  • Defines a detailed “Digital Twin Architect” persona that acts as a forensic analyst
  • Instructs the model to be precise, non-interpretive, and deterministic
  • Sets the structure for the Generative Manifest, such as sections for shots, camera, lighting, and physics

This base prompt is later combined with platform-specific metadata to give Gemini more context.

3. Platform detection and routing

The switch_platform node inspects the submitted URL and decides which branch of the workflow to run. It typically uses simple checks like:

  • If the URL contains instagram.com then route to the Instagram Reel branch
  • If the URL contains tiktok.com then route to the TikTok branch

From here, only the relevant branch is executed for that URL.

Stage 2 – Platform-specific branches

The workflow has two parallel branches, one for Instagram Reels and one for TikTok. Both follow the same logical pattern:

  1. Scrape metadata and video URL
  2. Build a final prompt that includes metadata
  3. Download the MP4 video
  4. Convert the video to base64
  5. Send the video and prompt to Gemini
  6. Extract and store the AI result

2.1 Instagram Reel branch

Nodes involved: scrape_ig_reel → build_final_ig_prompt → download_ig_reel → ig_to_base64 → analyze_ig_reel → set_ig_result

Step 1 – Scrape the Instagram Reel

The scrape_ig_reel node calls an Apify act dedicated to Instagram. This node:

  • Uses the Reel URL to fetch post-level data
  • Retrieves the direct videoUrl for the MP4 file
  • Collects metadata such as caption, hashtags, and possibly a title

Step 2 – Build the final prompt for Instagram

The build_final_ig_prompt node merges two sources of information:

  • The generic base prompt from set_base_prompt
  • Instagram-specific metadata returned by the scraper (caption, tags, etc.)

The result is a tailored prompt that gives Gemini both the forensic instructions and context about the content, which helps it interpret timing and on-screen text more accurately.

Step 3 – Download the Reel video

The download_ig_reel node uses the scraped videoUrl to download the Reel as an MP4 file. The binary data is stored in n8n so it can be transformed in the next step.

Step 4 – Convert MP4 to base64

The ig_to_base64 node converts the MP4 binary into a Base64-encoded string and stores it in a JSON property. This step is important because:

  • Google Gemini expects inline media data in base64 format
  • The workflow needs to pass the video payload directly inside the API request

Step 5 – Analyze the Reel with Google Gemini

The analyze_ig_reel node sends a request to the Gemini API that includes:

  • The full text prompt created in build_final_ig_prompt
  • The base64-encoded video data with the correct MIME type, such as video/mp4

Gemini responds with a detailed Generative Manifest that describes the video shot by shot, including camera behavior, timing, and other requested details.

Step 6 – Store the Instagram analysis result

The set_ig_result node parses Gemini’s response and extracts the main textual result. Typically this is the model’s first candidate output. It then stores this text in a property named result, which will be used later when sending content to Slack.

2.2 TikTok branch

Nodes involved: scrape_tiktok → build_final_tiktok_prompt → download_tiktok → tiktok_to_base64 → analyze_tiktok → set_tiktok_result

The TikTok branch mirrors the Instagram branch, but uses TikTok-specific scrapers and field names.

Step 1 – Scrape the TikTok video

The scrape_tiktok node calls an Apify act designed for TikTok. It:

  • Uses the TikTok URL to fetch video metadata
  • Returns a direct video URL for the MP4 file
  • Provides TikTok-specific fields like description, tags, or sound information (depending on the act configuration)

Step 2 – Build the final TikTok prompt

The build_final_tiktok_prompt node combines:

  • The shared base prompt from set_base_prompt
  • TikTok metadata from the scraper’s response

This gives Gemini a similar level of context as in the Instagram branch, but tailored to TikTok’s structure and content style.

Step 3 – Download the TikTok video

The download_tiktok node retrieves the MP4 file from the scraped video URL and stores the binary data in n8n.

Step 4 – Convert MP4 to base64

The tiktok_to_base64 node encodes the binary video data into a base64 string inside a JSON field, preparing it for the Gemini API request.

Step 5 – Analyze the TikTok video with Gemini

The analyze_tiktok node sends the TikTok-specific prompt and base64 video payload to Google Gemini, again specifying video/mp4 as the MIME type. Gemini returns a TikTok-focused Generative Manifest.

Step 6 – Store the TikTok analysis result

The set_tiktok_result node extracts the main text candidate from the Gemini response and stores it in a result property, aligning with the Instagram branch so that the downstream Slack delivery can handle either platform uniformly.

Stage 3 – Delivering the Generative Manifest to Slack

Nodes involved: Convert to File → upload_file → send_prompt_msg

1. Convert text result to a file

Once either branch has produced a result property, the Convert to File node turns this text into a downloadable file. For example, it might create a file named prompt.md or manifest.txt. This makes it easier for collaborators to store, edit, or import the prompt into other tools.

2. Upload the file to Slack

The upload_file node uses the Slack file upload API to send the generated prompt file to a chosen Slack channel. This requires that your Slack app has the correct OAuth scopes, such as files:write, and permission to post in that channel.

3. Post a message with a link to the manifest

The send_prompt_msg node posts a short Slack message that:

  • Mentions that a new Generative Manifest is available
  • Includes a link or reference to the uploaded file

This way, teammates can quickly open the file, review the analysis, and copy the prompt into their generative video tools.

Designing an effective Generative Manifest prompt

The quality of the Generative Manifest that Gemini returns is heavily influenced by how you design the base prompt in set_base_prompt. In this template, the persona “Digital Twin Architect” is used to enforce a forensic, deterministic style and avoid vague or interpretive descriptions.

Key sections you should include in your prompt design:

  • Global aesthetic and camera emulation
    Describe the overall look and feel of the video, such as:
    • Camera sensor or film stock being emulated
    • White balance and color temperature
    • Grain level, contrast, and saturation
  • Per-shot breakdowns
    Ask for a shot-by-shot analysis that includes:
    • Exact time offsets and durations
    • Framing and composition details
    • Camera movement curves and speed
    • Focus pulls and depth of field changes
    • On-screen micro-actions tied to precise timestamps
  • Lighting blueprint and environment
    Request a detailed lighting plan that covers:
    • Light temperature and color
    • Key light size, distance, and angle
    • Practical light sources in the scene
    • Atmospherics like dust or particles and how they catch light
  • Physics and simulation constraints
    For generative video tools that support physics, include:
    • Cloth behavior and how it reacts to motion or wind
    • Fluid dynamics, splashes, or smoke movement
    • Particle density and distribution
    • How these elements interact with light and objects

Tips to improve analysis accuracy

To get more reliable and detailed Generative Manifests, consider these best practices:

  • Use high quality source videos
    Provide the highest bitrate version you can. Overly compressed MP4s make it harder for Gemini to detect subtle motion, grain, and fine texture.
  • Include rich metadata in the prompt
    Feed extra context like the uploader handle, caption text, visible titles, and on-screen overlays into the prompt. This helps the model align visual events with meaning and timing.
  • Adjust model settings for precision
    If your Gemini configuration allows it, lower the temperature and limit candidate diversity to favor precise, rule-based outputs instead of creative variations.
  • Split long videos into segments
    For longer content, cut the video into shot segments before analysis. Running the workflow on shorter segments often yields more granular, accurate manifests.

Security, privacy, and legal considerations

Before you automate video analysis, keep these points in mind:

  • Ensure you have legal rights to download and analyze

Automate User Sign‑Ups with n8n + Notion

Automate User Sign‑Ups with n8n + Notion

This guide teaches you how to build a reliable sign‑up automation with n8n and Notion. You will learn how to accept webhook requests, find or create users in a Notion database, and automatically link each user to the current semester without losing previous semester relationships.

What you will learn

By the end of this tutorial, you will be able to:

  • Set up an n8n webhook to receive sign‑up data from a form or external service.
  • Normalize incoming data into predictable fields (name and email).
  • Query a Notion Users database to find existing users and avoid duplicates.
  • Create new Notion user records or update existing ones.
  • Fetch the current semester from a separate Notion database.
  • Safely merge semester relations so older semesters are kept and the current one is added.
  • Secure and test the workflow for production use.

Why automate sign‑ups with n8n and Notion?

Notion is a flexible database that works well for storing user records, such as students, customers, or members. n8n is an open‑source automation platform that connects webhooks, APIs, and logic without requiring a full custom backend.

Combining n8n with Notion lets you:

  • Accept sign‑ups through a webhook from any form or service.
  • Prevent duplicate user records by checking Notion for an existing email first.
  • Maintain relationships between users and semesters or cohorts.
  • Protect your sign‑up endpoint using Basic Auth or other authentication methods.

How the n8n + Notion workflow works

At a high level, the workflow follows this logic:

  1. Receive a sign‑up request via a webhook.
  2. Extract and standardize the name and email fields.
  3. Look up the user in the Notion Users database by email.
  4. Branch:
    • If the user exists, fetch their full Notion page.
    • If the user does not exist, create a new Notion user page.
  5. Query a separate Notion database to find the current semester.
  6. Merge the current semester with any existing semesters for that user.
  7. Update the user record so the Semesters relation includes the current semester without dropping older ones.

Example webhook payload

Your sign‑up form or external service should send a POST request to the n8n webhook. A minimal example payload looks like this:

{  "name": "John Doe",  "email": "john.doe@example.com"
}

Step‑by‑step: Building the workflow in n8n

1. Create the Sign Up Webhook node

The Sign Up (Webhook) node is the entry point for your workflow.

Recommended configuration:

  • HTTP Method: POST
  • Path: /sign-up (or another endpoint you prefer)
  • Authentication: Basic Auth or another secure method

Protecting the webhook is important because this endpoint will directly trigger user creation or updates in your Notion database.

2. Normalize the input with a Set node

Next, use a Set node (often named Extract Name and Email) to map the incoming data into consistent fields. This makes later nodes simpler and less error‑prone.

Example expressions in the Set node:

Name = {{$json["body"]["name"]}}
Email = {{$json["body"]["email"]}}

After this node, you should have predictable Name and Email properties available in the workflow.

3. Query Notion to check if the user already exists

Use a Notion getAll node (for example, named Query for User) to search your Users database by email. This step prevents duplicate user records.

Key configuration points:

  • Select your Users database.
  • Set a filter where the Email property equals the incoming Email from the previous node.
  • Optionally set returnAll to true if you want to handle multiple matches, although in most setups you expect zero or one match.

4. Branch with an If node: user exists or not

Add an If node (for example, named If user exists) to decide whether to create a new user or update an existing one.

A common pattern is to check whether the merged result from the Notion query contains an id field. For example:

Object.keys($json).includes("id")

Use this condition as follows:

  • True branch (user exists): The workflow continues to a node like Query User that fetches the full Notion page for that user.
  • False branch (user does not exist): The workflow goes to a Create User Notion node that creates a new page using Name and Email.

5. Get or create the Notion user page

In the True branch, the Query User node retrieves the complete Notion page for the existing user. In the False branch, the Create User node creates a fresh user page in the Users database.

From this point onward, both branches should provide you with a single user page and its pageId. You will use this ID later to update the Semesters relation.

6. Query the current semester in Notion

Now you need to find which semester is currently active. Add another Notion getAll node, often called Query Current Semester.

Configure it to:

  • Target your Semester database.
  • Filter by a boolean property such as Is Current? set to true.
  • Sort by created_time in descending order so the newest matching semester appears first.

The result should give you the page ID for the current semester that you will attach to the user.

7. Merge existing and new semester IDs

To avoid overwriting existing semester relations, you need to combine the current semester with any semesters already linked to the user. This is often done using a small Function node after merging the outputs from the user and semester queries.

The goal is to build an allSemesterIDs array that:

  • Always includes the current semester ID.
  • Preserves previous semesters.
  • Does not duplicate the current semester.

Example function code:

for (item of items) {  const currentSemesterID = item.json["currentSemesterID"]  let allSemesterIDs = [currentSemesterID];  if (item.json["Semesters"]?.length > 0) {  allSemesterIDs = allSemesterIDs.concat(  item.json["Semesters"].filter(semesterID => semesterID !== currentSemesterID)  );  }  item.json["allSemesterIDs"] = allSemesterIDs
}

return items;

This logic ensures that the current semester is included once and that any previously related semesters remain attached to the user.

8. Update the user’s Semesters relation in Notion

Finally, use a Notion update node, often named Update Semester for User, to write the merged semester information back to the user’s page.

Key points for configuration:

  • Use the pageId from the Query User or Create User node.
  • Set the Semesters relation property using the allSemesterIDs array produced by the Function node.
  • Make sure the relations are formatted as Notion expects, typically an array of relation objects containing IDs or properly structured relation fields.

If you are not sure about the format, use the Notion node UI to create a sample relation manually and inspect how n8n structures the data.

Security and validation best practices

Before using this workflow in production, harden it with a few safeguards:

  • Protect the webhook: Use Basic Auth or a secret token header. The example workflow uses HTTP Basic Auth credentials.
  • Validate inputs: In a Set or Function node, check that required fields are present and that the email has a valid format.
  • Handle repeated requests: Consider rate limiting or debouncing if your form or provider may resend the same payload multiple times.
  • Log errors: Send error details to a monitoring service or a dedicated Notion log database so you can review and retry failed runs.

How to test and debug your workflow

Use these steps to safely test the workflow before connecting it to real users:

  1. Run n8n in a safe or test environment and point it to a test copy of your Notion databases.
  2. Send sample POST requests to the webhook, including Basic Auth headers, using the example JSON payload shown earlier.
  3. Inspect each node’s output in n8n’s execution view to verify that:
    • Emails are extracted correctly.
    • Notion queries return the expected records.
    • The merged allSemesterIDs array contains the right IDs.
  4. Check Notion directly:
    • New users should be created when no existing record is found.
    • Existing users should keep their old Semesters relations and receive the new current semester as well.

Common pitfalls and how to avoid them

  • Incorrect Notion filters: Ensure the property key used in the filter exactly matches the Notion field, for example "Email|email" if that is how it appears in the schema.
  • Relation formatting: Notion relations must be passed as arrays of properly structured objects. Use the Notion node UI to create a relation once, then copy that structure into your workflow.
  • Duplicate records: If multiple pages share the same email, decide how to handle it: merge data, pick the first result, or notify an administrator.
  • Time zone issues: When sorting by created_time to find the current semester, be aware of time zone differences that might affect which record appears as the most recent.

Scaling and improving the workflow

As your sign‑up volume grows, you can enhance this workflow in several ways:

  • Add idempotency keys: Include a unique request ID and ignore repeated requests with the same ID to prevent duplicate processing.
  • Introduce a queue: Use a queue system, such as Redis or a dedicated job queue, if you expect high traffic that might hit Notion API rate limits.
  • Centralize logging and alerts: Send logs and errors to a central service so you can monitor failures and respond quickly.
  • Version your workflow: Keep versions of the workflow so changes to Notion fields or database structures can be rolled out safely.

Quick recap

This n8n + Notion workflow lets you:

  • Receive sign‑ups securely via a webhook.
  • Check for existing users and avoid duplicate Notion records.
  • Create or update user pages in a Notion Users database.
  • Automatically associate each user with the current semester without losing past semester links.

The result is a low‑code, maintainable system for user onboarding and record management that can grow with your needs.

FAQ

Can I use a different field instead of email to identify users?

Yes. Email is common and convenient, but you can filter on any unique identifier in your Notion Users database, such as a student ID or username. Just update the Notion filter and the incoming payload accordingly.

What if there are multiple current semesters?

The recommended setup assumes only one semester has Is Current? set to true. If more than one matches, the sort by created_time will pick the newest. If you need different behavior, adjust the filter or add extra logic in n8n.

How do I know the relation format is correct?

Create or edit a relation manually using the Notion node UI, then look at the JSON generated in n8n’s execution view. Use that as a template for how to pass relation IDs in your update node.

Try the template

You can use the existing n8n template as a starting point. To get it running:

  • Deploy the webhook node and configure authentication.
  • Set your Notion credentials and database IDs for Users and Semesters.
  • Send a sample payload to confirm everything works as expected.

If you want a copy of the template or help adapting it to your specific Notion schema, you can request a consultation or subscribe to receive more n8n + Notion automation tutorials.

Call to action: Ready to automate your sign‑up workflow? Deploy this n8n template, connect it to your Notion databases, run a few test sign‑ups, and reach out if you need a tailored integration or troubleshooting support.

Assign Values with the n8n Set Node

Assign Values to Variables Using the n8n Set Node

If you spend any time building workflows in n8n, the Set node quickly becomes one of those tools you reach for almost without thinking. It is simple on the surface, but incredibly handy whenever you need to shape, clean, or prepare data as it moves through your automation.

In this guide, we will walk through what the Set node actually does, how to set number, string, and boolean values, how to use expressions for dynamic data, and a few tips to keep your workflows tidy and predictable. Think of it as your friendly cheat sheet for assigning values in n8n.

What Is the Set Node in n8n?

At its core, the Set node lets you control the fields that exist on each item that passes through your workflow. You can:

  • Add new fields and variables
  • Change or overwrite existing fields
  • Remove fields you do not want to keep

That makes it perfect for everyday tasks such as:

  • Creating fixed variables like API keys, flags, or counters
  • Normalizing data into a consistent schema before it reaches other nodes
  • Renaming, combining, or splitting fields to match what another service expects

If you have ever thought, “I just need to tweak this data a bit before sending it on,” the Set node is usually the right answer.

Why Use the Set Node Instead of a Function Node?

You might be wondering, “Couldn’t I just do this in a Function node?” You absolutely can, but the Set node has a few advantages for simple assignments:

  • It is visual – you see exactly which fields you are setting without reading code.
  • It is safer – you are less likely to break things by accident when all you are doing is assigning values.
  • It is faster to configure – especially for basic number, string, or boolean fields.

When you get into complex transformations or heavy logic, a Function node becomes more useful. For simple data shaping and variable assignment, the Set node keeps things clean and easy to understand.

First Look: A Simple Set Node Example

Let us start with a tiny workflow so you can see the Set node in action. This example uses a Manual Trigger followed by a Set node that creates three fields: number, string, and boolean.

{  "nodes": [  {  "name": "On clicking 'execute'",  "type": "n8n-nodes-base.manualTrigger"  },  {  "name": "Set",  "type": "n8n-nodes-base.set",  "parameters": {  "values": {  "number": [  { "name": "number", "value": 20 }  ],  "string": [  { "name": "string", "value": "From n8n with love" }  ],  "boolean": [  { "name": "boolean", "value": true }  ]  }  }  }  ]
}

When you run this workflow, the Set node outputs an item with:

  • number: 20
  • string: “From n8n with love”
  • boolean: true

That is all it does: it takes whatever comes in, adds these three fields, and passes everything along to the next node. Simple, but powerful once you start using it everywhere.

How to Configure the Set Node Step by Step

Let us quickly walk through setting this up in the n8n UI. You do not need any special data source to follow along, just your n8n instance.

1. Add a trigger to test with

For testing, the easiest option is the Manual Trigger node. Drop it on the canvas. This lets you click Execute and immediately see what your workflow outputs.

2. Connect a Set node

Next, drag a Set node onto the canvas and connect it to the Manual Trigger. Open the Set node and you will see a UI where you can define new fields and choose their types.

For each field you want to add, you can:

  • Enter a field name
  • Pick a type, such as number, string, or boolean
  • Provide a value

To recreate the earlier example, you would add:

  • number with value 20 (type: number)
  • string with value From n8n with love (type: string)
  • boolean with value true (type: boolean)

3. Run the workflow and inspect the output

Click Execute on the Manual Trigger, then open the Set node’s output. You should see the three fields you just created, plus any data that was already on the incoming item.

Once you are comfortable with static values, you are ready for the fun part: expressions.

Using Expressions in the Set Node

Static values are useful, but workflows really shine when your values change based on previous nodes or the current time. That is where expressions come in.

In the Set node, instead of typing a fixed value, you can click into the value field and switch to an expression. A few common patterns:

Reference data from previous nodes

To copy a value from the incoming item, you can use:

{{$json["previousField"]}}

This reads the field previousField from the current item’s JSON and assigns it to your new field.

Use built-in helpers like time functions

Need a timestamp? n8n gives you handy helpers like $now:

{{ $now.toISOString() }}

You can use this in the Set node to store when an item was processed, for example.

Expressions let you compute values dynamically, pull in data from earlier steps, or even do light transformations without writing a full Function node.

Common Set Node Options You Should Know

“Keep Only Set” for a clean payload

One important option you will often see in the Set node is Keep Only Set. When you enable it, the node removes every field that you did not explicitly define in this Set node.

Use this when you want to:

  • Send a very specific payload to an API
  • Make sure no extra or sensitive fields are passed downstream
  • Clean up noisy data from previous nodes

Overwriting existing fields

If the incoming item already has a field with the same name, the Set node will overwrite it. This is extremely useful when you are normalizing data, but it can also cause confusion if you forget it is happening.

If you want to keep the original value, consider:

  • Renaming the new field, for example normalizedPrice instead of price
  • Copying the old field to something like priceOriginal before overwriting

Keeping data types consistent

Data types matter in n8n. You will save yourself a lot of debugging if you keep them consistent:

  • Use numbers for anything you will calculate with.
  • Use booleans for flags that you will check in IF or Switch nodes.
  • Use strings when you are dealing with text or IDs.

For example, "20" is a string, while 20 is a number. They are not the same when you start doing math or comparisons, so it is worth getting them right at the Set node stage.

Practical Example: Using Set With Expressions

Let us look at a slightly more realistic scenario. Imagine you receive items with a price field as a string, such as "12.50", but you need a numeric field for calculations. You can convert it in the Set node with an expression:

{{ parseFloat($json["price"]) }}

In the Set node, you could define multiple fields at once, for example:

{  "priceNumber": {{ parseFloat($json["price"]) }},  "receivedAt": "{{ $now.toISOString() }}",  "isProcessed": false
}

Here is what is happening:

  • priceNumber becomes a real number, ready for totals and calculations.
  • receivedAt stores the current timestamp in ISO format.
  • isProcessed is a boolean flag you can later flip to true or check in IF nodes.

This pattern comes up a lot when you are cleaning incoming data and preparing it for reports, invoices, or API calls.

Advanced Ways to Use the Set Node

1. Build clean API payloads

Before sending data to an external API, it is a good idea to build a clean, predictable payload. A Set node is perfect for this.

You can use it to:

  • Rename fields to match the API’s schema
  • Drop fields you do not want to send by enabling “Keep Only Set”
  • Ensure all required fields are present and correctly typed

This reduces surprises, like accidentally sending internal fields or malformed values to external services.

2. Rename and combine fields

Need to adapt data from one service to another? The Set node is great for mapping fields. For example, if your previous node returns first_name and last_name, but the next service expects a single fullName field, you can create it with an expression:

{{ $json["first_name"] + " " + $json["last_name"] }}

You can keep or remove the original fields depending on your needs. This kind of small transformation keeps your workflows flexible without resorting to heavy custom code.

3. Create control flags for routing

Another common pattern is using the Set node to define boolean flags, like:

  • isHighPriority
  • shouldNotify
  • needsReview

Later on, your IF or Switch nodes can read these flags and route items differently. It keeps your logic readable because you are essentially labeling items with clear, human friendly tags.

Troubleshooting Your Set Node

Things not working quite as expected? Here are a few quick checks.

  • Fields not showing up? Make sure the Set node is actually connected to the right input, and that you clicked Execute on the workflow or node.
  • Confused about what the node outputs? Open the node’s output preview or use the Debug panel to see exactly what fields are present.
  • Expression errors? Double check your syntax and confirm that the fields you reference, like $json["price"], actually exist on the incoming item.
  • Type issues? Remember that numbers in quotes are strings. Use helpers like parseFloat or parseInt to convert them to real numbers when needed.

Best Practices for Using the Set Node

  1. Use clear, descriptive field names. Future you (and your teammates) will thank you when reading the workflow later.
  2. Change only what you need. Avoid renaming or overwriting fields unless you have a specific reason to. Less surprise means easier debugging.
  3. Give each Set node a single main purpose. For example, one node to normalize input, another to build an API payload, another to set flags. It keeps your workflow modular and easier to follow.
  4. Document tricky expressions. If you use a non-obvious expression, add a note on the node so others understand why it is there.

When the Set Node Is Not Enough

There are times when the Set node is not the best tool. If you need to:

  • Perform complex calculations or multi step logic
  • Iterate over arrays and create multiple new items
  • Do heavy transformations on nested data structures

then a Function node or techniques like SplitInBatches or Item Lists might be a better fit.

For simple assignments though, the Set node is ideal. It is fast to configure, easy to read, and low risk compared to writing custom code.

Wrapping Up

The Set node is one of those small but essential building blocks in n8n. It helps you:

  • Create and manage workflow variables
  • Prepare clean payloads for APIs and other services
  • Keep your data types and schemas consistent

Start with basic static values, like numbers, strings, and booleans, then gradually bring in expressions to make your workflows more dynamic and powerful.

Ready to Try It?

Open your n8n instance, drop in a Manual Trigger and a Set node, and recreate the simple example from earlier. Then experiment a bit:

  • Change the values and types
  • Reference fields from previous nodes
  • Add timestamps and flags with expressions

The more comfortable you get with the Set node, the smoother the rest of your workflow building will feel.

If you want more n8n tips and automation ideas, subscribe to our newsletter for advanced recipes or grab a sample workflow you can import and run right away.

Call to action: Try the example in your own n8n instance today. If this guide helped you, share it with a teammate and follow us for more practical automation tutorials.