Two Way Sync Between Pipedrive and MySQL

Two Way Sync Between Pipedrive and MySQL Using n8n

Every growing business eventually hits the same wall: customer data is scattered across tools, never quite matching, and always a little out of date. Your CRM says one thing, your internal database says another, and you end up spending precious time chasing down the truth instead of serving customers or building your product.

That tension is often a signal that you are ready for a new level of automation. Instead of treating data updates as manual chores, you can turn them into a reliable, always-on process that quietly works in the background while you focus on higher-value work.

This is where a two-way sync between Pipedrive and MySQL using n8n becomes a powerful stepping stone. With a single workflow, you can keep your CRM and database in harmony, reduce errors, and create a foundation for more advanced automation across your business.

From Manual Updates To An Automated Mindset

Before we get into nodes and queries, it helps to look at the bigger picture. Every time you copy and paste contact details between Pipedrive and MySQL, you are doing work that a workflow can do for you. The cost is not just the minutes spent updating records, it is the mental load of remembering to do it and the risk of missing something important.

Adopting automation is less about tools and more about mindset. You are choosing to:

  • Protect your time by removing repetitive tasks
  • Trust systems to handle routine updates
  • Build a clean, consistent source of truth for your customer data

The n8n template for a two-way sync between Pipedrive and MySQL is designed exactly for this shift. It runs on a schedule, compares records, and keeps both sides aligned without constant supervision. Once you set it up, you can refine it, extend it, and use it as a model for future automations.

What This n8n Workflow Template Actually Does

At its core, the workflow connects your Pipedrive CRM and your MySQL database, then regularly checks for differences. Whenever it finds new, missing, or updated contacts, it syncs those changes in the right direction so both systems stay in step.

  • Sources: Pipedrive (as your CRM) and MySQL (as your internal database).
  • Trigger: A scheduled trigger that runs at set intervals, such as hourly or daily.
  • Matching key: Contacts are matched by the email field.
  • Actions: Create or update contacts in either Pipedrive or MySQL, depending on where the newest data lives.

This is not just a one-time import. It is a true two-way sync that keeps evolving with your data. As your team adds or edits contacts in either system, the workflow ensures that both sides are updated accordingly.

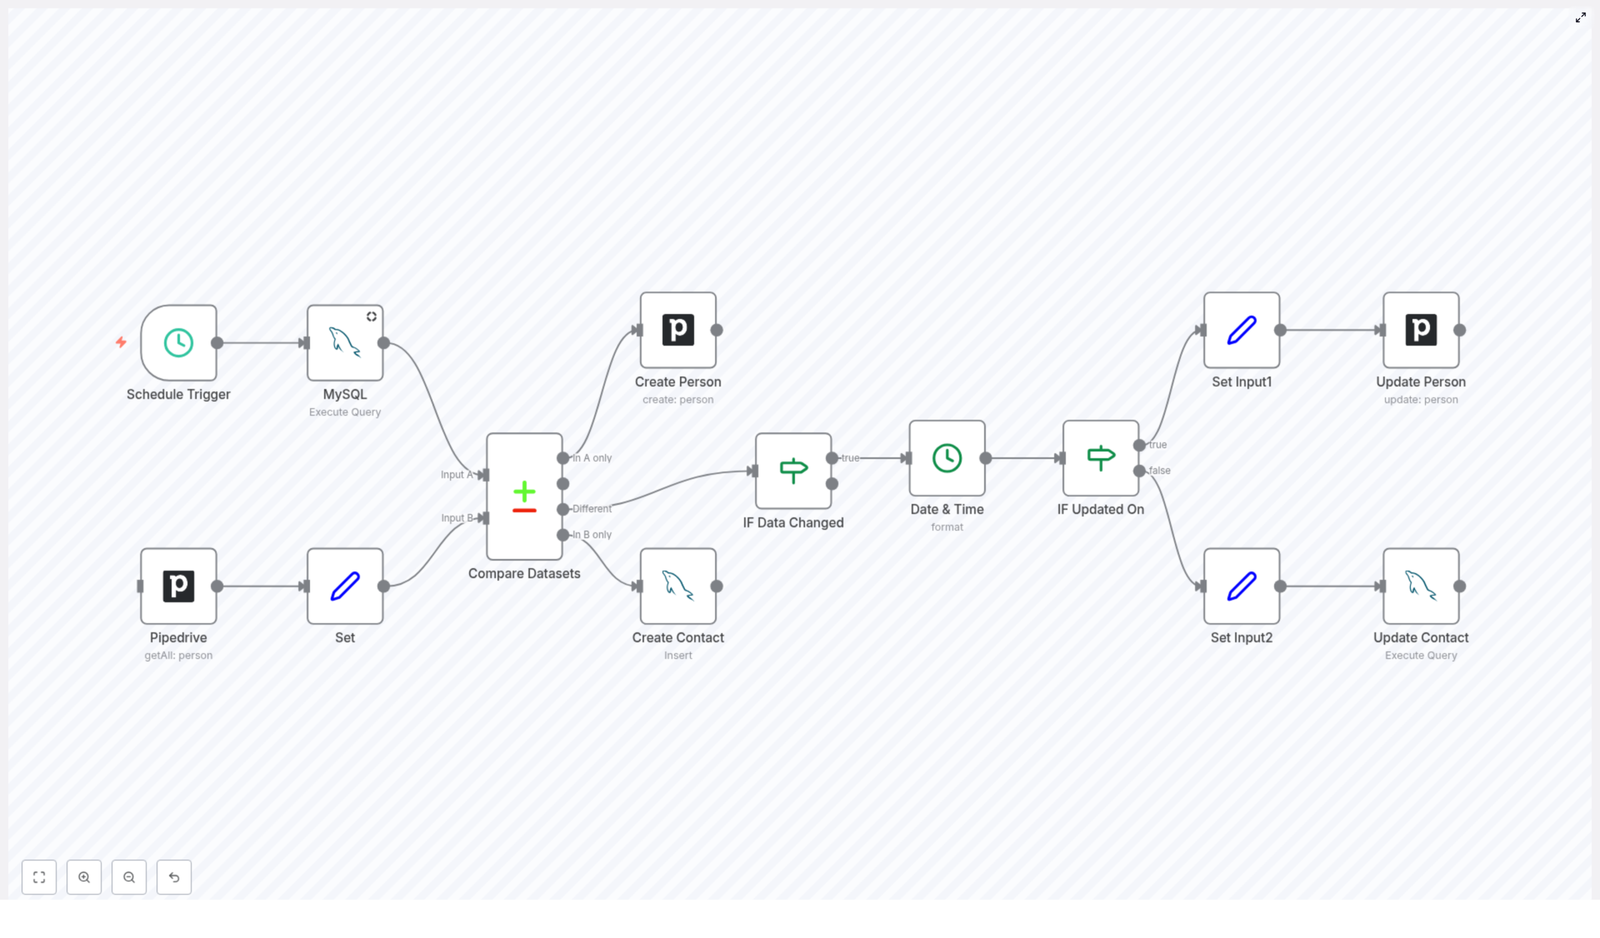
The Journey Of A Sync: How The Workflow Flows

To understand the power of this template, it helps to walk through the journey your data takes. Each n8n node plays a specific role, and together they create a robust, automated feedback loop between Pipedrive and MySQL.

1. Schedule Trigger Node – Let The Workflow Run For You

Everything begins with a Schedule Trigger node. Instead of relying on someone to remember to sync data, you define when the workflow should run.

For example, you can set it to run:

  • Every hour for near real-time updates
  • Once or twice a day for a lighter load

From that point on, the sync becomes an automatic routine. You no longer need to think about it, which is exactly the point.

2. MySQL Read Query – Pulling Contacts From Your Database

Next, the workflow reaches into your MySQL database to fetch the current list of contacts. The query targets your contact table and retrieves essential fields such as:

  • id
  • name
  • email
  • phone
  • updated_on timestamp

This snapshot represents how your internal systems currently see each contact. It becomes one side of the comparison that drives the sync.

3. Pipedrive Fetch Contacts – Getting The CRM View

At the same time, the workflow uses the Pipedrive API to fetch all person records. This gives you a live view of your CRM contacts, including the fields you want to keep consistent with MySQL.

Now you have two datasets: one from MySQL and one from Pipedrive. The next step is to bring them into a comparable format.

4. Set Node – Preparing Pipedrive Data For Comparison

Raw data from APIs is not always structured in the exact way you need. The Set node is where you shape and format the Pipedrive data so that it lines up cleanly with your MySQL dataset.

In this step, you map fields and ensure that the data structure is compatible with the comparison node that follows. It is a small but important transformation that makes the rest of the workflow more reliable.

5. Compare Datasets – Finding New, Missing, And Changed Contacts

Now comes the heart of the sync: the Compare Datasets node. Using the email field as the unique key, n8n compares the contacts from MySQL and Pipedrive, then separates them into four clear outcomes:

  • In A only: Contacts that exist in MySQL but not in Pipedrive. These trigger the creation of new persons in Pipedrive.
  • In B only: Contacts that exist in Pipedrive but not in MySQL. These trigger the creation of new contacts in MySQL.
  • Different: Contacts that exist in both systems but have mismatched data. These go through an update decision process.
  • Same: Contacts that are identical in both systems. No action is needed, which keeps the workflow efficient.

This single node turns a messy comparison task into a structured decision tree that the rest of the workflow can act on.

Deciding What To Update And Where

Not every difference should be synced blindly. To keep your data accurate, the workflow needs to understand what changed and which system has the most recent version. This is where the conditional logic and timestamp handling come in.

6. Conditional Node – IF Data Changed

Within the Different path from the comparison, the workflow uses an IF node to check whether key fields have actually changed. Typically, this includes fields such as:

  • name
  • phone

If those values differ between Pipedrive and MySQL, it signals that an update is needed. This protects you from unnecessary writes and keeps the workflow focused only on meaningful changes.

7. Date & Time Formatting – Aligning Timestamps

To decide which system has the most up to date information, the workflow needs consistent timestamps. The Date & Time node formats the updated_on field so that both sides can be compared reliably.

By standardizing these timestamps, you give the workflow a clear way to judge which record is newer.

8. Conditional Node – IF Updated On

Once timestamps are aligned, another IF node compares the updated_on values. This step determines the direction of the sync for each contact that has changed:

  • If Pipedrive has the more recent update, the workflow pushes those changes into MySQL.
  • If MySQL has the newer data, the workflow updates the corresponding person in Pipedrive.

This is what makes the integration truly two way. Neither system is always the source of truth. Instead, the most recent edit wins, regardless of where it happened.

Applying The Updates To Pipedrive And MySQL

After the workflow decides which side should be updated, it moves into the final step: actually writing the changes back into each system.

9. Set Input1 And Update Person (Pipedrive)

When Pipedrive is the system with the latest information, the workflow prepares that data for an update using a Set node. This node structures the fields so they are ready for the Pipedrive update operation.

Then the Update Person node sends the changes back into Pipedrive, keeping the CRM record aligned with the most current version of the data. Your sales and customer facing teams can trust that they are always seeing the latest details.

10. Set Input2 And Update Contact (MySQL)

If MySQL holds the most recent changes, a separate Set node prepares the data for an SQL update. The workflow then runs an Update Contact operation against the MySQL database.

This step ensures that your internal systems, dashboards, or reporting tools that rely on MySQL always reflect the latest contact information from Pipedrive when appropriate.

Why This Integration Matters For Your Growth

Automating a two-way sync between Pipedrive and MySQL is not just a technical improvement. It can reshape how your team works and how confidently you make decisions based on your data.

  • Data consistency: Eliminate conflicting records and outdated contact details between your CRM and database.
  • Efficiency: Remove repetitive manual data entry and updates, so your team can focus on selling, supporting, and building.
  • Centralized view: Give every department access to synchronized customer information, no matter which tool they use.
  • Scalability: Start with core contact fields, then extend the workflow to include more fields or additional systems as your needs grow.

Most importantly, this template can be the first of many automations. Once you experience the relief of having one piece of your data flow fully automated, it becomes easier to spot other areas you can streamline with n8n.

Using This Template As Your Launchpad

The beauty of n8n is its visual workflow editor. You are not locked into a rigid integration. Instead, you get a clear, editable map of how your data moves and transforms.

With this two-way sync template you can:

  • Start quickly with a working Pipedrive-MySQL integration
  • Customize fields, conditions, and timing to match your processes
  • Experiment safely, improve over time, and build more complex automations as you grow

Think of this template as a foundation. Today it keeps your contacts in sync. Tomorrow it might trigger follow up workflows, analytics updates, or notifications based on those same contacts, all within the same n8n environment.

Take The Next Step Toward Smarter Automation

This two-way sync between Pipedrive and MySQL is a practical, high impact starting point for anyone serious about automation. It protects your data quality, frees your team from tedious updates, and opens the door to a more focused, automated way of working.

If you are ready to streamline your data workflows, explore this n8n template, connect your Pipedrive and MySQL instances, and let the workflow handle the sync for you. As you see the time and errors it saves, you will be inspired to keep building and refining your automation stack.

SEO Keyword Rank Tracker with Google Sheets & BigQuery

SEO Keyword Rank Tracker With Google Sheets, BigQuery, And n8n: A Story Of One Overwhelmed Marketer

Introduction: When SEO Reports Start To Hurt

On a rainy Tuesday morning, Lina, a growth marketer at a small SaaS startup, stared at her screen in quiet frustration. Her CEO had just asked a simple question:

“Are we actually improving for our main keywords across all our domains?”

Lina opened five browser tabs. One for a pricey SEO rank tracker, another for Google Search Console, a third for Google Sheets, and two more for various reports she barely trusted anymore. Each tool told a slightly different story. None of them gave her a clean, unified view of how their target keywords were performing over time across every domain they managed.

The rank tracking tool alone was eating a painful chunk of their monthly budget. Worse, it could not fully adapt to their custom keyword lists, device breakdowns, or the way they wanted to report data to the team.

That morning, Lina decided two things:

  • She would stop relying on expensive rank trackers that felt like black boxes.
  • She would finally put their Google Search Console data, Google Sheets, and BigQuery to work in a way that actually fit their needs.

That decision led her to an n8n workflow template that changed how she tracked SEO performance, permanently.

Discovering The n8n Rank Tracking Template

Lina had heard of n8n before. Some colleagues used it to automate marketing ops and reporting, but she had never tried setting up a workflow herself. While searching for a “Google Search Console BigQuery rank tracker,” she stumbled on an n8n template titled:

“SEO Keyword Rank Tracker with Google Sheets & BigQuery”

The promise sounded almost too good:

  • Replace expensive SEO rank trackers.
  • Use data she already had in Google Search Console.
  • Store and analyze everything in Google Sheets and BigQuery.
  • Scale to any number of domains and keywords.

Curious and slightly skeptical, Lina opened the template. Instead of a generic black box, she found a clear structure split into two core flows:

  • Keyword tracking by keyword list
  • Keywords by URL and top position

It was exactly what she had been trying to cobble together manually in spreadsheets.

Rising Action: Setting The Stage For Automation

Before Lina could run the workflow, she had to prepare the foundations. That was the first test. If setup was too painful, she knew she would abandon the idea and go back to screenshots and copy-pasted CSVs.

Getting The Data Sources Ready

Lina started with the basics the template required:

  • Google Search Console bulk export
    She enabled bulk export for her properties so that Google Search Console would continuously send performance data into BigQuery. This gave her raw tables with queries, URLs, positions, impressions, and clicks – all the ingredients a real rank tracker needs.
  • Google BigQuery
    She verified that her BigQuery project contained the Search Console export tables. These tables would power all the ranking queries in the workflow, letting her slice performance by keyword, URL, and date without hitting interface limits.
  • Google Sheets
    The template required three specific spreadsheets, so Lina created them and noted their IDs:
    • Top Ranking Keywords – for queries that already rank well and for spotting low hanging fruits.
    • Rank Tracking – for daily keyword performance by URL and device over time.
    • Tracked Keywords – a master list of targeted keywords per domain.
  • Credentials for n8n
    She set up secure credentials in n8n so the workflow could talk to both Google Sheets and BigQuery without manual exports. Once done, she never had to log in to download CSVs again.

To her surprise, this part went faster than expected. The real magic, she suspected, would be in how the workflow handled the daily rank tracking logic.

The Turning Point: Running The Workflow For The First Time

With everything connected, Lina took a breath and triggered the n8n workflow manually. The template came alive in two intertwined stories of data: one focused on her keyword lists, the other on uncovering top ranking and opportunity keywords.

Storyline One: Tracking Keywords From Her Own Lists

Lina had always maintained messy spreadsheets of target keywords per domain. The first section of the workflow, “Keyword Tracking by Keyword List”, finally gave that chaos a structure.

This is how it unfolded inside n8n, step by step, while she watched the nodes light up:

  1. Trigger
    The workflow began with her manual test. Later, she planned to schedule it to run automatically, but for now she wanted to see it in action.
  2. Domains setup
    She defined each domain they were tracking, along with the associated BigQuery tables and Google Sheets. The workflow was designed to handle multiple domains, so she no longer had to duplicate anything.
  3. Loop and split per domain
    n8n split the process for each domain, handling them in parallel. For someone managing several brands, this parallelism felt like a superpower.
  4. Google Sheets keyword retrieval
    For each domain, the workflow pulled the list of tracked keywords from her dedicated Google Sheet. These were the exact phrases she cared about, not a generic set defined by a tool.
  5. If node to check history
    The workflow checked whether there was any existing historical data in the Rank Tracking sheet. If there was a last tracked date, it used that as the starting point.
  6. Defaulting to the last 7 days
    For domains or keywords that had never been tracked before, the workflow automatically set the start date to 7 days ago. Lina did not have to guess where to begin.
  7. BigQuery query for rankings
    Using those dates and keyword lists, the workflow queried BigQuery for ranking data by URL. It pulled positions, clicks, impressions, and other metrics for each tracked keyword since the last run.
  8. Merge and insert into Google Sheets
    Finally, the workflow merged the new daily ranking data with what was already in the Rank Tracking sheet and appended the fresh rows. Lina watched as her once static spreadsheet turned into a living, time series dataset.

Instead of manually exporting Search Console data and filtering for each keyword, she now had an automated rank tracker built on top of her own keywords, her own sheets, and her own BigQuery data.

Storyline Two: Finding Top Ranking And Opportunity Keywords

That alone would have been enough to impress her CEO, but the second section of the workflow was where Lina really started to smile. The template also included a flow called “Keywords by URL and Top Position”, designed to surface both top performers and opportunity keywords.

Inside n8n, this second storyline played out like this:

  1. Loop through domains
    Again, the workflow iterated through each domain separately, so Lina could compare performance across all their properties.
  2. Retrieve latest top keyword date
    For each domain, the workflow checked the Top Ranking Keywords sheet to find the most recent date for which data had already been saved. This ensured that only new data would be fetched.
  3. Set date with 7 day default
    If no previous entries existed, the workflow once more defaulted to a start date 7 days in the past. Lina did not have to manually adjust anything when adding a new domain.
  4. BigQuery query for opportunities
    Using BigQuery, the workflow searched for keyword opportunities and top ranking keywords for each URL. It applied criteria like impressions and click through rate to identify which queries were already performing well and which had the potential to grow.
  5. Insert results into Google Sheets
    Finally, it appended these opportunity keywords and their metrics into the Top Ranking Keywords sheet, giving Lina a clear list of what to prioritize in her next content sprint.

Within a single run, she had two powerful outputs:

  • A detailed rank tracking log for her chosen keywords by URL and device.
  • A curated list of high potential and high performing keywords by URL.

Resolution: From Chaos To A Scalable SEO Tracking System

By the end of that first test run, Lina’s relationship with SEO reporting had changed. The tension she felt each time a stakeholder asked for “just a quick update” on rankings started to fade.

What Lina Gained From The n8n Workflow

As she explored the new sheets and dashboards, the benefits became obvious:

  • Cost savings
    She could now rely on Google Search Console, BigQuery, and Google Sheets combined with n8n instead of paying for multiple rank tracking tools. The workflow became a cost effective alternative that still delivered all the insights she needed.
  • Full customization
    Every keyword list, every domain, every filter was under her control. She could add new tracked keywords per domain simply by updating the Tracked Keywords sheet.
  • Long term historical tracking
    Each daily run appended fresh data. Over time, this built a rich history that allowed her to compare performance across weeks and months without worrying about data retention limits in external tools.
  • Deeper keyword insights
    The Top Ranking Keywords sheet highlighted both strong performers and low hanging fruits. Instead of guessing which queries to optimize next, she could point to real impressions, CTR, and position data.
  • Scalability across domains
    Whether her team added one new site or ten, the workflow could scale to any number of domains and keywords. She simply updated the configuration and sheets, and the automation handled the rest.

How Her Day To Day Workflow Changed

A few weeks later, the pattern was clear:

  • The workflow ran on a schedule inside n8n, pulling fresh data from BigQuery and updating her Google Sheets daily.
  • Weekly SEO reviews no longer meant frantic last minute exports. She opened the sheets and filtered by date to see trends instantly.
  • Her content team used the Top Ranking Keywords sheet to choose which pages to improve or which topics deserved new content.
  • The CEO stopped asking if rankings were “really improving” because the answer was now visible in a simple, shareable spreadsheet.

Bring This n8n SEO Rank Tracker Into Your Own Story

If you recognize yourself in Lina’s struggle, juggling tools and spreadsheets just to answer basic ranking questions, you do not have to keep doing it the hard way.

This n8n workflow template lets you:

  • Leverage your existing Google Search Console data with BigQuery.
  • Centralize keyword rank tracking in Google Sheets.
  • Automate daily updates for any number of domains and keywords.
  • Uncover top ranking and opportunity keywords without manual digging.

Once your bulk export, BigQuery, and Google Sheets are set up, the workflow becomes a quiet background process that powers your SEO decisions with reliable data.

Start Your Own Automation Chapter

Ready to turn your scattered SEO reports into a coherent, automated rank tracking system with n8n, Google Sheets, and BigQuery?

Use this template as the foundation of your workflow, then adapt it to your own domains and keyword strategy.

If you need help implementing or customizing this automation for your specific setup, you can always reach out for expert guidance. Your next SEO report could be the easiest one you have ever prepared.

Automated Keyword Rank Tracker with Google Sheets & BigQuery

Automated Keyword Rank Tracker with Google Sheets & BigQuery

From Manual Tracking To Scalable SEO Insight

If you have ever copied rankings into spreadsheets, juggled multiple SEO tools, or tried to keep several domains up to date by hand, you know how quickly keyword tracking can eat your time and energy. It is essential for any SEO strategy, yet it often becomes a repetitive task that steals focus from higher value work.

This is where automation can change everything. With a simple but powerful n8n workflow, you can turn a manual chore into a repeatable system that quietly runs in the background. By connecting Google Sheets and Google BigQuery through n8n, you can build your own automated keyword rank tracker that is transparent, flexible, and cost effective.

Instead of relying on expensive rank tracking tools, you gain a workflow that you fully control and can improve over time. This template is not just a one off script, it is a foundation you can build on as your SEO efforts and domains grow.

Shifting Your Mindset: Automation As A Growth Lever

Before diving into the technical steps, it helps to approach this workflow with the right mindset. Automation in n8n is not only about saving a few minutes each day. It is about:

  • Freeing your attention from repetitive tasks so you can focus on strategy and creativity
  • Building repeatable systems that scale as you add more domains and keywords
  • Owning your SEO data instead of locking it into proprietary tools
  • Experimenting, iterating, and continuously improving your processes

This automated keyword rank tracker is a practical example of that mindset in action. Once it is running, you will have reliable daily data, organized in Google Sheets, powered by Google BigQuery, and orchestrated by n8n. From there, you can extend it, connect it to reporting dashboards, or trigger follow up workflows based on ranking changes.

What This n8n Workflow Actually Does

At its core, this automation template handles two powerful SEO processes for you, across one or many domains:

  • Keyword tracking by keyword list – Pulls a list of keywords from Google Sheets for each domain, queries Google BigQuery for performance metrics, and writes fresh ranking data back to your sheets.
  • Keywords by URL and top position – Analyzes your Google Search Console bulk export in BigQuery, finds top ranking keywords by URL, and highlights new keyword opportunities with detailed metrics.

Both processes are bundled into one n8n workflow template. You can start small with a single domain, then scale up to multiple domains and large keyword sets without changing your core setup.

The Journey Through The Workflow

1. Starting The Workflow And Defining Your Domains

The workflow begins with a simple manual trigger. In n8n, you click “Test workflow” to start the run. This gives you full control while you are experimenting, testing, or refining your setup.

Once triggered, a configured node reads your preset domains and their associated Google BigQuery tables. The workflow then splits this domain list so each domain is processed independently. This separation is what makes the template naturally scalable. As you add more domains, the workflow simply loops over them instead of needing a separate workflow for each one.

2. Tracking Keywords From Your Own Lists

The first major process in the template focuses on keywords you explicitly choose to monitor. This is ideal for target terms, priority pages, or campaigns you care deeply about.

  • Loop Over Items – The workflow runs a loop that processes each domain in turn. Every domain is treated as its own item so you can maintain clean, domain specific data.
  • Google Sheets Node – For each domain, n8n connects to a Google Sheet that is named after that domain. This sheet contains the list of tracked keywords you want to follow. The node reads that list and passes it along the workflow.
  • Code Node – The raw keyword list is then converted into a string format that is ready for use inside SQL queries. This step prepares your keywords so they can be safely and efficiently used in BigQuery.
  • Merge Loop Data – The workflow merges the domain information with the formatted keyword string. This combined data set is what the query node uses to request metrics for the right keywords under the right domain.
  • Google BigQuery Node – Here is where the heavy lifting happens. The node sends a query to BigQuery to retrieve daily metrics for your tracked keywords. Typical metrics include clicks, impressions, average ranking position, and click through rate (CTR), filtered by the dates and specific keywords you track.
  • Google Sheets Insert Node – Finally, the workflow writes the fresh metrics into your rank tracking sheet. You can append new rows or update existing ones, depending on how you structure your data. Over time, this sheet becomes a living history of your keyword performance.

This part of the workflow turns your Google Sheets into a dynamic keyword rank tracker that updates itself. No more copying data by hand or logging into multiple tools every morning.

3. Discovering Keyword Opportunities By URL And Position

The second major process in the template looks at your performance from a different angle. Instead of starting from a list of target keywords, it starts from your URLs and identifies which queries are already performing well or have the potential to grow.

  • Loop Over Items1 – Similar to the first process, this loop walks through each domain individually so you can keep your insights clearly separated.
  • Google Sheets Node – For each domain, the workflow reads the latest top ranking keywords from a dedicated Google Sheet. This sheet acts as your reference for what is currently performing well.
  • If Node – To make the workflow more resilient, an If node checks whether previous data exists. If there is no historical data yet, the workflow sets a default starting date, typically 7 days ago, so you can still gather a meaningful initial dataset.
  • Google BigQuery Node – Using your Google Search Console bulk export stored in BigQuery, this node extracts keyword opportunities. It pulls metrics such as impressions, clicks, and average position, then categorizes rankings into groups like Top 3 or Top 10. This makes it easier to spot quick win opportunities or pages that are close to breaking into better positions.
  • Google Sheets Insert Node – The resulting keyword opportunities are written into a dedicated Google Sheet. This sheet becomes your action list, where you can prioritize optimizations, content updates, and internal linking based on real data.

By combining both processes, you get a full picture. You track the keywords you care about and also uncover queries you might not have considered yet but are already driving visibility.

What You Need To Set Everything Up

To unlock the full power of this n8n template, you will need a few components in place. Once they are configured, you will be able to run the workflow repeatedly with minimal effort.

  • Google Search Console bulk export
    Enable bulk export for your Google Search Console property. This sends your performance data to BigQuery on a regular basis and is the foundation for your analysis.
  • Google BigQuery configuration
    Set up Google BigQuery to store and query your Search Console data. Make sure you know which tables correspond to which domains so you can map them correctly in n8n.
  • Three structured Google Sheets
    Create three Google Sheets documents with a clear structure:
    • Top Ranking Keywords – Used to store existing ranking queries and their metrics.
    • Rank Tracking – Used to collect daily performance data for the keywords you monitor over time.
    • Tracked Keywords – Contains the list of keywords to track for each domain. Each domain has its own sheet named after it.
  • Google credentials in n8n
    Configure Google credentials in your n8n instance so the workflow can securely access both BigQuery and Google Sheets.

Once these pieces are in place, you can plug in the template, connect your credentials, and start running test workflows. From there, you can refine your sheets, queries, and schedules until the system perfectly matches your SEO needs.

Why This Automation Template Is Worth Implementing

Building this workflow in n8n is not just a technical exercise. It is a strategic move that supports long term growth for your SEO efforts and your business.

  • Save costs – Replace or reduce reliance on expensive rank tracking tools with a solution built on services you already use, like Google Sheets and BigQuery.
  • Customize everything – Adjust keyword lists, domains, filters, and time ranges to match your exact strategy, instead of adapting to rigid tool limitations.
  • Centralize your data – Keep all key metrics in Google Sheets, where you can easily share, filter, visualize, or connect them to dashboards.
  • Leverage BigQuery power – Use Google BigQuery to process large volumes of Search Console data quickly and reliably, even for multiple domains and big keyword sets.
  • Scale without friction – As you add more domains or expand your keyword lists, the same workflow continues to handle the workload with minimal changes.

Most importantly, this automation frees you from manual updates and gives you consistent, trustworthy data. That consistency is what enables better decisions, faster experiments, and more focused SEO execution.

Next Steps: Experiment, Iterate, And Make It Your Own

Think of this n8n workflow template as your starting point, not your final destination. Once you have it running, you can:

  • Adjust the schedule to run daily, weekly, or at custom intervals
  • Add notifications when rankings change significantly
  • Connect your sheets to BI tools or dashboards for visual reporting
  • Extend the workflow with additional checks or automated follow up tasks

Every small improvement you make will compound over time, giving you a more automated, insight driven SEO process.

Take Action: Start Automating Your Keyword Tracking

You do not need to rebuild everything from scratch. You can start right now by loading this template into your n8n instance and connecting it to your own data. As you see the first automated reports appear in your Google Sheets, you will feel the shift from manual tracking to system driven insight.

If you need guidance while setting things up, you are not alone. Reach out to SEO automation specialists, or explore the n8n community where many users share tips, best practices, and customization ideas for workflows just like this.

Automate Daily AI News Summaries in Traditional Chinese

Automate Daily AI News Summaries in Traditional Chinese with n8n

1. Overview

This guide documents an n8n workflow template that automatically collects daily AI-related news, summarizes it with GPT-4, translates the content into Traditional Chinese, and sends the result to a specified Telegram chat.

The automation is designed for users who already understand basic concepts of APIs, webhooks, and n8n nodes. It focuses on reliability, clear data flow, and easy customization of topics, language, and schedule.

2. Workflow Architecture

The workflow is built in n8n and integrates several external services:

  • News sources: NewsAPI and GNews for English-language AI news.
  • LLM processing: OpenAI GPT-4 for summarization, article selection, and translation into Traditional Chinese.
  • Messaging: Telegram Bot API for delivering the final daily summary.

The core flow can be summarized as:

  1. Trigger the workflow on a daily schedule (default: 8:00 AM).
  2. Fetch AI-related news from NewsAPI and GNews.
  3. Normalize both responses to a shared articles structure.
  4. Merge and deduplicate the article list.
  5. Use GPT-4 to select the top 15 relevant articles, summarize them, and translate the content into Traditional Chinese while preserving key technical English terms.
  6. Post the final formatted summary to a specified Telegram chat.

3. Prerequisites and Credentials

3.1 Required API Keys and Tokens

Before importing or running the template, you need the following credentials:

  • NewsAPI API key for global news data.
  • GNews API key for an additional news source.
  • OpenAI API key for GPT-4 access.
  • Telegram Bot Token and the Telegram chat ID where summaries will be delivered.

3.2 Obtaining API Keys

  • NewsAPI: Sign up at newsapi.org and generate an API key from your account dashboard.
  • GNews: Register at gnews.io and obtain your API key.
  • OpenAI: Create or log in to your OpenAI account, generate an API key, and ensure your plan supports GPT-4 access.
  • Telegram Bot:
    • Open Telegram and start a conversation with BotFather.
    • Use the /newbot command to create a bot and obtain the Bot Token.
    • Invite the bot to your target chat (private or group) and obtain the chat ID using any Telegram chat ID lookup method or a simple helper bot.

3.3 Configuring Credentials in n8n

In the n8n UI, configure the following credentials and assign them to the appropriate nodes:

  • NewsAPI credentials: Store your NewsAPI key and link it to the NewsAPI node.
  • GNews credentials: Store your GNews key and link it to the GNews node.
  • OpenAI credentials: Add your OpenAI API key and assign it to the GPT-4 node.
  • Telegram credentials: Create a Telegram Bot credential using your Bot Token and assign it to the Telegram node.

Make sure you select the correct credential in each node, otherwise the workflow will fail at runtime with authentication errors.

4. Node-by-Node Breakdown

4.1 Schedule Trigger Node

  • Node type: Schedule / Cron (Trigger)
  • Purpose: Automatically start the workflow once per day.
  • Default configuration:
    • Frequency: Daily
    • Time: 08:00 (server time or configured timezone)

This node is responsible for initiating the entire pipeline at 8 AM daily. You can adjust the time or frequency to align with your preferred schedule.

4.2 NewsAPI Node

  • Node type: HTTP-based NewsAPI integration (REST API)
  • Purpose: Fetch up to 20 recent global AI-related articles in English.
  • Key parameters:
    • Query / Keywords: AI-related terms (for example, “artificial intelligence”, “AI”, “machine learning”).
    • Language: en (English).
    • Page size / Limit: Up to 20 articles.

The response from NewsAPI typically includes fields such as title, description, url, publishedAt, and source. In the workflow, these fields are later normalized into a shared articles structure.

4.3 GNews Node

  • Node type: HTTP-based GNews integration (REST API)
  • Purpose: Retrieve an additional set of up to 20 AI-related news articles in English from another provider.
  • Key parameters:
    • Query / Keywords: Same or similar AI-related terms as used in NewsAPI.
    • Language: en.
    • Max results: Up to 20 articles.

GNews returns its own schema (for example, title, description, url, publishedAt, source). These fields are also normalized to the common articles property in a later step.

4.4 Data Mapping Nodes (Standardizing Article Data)

  • Node type: Typically a Function, Set, or similar data transformation node.
  • Purpose: Map both NewsAPI and GNews responses to a common schema under a unified articles property.

Both upstream API responses have slightly different structures. To simplify merging and downstream processing, each source is transformed so that the items are stored under a shared articles field with consistent keys, for example:

  • articles[i].title
  • articles[i].description
  • articles[i].url
  • articles[i].publishedAt
  • articles[i].sourceName

This normalization step is critical because the merge node expects a uniform structure. If any field is missing from a source, the mapping node should handle it gracefully, typically by leaving it null or providing a fallback value.

4.5 Merge Node (Combining News Sources)

  • Node type: Merge
  • Purpose: Combine the standardized articles arrays from NewsAPI and GNews into a single comprehensive list.

The merge operation consolidates the two article lists into one unified dataset that will be passed to GPT-4. Depending on the template implementation, the merge may:

  • Concatenate both lists into a single articles array.
  • Preserve basic metadata from both sources.

At this point, the workflow has a combined set of AI-related news items, typically up to 40 articles in total (20 from each API), ready for analysis and summarization.

4.6 GPT-4 Node (Summarization and Translation)

  • Node type: OpenAI (Chat / Completion) using GPT-4
  • Purpose:
    • Select the 15 most relevant AI news articles from the merged list.
    • Summarize the selected articles with a focus on AI technology progress and applications.
    • Translate the resulting summaries into Traditional Chinese.
    • Preserve common technical terms in English for clarity.
    • Format the output with article URLs and a short header containing the current date and a greeting.

The node uses the OpenAI credentials configured earlier and sends the normalized article data as context. The prompt is designed so GPT-4:

  • Filters the articles down to the top 15 based on relevance to AI advancements and real-world applications.
  • Produces concise, high-quality summaries.
  • Outputs the text in Traditional Chinese, with technical English terms left untranslated where appropriate.
  • Includes each article’s URL so readers can access the full original content.
  • Begins the message with the current date and a friendly greeting for daily readability.

If the merged list contains fewer than 15 articles, GPT-4 will work with the available items. The prompt design should handle this scenario implicitly, so the model does not fail when fewer articles are provided.

4.7 Telegram Node (Summary Delivery)

  • Node type: Telegram (Send Message)
  • Purpose: Deliver the formatted AI news summary to the specified Telegram chat.
  • Key parameters:
    • Bot Token: Provided via the configured Telegram credentials.
    • Chat ID: The target user, channel, or group chat where the summaries should be delivered.
    • Message: The final GPT-4 output containing the Traditional Chinese summary and article URLs.

Once the GPT-4 node completes successfully, its text output is passed directly to the Telegram node. The node sends a single consolidated message to your Telegram chat each morning, making it easy to scan the latest AI news at a glance.

5. Detailed Execution Flow

5.1 Daily Trigger at 8 AM

The Schedule node activates the workflow every day at 8 AM. This is the only trigger in the template, which ensures a consistent daily cadence for news retrieval and summary delivery.

5.2 Fetching AI News Articles

Immediately after the trigger fires, the workflow calls both NewsAPI and GNews with your configured API keys. Each request is scoped to AI-related keywords and restricted to English-language results. Both APIs return up to 20 of the most recent relevant articles.

5.3 Normalization to a Common Schema

Since NewsAPI and GNews use slightly different response formats, the workflow uses mapping or transformation nodes to standardize all article items into a uniform articles property. This step ensures that downstream nodes can treat all items identically, regardless of source.

5.4 Merging Articles from Multiple Sources

The standardized article arrays from both APIs are merged into a single list. This gives GPT-4 a broader and more diverse set of news sources, improving coverage and reducing the risk of missing important AI developments.

5.5 AI-Driven Summarization and Translation

The merged article list is passed into the GPT-4 node, along with a carefully structured prompt. GPT-4 then:

  • Evaluates the relevance of each article to AI technology progress and applications.
  • Selects the top 15 articles when available.
  • Generates a concise but informative summary for each selected item.
  • Translates the summaries into Traditional Chinese, keeping technical English terminology intact where it aids understanding.
  • Appends the original URLs so you can open full articles directly from the summary.
  • Prefixes the output with the current date and a short greeting, making each daily message self-contained.

5.6 Telegram Delivery of the Final Summary

The Telegram node receives the GPT-4 output as the message body and sends it to your configured chat ID. The result is a single, well-structured message that arrives at roughly 8 AM daily, containing your curated AI news digest in Traditional Chinese.

6. Configuration and Customization

6.1 Changing the Topic or Domain

You can repurpose this workflow for other domains simply by modifying the query keywords in the NewsAPI and GNews nodes. For example:

  • Replace AI-related keywords with blockchain to track blockchain news.
  • Use quantum computing or similar terms to monitor developments in quantum technologies.

Ensure that both source nodes use consistent or complementary queries so the merged list remains coherent.

6.2 Adjusting Delivery Time and Frequency

To change when the summary is sent:

  • Open the Schedule / Cron node.
  • Update the time (for example, from 08:00 to 07:30 or 21:00).
  • Optionally modify the frequency (for example, multiple times per day or specific weekdays only) according to your needs.

6.3 Customizing Summary Style and Language

The GPT-4 node prompt controls how the summary is generated. You can edit it to:

  • Change the tone (more formal, more casual, or more technical).
  • Adjust the length (short bullet points vs. detailed paragraphs).
  • Translate into a different language instead of Traditional Chinese (for example, Simplified Chinese, English, Japanese).
  • Modify how URLs are displayed or how articles are formatted (numbered list, headings, etc.).

When changing the language, keep the instruction about preserving technical English terms if you still want them left untranslated for clarity.

6.4 Target Chat Configuration

In the Telegram node:

  • Set the Chat ID to your own user ID, a group ID, or a channel ID.
  • Ensure your bot is a member of the target group or channel if it is not a direct chat.

If the chat ID is incorrect or the bot lacks permission to post, the Telegram node will fail and the message will not be delivered.

7. Operational Notes and Edge Cases

7.1 Handling Fewer Articles than Expected

If one of the APIs returns fewer than 20 articles or is temporarily limited, the merged list may contain fewer than 40 items. GPT-4 is instructed to select up to 15 relevant articles, so it will simply work with whatever is available and generate a summary for that subset.

7.2 API Rate Limits and Failures

Because the workflow relies on third-party APIs, consider the following:

  • If NewsAPI or GNews hit rate limits or experience downtime, that node may fail or return an empty result.
  • If the OpenAI API is unavailable or returns an error, the GPT-4 node will fail and the Telegram message will not be sent.
  • Authentication errors will occur if any API key or token is misconfigured or revoked.

In production, you may want to add additional error handling or notifications in n8n (for example, on-error workflows or fallback branches) so you are alerted if any external service fails.

7.3 Message Size Considerations

GPT-4 outputs a consolidated summary text that is then sent as a single Telegram message. In typical usage, this fits comfortably within Telegram’s message size limits, but if you significantly increase the number of articles or the verbosity of the summaries in the prompt, you should be aware of potential message length constraints.

8.

Daily AI News Summary Workflow with GPT-4 & Telegram

Daily AI News Summary Workflow with GPT-4 & Telegram

What You Will Learn

In this guide, you will learn how to use an n8n workflow template to:

  • Fetch the latest AI news automatically from two news APIs
  • Summarize and translate those news articles using GPT-4
  • Send a clean, daily AI news digest to a Telegram chat
  • Customize the topic, language, and delivery time to fit your needs

By the end, you will understand how each node in the workflow works, how the data flows from one step to the next, and how to adapt this template for other topics such as blockchain or quantum computing.

Key Concepts Before You Start

n8n Workflow Automation

n8n is a workflow automation platform that lets you connect APIs and services without writing full applications. In this template, n8n:

  • Triggers the workflow at a specific time every day
  • Calls external APIs to fetch news
  • Passes article data to GPT-4 for summarization and translation
  • Sends the final text to Telegram

News Sources: NewsAPI and GNews

The workflow uses two news providers to increase coverage and reliability:

  • NewsAPI.org – a popular API for news articles from many sources
  • GNews – another news API that provides similar content but from different feeds

Both APIs return AI-related English news articles, which are then combined and standardized inside n8n.

GPT-4 for Summarizing and Translating

GPT-4 is used as the core AI engine. In this workflow it:

  • Selects the most relevant AI articles
  • Summarizes them into a concise daily digest
  • Translates the content into Traditional Chinese
  • Keeps common technical terms in English for clarity

Telegram as the Delivery Channel

Telegram is used to deliver the final summary. The workflow sends the digest to any specified:

  • Individual user chat
  • Group
  • Channel

Once set up, you will receive your AI news summary automatically every day.


Step 1 – Set Up Your API Keys

1.1 Register for NewsAPI and GNews

First, you need API keys for both news providers:

  • Go to NewsAPI.org and create an account to get your NewsAPI key.
  • Go to GNews and register to obtain your GNews API key.

1.2 Add Keys to the Correct n8n Nodes

In your imported n8n template, locate the news fetching nodes and insert your keys:

  • Open the "Fetch NewsAPI articles" node and paste your NewsAPI key into the appropriate field.
  • Open the "Fetch GNews articles" node and paste your GNews API key there.

These nodes will query the APIs for up to 20 of the latest AI-related English articles each day.


Step 2 – Configure Your Telegram Bot

2.1 Create a Telegram Bot

To send messages from n8n to Telegram, you need a bot:

  • Open Telegram and start a chat with BotFather or visit the docs at BotFather.
  • Follow the instructions to create a new bot.
  • Copy the bot token that BotFather gives you. You will need it in n8n.

2.2 Add Telegram Credentials in n8n

  • In n8n, create a new Telegram Bot credential and paste your bot token into it.
  • Assign this credential to the "Send summary to Telegram" node.

2.3 Set the Telegram Chat ID

You must tell the workflow where to send the summary:

  • Find the chat ID of the user, group, or channel where you want to receive the digest.
  • In the "Send summary to Telegram" node, enter this chat ID in the corresponding field.

After this step, the workflow will be able to post the AI news summary directly into that Telegram chat.


Step 3 – Connect OpenAI (GPT-4) to n8n

3.1 Create OpenAI Credentials

  • Obtain your OpenAI API key from your OpenAI account.
  • In n8n, create a new credential entry for OpenAI and paste your API key.

3.2 Attach GPT-4 to the AI Node

The template uses a GPT-4 based node for summarization and translation:

  • Locate the "GPT-4.1 Model" node (or the equivalent OpenAI / AI node in your n8n instance).
  • Assign the OpenAI credential you just created to this node.

This node will receive the collected articles, process them, and return a structured daily summary in Traditional Chinese.


How the Workflow Runs in n8n

4.1 Daily Trigger

The workflow starts with a scheduled trigger:

  • It is configured to run automatically every day at 8 AM.
  • You can later adjust this time if you want a different delivery schedule.

4.2 Fetching AI News from Two Sources

Once triggered, n8n runs both news nodes:

  • Fetch NewsAPI articles – calls the NewsAPI endpoint to get recent AI-related English articles.
  • Fetch GNews articles – calls the GNews API for similar AI news.

Each node can fetch up to 20 of the latest AI news articles. Using both APIs increases the chance of covering more sources and perspectives.

4.3 Mapping Articles into a Common Format

Because NewsAPI and GNews return slightly different JSON structures, the workflow uses mapping nodes to standardize the data:

  • Each source passes through a node that reshapes the response.
  • The result is a unified articles property for each source.

This makes it easier for later nodes to treat all articles in the same way, regardless of which API they came from.

4.4 Merging the Two Article Lists

After mapping, a Merge node combines the standardized articles:

  • Articles from NewsAPI and GNews are merged into a single dataset.
  • The output is a consolidated list of AI articles ready for AI processing.

4.5 AI Summarization and Translation with GPT-4

The merged articles are then sent to the GPT-4 node, which performs several tasks in one step:

  • Selects the 15 most relevant AI news articles from the merged list.
  • Generates a concise daily summary that includes:
    • The date at the beginning of the summary
    • A brief explanation of each selected article
    • The URL of each article for further reading
  • Translates the content into Traditional Chinese, while:
    • Preserving common technical terms in English to avoid confusion

The exact behavior is controlled by the prompt you configure in the GPT-4 node. You can adjust this prompt later to change tone, level of detail, or language.

4.6 Sending the Summary to Telegram

Finally, the output from GPT-4 is passed into the "Send summary to Telegram" node:

  • The node uses your Telegram Bot credentials to authenticate.
  • It sends the generated text to the chat ID you specified earlier.

At this point, your daily AI news digest appears automatically in Telegram at your scheduled time.


Customizing the Workflow for Your Needs

5.1 Change the Topic or Keywords

You are not limited to AI news. To track other fields:

  • Open the "Fetch NewsAPI articles" node and update the search keywords or query parameters.
  • Do the same in the "Fetch GNews articles" node.

For example, you can switch from "artificial intelligence" to topics such as:

  • "blockchain"
  • "quantum computing"
  • Any other domain-specific keywords you want to monitor

5.2 Adjust the Delivery Time

If 8 AM is not ideal for you or your team:

  • Open the schedule / trigger node at the start of the workflow.
  • Change the configured time to your preferred hour or frequency.

You can, for instance, send summaries before your daily standup or at the end of the workday.

5.3 Modify Summary Style and Language

The GPT-4 node is very flexible. You can tailor the output by editing the prompt:

  • Change tone – make the summary more formal, casual, or analytical.
  • Change detail level – ask for shorter bullet points or more in-depth explanations.
  • Change language – instead of Traditional Chinese, you can translate into any other language you prefer.

Just update the instructions in the AI summarizer node and test the workflow to see how the output changes.


Quick Recap

  • The workflow triggers every day at a set time (default 8 AM).
  • NewsAPI and GNews nodes fetch up to 20 English AI news articles each.
  • Mapping nodes standardize the responses into a common articles structure.
  • A Merge node combines all articles into one dataset.
  • GPT-4 selects the top 15 articles, summarizes them, translates to Traditional Chinese, and includes URLs.
  • The final summary is posted directly to your chosen Telegram chat using your bot.
  • You can customize topic, time, style, and language by adjusting node settings and prompts.

FAQ

Do I need coding skills to use this n8n template?

No. You mainly configure nodes, enter API keys, and adjust some text prompts. The logic is already built into the template.

Can I change the number of articles summarized?

Yes. The template is set to select 15 articles, but you can modify the AI prompt or logic in the GPT-4 node to use a different number.

Is it possible to keep the summary in English only?

Yes. Edit the GPT-4 prompt and remove the translation instruction, or ask it to summarize directly in English or any other language you want.

Can I send the summary to multiple Telegram chats?

You can duplicate the "Send summary to Telegram" node and configure each copy with a different chat ID, or build a loop over a list of chat IDs if needed.


Get Started with the Template

Once you have your API keys and credentials ready, you can import and run the workflow template in n8n. It will handle your daily AI news intake automatically, keep you and your team informed, and push updates straight into Telegram.

Customize it for your own topics, languages, and timing to turn it into a reusable daily briefing system.

Unique QR Code Coupon System for Lead Generation

Unique QR Code Coupon System for Lead Generation

From Manual Chaos to Confident Automation

If you have ever tried to run a coupon campaign manually, you know how quickly it can become messy. Spreadsheets get out of sync, duplicate leads slip through, and you are never quite sure which codes are still valid. It is stressful, time consuming, and it pulls your focus away from what really matters: building relationships, growing your business, and creating better offers.

Automation gives you a different path. Instead of chasing down coupon codes and updating records by hand, you can design a system that quietly works in the background, assigns unique QR codes, validates them in real time, and keeps your CRM and sheets perfectly aligned.

This is where n8n comes in. With a single workflow, you can transform a basic coupon campaign into a powerful, trackable lead generation engine that runs on autopilot.

Shifting Your Mindset: From Tasks to Systems

Before diving into the template, it helps to think not just in terms of tools, but in terms of systems. Every time someone submits a form, scans a QR code, or redeems a coupon, you have an opportunity to:

  • Capture clean, structured lead data
  • Deliver a consistent, on-brand experience
  • Track performance across your entire campaign
  • Free yourself and your team from repetitive work

Instead of asking, “How do I send this coupon?” you start asking, “How can I design a repeatable flow that handles this for me, every time, without fail?”

The n8n workflow template described here is a practical example of that mindset. It turns form submissions, coupon assignment, and QR code validation into a single, cohesive system that you can adapt, extend, and improve over time.

The Vision: A Fully Automated QR Code Coupon Journey

At the heart of this setup is a unique QR code coupon system that connects your landing page, Google Sheets, SuiteCRM, and email delivery, all orchestrated through n8n automation.

The workflow is designed to handle two core actions from start to finish:

  • Lead generation with coupon assignment – When a user submits a form, the system checks for duplicates, assigns a unique coupon, stores the lead in SuiteCRM, and sends a QR code by email.
  • Coupon validation – When the QR code is scanned or the coupon code is submitted via webhook, the system validates the code, checks if it was already used, and updates your CRM and Google Sheet accordingly.

Once this is in place, every new lead follows the same reliable path. You get consistency, your leads get instant rewards, and your campaigns become easier to measure and scale.

Step 1 – Capturing Leads and Avoiding Duplicates

The journey begins when someone fills out your landing page form. You collect essential details such as Name, Surname, Email, and Phone. This is where n8n starts doing the heavy lifting for you.

Using the n8n form trigger, the workflow performs several actions in sequence:

  • Form Fields node – Extracts the submitted data from the form so each field is cleanly available for later steps.
  • Duplicate Lead? (Google Sheets node) – Checks a Google Sheet that acts as your lead and coupon database. It looks for the submitted email to see if this person already exists.
  • If node – Based on the result, the workflow decides whether to treat this as a new lead or a duplicate. This protects you from accidentally assigning multiple coupons to the same person.

This simple logic already saves you time and prevents confusion. No more manually scanning spreadsheets or CRM records to see whether someone has already received a coupon.

Step 2 – Assigning a Unique Coupon and Sending the QR Code

When the workflow identifies a new lead, it moves into assignment mode. This is where the system starts to feel truly automated: a coupon is assigned, the CRM is updated, and a QR code is delivered, all in one smooth flow.

Here is what happens behind the scenes:

  • Retrieve an available coupon from Google Sheets – The workflow selects the first unassigned coupon from your coupons sheet. This ensures each lead gets a unique code.
  • Token SuiteCRM (HTTP Request node) – The workflow requests an authentication token from SuiteCRM using your API credentials. This token is needed for all subsequent CRM operations.
  • Create Lead SuiteCRM (HTTP Request node) – Using the token, n8n creates a new Lead record in SuiteCRM, including the form data and the assigned coupon code.
  • Update Sheet node – The Google Sheet is updated with the new lead details and the coupon assignment so your sheet stays in sync with your CRM.
  • Get QR node – A QR code URL is generated that links directly to your coupon validation webhook. This is what turns a simple code into a scannable, trackable experience.
  • Send Email node – Finally, an email is sent to the lead that includes the QR code image and clear instructions on how to redeem the coupon.

From the lead’s perspective, they submit a form and receive a professional, personalized coupon email in minutes. From your perspective, everything is handled automatically, with data captured and stored in the right places.

Step 3 – Validating Coupons via QR Code

The story does not end when the coupon is sent. The real value comes when you can reliably track redemptions and prevent misuse. This is where the coupon validation flow comes into play.

A dedicated webhook in n8n listens for incoming QR code validations. Whenever a coupon QR code is scanned or a coupon code is submitted, the workflow activates and runs through a clear validation process:

  • Set coupon – Extracts the coupon code from the incoming request query so it can be checked against your records.
  • If node – Confirms that a coupon code was provided and that it exists in your dataset.
  • Get Lead (Google Sheets node) – Retrieves the lead details linked to that coupon from the Google Sheet.
  • Not used? – Checks whether the coupon has already been redeemed or is still available.

When the Coupon is Valid

If the coupon exists and has not been used, the workflow completes the redemption process:

  • Token SuiteCRM 1 node – Generates a SuiteCRM authentication token for this validation step.
  • Update Lead (HTTP Request node) – Updates the corresponding lead in SuiteCRM, marking the coupon as used so your CRM always reflects the current status.
  • Update coupon used (Google Sheets) – The Google Sheet is updated to mark the coupon as redeemed, keeping your sheet and CRM aligned.
  • Coupon OK – Sends a response confirming that the coupon is valid and has been successfully processed.

This gives you accurate, real time visibility into who used which coupon and when, without any manual tracking.

When the Coupon is Invalid or Already Used

If the coupon does not exist or has already been redeemed, the workflow handles that gracefully too:

  • No coupon / Coupon KO nodes – Reply with clear, appropriate messages indicating that the coupon is invalid or has already been used.

Instead of confusion at the point of redemption, you provide immediate, consistent feedback. Your system protects your promotions and your customers understand exactly what is happening.

Technical Notes, Best Practices, and Room to Grow

This template is not just a one-off solution. It is a solid foundation you can build on as your campaigns and business grow. To get the most from it, keep these points in mind:

API Credentials and Configuration

  • Replace placeholders like SUITECRMURL, CLIENTID, CLIENTSECRET, and email-related settings with your real environment values.
  • Test your authentication steps in n8n to confirm that SuiteCRM and your email provider respond correctly before going live.

Using Google Sheets as a Lightweight Database

  • The workflow uses Google Sheets to store coupons and leads, which works very well for small and medium scale campaigns.
  • If your volume grows significantly, you can use this template as a blueprint and later migrate to a more robust database or a different CRM, while keeping the same overall flow.

Security and Reliability

  • Run your n8n instance over HTTPS to protect data in transit.
  • Keep your webhook URLs private and consider adding rate limiting or additional validation to avoid misuse.
  • Regularly review your logs in n8n to ensure each step is running smoothly and to catch any configuration issues early.

Customization and Experimentation

  • Add more form fields and validation rules to qualify leads better.
  • Adjust email content and design to match your brand and improve conversion.
  • Integrate with other CRMs or marketing platforms if SuiteCRM is not your main system, using similar HTTP Request nodes.
  • Introduce different coupon types, expiration dates, or segmentation logic as your campaigns evolve.

Think of this template as a starting point, not a finished product. As you learn what works best for your audience, you can refine, extend, and optimize it without rebuilding everything from scratch.

Turning This Template Into Your Next Growth Lever

Implementing a unique QR code coupon assignment and validation system is more than a technical upgrade. It is a strategic move toward smarter, more scalable marketing. You gain:

  • Cleaner lead acquisition with automatic duplicate checks
  • Faster, more reliable coupon delivery through QR code emails
  • Accurate tracking of coupon usage inside Google Sheets and SuiteCRM
  • More time and mental space to focus on strategy instead of manual tasks

Every campaign you run with this workflow teaches you something new. You can test different offers, tweak messaging, and experiment with follow-up sequences, all while knowing that the operational side is handled by automation.

Ready to Build Your Own Automated Coupon Engine?

You do not need to start from a blank canvas. This n8n workflow template gives you a ready made structure that you can plug into your environment, customize, and grow with.

Set it up once, iterate as you go, and let automation carry the repetitive workload so you can focus on high impact work: designing better campaigns, nurturing leads, and scaling your business.

Start deploying your unique QR code coupon system today and turn every new lead into a smooth, trackable, and rewarding experience.

Unique QR Code Coupon System for Lead Generation

Unique QR Code Coupon System for Lead Generation

From Manual Follow-ups to Automated Growth

If you have ever juggled spreadsheets, CRM entries, and email campaigns just to send a simple coupon to a new lead, you know how draining that can be. Manual work slows you down, introduces errors, and keeps you from focusing on what actually grows your business: building relationships, improving offers, and closing deals.

This is where automation becomes more than a technical trick. It becomes a mindset shift. Instead of reacting to every new lead, you can design a system that welcomes them, rewards them, and captures their data consistently, all while you focus on higher-value work.

The n8n workflow template described here is a concrete, ready-to-use step in that direction. It gives you a complete system for assigning and validating unique QR code coupons, tied directly to your lead generation funnel. Think of it as a starting point for a more automated, scalable, and predictable marketing engine.

Imagine a Smarter Lead Capture Process

Picture this: a visitor fills out a landing page form, instantly receives a unique QR code coupon by email, and when they redeem it, your CRM and Google Sheets update automatically. No duplicate coupons, no forgotten follow-ups, no manual cross-checking.

This n8n workflow template turns that vision into a practical, repeatable process. It connects:

  • Your landing page form to capture lead data
  • Google Sheets to store and manage unique coupon codes
  • SuiteCRM to create and update lead records
  • QuickChart.io to generate QR codes for your coupons
  • Webhook triggers to validate coupons when they are scanned

The result is a fully automated QR code coupon system that supports your lead generation strategy instead of slowing it down.

The Journey: From Form Submission to Coupon Redemption

Let us walk through the flow as your lead experiences it, and see how n8n quietly handles the work in the background.

1. A Lead Submits the Form

The journey begins when someone fills out your landing page form with their name, surname, email, and phone number. This form submission is the trigger that starts your n8n workflow.

Inside the workflow, the data is first collected and prepared. n8n then checks your Google Sheets document to see if this lead already exists. This duplicate check is crucial. It prevents sending multiple coupons to the same person and keeps your campaigns fair and organized.

2. Screening for Duplicates and Assigning a Unique Coupon

If the lead is identified as new, the automation continues. n8n looks into a dedicated Google Sheet where your pre-generated unique coupon codes are stored. From this list, it retrieves the first available coupon that has not yet been assigned.

This simple step is powerful. It means you can generate a batch of coupons once, store them in Google Sheets, and let the workflow handle the rest. No more copy-paste, no more accidental reuse of codes.

3. Creating the Lead in SuiteCRM

With a fresh coupon code ready, the workflow connects to SuiteCRM. It first obtains an OAuth token using your SuiteCRM credentials, which allows n8n to communicate securely with your CRM.

Using this token, n8n creates a new lead record in SuiteCRM via API. The record includes:

  • The lead’s name, surname, email, and phone number
  • The unique coupon assigned to that lead

Right after that, the same details are written back to Google Sheets, linking the coupon to the lead. Now both your CRM and your sheet are in sync, with no manual data entry.

4. Sending the Coupon via Email With a QR Code

Next comes the rewarding moment for your lead. The workflow uses QuickChart.io to generate a QR code that encodes the coupon link. This link can lead to a redemption page, a checkout with a discount, or any URL you configure.

n8n then sends an email to the lead, including:

  • A personalized message that acknowledges their sign-up
  • The unique coupon details
  • The QR code image generated from QuickChart.io

From the lead’s perspective, they receive an instant, exclusive reward. From your perspective, the entire process from form submission to coupon delivery is fully automated.

5. Validating the Coupon When the QR Code Is Scanned

The final stage of the journey happens when the lead scans the QR code to redeem their offer. That scan triggers a webhook in n8n, which starts the coupon validation part of the workflow.

Here is what happens behind the scenes:

  • n8n reads the coupon data sent by the QR scan.
  • It checks your Google Sheet to confirm that the coupon exists.
  • It verifies that the coupon has not been used yet.

If the coupon is valid and unused:

  • The corresponding lead is fetched and verified.
  • The coupon usage is marked as “yes” both in Google Sheets and in SuiteCRM.
  • A confirmation response is sent back, so your redemption flow can continue smoothly.

If the coupon is invalid or already used, the workflow responds accordingly, allowing you to handle declined or expired coupons in a consistent way.

Why This n8n Template Is a Stepping Stone

Beyond the technical flow, this template represents a mindset: automate the repetitive, so you can invest energy in strategy and creativity. By implementing this QR code coupon system, you:

  • Save time on manual lead entry and coupon handling
  • Reduce errors and duplicate coupons
  • Improve lead experience with instant, personalized rewards
  • Keep data aligned across Google Sheets and SuiteCRM
  • Build a foundation you can extend with more automation later

Once this is in place, you can start asking bigger questions: What if every campaign had its own coupon list? What if high-value leads received special offers? What if redeemed coupons triggered follow-up sequences, surveys, or upsell emails?

Automation in n8n grows with you. This template is not the finish line, it is your launchpad.

Customizing the Workflow for Your Business

To make this template truly yours, you only need a few configuration changes. These adjustments connect the workflow to your own CRM, sheets, and email setup.

1. Connect to Your SuiteCRM Instance

In the nodes that interact with SuiteCRM, update the following values:

  • SUITECRMURL – set this to your SuiteCRM base URL
  • CLIENTID – your SuiteCRM OAuth client ID
  • CLIENTSECRET – your SuiteCRM OAuth client secret

These details allow n8n to request an OAuth token and create or update lead records securely in your CRM.

2. Point to the Correct Google Sheets Document

In the Google Sheets nodes, configure:

  • Your Google Sheets document ID
  • The relevant sheet name where coupons and lead data are stored

Make sure this sheet includes your list of pre-generated unique coupons, along with any columns needed for lead details and coupon usage status.

3. Set Up Your Email Details

Within the email node, update:

  • The sender email address
  • Any SMTP configuration required by your email provider

You can also customize the email subject and body to match your brand voice, making the coupon delivery feel aligned with your existing communication style.

4. Prepare Your Coupon List

Before running the workflow, make sure you have:

  • A list of unique coupon codes pre-generated and stored in your Google Sheet
  • Columns that indicate whether a coupon is assigned and whether it has been used

This preparation ensures the workflow can assign coupons efficiently and track their status accurately.

From First Automation to Continuous Improvement

Once you see this template running in your n8n instance, you will likely start spotting new opportunities. Maybe you want to:

  • Trigger a follow-up email after a coupon is redeemed
  • Tag leads in SuiteCRM based on coupon usage
  • Send internal notifications to your sales team when a high-value coupon is scanned
  • Add more validation steps or error handling to make the system even more robust

The beauty of n8n is that you can evolve your workflow step by step. Start simple, get it working, then iterate. Each improvement frees a little more of your time and creates a smoother experience for your leads.

Conclusion: Start Automating Your Lead Generation Today

This unique QR code coupon system offers a clear, practical path from manual lead handling to a more automated, integrated, and scalable process. With n8n orchestrating the flow between Google Sheets, SuiteCRM, QuickChart.io, and your email provider, you can focus on strategy while your workflow quietly does the heavy lifting.

Use this template as your first or next step toward a more automated business. Adapt it, extend it, and let it inspire other workflows that support your growth.

Get started today, and transform your lead generation campaigns with personalized, automated QR code coupons.

Disclaimer: This system is a basic implementation and can be further enhanced with additional validation, logging, and error handling as your needs grow.

How to Write JSON Configs to Binary Files with n8n

How to Write JSON Configs to Binary Files with n8n

Overview

This guide documents a minimal, production-ready n8n workflow that converts JSON configuration data to binary and writes it to a file on the server file system. It is intended for users who already understand n8n basics and want a precise reference for implementing JSON-to-file automation.

The workflow focuses on a simple but common pattern:

  • Manually trigger execution.
  • Transform JSON data into binary using the Move Binary Data node.
  • Persist the binary payload using the Write Binary File node.

This pattern is particularly useful for configuration management, dynamic file generation, and automated backups of JSON data within n8n workflows.

Workflow Architecture

The example workflow is linear and consists of three nodes in sequence:

  1. Manual Trigger node
  2. Move Binary Data node
  3. Write Binary File node

There are no external credentials or API integrations involved. All operations are performed within the n8n instance and its underlying file system.

At a high level, the data flow is:

  1. The Manual Trigger node produces an initial JSON item or passes through preconfigured JSON data.
  2. The Move Binary Data node reads that JSON, serializes it using utf8 encoding, and stores it in a binary property.
  3. The Write Binary File node writes the binary property to a fixed path, for example /home/node/.n8n/standup-bot-config.json.

Node-by-Node Breakdown

1. Manual Trigger Node

The Manual Trigger node is used as the workflow entry point. It does not require configuration beyond being added to the canvas.

  • Type: Trigger node
  • Execution: Activated only when you click Execute Workflow in the n8n editor UI.
  • Purpose: Provide a controlled, on-demand start to the workflow for testing or ad-hoc file generation.

When you execute the workflow manually:

  • The node emits one or more items into the workflow.
  • Those items are passed directly to the next node, which is responsible for preparing the JSON that will be written to disk.

In the simplest case, you can attach additional nodes before the Move Binary Data node to construct or modify the JSON payload that will be converted to a file.

2. Move Binary Data Node

The Move Binary Data node is the core of the JSON-to-file conversion. It transforms JSON data in the item into a binary representation that the Write Binary File node can handle.

Primary Responsibilities

  • Read JSON data from the incoming item.
  • Serialize it as a string using the specified encoding (in this case, utf8).
  • Store the resulting data in a binary property, typically under a property name such as data or file.
  • Optionally define a target file name in the binary metadata.

Key Configuration Parameters

Typical configuration for this node in the described workflow:

  • Operation: Convert to Binary
  • Source: JSON data from the incoming item
  • Encoding: utf8
  • Binary Property: A property name that will hold the binary data (for example, data)
  • File Name: The logical file name to associate with the binary data (for example, standup-bot-config.json)

The encoding is important. Using utf8 ensures that the serialized JSON text is correctly represented and can be opened and read by standard tools and editors once written to disk.

Data Flow Details

Input to this node is plain JSON. The node:

  1. Takes the JSON payload from the incoming item.
  2. Stringifies it (if it is not already a string).
  3. Applies utf8 encoding.
  4. Stores the result as binary in the specified binary property.

The output item now contains:

  • The original JSON data (unless explicitly removed), and
  • A binary property that can be consumed by file-writing or file-upload nodes.

Edge Cases and Validation

To avoid issues when converting JSON to binary:

  • Ensure the JSON is valid and serializable. Invalid JSON or circular references can cause conversion errors or unexpected results.
  • Confirm that the encoding matches the expected use case. For standard configuration files, utf8 is typically the correct choice.
  • If the JSON originates from external systems, consider validating or normalizing it in a previous node before passing it into Move Binary Data.

3. Write Binary File Node

The Write Binary File node is responsible for persisting the binary payload to a local file on the n8n host system.

Primary Responsibilities

  • Read the binary property created by the Move Binary Data node.
  • Write the binary content to the specified file path.
  • Optionally overwrite existing files if the path already exists.

Key Configuration Parameters

In the example workflow, the node is configured to write to:

/home/node/.n8n/standup-bot-config.json

Typical settings include:

  • Binary Property: The name of the binary property produced by Move Binary Data.
  • File Path: Absolute path to the destination file, for example /home/node/.n8n/standup-bot-config.json.
  • Overwrite: Whether to overwrite the file if it already exists (depending on your environment and requirements).

File System Considerations

When configuring the file path, keep in mind:

  • The path must be valid on the server where n8n is running.
  • The n8n process user must have write permissions for the target directory and file.
  • If running n8n inside a container, the path must be accessible inside the container and mapped correctly to the host if you need external access.

Error Handling and Common Issues

  • Permission errors: If the n8n user cannot write to the path, the node will fail. Check directory permissions and ownership.
  • Invalid path: A non-existent directory or mis-typed path will result in a write failure. Ensure the directory structure exists in advance.
  • Binary property mismatch: If the binary property name does not match the one produced by Move Binary Data, the node will not find data to write. Confirm property names are consistent.

Configuration Notes

File Path and Permissions

The example path /home/node/.n8n/standup-bot-config.json is typical for n8n installations running under a user named node. Adjust this path to match your environment:

  • On different Linux distributions, the home directory or user name may differ.
  • On other operating systems, choose an equivalent writable location.

Before running the workflow in production:

  • Verify that the directory exists.
  • Ensure the n8n process can create or modify files in that directory.

JSON Data Validation

To prevent corrupted configuration files:

  • Validate JSON structure before the Move Binary Data node.
  • Use previous nodes or expressions to sanitize values and ensure required fields are present.
  • Optionally log or store the JSON payload before conversion for debugging or audit purposes.

Naming Conventions

Use clear and descriptive file names and paths to simplify maintenance:

  • Include environment identifiers, for example standup-bot-config.prod.json or standup-bot-config.staging.json.
  • Organize configuration files under a dedicated directory, for example /home/node/.n8n/configs/.

Use Cases and Practical Applications

This JSON-to-binary-to-file pattern is broadly applicable in n8n automation:

  • Dynamic configuration updates: Automatically regenerate and save configuration files after a workflow updates settings or receives new parameters.
  • JSON backups: Persist JSON data snapshots to disk for backup, versioning, or later inspection.
  • Pipeline handoff: Convert data streams into static files that can be consumed by external services, scripts, or cron jobs outside of n8n.

Because the workflow is minimal and self-contained, it is a good starting point for integrating file-based configuration management into more complex automations.

Tips for Optimization

  • Check file permissions early: Validate directory permissions before deploying the workflow to avoid runtime write errors.
  • Use consistent naming: Adopt clear file naming and directory structures to keep multiple configuration files manageable.
  • Validate JSON before conversion: Add a validation or transformation step before Move Binary Data to ensure you never write malformed JSON to disk.

Advanced Customization

Once the basic workflow is working, you can extend it while preserving the same core pattern:

  • Insert additional nodes before Move Binary Data to build JSON from APIs, databases, or user input.
  • Branch the workflow to write multiple configuration files by repeating the Move Binary Data and Write Binary File pattern with different paths.
  • Combine this workflow with scheduling or event-based triggers (instead of manual) once you are satisfied with the behavior.

Conclusion

This n8n workflow demonstrates a clean, reliable approach to converting JSON configurations into binary data and writing them to local files. By chaining a Manual Trigger, Move Binary Data, and Write Binary File node, you gain a reusable pattern for automating configuration updates, backups, and JSON file generation with minimal complexity.

Use this template as a starting point, then adapt the file path, JSON source, and surrounding nodes to fit your own automation scenarios.

Next step: Explore n8n further to build more advanced data and file automation workflows. Start with this JSON-to-file example and extend it to match your environment and configuration management needs.

How AI Agents Use Tools to Enhance Chat Responses

How AI Agents Use Tools To Transform Chat Responses

The Shift From Manual Work To Smart Automation

Every growing business eventually hits the same wall: there are too many conversations, too many questions, and not enough time. You answer the same queries, look up the same information, and jump between tools to keep up. It works for a while, but it is not scalable and it keeps you away from the work that truly moves the needle.

This is where automation and AI agents become more than a technical curiosity. They become a way to reclaim your time, scale your support, and create space for deeper, more strategic work. Instead of manually searching for answers, you can design an automated system that listens, understands, and responds with context-aware, accurate information.

In this article, you will walk through how an AI agent powered by n8n and tools like Wikipedia, SerpAPI, memory buffers, and OpenAI’s GPT models can upgrade your chat experience. Think of this workflow template as a starting point in your automation journey – a practical, ready-to-use foundation you can adapt, extend, and make your own.

From Static Replies To Tool-Powered AI Agents

Traditional chatbots rely on fixed rules or predefined answers. They can be useful, but they hit their limits quickly. Modern AI agents are different. They combine:

  • Powerful language models for natural conversation
  • Memory to remember what was said before
  • External tools to look up real-time, verified information

Instead of acting like a script, your agent behaves more like a smart assistant that can think, recall, and research on demand. With n8n, you can orchestrate all of this visually, turning complex AI behavior into a clear, maintainable workflow.

Mindset: Treat Your AI Agent As A Growing System

Before diving into the template itself, it helps to adopt the right mindset. This is not about building a perfect chatbot on day one. It is about creating a flexible system you can iterate on.

Start small, then improve:

  • Launch with a simple, working AI agent that can answer questions
  • Observe how users interact with it and what they ask most
  • Add new tools, refine prompts, and adjust memory as you learn

Every improvement you make compounds over time. As your AI agent becomes smarter, you free up more of your energy for creative and strategic work. The n8n template you are about to explore is built exactly with this spirit of growth and experimentation in mind.

Inside The AI Agent Architecture

At the heart of this n8n workflow template is a simple but powerful architecture. It brings together four core components that work in harmony:

  • User Input Trigger – Listens for new chat messages and kicks off the workflow.
  • Language Model (Chat OpenAI) – Understands the user’s request and generates human-like responses.
  • Memory Module – Keeps track of recent conversation history so replies stay consistent and contextual.
  • External Tools – Connects to services like Wikipedia and SerpAPI to fetch fresh, accurate information.

Instead of treating AI as a black box, this architecture lets you see and control how each part contributes. You can tweak settings, add or remove tools, and adapt the workflow as your needs evolve.

Step 1: Triggering The AI Agent With A New Chat Message

Every great conversation starts with a message. In this workflow, that moment is captured by a dedicated trigger node.

The process begins when a user sends a manual chat message. In n8n, this is represented by the “On new manual Chat Message” node. This node detects incoming messages and passes them directly into the AI agent block.

From a business perspective, this is where your automation starts saving time. Instead of someone manually reading, interpreting, and responding, the workflow takes over instantly, 24/7, without losing quality.

Step 2: Letting The Language Model Do The Heavy Lifting

Once the message is received, the AI agent calls a language model such as the GPT-4 variant via Chat OpenAI. This is the brain of your agent.

The model:

  • Understands natural language queries
  • Interprets intent, not just keywords
  • Generates coherent, context-aware responses

Within the node configuration, you can fine-tune parameters like temperature to balance creativity and precision. A lower temperature keeps answers focused and reliable. A slightly higher one allows more flexible, exploratory responses. This is your chance to shape the personality and tone of your AI assistant to match your brand or use case.

Step 3: Using Memory Buffers To Build Real Conversations

Real conversations flow. Users refer back to earlier questions, change their minds, or build on previous replies. Without memory, an AI agent would treat every message as if it were the first, which quickly becomes frustrating.

To solve this, the workflow uses a window buffer memory that stores the last 20 chat exchanges. This memory module:

  • Preserves recent context so the AI can follow the thread
  • Supports follow-up questions and clarifications
  • Makes the interaction feel more human and continuous

In practice, this means your agent can answer questions like “What about the previous option?” or “Can you expand on that?” without losing track. It is a small configuration that delivers a big upgrade in user experience.

Step 4: Connecting External Tools For Real-Time Accuracy

Language models are powerful, but they are not omniscient. Their knowledge is based on what they were trained on, which means they can be out of date or uncertain about specific details.

This is where external tools come into play. In this n8n workflow template, the AI agent can call out to:

  • Wikipedia – To retrieve factual information, definitions, and background knowledge.
  • SerpAPI – To perform real-time web searches and access up-to-date information from the internet.

The agent does not have to guess. It can query these APIs on demand, then weave the results into its responses. The outcome is a chatbot that feels both knowledgeable and current, ideal for users who rely on you for accurate, timely information.

Why A Multi-Tool Conversational Agent Changes The Game

By combining a language model, memory, and external tools inside n8n, you are not just building a chatbot. You are building a scalable, intelligent assistant that grows with your business.

Some of the key benefits include:

  • Improved Accuracy – Access to real-time and verified data sources like SerpAPI and Wikipedia reduces misinformation and guesswork.
  • Context Awareness – Memory buffers help maintain natural conversation flow, so users feel heard and understood.
  • Enhanced Flexibility – You can plug in different tools and APIs to handle a wide range of tasks, from research to support.
  • Better User Experience – Responses feel more relevant, more helpful, and more human, which builds trust and satisfaction.

Most importantly, this kind of automation frees you and your team from repetitive support tasks. You can invest your energy in strategy, creativity, and growth, knowing that your AI agent is handling a large portion of everyday questions and lookups.

Using The n8n Template As Your Starting Point

Instead of assembling all of this from scratch, you can start from a ready-made n8n workflow template that already connects:

  • The “On new manual Chat Message” trigger
  • The Chat OpenAI language model
  • A window buffer memory storing the last 20 exchanges
  • External tools like Wikipedia and SerpAPI

From there, you can:

  • Adjust prompts and temperature to match your voice
  • Change how many messages the memory keeps
  • Add new tools or APIs your business relies on
  • Integrate the agent into your existing chat interface or internal systems

This template is not the final destination. It is a launchpad that helps you move faster, experiment safely, and learn what works for your audience.

Next Steps: Build, Experiment, And Grow Your Automation

Modern conversational AI agents are no longer just language models. They are connected systems that use memory, external tools, and smart workflows to deliver enriched, context-aware responses. By combining Chat OpenAI, memory buffers, and APIs like SerpAPI and Wikipedia inside n8n, you can create an AI assistant that feels intelligent, reliable, and genuinely helpful.

If you have been waiting for the right moment to start automating more of your work, this is it. Use this template as your first step. Launch it, watch how it behaves, then refine and expand it as you go. Every improvement you make will compound, saving you time and giving your users a better experience.

Try The Template And Start Your Automation Journey

Ready to build your own AI-powered chatbot that leverages multiple tools for enhanced responsiveness and accuracy? Explore integrations with OpenAI, Wikipedia APIs, and search APIs like SerpAPI inside n8n, and turn your conversations into a powerful, automated system.

Use the workflow template below as your foundation, then customize it to fit your unique needs, brand, and goals.

How to Build an Air Quality Alerting System with n8n

How to Build an Air Quality Alerting System with n8n

What You Will Learn

In this tutorial-style guide, you will learn how to build an automated Air Quality Alerting System using n8n, an open-source workflow automation platform.

By the end, you will understand how to:

  • Schedule a workflow to run automatically every few minutes
  • Fetch live air quality data from the OpenAQ API
  • Format and calculate an AQI value from pollutant data
  • Send processed measurements to an AWS SQS queue
  • Check an AQI threshold and decide when to alert
  • Post detailed alerts into a Slack channel when air quality worsens

This guide focuses on Los Angeles as an example city, but you can easily adapt it to any location supported by OpenAQ.

Why Automate Air Quality Monitoring with n8n?

Monitoring air quality is important for public health, especially in cities that experience frequent pollution events. Manual checks are easy to forget and do not scale well. With n8n you can:

  • Run checks in near real time without manual effort
  • Centralize data collection in a queue for later analysis
  • Alert teams instantly when conditions become unhealthy
  • Extend the workflow as your needs grow

The workflow you will build fetches live data, processes it, stores it, and sends alerts when pollution crosses a defined threshold.

Conceptual Overview of the n8n Workflow

Before we dive into configuration steps, it helps to understand how the workflow is structured in n8n. At a high level, the automation follows this pattern:

  1. Scheduled Trigger – A Cron node runs the workflow every 5 minutes.
  2. Fetch AQI Data – An HTTP request retrieves the latest OpenAQ data for Los Angeles.
  3. Format AQI Record – A Set node extracts key fields and calculates an AQI value.
  4. Send to AWS SQS – The formatted record is serialized to JSON and pushed into an SQS queue.
  5. Check AQI Threshold – An IF node checks whether AQI is above 100.
  6. Alert Environment Channel – A Slack node posts an alert if the threshold is exceeded.

Each step is handled by a specific n8n node, which makes the workflow easy to read, debug, and extend.

Prerequisites

To follow along and implement this air quality alerting system, you will need:

  • n8n installed and running (self-hosted or cloud)
  • AWS credentials with permission to send messages to an SQS queue
  • An AWS SQS queue, for example named aqi-ingest-queue
  • A Slack app with permissions to post messages into your chosen channel
  • Access to the OpenAQ API (public and free at the time of writing)

Once you have these in place, you can create the workflow in n8n step by step.

Step-by-Step: Building the Air Quality Alerting Workflow in n8n

Step 1 – Configure the Scheduled Trigger (Cron Node)

The first node is responsible for starting the workflow at regular intervals.

  1. Add a Cron node to your workflow.
  2. Set the schedule to run every 5 minutes. For example:
    • Mode: Every X minutes
    • Value: 5

This node ensures near real-time monitoring without requiring you to manually click “Execute” in n8n.

Step 2 – Fetch Air Quality Data from OpenAQ

Next, you will retrieve the most recent air quality measurements from OpenAQ.

  1. Add an HTTP Request node (or a dedicated OpenAQ node if available in your n8n version).
  2. Configure it to call the OpenAQ API endpoint that returns measurements for Los Angeles.
  3. Set query parameters so that:
    • The results are limited to the latest single record.
    • You filter for the pollutant parameters PM2.5, PM10, and O3.

The response will typically include location information, timestamps, and pollutant concentrations. This raw data is what you will process in the next node.

Step 3 – Format and Enrich the AQI Record

Now you will extract the fields you care about and compute a simple AQI value.

  1. Add a Set node after the HTTP Request node.
  2. Use it to:
    • Pick out the location details from the API response.
    • Extract the pollutant concentrations for PM2.5, PM10, and O3.
    • Capture latitude and longitude for geo-referencing.
  3. In the same node (using expressions or additional fields), calculate an AQI value:
    • Apply a multiplier of 4.17 to the PM2.5 concentration to derive a basic AQI.
    • If the PM2.5 value is unavailable, default the AQI to 50.

This step turns the raw OpenAQ payload into a structured record that is easier to store, analyze, and display in alerts.

Step 4 – Send Processed Data to AWS SQS

With a clean record in hand, you can now send it to an AWS SQS queue for further processing or logging.

  1. Add an AWS SQS node.
  2. Configure your AWS credentials in n8n if you have not already.
  3. Set the target queue name to aqi-ingest-queue (or your chosen queue name).
  4. Serialize the formatted data into JSON and use it as the message body.

Storing the data in SQS decouples data ingestion from alerting. Other systems can read from the queue to batch process, archive, or analyze historical air quality trends without affecting this workflow.

Step 5 – Check the AQI Threshold with an IF Node

Next, you will decide whether the current air quality should trigger an alert.

  1. Add an IF node after the SQS node (or directly after the Set node, depending on your preferred sequence).
  2. Configure a condition that checks if:
    • AQI > 100

An AQI over 100 is commonly used as a cutoff where air quality moves from moderate into unhealthy for sensitive groups. If the condition is met, the workflow follows the “true” path to send an alert. If not, the workflow ends quietly without any notification.

Step 6 – Send an Alert to a Slack Channel

When the threshold is exceeded, you want your team or community to know quickly.

  1. On the “true” branch of the IF node, add a Slack node.
  2. Connect your Slack credentials or use an existing Slack integration in n8n.
  3. Choose the target channel, for example an environment or alerts channel.
  4. Compose a detailed message that includes:
    • The location and timestamp
    • The calculated AQI value
    • Individual pollutant concentrations for PM2.5, PM10, and O3
    • A short health advisory based on the AQI level, such as advising sensitive groups to limit outdoor activity

This Slack node becomes the visible part of your system, turning raw sensor data into actionable information for your audience.

Benefits of This Automated n8n Air Quality System

Once the workflow is live, you gain several advantages:

  • Timely alerts – The Cron node checks every 5 minutes so you get near real-time warnings as conditions change.
  • Reliable data storage – Using AWS SQS provides a scalable buffer for all processed records, which is ideal for later analysis or integration with other services.
  • Easy scalability – You can duplicate or extend nodes to support multiple cities or additional pollutants without redesigning the system.
  • Flexible alerting – Slack message formatting is fully customizable, so you can tailor alerts for technical teams, public channels, or other platforms.

Next Steps and Extensions

After your basic air quality alerting system is running, you can build on it with more advanced features:

  • Historical data logging – Add a database node to store each record for long-term trend analysis.
  • Multi-channel notifications – Extend the alert branch to include email or SMS for critical AQI levels.
  • More advanced AQI calculations – Incorporate multiple pollutants and more detailed formulas to improve accuracy.
  • Dashboards and visualizations – Connect the data in SQS or your database to a BI tool to create live monitoring dashboards.

Each of these enhancements can be added as extra nodes or branches in the same n8n workflow.

Quick Recap

To summarize, your n8n air quality alerting workflow:

  1. Uses a Cron node to trigger every 5 minutes.
  2. Calls the OpenAQ API to fetch the latest Los Angeles measurements for PM2.5, PM10, and O3.
  3. Formats the response with a Set node, calculates an AQI using a 4.17 multiplier on PM2.5, and captures location and coordinates.
  4. Sends the structured data as JSON to an AWS SQS queue named aqi-ingest-queue.
  5. Uses an IF node to check if AQI is greater than 100.
  6. Posts a detailed alert to a Slack channel if the threshold is exceeded.

FAQ

Can I monitor a different city instead of Los Angeles?

Yes. Update the parameters in the node that calls the OpenAQ API to use your target city or coordinates. The rest of the workflow can remain the same.

Do I have to use AWS SQS?

No. SQS is used here to provide scalable message buffering and decouple ingestion from processing. You can replace it with a database, another queue system, or skip it if you only need alerts.

Is the AQI calculation accurate?

The example uses a simple multiplier of 4.17 on PM2.5 and defaults to 50 when PM2.5 is missing. This is a simplified approach. For production use, you may want to implement a more detailed AQI formula that considers multiple pollutants.

Can I send alerts to other platforms besides Slack?

Yes. n8n supports many integrations. You can add nodes for email, SMS, incident management tools, or other messaging apps alongside or instead of Slack.

Start Building Your Air Quality Alert System

With n8n, you can automate air quality monitoring, protect public health, and stay informed with minimal ongoing effort. Once you have your prerequisites ready, configure each node, test the workflow, then activate it so it runs on schedule.

Explore the n8n documentation and the AWS and Slack integrations to customize this workflow for your specific needs and audience. Small adjustments to thresholds, locations, or alert messages can tailor the system for local communities, workplaces, or city-wide monitoring projects.

If you find this kind of automation helpful, share the idea with your tech community and help raise awareness about clean air initiatives.