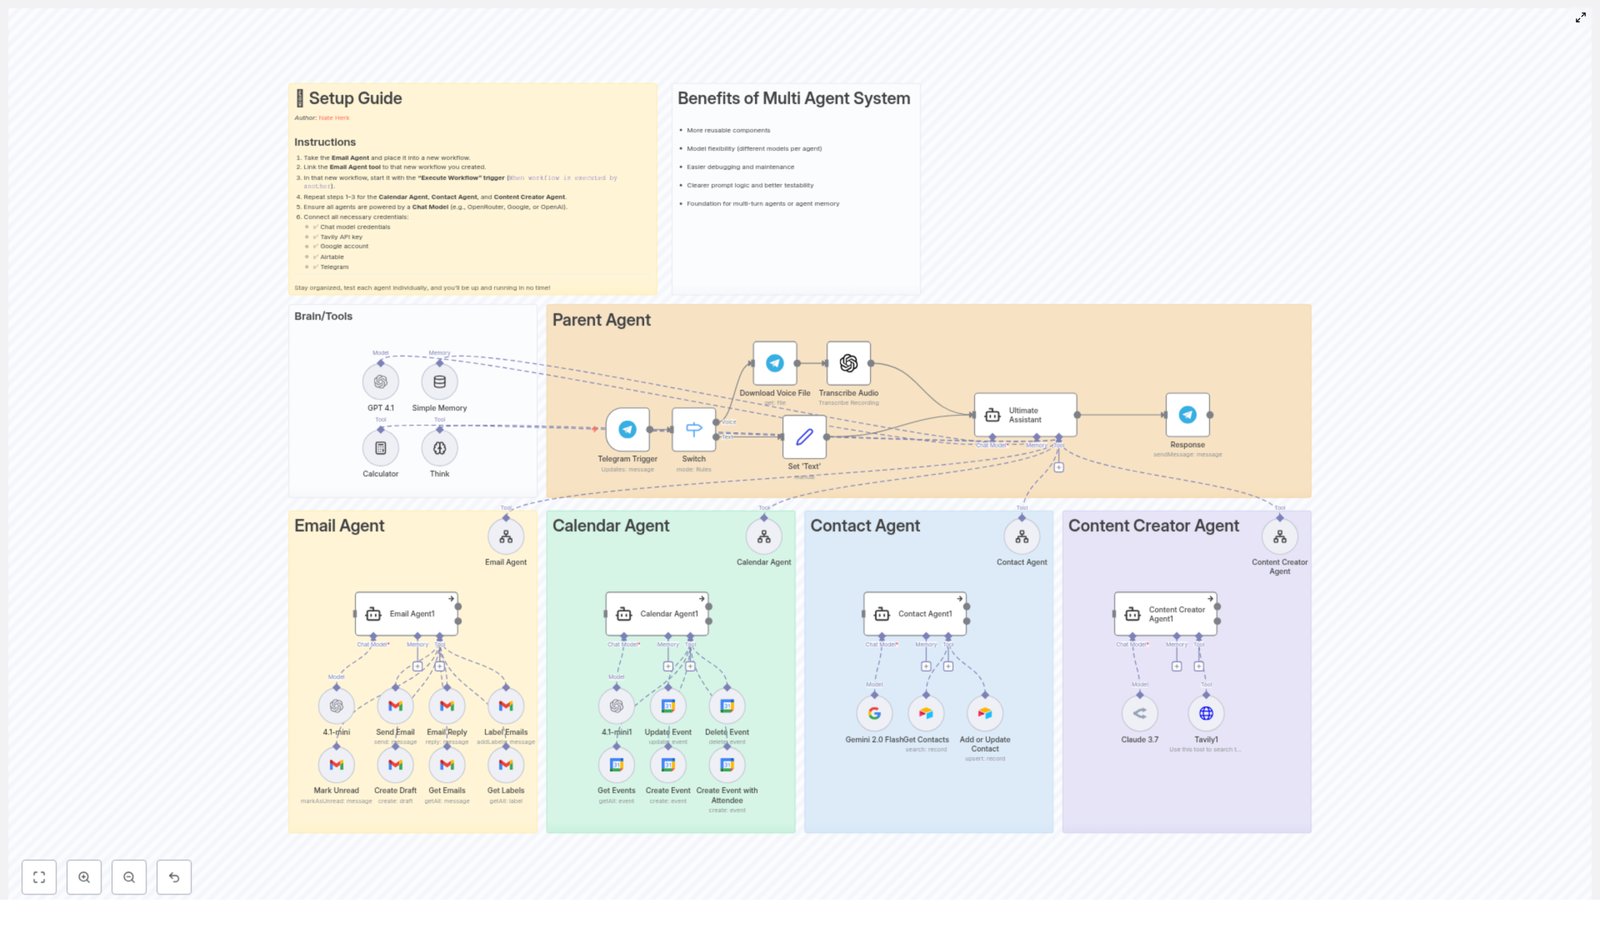
Benefits of Multi Agent System
Multi agent systems (MAS) are a software architecture pattern in which multiple autonomous, intelligent agents cooperate or coordinate to achieve shared system objectives. Instead of relying on a single monolithic component, responsibility is distributed across specialized agents that communicate and collaborate. This pattern is increasingly used in AI automation, complex workflows, and large-scale intelligent applications because it improves modularity, scalability, and maintainability.
Overview of Multi Agent System Architecture
In a multi agent system, each agent is designed as an independent unit with a clearly defined role. Agents can process inputs, apply domain-specific logic or models, and produce outputs that other agents or external services consume. Collectively, they form a coordinated workflow that can handle complex tasks more flexibly than a single, tightly coupled system.
Key characteristics of a MAS include:
- Autonomy – Each agent can operate independently within its own scope.
- Specialization – Agents are optimized for specific sub-tasks or domains.
- Interoperability – Agents communicate via well-defined interfaces or message structures.
- Composability – Agents can be combined, reordered, or reused across different workflows.
This structure is particularly useful when building AI-driven systems that integrate multiple capabilities, such as email handling, scheduling, content generation, and contact management, in a single coordinated environment.
System Architecture and Core Advantages
1. Component Reusability and Modular Design
In a MAS, each agent is implemented as a self-contained component responsible for a specific task or role. Because the agent encapsulates its logic, data handling, and interaction patterns, it can be reused in multiple solutions with minimal changes.
Practical benefits include:
- Reduced duplication – Common capabilities (for example, a calendar scheduling agent) can be shared across projects instead of being reimplemented.
- Faster development cycles – Existing agents can be composed into new workflows, which shortens the time required to design and deploy new features.
- Consistent behavior – Reusing the same agent logic across different contexts ensures uniform handling of similar tasks.
This modularity is especially valuable when scaling automation or when maintaining a library of agents that address recurring business needs.
2. Flexible Integration of Different Models per Agent
Multi agent systems support heterogeneous AI models, which means each agent can be backed by a different underlying model or algorithm tuned for its specific function. This avoids forcing a single model to handle all use cases, which can degrade performance or accuracy.
Typical patterns include:
- Task-specific models – A natural language processing agent might use a language model optimized for text understanding, while a scheduling agent uses a model or rule set tailored to calendar logic.
- Domain-specific optimization – Agents that work with structured data, such as contacts or events, can rely on specialized parsers or validation routines, while creative agents can use generative models.
- Independent upgrades – You can update or swap the model behind one agent without affecting the rest of the system, as long as the agent maintains its external interface.
This per-agent model selection improves overall system effectiveness, because each capability uses tools that are well aligned with its task requirements.
3. Isolated Debugging and Maintainability
Because agents operate semi-independently, troubleshooting can focus on a single agent at a time rather than the entire system. Each agent has its own input, processing logic, and output, which makes it easier to pinpoint where an error originates.
Maintenance advantages include:
- Targeted debugging – If output from a specific agent is incorrect, developers can inspect that agent’s logic, prompts, or configuration without disturbing other agents.
- Lower risk during updates – Changes to one agent typically do not require refactoring the whole system, as long as the agent’s contract (inputs and outputs) remains stable.
- Simplified regression testing – You can run focused tests on a single agent to verify fixes or optimizations before reintegrating it into the wider workflow.
This compartmentalization is important for complex AI applications, where a monolithic architecture can make debugging and maintenance costly and error-prone.
4. Clear Prompt Logic and Improved Testability
Assigning well-defined sub-tasks to distinct agents leads to clearer prompt logic and more structured reasoning flows. Instead of constructing a single, very complex prompt for all tasks, you can define smaller, focused prompts per agent that are easier to design, audit, and refine.
From a testing perspective:
- Per-agent test scenarios – Each agent can be tested with specific input-output cases that reflect its role, which improves coverage and reliability.
- Prompt-level validation – Developers can iterate on an individual agent’s prompt or configuration and immediately measure the impact, without interference from other parts of the system.
- Incremental rollout – New or modified agents can be validated in isolation, then reintroduced into the full multi agent workflow after they pass their tests.
This structure yields more predictable and robust behavior, especially in AI workflows where prompt design and evaluation are critical.
5. Foundation for Multi-turn Agents and Agent Memory
A well-architected multi agent system provides a strong base for advanced capabilities, such as multi-turn interactions and persistent agent memory. By design, agents can maintain or access context related to past interactions, which is essential for building more intelligent and user-aware systems.
Typical use cases include:
- Multi-turn conversations – Conversation-oriented agents can track previous user messages, decisions, or system states and use that history to inform subsequent responses.
- Contextual memory – Agents responsible for tasks like email handling, calendar management, or contact updates can store and recall relevant details, so they do not need to recompute or re-ask for information each time.
- Coordinated context sharing – Multiple agents can share or pass context where appropriate, enabling a coherent overall experience even when different agents handle different segments of a workflow.
This capability significantly enhances user experience, because the system behaves more like a cohesive assistant that remembers previous interactions, rather than a set of disconnected tools.
Practical Application Scenarios
Multi agent systems are particularly suited to AI applications that involve several specialized operations working in tandem. Common patterns include:
- Email processing agents that classify, summarize, or respond to messages.
- Calendar scheduling agents that interpret availability, manage events, and resolve conflicts.
- Contact management agents that maintain and update user or customer records.
- Content creation agents that draft, refine, or localize written material.
By designing each of these as separate agents and orchestrating them as a coordinated MAS, teams can build systems that are both powerful and easier to evolve over time.
Configuration Notes and Implementation Considerations
When implementing a multi agent system, consider the following technical aspects to fully leverage its benefits:
- Agent boundaries – Define clear responsibilities and interfaces for each agent so that data flow and ownership are unambiguous.
- Error isolation – Design agents to handle errors locally where possible, for example by validating inputs or handling model failures, then returning informative outputs or status codes to the rest of the system.
- Communication patterns – Use structured messages or well-defined data formats for inter-agent communication to avoid ambiguity and to simplify debugging.
- Versioning – When updating agents or underlying models, maintain version control to allow rollback if a change introduces unexpected behavior.
By paying attention to these details, you preserve the core advantages of MAS architecture, such as modularity and maintainability, while reducing integration issues.
Advanced Customization and Extension
After establishing a basic multi agent system, you can extend it in several advanced directions without disrupting the existing architecture:
- Adding new agents – Introduce additional specialized agents, for example a reporting agent or a monitoring agent, and integrate them into the existing orchestration.
- Optimizing models per agent – Swap or fine-tune models used by individual agents to improve accuracy, latency, or cost, while keeping the rest of the system unchanged.
- Enhancing memory and context – Implement more sophisticated memory strategies, such as long-term storage of key events or user preferences, that agents can query when needed.
- Scaling horizontally – Run multiple instances of high-load agents to handle increased traffic or more complex workloads.
Because each agent is modular, these enhancements can be implemented incrementally and tested independently before full deployment.
Conclusion
Adopting a multi agent system architecture delivers tangible benefits for AI and automation projects. By decomposing functionality into specialized agents, you gain reusable components, flexible model integration, simpler debugging, clearer prompt logic, and a robust basis for multi-turn interactions and agent memory.
This approach is particularly effective for complex applications that require collaboration among diverse capabilities, such as email handling, scheduling, contact management, and content generation. A well-designed MAS offers a structured yet adaptable framework that can evolve alongside your requirements.
Call to Action
If you are planning to build scalable, intelligent, AI-powered systems, consider structuring your solution as a multi agent system. Start by identifying discrete tasks, design modular agents around those tasks, and select specialized models for each agent. Over time, you can expand the system by adding new agents or refining existing ones, while keeping the overall architecture clean and maintainable.