Keeping inventory synchronized across Shopify, WooCommerce, and Square is a recurring challenge for e-commerce teams that sell on multiple channels. This reference guide documents an n8n workflow template – the Multi-Channel Inventory Orchestrator – that centralizes inventory logic in Supabase, reconciles stock across channels, applies rate-limited updates, and dispatches alerts when stock levels fall below defined thresholds.
1. Solution Overview
The workflow is designed as a reusable n8n automation that:
Runs on a fixed schedule (every 10 minutes in the template)
Pulls inventory from Shopify, WooCommerce, and Square via HTTP Request nodes
Merges per-channel quantities into a unified inventory representation
Reconciles that data with a canonical inventory table in Supabase
Upserts reconciled records back into Supabase as the source of truth
Propagates final stock values back to each sales channel
Sends Slack notifications for low stock and email alerts for critical stock
By centralizing inventory orchestration in n8n and Supabase, the workflow helps prevent overselling, reduces manual updates, and provides a consistent, auditable inventory record across all connected systems.
2. Architecture & Data Flow
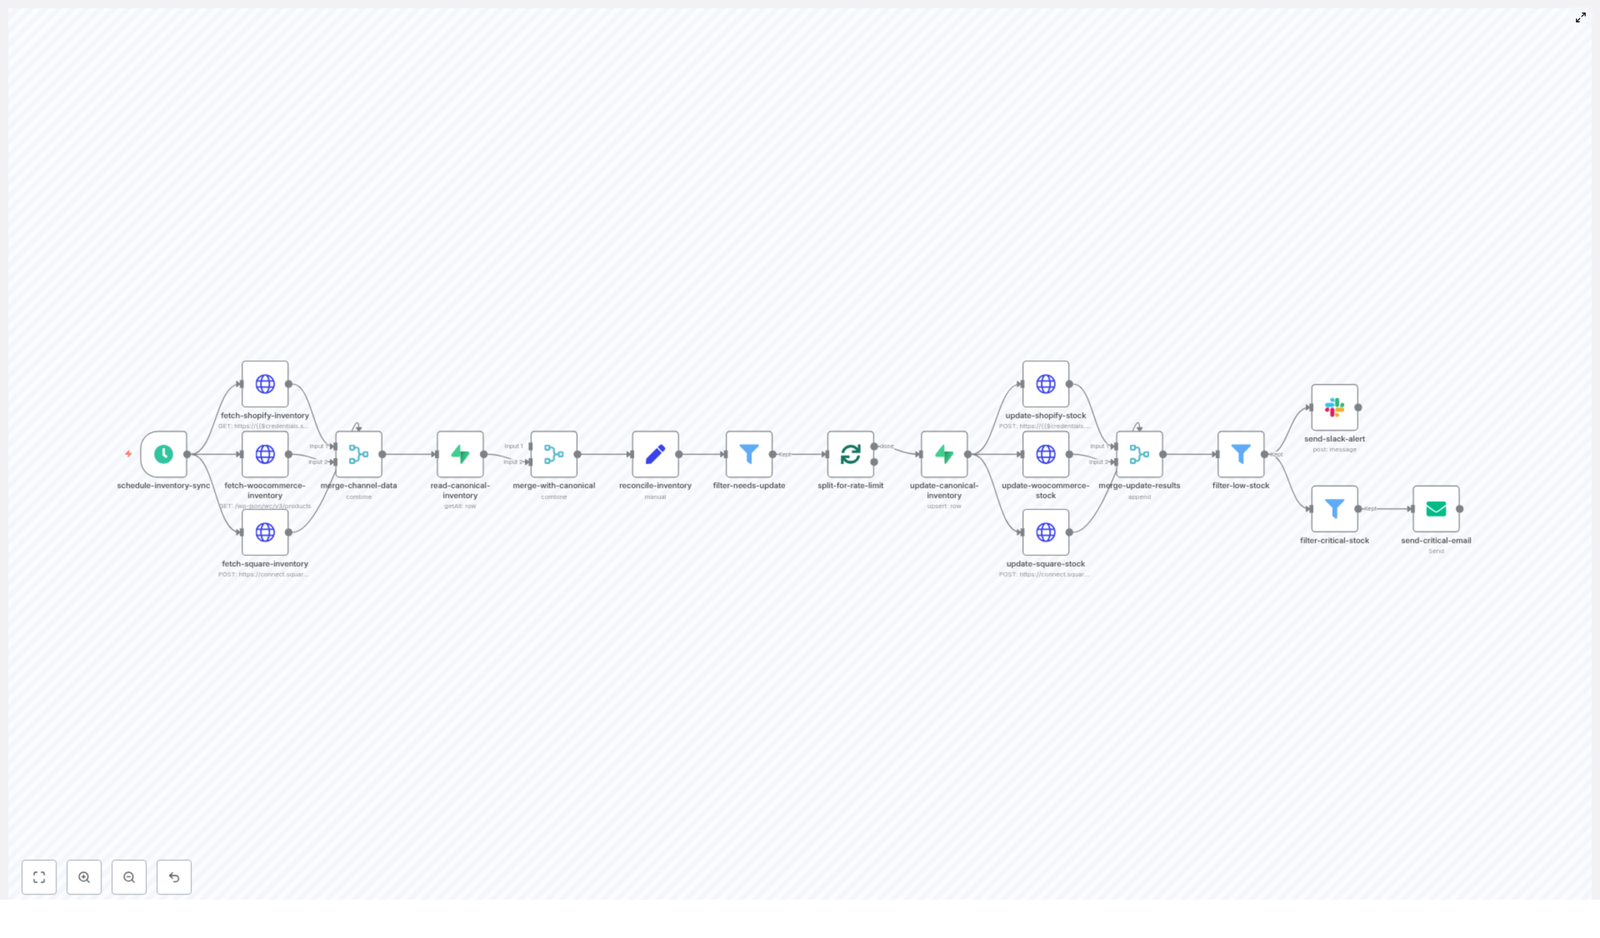
2.1 High-Level Data Flow
Trigger – A Schedule Trigger node starts the workflow at a configured interval.
Data Ingestion – HTTP Request nodes fetch inventory data from Shopify, WooCommerce, and Square APIs.
Normalization & Merge – A merge node consolidates per-channel responses into a unified structure.
Canonical Read – A Supabase node reads the existing canonical inventory table.
Reconciliation – A Set node calculates per-SKU fields such as per-channel quantities, total_stock, and needs_update.
Filtering & Batching – Only records flagged as needs_update are passed to a Split In Batches node to respect API rate limits.
Canonical Upsert – The Supabase node upserts reconciled records with onConflict: sku.
Channel Updates – HTTP Request nodes push updated stock levels back to Shopify, WooCommerce, and Square.
Alerts – Slack and Email nodes send notifications for low and critical stock levels.
2.2 Core Design Goals
Single source of truth – Supabase inventory table acts as the canonical store.
Idempotent updates – Repeated workflow runs should not create duplicate or inconsistent changes.
Rate-limit awareness – All external API calls are batched to comply with provider rate limits.
Extensibility – Additional channels or reconciliation rules can be added without redesigning the entire flow.
3. Node-by-Node Breakdown
3.1 schedule-inventory-sync (Schedule Trigger)
Type: Schedule Trigger node
Role: Initiates a full inventory reconciliation and sync on a fixed interval.
Default configuration: Runs every 10 minutes.
Usage: Adjust the interval based on order volume and API rate limits. For high-volume stores, shorter intervals improve freshness but increase API usage.
Key considerations:
Ensure the configured interval plus total workflow runtime does not lead to overlapping runs, especially if inventory updates are not strictly idempotent.
For testing, you can temporarily switch to manual execution or a longer interval to observe behavior.
3.2 fetch-*-inventory (HTTP Request nodes)
Type: HTTP Request nodes
Role: Retrieve current inventory state from each sales channel.
There are three dedicated HTTP Request nodes, each using its own credentials and endpoint configuration:
3.2.1 Shopify Inventory Fetch
API: Shopify REST API
Endpoints: Products / Inventory-related endpoints
Key fields:inventory_item_id, location_id, and quantity
The node calls Shopify product or inventory endpoints and maps each inventory item to its associated location. The resulting data is normalized so that each SKU can be associated with a Shopify-specific quantity field, typically exposed as shopify_qty during reconciliation.
3.2.2 WooCommerce Inventory Fetch
API: WooCommerce REST API
Endpoint: Products endpoint
Key field:stock_quantity
The WooCommerce node retrieves product data and extracts stock_quantity for each item. This quantity is later mapped to woocommerce_qty in the unified inventory record.
The Square node uses batch-retrieve calls to obtain inventory counts associated with catalog IDs. These are then normalized to a per-SKU quantity, typically represented as square_qty in the reconciliation step.
Authentication: Each node uses n8n credential objects for secure API key or OAuth storage. Configure these credentials once and reference them in the HTTP Request nodes.
3.3 merge-channel-data & read-canonical-inventory
This stage combines the data from all channels and aligns it with the canonical Supabase dataset.
3.3.1 merge-channel-data (Merge node)
Type: Merge node
Role: Aggregate responses from Shopify, WooCommerce, and Square into a single item stream keyed by SKU or other product identifier.
The merge node is responsible for:
Matching records from multiple channels based on a shared identifier (commonly SKU).
Producing one consolidated item per SKU that contains all per-channel quantities.
3.3.2 read-canonical-inventory (Supabase node)
Type: Supabase node (Read operation)
Role: Load the current canonical inventory snapshot from Supabase.
Table:inventory
Usage: Provides baseline data such as previous sync quantities, SKU mappings, and any historical fields required for decision-making.
The canonical dataset is used to determine whether a record has diverged from the last known state and to compute fields like needs_update and last_sync.
3.4 reconcile-inventory (Set node)
Type: Set node
Role: Build a unified inventory record per SKU and compute derived fields.
Typical fields computed in this node include:
sku – Primary identifier for the product or variant.
shopify_qty – Quantity reported by Shopify.
woocommerce_qty – Quantity reported by WooCommerce.
square_qty – Quantity reported by Square.
total_stock – Aggregated quantity across channels, commonly the sum of all channel quantities.
needs_update – Boolean flag indicating that the canonical record differs from current channel data and requires synchronization.
low_stock – Boolean or flag field used later for alerting when quantity is below a threshold.
last_sync – Timestamp of the last time this SKU was reconciled.
Reconciliation logic:
By default, the template uses a simple aggregation strategy: total_stock is computed as the sum of all available channel quantities.
In more advanced scenarios, you may treat certain channels as authoritative. For example, you might prioritize Square for in-store inventory and Shopify for online availability, and adjust total_stock accordingly.
The needs_update flag typically compares the newly calculated values with the existing canonical record. If they differ, the record is marked for update.
All logic in this node should be explicit and deterministic. This simplifies debugging and makes it easier to evolve reconciliation rules as business requirements change.
3.5 filter-needs-update & split-for-rate-limit
3.5.1 filter-needs-update (Filter node)
Type: Filter or IF node
Role: Pass only items where needs_update is true.
This step ensures that only SKUs with actual discrepancies proceed to update operations, reducing unnecessary API calls and load on external systems.
3.5.2 split-for-rate-limit (Split In Batches node)
Type: Split In Batches node
Role: Process inventory updates in controlled batch sizes to respect rate limits.
Default batch size:batchSize: 50
Behavior: Items are processed in chunks of up to 50 per iteration.
Adjust batchSize based on:
Provider-specific API rate limits (Shopify, WooCommerce, Square).
Typical number of SKUs and frequency of syncs.
3.6 update-canonical-inventory (Supabase upsert)
Type: Supabase node (Insert/Upsert)
Role: Persist reconciled inventory records into the canonical Supabase table.
Table:inventory
Operation: Upsert with onConflict: sku
Using onConflict: sku ensures that each SKU is unique in the table:
If the SKU exists, the record is updated with the latest quantities and metadata.
If the SKU does not exist, a new record is inserted.
This canonical store provides:
A historical trail of inventory changes (when combined with audit fields).
A stable reference for cross-channel reconciliation.
A convenient integration point for reporting, analytics, or downstream automations.
3.7 update-*-stock (Channel update nodes)
Type: HTTP Request nodes
Role: Apply the final reconciled stock levels back to each sales channel.
3.7.1 Shopify Stock Update
Endpoint:inventory_levels/set
Identifiers:inventory_item_id, location_id
The node sets inventory levels for each Shopify item using stable identifiers. Ensure that the payload includes both inventory_item_id and location_id so the operation is idempotent and updates the correct location-specific quantity.
3.7.2 WooCommerce Stock Update
Endpoint:products/{id} (PUT)
Field:stock_quantity
This node issues a PUT request to the WooCommerce products endpoint, updating stock_quantity for each product ID. The call overwrites the existing stock quantity with the reconciled value from Supabase.
3.7.3 Square Stock Update
Endpoint:inventory/changes/batch-create
Type: Inventory adjustment
The Square update node creates inventory adjustments using a batch-create changes endpoint. Each adjustment references the appropriate catalog_object_id and applies the required quantity change.
Idempotency considerations:
Always include stable identifiers (inventory item IDs, location IDs, catalog object IDs) so repeated runs do not create duplicated or conflicting entries.
Design requests to set absolute quantities where possible, not just relative adjustments, to avoid drift.
3.8 Alerts: Slack and Email
Type: Slack and Email nodes
Role: Notify relevant teams when stock drops below configured thresholds.
After channel updates, the workflow merges results and filters items based on their low_stock or similar flag.
Slack alerts: A Slack node sends a message containing key fields such as SKU, product name, and per-channel quantities. This is intended for general team awareness and routine monitoring.
Email alerts: When stock reaches a critical level (for example, less than 5 units), an Email node sends a more urgent notification to operations or purchasing stakeholders.
Use these alerts to trigger manual or automated replenishment actions and to ensure that critical SKUs do not run out unexpectedly.
4. Configuration & Operational Notes
4.1 Authentication and Credentials
Store all API keys, secrets, and tokens in n8n Credentials rather than hard-coding them in node parameters.
Use least-privilege keys that only grant the required access for inventory operations.
Regularly rotate credentials in line with your security policies.
For Supabase, consider role-based access control so that the user used by n8n can only access the required tables and operations.
4.2 Error Handling and Retries
Wrap external API calls in n8n error handling constructs, such as error workflows or Try/Catch-style patterns.
Enable retries with exponential backoff where appropriate to handle transient network or rate-limit errors.
Log failures with enough context (SKU, channel, error message) to support troubleshooting.
Consider compensating actions or partial rollback strategies if a subset of channels fails during an update.
4.3 Idempotency and Conflict Resolution
Treat the Supabase inventory table as the single source of truth for stock values.
Ensure update calls to Shopify, WooCommerce, and Square are idempotent by:
Using stable identifiers like inventory_item_id, location_id, catalog_object_id.
Setting absolute quantities rather than incremental deltas where supported.
Define conflict resolution policies when channels disagree, such as:
Last-write-wins based on the most recent update timestamp.
Channel-priority rules where certain systems override others.
4.4 Monitoring, Logging, and Auditing
Export metrics like:
Workflow run duration
Number of SKUs processed
Number of updates per channel
Success vs failure counts
Integrate with monitoring tools such as Datadog or Prometheus if available.
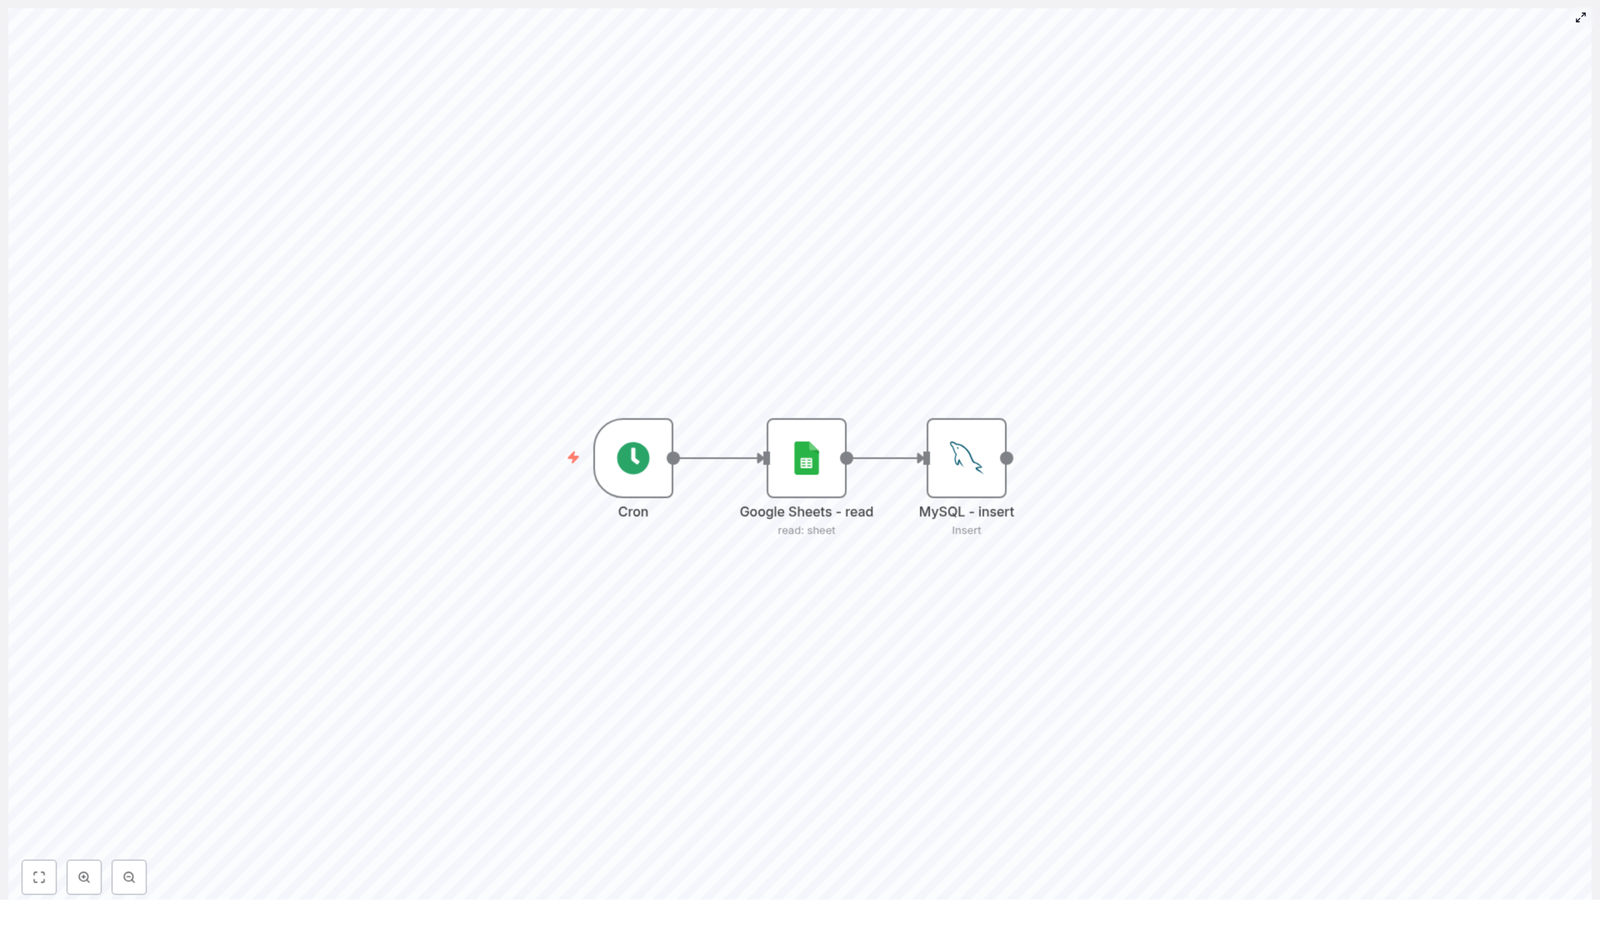
Import Spreadsheet to Postgres with n8n (Automated Workflow)
Picture this: it is 11:58 p.m., your spreadsheet has 4,000 rows, and you are still copy-pasting data into your PostgreSQL table like it is 2005. Your eyes hurt, your coffee is cold, and one wrong paste could ruin tomorrow’s reports.
Or, you could let an n8n workflow quietly wake up at midnight, read your spreadsheet, load everything into Postgres, and politely ping Slack when it is done. No drama, no late-night copy-paste marathons.
In this guide, you will learn how to set up an automated n8n workflow that:
Runs on a schedule
Reads an Excel or CSV file
Parses each row into structured JSON
Inserts or updates rows in a PostgreSQL product table
Notifies a Slack channel when the import finishes
We will walk through what the template does, how to configure it, and some tips to keep your ETL pipeline fast, safe, and pleasantly boring.
Why bother automating spreadsheet imports?
Spreadsheets are still the universal language of “can you please update this by EOD.” Sales, inventory, product data, pricing, you name it, it is probably living in a sheet somewhere.
Turning that into an automated n8n workflow gives you:
Consistent, repeatable imports on a schedule, no human required
Fewer manual errors, because robots do not mis-click cells
Easy integration with analytics, inventory, or ERP systems downstream
Centralized error handling and notifications so problems do not stay hidden
In short, you trade “Did I import the latest version?” for “n8n has it covered.”
What this n8n workflow template actually does
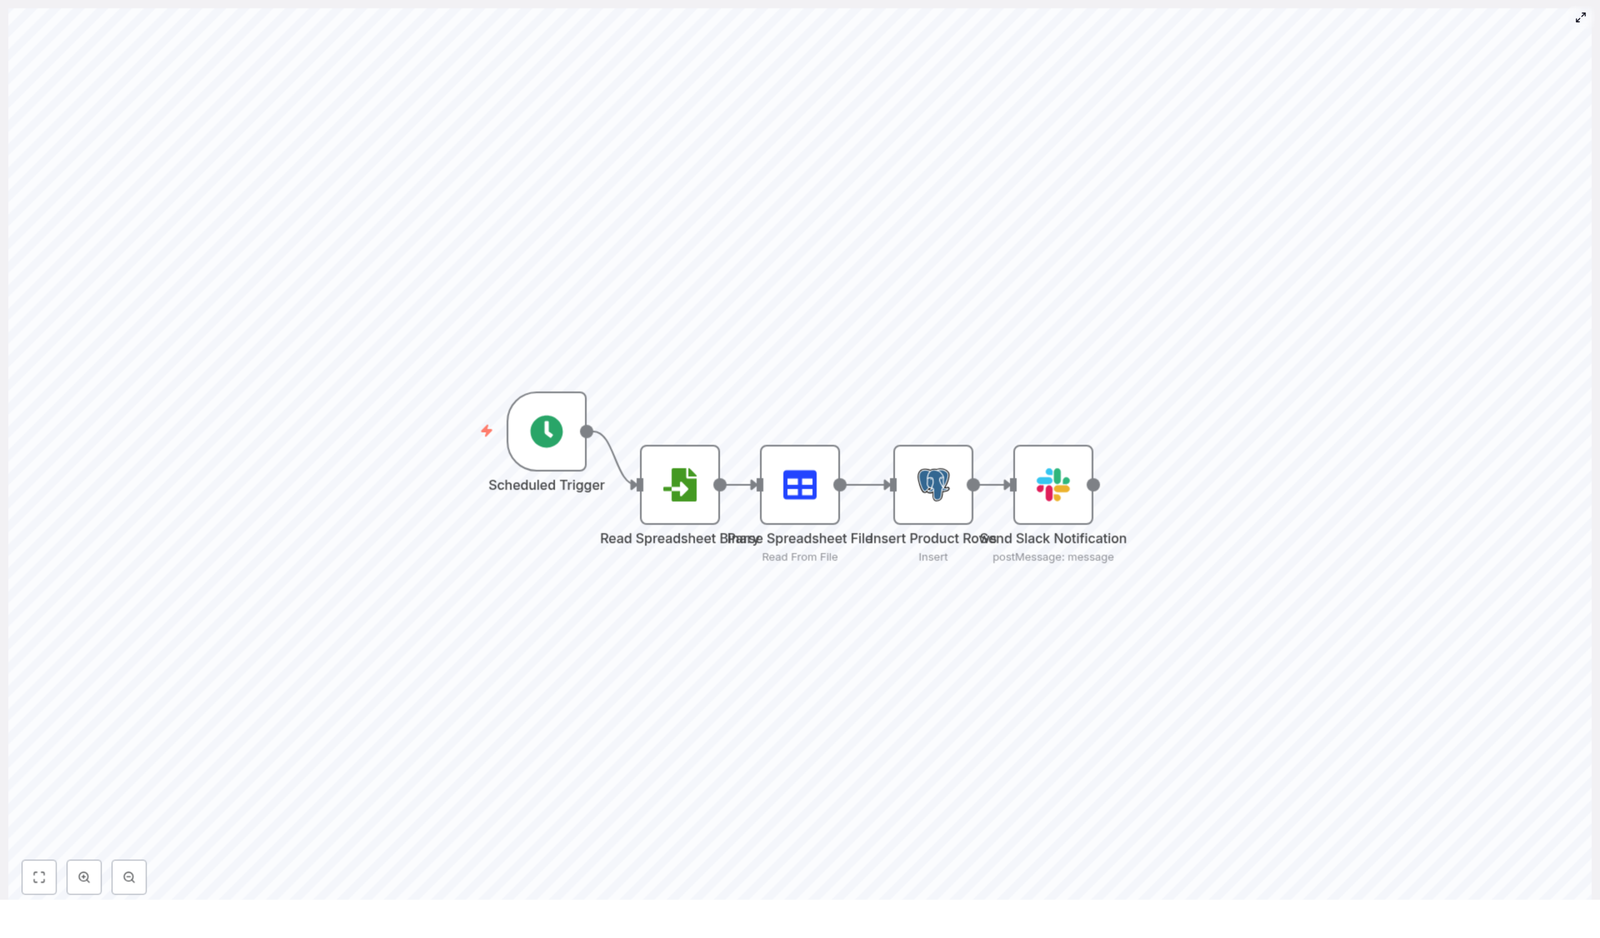
The template is a straightforward ETL-style automation. It pulls data from a spreadsheet and lands it in a Postgres table, then tells Slack about it. The workflow uses five nodes in a simple linear sequence:
Scheduled Trigger – runs on a cron schedule, for example daily at midnight (0 0 * * *).
Read Spreadsheet Binary – loads the spreadsheet file from disk or a mounted location.
Parse Spreadsheet File – converts the file into JSON rows that n8n can work with.
Insert Product Rows (Postgres) – inserts or updates records in the product table.
Send Slack Notification – posts a message in Slack when the import is done.
That is it. No manual imports, no “final_final_v3_really_final.xlsx” confusion. Just a predictable pipeline.
Before you start: prerequisites
You only need a few pieces in place to use this n8n template effectively:
n8n instance, either self-hosted or n8n cloud, with access to the file and database.
PostgreSQL database that has a product table with columns like name and ean.
Spreadsheet file in Excel or CSV format that n8n can reach, for example via a local path, mounted volume, S3, or another storage provider. The example uses a direct file path.
Slack workspace and app token with permission to post messages to a channel.
Quick-start: how to set up the template
Let us walk through the workflow step by step so you can tweak it for your own setup. We will follow the actual execution order: trigger, read, parse, insert, notify.
1. Schedule the workflow with a Cron Trigger
First, add a Cron Trigger node. This is what turns “I will run it later” into “it just runs.”
For a daily midnight import, use this cron expression:
0 0 * * *
You can change the schedule to match your use case:
Every hour for more frequent syncs
Once a week for slower-changing data
Any custom cron interval your ops team loves to argue about
2. Read the spreadsheet as binary data
Next, add a Read Binary File node. This node grabs the spreadsheet file and passes it along as binary data.
Configure:
File path to your spreadsheet, for example spreadsheet.xls or an absolute path.
If your file lives in cloud storage like S3 or Google Drive, you can swap this node for the matching storage node instead. The key idea is the same: the node outputs the file as binary so the next node can parse it.
Make sure:
The n8n process can reach that path
File permissions allow read access
3. Parse the spreadsheet into JSON rows
Now add a Spreadsheet File node. This is where the binary file turns into useful JSON objects, one per row.
Configure the node to:
Select the correct sheet if your workbook has multiple sheets
Set the header row if your spreadsheet has column names at the top
Each of these JSON objects will be passed to the Postgres node so it can map fields to table columns.
4. Insert spreadsheet rows into Postgres
Time to land the data in your database. Add a Postgres node that connects to your PostgreSQL instance and writes to the product table.
In the simple template version, the node is configured with:
{  "table": "product",  "columns": "name,ean"
}
The Postgres node takes incoming JSON rows and maps the fields to the specified columns. So name in the JSON goes into name in the table, and so on.
If you want more control, switch the node to Execute Query mode and use parameterized SQL, for example:
INSERT INTO product (name, ean)
VALUES ($1, $2)
ON CONFLICT (ean) DO UPDATE SET name = EXCLUDED.name;
Then map the incoming fields to the query parameters:
$1 → {{$json["name"]}}
$2 → {{$json["ean"]}}
The ON CONFLICT (ean) clause is your safety net. It prevents duplicate EANs from crashing the import by updating the existing row instead of inserting a new one.
5. Send a Slack notification when the import finishes
Finally, add a Slack node so you and your team know the job is done without having to check logs or dashboards.
Then include those details in the Slack message so stakeholders can react quickly if something looks off.
Making the workflow robust: errors, validation, and performance
A basic import is great until the first broken row, missing column, or surprise file format shows up. Here is how to make the workflow resilient without turning it into a monster.
Handling errors and retries in n8n
Automation is only relaxing when you trust it. n8n gives you several tools to manage failures:
Use an Execute Workflow node on error to route failures to a dedicated recovery workflow. That workflow might log details, send alerts, or attempt a retry.
Enable Continue On Fail on non-critical nodes when you prefer “import what you can” over “fail the whole job.”
Add an IF node to inspect responses and, if something looks wrong, trigger a Slack or Email node with a clear error message.
Log errors to a separate database table for long-term auditing and debugging.
Data validation and transformation before Postgres
Spreadsheets are friendly to humans, not always to databases. Before inserting rows, it is smart to clean and validate the data.
Trim whitespace and normalize text cases where appropriate.
Validate EAN or UPC values with a regex or checksum to avoid junk IDs.
Convert numeric strings to integers or decimals so Postgres does not complain.
Drop blank or incomplete rows using an IF node or a Function node.
For example, a Function node that filters out rows missing name or ean could look like:
If your spreadsheets are small, you can probably skip this section. If they are not, your future self will appreciate some tuning:
Batch inserts: For thousands of rows, use multi-row INSERTs or COPY-style operations instead of one row at a time.
Connection pooling: Make sure your Postgres connections are pooled so the workflow does not exhaust database connections under load.
Heavy transforms outside n8n: If you are doing complex calculations, consider pre-processing with a script or serverless function before n8n handles the import.
Monitor runtime: Track how long the job takes and set alerts if it suddenly starts running much longer than usual.
Security best practices
Even if this is “just an import,” it still touches your database and Slack, so treat credentials carefully.
Store Postgres credentials and Slack tokens in n8n Credentials or environment variables, not directly in node fields as plain text.
Use a database user with only the permissions the workflow needs, for example INSERT and UPDATE on the target table, not superuser.
Enable TLS for Postgres connections where supported so your data is encrypted in transit.
Concrete example: template configuration at a glance
To recap, here is how the example workflow template is configured:
Parse Spreadsheet File – uses the default sheet and header row configuration
Insert Product Rows (Postgres) – table: product, columns: name,ean, with your Postgres credentials
Send Slack Notification – posts to #general with a message like “Spreadsheet import completed successfully.”
Testing, validation, and troubleshooting
Before you trust this workflow with production data, give it a safe test run or two.
Testing checklist
Run the workflow manually using a small test spreadsheet.
Verify that the expected rows appear correctly in the Postgres product table.
Confirm that the Slack notification arrives with the right context or row counts.
Try edge cases like an empty file, missing columns, or duplicate EANs and see how the workflow behaves.
Common issues and how to fix them
File not found: Double-check the file path, make sure n8n is running in the same environment that can see that path, and verify file permissions.
Parse errors: Confirm that the spreadsheet has a header row or configure explicit column mappings in the Spreadsheet File node.
Database constraint violations: Inspect the Postgres logs and adjust your INSERT logic, for example by adding an ON CONFLICT clause as shown above.
Slack authentication errors: Check that the app token and channel ID are correct and that the Slack app is installed in the right workspace with permission to post.
Leveling up: next steps and enhancements
Once the basic import is running smoothly, you can gradually turn this into a more complete ETL setup.
File versioning and archiving: Move processed files to an archive folder or bucket so you know exactly what was imported and when.
Import metadata: Store file name, timestamp, and row counts in a separate audit table for reporting and debugging.
Status dashboard: Build a lightweight dashboard or report that shows last run status, failures, and row counts, so non-technical stakeholders can keep an eye on imports.
Multi-sheet and multi-format support: Extend the workflow to handle multiple sheets or dynamically choose file formats when your data sources grow more complex.
Conclusion: let n8n do the boring bits
Using n8n to import spreadsheets into PostgreSQL turns a repetitive, error-prone chore into a predictable background job. With just a few nodes – a scheduler, file reader, parser, Postgres inserter, and Slack notifier – you get a reliable ETL pipeline that:
Runs automatically on a schedule
Keeps your database in sync with spreadsheet updates
Provides clear, auditable results and notifications
Your team spends less time wrestling with CSVs and more time using the data.
Generate AI-Ready llms.txt Files from Screaming Frog Crawls With n8n (So You Never Copy-Paste Again)
Picture this: you have a huge website, a looming AI project, and a blinking cursor asking for “high quality URLs for training.” So you open your crawl export, start scanning URLs, and realize you are three minutes in and already regretting every life choice that led you here.
Good news, you do not have to do that. This n8n workflow takes a Screaming Frog crawl, filters the good stuff, formats everything nicely, and spits out a clean llms.txt file that LLMs will love. No manual sorting, no spreadsheet rage, just automation doing what automation does best.
In this guide, you will see what an llms.txt file is, how Screaming Frog and n8n work together, how the workflow is built, and how to customize it for your own site. Same technical details as the original tutorial, just with fewer yawns and more clarity.
First things first: what is an llms.txt file?
An llms.txt file is a simple text index that tells large language models which pages on your site are worth their attention. Think of it as a curated reading list for your website.
Each line usually contains:
A title
A URL
An optional short description
By feeding an llms.txt file into your content discovery or ingestion pipeline, you:
Help LLMs find your best pages faster
Improve the quality of content used for training or querying
Make prompts and results more relevant, especially for large sites
In other words, it is a tiny file with a big impact on LLM performance and content selection.
Why Screaming Frog + n8n is a great combo
Screaming Frog is the workhorse that crawls your website and collects page-level data. n8n is the automation brain that turns that data into a polished llms.txt file.
Screaming Frog gives you:
URLs and titles
Meta descriptions
Status codes
Indexability
Content types
Word counts
n8n then:
Parses the Screaming Frog CSV export
Maps and normalizes the fields you care about
Filters out junk and non-indexable pages
Optionally runs a text classifier with an LLM
Formats everything into clean llms.txt lines
Exports or uploads the finished file automatically
The result is a repeatable workflow you can run every time you crawl a site, instead of reinventing your process every project.
How the n8n workflow works (high-level overview)
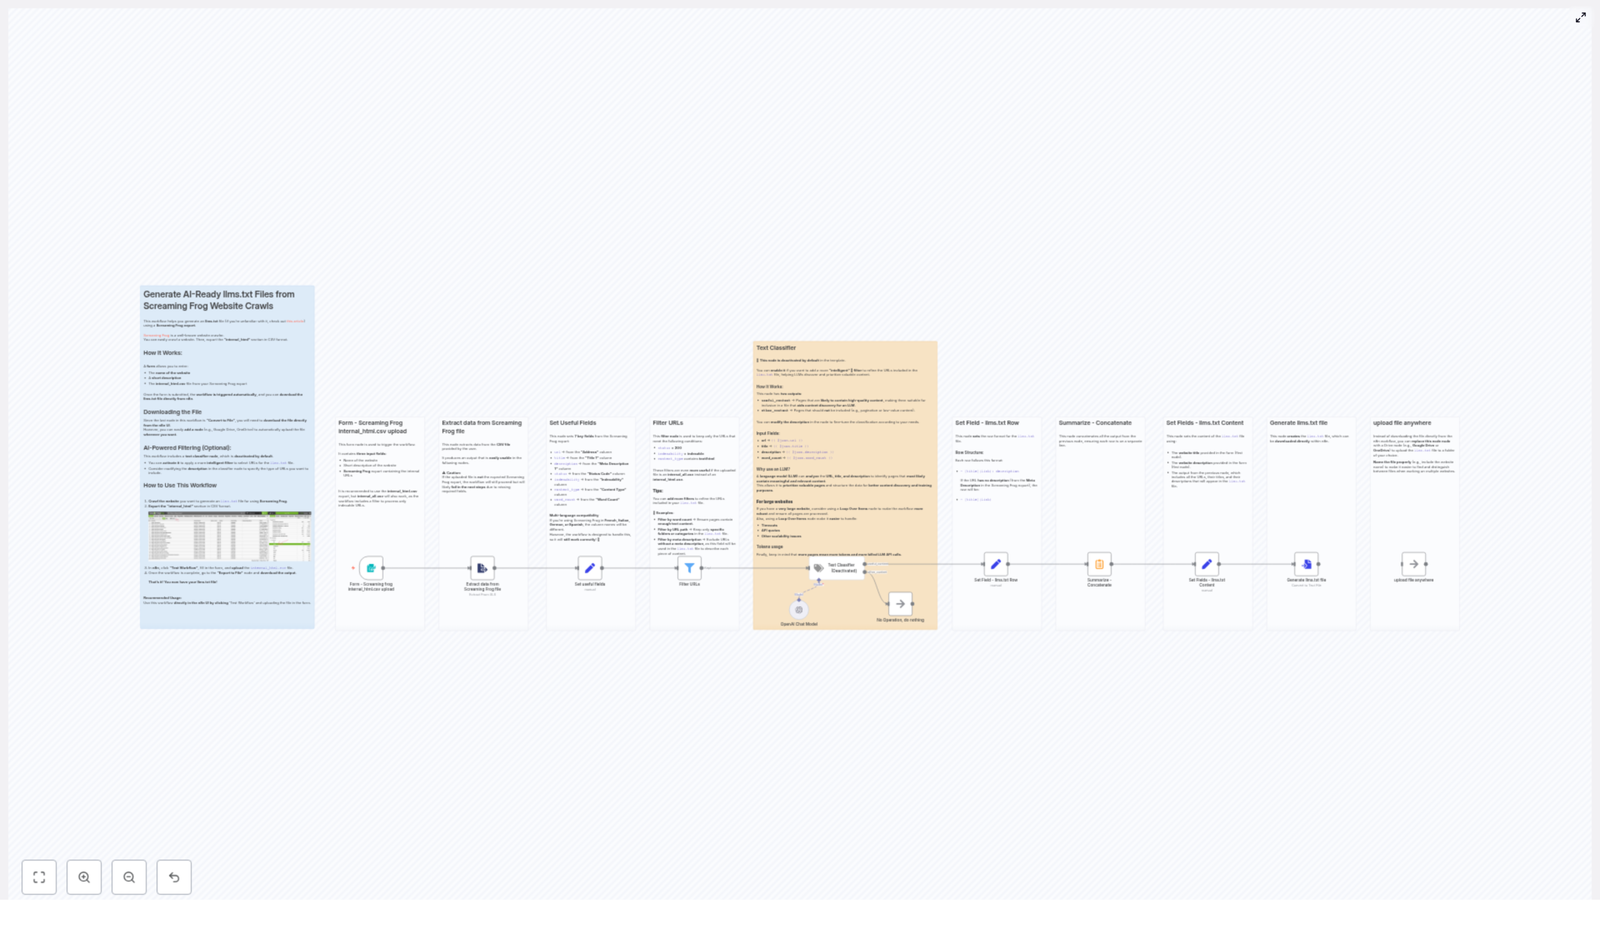
Before we dive into setup, here is the general flow of the n8n template:
Form trigger – You fill in the website name, a short description, and upload your Screaming Frog CSV.
Extract CSV – The CSV is parsed into JSON records for n8n to process.
Field mapping – Key columns like URL, title, status code, and word count are normalized.
Filtering – Only indexable, status 200, HTML pages (plus any extra filters you add) are kept.
(Optional) LLM classifier – A text classifier can further separate high-value content from everything else.
Formatting – Each selected URL is turned into a formatted llms.txt row.
Concatenation – The rows are combined and prefixed with the website name and description.
Export – A UTF-8 llms.txt file is created and either downloaded or uploaded to cloud storage.
Once set up, your main job is to upload a fresh Screaming Frog export and let the workflow do the boring parts.
Step-by-step: set up the n8n workflow
1. Start with the form trigger
The workflow kicks off with a form node. This is where you provide the basic context and the crawl data:
Website name – Used as the main heading at the top of the llms.txt file.
Short website description – Appears as the first lines of the file, giving LLMs a quick overview.
Screaming Frog export – Typically internal_html.csv (recommended) or internal_all.csv.
Once the form is submitted, n8n has everything it needs to start building your index.
2. Extract and parse the Screaming Frog CSV
Next, an Extract node reads the uploaded CSV and turns each row into a JSON object. This is what allows later nodes to filter and transform data programmatically.
The workflow is designed to be friendly to multilingual Screaming Frog setups. It checks multiple possible column names so it works whether your Screaming Frog UI is in English, French, German, Spanish, or Italian.
3. Map the important fields
To avoid dealing with every possible Screaming Frog column name later, the workflow normalizes the key fields into a consistent schema. A Set node creates the following properties:
url ← Address
title ← Title 1
description ← Meta Description 1
statut ← Status Code
indexability ← Indexability
content_type ← Content Type
word_count ← Word Count
From this point onward, every node in the workflow can rely on these consistent field names, no matter how Screaming Frog labels them.
4. Filter out junk and non-indexable URLs
This is where quality control happens. The workflow applies several filters to keep only pages that are:
Status code = 200
Indexability = indexable (localized values are supported)
Content type contains text/html
You can also layer on extra filters if you want to be more selective:
Minimum word count, for example greater than 300, to avoid very thin pages
Include or exclude specific paths or folders to focus on certain sections
Exclude paginated URLs or anything with query parameters if they are not useful for training
This step alone saves a lot of manual cleanup later, and your future self will thank you.
5. (Optional) Use an LLM text classifier for smarter selection
The template includes a deactivated Text Classifier node. When you enable it, the workflow sends details like URL, title, description, and word count to a language model.
The classifier then splits content into two groups:
useful_content – Pages that look important or high quality.
other_content – Everything else.
This extra layer is especially handy on large sites where simple filters are not enough to find the truly valuable pages.
Important notes:
Only activate this node if you are comfortable with using an LLM API and the associated costs.
For very large sites, pair it with a Loop Over Items node to avoid timeouts and keep API usage manageable.
6. Format each line of the llms.txt file
Once you have your final list of URLs, the workflow formats each one into a neat llms.txt row. The template uses this pattern:
- [How to Bake Sourdough](https://example.com/sourdough): A practical guide to ingredients, technique, and troubleshooting.
If there is no description, the part after the URL is simply omitted, so the format stays clean.
7. Combine rows and build the final llms.txt content
All the formatted rows are then concatenated into a single block of text. Before the list, the workflow prepends the website name and short description you provided in the form.
The final structure looks like this:
# My Example Website
> A short description of the website

- [Title 1](url1): description
- [Title 2](url2)
That heading and description give LLMs a bit of context about what they are looking at, instead of just dumping a list of URLs.
8. Export or upload the llms.txt file
The final step uses a Convert To File node to generate a UTF-8 text file named llms.txt.
You can:
Download the file directly from the n8n UI, or
Swap the last node for a cloud storage node, for example Google Drive, OneDrive, or S3, to automatically upload and store the file.
If you run this regularly, automating the upload is a nice way to stop hunting for files in your downloads folder.
Best practices for Screaming Frog and llms.txt automation
Prefer internal_html.csv when possible since it is already scoped to HTML pages.
Localize your mappings if your Screaming Frog interface is not in English. The template already supports common translations, so you usually just need to verify column names.
Start small with a limited crawl to test your filters and, if used, the classifier behavior before scaling up.
Use a clear naming convention when automating uploads, for example site-name-llms-YYYYMMDD.txt.
Keep an eye on LLM costs if you enable the text classifier, especially on very large sites.
Troubleshooting common issues
If your workflow runs but the llms.txt file is empty or the workflow fails, check the following:
Make sure the uploaded file is actually a Screaming Frog export and that it includes the expected columns.
Temporarily disable the text classifier node to confirm that the basic filters alone still produce results.
Use Set nodes or other logging inside n8n to preview intermediate outputs and verify that fields like url, title, and indexability are mapped correctly.
Most issues come down to column naming mismatches or filters that are a bit too strict.
When this workflow is a perfect fit
This n8n template shines whenever you need a reliable, repeatable way to turn a website crawl into an llms.txt file for AI or SEO work. Typical use cases include:
SEO teams preparing content sets for semantic analysis or LLM-powered audits.
Data teams building prioritized web corpora for LLM fine-tuning or evaluation.
Site owners who want a curated, human-readable index of their most important pages.
If you are tired of manually sorting URLs in spreadsheets, this workflow is basically your new favorite coworker.
Try the n8n llms.txt workflow template
To get started:
Download the n8n workflow template.
Run a Screaming Frog crawl and export internal_html.csv (or internal_all.csv if needed).
Upload the CSV through the form node, fill in the website name and description, and let the workflow generate your llms.txt in minutes.
If you want help tuning filters, designing classifier prompts, or wiring up automatic uploads to your storage of choice, reach out to the author or leave a comment to explore consulting options.
Generate AI-Ready llms.txt Files from Screaming Frog Website Crawls
If you have ever exported a giant Screaming Frog CSV and thought, “Cool, now what?” you are not alone. Manually turning that CSV into something an AI can actually use is the kind of repetitive task that makes people consider a career in pottery instead.
Luckily, this is exactly the sort of job that automation loves. With a ready-to-run n8n workflow, you can feed in a Screaming Frog export and get back a clean, structured llms.txt file that large language models can happily digest for content discovery, summarization, indexing, or fine-tuning.
In this guide, you will:
See what an llms.txt file actually is and why it matters for AI
Learn how the n8n workflow transforms your Screaming Frog crawl
Get a simplified setup walkthrough so you can generate llms.txt in minutes
Pick up best practices for filters, multi-language exports, and scaling
An llms.txt file is a simple text file that gives large language models a friendly shortcut to your best content. Instead of forcing an LLM to crawl your entire site and guess what matters, you hand it a curated list of pages.
Each line usually contains:
The page title
The URL
A short description or meta description
That is enough context for an LLM to understand what a page is about without crawling everything. When you generate llms.txt from a Screaming Frog crawl, you:
Accelerate AI content discovery
Make summarization and indexing much easier
Prepare your site for fine-tuning or other downstream AI tasks
In short, llms.txt is like a VIP guest list for your website. The n8n workflow is the bouncer that decides who gets in.
What this n8n workflow actually does
This template takes a Screaming Frog CSV export (ideally internal_html.csv) and turns it into a structured llms.txt file with minimal human effort and zero spreadsheet rage.
At a high level, the workflow:
Accepts a form submission with your website name, description, and CSV
Extracts and normalizes key fields from the Screaming Frog crawl
Filters out non-indexable or irrelevant URLs
Optionally runs an LLM-based text classifier to keep only high-value pages
Formats each page into a neat llms.txt row
Builds a header, concatenates everything, and outputs a final llms.txt file
Lets you download it or push it to cloud storage like Google Drive or S3
You get a repeatable, scalable way to produce AI-ready discovery files from any Screaming Frog website crawl.
Quick setup: from Screaming Frog CSV to llms.txt in n8n
Step 1 – Trigger the workflow with a form
The workflow starts with a built-in Form Trigger. This is where you provide the basics:
Website name – the name that will appear in your llms.txt header
Short site description – in your site’s language, for extra context
The website name and description go straight into the header of your generated llms.txt file. The CSV becomes the raw material for the rest of the workflow.
Step 2 – Extract data from the Screaming Frog file
Next, a file-extraction node converts your CSV into structured records that n8n can work with. The workflow is friendly to Screaming Frog users in multiple languages.
It maps column names for:
English
French
German
Spanish
Italian
So even if your Screaming Frog interface is not in English, the workflow knows which columns are which and you do not have to manually rename anything.
Step 3 – Normalize the useful fields
To keep things consistent, the workflow maps the Screaming Frog columns into seven normalized fields. These fields are then used in every later step:
url – from Address / Adresse / Dirección / Indirizzo
title – from Title 1 / Titolo 1 / Titel 1
description – from Meta Description 1
status – from Status Code
indexability – from Indexability / Indexabilité
content_type – from Content Type
word_count – from Word Count
This normalization step is what lets the rest of the workflow stay clean and language-agnostic, instead of becoming a tangle of “if this column name, then that” logic.
Step 4 – Filter the URLs to keep only good candidates
Not every page deserves a spot in llms.txt. The workflow applies a few core filters so you do not end up feeding AI your 404s, PDFs, or random tracking URLs.
The built-in filters keep only pages where:
Status is 200
Indexability is recognized as indexable
Content type contains text/html
On top of that, you can easily add your own filters, for example:
Minimum word_count, such as keeping only pages with more than 200 words
Restricting URLs to certain paths like /blog/ or /docs/
Excluding specific query parameters or utility pages
These filters are your main lever for quality control before the AI even sees anything.
Step 5 – Optional: use the Text Classifier for extra curation
For some sites, the basic filters are enough. For others, you might want a smarter bouncer at the door. That is where the optional Text Classifier node comes in.
This node is deactivated by default, but once enabled, it uses an LLM to evaluate each page based on:
Title
URL
Meta description
Word count
The classifier then decides whether a page is likely to contain high-quality, useful content. This is particularly helpful for:
Very large sites with thousands of URLs
Sites where content quality varies a lot
Situations where you want a higher signal-to-noise ratio in llms.txt
When using AI classification, keep a few things in mind:
Use a loop or batching mechanism for big sites so you do not run into API quotas or timeouts.
Adjust the classifier prompt to match what you care about, for example long-form guides, detailed product pages, or in-depth documentation.
Monitor token usage, since LLM calls can incur costs if you are not paying attention.
Step 6 – Turn each page into an llms.txt row
Once the pages are filtered (and optionally classified), the workflow formats each one into a simple, human-readable row for llms.txt.
The standard pattern looks like this:
- [Title](https://example.com/page): Short meta description
If a page does not have a meta description, the workflow simply drops the description part and keeps it clean:
- [Title](https://example.com/page)
Each of these rows is stored in a field such as llmTxtRow. The workflow then concatenates all rows with newline separators to create the main body of your llms.txt file.
Step 7 – Build the header and export the llms.txt file
Finally, the workflow assembles the full llms.txt content by combining:
The website name from the form
The short site description you provided
The concatenated list of formatted rows
The last node converts this full string into a downloadable llms.txt file. From there, you can:
Download it directly from the n8n UI
Swap the final node for a Google Drive, OneDrive, or S3 node to upload automatically to your preferred cloud storage
That is it. One form submission in, one AI-ready llms.txt file out, and no spreadsheets harmed in the process.
Best practices for clean, AI-friendly llms.txt files
Handling multi-language Screaming Frog exports
Screaming Frog likes to adapt to your language settings, which is great for users but annoying for automation if you are not prepared. Column headers change between English, French, Italian, Spanish, and German.
This workflow already accounts for those variants by normalizing the expected column names, so in most cases you can just drop in your CSV and run it.
If you ever see fields not being picked up correctly:
Check the exact column names in your export
Update the mapping node to include any missing variants
Refining filters to improve content quality
The default filters (status 200, indexable, text/html) are a solid starting point, but you can go further to keep llms.txt focused on pages that actually matter.
Consider experimenting with:
A minimum word_count, for example only keeping pages with more than 200 words
URL path filtering, so you can focus on directories like /blog/, /docs/, or /resources/
Excluding pagination, tag pages, and archive listings that rarely add value for LLMs
A bit of tuning here can drastically improve the usefulness of your llms.txt file while keeping it compact.
Scaling the workflow for large sites
If your site has a modest number of pages, you can usually run everything in one go. For large sites with thousands of URLs, it is better to think in batches.
Use a Loop Over Items node in n8n to process pages in chunks. This:
Reduces the risk of workflow timeouts
Gives you more control over LLM API usage
Makes it easier to monitor progress and debug if needed
Combined with the optional Text Classifier, this lets you scale from “small blog” to “massive content library” without changing your basic approach.
Example: what a finished llms.txt can look like
To give you a feel for the final output, here is a sample snippet of an llms.txt file that this workflow could generate:
# Example Site
> A short description of the site

- [How to run an SEO audit](/seo-audit): A concise step-by-step guide to auditing your website.
- [Pricing](/pricing)
- [Product overview](/product): Details about features and integrations.
Simple, readable, and very friendly to both humans and LLMs.
When to turn on the Text Classifier (and when to skip it)
The Text Classifier is like a helpful but slightly opinionated editor. It is not always necessary, but it can be very powerful in the right context.
Use the classifier if:
You have a large site and want to focus only on high-value content
You are comfortable trading some API calls for better curation
You want an AI-assisted way to decide which pages belong in llms.txt
Skip the classifier if:
Your site is small or already well structured
You have strong deterministic filters like word count and path rules
You want the fastest, cheapest possible run
In many cases, simple filters do a great job. The classifier is there for the times when “good enough” is not actually good enough.
Next steps: generate your own AI-ready llms.txt
You now have everything you need to turn a Screaming Frog crawl into an AI-friendly llms.txt file without getting lost in CSV hell.
To recap your action plan:
Export internal_html.csv from Screaming Frog
Open the n8n workflow template and trigger the form
Provide your website name, short description, and CSV
Adjust filters and, if needed, enable the Text Classifier
Download or auto-upload your freshly generated llms.txt
Ready to automate away one more tedious task? Try this n8n workflow with your next Screaming Frog crawl. If you want help fine-tuning filters, scaling to huge sites, or wiring in cloud storage, get in touch or request a custom workflow template and we will help you automate the whole process.
Automate Crypto Price Recording with n8n: Step-by-Step Learning Guide
This tutorial shows you how to build and understand a complete n8n workflow that automatically records cryptocurrency prices. You will learn how to receive price data via webhook, convert it into embeddings, store it in a Supabase vector database, validate it with a RAG agent, log approved records to Google Sheets, and get Slack alerts when something goes wrong.
What you will learn
By the end of this guide, you will be able to:
Configure an n8n webhook to receive crypto price updates
Split, embed, and store text data in a Supabase vector table
Use a RAG-style agent with Anthropic (or another LLM) to validate prices
Append clean, validated records to Google Sheets for analysis
Set up Slack alerts for workflow errors
Apply best practices for schema design, security, and cost optimization
Why automate crypto price recording?
Manually logging cryptocurrency prices is slow, inconsistent, and easy to mess up. Automation with n8n and a vector database gives you:
Reliable historical logs that are always captured in the same format
Semantic context around each price event using embeddings
Smarter queries using a RAG agent to search and interpret past data
Simple analysis in Google Sheets for dashboards or exports
Instant visibility into failures via Slack alerts
In practice, this means you can store more than just numbers. You can save rich context (such as notes or trade conditions) and then search for similar past situations when you see a new price event.
Prerequisites
Before you start, make sure you have:
An n8n instance (cloud or self-hosted)
A Cohere API key for generating embeddings
A Supabase project with a vector-enabled table
An Anthropic API key (or another compatible chat model credential)
A Google Sheets account with OAuth credentials configured in n8n
A Slack app token or bot token for sending alerts
Concepts and architecture
Core idea of the workflow
The workflow follows a simple pattern:
Receive a new crypto price event
Convert its text into embeddings and store it in Supabase
Use a RAG agent to compare with historical data and validate the new event
If valid, append it to a Google Sheet
If something fails, notify a Slack channel
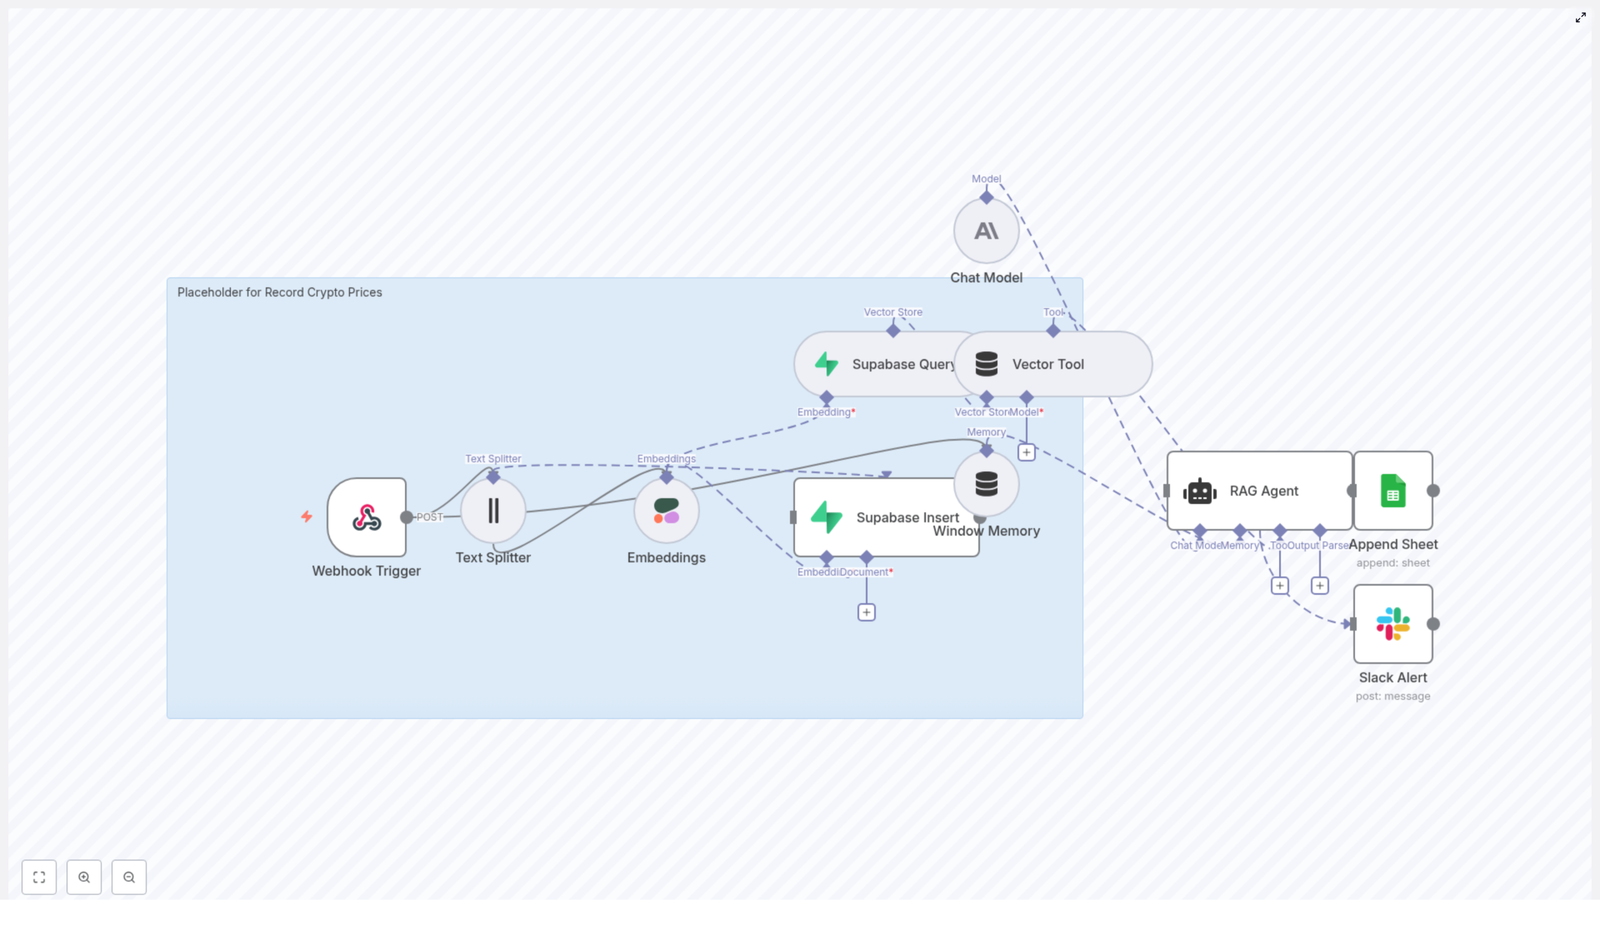
Key components used
The n8n template is built from these main nodes and services:
Webhook Trigger – receives POSTed price data
Text Splitter – breaks long text into smaller chunks
Cohere Embeddings – converts text into vectors
Supabase Vector Store – stores and queries embeddings
Window Memory and Vector Tool – provide context to the agent
Chat Model (Anthropic) with a RAG Agent – validates and decides what to log
Google Sheets Append – writes validated rows to a sheet
Slack Alert – sends error notifications
How the RAG agent fits in
RAG (Retrieval-Augmented Generation) combines a language model with a vector database. In this workflow:
Supabase stores embeddings of past price events
The Vector Tool retrieves similar historical entries for the current event
Window Memory keeps recent context across workflow runs
The Chat Model uses both to decide if the new price looks valid and what status it should have in your log
Step-by-step: building the n8n workflow
Step 1 – Create the Webhook Trigger
First, set up an HTTP POST webhook in n8n that will receive incoming price data.
Node type: Webhook
HTTP Method: POST
Path:/record-crypto-prices
External services like price feeds, trading bots, or custom scripts will send JSON payloads to this endpoint. A typical payload might look like:
Security tip: In production, protect this webhook by:
Requiring a secret header or token
Restricting IPs or using an allowlist
Step 2 – Split long text with the Text Splitter
If your payload includes extra context such as trade notes, orderbook snapshots, or additional metadata, the content may be long. Embedding very long text can be inefficient and costly, so you use the Text Splitter node to break it up.
Node type: Text Splitter
Recommended settings:
chunkSize: 400
chunkOverlap: 40
These values are a good balance for many use cases. Smaller chunks usually give more precise matches when you later query the vector database for similar events.
Step 3 – Generate embeddings with Cohere
Next, convert each chunk of text into a vector representation using Cohere.
Node type: Embeddings (Cohere)
Model:embed-english-v3.0
Each chunk becomes a numeric vector (an array of floats). These embeddings allow you to compute semantic similarity. For example, you can later ask: “Find previous BTC price snapshots with similar context to this one.”
Step 4 – Insert and query vectors in Supabase
Once you have embeddings, store them in a Supabase table that supports vector search.
Node types: Supabase Insert, Supabase Query (or combined operations depending on your setup)
Target table/index name (template):record_crypto_prices
The Insert operation writes the new embedding and metadata to Supabase.
The Query operation retrieves the nearest vectors when the agent needs historical context, for example, to compare the current price to similar past events.
Step 5 – Configure Vector Tool and Window Memory
To let the RAG agent use your Supabase data, you expose the vector store as a tool and add memory.
Vector Tool: Wraps the Supabase vector store so the agent can run similarity searches as needed.
Window Memory: Keeps a short history of recent interactions or processing steps.
Together, they allow the agent to reason with:
Recent workflow context (from Window Memory)
Relevant historical records (from the Vector Tool)
Step 6 – Set up the Chat Model and RAG Agent
The heart of the workflow is the RAG agent, powered by a chat model such as Anthropic. It receives:
The new price payload from the webhook
Relevant past vectors from Supabase
Short-term context from Window Memory
Node types:
Chat Model (Anthropic or compatible LLM)
RAG Agent (or an agent node configured to use the vector tool and memory)
Configure the agent with a clear system message so it knows its job. For example:
You are an assistant for "Record Crypto Prices".
Validate price entries and prepare the row for Google Sheets with a Status column.
Flag anomalous prices and ensure price is numeric and within expected ranges.
The agent should be responsible for:
Checking if the incoming price is valid or suspicious
Enriching the record if needed (for example, adding notes)
Deciding whether the record should be logged to Google Sheets
Returning a structured status message (such as “approved”, “rejected”, or “needs_review”)
Step 7 – Append approved records to Google Sheets
Once the agent approves a record, the workflow appends a new row to a Google Sheet. This becomes your easy-to-use audit log.
Node type: Google Sheets – Append
Sheet name (template):Log
Map the following columns from the agent output and original payload:
Timestamp
Symbol
Price
Source
Status (for example, Approved, Rejected, Anomaly)
This structure makes it simple to:
Filter by symbol or date
Review only failed or suspicious entries
Export data to BI tools or dashboards
Step 8 – Add Slack alerts for error handling
Errors are inevitable, so it is important to know when they happen. Attach an error path from the RAG Agent (or another critical node) to a Slack node.
Node type: Slack – Send Message
Channel: for example, #alerts
Use a message template like:
Record Crypto Prices error: {{ $json["error"]["message"] || "Unknown error" }}
This way, you are notified quickly when:
Supabase is unreachable
The LLM request fails
Google Sheets cannot be updated
Designing your Supabase schema
To support vector search, you need a Supabase table with a vector column. For Postgres with pgvector, you might use:
CREATE TABLE record_crypto_prices (  id uuid PRIMARY KEY,  symbol text,  price numeric,  timestamp timestamptz,  source text,  text text,  embedding vector(1536)
);
Make sure the vector dimension matches your embedding model. For embed-english-v3.0 from Cohere, use the appropriate dimension documented by Cohere. Adjust column types if your use case needs additional metadata.
Accuracy, performance, and cost tips
To keep the workflow reliable and cost-effective, consider these practices:
Choose a suitable chunk size. Values between 300 and 800 characters usually work well. Smaller chunks increase precision but create more embeddings.
Deduplicate payloads. Before inserting into Supabase, check for identical or very similar payloads to avoid unnecessary vector bloat.
Archive or rotate old vectors. If storage costs grow, move older data to cheaper storage or a separate table, keeping only recent or high-value records in the main vector index.
Tune the RAG prompt. Be explicit about validation rules, such as:
Price must be numeric
Timestamp must be a valid ISO 8601 string
Price should be within a realistic range for the symbol
Log key events. Consider logging decisions or anomalies to a separate sheet or observability tool for easier debugging.
Security and best practices
Since you are handling API keys and external calls, follow these guidelines:
Use n8n credentials. Store API keys and tokens in n8n’s credential manager instead of hard-coding them in nodes or expressions.
Secure the webhook. Use a secret header, token validation node, or IP restrictions to limit who can send data.
Restrict Google Sheets scopes. Grant only the minimum permissions needed to append rows to the target sheet.
Review Slack alert rules. Make sure you send alerts only for meaningful errors to avoid alert fatigue.
Testing and rollout checklist
Before using this workflow in production, walk through this checklist:
Webhook test: Send sample JSON payloads to the webhook and verify that n8n receives them.
Supabase insert verification: Confirm that new records and embeddings are inserted into the record_crypto_prices table.
Similarity queries: Run a Supabase Query node to check that nearest-neighbor searches return sensible historical records.
RAG edge cases: Test malformed or incomplete payloads, such as missing prices or invalid timestamps, and confirm the agent handles them as expected.
Google Sheets logging: Check that rows are appended with correct values, including the Status column.
Slack error simulation: Temporarily break a credential or node to trigger an error and verify that a Slack alert is sent.
Use cases and extensions
Once this pipeline is running, you can extend it beyond simple logging:
Semantic search for events. Ask questions like “Find similar BTC volatility spikes” or “Show events with large price jumps near FOMC announcements.”
Automated reporting. Use the RAG agent to summarize daily or weekly price movements and send a report to Slack or email.
Trading strategy inputs. Feed the cleaned, validated historical snapshots into backtesting tools or live trading systems.
Recap: how the template works
Here is the full flow in plain language:
A service sends a crypto price payload to your n8n webhook.
The workflow optionally splits long text, embeds it with Cohere, and stores the embedding plus metadata in Supabase.
A RAG agent, backed by Anthropic and the Supabase vector store, checks the new data against historical context.
If the record looks valid, the workflow appends it to a Google Sheet with a clear Status.
If something fails along the way, a Slack message alerts you.
This pattern gives you a robust, auditable, and extensible crypto price recording system.
Quick FAQ
Do I have to use Cohere and Anthropic?
No. The template uses Cohere for embeddings and Anthropic for the chat model, but you can swap them for other providers as long as they integrate with n8n and you adjust the vector dimension and node configuration accordingly.
Can I log extra fields, such as volume or exchange name?
Record Crypto Prices with n8n & Supabase: Turn Raw Data Into Action
Every day, more crypto data flows past you than any one person or team could ever fully track. Prices spike, markets shift, and insights appear for a moment before disappearing into the noise. The people and teams who win are not the ones who work the longest hours, but the ones who design systems that work for them.
This is where automation becomes a catalyst for growth. In this guide, you will walk through an n8n workflow template that turns incoming crypto price data into a living, searchable knowledge base. You will capture price records, convert them into embeddings, store them in a Supabase vector database, and use a RAG (retrieval-augmented generation) agent to enrich the data, log it to Google Sheets, and alert your team in Slack when something goes wrong.
The goal is not just to build a workflow. It is to create a repeatable system that frees your time, sharpens your decision making, and gives you a foundation you can extend as your research or business grows.
The Problem: Drowning in Crypto Data
Researchers, traders, and operations teams all face the same challenge: crypto data is abundant, but usable insight is scarce. You might already be collecting prices and notes in different tools, but:
Logs are scattered across sheets, databases, and chat threads
Searching historic data is slow and often limited to basic keyword searches
Manual reporting and monitoring take time away from deeper analysis
As the volume of information grows, relying on manual workflows becomes a bottleneck. You need reliable logging, fast semantic search across historic data, and tooling that scales with your ambition, not your workload.
The Shift: From Manual Tracking To Automated Insight
Instead of typing notes into spreadsheets and chasing down context later, imagine a system where:
Every crypto price record is captured automatically through a webhook
Rich notes are transformed into embeddings that can be semantically searched
Supabase stores everything in a vector index that grows as your data grows
An Anthropic-powered RAG agent enriches and validates records on the fly
Google Sheets keeps an easy-to-share log, and Slack alerts you when errors occur
This n8n workflow template is that system. It is a practical, low-code way to build a “memory” for your crypto data, so you can stop firefighting and start focusing on strategy, research, and higher-value work.
The Stack: Tools That Work Together For You
The power of this template comes from how each component plays a specific role in your automation journey:
n8n for low-code orchestration and automation
Cohere embeddings to convert price records and notes into vectors
Supabase as a vector-enabled store for scalable retrieval
Anthropic chat model + RAG agent to reason about and enrich stored data
Google Sheets for simple, shareable reporting
Slack for instant error alerts and operational awareness
Each part is replaceable and configurable, but together they create a powerful foundation for automated crypto data management.
Architecture: How The Workflow Flows
Before diving into the steps, it helps to see the big picture. The n8n workflow follows a clear journey from raw input to structured insight:
Webhook Trigger receives crypto price data via POST
Text Splitter breaks long notes into chunks for better embedding
Embeddings (Cohere) convert each chunk into a vector
Supabase Insert stores vectors and metadata in a vector index
Supabase Query + Vector Tool fetch context when the RAG agent needs it
Window Memory maintains recent context across interactions
Chat Model (Anthropic) + RAG Agent interpret and enrich the data
Append Sheet (Google Sheets) logs results in a simple, auditable format
Slack Alert notifies you if anything fails along the way
Now let’s walk through how to build this flow in n8n and make it your own.
Step-by-Step: Building Your Crypto Logging System In n8n
1. Capture Inputs With The Webhook Trigger
Your automation journey starts with a single endpoint. In n8n, add a Webhook node and configure it to accept POST requests, for example at /record-crypto-prices.
Make sure the payload includes required fields like symbol, price, and timestamp. Keep the body compact and validate the presence of essential keys before moving to the next node. This small upfront discipline pays off later in reliability and easier debugging.
2. Prepare Text With The Text Splitter
Price data is compact, but your notes can be long and detailed. To make them easier to embed and search, add a Text Splitter node after the webhook.
Recommended starting configuration:
chunkSize = 400
chunkOverlap = 40
These values help balance context and precision. Shorter chunks can improve retrieval accuracy for specific queries, while slightly longer ones preserve more context for summarization. You can tune these numbers over time as you see how the system behaves with your actual data.
3. Turn Text Into Vectors With Cohere Embeddings
Next, add an Embeddings (Cohere) node to convert each text chunk into a vector representation. Use an embeddings model tuned for English, such as embed-english-v3.0.
For each chunk, send along key metadata so you can filter and understand results later. Typical metadata fields include:
symbol
timestamp
source or origin of the data
request_id for traceability
This step is where your unstructured notes gain a new capability: semantic searchability. You are effectively teaching your system to “understand” your comments about crypto events, not just store them.
4. Store Everything In Supabase As A Vector Store
With embeddings and metadata ready, connect a Supabase Insert node. Configure it to write to a vector index, for example with indexName: record_crypto_prices.
Key configuration tips:
Use mode = insert for straightforward ingestion
Consider using upsert logic if duplicate messages or retries are possible
Store chunk-level IDs so you can map each vector back to the original payload and request_id
At this point, you have a scalable vector store that can grow with your data, giving you fast, flexible retrieval over historic crypto price records and notes.
5. Retrieve Context With Supabase Query + Vector Tool
To enable intelligent reasoning on top of your stored data, add a Supabase Query node. This node will search your vector index and return the most relevant vectors for a given query.
Then, expose this query as a Vector Tool to your RAG agent. This allows the agent to:
Look up prior notes similar to a new event
Pull in contextual information for anomaly detection or validation
Answer follow-up questions using your own historical dataset
This is where your system starts to feel less like a log and more like a knowledge partner.
6. Maintain Context With Window Memory
To keep conversations and reasoning coherent, add a Window Memory node. This maintains a sliding window of recent context, such as:
Previous questions or instructions
Recently retrieved vectors
Recent outputs from the agent
By feeding this memory into the chat model, you help the RAG agent avoid repetition and make smarter decisions without re-running unnecessary searches.
7. Power The Brain: Anthropic Chat Model And RAG Agent
Now connect an Anthropic chat model as the core LLM behind your RAG agent. This is the reasoning engine that interprets your data and generates meaningful output.
Configure the agent with a clear system message, for example:
You are an assistant for Record Crypto Prices.
Then define prompts that explain how the agent should use retrieved context. Typical tasks include:
Summarizing price events and notes
Validating records or flagging anomalies
Enriching entries with human-readable commentary before logging
By combining embeddings, Supabase, and Anthropic in a RAG pattern, you are no longer just storing data. You are transforming it into structured insight that can be shared, audited, and acted on.
8. Log Results In Google Sheets For Visibility
Once the RAG agent produces its final output, connect an Append Sheet (Google Sheets) node. This creates a simple, shareable log that non-technical stakeholders can access immediately.
Each new row might include:
symbol
price
timestamp
status or outcome
An optional note field with enriched commentary from the agent
Google Sheets becomes your lightweight reporting layer and audit trail, without the need to build a custom dashboard on day one.
9. Stay Ahead Of Issues With Slack Error Alerts
Automation should give you peace of mind, not anxiety. To keep the system trustworthy, configure the onError path of your RAG agent (or critical nodes) to send a message via a Slack node.
Send alerts to a dedicated #alerts channel that include:
The error message
The step or node that failed
Any relevant request identifiers
This simple habit helps you catch issues like expired credentials, Supabase failures, or model timeouts before they silently impact your data pipeline.
Best Practices To Keep Your Workflow Strong
As you scale this template and integrate it deeper into your operations, a few best practices will help you maintain reliability and control costs.
Security & Credentials
Protect your webhook with a shared secret, IP allowlist, or both
Use OAuth for Google Sheets where possible
Store API keys for Cohere, Anthropic, and Supabase as secure environment variables
Idempotency & Duplicates
Include a unique request_id in every payload
Use upserts or deduplication logic in Supabase to avoid duplicate entries if retries occur
Chunk Tuning
Start with chunkSize = 400 and chunkOverlap = 40
Experiment with shorter chunks for fine-grained retrieval
Test slightly longer chunks if you care more about preserving full-context summaries
Embedding Cost & Throughput
Batch embeddings to reduce cost and stay within rate limits
Balance batching with your latency needs for near real-time scenarios
Index Lifecycle Management
Periodically prune or archive stale records
Re-embed data if you move to a newer embeddings model or change your chunking strategy
Testing & Resilience
Simulate POST payloads directly to the webhook during development
Intentionally break things, such as invalid credentials or timeouts, to confirm Slack alerts are working
Monitoring & Scaling As You Grow
As your workflow gains adoption, you can scale it step by step rather than all at once. For higher volumes, consider:
Queueing incoming webhooks with Redis or a message broker before processing
Parallelizing embedding calls while respecting provider rate limits
Using Supabase auto-scaling or managed vector databases for heavy query loads
Storing raw payloads in object storage like S3 for full-fidelity audit logs and reprocessing
You are not locked into a single architecture. This template is a strong starting point that can evolve with your needs.
RAG Or Direct Vector Queries: Choosing The Right Tool
Both direct queries and RAG have their place. Use each intentionally:
Direct vector queries are ideal when you need fast similarity search, such as finding prior notes that resemble a new price event.
RAG is ideal when you want the LLM to synthesize context, validate anomalies, or generate human-readable summaries that you append to Google Sheets or pass downstream.
You can mix both approaches in the same system, using direct queries for quick lookups and RAG for deeper interpretation.
From Template To Transformation: Your Next Steps
This n8n workflow is more than a tutorial. It is a blueprint for how you can reclaim time, reduce manual work, and build a trustworthy memory for your crypto research or operations.
With a few adjustments, you can extend it to:
Track more metadata for richer analysis
Improve deduplication and idempotency logic
Optimize cost with smarter batching and pruning strategies
Plug in additional downstream tools as your stack grows
The most important step is the first one: get the template running, send a test payload, and see your data move through the system. From there, you can iterate, refine, and shape it into a workflow that truly matches how you work.
Call to action: Import this workflow template into your n8n instance, connect your Cohere, Anthropic, Supabase, Google Sheets, and Slack credentials, then POST a sample payload like the example above. Use it as a foundation, experiment with improvements, and let it become a stepping stone to a more automated, focused workflow.
Build a LINE Chatbot with n8n & Google Sheets as Memory
Imagine this: you are answering the same questions on LINE all day, every day. Your fingers hurt, your brain is on autopilot, and you start replying to real humans with “see FAQ sheet row 12”. Not ideal.
Now picture this instead: a LINE chatbot that remembers conversations, replies in natural language, and politely handles your users while you sip coffee and pretend everything is fully under control. That is what this n8n + Google Gemini + Google Sheets setup is for.
In this guide, you will learn how to build a production-ready LINE chatbot using:
n8n as the low-code orchestration brain
Google Gemini (via LangChain) for natural language replies
Google Sheets as a simple, cheap memory store
We will walk through the architecture, the key n8n nodes, how the Google Sheets memory works, and how to send reliable replies back to the LINE Messaging API. By the end, repetitive support messages should feel like a distant, slightly traumatic memory.
What this LINE chatbot workflow actually does
The workflow connects your LINE Official Account to n8n, lets Gemini generate context-aware responses, and stores chat history per user in Google Sheets. So your bot can remember what was said before instead of answering every message like it just woke up with no idea who you are.
Here is the high-level flow in n8n:
Receive a message from LINE via a Webhook node.
Extract the essentials (user message, reply token, user ID) with a Set node.
Fetch the user’s history from Google Sheets using the userId.
Build a prompt that combines archived history, recent messages, and the new user input.
Send the prompt to a LangChain AI Agent configured with a Google Gemini chat model.
Update the memory in Google Sheets with the new user message and AI response, including some smart history splitting.
Reply to the user on LINE using an HTTP Request node and the LINE Messaging API reply endpoint.
The result: a contextual, Thai-friendly chatbot (in this example) that remembers past exchanges and uses a spreadsheet as its very humble yet effective brain.
Why this architecture works so well
If you want automation without spinning up heavy infrastructure or managing a zoo of microservices, this combo is very practical.
Fast prototyping with n8n as your low-code orchestration platform. Drag, drop, connect, and ship.
Simple long-term memory by using Google Sheets rows and archive columns instead of a full database at the start.
Flexible prompt engineering with the LangChain agent node inside n8n, so you can tweak how Gemini thinks and talks.
Direct LINE replies through the LINE Messaging API using a simple HTTP Request node.
It is a sweet spot for building a real chatbot without committing to complex infra from day one. When you outgrow Sheets, you can always move to a proper database later.
Step 1 – Receive messages from LINE with a Webhook
Configure the Webhook node (LINE to n8n)
Start by creating a Webhook node in n8n and set it to handle POST requests. Give it a path such as /guitarpa or anything memorable.
Then, in your LINE Official Account settings, register the full webhook URL from n8n so LINE knows where to send incoming messages.
From the webhook body, you will need these fields:
body.events[0].message.text – the user’s message
body.events[0].replyToken – required to send back a reply
body.events[0].source.userId – a unique ID so you can store per-user memory
This is the raw material that flows through the rest of the automation.
Step 2 – Clean up the incoming data with a Set node
Prepare input fields for easier use
Working directly with body.events[0].something everywhere gets old very fast. Use a Set node to rename things to something more pleasant.
Now all downstream nodes can refer to userMessage, replyToken, and userId without digging through nested JSON every time.
Step 3 – Use Google Sheets as chatbot memory
Design your Google Sheets structure
Each user gets a single row in Google Sheets. That row stores their conversation history and archived chunks. A simple structure might look like this:
UserID
History
LastUpdated
History_Archive_1
History_Archive_2
History_Archive_3
History_Archive_4
Use a Google Sheets node in n8n to read the row that matches the incoming userId. This gives you the recent conversational context you will feed into the AI.
Step 4 – Build a prompt that includes history
Prepare the AI prompt with a Set node
Now it is time to talk to Gemini. Use another Set node to assemble the full prompt. You will concatenate the archive fields and the main History field, then add the latest user message.
Optionally mention timezone or any other context the bot should know.
Tell the bot to answer in the user’s language when possible, so it feels natural and local.
Step 5 – Call Gemini via the LangChain AI Agent node
Configure LangChain with Google Gemini
Next, drop in a LangChain AI Agent node in n8n and attach a Google Gemini chat model, such as models/gemini-2.0-flash-001.
Make sure you have set up your Google PaLM / Gemini credentials in n8n first. The LangChain agent helps you keep prompts structured and parse the model’s output more reliably, which is helpful when you are building flows that should not break just because the AI decided to be creative.
The node takes your prepared prompt, sends it to Gemini, and returns the AI’s response for the next steps in the workflow.
Step 6 – Split and archive long history with a Code node
Why you need history splitting
Google Sheets cells are generous, but not infinite. If you dump every single message into one cell forever, you will eventually hit limits and slow down lookups. Also, your prompt will get bloated and expensive to send.
To keep things efficient, this workflow uses a Code node to:
Keep the live History cell under about 17,500 characters.
Use an archive threshold of around 35,000 characters per archive cell.
When updatedHistory exceeds the threshold, move the oldest content into archive fields one by one.
Here is some pseudocode from the workflow:
// pseudocode from the workflow
let updatedHistory = previousHistory + '\n' + 'ผู้ใช้: ' + message + '\nลลิตา: ' + response;
if (updatedHistory.length > 35000) {  // keep last 17,500 chars and move older chunk into archives
}
This approach keeps the most recent context in the main History column, while older conversations are still stored in History_Archive_1..4 for reference or analysis.
Example splitting logic snippet
A more explicit summary snippet might look like this:
Where {{ replyToken }} and {{ aiResponse }} come from earlier nodes. When building this JSON string in a Set node, be careful to escape line breaks and quotes so the payload stays valid.
Security, sanity, and best practices
Automation is fun until credentials leak or you accidentally reply to LINE with a stack trace. A few safety tips:
Use n8n credentials for API keys and tokens. Do not hardcode secrets directly in your workflow.
Validate incoming webhooks from LINE where possible, for example by checking the LINE signature.
Rate-limit model calls and replies to control cost and avoid surprise bills when your bot suddenly becomes popular.
Handle PII carefully. If you store sensitive user data in Google Sheets, clean or anonymize logs where appropriate.
Testing, debugging, and avoiding silent failures
Local testing with tunneling tools
When developing locally, you can expose your n8n webhook URL to LINE using tools like ngrok. This lets you test the full LINE to n8n round trip without deploying n8n to a public server immediately.
Common issues and how to fix them
No reply from the bot Check that the replyToken is valid and used only once. LINE reply tokens are single-use per event, so reusing them will fail silently.
Slow model responses If Gemini is taking a while, consider caching answers to common questions or using a lighter, cheaper model for quick responses.
Errors writing to Sheets Verify that the authenticated Google account has edit rights to the sheet and that you are not hitting Google Sheets API quotas.
Scaling beyond “spreadsheet as a brain”
Google Sheets is great for prototyping and small to medium usage. When your chatbot grows up and starts handling serious traffic, you might want to:
Move memory to a real database like Firestore, PostgreSQL, or Redis for faster reads and structured queries.
Shard user history by a userId hash to avoid huge single rows or hot spots.
Batch writes or use a queue so peak traffic does not overwhelm the model or the Sheets API.
The good news is that the overall logic stays the same. You just swap out the persistence layer when you are ready.
Prompt example and quick JS recap
Sample system prompt
Here is a simple prompt pattern you can adapt:
System: You are "ลลิตา", a helpful Thai chatbot. Today is {date}.
User: {userMessage}
ลลิตา:
Combine this with your archived history to keep the conversation coherent, polite, and on topic.
History splitting snippet (summary)
As a reminder, the splitting logic keeps recent history short and archives older content:
n8n LINE Chatbot with Google Gemini & Sheets Memory
Imagine this: your LINE chatbot is having a full-on heart-to-heart with users, but it forgets everything the moment the conversation scrolls up. Every reply is like meeting for the first time. Again. And again. And again.
If that makes you cringe a little, good news. With n8n, Google Gemini (Gemini-2.0), and a humble Google Sheet, you can give your LINE bot a decent memory, keep everything low-cost, and avoid spinning up a full database or backend. Your bot gets context, you get fewer repetitive tasks, and everyone gets to keep their sanity.
What this n8n workflow actually does
This workflow template ties together LINE Messaging API, Google Sheets, and Google Gemini so your chatbot can:
Receive messages from LINE via webhook
Look up the user’s past conversation history in Google Sheets
Feed that history plus the new message to Google Gemini via an AI Agent node
Store the updated conversation back in the sheet, with automatic archiving when things get too long
Reply to the user on LINE, all in one smooth flow
In short, it turns “stateless bot with goldfish memory” into “stateful chatbot that remembers what you said 5 messages ago” without the overhead of a full database.
Why this setup works so well
This architecture is especially handy if you want:
A cheap and simple memory layer using Google Sheets instead of a database
Smart, friendly language understanding powered by Google Gemini
An event-driven flow in n8n that plugs into the LINE Messaging API without writing a full backend service
It is perfect for prototypes, small to medium bots, multilingual experiments, and anyone who would rather not babysit servers.
High-level flow: from LINE message to smart reply
Here is the overall journey of a single user message through the n8n workflow:
LINE sends a POST webhook to your n8n Webhook node when a user messages the bot.
The workflow extracts the message text, userId, and replyToken.
Google Sheets is queried to find any existing conversation history for that userId.
The workflow builds a prompt that mixes previous history with the new message.
An AI Agent node, backed by Google Gemini, generates a reply.
The new Q&A pair is appended to the history, and if things are getting too long, older parts are shifted into archive columns.
The updated history is saved back to Google Sheets, matched by UserID.
The reply is sent back to the user via the LINE Messaging API using the replyToken.
All of that happens inside a single n8n workflow template that you can import and customize.
Step-by-step: building the n8n LINE chatbot workflow
1. Webhook node – catching LINE events
Everything starts with a Webhook node in n8n that accepts POST requests from LINE.
Set the Webhook path to something like guitarpa (or any path you like).
LINE will send events to this URL, including:
body.events[0].message.text – the user’s message
body.events[0].source.userId – the unique user ID
body.events[0].replyToken – the token required to send a reply
Think of this node as the front door where every LINE message knocks.
2. Set node – cleaning up the incoming data
Next, a Set node (often named something like “Edit Fields”) normalizes the incoming body so the rest of the workflow does not need to dig through nested JSON every time.
In this node you map fields like:
body.events[0].message.text
body.events[0].replyToken
body.events[0].source.userId
into simpler properties that later nodes can use directly. This is the “tidy up the kitchen so you can cook” step.
3. Google Sheets node – fetching conversation history
Now it is time to give your bot some memory. A Google Sheets node (for example, “Get History”) looks up the row that matches the current userId.
Use a lookup on the UserID column.
Enable returnFirstMatch = true so you always get the latest row for that user.
Keep columns such as:
History
History_Archive_1 up to History_Archive_4
LastUpdated
These fields are the raw material for building a contextual prompt for Gemini.
4. Set node – preparing the AI prompt
With history in hand, another Set node (for example, “Prepare Prompt”) constructs the message that will be sent to the AI Agent node.
The prompt is built by concatenating:
Archived history columns: History_Archive_1..4
The current History column
The latest user message
All of this is formatted as a clear conversation transcript. A sample system message used in the workflow looks like this:
This example uses Thai system text and instructs the assistant to respond based on the conversation context, in the user’s language. You can adapt the persona and language to match your bot.
5. AI Agent + Google Gemini – generating the reply
Next up is the AI Agent node, wired to a Google Gemini chat model, for example:
models/gemini-2.0-flash-001
The Agent node receives the prepared prompt and returns the reply text from Gemini.
In the AI Agent node configuration you can:
Set a system message to define the bot’s personality and behavior
Configure timezone and other parameters
Control how the model responds to user messages
This is where the “smart” part of the chatbot lives. Everything before this was about context. Everything after is about saving and sending the answer.
6. Code node – splitting and archiving long history
Conversation history grows quickly. Google Sheets cells have limits, and your prompts should not be unreasonably large. To handle this, the workflow includes a Code node (for example, “Split History”) that:
Builds a new exchange string in the form: ผู้ใช้: [message]\nลลิตา: [response]
Appends that string to the existing History value.
Checks the total length, and if it exceeds a safe threshold, moves older content into archive columns like History_Archive_1..4.
Keeps only the most recent chunk, for example the last 17,500 characters, in the main History column.
The sample logic in the template uses around 70% of a 50,000 character limit (about 35,000 characters) as a threshold, then keeps the freshest half of that in the active History column.
This strategy keeps your prompts relevant, avoids hitting Google Sheets cell limits, and lets you preserve older context in the archive columns if you ever need it.
7. Google Sheets node – saving updated history
Once the new history is calculated, another Google Sheets node (for example, “Save History”) writes it back.
Use the node in appendOrUpdate mode.
Match rows using the UserID column so each user has a single row.
Update:
History
History_Archive_1..4
LastUpdated
At this point, your Google Sheet is the bot’s brain-in-a-table, neatly organized per user.
8. HTTP Request node – replying to LINE
Finally, the workflow sends the generated reply back to the user on LINE using an HTTP Request node.
The template uses string replacement inside the HTTP Request node to escape newlines, tabs, and quotes in the AI response so your JSON payload does not break. That means fewer mysterious 400 errors and more happy users.
Key implementation tips so your bot does not break at 2 a.m.
1. Escaping AI responses in JSON
AI models love newlines, quotes, and other characters that JSON does not always appreciate. When you inject the model output into the HTTP Request body, make sure to escape:
Quotes
Newlines
Tabs
The example template uses chained replace functions on the response string before it is placed into the JSON body. This avoids malformed payloads and lets LINE accept your replies without complaint.
2. Handling LINE reply token lifetime
LINE reply tokens are not patient. They expire quickly, so you should:
Send the reply in the same n8n flow, without long blocking operations.
If you need heavy processing, consider:
Replying quickly with an acknowledgement (via push messages or a separate flow).
Doing the heavy work asynchronously, then sending a follow up message using the appropriate LINE API.
In other words, do not go on a coffee break between receiving the message and using the replyToken.
3. Security best practices
Store your LINE channel access token and Google credentials in n8n’s credential store, not hard coded in nodes.
Restrict who can call your webhook by:
Verifying LINE signatures, or
Validating that incoming events match the expected structure
This keeps your workflow from becoming an open playground for random requests.
4. Managing conversation history size
The split and archive approach in the template is designed to:
Keep the most recent, relevant context in the main History column
Move older content into History_Archive_1..4
You can adjust thresholds based on:
Typical conversation length
Google Sheets limits
How much context your Gemini prompts really need
Think of it as a rolling chat log with a short-term memory section and an attic full of archives.
Scalability: when Google Sheets starts to feel a bit small
Google Sheets is great for:
Prototypes
Low volume bots
Early experiments
If your LINE bot grows to thousands of users or very frequent messages, you might want to graduate to a proper database. Consider:
Firestore
PostgreSQL
Another lightweight DB that plays nicely with n8n
This gives you better performance, more robust querying, and fewer concurrency headaches when multiple users are chatting at the same time.
Ideas to improve the workflow further
Once you have the basic template running, you can enhance it in several ways:
Compress or summarize old exchanges before archiving to save space and keep context lean.
Store metadata like topics, intent, or sentiment to help the model pick the most relevant parts of the history.
Rate-limit user requests so you do not blow through your Google Gemini or LINE quotas during a busy day.
These tweaks help you keep costs under control while still giving users a smooth, contextual chat experience.
Putting it all together
This n8n workflow shows a practical way to:
Use Google Gemini as the “brain” of your LINE chatbot
Use Google Sheets as a lightweight memory layer
Handle multilingual, contextual conversations without running a full backend
The provided example is Thai-first, but the same pattern works for any language Gemini supports. It is ideal for rapid prototyping, experimenting with personas, and iterating on prompts without touching server code.
Next steps: try the template yourself
If you are ready to stop copy-pasting chat logs and let automation handle the boring parts, here is what to do:
Import the n8n template.
Connect your LINE Messaging API credentials and Google credentials.
Test the flow with a single user and watch the conversation history appear in Google Sheets.
Tweak:
Prompt wording and persona
History length thresholds
Archive behavior
If you want a version that automatically summarizes older history, supports more complex multi-user scenarios, or migrates from Sheets to a database, this flow is a solid starting point that can be adapted to your goals.
Call to action: Import the flow in n8n, connect your credentials, and send a message to your LINE bot. If you want a more detailed step-by-step setup or an extended version that auto-summarizes old history, reply and we can shape this workflow to your exact use case.
Moving data from spreadsheets into a relational database is a foundational automation use case. With n8n you can design a lightweight, maintainable ETL workflow that extracts rows from Google Sheets on a defined schedule and loads them into MySQL in a controlled, production-ready manner.
This article presents a refined n8n workflow template that:
Runs on a schedule using a Cron trigger
Reads data from Google Sheets using the Google Sheets – Read node
Writes records into MySQL using the MySQL – Insert node
It also covers configuration details, hardening strategies, and best practices for automation professionals who want a robust Google Sheets to MySQL integration.
Why automate Google Sheets to MySQL?
Google Sheets is widely used for quick data collection, operational tracking, and ad-hoc reporting. However, it is not designed to act as a long-term system of record or as the primary data source for analytics and transactional workloads.
Automating a pipeline from Google Sheets to MySQL provides several advantages:
Centralized, queryable data: Store information in a structured MySQL schema for reliable querying and joins.
Reduced manual work: Eliminate copy-paste operations and reduce the risk of human error.
Historical tracking and backups: Maintain a persistent history of changes in a database that can be backed up and versioned.
Analytics and reporting: Connect BI tools and dashboards directly to MySQL for consistent reporting on clean data.
Architecture of the n8n workflow
The template implements a straightforward pipeline that is easy to reason about and extend. At its core, the workflow consists of three primary nodes:
Cron – schedules the workflow execution (weekly at 05:00 in the template).
Google Sheets – Read – fetches spreadsheet rows via OAuth2 authentication.
MySQL – Insert – inserts the rows into a MySQL table named books with columns title and price.
Conceptually, the flow is linear:
Cron -> Google Sheets - Read -> (optional transform) -> MySQL - Insert
While the basic template is intentionally minimal, you can insert additional nodes between Google Sheets and MySQL for validation, transformation, and monitoring.
Key configuration parameters
The following sections summarize the critical settings used in the template. These are the main values you will adapt for your own environment.
Cron node configuration
triggerTimes: item
mode: everyWeek
hour: 5 (runs at 05:00)
This schedule is suitable for low-frequency batch syncs. For nightly or higher frequency imports, adjust the mode and time according to your data freshness requirements and timezone.
Google Sheets – Read node configuration
sheetId: qwertz (placeholder, replace with your actual sheet ID)
authentication: oAuth2
credentials: googleSheetsOAuth2Api (OAuth2 credentials stored in n8n)
The sheetId is the long identifier in the URL of your Google Sheet. The node uses OAuth2 to access the sheet through n8n’s credential manager, which keeps secrets out of the workflow definition itself.
In addition, you should:
Configure the range to limit which rows are read, or read all rows for small sheets.
Enable header usage if your first row contains column names, so output fields align with your schema.
MySQL – Insert node configuration
table: books
columns: title, price
options:
ignore: true (skips rows that would cause errors, for example duplicates)
priority: LOW_PRIORITY (allows MySQL to delay inserts if the server is under load)
credentials: mySql (MySQL connection saved in n8n)
The ignore option is valuable for idempotent workflows. Combined with unique constraints in MySQL, it prevents the workflow from failing on duplicate inserts.
Step-by-step workflow implementation
1. Configure the Cron trigger
Start by adding a Cron node to your n8n canvas.
Set the mode to Every Week.
Set the hour to 5 to run at 05:00.
Align this schedule with your operational needs. For example:
Nightly imports: run daily at 02:00 or during off-peak hours.
Weekly reporting: run once per week before a reporting cycle.
2. Connect and read from Google Sheets
Next, add a Google Sheets – Read node and connect it to the Cron node.
Authenticate using OAuth2 and select the saved credentials googleSheetsOAuth2Api.
Set the sheetId to your Google Sheet’s ID from the URL.
Define the range or use the default to read all rows.
If the first row contains column names, enable the option to use the header row as field names.
This configuration ensures that the output JSON from the node has keys that correspond to your spreadsheet headers, which simplifies downstream mapping.
3. Normalize and transform data (recommended)
Before persisting data into MySQL, it is good practice to standardize and validate it. Insert a Set or Function node between Google Sheets and MySQL to:
Align column names with your database schema, for example title and price.
Clean input values, such as trimming whitespace and converting text to numeric types.
Introduce derived fields, such as an imported_at timestamp or a source_sheet identifier.
This pattern enforces consistent types and structure before the data reaches MySQL, which significantly reduces insert failures and downstream issues.
4. Insert rows into MySQL
Finally, add a MySQL – Insert node and connect it to your transformation node (or directly to Google Sheets if you are not transforming).
Set table to books.
Set columns to title, price to match your MySQL table schema.
Enable the ignore option if you rely on unique constraints and want to skip duplicates rather than fail the run.
Leave priority set to LOW_PRIORITY if you want MySQL to defer inserts when the server is under heavy load.
For large imports, consider batching:
Split items into batches of 100 to 1000 rows per insert to avoid extremely large SQL statements.
Use n8n’s built-in batch or split features to control group sizes.
Best practices for a production-ready workflow
Error handling and observability
Error workflows: Configure n8n’s error workflow feature or add a dedicated “Catch” branch to capture failures.
Notifications: Send alerts via Slack, email, or another channel when inserts fail, including row context for faster diagnosis.
Retries and resilience
Enable retry logic on nodes that are prone to transient errors, such as OAuth token refresh or database connections.
Use controlled retry counts and backoff intervals to avoid overloading external systems.
Idempotency and deduplication
Define a unique key in MySQL, for example a composite key or a natural key from the sheet.
Keep the MySQL ignore option enabled so duplicate inserts are safely skipped.
Optionally, insert a MySQL query node before the insert to check for existing rows and implement custom deduplication logic.
Data validation and quality
Validate that required fields are present and non-empty before inserts.
Ensure type consistency, for example, numeric fields are correctly parsed and not left as strings.
Reject or log rows that fail validation to avoid polluting your database.
Performance and scalability
For large Google Sheets, use pagination or batching to process data in manageable chunks.
Leverage database transactions for multi-step update sequences where you require all-or-nothing behavior.
Monitor MySQL for slow queries and optimize indexes where necessary.
Security considerations
Store all credentials in n8n’s credential manager rather than in plain-text workflow fields.
Limit MySQL user permissions to only the operations required, typically INSERT (and possibly SELECT for checks).
Rotate credentials periodically and remove unused accounts.
Testing and deployment checklist
Before enabling the workflow in production, validate each step in isolation.
Google Sheets node: Execute manually and confirm that all expected rows and header mappings are correct.
Transformation node: Test the Set or Function node, inspect the resulting JSON, and verify that types and field names match your MySQL schema.
MySQL insert: Run a test with a single row, then query the database to confirm structure and values.
Cron activation: Enable the Cron node and monitor the first scheduled run using n8n’s execution logs.
Monitoring and alerts: Confirm that alerting is configured for runtime failures and monitor MySQL for slow or failing queries.
Troubleshooting common issues
Google Sheets authentication or permissions errors
If the Google Sheets node returns authentication or permission errors:
Re-authorize the OAuth2 credentials in n8n.
Verify that the authenticated Google account has at least read access to the target sheet.
Unexpected or changing column names
Spreadsheet headers often change over time, which can break field mappings.
Normalize headers in your transformation node, mapping them explicitly to stable field names.
Use a Set node to map from the current sheet header labels to the database column names you expect.
MySQL insert failures
When rows are rejected by MySQL:
Check table constraints such as NOT NULL, data types, and unique keys.
If ignore is enabled, invalid rows are silently skipped, so implement logging or counters to track how many rows were not inserted.
Advanced optimization tips
Prepared statements: Use the MySQL node’s capability to execute prepared statements for safer, parameterized inserts.
Selective imports: Combine the Google Sheets – Read node with a filter node to import only rows that meet specific criteria, such as a status column set to “Ready” or a last_updated value more recent than the last run.
High-volume workflows: For very large datasets, consider exporting the sheet to CSV and using MySQL’s bulk loading mechanisms for higher throughput.
Conclusion and next steps
Using n8n to automate the transfer of data from Google Sheets to MySQL provides a repeatable, auditable ETL pipeline that eliminates manual steps and centralizes your data in a robust relational database.
The core pattern – Cron -> Google Sheets – Read -> MySQL – Insert – is intentionally simple, yet it offers a solid foundation that you can extend with validation, transformation, error handling, and performance optimizations as your needs evolve.
If you prefer to start from a ready-made configuration, you can import the template directly into your n8n instance and adapt the sheet ID, table name, and column mappings to match your environment.
Recommended next actions:
Import the template into your n8n instance.
Test with a small Google Sheet to validate mappings and data quality.
Iterate on transformations and error handling to align with your production standards.
Subscribe for additional n8n automation templates and implementation guides.
Import Google Sheets to MySQL with n8n (Automated)
This guide describes how to implement a robust scheduled integration that reads rows from Google Sheets and writes them into a MySQL database using n8n. The workflow follows a lightweight ETL pattern, suitable for synchronizing operational spreadsheets into relational tables, feeding reporting databases, or maintaining a central data store sourced from collaborative Google Sheets.
Business case and benefits of automating Google Sheets to MySQL
Many teams rely on Google Sheets as an operational data entry surface, while analytics, applications, and reporting tools consume data from MySQL or other relational databases. Automating the bridge between the two avoids manual work and reduces risk.
Eliminate manual export, copy, and paste between Sheets and MySQL.
Maintain a single, up-to-date database for BI tools, dashboards, and applications.
Standardize on a repeatable, auditable process with built-in scheduling and retry behavior.
Using n8n, this pattern can be implemented with minimal scripting, while still following sound automation and data engineering practices.
Workflow architecture and core components
The integration is intentionally minimal and uses three primary nodes, which can later be extended with additional logic for validation, transformation, and monitoring.
Cron – defines the execution schedule for the sync.
Google Sheets – read – fetches rows from the specified spreadsheet using OAuth2.
MySQL – insert – writes the incoming rows into a target MySQL table.
The following JSON represents the base workflow that you can import directly into n8n and adapt to your environment:
In this baseline configuration, the Cron node triggers the workflow, the Google Sheets node retrieves the data, and the MySQL node performs the insert operations. The pattern is straightforward but can easily be extended with additional nodes for mapping, filtering, and error handling.
Configuring the workflow in n8n
1. Scheduling the sync with the Cron node
The Cron node defines when the import runs. In the example JSON, it is configured to execute once per week at 05:00:
mode: everyWeek
hour: 5
Typical alternative schedules include:
Daily syncs at a specific time using mode: everyDay and setting the desired hour.
Multiple runs per day by adding several trigger time entries.
Near real-time behavior by triggering every few minutes or every hour, depending on load and latency requirements.
When designing the schedule, balance data freshness with system load, API quotas, and MySQL capacity.
2. Reading data from Google Sheets
The Google Sheets – read node is responsible for pulling data from your spreadsheet. Configure it with OAuth2 authentication to access the desired sheet.
sheetId – the unique identifier of the Google Sheet, found in the URL of the document.
range (optional) – a standard A1 notation range such as Sheet1!A1:C100 to restrict the rows and columns processed.
Authentication – select OAuth2 credentials that grant access to the target sheet.
If the sheet contains a header row, you have two main options:
Enable the node option to include the header row and handle it downstream, or
Exclude the header from the range and use a Set or Function node to assign explicit field names to each column.
For production workflows, explicit field mapping is recommended to avoid ambiguity when columns are added or reordered in the sheet.
3. Writing rows into MySQL
The MySQL – insert node inserts the incoming records into a target table. In the sample workflow, the node is configured as follows:
table: books
columns: title, price (comma-separated list of target columns)
options.ignore: true, which converts INSERT into INSERT IGNORE to silently skip rows that violate unique constraints.
Before enabling the workflow, confirm that:
The field names produced by the Google Sheets node (or any mapping node in between) align with the MySQL column names.
Data types are compatible, for example, numeric columns in MySQL receive numeric values from the sheet.
The MySQL user configured in the credentials has privileges to perform INSERT operations on the specified table.
When necessary, introduce a Set node between the Sheets and MySQL nodes to rename properties, cast values, or drop unwanted fields.
Improving robustness with mapping and validation
Field mapping with a Set node
For maintainable workflows, it is best practice to explicitly control the shape of the data before writing to the database. A Set node can be added between the Google Sheets and MySQL nodes to produce records that match the schema of the target table.
Example mapping:
Sheet column "Book Title" mapped to MySQL column title.
Sheet column "Price (USD)" mapped to MySQL column price, with a cast to a numeric type.
This approach reduces the risk of SQL errors due to unexpected field names and simplifies debugging when the sheet structure changes.
Data validation and normalization
Use a Set or Function node to implement basic validation logic before inserting into MySQL. Typical operations include:
Ensuring numeric fields, such as prices or quantities, are valid numbers.
Normalizing empty or missing values to NULL where appropriate.
Trimming whitespace and standardizing date formats.
By enforcing these rules upstream, you avoid data quality issues and reduce the likelihood of failed inserts.
Handling duplicates and ensuring idempotency
Repeated imports from Google Sheets can introduce duplicate data if not handled correctly. Several strategies are available:
Database constraints with INSERT IGNORE – define unique keys in MySQL and use the ignore: true option, as in the example, to skip rows that conflict with existing records.
Pre-insert checks – perform a SELECT in MySQL prior to insertion to check for existing records. This is explicit but can be slower at scale.
Timestamp or status flags – maintain a “last synced” timestamp or a processed flag in the sheet or in an auxiliary tracking table to avoid re-importing the same rows.
For higher-volume or business-critical workflows, combining database constraints with explicit tracking is often the most reliable pattern.
Error handling, logging, and observability
Production-grade automations require clear visibility into failures and the ability to recover gracefully. n8n provides several mechanisms to implement this.
Using error workflows and Catch nodes
Add a Catch node or configure error workflows so that any failure in the Google Sheets or MySQL nodes is captured and processed. Typical actions include:
Writing error details to a log file, database table, or monitoring system.
Sending notifications to Slack, email, or another alert channel when inserts fail.
Implementing retry strategies, such as exponential backoff for transient network or API issues.
These practices ensure that issues do not go unnoticed and that operators have enough context to resolve them quickly.
Performance and scalability considerations
Large spreadsheets and high-frequency schedules can put pressure on both the Google Sheets API and the MySQL database. To keep the workflow performant and predictable, consider the following approaches.
Chunked reads – use the range parameter to process the sheet in smaller segments instead of fetching the entire dataset in a single run.
Batch inserts – where supported by the MySQL node, use bulk insert operations to reduce round trips to the database.
Higher-frequency, smaller batches – run the workflow more often with fewer rows per execution to reduce peak load and memory usage.
Design the batch strategy based on sheet size, acceptable latency, and database capacity.
Troubleshooting common issues
Diagnosing MySQL-related errors
Verify that column data types in MySQL are compatible with the values provided by the workflow, for example, numeric vs string fields.
Confirm that the MySQL user configured in n8n has the required privileges, particularly INSERT and, if needed, SELECT.
For duplicate key errors, either adjust constraints or enable the IGNORE option to skip conflicting rows.
Resolving Google Sheets access problems
Ensure that the OAuth2 credentials configured in n8n include the necessary Google Sheets API scopes.
If you require non-interactive access, consider using a service account and share the sheet with that account.
Double-check the sheetId and range syntax to ensure they match the actual document and tab names.
Security and access control
Security should be treated as a first-class concern when connecting external services and databases.
Store credentials securely within n8n and restrict access to them to authorized users only.
Grant the MySQL user only the minimum privileges required, typically INSERT and optionally SELECT for validation or deduplication logic.
Avoid using public Google Sheets for sensitive or regulated data. Prefer private sheets with tightly controlled sharing settings.
When this pattern is a good fit
The Cron → Google Sheets → MySQL pattern is particularly effective in the following scenarios:
Regular (daily or weekly) synchronization of operational spreadsheets into a central reporting or analytics database.
Lightweight ETL use cases where a full data pipeline or dedicated ETL platform would be excessive.
Rapid prototyping of integrations before transitioning to more complex or high-volume architectures.
Because the workflow is simple and extensible, it provides a strong foundation that can evolve with your data requirements.
Scaling and next steps
Once the base workflow is stable, you can extend it to handle more advanced requirements.
Add dedicated validation and normalization nodes to enforce data quality rules.
Introduce a queuing or staging pattern for very large imports, for example, writing to an intermediate table before merging into production tables.
Track processing status using a flag in the sheet or a separate tracking table to avoid reprocessing already imported rows.
These enhancements improve reliability and make the workflow easier to operate at scale.
Conclusion and template access
By combining n8n’s Cron, Google Sheets, and MySQL nodes, you can implement a reliable, scheduled synchronization from Google Sheets into MySQL with minimal custom code. Start with the basic three-node workflow, then incrementally add field mapping, validation, deduplication, and error handling to align with your production standards.
Next action: Import the example workflow into your n8n instance, configure your Google Sheets OAuth2 and MySQL credentials, and run a test with a small subset of data. Iterate on the mapping and validation logic until the integration behaves as required for your environment.
Recommendation: Clone the template, validate it using a small test sheet, then subscribe or follow for additional n8n automation patterns and best practices.