Sync HubSpot Contacts to Mailchimp with n8n

Sync HubSpot Contacts to Mailchimp with n8n (So You Never Export a CSV Again)

Picture this: it is 6:55 AM, you are on your second coffee, and your day starts with the classic routine – export contacts from HubSpot, clean the CSV, import into Mailchimp, fix a random column mismatch, and hope no one unsubscribed in the meantime. Glamorous? Not exactly.

Now imagine this instead: at 07:00 every morning, your contacts quietly sync from HubSpot to Mailchimp while you do literally anything else. That is what this n8n workflow template gives you – a simple, no-code automation that grabs new HubSpot contacts every day and drops them straight into your Mailchimp audience with first and last names neatly mapped.

In this guide, you will see what the workflow does, how it works under the hood, and how to set it up in n8n without writing custom code. We will also look at a few improvements, like handling duplicates, errors, and rate limits, so your automation behaves like a pro and not like a rushed copy-paste job.

What This n8n Workflow Actually Does

This workflow is all about keeping HubSpot and Mailchimp in sync so your marketing list is always fresh without you lifting a finger. Once configured, it will:

  • Run every day at 07:00 (server time) using a Cron trigger.
  • Search HubSpot for contacts created in the last 24 hours using the createdate property.
  • Send each new contact to Mailchimp as a subscriber in your chosen audience (list).
  • Map the contact’s email, first name, and last name into Mailchimp merge fields.

The result: your HubSpot CRM and Mailchimp email marketing stay aligned, your onboarding flows hit the right people, and you never have to touch that cursed “Export CSV” button again.

Why Automate HubSpot To Mailchimp Syncs?

If your team uses HubSpot as the CRM and Mailchimp for newsletters or campaigns, you probably already know the pain of manual syncing. It is not just boring, it is risky:

  • Time sink – exporting and importing contacts every day or week adds up fast.
  • Error magnet – wrong columns, outdated lists, and missing fields sneak in easily.
  • Stale data – new leads might miss campaigns or onboarding sequences altogether.

Automating the sync with n8n fixes all of that. You get up-to-date contacts in Mailchimp, fewer mistakes, and more time for things that do not involve spreadsheets.

What You Will Have by the End

By the time you finish this setup, you will have a working n8n workflow that:

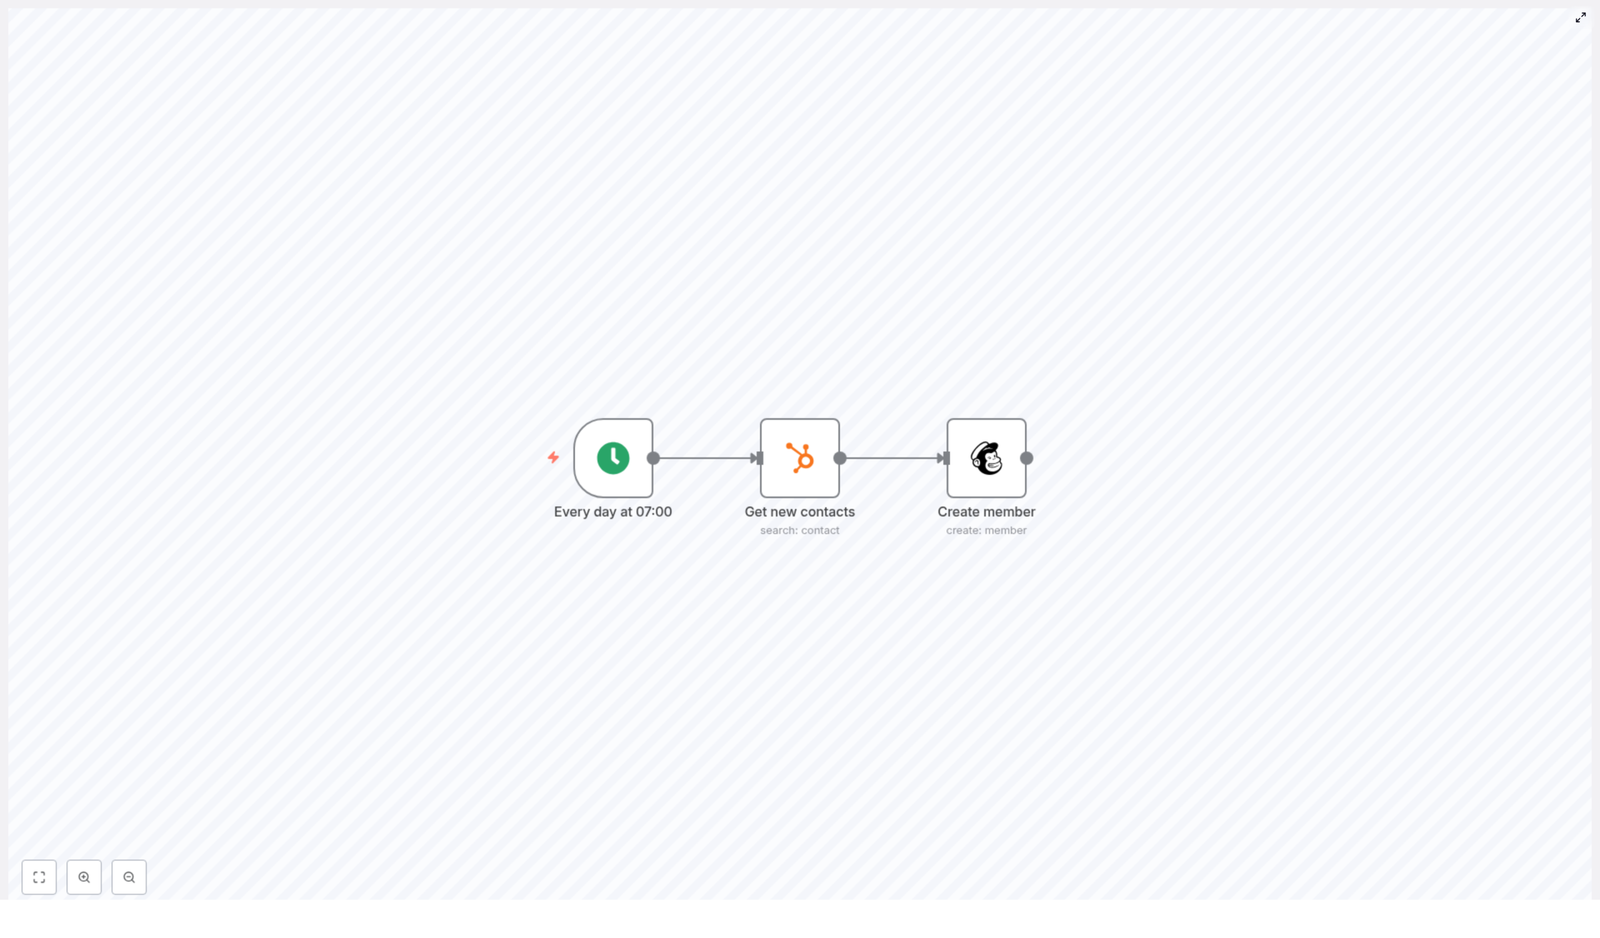
  • Triggers daily at 07:00 using a Cron node.
  • Uses a HubSpot (Search Contacts) node to pull contacts created in the last 24 hours.
  • Uses a Mailchimp (Create Member) node to add each contact to your Mailchimp audience with proper merge field mapping.

It is a small, three-node workflow that quietly does the job of a very patient assistant who never forgets and never complains.

What You Need Before You Start

Before you jump into n8n and start dragging nodes around, make sure you have:

  • An n8n instance (self-hosted or n8n.cloud).
  • A HubSpot account with OAuth2 credentials already connected to n8n.
  • A Mailchimp account with OAuth2 credentials and the ID of the target audience (list) where you want to add subscribers.
  • Basic familiarity with n8n nodes, expressions, and how to edit node parameters.

Once those are in place, you are ready to build the workflow.

High-Level Workflow Overview

The workflow is intentionally minimal so it is easy to understand and extend later. It uses just three nodes:

  1. Cron – Triggers the workflow every day at 07:00.
  2. HubSpot (Search Contacts) – Searches for contacts whose createdate is between “yesterday at this time” and “now”.
  3. Mailchimp (Create Member) – Adds each contact as a member in your Mailchimp audience and maps first name and last name to merge fields.

That is it. No loops, no complicated logic, just a clean daily sync between HubSpot and Mailchimp.

Step-by-Step: Building the Workflow in n8n

1. Create the Daily Cron Trigger

First, you want the workflow to run on its own without your supervision, like a responsible adult process.

  1. Drag a Cron node onto the canvas in n8n.
  2. Set it to run every day at 07:00 (based on your n8n server timezone).

This Cron node is the alarm clock for your sync. Once a day at 07:00, it will wake up the rest of the workflow.

2. Configure the HubSpot Search Contacts Node

Next, you will tell HubSpot, “Show me everyone who joined in the last 24 hours.”

  1. Add a HubSpot node and connect it after the Cron node.
  2. Set Resource to contact.
  3. Set Operation to search.
  4. Configure filters so you only get contacts whose createdate is within the past 24 hours.

You can use n8n expressions to define this time window. For example:

// In the HubSpot node filters
filters: [  { propertyName: 'createdate', operator: 'GTE', value: '={{$today.minus({day:1}).toMillis()}}' },  { propertyName: 'createdate', operator: 'LT', value: '={{$today.toMillis()}}' }
]

These expressions evaluate to millisecond timestamps for “24 hours ago” and “now”. If you ever want to get fancy and sync more often, you can adjust that window for hourly syncs or a different schedule.

3. Add the Mailchimp Create Member Node

Now that you have a list of new contacts from HubSpot, it is time to send them to Mailchimp.

  1. Add a Mailchimp node after the HubSpot node.
  2. Set the operation to create member.
  3. Map the email and name fields from the HubSpot contact into Mailchimp.

A typical configuration looks like this:

email: ={{ $json["properties"].email }}
merge fields:  FNAME: ={{ $json["properties"].firstname }}  LNAME: ={{ $json["properties"].lastname }}
list: YOUR_MAILCHIMP_LIST_ID

Replace YOUR_MAILCHIMP_LIST_ID with your actual Mailchimp audience ID. In the example template, you will see 8965eba136 used as a placeholder.

Once this is set, each HubSpot contact flows into Mailchimp with their email, first name, and last name mapped to the right merge fields.

Testing the Workflow Before You Trust It

Before you let this workflow run unattended, it is worth doing a quick test so you do not accidentally spam the wrong list or mis-map fields.

  1. Temporarily change the Cron node to trigger a few minutes in the future, or run the workflow manually.
  2. Make sure you have at least one recent HubSpot contact that matches the filter.
  3. Run the workflow and inspect the data coming out of the HubSpot node.
  4. Check Mailchimp to confirm:
    • The new subscriber appears in the correct audience.
    • Email, first name, and last name are correctly populated in the merge fields.

Once everything looks good, set the Cron node back to the daily 07:00 schedule and activate the workflow.

Example Workflow JSON Template

If you prefer to start from a ready-made configuration instead of building from scratch, here is a minimal example of the workflow used in this guide. You can import it into n8n, then update credentials and list IDs as needed.

{  "nodes": [  { "name": "Every day at 07:00", "type": "cron", "parameters": {"triggerTimes": {"item": [{"hour": 7}] } } },  { "name": "Get new contacts", "type": "hubspot", "parameters": {  "resource": "contact",  "operation": "search",  "filterGroupsUi": { "filterGroupsValues": [{ "filtersUi": { "filterValues": [  { "value": "={{$today.minus({day:1}).toMillis()}}", "operator": "GTE", "propertyName": "createdate" },  { "value": "={{$today.toMillis()}}", "operator": "LT", "propertyName": "createdate" }  ] } }] }  } },  { "name": "Create member", "type": "mailchimp", "parameters": {  "list": "8965eba136",  "email": "={{ $json[\"properties\"].email }}",  "status": "subscribed",  "mergeFieldsUi": { "mergeFieldsValues": [  { "name": "FNAME", "value": "={{ $json[\"properties\"].firstname }}" },  { "name": "LNAME", "value": "={{ $json[\"properties\"].lastname }}" }  ] }  } }  ]
}

Remember to replace the placeholder Mailchimp list ID and connect your own HubSpot and Mailchimp credentials before activating it.

Leveling Up: Tips To Make Your Sync More Robust

Preventing Duplicate Subscribers

Mailchimp identifies subscribers by email, which is great until you accidentally try to add the same address twice and get a faceful of 400 or 409 errors.

To avoid that, you can:

  • Add a preliminary Mailchimp get member call to check if the email already exists. If it does, decide whether to update or skip.
  • Ensure the status field in the Mailchimp node is set correctly, for example subscribed or pending, depending on your flow.
  • Handle Mailchimp errors gracefully so a single duplicate does not break the whole run.

Handling Errors and Retries

APIs sometimes fail, networks occasionally wobble, and rate limits can surprise you. Instead of letting your workflow silently fail, you can:

  • Enable the workflow’s Error Trigger in n8n to catch failures.
  • Send alerts to Slack, email, or logging tools when something goes wrong.
  • Use the Mailchimp node’s response handling to log failed requests.
  • Implement an exponential backoff retry strategy if you expect rate limits or intermittent errors.

Dealing With Rate Limits and Large Volumes

If you only get a handful of new contacts each day, you are probably fine. If you are dealing with hundreds or thousands, both HubSpot and Mailchimp rate limits start to matter.

To keep things smooth:

  • Use n8n’s SplitInBatches node to process contacts in chunks.
  • Add a small delay between batches to stay comfortably under API quotas.
  • Monitor your daily volumes so you know when it is time to tweak batching or scheduling.

Timezone and Server Clock Gotchas

The Cron node uses the timezone of your n8n server. If your workflow runs at a weird time, it might not be your imagination, it might be your container.

  • If you are running n8n in a container, make sure the container timezone matches the schedule you want.
  • On n8n.cloud, you can use Cron expressions with timezone awareness for more control.

Security and Best Practices

Even though this workflow is simple, it still touches personal data and API credentials, so a bit of hygiene goes a long way.

  • Store OAuth2 credentials in n8n’s credentials manager, not in plain text or node parameters.
  • Use least-privilege API access and rotate credentials regularly based on your security policy.
  • Log actions and errors for debugging, but avoid dumping full PII into unsecured logs.

Wrapping Up: Let the Robots Handle the Repetitive Stuff

With a simple Cron → HubSpot search → Mailchimp create flow, you can keep your email lists in sync automatically, without daily exports or messy imports. n8n handles the boring part so you can focus on campaigns, content, and strategy instead of CSV gymnastics.

Once this workflow is running, you can extend it with better error handling, batching for higher volumes, or additional logic like segmenting contacts based on properties.

Next Steps

Ready to retire that manual sync ritual?

  • Deploy this workflow in your n8n instance.
  • Update credentials and your Mailchimp list ID.
  • Run a test, confirm everything looks good, then activate it.

If you need a more customized setup or want help scaling this workflow, reach out to your team, automation partner, or subscribe to more n8n tutorials and resources to keep leveling up your automations.

Expose Google Sheets as HTML Table with n8n

Expose Google Sheets as an HTML Table with n8n

Imagine turning any Google Sheet into a clean, responsive web page in a few minutes, without spinning up a server or touching a traditional backend. With n8n, you can do exactly that. In this guide, you will learn how to build an automation that reads a Google Sheet, transforms it into a Bootstrap-styled HTML table, and serves it through a simple webhook URL.

This is more than a technical trick. It is a small but powerful step toward a more automated, focused way of working, where your tools quietly handle the busywork so you can stay present for the work that really matters.

The problem: data stuck in spreadsheets

Spreadsheets are often where ideas start. You track leads, inventory, content calendars, event registrations, or internal reports in Google Sheets because it is fast and familiar. Yet, when you want to share that data with others in a simple, polished way, you quickly hit friction:

  • You do not want to manually export and format data every time something changes.
  • You do not want to maintain a separate web server or write a full web app.
  • You want a simple, always up to date view that anyone can open in a browser.

That is where automation becomes a catalyst for change. Instead of repeatedly copying, pasting, and formatting, you can build a small n8n workflow that does the work for you whenever someone calls a URL.

Shifting your mindset: from manual tasks to reusable automations

When you start thinking in workflows instead of one-off tasks, your relationship with tools like Google Sheets and n8n changes. Every repetitive step becomes an opportunity to automate. Every small automation becomes a building block for something bigger.

The workflow in this tutorial is intentionally simple. It is a public endpoint that reads a sheet and returns a styled HTML table. Yet this simplicity is powerful:

  • You gain a reusable pattern for exposing data as web content.
  • You free yourself from manual exports and formatting.
  • You build confidence to create more advanced automations later.

Think of this template as a starting point. Once it is running, you can extend it with filters, authentication, multiple formats, or even dashboards. The important part is taking the first step and seeing that you can automate more than you might expect.

What this n8n workflow will do for you

By the end of this tutorial, you will have a working n8n workflow that turns any supported Google Sheet into a lightweight HTML page. It will:

  • Expose a Webhook endpoint that anyone (or any system) can call.
  • Use a Google Sheets node to read data from a specific sheet.
  • Transform that data with a Function node into a Bootstrap-styled HTML table.
  • Return the final HTML directly from a Respond to Webhook node so a browser can render it instantly.

You will not need a separate web server or backend. n8n becomes your lightweight publishing layer for spreadsheet data.

What you need before you start

To follow along and get your first automated HTML table live, make sure you have:

  • An n8n instance, either cloud-hosted or self-hosted.
  • A Google account with access to the Google Sheet you want to expose.
  • n8n Google Sheets credentials configured using OAuth2.

Once these are ready, you are set to build a workflow that can grow with you as your automation needs evolve.

From idea to reality: building the workflow step by step

1. Create the entry point with a Webhook node

Start by adding a Webhook node in your n8n workflow. This is the public endpoint that will trigger the automation.

Configure it as follows:

  • Set the Path to something easy to remember, for example /sheet-html.
  • Choose the HTTP Method as GET if your sheet is read-only and publicly accessible.

For production setups, you may want to switch to POST and add authentication. For now, keep it simple so you can see the workflow in action quickly.

2. Connect to Google Sheets and read the data

Next, add a Google Sheets node and connect it to your Webhook node. This is where your spreadsheet becomes structured data that you can transform.

Configure the node:

  • Select your Google Sheets OAuth2 credentials.
  • Set the Operation to Read.
  • Set the Resource to Sheet.
  • Provide the Sheet ID, which you can copy from the Google Sheet URL.
  • Optionally, specify a range if you want to limit which cells are read.

The output from this node will be a list of JSON objects, where each row is an item and each column header becomes a key. This structure makes it easy to build a table programmatically.

3. Transform rows into a responsive HTML table

Now you will turn that raw data into a complete HTML document using a Function node. This is where the magic happens: your workflow takes structured data and turns it into a shareable, styled web page.

Add a Function node after the Google Sheets node and paste the following code:

Example Function node code

// Get the column names from the first row
const columns = Object.keys(items[0].json);

const html = `

  <head>  <meta charset="utf-8">  <meta name="viewport" content="width=device-width, initial-scale=1">  <title>Sheet Table</title>  <link href="https://cdn.jsdelivr.net/npm/bootstrap@5.2.0/dist/css/bootstrap.min.css" rel="stylesheet">  </head>  <body>  <div class="container mt-4">  <h1>Spreadsheet Table</h1>  <table class="table table-striped table-bordered">  <thead>  <tr>  ${columns.map(e => '<th scope="col">' + e + '</th>').join('\n')}  </tr>  </thead>  <tbody>  ${items.map(row => '<tr>' + columns.map(col => '<td>' + (row.json[col] ?? '') + '</td>').join('\n') + '</tr>').join('\n')}  </tbody>  </table>  </div>  <script src="https://cdn.jsdelivr.net/npm/bootstrap@5.2.0/dist/js/bootstrap.bundle.min.js"></script>  </body>

`;

return [{ json: { html } }];

What this code does:

  • It reads the column names from the first row so your table headers match the sheet headers.
  • It loops through each row and each column to build a proper HTML table body.
  • It uses the nullish coalescing operator ?? so empty cells display as blank strings instead of undefined.
  • It includes Bootstrap via CDN so you instantly get a responsive, nicely styled table without writing custom CSS.

With this node in place, your Google Sheet is now transformed into a complete HTML document, ready to be sent to the browser.

4. Return the HTML with a Respond to Webhook node

The final step is to send the generated HTML back to whoever called the webhook. Add a Respond to Webhook node and connect it after the Function node.

Configure it so that:

  • The Response body uses the html field from the Function node output.
  • The Response headers include:
    Content-Type: text/html; charset=UTF-8
  • The node is set to respond with text so browsers render the HTML directly.

At this point, your workflow is complete. A single URL now reads your sheet, converts it into a responsive table, and returns it as a web page.

How the complete n8n workflow flows

Your finished workflow follows a clear, logical path:

Webhook (incoming request) → Google Sheets (read data) → Function (build HTML) → Respond to Webhook (send HTML back)

This simple pattern is powerful and reusable. You can import a prebuilt n8n JSON template that follows this exact layout, then just plug in your own Sheet ID and credentials.

Once you see this working, you will likely start to imagine other places where the same pattern could save you time, whether you are sharing internal reports, public data, or simple internal tools.

Keeping your workflow safe and efficient

Protecting your webhook

Public webhooks are convenient, but you also want to be thoughtful about access, especially in production. To keep your automation secure, consider:

  • Adding Basic Auth to the webhook or validating a secret query parameter.
  • Restricting access by IP allowlists or cloud firewall rules.
  • Serving the webhook over HTTPS, ideally behind a custom domain or proxy that enforces TLS.

Improving performance with caching

If your Google Sheet is large or you expect many requests, you can reduce load and speed up responses by adding a caching layer. Options include:

  • Using in-memory caching inside n8n to reuse recent results.
  • Relying on an external cache or key-value store to store rendered HTML.

Caching helps you respect Google Sheets API limits and keeps the experience snappy for your users.

Handling large sheets and pagination

For very large datasets, HTML tables can become heavy for both your workflow and your users. In that case, consider:

  • Implementing pagination with limit and offset parameters.
  • Providing alternative endpoints that return CSV or JSON instead of HTML when clients do not need a visual table.

These strategies keep your automation responsive as your data grows.

Troubleshooting your n8n Google Sheets HTML workflow

If something does not work on the first try, that is part of the learning journey. Here are some common issues and how to approach them:

  • No data returned
    Double check the Sheet ID and sharing settings. Make sure the OAuth client or account used in n8n has access to the sheet.
  • Malformed HTML
    Open the response in the browser and use “View Source” to inspect the generated HTML. You can also log the html field in the Function node for easier debugging.
  • Slow responses
    Look at Google Sheets API rate limits and network latency. Adding caching or limiting the range you read can greatly improve performance.

Each small fix you make builds your confidence with n8n and helps you move faster on future workflows.

Ideas to extend and personalize your template

Once your basic HTML table is working, you can turn it into something uniquely suited to your team or business. Here are some enhancements to explore:

  • Multiple formats
    Return CSV or JSON when a query parameter such as ?format=json or ?format=csv is provided, and keep HTML as the default.
  • Server-side sorting and filtering
    Accept query parameters (for example ?sort=column, ?status=active) and filter or sort the rows inside the Function node before rendering.
  • Custom styling and interactivity
    Swap Bootstrap for your own CSS or add interactive JavaScript libraries like DataTables for client-side search, sorting, and pagination.
  • Static snapshots
    Generate static HTML snapshots at intervals and host them on a CDN for very fast delivery, while keeping the workflow for scheduled updates.

Each improvement is a chance to learn, experiment, and tailor your automation to the way you actually work.

Take the next step: automate your sheet into a web page

You now have a clear path to turn any Google Sheet into a responsive HTML table using n8n. This workflow is simple, but it represents something bigger: the shift from manually maintaining views of your data to letting automation do the work for you.

Here is a suggested path forward:

  1. Import the workflow into your n8n instance.
  2. Insert your own Google Sheets credentials and sheetId.
  3. Open the webhook URL in your browser and watch your spreadsheet appear as a clean, responsive table.

Once it is running, ask yourself: what else could I automate around this? Could I add filters, multiple formats, or scheduled snapshots? Let this template be a stepping stone toward a more automated, focused workflow where your tools quietly handle the repetitive parts.

If you want a ready made template or support tailoring this to your use case, you can start here:

Download the n8n template
Subscribe for tutorials

Build a Recall Notice Tracker with n8n & Pinecone

Build a Recall Notice Tracker with n8n & Pinecone

Automating recall notice monitoring reduces manual effort, improves coverage, and makes it easier to act on critical safety information. This reference-style guide documents a complete n8n workflow template that uses a webhook, OpenAI embeddings, Pinecone as a vector database, an AI agent, and Google Sheets to ingest, index, summarize, and log product recall notices.

The goal of this documentation is to explain the workflow architecture, node-by-node configuration, and data flow so you can deploy, adapt, and extend the template in your own n8n environment.

1. Solution Overview

The Recall Notice Tracker workflow turns unstructured recall notices into structured, searchable records. It:

  • Accepts incoming recall payloads via an HTTP webhook.
  • Splits long notice bodies into overlapping text chunks.
  • Generates vector embeddings for each chunk using OpenAI.
  • Persists embeddings in a Pinecone index for semantic retrieval.
  • Uses an AI agent that can query Pinecone as a tool, then summarize and extract key fields.
  • Appends a structured row to a Google Sheet for human review and reporting.

This architecture is designed for:

  • Real-time ingestion from regulatory feeds, suppliers, or scrapers.
  • Semantic search across historical recall content.
  • Automated summarization and normalization into a consistent schema.

2. Architecture & Data Flow

The workflow is built around a linear ingestion pipeline plus an AI-agent summarization step that leverages the vector store. At a high level:

  1. Webhook node receives a JSON payload for each recall notice.
  2. Splitter node transforms the notice body into smaller text segments.
  3. Embeddings node sends each segment to OpenAI to obtain vector embeddings.
  4. Insert node writes the resulting vectors into a Pinecone index named recall_notice_tracker.
  5. Query & Tool nodes expose Pinecone as a semantic search tool that the AI agent can call.
  6. Memory node maintains short-term conversational context for the agent.
  7. Chat / Agent node uses the vector context and memory to produce a structured summary.
  8. Google Sheets node appends the structured data as a new row to a sheet named Log.

All nodes are orchestrated inside n8n. External services are accessed through configured credentials and API keys.

3. Prerequisites

Before importing and configuring the template, ensure you have:

  • An n8n instance (n8n Cloud or self-hosted).
  • An OpenAI API key, or a compatible embeddings provider that n8n supports.
  • A Pinecone account with an API key and environment.
  • An Anthropic API key, or another LLM provider for the agent step.
  • A Google account with Google Sheets API credentials and access to the target spreadsheet.

4. Node-by-Node Breakdown

4.1 Webhook Node

  • Endpoint: POST /recall_notice_tracker
  • Purpose: Entry point for recall notices from publishers, scrapers, or integration platforms such as Zapier or Make.
  • Expected payload: JSON with at least a title and body, plus optional metadata.

Sample payload:

{  "title": "Toy recall - lead paint",  "body": "Company X is recalling a batch of toy cars due to lead-based paint found in samples...",  "source": "https://example.gov/recall/123",  "published_at": "2025-10-01T12:00:00Z"
}

The node should be configured to accept JSON and map fields such as title, body, source, and published_at into the workflow data.

4.2 Splitter Node (Text Splitter)

  • Type: Character-based text splitter.
  • Parameters:
    • chunkSize: 400
    • chunkOverlap: 40
  • Input: The full recall notice body (and optionally title or other text fields).
  • Output: An array of text chunks with overlapping content.

The splitter converts a long notice into segments that are easier to embed and retrieve. Chunk overlap of 40 characters helps preserve context across boundaries. You can tune these values later based on recall length and retrieval quality.

4.3 Embeddings Node (OpenAI)

  • Service: OpenAI embeddings API.
  • Credentials: OpenAI (e.g., OPENAI_API in n8n credentials).
  • Model example: text-embedding-3-small.
  • Input: Each text chunk from the Splitter node.
  • Output: A vector embedding per chunk, plus reference to the original text.

Dimensionality must match the Pinecone index configuration. For text-embedding-3-small, this is typically 1536 dimensions. Ensure the model you select is compatible with your Pinecone index.

4.4 Insert Node (Pinecone Vector Store)

  • Service: Pinecone.
  • Index name: recall_notice_tracker.
  • Credentials: Pinecone API key and environment (e.g., PINECONE_API in n8n).
  • Input: Embeddings and associated metadata (text, title, source, timestamps).
  • Output: Stored vectors in the Pinecone index, keyed by unique IDs.

Each embedding is inserted with metadata that can include:

  • Original text chunk.
  • Recall title.
  • Source URL.
  • Publication date.
  • Any other relevant attributes from the webhook payload.

Make sure the index dimensionality matches the embedding model (for example, 1536 for text-embedding-3-small). Mismatched dimensionality will cause Pinecone write failures.

4.5 Query & Tool Nodes (Semantic Search Integration)

  • Purpose: Allow the AI agent to run semantic queries against Pinecone.
  • Input: Agent-generated queries or recall-related search terms.
  • Output: Relevant recall chunks retrieved from the vector store.

The Query node is configured to search the recall_notice_tracker index using the same embedding model as the Insert node. The Tool node exposes this query capability to the agent, so the agent can call Pinecone as a tool when generating summaries.

4.6 Memory Node

  • Purpose: Maintain short-term conversational or workflow context for the agent.
  • Usage: Stores recent notices or prior agent outputs so the agent can reference them when answering or summarizing.

This node is optional but useful if you extend the workflow into a multi-step conversation or need the agent to consider several recalls together. In the base template, it functions as short-term context for the Chat / Agent node.

4.7 Chat / Agent Node

  • Service: Anthropic or another LLM provider.
  • Credentials: Anthropic API key (e.g., ANTHROPIC_API) or equivalent.
  • Inputs:
    • Recall notice content (title, body, metadata).
    • Context retrieved from Pinecone via the Query & Tool nodes.
    • Memory context from the Memory node.
  • Output: A structured JSON-like object with normalized recall fields.

The agent is configured to summarize each recall and extract fields such as:

  • Product name.
  • Manufacturer.
  • Recall date.
  • Hazard description.
  • Recommended action.
  • Source URL.
  • Raw excerpt for reference.

The agent response is expected to conform to a schema similar to:

{  "product": "...",  "manufacturer": "...",  "recall_date": "YYYY-MM-DD",  "hazard": "...",  "recommended_action": "...",  "source_url": "...",  "raw_excerpt": "..."
}

When crafting the agent prompt, instruct the model to:

  • Use only information that appears in the notice or retrieved context.
  • Return a single JSON object with the exact keys shown above.
  • Use clear, concise text for human readability.

4.8 Google Sheets Node (Sheet)

  • Service: Google Sheets.
  • Credentials: Google Sheets OAuth2 credentials (e.g., SHEETS_API in n8n).
  • Target sheet: Worksheet named Log within your spreadsheet.
  • Input: The JSON fields produced by the Chat / Agent node.
  • Output: A new row appended to the Log sheet per recall notice.

Map each JSON field from the agent output to a column in the Google Sheet. For example:

  • product → “Product”
  • manufacturer → “Manufacturer”
  • recall_date → “Recall Date”
  • hazard → “Hazard”
  • recommended_action → “Recommended Action”
  • source_url → “Source URL”
  • raw_excerpt → “Raw Excerpt”

5. Initial Configuration Steps

5.1 Configure API Credentials in n8n

In the n8n credentials section, add:

  • OpenAI: API key for embeddings (e.g., OPENAI_API).
  • Pinecone: API key and environment (e.g., PINECONE_API).
  • Anthropic: API key for the agent (e.g., ANTHROPIC_API).
  • Google Sheets: OAuth2 credentials with permission to edit the target spreadsheet.

Assign these credentials to the corresponding nodes in the imported workflow.

5.2 Create the Pinecone Index

In your Pinecone console or via API:

  • Create an index named recall_notice_tracker.
  • Set dimension to match your embedding model (for example, 1536 for text-embedding-3-small).
  • Configure pods and replicas based on expected read/write volume.

Index configuration cannot be changed easily after creation, so verify dimensionality and region before you start writing data.

5.3 Import the n8n Workflow Template

Use the provided JSON template to import the workflow into your n8n workspace:

  1. Open n8n.
  2. Import the JSON file containing the Recall Notice Tracker template.
  3. Connect the Webhook node to your external sources such as:
    • Regulatory feeds.
    • Supplier notifications.
    • Custom scrapers.
    • Zapier, Make, or other integration tools.

5.4 Tune Splitter and Embeddings Parameters

In the Splitter node:

  • Start with chunkSize: 400 and chunkOverlap: 40.
  • Increase chunkSize if you want fewer vectors and lower cost, at the expense of more diffuse retrieval.
  • Decrease chunkSize if notices are very long or you need more precise context windows.

In the Embeddings node:

  • Select the embeddings model that matches your Pinecone index dimension.
  • Ensure the node uses the correct OpenAI credentials.

5.5 Configure Agent Prompt and Output Parsing

In the Chat / Agent node:

  • Reference the Pinecone Tool so the agent can retrieve related recall text.
  • Pass in the notice content and any metadata from the webhook.
  • Define a prompt that instructs the agent to:
    • Identify product, manufacturer, affected batches (if present), date, hazard, and recommended action.
    • Include the source URL and a short raw excerpt.
    • Return output in a strict JSON-like structure with the keys: product, manufacturer, recall_date, hazard, recommended_action, source_url, raw_excerpt.

Keep the schema consistent with what the Google Sheets node expects. If the agent occasionally returns malformed JSON, tighten the instructions and provide an explicit example in the prompt.

6. Testing & Validation

After basic configuration, validate the workflow end to end:

  1. Webhook test: Send a POST request to the webhook URL using the sample payload or a real recall notice.
  2. Splitter verification: Inspect the Splitter node output to ensure chunks are coherent and not cutting off mid-word excessively.
  3. Embeddings & Pinecone: Confirm that the Embeddings node runs without errors and that new vectors appear in the recall_notice_tracker index.
  4. Agent output: Run through the Chat / Agent node and verify that the returned JSON matches the expected schema and values.
  5. Google Sheets append: Check that a new row appears in the Log sheet with correctly mapped fields.

6.1 Validation Tips

  • Use small batches of test messages to validate Insert and Query behavior before scaling up.
  • Query Pinecone manually for phrases from your notices to verify semantic similarity and vector quality.
  • Initially, direct agent outputs to a dedicated debug sheet so you can review formatting and content before sending them to a production log.

7. Security & Privacy Considerations

When running this workflow in production, pay attention to:

  • Webhook access: Limit who can POST to the webhook using shared secrets, IP allowlists, or mutual TLS where possible.
  • PII handling: If recall data includes personally identifiable information, consider masking or redacting it before sending content to OpenAI, Pinecone, or the agent provider to comply with privacy requirements.
  • Access control: Use role-based permissions for your n8n instance and Pinecone project so only authorized users can view or modify recall data.

Nano Banana: n8n AI Image Editor Workflow

Nano Banana: How One Telegram Bot Turned Into an n8n AI Image Editor

On a quiet Tuesday night, Leo stared at his laptop, surrounded by half-finished mockups and a Telegram window full of images from his users. He had promised his small community a playful AI image editor bot that could transform their photos on the fly. Instead, he was drowning in manual downloads, uploads, and scripts that kept breaking.

Leo was a developer who loved rapid prototypes, not production-grade infrastructure. He wanted a way to turn Telegram photo messages into AI-edited images without building a custom backend, managing servers, or hand-rolling integrations. That is when he stumbled across an n8n workflow template with a curious name: Nano Banana.

Within a single evening, that template turned his messy idea into a working AI image editor powered by n8n, Telegram, and Gemini 2.5 Flash Image Preview via OpenRouter. The bot would receive a photo, send it to an AI model, and return a transformed image back into the same chat, all automatically.

The problem Leo faced: too many images, not enough automation

Leo’s community loved sending photos and asking for edits.

  • “Can you blur the background of this?”
  • “Add a fun caption here.”
  • “Make this look like a watercolor painting.”

Every request meant:

  • Downloading the image from Telegram
  • Running it through some script or external tool
  • Uploading the result back to the chat

It was slow, error-prone, and definitely not scalable. What he really wanted was:

  • An AI that could understand images and captions together
  • A no-code or low-code way to orchestrate the entire flow
  • Something that worked directly inside Telegram chats

When Leo discovered that n8n could connect Telegram, OpenRouter, and Gemini into a single workflow, the pieces finally clicked. He did not need to build an API server. He just needed the right automation.

Why n8n and Gemini were the turning point

As Leo read through the Nano Banana description, he realized it did exactly what he envisioned. By combining n8n with Google Gemini through OpenRouter, he could:

  • Apply intelligent transformations and filters to user photos
  • Add AI-generated captions, annotations, and overlays
  • Run visual analysis or moderation on incoming images
  • Prototype chat-driven image editing bots without custom backend code

Gemini, as a large multimodal model, could “see” the image and “read” the caption at the same time. n8n would handle all the glue logic: receiving photos from Telegram, encoding them, sending them to the AI, parsing the response, and posting the result back to users.

The workflow had a name that made him smile, but the architecture was serious. Nano Banana was exactly the kind of n8n AI image editor workflow he needed.

What Nano Banana actually does behind the scenes

Before turning it on, Leo wanted to understand the flow. The Nano Banana n8n workflow follows a clear sequence:

  • Listen for incoming Telegram messages that contain photos
  • Download the photo file from Telegram’s servers
  • Convert the photo from binary format to a Base64 string
  • Wrap that Base64 string in a proper data:image/png;base64,... URL
  • Send the image plus the user’s caption to OpenRouter using the Gemini 2.5 Flash Image Preview model
  • Parse the AI response and extract the returned image data (Base64)
  • Convert the Base64 back into a binary file
  • Send the processed image back to the same Telegram chat

In human terms, Leo’s bot would now say: “Send me a photo and a caption, and I will send you back an AI-edited version.” Nano Banana handled the rest.

Setting the stage: what Leo needed before he could start

To bring the workflow to life, Leo gathered a few prerequisites:

  • An n8n instance, either cloud or self-hosted
  • A Telegram bot token and the relevant chat ID
  • An OpenRouter API key with access to the Gemini image preview model
  • Basic familiarity with n8n nodes, credentials, and how to map data between them

Once those were ready, he imported the Nano Banana template and started exploring the nodes that powered the magic.

Walking through the Nano Banana workflow as a story

1. The first contact: Photo Message Receiver

The story begins when a user sends a photo to Leo’s Telegram bot. In n8n, this is handled by the Telegram Trigger node, which listens for updates of type message.

Leo configured the node with his bot token and set it to pay attention to messages that contain photos. Whenever someone sent an image, the node captured the file_id from the message and passed it to the next step.

For the bot, this was the moment of “I have a new photo, let us process it.”

2. Getting the actual file: Download Telegram Photo

Next, the workflow needed the real image, not just an ID. The Telegram node, using the getFile resource, fetched the binary data for that photo.

In n8n, Leo mapped the file ID from the trigger node like this:

={{ $('Photo Message Receiver').item.json.message.photo[0].file_id }}

With this, his workflow could download the original image from Telegram servers and move on to preparing it for Gemini.

3. Preparing the image for AI: Convert Photo to Base64

Gemini’s image endpoint needed the file in a specific format. The extractFromFile (or Convert Binary) node handled that conversion, turning the binary image into a Base64-encoded string.

This step was crucial. The AI endpoint expects a Base64-encoded data URL, so Leo made sure the node stored the Base64 value in a predictable property on the item.

4. Giving the image a proper URL: Format Image Data URL

Now Leo had a Base64 string, but Gemini needed it wrapped in a data:image/png;base64, URL. A simple Code node took care of this formatting.

Inside that node, he used JavaScript similar to this:

const items = $input.all();
const updatedItems = items.map((item) => {  const base64Url = item?.json?.data;  const url = `data:image/png;base64,${base64Url}`;  return { url };
});
return updatedItems;

After this step, each item in the workflow had a clean url field that Gemini could understand as an image input.

5. The brain of the operation: Nano Banana Image Processor (OpenRouter)

This was the heart of the story. The HTTP Request node, which Leo renamed “Nano Banana Image Processor,” sent a POST request to the OpenRouter chat completions endpoint.

He selected the google/gemini-2.5-flash-image-preview:free model and built a request body that included both the user’s text caption and the image URL. The payload looked like this:

{  "model": "google/gemini-2.5-flash-image-preview:free",  "messages": [  {  "role": "user",  "content": [  { "type": "text", "text": "...user caption..." },  { "type": "image_url", "image_url": { "url": "{{ $json.url }}" } }  ]  }  ]
}

In the headers, he passed his OpenRouter API key using the Authorization: Bearer pattern. This was the moment the bot asked Gemini, “Here is the photo and what the user wants. Please work your magic.”

6. Understanding the AI’s reply: Parse AI Response Data

The response from OpenRouter could contain one or more images, usually encoded as a data URL with Base64 inside. Leo used a Set node to extract exactly what he needed.

For example, to pull out the Base64 portion of the first returned image, he used an expression like:

=
{{$json.choices[0].message.images[0].image_url.url.split(',')[1]}}

This expression split the data URL at the comma and took the second part, which held the pure Base64 payload. Now the workflow had the AI-generated image in a form it could convert back to a file.

7. Turning Base64 back into a file: Base64 to Binary File

To send the result back through Telegram, Leo needed an actual file again. The ConvertToFile node converted the Base64 string into a binary file inside n8n.

Once that binary data was ready, the bot had a fresh, AI-processed image ready to share.

8. The big reveal: Send Processed Photo back to Telegram

For the final step, Leo used the Telegram node with the sendPhoto operation. He mapped the chat ID from the original trigger node so the image would go right back to the user who sent the photo.

In the chat, it looked seamless: the user sent a photo with a caption, waited a moment, and then received a transformed image created by Gemini, orchestrated by n8n, and delivered by Nano Banana.

Keeping things safe: security and best practices Leo adopted

As Leo prepared to share his bot more widely, he tightened up security and reliability:

  • He never hardcoded API keys, instead using n8n’s credentials and environment variables for both Telegram and OpenRouter tokens.
  • He added checks on image size and type before sending them to the AI to reduce costs and avoid timeouts.
  • He implemented rate limiting and retries with exponential backoff to handle temporary API errors gracefully.
  • He considered basic moderation of user captions to reduce the risk of inappropriate or malicious prompts.

These steps turned his fun prototype into a more robust automation.

When things go wrong: debugging the Nano Banana workflow

Not every run was perfect at first. Sometimes the AI did not return an image, or a data URL looked suspiciously short. To troubleshoot, Leo relied on a few n8n techniques:

  • Using Execute Node on individual nodes to inspect their output step by step.
  • Checking the raw JSON returned by OpenRouter in the HTTP Request node whenever the AI response did not include an image.
  • Logging or inspecting the length of the generated data URL to ensure the Base64 string was complete and not truncated.

With these tools, he quickly identified configuration issues and adjusted his prompts or parsing logic as needed.

Where Leo wants to take Nano Banana next

Once the core workflow was stable, Leo started dreaming up enhancements. The Nano Banana template made it easy to extend the automation with additional nodes:

  • Image caching so repeated requests with the same file_id would not trigger new AI calls every time.
  • Support for multiple image sizes or formats by adding a resizing step before the Base64 conversion.
  • Telegram commands like /style watercolor or /mode cartoon to tweak the model behavior dynamically.
  • Cloud storage integration with S3 or GCS so processed images could be stored and shared as links instead of raw binary files.

Each of these ideas was just a few nodes away inside n8n.

Thinking about costs and model selection

As his bot gained more users, Leo started paying attention to pricing and performance. OpenRouter provides access to multiple models and pricing tiers, and the Gemini 2.5 Flash Image Preview model he used was great for fast image experiments.

For larger scale usage, he planned to:

  • Review the cost per request for different models
  • Balance latency against quality for his particular use case
  • Potentially switch or mix models depending on the type of transformation requested

n8n made it easy to swap models or add logic for routing different requests to different AI backends.

The resolution: from late-night frustration to a live AI image editor

By the end of that Tuesday night, Leo’s once chaotic idea had become a working n8n AI image editor workflow. The Nano Banana template let him:

  • Turn Telegram photo messages into AI-processed images automatically
  • Leverage Gemini’s multimodal capabilities without writing a traditional backend
  • Prototype and ship a chat-driven image editing bot in a fraction of the time

It was more than a clever automation. It was a foundation he could build on for:

  • Creative Telegram bots that apply filters and styles
  • Visual moderation pipelines that flag risky content
  • Automated image analysis tools that respond directly inside chat

Try the same journey: import the Nano Banana workflow into your n8n instance, plug in your Telegram and OpenRouter credentials, and activate the trigger. Send your bot a photo with a caption and watch the AI-edited image come back in real time.

If you want to push it further, you can experiment with different prompts and styles. Paste your Telegram bot messages into n8n or your prompt editor and iterate on the instructions you send to Gemini to shape the kind of image edits you want.

If this story sparked ideas, keep exploring more n8n automation patterns and AI integration recipes. Your next late-night experiment might turn into the workflow your users love most.

Nano Banana: n8n Telegram AI Image Workflow

Nano Banana AI Image Editor – How One Telegram Bot Changed a Marketer’s Workflow

When Maya, a solo marketer at a fast-growing ecommerce startup, opened her Telegram one Monday morning, it was already overflowing with photos.

Customers were sending product shots, support requests with screenshots, and user-generated content for campaigns. Her job was to tag, moderate, and enhance these images before they ever touched a landing page or ad set.

She tried doing it all manually. Then she tried a patchwork of tools. Everything was slow, fragile, and impossible to scale. What she really wanted was simple: send a photo to a Telegram bot, have an AI model analyze or edit it, and get the processed image right back in the chat.

That is how she stumbled on an n8n workflow template that combined Telegram, OpenRouter, and Google’s Gemini 2.5 Flash image model (Nano Banana preview). It looked almost too good to be true: an end-to-end AI image pipeline that she could run on her own infrastructure.

The problem: too many images, not enough hours

Maya’s challenges will sound familiar to anyone working with visual content at scale:

  • Customers sending photos at all hours through Telegram
  • A need for fast moderation and visual tagging before publishing anything
  • Constant requests for quick edits, crops, and enhancements
  • No time to manually download, upload, and process every single image

She had experimented with AI tools before, but they all required her to jump between apps, upload files, and copy results back into Telegram or her CMS. Nothing felt integrated into her daily workflow.

What she really needed was automation that lived where her users already were: Telegram. That is when she discovered the Nano Banana AI Image Editor workflow built on n8n.

The discovery: a lightweight n8n + Telegram + OpenRouter pipeline

In a late-night search for “n8n Telegram AI image workflow,” Maya found a template that promised exactly what she wanted. It described a pipeline that could:

  • Receive photos directly from Telegram
  • Send them to Gemini 2.5 Flash image model via OpenRouter
  • Return the processed image back to the same chat

Even better, it was designed to be:

  • Lightweight – no heavy infrastructure required
  • Inexpensive – efficient use of Gemini through OpenRouter
  • Customizable – prompts and logic she could tweak herself

The workflow used OpenRouter’s access to Google’s Gemini family, including the Nano Banana / Gemini 2.5 Flash image preview model. It promised automated moderation, visual tagging, on-the-fly editing, and even conversational image assistance, all triggered by a simple Telegram message.

Maya decided to give it one weekend. If it worked, it could save her hours every week. If not, she would at least understand n8n better.

Rising action: wiring the workflow together

On Saturday morning, she opened n8n, imported the template, and started tracing the nodes. The flow looked surprisingly linear and understandable, even for a non-developer:

  1. Receive photo from Telegram
  2. Download the photo file
  3. Convert the image to base64
  4. Format it as a data URL
  5. Send it to Gemini via OpenRouter
  6. Parse the AI response
  7. Convert the result back to a binary file
  8. Send the processed photo back on Telegram

She decided to walk through each step, imagining what would happen when a customer sent a photo to her future bot.

Listening for photos: the Telegram trigger

The story begins every time a user sends a photo. The first node in her n8n canvas was the Telegram trigger, which would be the “ears” of her automation.

She configured it to listen for incoming messages that contain photos and made sure updates included message. Depending on her environment, she could choose between webhook or polling, but the idea was simple: whenever a user dropped an image into the chat, n8n would wake up and catch it.

Getting the actual file: Download Telegram Photo

Once a message landed, the next node, Download Telegram Photo, took over. Telegram only sends a file_id at first, so this node used that ID to fetch the real image from Telegram’s servers.

The node stored the image as a binary payload inside n8n. To Maya, this felt like the moment the photo truly “entered” her workflow, ready to be processed by AI.

Preparing the image for AI: base64 and data URLs

Many AI APIs, including Gemini through OpenRouter, prefer image data as base64 or data URLs. The template handled this in two steps that Maya quickly learned to appreciate.

Step 1 – Convert Photo to Base64: A Binary to JSON style node (n8n’s binary-to-property converter) took the binary image and extracted it into a base64 string. Without this, Gemini would not know how to consume the photo.

Step 2 – Format Image Data URL: Next, a small Code node formatted that base64 string as a data URL, something like:

// Example snippet used in the code node
const items = $input.all();
const updatedItems = items.map((item) => {  const base64Url = item?.json?.data;  const url = `data:image/png;base64,${base64Url}`;  return { url };
});
return updatedItems;

She made a note to adjust the mime type based on the incoming image, using image/png or image/jpeg as needed. It was a tiny detail, but crucial for consistent results.

The heart of the story: Nano Banana Image Processor

The real magic lived in the HTTP Request node that talked to OpenRouter. This was the Nano Banana Image Processor, and it was where her Telegram photos met Gemini.

The node sent a POST request to:

https://openrouter.ai/api/v1/chat/completions

It used the model:

google/gemini-2.5-flash-image-preview:free

Inside the request body, the node combined two key ingredients:

  • The caption text that users typed along with their photo, which acted as the instruction or prompt
  • The image itself, passed as a data URL from the earlier node

Maya stored her OpenRouter API key securely in n8n credentials so it never appeared in plain text inside the node. That small security practice made her feel more confident about eventually moving this into production.

Bringing the AI’s answer back to life

Once Gemini processed the image, OpenRouter returned a response. Sometimes it would contain base64 image data, other times an image URL. The next part of the workflow made sure that whatever came back could be turned into a Telegram-friendly photo.

Parse AI Response Data: This node extracted the base64 string or fetched the image from the URL and stored it in a property that the next node understood.

Base64 to Binary File: Using n8n’s conversion tools, the workflow turned the base64 result back into a binary file. This was the final format Telegram needed to attach the image correctly.

Send Processed Photo: Finally, the Telegram sendPhoto node took over. With binaryData enabled and the appropriate chat_id set to the original message’s chat.id, the workflow sent the AI-processed image right back to the user.

In Maya’s mind, she could already see it: a customer sends a product photo with the caption “make this background white and sharpen the image,” and the bot replies with a polished, ready-to-use image in seconds.

The turning point: from fragile scripts to a reliable automation

Of course, not everything worked perfectly on the first try. The first time Maya tested the workflow, nothing came back. No image, no error in Telegram, just silence.

Instead of giving up, she walked through a mental troubleshooting checklist, using the template’s guidance as her map.

Troubleshooting in the real world

  • No image returned? She checked that the Telegram trigger was correctly extracting the file_id and that the Download node was receiving a valid file. She also verified that her Telegram bot had the right permissions.
  • OpenRouter errors? She inspected the HTTP Request node. Was the API key correct? Model name exactly google/gemini-2.5-flash-image-preview:free? Was the payload structured correctly? Looking at the HTTP response body quickly revealed a formatting mistake she had made.
  • Large files timing out? When a test image failed due to size, she added a guard to resize or reject overly large photos and considered sending a lower resolution version to Gemini to keep latency and cost under control.
  • Broken base64? She confirmed that any data URL prefixes were either stripped or added correctly when converting between base64 and binary. One misplaced prefix had been enough to break the final file.

Within an afternoon, the workflow was stable. Maya could send an image with a caption from her phone and get back a transformed version in the same Telegram thread.

Hardening the workflow: environment, security, and performance

Once the basic flow worked, Maya started thinking like someone preparing for production. She did not want a fragile toy; she wanted a reliable image automation pipeline.

Environment setup and best practices

  • Secrets in n8n credentials: She stored both her Telegram bot token and OpenRouter API key in n8n credentials instead of hardcoding them into nodes. That made it easier to rotate keys and share the workflow safely.
  • Correct chat IDs: To make the bot feel conversational, she used the incoming message’s chat.id as the target for replies, rather than a fixed ID. That way, each user got their own direct response.
  • Mime type detection: She added logic to detect whether the incoming file was image/jpeg or image/png and built the proper data URL. This small detail improved compatibility across different devices.
  • Handling rate limits: Knowing that OpenRouter and Gemini models enforce rate limits, she planned for spikes by adding retries and optional throttling. For future campaigns, she considered adding a queue so that high-volume bursts would not cause failures.
  • Persistent storage: Since n8n’s filesystem can be ephemeral, she earmarked S3 or another cloud storage option for any images she wanted to keep long term, instead of relying on local storage.

Security and privacy considerations

Working with customer images meant Maya had to think about more than just convenience. She also needed to respect privacy and compliance requirements.

  • She planned to inform users that their images were analyzed by an AI service and might be stored by the provider.
  • For sensitive use cases, she looked into redacting or obfuscating parts of images before sending them to third-party APIs.
  • She enabled encryption and secure storage for any persisted files or logs that might contain user data.

With these safeguards, she felt comfortable using the workflow beyond internal testing.

Optimization: from “it works” to “it scales”

After a week in light production, the workflow was already saving Maya hours. But she could also see where optimization would matter as usage grew.

  • Caching results: She started caching processed results for repeated images or similar requests from the same user. That cut down on API calls and improved response times.
  • Preprocessing images: Before sending photos to Gemini, she experimented with cropping and compressing images in n8n. This reduced latency and cost while still keeping quality high enough for her use cases.
  • Asynchronous processing: For heavier tasks, she considered using asynchronous webhooks and job queues. The idea was to accept the upload quickly, enqueue the processing job, and notify the user when the image was ready, rather than making them wait.

These tweaks turned a clever prototype into a workflow she could trust during product launches and campaign spikes.

What Maya used it for (and what you might too)

Once the bot was live, new use cases appeared almost daily. Some of the most valuable ones included:

  • Photo captioning and alt-text generation for accessibility on product pages
  • Automated product image enhancement for ecommerce listings
  • Scene analysis and tagging to organize user-generated content libraries
  • Conversational image assistance where users could ask the bot to edit, annotate, or analyze their photos directly in Telegram

Every one of these started the same way: a simple Telegram message with a photo and a short caption. The Nano Banana workflow did the rest.

How she deployed it: a simple launch checklist

To move from test to production, Maya followed a straightforward checklist that you can reuse:

  1. Create a Telegram bot and add it to the target chat or channel.
  2. Store the Telegram bot token and OpenRouter API key in n8n credentials.
  3. Import or recreate the nodes from the template, wire them together, and enable the workflow.
  4. Send a test image with a descriptive caption to the bot and confirm that the processed image comes back successfully.

With that, her Telegram AI image editor was live.

Resolution: from overwhelm to a scalable AI image assistant

Two weeks after launch, Maya looked back at her old routine of downloading images manually and could not imagine going back.

The Nano Banana AI Image Editor workflow had become her invisible teammate. It handled moderation, tagging, and basic edits automatically, so she could focus on strategy and creative work instead of repetitive image chores.

The best part was that it was not a black box. Built on n8n, Telegram, and OpenRouter, it was modular and easy to extend. She could add new prompts for Gemini, plug in S3 to persist processed photos, or even chain additional workflows for publishing content to her CMS.

For her, this was not just an automation. It was a foundation for image-first conversational experiences that felt native to the tools her customers already used.

Want to follow Maya’s path?

The same Nano Banana AI Image Editor workflow is available as an n8n template that you can adapt to your own environment and use case. It is ready for production with the right throttling, error handling, and security practices in place, and it gives you a powerful starting point for any Telegram-based AI image automation.

If you would like, you can:

  • Get a downloadable n8n workflow JSON with placeholders for your credentials
  • Customize Gemini prompts for specific edits like retouching, cropping, or tagging
  • Add S3 or a database step to persist processed photos automatically

When you are ready to build your own story with this workflow, you can start by importing the template and running your first test image.

Automate Slack: Create Channels, Invite Users & Upload Files

Automate Slack: Create Channels, Invite Users & Upload Files with n8n

Slack is a critical collaboration layer for many engineering, product, and operations teams. Yet, the repetitive work of creating channels, inviting users, posting initial messages, and sharing files often remains manual. This guide explains how to implement a robust n8n workflow that automates the full Slack channel setup lifecycle, from channel creation to file upload, using best practices suitable for production-grade automation.

Use case overview: automated Slack channel provisioning

Whenever you onboard new teams, ship a feature, or start a project, you likely repeat the same Slack tasks:

  • Create a dedicated channel
  • Invite the right stakeholders
  • Post a welcome or kickoff message
  • Attach relevant documentation or assets

Codifying this flow in n8n ensures that every new channel is created consistently, with the correct participants and resources, and without manual intervention. It improves delivery speed, reduces human error, and provides a repeatable pattern that can be integrated with other systems such as HR platforms, CI/CD pipelines, or project management tools.

What this n8n workflow automates

The workflow template you will configure performs the following steps automatically:

  • Create a new Slack channel (for example, n8n-docs)
  • Invite one or more users by Slack user ID
  • Post a welcome message, optionally with an attachment reference
  • Download a file or image via HTTP
  • Upload the downloaded file into the newly created Slack channel

These operations are implemented using n8n’s Slack and HTTP Request nodes, orchestrated in a way that passes data between nodes via expressions.

Slack authentication, scopes, and security

Required Slack bot scopes

For this workflow to function correctly, configure a Slack App with a bot token that has, at minimum, the following scopes:

  • conversations:write – create and manage channels
  • conversations.invite – invite users to channels
  • chat:write – post messages as the bot
  • files:write – upload files to channels
  • users:read – read user IDs when needed

Store this token in n8n using the credentials system (for example, as Slack Bot Access Token). Do not hard-code tokens in node parameters or workflow fields. Using a bot token is recommended for automation since it is easier to scope and audit than user tokens.

Security best practices

  • Keep all secrets in n8n credentials, not in plain-text fields or expressions.
  • Limit the bot to the minimal scopes required for the workflow.
  • Implement idempotency checks where appropriate to avoid accidental duplication, such as re-creating existing channels.
  • Log key operations for auditing, especially in production environments.

Architecture of the n8n workflow

The workflow consists of six primary nodes executed in sequence:

  1. Manual Trigger – initiates the workflow during testing or on demand.
  2. Slack (Create Channel) – provisions a new Slack channel.
  3. Slack (Invite) – invites specified users to that channel.
  4. Slack (Post Message) – posts the initial welcome message.
  5. HTTP Request – downloads an external file or image.
  6. Slack (Upload File) – uploads the binary file to the channel.

Data flows between these nodes primarily through expressions that reference the output of the Slack channel creation step, especially the channel id.

Step-by-step configuration in n8n

1. Manual Trigger for interactive runs

Start with a Manual Trigger node. This trigger is ideal while designing and validating the workflow template because it allows you to run the flow on demand from the n8n UI. Later, you can replace or augment this with other triggers, such as Webhook or Cron, depending on how you want to automate channel creation.

2. Create the Slack channel

Add a Slack node and set the operation to create a channel. In the template example, the channel name is configured as n8n-docs, but you can parameterize this value using expressions or external data sources.

When the node executes successfully, Slack responds with a channel object that includes an id, such as C01FZ3TJR5L. This channel ID is the key reference that subsequent nodes will use to post messages, invite users, and upload files.

3. Invite users to the newly created channel

Next, add another Slack node configured with the Invite operation. Provide an array of Slack user IDs, for example:

["U01797FGD6J"]

To ensure that the invite targets the channel created in the previous step, use an expression to reference the channel ID from the create-channel node. Assuming that node is named Slack, you can use:

{{$node["Slack"].json["id"]}}

This expression passes the channel ID dynamically, so the workflow continues to work even when the channel name or other parameters change.

Tip: If you only know user email addresses, you can add an additional Slack or HTTP node to look up user IDs from emails using the Slack API, then feed those IDs into this invite step.

4. Post a structured welcome message

Add a third Slack node, this time using the Post Message operation. Again, map the channel field to the channel ID using the same expression:

{{$node["Slack"].json["id"]}}

In the message body, define your standard onboarding or project kickoff text. You can also attach images or other media by referencing public URLs (using image_url or similar attachment fields supported by the Slack API). For more advanced implementations, consider templating this message with dynamic variables such as project name, owner, or due dates.

5. Download a file or image using HTTP Request

To include assets directly in the channel, add an HTTP Request node. Configure it to fetch a file from a URL, for example:

https://n8n.io/n8n-logo.png

Set the responseFormat parameter to file. This instructs n8n to store the response as binary data instead of JSON. The resulting binary property can then be passed directly to the Slack file upload node.

6. Upload the downloaded file to Slack

Finally, add a Slack node with the Upload File operation. In this node:

  • Enable the option to upload binary data.
  • Select the binary property created by the HTTP Request node as the file source.
  • Set the target channel using the channel ID expression.

A typical configuration for the channel IDs field might look like:

{"channelIds": [{{$node["Slack"].json["id"]}}]}

After this node executes, the file appears in the Slack channel, and the Slack API responds with a file object that includes the file URL and metadata such as size and type.

Key implementation details and best practices

Using expressions to pass data between nodes

Expressions are central to making this workflow dynamic. For the channel ID, use:

{{$node["Slack"].json["id"]}}

This pattern ensures that every node operates on the channel created earlier, even if you later rename nodes or parameterize inputs. Ensure that node names are stable or update expressions accordingly when refactoring the workflow.

Handling private channels

If you need to create private channels, configure the Slack create-channel node with the appropriate option (for example, is_private or an equivalent setting in the node UI). Verify that your bot token has the necessary permissions to create private channels and manage membership.

File size and format considerations

  • Slack enforces file size limits that vary by plan. Large uploads may fail if they exceed these limits.
  • For very large assets, consider sharing links to hosted files instead of direct uploads.
  • Ensure the HTTP Request node actually returns binary content and not an HTML error page, particularly when downloading from authenticated or rate-limited endpoints.

Error handling and resilience

For production workflows, add explicit error handling around Slack operations:

  • Use a Catch Error node to centralize error handling logic.
  • Add IF nodes to branch on known error conditions, such as channel_already_exists, user_not_found, or invalid_auth.
  • Implement retry logic or delays for rate-limited operations, particularly if you create many channels or invite large groups of users.

Common issues and troubleshooting guidance

Authentication failures or missing scopes

Errors such as invalid_auth or permission-related messages usually indicate that the bot token is missing required scopes or that the Slack App has not been re-installed after scope changes. Verify the configured scopes in the Slack App dashboard, update them if needed, and re-install the app into the workspace so the changes take effect.

Channel already exists

If you attempt to create a channel with a name that already exists, Slack returns an error. To handle this gracefully:

  • Add a lookup step before channel creation to check whether the channel already exists.
  • Or, capture the error and fall back to using the existing channel’s ID instead of failing the entire workflow.

Failed user invitations

When invites fail for specific users:

  • Confirm that the user IDs are correct and belong to the target workspace.
  • Verify that your bot has permission to invite users to the channel.
  • Be aware that external or restricted accounts may have limitations that prevent automatic invites.

File upload problems

If the Slack upload file node fails:

  • Check that the HTTP Request node has responseFormat set to file, not json.
  • Inspect the binary property in n8n’s execution data to confirm that it contains valid file content.
  • Validate that the file size and type are supported by Slack and your plan.

Practical automation scenarios

This workflow pattern can be reused and extended for many operational scenarios, including:

  • Employee onboarding
    Automatically create a project or team channel, invite the new hire and their stakeholders, post onboarding guidelines, and upload key documents.
  • Deployment and release notifications
    For each release, spin up a release-specific channel, invite engineering, QA, and product, post release notes, and attach logs or change summaries.
  • Event and sprint channels
    Create time-bound channels for events, hackathons, or sprints, pre-populate them with agendas, links, and assets, and then schedule cleanup or archiving.

Extending the workflow

Once the core automation is in place, you can enhance it with additional logic and integrations:

  • Add a lookup step to check whether a channel already exists before attempting creation.
  • Use a database, CRM, or spreadsheet to map user email addresses to Slack user IDs and invite users automatically without manual ID management.
  • Implement templated welcome messages that pull dynamic content, such as project identifiers, owners, or links to tickets, from upstream systems.
  • Introduce scheduled cleanup for temporary channels, for example, archiving event channels after a defined period.

From manual trigger to full automation

Initially, run this template via the Manual Trigger to validate behavior:

  1. Execute the workflow from the n8n editor.
  2. Verify that the channel is created correctly.
  3. Confirm that users are invited, the welcome message is posted, and the file appears in the channel.

After validation, replace or complement the Manual Trigger with:

  • A Webhook trigger to respond to external systems, such as HR tools or CI/CD platforms.
  • A Cron trigger to schedule periodic or batch channel provisioning.

Next steps

Use this n8n template as a baseline and adapt it to your organization’s workflows and governance requirements. Integrate it with your existing tooling, introduce additional checks and logging, and evolve it into a standard pattern for Slack automation across your teams.

Call to action: Deploy this workflow in your n8n instance, clone and customize it for your environment, and explore additional n8n templates to standardize more of your operational processes.

Need support tailoring this workflow to your stack or security requirements? Leave a comment or contact our automation specialists for a detailed consultation.

Automate Slack: Create Channel, Invite Users & Upload Files with n8n

Automate Slack: Create a Channel, Invite Users, Post a Message & Upload a File with n8n

Imagine this: it is Monday morning, you have coffee in hand, and instead of doing something fun or at least mildly interesting, you are creating yet another Slack channel, inviting the same group of people, posting the same welcome message, and uploading the same file. Again. For the 27th time.

If that scenario hits a little too close to home, this n8n workflow template is here to rescue you from Slack Groundhog Day. In this guide, you will learn how to set up an automated n8n workflow that:

  • Creates a Slack channel
  • Invites one or more users
  • Posts a welcome message with an image attachment
  • Downloads a file from an external URL
  • Uploads that file into the new Slack channel

Perfect for onboarding, project kickoffs, or any situation where you are tired of clicking the same buttons over and over. Let the workflow do the boring parts so you can focus on things that are slightly more exciting than typing “Welcome to the channel!” for the hundredth time.

What this n8n + Slack workflow actually does

This n8n workflow is a compact, end-to-end automation that handles the full lifecycle of a fresh Slack channel. From left to right, the workflow uses the following nodes:

  • Manual Trigger – to kick things off while you test
  • Slack (create channel) – spins up a brand new channel
  • Slack (invite users) – adds your teammates or new hires
  • Slack (post message with attachment) – sends a welcome message, optionally with an image
  • HTTP Request – downloads an external file or image
  • Slack (upload file) – uploads that file into the new channel

Once it is configured, you can trigger it from anything you like, for example:

  • A webhook from your project management tool when a new project is created
  • An HR system when a new hire is added
  • A calendar event for recurring reports or updates

The result is a standardized, repeatable Slack setup flow that behaves the same way every time, without you needing to remember which channel name format you used last week.

Before you start: Slack API scopes and credentials

Before n8n can work its magic, Slack needs to know your bot is allowed to do things. That means creating a Slack App, giving it the right scopes, and connecting it to n8n.

Required Slack scopes for this workflow

Create a Slack App with a Bot token and add these scopes, depending on whether you are working with public or private channels:

  • conversations:write – create and manage channels
  • conversations:read – read channel metadata
  • chat:write – post messages as the app
  • users:read – resolve or fetch user IDs if needed
  • files:write – upload files into Slack

After adding or changing scopes, install (or reinstall) the app into your Slack workspace. Then:

  • Copy the Bot User OAuth Token
  • In n8n, create Slack credentials and paste that token there (for example, name it Slack Bot Access Token)

Once this is done, the workflow can create channels, invite users, post messages, and upload files on your behalf without you lifting another finger.

Quick setup guide: building the n8n workflow

Let us walk through the workflow configuration step by step. You will keep all the power of the original setup, just with fewer clicks in your life.

1. Manual Trigger – for easy testing

Start with a Manual Trigger node. This is your test button so you can run the workflow on demand while building it.

Later, you can replace it or connect it to a real trigger, for example:

  • A webhook
  • A calendar event
  • An HR or CRM system trigger

2. Create a Slack channel

Next, add a Slack node and configure it to create a channel. Use your Slack bot credentials and set the following:

resource: channel
operation: create
channelName: n8n-docs  (or use an expression to generate names dynamically)

The output of this node is the freshly created channel object. The important part is the channel id, which you will reuse in later nodes. You can reference it in expressions like:

={{$node["Slack"].json["id"]}}

This is the key that connects all the later channel-related actions.

3. Invite users to the new channel

Now that the channel exists, it is time to invite some humans into it. Add another Slack node and configure it for the invite operation:

resource: channel
operation: invite
userIds: ["U01797FGD6J"]
channelId: ={{$node["Slack"].json["id"]}}

Some notes so you do not get stuck:

  • User IDs, not emails – the invite operation expects user IDs that look like U...
  • If you only have emails, use Slack APIs like users.lookupByEmail or users.list first to translate email to user ID
  • Use expressions in n8n to grab the channel id from the create-channel node:
    ={{$node["Slack"].json["id"]}}

Once configured, your workflow will automatically invite the right users to each new channel, no more manual searching for usernames.

4. Post a welcome message with an attachment

With the channel created and users invited, add another Slack node to post a welcome message. Configure it like this:

resource: message
operation: post
channel: ={{$node["Slack"].json["id"]}}
text: "Welcome to the channel!"
attachments: [{"title":"Logo","image_url":"https://n8n.io/n8n-logo.png"}]

You can customize the text, add emojis, or use attachments and Block Kit to include richer content such as:

  • Images or logos
  • Buttons or links
  • Additional formatted sections

The message will appear in the newly created channel, giving everyone a friendly hello and a bit of context as soon as they join.

5. Download an external file with HTTP Request

If you want to upload a file that lives outside Slack, for example a logo, onboarding PDF, or report, add an HTTP Request node.

Configure it like this:

Method: GET
URL: https://n8n.io/n8n-logo.png
Response Format: file

The crucial part is setting the Response Format to file. This tells n8n to treat the response as binary data, which the Slack upload node needs later.

The node will output a binary property (often called data, or whatever key n8n shows for that file) that you will map into the Slack file upload node.

6. Upload the file into Slack

Finally, add a Slack node to upload the file into the channel. Configure it with:

  • resource: file
  • binaryData: true
  • options: set channelIds to the channel id

Example configuration:

resource: file
binaryData: true
options: {"channelIds":["C01FZ3TJR5L"]}  // or use ={{$node["Slack"].json["id"]}}

Then, in the node’s binary mapping, select the binary property from the HTTP Request node output, for example data or whichever key is shown in n8n.

Once this is mapped correctly, the workflow will pull a file from the external URL and drop it straight into your new Slack channel, no manual upload required.

Common gotchas and how to fix them

Even with automation, a few things can still trip you up. Here are the usual suspects.

  • Permission errors If Slack complains about permissions, double check:
    • Your app has all required scopes (conversations:write, chat:write, files:write, etc.)
    • You reinstalled the app after adding new scopes
  • Private channel invites Bots can invite users to private channels only if:
    • The bot is a member of that channel, or
    • It has appropriate permissions to manage members

    A simple pattern is to let the bot create the channel, then invite users through the workflow.

  • Emails vs user IDs The invite operation wants user IDs like U123..., not emails. If you only have emails, use:
    • users.lookupByEmail to get a single user
    • users.list to fetch and map users in bulk
  • Binary mapping issues If the file upload fails, check that:
    • The HTTP Request node Response Format is set to file
    • You selected the correct binary property in the Slack upload node
  • Rate limits Slack has rate limits, especially if you create many channels or send a lot of invites. Add:
    • Delays between operations
    • Retries or error handling paths

    so your workflow behaves nicely under load.

Security and best practices

Automation is fun until a token leaks, so keep things tidy and secure.

  • Store tokens in n8n credentials Never hard code your Slack bot token directly in nodes or expressions. Use n8n credentials so secrets stay protected.
  • Separate dev and prod Use different Slack apps and workspaces for development and production. This prevents “test” channels and messages from surprising real users.
  • Log important responses Store or log channel IDs, file IDs, and error messages. It makes debugging and audits much easier when something goes wrong.
  • Add error handling Use n8n’s Error Trigger or Catch nodes to gracefully handle Slack API failures, rate limits, or invalid data.

Taking it further: ideas to extend the workflow

Once the basic pattern is in place, you can plug it into almost any process that touches Slack. Some ideas:

  • Project-based channels Automatically create a new Slack channel whenever a project is created in your PM tool, then invite the project team and upload kickoff docs.
  • New hire onboarding For each new employee, create a private channel, invite HR and the manager, post a welcome message, and attach training material or company docs.
  • Daily or weekly reports Generate PDFs or images elsewhere, fetch them via HTTP, and upload them into a reporting channel on a schedule.

This template is a solid base that you can mix with other triggers, branches, and conditions to match your exact workflow.

Helpful n8n expressions for this template

Here are some commonly used expressions you will likely need:

Channel ID from create-channel node:
={{$node["Slack"].json["id"]}}

Use channel ID in file upload:
={{$node["Slack"].json["id"]}}

These expressions keep your workflow dynamic, so the same logic works for every new channel without manual adjustments.

Wrapping up: from repetitive clicks to one-click automation

With just a handful of n8n nodes, you can fully automate:

  • Channel creation
  • User invitations
  • Welcome messages
  • File uploads

All inside Slack, all triggered by whatever event makes sense for your team. The result is a repeatable, auditable, and far less annoying setup process for onboarding, project creation, or recurring updates.

If you want, this workflow can be exported as JSON and tailored to your workspace, or extended with conditions, branching, and more advanced error handling. Once you have it running, you might start wondering why you ever created channels manually in the first place.

Call to action: Import this template into your n8n instance, plug in your Slack Bot token, and give it a spin. Need the exported workflow file or help with Slack scopes and configuration? Ask, and it can be generated or explained step by step.

Real Estate Market Trend Report

Real Estate Market Trend Report: Build an Automated AI Pipeline With n8n

If you have ever tried to pull together a real estate market trend report by hand, you know how painful it can be. Hunting for data, copying numbers into spreadsheets, writing summaries from scratch – it gets old fast. The good news is that you can automate most of it with an AI-powered pipeline built in n8n.

In this guide, we will walk through how a real estate market trend report workflow works, what each part of the pipeline does, and how it all comes together to give you consistent, repeatable insights. We will talk about webhooks, text splitting, embeddings, vector stores, agents, and how everything plugs into tools like Google Sheets or dashboards.

Think of this as your blueprint for turning messy property data into clear, structured, AI-generated market reports, without babysitting the process every time.

Why bother automating real estate market reports?

Let us be honest. Manual reports are not just annoying, they are risky. They are slow, hard to reproduce, and often depend on that one person who “knows the spreadsheet.” Automation helps you escape that trap.

With an automated n8n workflow for real estate market trend reports, you get:

  • Faster turnaround – new listings, feeds, and news can be ingested automatically, so you are not waiting on manual exports.
  • Consistent methodology – the same steps, models, and calculations run every time, which means less guesswork and fewer errors.
  • Scalability – you can cover more regions, property types, and time periods without multiplying your workload.
  • Actionable insights – embeddings and a vector store let you surface relevant history and context, which makes your AI summaries smarter and more grounded.

In short, you get to spend less time wrangling data and more time actually using the insights.

What this AI pipeline actually does

So what does this n8n-based pipeline look like in practice? At a high level, it takes raw real estate data, structures it, enriches it with embeddings, and then uses an AI agent to produce a clear narrative report and metrics. Finally, it saves the results somewhere useful, like Google Sheets or a dashboard.

Here is the basic flow:

  1. Webhook receives raw inputs like CSV files, API payloads, or manually uploaded data.
  2. Text splitter breaks longer documents into smaller, overlapping chunks so they can be embedded properly.
  3. Embedding model converts each chunk into a numeric vector that captures its meaning.
  4. Vector store (Weaviate) stores those embeddings and lets you search them semantically.
  5. Agent + chat model pull relevant context from the vector store and memory, then write a structured trend report.
  6. Output step appends the final results to Google Sheets or publishes them to a dashboard or email.

Each of these parts has a job to do. Let us break them down in a more conversational way.

Step 1: Ingesting data with a webhook

Webhook as your single entry point

First, you need a way to get data into your workflow. That is where a webhook comes in. In n8n, the webhook node acts as the front door to your pipeline.

You can configure it to accept POST requests from sources such as:

  • MLS feeds or property listing APIs
  • Market research exports and CSV uploads
  • News scrapers that track local real estate stories
  • Manual uploads or internal tools that send data via HTTP

The beauty of a webhook is that it centralizes ingestion. As soon as new data hits that endpoint, n8n triggers the rest of the workflow automatically. You can schedule nightly runs, near real-time updates, or connect it to other automations that push data whenever something changes.

Step 2: Preparing text with a splitter

Why text splitting matters

Embedding models work best when they receive text in manageable chunks. If you feed them very long reports, important context can get truncated. On the other hand, if chunks are too small, you lose meaning.

That is why the workflow uses a text splitter. It takes long documents and breaks them into overlapping segments so the model sees enough context without being overloaded.

Typical production settings look like this:

  • Chunk size: around 300 to 500 characters
  • Overlap: around 20 to 40 characters

You can tune these values depending on your content. Short property descriptions might not need much splitting at all, while full-length market reports benefit from slightly larger chunks with overlap so the narrative flows naturally across boundaries.

Step 3: Turning text into embeddings

Embeddings with Cohere or similar models

Once your text is split, the next step is to convert each chunk into an embedding, which is just a numeric vector that represents the meaning of the text. This is what allows the system to later say, “show me similar documents to this query” or “retrieve relevant context for this region and time period.”

You can use an embedding model such as:

  • Cohere
  • OpenAI
  • Or an open source alternative tuned for semantic tasks

These vectors make it possible to:

  • Find comparable property descriptions
  • Retrieve past market commentary that relates to a specific city or property type
  • Surface relevant documents for a given query, like “San Francisco condos last 30 days”

The specific embedding dimension or model you choose will depend on your budget and performance needs. A reliable commercial model is a good starting point, and you can always experiment with smaller or local models later if you need to optimize cost or latency.

Step 4: Storing context in Weaviate

Using a vector store for semantic search

Now that you have embeddings, you need somewhere to store and query them. That is where Weaviate comes in as your vector database.

In this workflow, Weaviate is used to:

  • Store embeddings for all your documents and chunks
  • Run fast nearest-neighbor searches to find similar content
  • Filter by metadata such as city, property type, or date

You might create an index with a clear name like real_estate_market_trend_report so it is easy to separate this project from other data you store.

With Weaviate in place, your agent can ask questions like “what is happening with inventory in this neighborhood over the past quarter?” and actually retrieve the most relevant documents to support its answer.

Step 5: Letting the agent write the story

How the agent and chat model work together

This is the fun part. After the data is ingested, split, embedded, and stored, an agent steps in to orchestrate everything and produce a readable market trend report.

The agent typically uses:

  • A vector store search to pull relevant chunks from Weaviate
  • A memory buffer to keep track of prior reports or important context
  • A chat model such as Anthropic or another LLM to generate the final narrative

You can configure the agent to focus on the insights you care about, such as:

  • Aggregating price changes by region and property type
  • Highlighting supply and demand indicators like new listings or average days on market
  • Flagging anomalies such as sudden inventory spikes or rapid price jumps

When you request a report, the process usually looks like this:

  1. The agent pulls the latest relevant embeddings based on your query, for example “San Francisco condos last 30 days.”
  2. It retrieves memory snippets such as prior reports or analyst notes so the tone and context stay consistent over time.
  3. It aggregates numeric metrics from your time-series store or from the retrieved documents.
  4. It sends a structured prompt to the chat model, asking it to generate an executive summary, detailed findings, and clear recommendations.

The result is a market trend report that feels like a human analyst wrote it, but with the speed and consistency of automation.

Step 6: Saving and sharing your results

From AI output to something stakeholders can use

Once the agent has created the report, you still need a convenient way to share it. In the n8n workflow, the final step pushes the output wherever your team actually works.

Typical options include:

  • Google Sheets – append each new report as a row, including key metrics and links to full text.
  • Dashboards – send the data to BI tools for charts, filters, and interactive exploration.
  • Email or internal tools – notify stakeholders automatically when a new report is ready.

This way, the pipeline does not just generate insights, it also makes them visible and easy to act on.

What should your trend report actually include?

Automation is powerful, but it only helps if you are tracking the right things. A strong real estate market trend report usually blends hard numbers with contextual signals so readers get both the “what” and the “why.”

Core metrics to track

  • Median sale price by region and property type
  • Average days on market
  • New listings vs. closed sales to capture the supply and demand ratio
  • Price per square foot
  • Inventory measured in months of supply

Contextual signals that add meaning

  • Mortgage rate trends and lender activity
  • Local economic indicators like employment levels and new construction permits
  • News and policy events such as zoning changes, tax incentives, or new infrastructure

Your AI agent can weave these metrics and signals into a narrative that explains not just what is happening, but also what might be driving those changes.

Visualizing your real estate market trends

Even the best-written report benefits from a few clear visuals. Once your pipeline is generating structured data, you can easily plug it into dashboards or charting tools.

Common visualizations include:

  • Time-series charts for median price and inventory trends
  • Heat maps showing price changes by neighborhood
  • Bar charts comparing new listings vs. closed sales

These visuals work nicely alongside automated email reports, web dashboards, or shared Google Sheets so everyone has the same view of the market.

Keeping your data pipeline clean and trustworthy

Best practices and data governance

Because this workflow relies heavily on data quality, it is worth putting some guardrails in place. Here are a few practices to keep in mind:

  • Source reliability: prioritize official MLS feeds, government datasets, and trusted aggregators.
  • Data freshness: schedule regular ingestion and re-indexing so your insights stay current.
  • Rich metadata: store fields like city, neighborhood, property type, and date with each embedding for precise filtering.
  • Audit trails: log data ingestion steps and agent prompts to Google Sheets or a database so you can debug issues and track changes.
  • Bias and fairness: monitor AI outputs for biased or misleading statements, and add clear instructions and guardrails in the agent prompt.

Good governance makes your automated reports not just fast, but also reliable enough for real decisions.

How often should you re-index or update data?

The right cadence depends on how fast your markets move.

  • For fast-moving markets, consider nightly re-indexing or even hourly updates for certain feeds.
  • For slower regions, a weekly schedule might be perfectly fine.

The n8n workflow can be triggered on a schedule or whenever new data arrives, so you can mix both strategies if needed.

Choosing the right embedding model

There is no single “best” embedding model for every use case, but you can make a smart choice by thinking about three things: quality, cost, and speed.

  • Start with a reliable commercial model like Cohere or OpenAI and test whether retrieval results are relevant for your queries.
  • If latency or cost becomes an issue, experiment with smaller or local models after you have a baseline.
  • Benchmark a few options using real queries such as “2-bedroom townhomes inventory in Austin last quarter” and compare which model surfaces the most helpful context.

Can you add forecasting to this workflow?

Yes, you can. The template focuses on retrieval and summarization, but it is straightforward to layer forecasting on top.

You can combine the retrieved historical context with time-series models such as:

  • ARIMA
  • Prophet
  • Other ML-based forecasting models

Using historical price and inventory time-series data, you can train forecasting models and then feed their outputs into the agent. The agent can then present both current trends and forward-looking estimates in the same report.

Implementation checklist for your n8n workflow

Ready to put this into practice? Here is a compact checklist you can follow while setting up the template in n8n:

  1. Define your report scope: regions, cadence, property types, and key metrics.
  2. Set up webhook ingestion to accept feeds, CSVs, or API payloads and trigger processing.
  3. Configure the text splitter with tuned chunk size and overlap values.
  4. Choose and configure your embedding model (Cohere or equivalent).
  5. Deploy Weaviate with an index such as real_estate_market_trend_report and a metadata schema for city, property type, date, etc.
  6. Design your agent prompts, including rules for memory buffering and retrieval.
  7. Connect outputs to Google Sheets, email, or dashboards so stakeholders can access the reports.
  8. Run end-to-end tests with sample data, review the AI-generated reports, and iterate on prompts and settings.

When this template is a great fit

You will get the most value from this n8n workflow template if you:

  • Produce recurring market analysis for multiple regions or property types.
  • Rely on a mix of structured data (prices, days on market) and unstructured text (

Automated Real Estate Market Trend Report

Automated Real Estate Market Trend Report: Build a Smart Data Pipeline

Imagine never having to manually piece together a market update again. No more copy-pasting from MLS exports, wrangling spreadsheets, or trying to remember which neighborhood you analyzed last week.

That is exactly what this n8n workflow template is built to solve. It pulls in your real estate data, breaks it into useful chunks, turns it into semantic embeddings, stores everything in a vector database, then uses an LLM-powered agent to generate polished, data-backed market trend reports. All on autopilot.

Under the hood, the workflow uses:

  • n8n for orchestration and automation
  • Cohere for generating text embeddings
  • Weaviate as the vector database
  • An LLM-based agent for analysis, writing, and logging
  • Google Sheets for storing outputs and logs

Let us walk through what the template does, when to use it, and how the workflow actually works in practice.

Why automate your real estate market trend reports?

If you have ever tried to produce weekly or monthly market updates by hand, you know how painful it can be. Pull data, clean it, analyze it, write it up, format it, share it. Then do it all again next week.

This is where an automated n8n workflow really shines. With a smart pipeline in place, you get:

  • Faster turnaround – spin up daily or weekly reports with no manual processing.
  • Consistent methodology – the same logic runs every time, which makes trends easier to compare over time.
  • Scalability – duplicate the process across multiple neighborhoods, cities, or property types without extra effort.
  • Actionable outputs – send results to Google Sheets, dashboards, or email so your team can use them immediately.

If you are an agent, investor, analyst, or part of a brokerage or proptech team, this kind of automation can quietly become your “always-on” market intelligence engine.

What this n8n template actually does

Let us zoom out for a second and look at the overall architecture before diving into each step. The workflow is modular and built as a data pipeline:

  • Webhook – receives raw real estate data like CSVs, JSON feeds, or outputs from scraping tools.
  • Text Splitter – breaks long text (descriptions, commentary, news) into smaller chunks.
  • Embeddings (Cohere) – converts those chunks into dense vectors that capture semantic meaning.
  • Vector Store (Weaviate) – stores vectors plus metadata and supports fast semantic search.
  • Query/Tool – retrieves the most relevant chunks when the agent needs context.
  • Memory – lets the agent keep short-term context across multi-step tasks.
  • Agent (LLM) – analyzes the data, writes the market trend report, and formats the output.
  • Google Sheets – stores logs, metrics, and final report data for dashboards or review.

In practice, that means you send in property and market data at one end and get a clean, narrative-style market report out the other end, backed by real numbers and citations.

Step-by-step: how the workflow runs in n8n

1. Capture your data with a webhook

Everything starts with the webhook node in n8n. This is your pipeline’s front door.

You can send data to this webhook from:

  • MLS feeds
  • Web scrapers
  • Property APIs
  • CSV uploads or exports

Whenever new data hits the webhook, n8n automatically triggers the workflow. No buttons to click, no scripts to run. You just keep feeding it data, and it keeps producing insights.

2. Split and normalize the text for analysis

Real estate data rarely arrives in a neat, tidy format. Listing descriptions are long, market commentary can be verbose, and news feeds often come as big blocks of text.

The text splitter in the workflow helps by:

  • Breaking long documents into smaller chunks, typically around 300-500 characters each.
  • Adding a bit of overlap between chunks so context is not lost between splits.
  • Normalizing key fields like price, location, bedrooms into a structured JSON format for later analysis.

This step is essential for two reasons: it keeps your data within model limits and makes the embeddings more meaningful and consistent.

3. Turn text into embeddings with Cohere

Next, each chunk of text is sent to an embeddings model, such as Cohere. This is where the workflow becomes “semantic” instead of just keyword-based.

Embeddings transform text into numerical vectors that represent meaning. That way, when you later search for something like “rental yield near downtown,” the system can find relevant text even if the exact phrase never appears. Phrases like “strong investor returns in the city center” will still be picked up because they are semantically similar.

4. Store everything in a vector database

Once embeddings are generated, they are stored in Weaviate or another vector store, along with useful metadata. Typical metadata fields include:

  • Property ID
  • Date
  • Price
  • Neighborhood
  • Source (MLS, scraper, API, etc.)

With this setup, you can run semantic searches filtered by neighborhood, property type, or time period, which is incredibly powerful for dynamic market reports.

5. Retrieve relevant context for the report

When it is time to build a report, the workflow uses a query/tool node to ask the vector store for exactly the context it needs. For example, the agent might query:

“Recent price trend for 2-bedroom apartments in Neighborhood X over the last 90 days.”

Weaviate then returns the most relevant chunks and their metadata. That becomes the factual backbone of the report, rather than the agent trying to “guess” or hallucinate trends.

6. Let the LLM agent analyze and write the report

Now the fun part. The agent node, powered by an LLM, takes the retrieved context and follows a prompt template to generate a structured market trend report.

Typically, the agent will:

  • Summarize price trends and transaction volumes.
  • Extract metrics like median and average price, days on market, and inventory changes.
  • Highlight outliers and potential drivers, such as new construction, zoning updates, or seasonal patterns.
  • Produce a clear narrative and recommendations tailored to buyers, sellers, or investors.

The agent also uses memory to keep track of context across multiple steps, which helps if your workflow involves multi-part analysis or follow-up queries.

Because the agent is grounded in data from the vector store, the risk of hallucination is much lower. You can also audit where insights came from by looking at the original chunks and metadata.

7. Log and share results with Google Sheets

Finally, the workflow writes key outputs and logs to Google Sheets. This can include:

  • Report headlines and summaries
  • Key metrics and trends
  • Run metadata, such as timestamps and model versions
  • Error logs or flags for failed runs

From there, you can plug the sheet into your BI tool, create dashboards, or simply share it with your team. It is a simple way to keep everything transparent and easy to review.

Practical ways to use this template

So where does this workflow really shine in real life? Here are a few common use cases:

  • Weekly neighborhood snapshots for real estate agents who want quick, consistent updates to send to clients.
  • Investor-focused reports that highlight rental yields, cap rates, and performance by submarket.
  • Competitive market intelligence comparing listing descriptions, pricing strategies, and positioning.
  • Automated alerts for sudden price swings, changing inventory levels, or new trends in specific areas.

If you are juggling multiple markets or client segments, this template helps you keep them all covered without burning out on manual analysis.

Best practices to get better results

1. Focus on data quality

Any pipeline is only as good as the data feeding it. To keep your reports trustworthy:

  • Normalize important fields like prices and dates at ingestion.
  • Validate incoming data and handle obvious errors or missing values.
  • Tag data by source and, where possible, keep the raw payload for audit purposes.

2. Tune your chunk size and overlap

Chunking might sound like a small detail, but it has a big impact on retrieval quality. As a starting point:

  • Try around 400 characters per chunk.
  • Add about 40 characters of overlap between chunks.

Too-small chunks lose context, while too-large chunks can cause token limits and muddy the semantic meaning. Feel free to experiment based on your typical text length.

3. Choose the right embeddings model

Real estate text is often short and packed with details. When picking an embeddings model (such as Cohere):

  • Look for strong performance on short-form, domain-specific text.
  • Test different cosine similarity thresholds to balance precision and recall in retrieval.

Good embeddings mean the agent sees the right context and produces more accurate insights.

4. Design a useful vector store schema

In Weaviate, you are not just storing vectors. You are also defining how you will query them later. A helpful schema might include fields like:

  • property_type
  • neighborhood
  • price
  • date_listed
  • source

This lets you combine semantic search with structured filters, which is ideal for real estate use cases.

5. Invest a bit of time in prompt engineering

The agent’s prompt is where you define what a “good” report looks like. It is worth getting specific. For example, your prompt can:

  • Lay out the expected sections of the report.
  • Specify the tone (professional, neutral, investor-focused, etc.).
  • Require numeric fields like median price, percent change, or days on market.
  • Ask the agent to cite evidence, such as: “Source: Listing ID 12345 – price change +5%.”

Clear instructions lead to reports that feel consistent, polished, and trustworthy.

6. Monitor runs and version your setup

Since this is an automated system, you want to know when something changes or breaks. Good habits include:

  • Logging each run to Google Sheets with timestamps and statuses.
  • Tracking embedding and model versions so you can compare performance over time.
  • Watching costs and setting alerts for failures or unexpected data patterns.

This keeps your automation reliable as you scale it up.

Security and compliance considerations

Real estate data can include sensitive information. When using this workflow:

  • Be mindful of PII and your organization’s data retention policies.
  • Use secure API keys and lock down access to your vector store.
  • Anonymize personal identifiers if required by law or internal policy.

Building security in from day one saves you a lot of headaches later.

Costs and scaling: what to expect

As you roll this out across more markets or time periods, a few cost factors come into play:

  • Embeddings and LLM calls are usage-based. Batch operations where possible to reduce the number of calls.
  • Vector storage grows with the number of embeddings. In Weaviate, you can use metadata pruning or TTL policies to manage older data.
  • n8n hosting can be self-hosted or cloud-hosted. Self-hosting gives you more cost control, but you are responsible for maintenance.

The nice part is that you can start small and scale gradually as you see value.

Quick start checklist

Ready to try this in your own setup? Here is a simple checklist to get from idea to running workflow:

  1. Identify your data sources (MLS feeds, scrapers, property APIs, CSV exports).
  2. Set up an n8n webhook and ingestion flow to capture incoming data.
  3. Configure your text splitter and connect your embedding provider (Cohere, OpenAI, etc.).
  4. Provision a vector store like Weaviate and design your schema and metadata fields.
  5. Craft and test your agent prompts for report generation and tone.
  6. Send outputs to Google Sheets or your BI tool, then schedule your workflow to run on a regular cadence.

What a finished report can look like

Your generated market trend report can be structured in a clear, repeatable format, for example:

  • Headline – a one-sentence summary, such as “Downtown 2-bed prices rose 4% in the last 30 days.”
  • Key metrics – median price, percent change, new listings, average days on market.
  • Market narrative – 3 to 5 bullet points capturing the story behind the numbers.
  • Recommendations – practical actions for buyers, sellers, or investors.
  • Data sources and citations – references back to listings or datasets used in the analysis.

This structure keeps reports both digestible and data-rich, which is ideal for sharing with clients or internal teams.

Wrapping up: turn your data into an always-on market analyst

Automating your real estate market trend reports with n8n, Cohere, Weaviate, and an LLM agent gives you a powerful edge. You save time, reduce errors, and scale your insights across multiple markets without adding more manual work.

If you are ready to stop wrestling with spreadsheets and start running a smart, repeatable data pipeline, this template is a great starting point.

Try the template by deploying the n8n workflow, connecting your data sources, and letting it generate your next report for you. If you need help tailoring it to your specific markets or integrating it with your CRM, you can reach out for a custom

Split Arrays into Separate Items in n8n Function Node

Split Arrays into Separate Items in an n8n Function Node

If you spend any time building automations in n8n, you quickly bump into arrays. Maybe an API hands you a list of records, a webhook sends multiple events at once, or a CSV import comes through as a big chunk of rows. All great, except for one thing: most n8n nodes really want to work with one item at a time.

That is where this simple Function node pattern comes in. It takes a single item that contains an array and turns it into multiple n8n items, one per element. Once you have that, everything else in your workflow becomes much easier to manage, debug, and scale.

In this guide, we will walk through a ready-to-use template, how the Function node code works, a few useful variations, and some real-world examples. Think of it as your go-to pattern for “I’ve got an array, now what?” moments in n8n.

Why you should split arrays into separate n8n items

In n8n, each item is treated as a separate unit of work. Most nodes, like HTTP Request, Send Email, or database nodes, expect to receive one item, do something with it, then move on to the next.

So if an earlier node returns a single item that contains an array, you end up with one “super item” that holds many values. That is not ideal if you want to:

  • Process each array element independently For example, validate each row, send one email per address, or store one record per database insert.
  • Take advantage of n8n’s item handling n8n can process items in parallel internally, which speeds things up when you split a big array into smaller units.
  • Get better logs, errors, and retries When each element is its own item, failures and retry logic are scoped to a single element instead of the entire array.

In short, splitting arrays into items fits how n8n is designed to work. It makes your workflows more robust and easier to reason about.

Quick-start: a minimal n8n template you can paste in

Let us start with something you can try immediately. Here is a small workflow with two nodes:

  1. A Mock Data Function node that outputs an array.
  2. A Function node that splits that array into separate items.

You can paste this JSON directly into the n8n workflow editor:

{  "nodes":[  {  "name":"Mock Data",  "type":"n8n-nodes-base.function",  "position":[550,300],  "parameters":{  "functionCode":"return [{json:[\"item-1\", \"item-2\", \"item-3\", \"item-4\"]}];"  },  "typeVersion":1  },  {  "name":"Function",  "type":"n8n-nodes-base.function",  "position":[750,300],  "parameters":{  "functionCode":"return items[0].json.map(item => {\n  return {\n  json: {\n  data:item\n  },\n  }\n});\n"  },  "typeVersion":1  }  ],  "connections":{  "Mock Data":{"main":[[{"node":"Function","type":"main","index":0}]]}  }
}

After you paste it in, run the workflow and look at the output of the Function node. You will see that one array has been turned into four separate items.

What the Function node is actually doing

Let us unpack the important part, which is the Function node code:

return items[0].json.map(item => {  return {  json: {  data: item  },  }
});

Here is how this works in n8n’s context:

  • items is an array that holds all incoming items to the Function node.
  • Each entry in items is an object with at least one property: json, where your data lives.

In the mock setup, the previous node returns a single item that looks like this:

{  json: ["item-1", "item-2", "item-3", "item-4"] 
}

The code then does the following step by step:

  • items[0] – grab the first (and here, only) item coming into the node.
  • .json – access the JSON payload, which in this example is the array itself.
  • .map(...) – loop over that array and transform each element into a new n8n item.
  • Inside the map, we return an object with a json property, because n8n expects every item to have that shape.

So for each array value, you end up with a new item like this:

{ json: { data: 'item-1' } }

All of those new items are returned as an array, and n8n treats each one as a separate item moving forward.

What the output looks like

Run the sample workflow and inspect the Function node output. You should see:

[  { json: { data: 'item-1' } },  { json: { data: 'item-2' } },  { json: { data: 'item-3' } },  { json: { data: 'item-4' } }
]

Now every element is ready to be processed individually by any node that expects a single payload, such as HTTP Request, Send Email, or a database node.

When to use this pattern in real workflows

This little trick shows up in all kinds of real-world automations. Some common scenarios:

  • CSV imports A CSV parser or import node returns all rows as one array. You split each row into its own item so you can validate, transform, and insert rows one by one into your database.
  • Webhooks with multiple events Many services batch events into a single webhook payload. By splitting that array, each event can trigger its own processing chain, error handling, and logging.
  • Bulk email sending You receive an array of email addresses or recipients. Splitting them lets you send personalized messages to each recipient using the Send Email node.

If you ever see “array of things” in your input and want to treat each “thing” separately, this Function node pattern is what you are looking for.

Variations and improvements you will probably need

The basic split is handy, but in real workflows you often need a bit more control. Here are some common tweaks.

1. Keeping original metadata around

Often the original item has useful fields like id, source, or other metadata that you do not want to lose when you split the array. In that case, you can copy those fields into every new item.

const original = items[0].json;

return original.arrayField.map(element => ({  json: {  data: element,  id: original.id,  source: original.source,  }
}));

Here:

  • original.arrayField is the array you want to split.
  • Each new item keeps id and source from the original, so you always know where it came from.

2. Handling multiple incoming items, each with its own array

Sometimes the Function node receives many items, and each of those items contains an array you want to split. In that case, you will want to:

  1. Loop over each incoming item.
  2. Split that item’s array.
  3. Flatten all the results into one big list of items.

Here is a pattern that does exactly that:

let result = [];

for (const it of items) {  const arr = it.json.myArray || [];  result = result.concat(  arr.map(el => ({  json: {  data: el,  originId: it.json.id,  }  }))  ); 
}

return result;

What is going on here:

  • for (const it of items) loops through every incoming item.
  • const arr = it.json.myArray || [] safely reads the array, defaulting to an empty array if it is missing.
  • originId keeps a reference to the original item’s id, which is super helpful for tracing and debugging.

3. Filtering, transforming, or enriching elements while you split

You do not have to just copy values as is. Because you are inside a Function node, you can use normal JavaScript to shape the data exactly how you want.

Some ideas:

  • Filter out elements you do not want to process, for example invalid emails or records missing required fields.
  • Transform values, such as trimming strings, converting dates, or normalizing case.
  • Enrich each element with extra fields like timestamps, lookups, or configuration values.

For example, you might filter and transform inside map, or use filter before mapping. The key point is that you can do all of this as you split the array into items.

4. Working with large arrays – batching strategies

If you are dealing with arrays that have hundreds or thousands of elements, splitting everything into individual items in one go can be heavy on memory and processing.

Two common strategies help here:

  • Batch the array into groups Instead of creating one item per element, you group elements into chunks, for example 50 per item. You process each batch, and only split further if needed later in the workflow.
  • Paginate or stream at the source If the API or source system supports pagination or streaming, request smaller chunks instead of one massive array. That keeps your workflow lighter and more responsive.

The exact batching code will depend on your use case, but the concept is the same: control how many items you create at once so your workflow stays efficient.

Debugging tips for array splitting in n8n

If things do not behave the way you expect, here are a few quick checks that often solve the problem:

  • Inspect the input and output in Executions Open the Executions view and look carefully at what the Function node receives and returns. Confirm where the array actually lives, and what the structure is.
  • Always return objects with a json field n8n expects each item to look like { json: { ... } }. If you return plain values like 'item-1' or [1, 2, 3] without wrapping them in { json: ... }, you will run into errors.
  • Add guards for missing or nested properties If a property might not exist or is nested differently than you think, use safe access patterns. For example: const arr = items[0]?.json?.myArray || []; This prevents the Function node from failing when the property is missing.

Most issues come down to “I thought the data was here, but it is actually over there.” Once you confirm the exact structure, the splitting logic usually falls into place.

Complete example: preserve metadata and add a timestamp

To pull everything together, here is a more realistic Function node example. It:

  • Reads an original item that has recipients and source.
  • Splits recipients into separate items.
  • Adds a timestamp to each new item so you know when it was processed.
const original = items[0].json;
const arr = original.recipients || [];

return arr.map(recipient => ({  json: {  recipient,  source: original.source,  importedAt: new Date().toISOString()  }
}));

This is a great pattern for things like email imports, contact lists, or any workflow where you want to keep context and track when each element was handled.

Putting it all together

Splitting arrays into separate items with an n8n Function node is one of those small techniques that has a big impact. Once you know how to do it, you can:

  • Turn “one big array” into clean, individual items.
  • Leverage n8n’s per-item processing, logging, and retry behavior.
  • Handle single-array inputs, multiple items with arrays, and even large datasets with batching.

If you want to see it in action right away, copy the sample template into your n8n instance, run it, and explore the Function node output. Then swap in your own data source, whether that is CSV, a webhook, or an external API.

Call to action: Try this pattern in one of your existing workflows today, and see how much cleaner your logic becomes. If you are looking for more n8n automation tips and best practices, subscribe to our newsletter so you do not miss future guides.