Backup n8n Workflows to Gitea

Backup n8n Workflows to Gitea (So You Never Lose a Flow Again)

Imagine this: you finally perfect that beautiful n8n workflow that glues half your tech stack together. It runs like a dream, you feel like an automation wizard… and then an accidental delete, a broken instance, or a bad edit turns it into a distant memory. Rebuilding from scratch is not just annoying, it is the kind of repetitive task that automation was supposed to save you from.

This is where backing up your n8n workflows to Gitea comes in. With a simple n8n workflow template, you can automatically export all your workflows into a Gitea Git repository on a schedule. It checks what is already there, only updates files when something really changed, and keeps everything in neat JSON files that you can version, review, and restore whenever needed.

In other words: set it up once, let it quietly back up your automation brain, and stop worrying about “oops” moments.

Why back up n8n workflows to Gitea instead of “hoping for the best”?

Storing n8n workflows in a Gitea Git repository gives you all the good stuff developers enjoy, without you having to manually export anything every week.

  • Version history for changes and rollbacks – See what changed, when, and by whom, and roll back if a “quick tweak” goes badly.
  • Secure, centralized storage – Gitea is self-hosted, which means your workflow JSON lives in your own infrastructure, not on someone else’s laptop.
  • Automated, scheduled snapshots – No more “I will export this later” promises that never happen. The workflow runs for you at a set interval.
  • Easy collaboration and review – Use Git features like diffs, pull requests, and code review to track and discuss workflow changes.

So instead of manually exporting JSON files like it is 2009, you let n8n and Gitea do the boring work on repeat.

What this n8n backup workflow actually does

The template is a fully automated backup pipeline for your n8n instance. At a high level, it:

  1. Runs on a schedule (for example, every 45 minutes).
  2. Fetches all workflows from your n8n instance through the n8n API.
  3. Loops through each workflow one by one.
  4. Checks in Gitea if a JSON file already exists for that workflow.
  5. If the file exists, it compares contents and only updates the file if something actually changed.
  6. If the file does not exist, it creates a brand new JSON file in the repository.

The end result is a clean, versioned collection of .json files in Gitea that mirror your n8n workflows, updated on a schedule without you lifting a finger.

How the backup flow is structured (high-level logic)

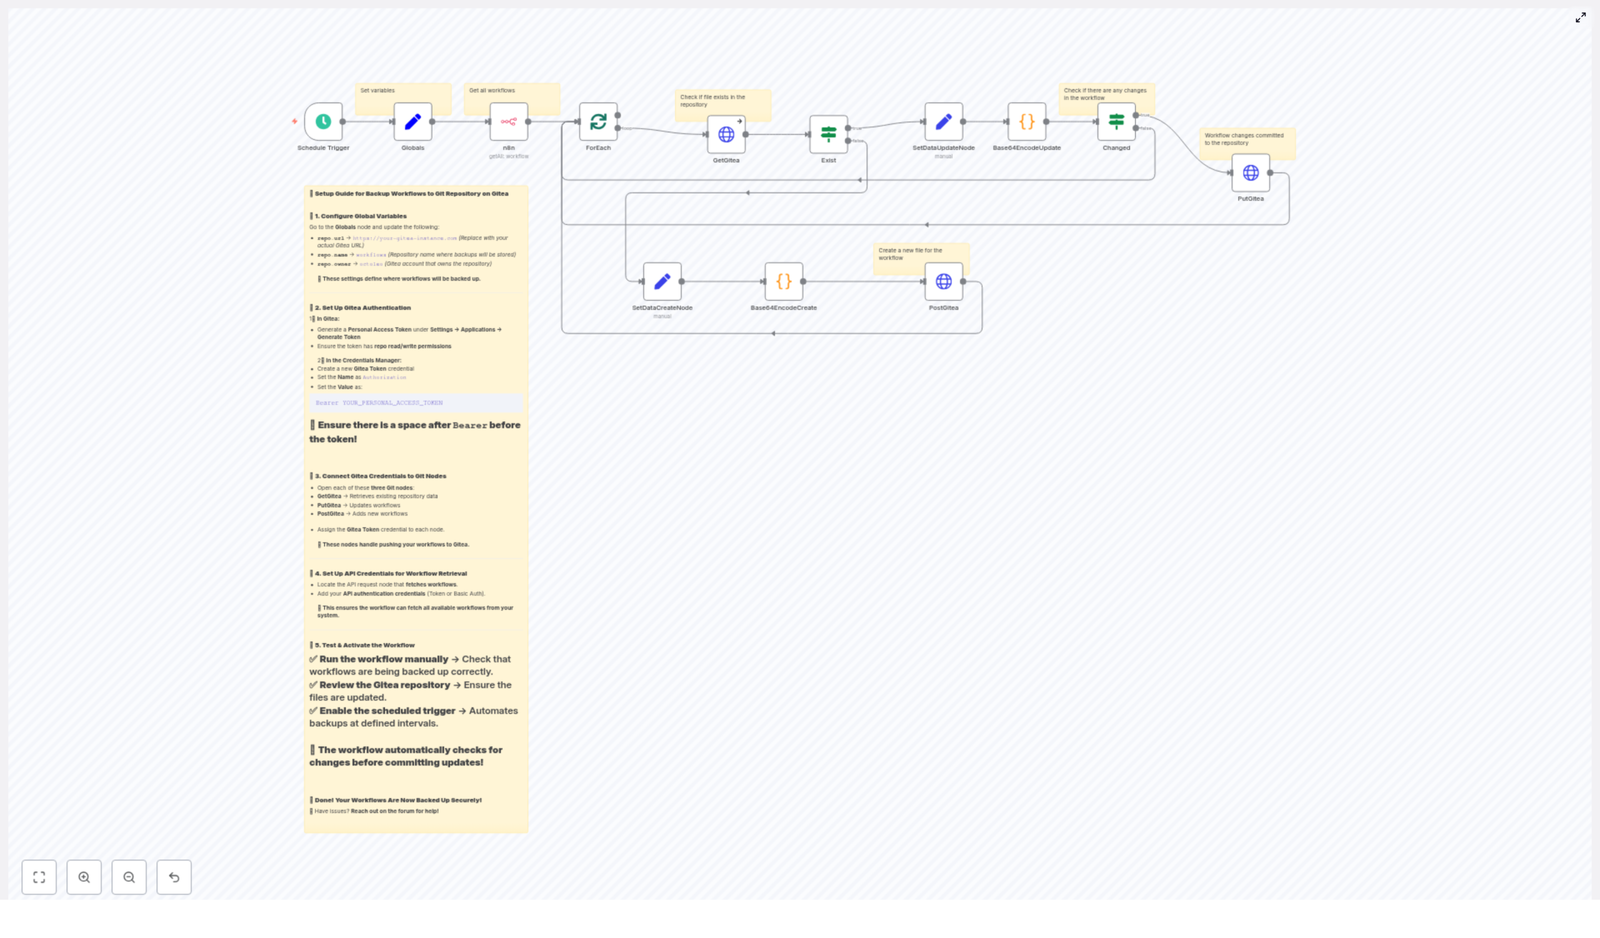
Here is the general flow from start to finish:

  1. Schedule Trigger wakes up the workflow at your chosen interval.
  2. Globals stores handy variables like Gitea URL, repo owner, and repo name so you do not repeat them everywhere.
  3. n8n API node fetches all workflows from your n8n instance.
  4. splitInBatches / ForEach processes each workflow as an individual item.
  5. GetGitea checks if the corresponding JSON file already exists in Gitea.
  6. Exist (If node) branches into “file exists” or “file does not exist.”
  7. Base64EncodeCreate / Base64EncodeUpdate encode the workflow JSON into base64, ready for the Gitea API.
  8. Changed (If node) compares the new base64 content with what is already in the repo.
  9. PostGitea creates new files, and PutGitea updates existing ones when there are actual changes.

It is basically a polite robot that checks “Do I need to change anything?” before touching your Git history.

Key n8n nodes in this template (and what they do)

Schedule Trigger: the “set and forget” starter

The Schedule Trigger node is what kicks off the backup at regular intervals. In the example template, it is configured to run every 45 minutes, but you can tweak that based on how often your workflows change and how much history you want.

You might choose:

  • Every few minutes for very active environments.
  • Once or twice a day for more stable setups.

Pick a schedule that matches your recovery needs and storage comfort level.

Globals: one place for all your Gitea settings

The Globals node keeps your repository details in one tidy location so you do not repeat them across nodes or risk typos.

It typically stores values like:

  • repo.url – for example, https://git.example.com
  • repo.owner – your Gitea user or organization
  • repo.name – the repository where workflow backups are stored, such as workflows

These variables are then referenced by the HTTP request nodes that interact with Gitea.

n8n API node: collecting all your workflows

The n8n (API node) queries the n8n API to list all workflows in your instance. You will need to configure authentication, using either an API key or Basic Auth, so the node has permission to access workflow data.

This step is what turns “whatever is in n8n right now” into a list of items the rest of the workflow can process.

splitInBatches / ForEach: processing workflows one at a time

The splitInBatches and ForEach nodes take the list of workflows and handle them individually. This is useful for:

  • Avoiding API rate limits.
  • Handling errors gracefully without breaking the whole backup run.
  • Keeping everything predictable and per-workflow.

Each workflow goes through the same “do you exist in Gitea yet?” check.

GetGitea: checking if a workflow file already exists

The GetGitea node calls the Gitea API to see if there is already a JSON file for the workflow.

GET /api/v1/repos/{owner}/{repo}/contents/{workflowName}.json

This node is configured to continue on error. That is important because a 404 from Gitea simply means “this file does not exist yet,” which is a perfectly normal situation for new workflows. Instead of failing, the workflow treats 404 as a signal to go down the “create file” path.

Exist (If node): deciding between create vs update

The Exist If node inspects the result from GetGitea. It checks whether the file is present or whether Gitea responded with an error like 404.

Based on that, it branches into:

  • File exists – go to the “update” logic.
  • File does not exist – go to the “create” logic.

That way, the workflow uses the same pattern for every workflow, but chooses the right Git action automatically.

Base64EncodeCreate and Base64EncodeUpdate: preparing JSON for Gitea

The Base64EncodeCreate and Base64EncodeUpdate nodes are Code nodes (using Python) that take the workflow object, format it nicely, and convert it to base64.

Gitea’s contents API expects file content to be base64-encoded, so this step is essential. The code follows a pattern like this:

# simplified steps used in the code nodes
json_string = json.dumps(workflow_object, indent=4)
json_bytes = json_string.encode('utf-8')
base64_string = base64.b64encode(json_bytes).decode('utf-8')

The result is a clean, human-readable JSON structure, encoded in a way Gitea understands.

Changed (If node): avoiding noisy commits

The Changed If node compares the newly encoded base64 content with the base64 content that is already stored in Gitea.

If the two match, nothing has changed in the workflow, so there is no reason to create a new commit. If they differ, the workflow proceeds to update the file using the PutGitea node.

This keeps your commit history from turning into a wall of “no-op” updates and makes it easier to see real changes.

PutGitea and PostGitea: writing files into Gitea

Finally, the PutGitea and PostGitea nodes talk to the Gitea API to create or update files.

  • Create – use POST /api/v1/repos/{owner}/{repo}/contents/{name} to create a new file.
  • Update – use PUT on the same endpoint, including the current file’s sha to tell Gitea which version you are updating.

Between these two, every workflow ends up with a matching JSON file in your repo, updated only when needed.

Authentication and security: making Gitea and n8n trust each other

To let n8n talk to Gitea securely, you will use a Personal Access Token (PAT) with repository read/write permissions.

Steps:

  1. Create a Personal Access Token in Gitea with the necessary repo scopes.
  2. Store this token as a credential in n8n, typically as an HTTP header credential.
  3. Use that credential in your GetGitea, PostGitea, and PutGitea nodes.

In the HTTP header, use the following format:

Authorization: Bearer YOUR_PERSONAL_ACCESS_TOKEN

Pay attention to the space after Bearer. Forgetting that tiny space is a surprisingly common source of “why is this not working” frustration.

Configuration checklist (before you hit “activate”)

To get this n8n backup workflow template running smoothly, walk through this quick list:

  • Set the Globals node values:
    • Gitea URL (for example, https://git.example.com)
    • Repository owner
    • Repository name (for example, workflows)
  • Create a Gitea Personal Access Token with repository read/write permissions.
  • Add that token to n8n credentials as an HTTP header credential.
  • Make sure the n8n API node has permission to list workflows in your n8n instance.
  • Assign the Gitea credential to:
    • GetGitea
    • PostGitea
    • PutGitea
  • Run the workflow manually at least once before enabling the schedule.

Once everything checks out, you can hand the job off to the scheduler and focus on more interesting problems than “did I remember to export that workflow.”

Testing the backup workflow (before you trust it with your future)

  1. Run it manually from within n8n and watch the execution logs to confirm each node behaves as expected.
  2. Open your Gitea repository and verify that JSON files have been created for each workflow.
  3. Edit one of your n8n workflows slightly, then run the backup workflow again to confirm that the update path triggers and the corresponding file is updated via PutGitea.
  4. Once you are happy with the behavior, enable the Schedule Trigger to automate everything.

Troubleshooting and practical tips

404 on GetGitea

Seeing a 404 from the GetGitea node is not always a problem. In this context, it usually means:

  • The JSON file for that workflow does not exist yet.

The workflow is intentionally built to treat 404 as “file not found, please create it” and then continue down the create path. As long as the node is set to continue on error, this is expected behavior.

Authorization errors that make no sense

If you are getting authorization errors from Gitea:

  • Double check the Authorization header format:
    • It must be Bearer YOUR_PERSONAL_ACCESS_TOKEN with a space after Bearer.
  • Confirm that the token has the correct repository scopes.
  • Verify that you pasted the token into the right credential field in n8n.

Most auth issues come down to a small formatting mistake or missing permission.

Large workflow files and repo limits

If your workflows are huge (lots of nodes, heavy data), keep in mind that Gitea can have file size limits depending on how your server is configured.

In those cases, you might consider:

  • Compressing older snapshots.
  • Storing bulk archives as release artifacts instead of individual content files.

For normal sized workflows, the template should work just fine out of the box.

Keeping Git history clean

The workflow’s comparison step using base64 content is there to avoid unnecessary commits. If nothing changed in a workflow, the file stays untouched and your commit history stays readable instead of “backed up again, nothing changed” on repeat.

File naming strategy for workflow backups

By default, a simple and predictable naming scheme keeps things organized. A common approach is:

{workflowName}.json

If you have workflows with the same name across multiple environments, you can prevent collisions by including extra details, for example:

  • prod_ping_check_12345.json

Using environment names or workflow IDs in the file name makes it easier to tell them apart at a glance.

Next steps: turn on the automation and relax

Once this backup workflow is in place, your n8n setup becomes much safer and easier to manage. You get:

  • Versioned, auditable backups in your self-hosted Gitea server.
  • A repeatable pattern: fetch workflows, check repo state, encode, compare, and create or update only when needed.
  • Less manual exporting, more time for building new automations.

To recap your action plan:

  • Import or open the template in n8n.
  • Configure your Gitea URL, repo owner, and repo name in the Globals node.
  • Set up and secure your Personal Access Token.
  • Test the workflow manually and verify JSON files in Gitea.
  • Enable the schedule so backups run automatically.

If you want a downloadable workflow JSON

Build an n8n Developer Agent: Step-by-Step Guide

Build an n8n Developer Agent: Step-by-Step Guide

Imagine turning a rough idea for an automation into a working n8n workflow in just a few minutes. No more staring at blank canvases, wiring nodes from scratch, or rewriting the same patterns again and again. With the right setup, you can describe what you want in plain language and let an “n8n Developer Agent” design the workflow for you.

This guide walks you through that journey. You will move from manual, repetitive workflow building to a more focused, automated way of working. Along the way, you will see how this n8n workflow template can become a powerful stepping stone toward a more scalable, efficient, and creative automation practice.

From manual workflows to an automation mindset

Most teams, consultants, and developers start with n8n the same way: opening the editor, dragging in nodes, testing, adjusting, and repeating. It works, but it does not always scale. As requests pile up, you might notice:

  • Time lost building similar workflows from scratch
  • Inconsistent naming or structure across workflows
  • Colleagues who want automations but lack deep n8n knowledge
  • Difficulty maintaining or reusing patterns at scale

The opportunity is not just to go faster. It is to change how you think about building automations. Instead of “I have to build this workflow,” you can shift to “I will describe what I need, and my system will build the first version for me.”

The n8n Developer Agent pattern helps you make that shift. It gives you a reliable way to convert natural language requests into importable n8n workflow JSON, so you can spend more time refining and less time wiring the basics.

What is the n8n Developer Agent?

The n8n Developer Agent is an automation pattern built around a single idea: you describe the automation, and the system generates the workflow.

Technically, it is a workflow that combines:

  • A trigger (such as a chat interface or an execute-workflow trigger)
  • A main agent node powered by a language model
  • Optional “thinker” models for deeper reasoning
  • A Developer Tool that produces valid n8n workflow JSON
  • The n8n API to create workflows directly in your instance
  • Supporting services like Google Drive and memory utilities

For example, you might say: “Create a workflow that listens for new Google Drive files and posts a summary to Slack.” The Developer Agent interprets the request, chooses the right nodes, assembles the connections, and outputs a complete workflow JSON that you can import or have created automatically.

In practice, this means you can go from idea to runnable workflow in minutes, while still keeping control over standards, safety, and governance.

Why this pattern is worth adopting

When you invest a bit of time in setting up an n8n Developer Agent, you unlock benefits that compound over time:

  • Speed: Turn ideas into runnable workflows in minutes instead of hours.
  • Consistency: Apply naming conventions and node standards automatically.
  • Scalability: Let non-experts request workflows without needing deep n8n skills.
  • Repeatability: Build and refine a growing library of generated workflows.

Each new request becomes less about manual construction and more about guiding and improving a system that works for you. The template in this guide is not just a one-off workflow, it is a foundation you can extend, customize, and govern as your automation needs grow.

How the n8n Developer Agent works behind the scenes

To feel confident using and extending this pattern, it helps to understand how the core components interact. At a high level, the template is made of these logical parts, each represented by one or more n8n nodes:

  • Trigger: A chat input, webhook, or execute-workflow trigger that starts the process.
  • Main agent: A chat or agent node that receives the user request and orchestrates tools and models.
  • Language models: A primary LLM (for example OpenRouter / GPT 4.1 mini) and an optional thinker model (such as Claude Opus 4) for multi-step reasoning.
  • Developer Tool: A sub-workflow or node that turns the natural language prompt into valid n8n workflow JSON, including nodes, connections, and settings.
  • n8n API node: A node that creates the new workflow in your n8n instance and returns a link to it.
  • Supporting services: Google Drive for docs and templates, extract-from-file utilities, and memory buffers to retain conversational state.

Together, these components form a pipeline: from a human-friendly prompt to a machine-usable workflow definition, and finally to a live workflow ready for review and execution.

What you need before you start

Before you begin configuring the template, make sure you have:

  • An n8n instance with API access and credentials set up
  • API keys for your chosen LLM providers (for example OpenRouter, and Anthropic if you plan to use Claude Opus)
  • Access to Google Drive if you want to use documents as templates or references
  • Basic familiarity with n8n nodes and importing workflows

With these in place, you are ready to turn the template into a working n8n Developer Agent that fits your environment.

Step-by-step: turning the template into your Developer Agent

1. Decide how people will talk to the agent

Your first choice is how users will trigger the Developer Agent. This decision shapes how accessible and secure the system will be:

  • For quick experiments: Use a chat trigger or manual execution. This keeps the feedback loop tight while you learn.
  • For production use: Consider a secure, authenticated webhook or an internal tool interface that only approved users can access.

Start simple. You can always upgrade the trigger later as adoption grows.

2. Connect and configure your primary LLM

The main agent node is the brain of the Developer Agent. Connect your OpenRouter (or other LLM) API key to the chat or agent node that will handle user prompts.

Then, carefully design the system prompt. This is where you set expectations for the model. Be clear that the agent must:

  • Output a complete, importable n8n workflow JSON
  • Follow a specific JSON schema that your Developer Tool expects
  • Respect any naming conventions or structural rules you want to enforce

A precise system prompt reduces ambiguity and leads to more reliable workflows on the first try.

3. Add an optional thinker model for deeper reasoning

If your workflows tend to be complex or multi-step, you can enhance the main agent with a secondary “thinker” model such as Claude Opus 4. This model does not replace the primary LLM, it supports it.

Use the thinker model to:

  • Refine the architecture of the workflow
  • Check compatibility between nodes
  • Plan multi-step logic before the final JSON is generated

The main agent can consult this reasoning assistant, then translate the refined plan into the final workflow JSON. This is optional, but powerful when you want higher quality on more advanced automations.

4. Link or build the Developer Tool

The Developer Tool is where your natural language request becomes a real n8n workflow object. It constructs the JSON with top-level properties such as:

  • name
  • nodes
  • connections
  • settings
  • staticData

To keep it robust and reliable, design the Developer Tool to:

  • Break the user request into logical steps
  • Choose appropriate nodes, for example Webhook, Google Drive, HTTP Request, Function, Set, and others as needed
  • Produce a fully valid JSON object that n8n can import or your API can accept

A best practice is to require the Developer Tool to return only the JSON, with no commentary or extra text. Then, add a validation step before sending it to the n8n API node. This combination gives you both flexibility and control.

5. Create the workflow through the n8n API

Once the JSON is ready and validated, the next step is to create the workflow in your n8n instance using the n8n API node.

Configure the node with your n8n API credentials and use it to POST the workflow JSON to your instance. After a successful request, capture the workflow ID from the response and build a direct link for the user.

This gives people a smooth experience: they describe the workflow, then immediately receive a clickable link to review, test, or edit the result.

6. Use Google Drive and file extraction as your knowledge base

As you mature your Developer Agent, you can feed it more context about your standards. If you keep templates or documentation in Google Drive, connect:

  • A Google Drive node to fetch the relevant document
  • An extract-from-file node to convert the file into plain text

The agent can then reference this text to:

  • Enforce naming conventions
  • Follow internal standards for error handling or logging
  • Reuse approved patterns across new workflows

This turns your existing documentation into a live guide that shapes each generated workflow.

Keeping your Developer Agent safe, stable, and trustworthy

As you rely more on automated workflow generation, good safeguards become essential. Build these into your template from the start so you can scale with confidence.

Validation and safety best practices

  • JSON validation: Always validate the JSON before creating a workflow. Check the nodes array, connections object, and top-level settings to avoid malformed imports.
  • Credential placeholders: Never embed real credentials in generated workflows. Use placeholders and add production credentials manually afterward.
  • Access control: Restrict who can request workflows. Secure your chat or webhook triggers with authentication or internal-only access.
  • Audit trail: Store generated workflows and request metadata in a database or drive so you can review, roll back, or learn from past generations.
  • Rate limits and cost management: Monitor LLM usage, apply sensible rate limits, and keep an eye on cost as adoption grows.

Troubleshooting common issues

As you experiment, you might run into a few predictable problems. Use these quick checks to stay in flow:

  • Workflow fails to import: Inspect the JSON for missing commas, duplicate node IDs, or invalid node types.
  • API errors when creating workflows: Confirm that your n8n API key has the right permissions and that the instance URL is correct and reachable.
  • Inconsistent outputs: Tighten the Developer Tool’s constraints. Provide explicit node lists and fixed parameter templates to reduce unnecessary creativity from the LLM.

Each issue you solve makes your Developer Agent more robust. Over time, you build not just a workflow, but a reliable automation partner.

Growing into team-wide automation: scaling and governance

Once the Developer Agent proves valuable for you, it is natural to share it with your team. At that point, governance becomes key. You can extend the template with structures that keep quality high as usage grows.

  • Approval workflow: Have generated workflows stored as drafts that require human approval before going into production.
  • Template library: Maintain a curated set of approved templates for common use cases such as file processing, CRM sync, or Slack notifications.
  • Monitoring and observability: Connect your workflows to logging and alerting systems so you can track failures and performance metrics.

This is where the Developer Agent evolves from a personal helper into a shared automation platform that supports your entire organization.

Quick reference: who does what in the template

As you work with the template and customize it, this quick reference can help you keep each node’s role clear:

  • Chat trigger / Execute Workflow trigger: Accepts user input and starts the pipeline.
  • Main agent node: Orchestrates LLM calls and tools, and composes system prompts.
  • Developer Tool node: Returns the final n8n workflow JSON object ready to import.
  • n8n API node: Creates the workflow in your n8n instance and provides a direct link.
  • Memory and sticky notes: Store conversational context and human-facing setup instructions.

Once you are familiar with these responsibilities, adjusting or extending the template becomes much easier.

Your next step: start small, then expand

The n8n Developer Agent pattern is powerful, but you do not need to implement everything at once. The most important step is the first one: getting a basic version running so you can see the impact for yourself.

Here is a simple path to follow:

  1. Spin up a sandbox n8n instance where you can experiment safely.
  2. Connect a single LLM provider via the main agent node.
  3. Set up a simple trigger, such as a chat trigger or manual execution.
  4. Run a basic prompt like “Create a workflow that watches a Google Drive folder and emails new file details.”
  5. Review the generated workflow, refine your prompts and validation, and repeat.

As your confidence grows, you can layer in more features: templates from Google Drive, approval gates, stronger validation, and team-level access controls.

Ready to try it? Use the workflow template included with this guide as your starting point. Import it, connect your credentials, and begin shaping an automation system that builds workflows for you.

Get the template & request expert help

If you would like a customized workflow tailored to your exact use case, reach out. We can convert your specification into a validated n8n workflow JSON that is ready to import and run, so you can focus on strategy while your automations handle the execution.

Backup n8n Workflows to Gitea

How One Automation Failure Pushed Alex To Back Up n8n Workflows To Gitea

Alex stared at the n8n dashboard, heart sinking. A production workflow that handled hundreds of customer records had vanished after a misconfigured update. No JSON export, no backup, no Git history. Just an empty space where a mission-critical workflow used to be.

Like many developers and automation builders, Alex always meant to set up a proper backup strategy “later.” Now, with stakeholders asking what went wrong, “later” had arrived.

This is the story of how Alex discovered an automated n8n workflow template that backs up every workflow to a Gitea repository, keeps a versioned history, and only commits when something actually changes. By the end, Alex had a safe, auditable backup system that quietly ran in the background, and never had to fear losing another workflow again.

The Problem: Fragile Automations Without a Safety Net

Alex was responsible for maintaining dozens of n8n workflows. Some synced data between tools, others triggered customer notifications, and a few glued together critical backend processes. Everything worked, until it did not.

One day, a small change to the n8n instance caused a workflow to corrupt and disappear. Alex had no recent export and no Git history to roll back to. Rebuilding from memory took hours, and Alex knew this was a warning shot.

Alex wrote down the real pain points:

  • No versioned, auditable history of workflow changes.
  • No easy way to recover lost or corrupted workflows.
  • Backups were ad hoc, manual exports that never happened on time.
  • No integration with the team’s Git-based backup strategy.

Alex needed an automated way to back up every n8n workflow into Git, preferably into the team’s self-hosted Gitea instance. It had to be scheduled, reliable, and smart enough not to spam the repo with useless commits.

The Discovery: An n8n Template That Talks To Gitea

After some searching, Alex found exactly what was needed: an n8n workflow template built to back up workflows into a Gitea repository through the Gitea API. No extra scripts, no external cron jobs, just n8n talking directly to Gitea.

The template promised to:

  • Export all workflows from the n8n instance.
  • Check if each workflow already exists as a JSON file in Gitea.
  • Pretty-print and Base64-encode the JSON content.
  • Compare with the existing file in Gitea to detect changes.
  • Create or update files only when something actually changed.
  • Run automatically on a schedule.

It sounded perfect. But Alex knew that templates only help if they are configured correctly. So the real journey started: wiring up n8n, Gitea, and the template into a smooth, automated backup pipeline.

Rising Action: Wiring Up Gitea And n8n

Step 1 – Preparing Gitea: The Backup Home

First, Alex needed a place to store the backups. That meant setting up a dedicated repository in Gitea.

  • Alex created a repository named workflows in Gitea.
  • Under Settings → Applications, Alex generated a Personal Access Token.
  • The token was granted repository read and write permissions, but nothing more, to keep the blast radius small.

Inside n8n, Alex added a new HTTP header credential for Gitea that looked like this:

  • Header name: Authorization
  • Header value: Bearer YOUR_PERSONAL_ACCESS_TOKEN

Alex double checked that there was a space after Bearer. Missing that space is a classic cause of 401 errors.

Step 2 – Setting Global Repo Details In n8n

The template included a Globals node, which acts as a small configuration hub. Instead of hardcoding URLs and repo names in multiple places, Alex could define them once.

In the Globals node, Alex filled in:

  • repo.url – for example https://git.example.com, the Gitea base URL.
  • repo.owner – the user or organization that owns the repo.
  • repo.name – in this case workflows.

With this, any node that needed to call Gitea could reuse these values. Less duplication, fewer mistakes.

Step 3 – Giving n8n Permission To Read Its Own Workflows

The whole point of this template was to export workflows from n8n itself. That required an authenticated n8n API node.

Alex configured the n8n API node with the appropriate authentication:

  • Either an API token or Basic Auth.
  • Enough permission to list and export all workflow objects.

Once configured, the node could fetch all workflows from the instance. The template would then iterate over each one and back it up to Gitea.

The Engine: How The Workflow Template Actually Works

Curious about what was happening under the hood, Alex walked through the main nodes in the template. Understanding the flow would make troubleshooting and tweaking much easier.

Controlling Time: The Schedule Trigger

At the top of the workflow sat the Schedule Trigger node. It controlled how often backups would run.

Alex set it to run every 45 minutes, but any interval could work, from hourly to once a day, depending on how frequently workflows change.

Fetching Workflows: The n8n API Node

Next, the n8n (API) node pulled in all workflows from the n8n instance. It returned a list of workflow objects, each containing the JSON definition that needed to be backed up.

Scaling Safely: ForEach And splitInBatches

Since Alex’s instance had a growing number of workflows, processing them all at once could lead to memory spikes or API throttling. The template solved this by using a combination of ForEach and splitInBatches nodes.

These nodes:

  • Iterate over each workflow item individually or in small batches.
  • Prevent overloading the system with too many operations at once.

This design choice meant the template would scale gracefully as the number of workflows grew.

Talking To Gitea: Get, Post, And Put

For each workflow, the template needed to know whether a corresponding JSON file already existed in Gitea. That is where the Gitea API nodes came in.

  • GetGitea used an HTTP GET to check for an existing file:
GET /api/v1/repos/{owner}/{repo}/contents/{path}

If the file existed, Gitea returned its metadata and Base64-encoded content. If it did not, the API responded with a 404, which the workflow treated as a signal to create a new file.

  • PostGitea created new files:
POST /api/v1/repos/{owner}/{repo}/contents/{path}
  • PutGitea updated existing files:
PUT /api/v1/repos/{owner}/{repo}/contents/{path}

These nodes all hit the same Gitea REST API, but with different HTTP methods. The workflow passed parameters like:

  • content – Base64-encoded JSON.
  • message – the commit message.
  • branch – usually main or a dedicated backup branch.
  • sha – required for updates, taken from the GET response.

The Smart Part: Change Detection With Base64

Alex did not want a new commit every time the schedule ran if nothing had changed. That would clutter the Git history and make it harder to spot real changes.

The template solved this with a simple but effective approach:

  • First, it pretty-printed the workflow JSON to keep formatting consistent.
  • Then it used Base64EncodeCreate and Base64EncodeUpdate nodes to encode the JSON into Base64, which is what Gitea expects.
  • Next, the Changed IF node compared the encoded content from n8n with the encoded content returned from Gitea.
  • If the values matched, the workflow skipped any update. No commit was made.
  • If the values differed, the workflow sent a PUT request using PutGitea, including the current file sha to update the file.
  • If the file did not exist at all (404 from GetGitea), the workflow used PostGitea to create it.

This logic meant that the repo only recorded meaningful changes, keeping history clean and storage efficient.

The Turning Point: First Successful Backup Run

After wiring everything up, Alex was both excited and nervous. It was time to test.

Template Bodies For Gitea Requests

Alex inspected the request bodies used to create and update files, to be sure nothing was missing.

For new files, the template used a body like this:

{  "content": "BASE64_ENCODED_CONTENT",  "message": "Add workflow: My Workflow",  "branch": "main"
}

For updates, the body included the existing sha so Gitea knew which version to update:

{  "content": "BASE64_ENCODED_CONTENT",  "sha": "EXISTING_FILE_SHA",  "message": "Update workflow: My Workflow",  "branch": "main"
}

Everything looked correct. Alex hit the manual run button in n8n.

After a few seconds, the Gitea repo started to fill with JSON files, one per workflow. Commit messages showed which workflows were added. On the next manual run, no new commits appeared, confirming that the change detection logic was working perfectly.

For the first time, Alex had a reliable, automated backup of every n8n workflow, safely versioned in Git.

Refining The Setup: Best Practices Alex Adopted

Once the basic backup pipeline was running, Alex started to refine it using some best practices.

  • Dedicated token – Alex used a dedicated Personal Access Token with minimal permissions, restricted to the backup repository where possible.
  • Informative commit messages – The commit messages were updated to include timestamps, workflow IDs, and sometimes the author, making the Git history more useful.
  • Separate backup branch – To keep production branches clean, Alex configured the workflow to commit to a dedicated backup branch.
  • Secret storage – Tokens were stored as n8n credentials, never hardcoded in nodes or visible in logs.
  • Error handling and retries – Alex added basic error handling and backoff in case of API rate limits or transient network issues.
  • Large instances – With many workflows, splitInBatches ensured that backups stayed stable and did not cause spikes.
  • Testing before scheduling – Alex always ran the workflow manually and inspected the Gitea repo before enabling the schedule trigger.

When Things Go Wrong: Troubleshooting Lessons

Not everything worked perfectly on the first try. Alex hit a few common issues that are worth knowing about.

  • 401 Unauthorized – The culprit was usually the Authorization header. Either the token was wrong, or there was no space after Bearer. Fixing the header and verifying token permissions solved it.
  • 404 Not Found from GetGitea – At first this looked like an error, but it was actually expected for new workflows. The template treated 404 as a signal that the file did not exist yet and should be created.
  • Encoding mismatches – If the workflow kept committing on every run, it often meant the JSON was not consistently pretty-printed before encoding. Once Alex ensured that formatting was stable, comparisons became reliable.
  • Missing SHA on PUT – Gitea requires the correct sha value when updating a file. If PUT failed, it usually meant the workflow was not passing the sha from the GET response correctly. Fixing that field resolved the issue.

Security Considerations Alex Did Not Ignore

Because this setup involves tokens and repository access, Alex took security seriously:

  • Tokens were stored in n8n credentials, never in plain text fields.
  • Logs were checked to ensure no tokens were accidentally printed.
  • Tokens were rotated periodically as part of regular security hygiene.
  • Scopes and repository access were kept as narrow as possible.

This way, even if something went wrong, the potential damage was limited.

The Resolution: Peace Of Mind With Automated n8n Backups

Weeks after setting up the backup workflow, another teammate accidentally broke a production workflow. This time, Alex did not panic.

Instead, Alex opened the Gitea repository, browsed to the correct JSON file, and restored the previous version. Within minutes, the workflow was back in n8n, running as if nothing had happened.

The automated backup template had quietly done its job, exporting workflows, encoding them, checking for changes, and only committing when something was different. The Git history told a clear story of how workflows evolved over time.

Alex also started to build on top of this foundation:

  • Adding commit metadata such as timestamps or “exported by” information to messages.
  • Pushing backups to a secondary remote or mirror for extra redundancy.
  • Using notification nodes like Slack or Email to alert the team when new backups or updates were created.

To keep environments clean, Alex followed one last pro tip: maintain a separate backup repository for each environment (dev, stage, prod) so workflow changes can be tracked independently.

Your Turn: Put A Safety Net Under Your n8n Workflows

If you are where Alex once was, relying on manual exports or no backups at all, you do not have to stay there.

With this n8n template, you can:

  • Automatically back up all n8n workflows to a Gitea repository.
  • Use the Gitea API to create and update JSON files on a schedule.
  • Keep a clean, versioned history of your automations.
  • Recover quickly when something breaks or disappears.

All it takes is importing the template, configuring your Gitea credentials and repository details, running a manual test, and then enabling the schedule.

If you run into questions, share your setup on the n8n community forum or talk to your platform admin. There is no need to wait for a painful incident before putting a safety net under your automations.

n8n AI Agent: Code Tool for Random Color Selection

n8n AI Agent: Code Tool for Random Color Selection

On a late Tuesday afternoon, Maya, a marketing automation specialist, stared at yet another confusing chatbot transcript.

The bot had replied, “I suggest the color green” right after the user clearly wrote, “Anything but green or blue, please.”

Maya sighed. She had wired a powerful OpenAI chat model into her n8n workflows, but every time she asked it to make a simple, deterministic choice, it occasionally ignored rules, hallucinated options, or gave inconsistent answers. All she wanted was a predictable way to select a random color while excluding certain colors, and to do it as part of a friendly, conversational chatbot.

That small problem turned into a bigger question: how could she combine the flexibility of AI with the reliability of code inside n8n?

The problem: powerful AI, unreliable logic

Maya’s team was building an interactive color picker experience for their website. Visitors could type messages like:

  • “Give me a random color, but not green or blue.”
  • “Pick a bright color that is not black or brown.”

The OpenAI chat model handled natural language beautifully. It understood what users meant, but when it came to actually choosing a color and respecting exclusions, it sometimes slipped. A language model is not optimized for strict logic, and Maya needed:

  • Predictable, reproducible results every time.
  • A simple way to test and debug the selection logic.
  • Less risk of the model “inventing” options that were not allowed.

She wanted AI to understand what the user was asking, but she wanted code to make the final decision.

The discovery: an n8n AI Agent with a Code Tool

While exploring n8n’s documentation, Maya found exactly what she needed: the n8n AI Agent node, combined with a custom Code Tool. The idea was simple but powerful:

  • Let the AI Agent handle the conversation and interpret user intent.
  • Let a JavaScript Code Tool handle the deterministic logic of filtering and randomly selecting a color.

This pattern meant she could keep the “brain” of the interaction in the AI model while delegating strict rules to code she fully controlled. It was also reusable for many other automation tasks, not just colors.

How Maya’s workflow came together

Maya opened n8n and started sketching her workflow. Instead of thinking in isolated nodes, she imagined the conversation flow:

  1. A user sends a chat message, or she tests the workflow manually.
  2. The AI Agent reads the message, understands which colors to exclude, and decides to call a custom tool.
  3. The Code Tool receives the list of colors to ignore, runs a clean JavaScript function, and returns one random color.
  4. The AI Agent wraps that result into a friendly response and sends it back to the user or the next workflow step.

To make that happen, she added the following nodes:

  • When clicking ‘Test workflow’ – a manual trigger for local testing.
  • When chat message received – a webhook or chat trigger to receive live messages from users.
  • Debug Input – a Set node to simulate chat input during development.
  • AI Agent – the orchestrator that uses a chat model and can call tools.
  • OpenAI Chat Model – the language model (for example, gpt-4o-mini) that understands user messages.
  • Code Tool (my_color_selector) – the JavaScript function that returns a random color while excluding specified colors.

The heart of the story: the my_color_selector Code Tool

The key to making the workflow reliable was the Code Tool. Maya created a new n8n Code Tool node, set its Tool Type to Code, and named it my_color_selector. Inside, she pasted the following JavaScript:

const colors = [  'red',  'green',  'blue',  'yellow',  'pink',  'white',  'black',  'orange',  'brown',
];

const ignoreColors = query.split(',').map((text) => text.trim());

// remove all the colors that should be ignored
const availableColors = colors.filter((color) => {  return !ignoreColors.includes(color);
});

// Select a random color
return availableColors[Math.floor(Math.random() * availableColors.length)];

She liked how transparent this logic was. No guessing, no hidden behavior. Just a clear sequence:

  • colors – the base list of allowed colors.
  • ignoreColors – the colors to exclude, parsed from the incoming query string and trimmed.
  • availableColors – the filtered list after removing ignored colors.
  • Return – a single random color from the remaining options.

In the AI Agent configuration, she attached this Code Tool so the agent could call it whenever a user asked for a color with exclusions. The tool’s input would be a simple string, for example "green, blue", representing the colors to ignore.

Rising action: wiring the AI and automation together

With the core logic in place, Maya focused on the full workflow. She wanted to test quickly, iterate safely, and then go live.

1. Setting up triggers for testing and chat

First, she added two different entry points:

  • Manual trigger using When clicking ‘Test workflow’ so she could run the flow from the editor.
  • Chat trigger using When chat message received to handle real-time messages from users via a webhook or chat integration.

This gave her a smooth path from development to production. She could iterate with the manual trigger, then switch to the chat trigger when ready.

2. Creating the Debug Input

Next, she added a Set node called Debug Input. During development, this node would simulate what a user might say. For example, she defined a simple field like:

Return a random color but not green or blue

She mapped this field to the AI Agent’s input parameter, which she called something like chatInput. This way, each time she clicked “Test workflow,” the AI Agent would receive the same test message and she could see exactly how the flow behaved.

3. Configuring the AI Agent

Now came the orchestration layer. In the AI Agent node, Maya:

  • Set the promptType to an appropriate value for her use case, for example define.
  • Connected the AI Agent’s Chat Model input to an OpenAI Chat Model node.
  • Attached the my_color_selector Code Tool so the agent could call it as needed.

The AI Agent’s role was to analyze the text, decide when the Code Tool should run, pass the right input string (like "green, blue"), and then format the final answer in natural language.

4. Adding and tuning the OpenAI Chat Model

In the OpenAI Chat Model node, she:

  • Provided her OpenAI credentials.
  • Selected the model gpt-4o-mini as a compact yet capable choice.
  • Configured options like temperature and max tokens to match the tone and length she wanted.

The model did not need to generate long essays. Its main job was to understand queries like “anything except green or blue” and to converse around the tool’s output.

5. Connecting the Code Tool

Finally, she made sure the AI Agent was configured to call my_color_selector whenever the user requested a random color with exclusions. The tool expected a comma-separated string of colors to ignore, so the agent would pass something like "green, blue" after parsing the user’s message.

At this point, the workflow chain was complete: trigger, debug input or chat, AI Agent, chat model, Code Tool, and back again.

The turning point: testing the workflow

With everything wired up, Maya clicked “Test workflow”.

The flow started at the manual trigger, moved to Debug Input, and sent the text “Return a random color but not green or blue” to the AI Agent.

Behind the scenes, the AI Agent:

  1. Parsed the message and identified that “green” and “blue” should be excluded.
  2. Called the my_color_selector Code Tool with the input "green, blue".
  3. Received a random color from the tool, for example "red".
  4. Wrapped that result into a friendly response and passed it on to the next node or back to the chat trigger.

On her screen, Maya saw an answer like:

“Your random color is red.”

She ran the test again. The workflow returned a different allowed color, but never green or blue. The behavior was now both conversational and deterministic, exactly what she needed.

Making the workflow robust: edge cases and improvements

Once the basic flow worked, Maya started thinking like a production engineer. What could go wrong, and how could she harden the system?

  • Input validation She added checks to ensure the query string passed to the Code Tool was defined and not empty before splitting it. This avoided unexpected errors when the AI Agent did not need to exclude any colors.
  • Case normalization To avoid mismatches like “Blue” vs “blue,” she considered lower-casing the input before splitting and comparing, so user capitalization would not break the logic.
  • Fallback handling She planned for the scenario where a user excluded every available color. In that case, the Code Tool could return a friendly error or a default list instead of failing silently.
  • Extended logic Over time, she could expand the Code Tool to handle categories like warm or cool colors, prioritize colors that had not been used recently, or even implement weighted probabilities.
  • Security and safety She made sure any inputs were sanitized, and that no secrets or API keys were exposed in logs or responses.

These small improvements turned a demo into a production-ready workflow.

Best practices Maya learned about AI and code tools

Building this workflow taught Maya a broader lesson about combining AI and deterministic code inside n8n:

  • Keep strict logic in your Code Tools, and use the AI Agent for language understanding and orchestration.
  • Limit the model’s role in computations or rule-based decisions to avoid inconsistent outputs.
  • Monitor and log tool calls so you can track failures and unusual inputs.
  • Use environment variables and secure credentials for any API keys or secrets.

This separation of concerns gave her the best of both worlds: predictable code and flexible AI.

Beyond colors: how the same pattern scales

After the success of the color picker, Maya started seeing this pattern everywhere. The combination of an n8n AI Agent with a Code Tool was not just about colors. It was a reusable blueprint for AI-driven automation with deterministic decision steps.

She could apply the same structure to:

  • Product recommendation filters Let the AI understand user preferences, then use a Code Tool to exclude out-of-stock items and select a product.
  • Appointment scheduling Have the AI interpret natural language like “next Tuesday afternoon,” then let code select the next available slot while excluding conflicts.
  • Content generation pipelines Use AI to draft content, then run deterministic checks or filters in a Code Tool before publishing.
  • Chatbots with utility scripts Allow the AI Agent to call microservices or utility scripts for calculations, lookups, or other strict logic.

What started as a “random color” experiment became a foundation for more advanced, reliable automations.

Resolution: from frustration to a reliable n8n AI workflow

The next time Maya checked the chatbot transcripts, she smiled. Users were asking for “anything but green or blue,” and the bot was respecting their preferences every time. The AI Agent handled the conversation, the Code Tool handled the logic, and the workflow was both smart and trustworthy.

If you want to follow the same path, you can replicate Maya’s setup inside your own n8n instance:

  1. Import or create the workflow with:
    • When clicking ‘Test workflow’ and/or When chat message received triggers.
    • A Debug Input Set node for easy testing.
    • An AI Agent node connected to an OpenAI Chat Model (for example gpt-4o-mini).
    • A Code Tool node named my_color_selector with the JavaScript shown above.
  2. Set your OpenAI credentials and adjust model settings like temperature and max tokens.
  3. Attach the my_color_selector tool to the AI Agent and pass a comma-separated string of colors to exclude.
  4. Click “Test workflow” and watch the AI Agent call the Code Tool and return a valid random color.

You can keep the color list as is, or replace it with domain-specific data that fits your product, schedule, or content.

Next steps: build your own AI + code automations

Using the n8n AI Agent with a Code Tool is a practical way to blend conversational AI with strict, testable logic. Start with a simple example like my_color_selector, then evolve your tools as your automation needs grow.

Try it now: Import the template into n8n, configure your OpenAI credentials, paste the Code Tool JavaScript, and run a test. Then adapt the logic to your own use case, whether that is product selection, scheduling, or content workflows.

Stay in the loop

If this story helped you see how n8n, AI Agents, and Code Tools can work together, consider subscribing for more guides on n8n automation and AI integrations. If you would like help designing or scaling a custom workflow, reach out or leave a comment. We can walk through setup, performance tuning, and best practices tailored to your stack.

Research Agent Demo — n8n + LangChain Workflow

Research Agent Demo – n8n + LangChain Workflow

On a rainy Tuesday afternoon, Lena, a content strategist at a fast-growing startup, stared at her screen in frustration. Her editor had just pinged her again: “Can you get me 3 solid articles about the election for tomorrow’s briefing?”

It was not a hard request, but it was the tenth one that week. Each time, Lena bounced between Wikipedia tabs, Hacker News threads, and generic web searches, trying to find credible, relevant links fast enough to keep up with the pace of her team. She knew there had to be a better way to automate this research without losing quality.

That was the day she discovered the Research Agent demo template built with n8n and LangChain.

The problem: manual research in a multi-source world

Lena’s job was to curate reliable information from multiple sources. She needed:

  • Background context from Wikipedia
  • Tech and community perspectives from Hacker News
  • Fresh, broad coverage from the wider web via SerpAPI

Every time she received a question like “can you get me 3 articles about the election,” she had to decide:

  • Which source to check first
  • How many tabs to open
  • How to avoid wasting time and API credits on redundant searches

The mental overhead was small per request, but it added up. She wanted something that could:

  • Choose the right research tool automatically
  • Return concise, usable results
  • Be predictable and cost-efficient

A colleague suggested she try n8n and showed her a workflow template that sounded exactly like what she needed: a Research Agent powered by LangChain and an OpenAI chat model.

Discovery: an intelligent research agent in n8n

Lena opened the template page labeled “Research Agent Demo – n8n + LangChain Workflow.” The description promised a smart research automation that could query Wikipedia, Hacker News, and SerpAPI, then decide which one to use based on the question.

At a high level, the workflow contained:

  • Execute Workflow Trigger to start the automation with a query like “can you get me 3 articles about the election”
  • Research Agent, a LangChain agent node that interprets the query and chooses the most suitable tool
  • Tools registered as LangChain tools:
    • Wikipedia
    • Hacker News API
    • SerpAPI
  • An OpenAI Chat Model that gives the agent reasoning and formatting abilities
  • A Response (Set) node that shapes the final output for sending to Slack, email, or a database

It was not just a collection of nodes. It was a small research assistant, ready to be trained.

Rising action: building the workflow into her daily routine

Importing the template

Lena started by importing the provided JSON template into her n8n instance. In seconds, the structure appeared on her canvas:

Execute Workflow Trigger → Research Agent → Response, with the Wikipedia, Hacker News, and SerpAPI integrations wired into the agent node as tools.

She realized that instead of manually clicking around the web, she could trigger this workflow with a simple JSON payload containing a query field and let the agent handle the rest.

Connecting the right credentials

To bring the agent to life, she needed to supply a few keys and credentials:

  • OpenAI API key for the OpenAI Chat Model node
  • SerpAPI key for the SerpAPI tool node, which the agent would only use as a fallback
  • Hacker News access, configured in the Hacker News node according to her environment

She made sure each of these tool nodes was:

  • Properly authenticated using n8n credentials (not plain text)
  • Exposed to the Research Agent in the node’s AI tool configuration

Once connected, the workflow had everything it needed to query real data sources.

The secret sauce: how the agent decides what to do

The turning point in Lena’s understanding came when she opened the Research Agent node and read the system instruction. This prompt was the rulebook the agent followed.

The instruction told the agent to:

  1. Search Wikipedia first.
  2. If the answer was not found there, search for relevant articles using the Hacker News API.
  3. If both failed, use SerpAPI for a broader web search.

Most importantly, it enforced a strict single-tool policy. The agent was reminded:

You are a research assistant agent. You have Wikipedia, Hacker News API, and Serp API at your disposal.

To answer the user's question, first search wikipedia. If you can't find your answer there, then search articles using Hacker News API. If that doesn't work either, then use Serp API to answer the user's question.

*REMINDER*
You should only be calling one tool. Never call all three tools if you can get an answer with just one: Wikipedia, Hacker News API, and Serp API

This single-tool rule mattered. It kept Lena’s workflow:

  • Efficient, by avoiding unnecessary API calls
  • Predictable, since the agent used one source per query
  • Cost-conscious, staying within rate limits and budgets

She realized she could customize this behavior. For developer-heavy topics, she could prioritize Hacker News. For fast-moving news, she could prefer SerpAPI first. The prompt was her control panel.

Mapping inputs and outputs into a smooth flow

Next, Lena checked how the query moved through the workflow. The template used a simple payload mapping pattern:

  • The Execute Workflow Trigger node held the initial JSON payload, for example:
    { "query": "can you get me 3 articles about the election" }
  • The Research Agent node read that query using expressions like {{ $json.query }}
  • Tool nodes used expressions like {{ $fromAI("keyword") }} or {{ $fromAI("limit") }} to receive dynamic parameters from the agent

This meant the agent could decide not only which tool to use but also how to shape the search, for example:

  • What keyword to send
  • How many articles to request

At the end, the Response node collected the agent’s final answer and formatted it into a compact list of article titles, descriptions, and URLs, ready to be used by other workflows.

The turning point: testing “3 articles about the election”

With everything wired up, Lena pinned a test query to the trigger:

“can you get me 3 articles about the election”

She hit execute and watched the agent in action.

Following its instruction, the agent:

  • First tried Wikipedia, looking for pages or references related to the election that contained useful links or summaries
  • If Wikipedia did not provide specific article links, the agent switched to the Hacker News API, searching for related posts and selecting the top 3 results
  • Only if both of those failed would it call SerpAPI to perform a broad web search and choose the top 3 articles

The result that landed in the Response node was exactly what she needed: a short, curated list of articles, each with a title, a brief description, and a URL. From there, she could send it to Slack, email it to her editor, or store it in a database for later reporting.

For the first time that day, Lena felt ahead of her research queue instead of behind it.

Resolution: turning a demo into a powerful research system

Once the initial test worked, Lena started thinking about how to adapt the workflow to her team’s needs.

Customizing the Research Agent for different priorities

She experimented with the system prompt and node settings to create variations of the agent:

  • Source prioritization She changed the search order in the agent prompt for different use cases:
    • For breaking news, she told the agent to check SerpAPI first
    • For developer-focused content, she made Hacker News the primary source
  • Result filtering She added post-processing nodes that:
    • Filtered articles by date
    • Excluded certain domains
    • Kept only results that matched specific keywords
  • Summarization For longer briefs, she added another OpenAI model call to summarize each article snippet before returning results, so stakeholders could skim quickly.
  • Automatic publishing She extended the workflow to send output directly to:
    • A CMS for content drafts
    • A newsletter system for scheduled digests
    • Internal Slack channels for daily research drops

Best practices she learned along the way

Costs and rate limits

Lena quickly understood why the single-tool rule in the prompt was so important. Every tool call had a cost, and APIs like OpenAI and SerpAPI had rate limits. By instructing the agent to use only one tool per query when possible, she kept:

  • API usage under control
  • Costs predictable
  • Performance stable, even as the team scaled up requests

Accuracy and freshness

She also learned to choose tools based on the type of information needed:

  • Wikipedia for stable background context and high-level overviews
  • Hacker News for developer and tech community discussions, trends, and commentary
  • SerpAPI for the most current web coverage, especially for time-sensitive or rapidly changing topics

When using SerpAPI, she added checks to validate domains and links to keep quality high.

Security and privacy

As she integrated the workflow into more internal systems, she made sure to:

  • Store all API keys in n8n credentials, not in plain text fields
  • Mask or redact any personal or confidential data before sending it to external APIs
  • Limit who could edit the workflow in n8n to avoid accidental exposure of keys or sensitive logic

When things went wrong: quick troubleshooting wins

Not every test went smoothly. A few early runs taught her how to debug effectively:

  • Agent chose the wrong tool She tightened the system prompt, making the single-tool requirement more explicit and clarifying the conditions under which each tool should be used.
  • Wikipedia returned no results She verified the Wikipedia tool configuration and tested manual queries in the node to confirm connectivity and query formatting.
  • Hacker News returned too many or too few items She adjusted the limit parameter, mapped from the agent using expressions like {{ $fromAI("limit") }}, and added logic to select the top N results by score or recency.

Key configuration details she kept an eye on

Over time, Lena developed a checklist of node settings to review whenever she cloned or modified the template:

  • Execute Workflow Trigger Ensured the initial JSON payload contained the query field, for example:
    { "query": "can you get me 3 articles about the election" }
  • Research Agent Verified the systemMessage string, tool attachments, and that the ai_languageModel was correctly set to the OpenAI Chat node.
  • Hacker News node Checked that:
    • resource: all was selected
    • The limit field was mapped from agent inputs, for example {{ $fromAI("limit") }}

What changed for Lena and her team

Within a week, Lena’s workflow had shifted from frantic tab juggling to calm automation. The Research Agent handled routine questions, delivered consistent results, and scaled effortlessly as her team’s demands grew.

The Research Agent demo had become more than a tutorial. It was a practical example of how n8n, LangChain agents, and external tools like Wikipedia, Hacker News, and SerpAPI could work together to create a reliable research assistant.

Her team now used it for:

  • Curated article lists for newsletters
  • Regular internal briefings
  • Quick background research for new topics

Your next step: put the Research Agent to work

If you recognize yourself in Lena’s story, you can follow a similar path:

  1. Import the Research Agent template into your n8n instance.
  2. Connect your OpenAI and SerpAPI credentials, and configure any required access for the Hacker News node.
  3. Review and adjust the agent’s system prompt to match your priorities for Wikipedia, Hacker News, and SerpAPI.
  4. Trigger the workflow with a query like “can you get me 3 articles about the election” and inspect the output.
  5. Extend the workflow with filters, summaries, or publishing steps tailored to your content sources and channels.

If you want a faster start, you can adapt the template to your own stack: internal knowledge bases, different news APIs, or custom dashboards.

Call to action: Import the Research Agent template into n8n, wire up your OpenAI and SerpAPI credentials, and run your first research query. From there, refine the prompt, add post-processing, and turn it into the research assistant your team has been missing.

Create a Research Agent in n8n with LangChain

Create a Research Agent in n8n with LangChain

Automating research workflows in n8n lets you delegate time-consuming tasks like source discovery, content summarization, and article curation to a repeatable, deterministic pipeline. This documentation-style guide explains how to implement a LangChain-powered Research Agent in n8n that uses OpenAI, Wikipedia, Hacker News, and SerpAPI in a prioritized order to answer user queries.

The focus is on predictable tool selection, minimal unnecessary API calls, and structured outputs that can be consumed by downstream systems such as Slack, email, or a CMS.

1. Workflow Overview

The Research Agent workflow is designed to accept a natural language query, route it through a LangChain Agent with multiple tools, and return a curated response. A typical input might look like:

{  "query": "can you get me 3 articles about the election"
}

The workflow then executes a deterministic sequence of lookups:

  • Attempt to answer using Wikipedia first for authoritative summaries.
  • If Wikipedia is insufficient, query Hacker News for recent, developer-centric or tech-focused articles.
  • If both fail to produce a suitable answer, fall back to SerpAPI for a broader web search.

This ordered strategy keeps responses focused, reduces latency, and avoids unnecessary calls to external APIs where possible.

2. High-Level Architecture

The workflow is composed of several key n8n nodes wired together to implement the research logic:

  1. Execute Workflow Trigger – Receives the initial query payload and starts execution.
  2. Research Agent (LangChain Agent) – Central orchestration node that chooses and invokes a single tool based on the system prompt.
  3. LangChain Tools – Configured within the agent:
    • Wikipedia Tool
    • Hacker News API Tool
    • SerpAPI Tool
  4. Response (Set node) – Normalizes and formats the agent output into a structured response.

The data flow is straightforward:

  1. Trigger node injects a JSON object with a query field.
  2. The LangChain Agent reads this query, applies the system prompt, and selects exactly one tool.
  3. The selected tool queries its respective external API and returns results to the agent.
  4. The agent composes a final answer, which is then shaped by the Response node into your preferred output schema.

3. Node-by-Node Breakdown

3.1 Execute Workflow Trigger

Purpose: Entry point for the Research Agent workflow.

Typical usage patterns:

  • Manual execution from the n8n editor with a test payload.
  • Triggered via another workflow using the Execute Workflow node.
  • Invoked indirectly through a Webhook or a scheduled trigger in a parent workflow.

Expected input: A JSON object that includes at least a query field, for example:

{  "query": "can you get me 3 articles about the election"
}

Configuration notes:

  • Ensure that the field name used for the research prompt (query) is consistent with how the LangChain Agent node expects to read it.
  • If the trigger is part of a larger pipeline, validate that upstream nodes always provide a non-empty query string.

3.2 Research Agent (LangChain Agent Node)

Purpose: Core decision-making component that uses LangChain with an OpenAI Chat Model and multiple tools. It decides which tool to call and composes the final answer.

Key configuration aspects:

  • Language Model: OpenAI Chat Model (configured via n8n credentials).
  • Tools:
    • Wikipedia
    • Hacker News API
    • SerpAPI
  • System prompt: Enforces the tool ordering and the single-tool rule.

The system prompt used in the template is:

You are a research assistant agent. You have Wikipedia, Hacker News API, and Serp API at your disposal.

To answer the user's question, first search wikipedia. If you can't find your answer there, then search articles using Hacker News API. If that doesn't work either, then use Serp API to answer the user's question.

*REMINDER*
You should only be calling one tool. Never call all three tools if you can get an answer with just one: Wikipedia, Hacker News API, and Serp API

Behavior:

  • The agent reads the user query from the input data.
  • Based on the system instructions, it evaluates which tool is most appropriate starting with Wikipedia, then Hacker News, then SerpAPI.
  • It must call exactly one tool per query, which helps control API usage and keeps the behavior predictable.

Edge considerations:

  • If the model attempts to call multiple tools, verify that the system prompt above is applied exactly and that no other conflicting instructions are present.
  • If the agent returns an empty or low-quality answer, you can tighten the instructions in the system prompt to encourage more detailed responses or stricter adherence to the tool order.

3.3 Wikipedia Tool

Purpose: Primary lookup tool for quick factual summaries and background information.

Typical use cases:

  • High-level overviews of events, concepts, or entities.
  • Authoritative background context before moving to news or opinion sources.

Behavior in this workflow:

  • The agent will attempt a Wikipedia search first, in line with the system prompt.
  • If Wikipedia returns relevant content, the agent can answer using only those results.

Configuration notes:

  • Adjust search parameters such as language or result limits if supported by the node.
  • If you see frequent “no results” scenarios, consider instructing the agent to broaden the phrasing of queries in the system prompt.

3.4 Hacker News Tool

Purpose: Secondary lookup tool for developer-centric and technology-related discussions and articles.

Typical use cases:

  • Recent technical news and community discussions.
  • Links to blog posts, tutorials, and opinion pieces that may not be in Wikipedia.

Behavior in this workflow:

  • Invoked by the agent only when Wikipedia does not provide sufficient information.
  • Used to surface up-to-date content or niche technical topics that are better covered in community sources.

Configuration notes:

  • Provide any required credentials or API configuration for the Hacker News node, if applicable in your n8n setup.
  • Use filters such as score, time, or domain (when available) to reduce noise and irrelevant results.

3.5 SerpAPI Tool

Purpose: Final fallback tool for broad web search when Wikipedia and Hacker News are not sufficient.

Typical use cases:

  • General web research across multiple domains.
  • Topics that are not well covered on Wikipedia or Hacker News.

Behavior in this workflow:

  • Only used if the first two tools cannot answer the question adequately.
  • Provides wide coverage at the cost of potentially higher API usage.

Configuration notes:

  • Requires a valid SerpAPI API key configured as n8n credentials.
  • Consider setting result limits and safe search or localization parameters, depending on your use case.
  • To control costs, you may want to cache results or restrict SerpAPI calls to only when strictly necessary, which is already encouraged by the system prompt.

3.6 Response Node (Set Node)

Purpose: Final formatting step that transforms the agent’s raw output into a structured, predictable schema for downstream systems.

Typical output formats:

  • JSON with fields like title, link, summary, and source.
  • HTML snippet for direct embedding into a CMS or newsletter.
  • Plain text summaries for email, chat, or logging.

Example JSON structure:

{  "query": "can you get me 3 articles about the election",  "results": [  {  "title": "Election coverage - Example",  "link": "https://...",  "summary": "...",  "source": "Hacker News"  },  {  "title": "Election background - Wikipedia",  "link": "https://...",  "summary": "...",  "source": "Wikipedia"  }  ]
}

Configuration notes:

  • Map fields from the agent’s output to a consistent schema so downstream consumers do not need to handle variable structures.
  • Add default values or fallbacks in case some fields are missing from the tool response.
  • If you plan to send data to multiple destinations (Slack, email, database), consider including both a machine-readable JSON object and a human-friendly summary string.

4. System Prompt and Tool Selection Strategy

The system prompt is central to how the LangChain Agent behaves. In this template, it encodes two key rules:

  1. Ordered tool preference: Always try Wikipedia first, then Hacker News, then SerpAPI.
  2. Single-tool rule: The agent should call exactly one tool for each query.

This approach:

  • Reduces latency by avoiding unnecessary multi-tool calls.
  • Controls costs for APIs like SerpAPI and OpenAI.
  • Makes behavior easier to reason about and debug.

If you need different behavior, you can modify the system prompt. For example, to prioritize recent news, you might instruct the agent to check Hacker News before Wikipedia. Always keep the single-tool reminder if you want to maintain the deterministic, cost-efficient behavior.

5. Step-by-Step Setup

  1. Provision an n8n instance
    Use n8n Cloud or deploy a self-hosted instance. Ensure it has outbound internet access to reach OpenAI, SerpAPI, and any other APIs you plan to use.
  2. Configure LangChain and OpenAI credentials
    In n8n, enable the LangChain integration and create OpenAI credentials. The OpenAI Chat Model will be used by the LangChain Agent node.
  3. Add external API credentials
    • Configure SerpAPI credentials for the SerpAPI tool.
    • Configure Hacker News credentials or parameters if required by your specific node configuration.

    Store all keys in n8n’s credentials store, not directly in node parameters.

  4. Import the Research Agent template
    Import the “Research Agent Demo” workflow template into your n8n instance. This provides a ready-made configuration of the nodes described above.
  5. Adjust system prompt and tool parameters
    Edit the LangChain Agent node to:
    • Refine the system prompt for your domain or tone.
    • Set any tool-specific options, such as result limits or filters for Wikipedia, Hacker News, or SerpAPI.
  6. Test with sample queries
    Use the Execute Workflow Trigger node to run the workflow with various queries. Validate:
    • Which tool is selected for different query types.
    • That the agent respects the single-tool rule.
    • That the Response node returns data in the expected format.
  7. Connect downstream integrations
    Once the output is stable, connect the Response node to:
    • Slack, for posting curated research updates.
    • Email, for sending research digests.
    • A CMS or database, for storing citations and summaries.

6. Configuration Tips and Best Practices

6.1 API Keys and Security

  • Store all API keys (OpenAI, SerpAPI, Hacker News, etc.) in n8n credentials.
  • Avoid hardcoding secrets directly in node parameters or expressions.
  • Use environment variables or n8n’s built-in credential encryption for secure deployments.

6.2 Rate Limits and Reliability

  • Check rate limits for OpenAI, SerpAPI, and any other APIs used.
  • Where possible, add retry or backoff logic around nodes that call external services, especially SerpAPI and OpenAI.
  • Consider caching frequent queries if your use case involves repeated research on similar topics.

6.3 Tool Selection Logic

  • Modify the system prompt if your priority changes, for example:
    • Prefer recent news (Hacker News, then SerpAPI) before static background (Wikipedia).
    • Skip SerpAPI entirely for cost-sensitive environments.
  • Keep the instructions explicit and concise so the model reliably follows them.

6.4 Result Limits and Response Size

  • Limit the number of results returned by Hacker News or SerpAPI to avoid overly long or noisy responses.
  • In the Response node, cap the number of items in the results array if your downstream consumers expect a fixed or small list.

6.5 Memory and Context

  • For repeated queries on similar topics, consider adding a lightweight memory or cache layer to store previous results.
  • This can reduce repeated API calls and improve response times, especially for SerpAPI.

6.6 Error Handling

  • Check for empty or error responses from each tool and provide a fallback message.
  • In the Response node, you can include a field such as status or error to signal when no suitable sources were found.
  • Log failures or unexpected outputs for later analysis and prompt refinement.

7. Customizing Output

The Response (Set) node is where you control exactly what the workflow returns. Some common patterns:

7.1 JSON Output

  • Ideal for APIs, webhooks, or other workflows.
  • Include fields like:
    • query
    • results[] with title, link, summary, source

7.2 HTML Output

  • Useful for CMS, newsletters, or dashboards.
  • Generate an HTML list (for example, <ul> with <li> entries) containing links and short summaries.

7.3 Plain Text Output

  • Suitable for Slack, email, or logging.
  • Return short summaries followed by links for human review.

You can combine these approaches, for example returning a JSON object that includes both a structured

Automated CSR Approval: n8n + Slack + Venafi

In contemporary DevOps and security engineering, Transport Layer Security (TLS) certificates are foundational infrastructure. Yet, Certificate Signing Request (CSR) approval and issuance are still frequently handled through manual, ticket-driven processes that create operational drag and increase risk.

This article presents a production-grade, automated CSR approval workflow built in n8n that integrates Slack, VirusTotal, OpenAI, and Venafi TLS Protect Cloud. The workflow is designed for security-conscious teams that want to accelerate certificate issuance, enforce standardized checks, and preserve human oversight where it matters.

Business and security rationale for automating CSR approvals

Manual certificate management does not scale with modern deployment velocity. An automated, policy-driven CSR workflow helps teams:

  • Reduce time-to-issue for certificates across environments and applications
  • Enforce repeatable security checks such as VirusTotal domain reputation scans before issuance
  • Maintain an auditable trail of decisions in Slack and Venafi for compliance and incident response
  • Standardize issuance via reusable Venafi templates and application IDs aligned with organizational policy

By embedding both deterministic checks and human-in-the-loop approval, the workflow enables safe automation rather than blind automation.

Architecture overview: n8n workflow and integrations

The workflow uses n8n as the orchestration layer that connects collaboration, threat intelligence, AI summarization, and certificate management:

  • Slack – primary request interface and notification channel for requesters and approvers
  • n8n – workflow engine that receives events, validates input, enriches data, and routes decisions
  • VirusTotal – domain reputation and threat intelligence source
  • OpenAI (or compatible LLM) – interprets VirusTotal results and produces a concise risk assessment
  • Venafi TLS Protect Cloud – CSR generation and certificate issuance using predefined templates

At a high level, the message flow is:

Slack modaln8n WebhookVirusTotal scanAI risk summarydecision (auto-issue or request approval)Venafi issuance or Slack approval workflow.

End-to-end workflow: from Slack request to certificate issuance

1. Initiating a certificate request from Slack

The user experience begins in Slack. A custom “Request New Certificate” modal is exposed via a Slack app. This modal collects the minimum required attributes:

  • Domain name (including optional wildcard support)
  • Requested validity period
  • Optional justification or context from the requester

When the user submits the modal, Slack sends the payload to an n8n Webhook node. The webhook captures the raw event and passes it into a Parse node, which normalizes the payload into a structured object that the rest of the workflow can consume.

2. Event routing and input validation in n8n

Slack events can represent several interaction types, not just the initial modal submission. To handle this cleanly, the workflow uses a Switch node as a router. This node inspects the payload to determine whether the event corresponds to:

  • A modal submission (new certificate request)
  • A button press in an approval message
  • Other interaction types that may be added later

For modal submissions, the workflow extracts the key fields (domain, validity period, justification) and performs input validation on the domain. A regular expression is used to validate the domain format, including optional wildcard syntax. This protects the workflow from malformed or injection-prone input and ensures that only syntactically valid domains proceed to threat analysis.

3. Domain reputation analysis with VirusTotal

Once the request is validated, the workflow queries VirusTotal for the target domain. The VirusTotal node retrieves a set of metrics that are then condensed into the most operationally relevant fields, including:

  • Last analysis statistics:
    • malicious
    • suspicious
    • undetected
    • harmless
    • timeout
  • Reputation score

To reduce token usage and cost when calling the LLM, the workflow intentionally strips the VirusTotal response down to a concise, high-signal subset of attributes. This pre-processing step also simplifies downstream prompt design.

4. AI-based summarization and risk classification

The condensed VirusTotal output is then passed to an OpenAI node (or an equivalent LLM connector). The model is prompted with a focused rubric to:

  • Summarize the VirusTotal findings in a short, human-readable format
  • Ignore or de-emphasize results that are purely “clean” or “unrated”
  • Output a normalized risk rating such as Low, Medium, or High
  • Recommend next steps based on that rating

The workflow uses that rating to drive policy:

  • Low risk – eligible for automatic issuance
  • Medium or High risk – requires manual approval in Slack

5. Policy decision: auto-issue vs human approval

The decision logic is implemented using simple conditional checks in n8n, for example:

  • If malicious == 0 and overall risk is Low, proceed to automated issuance.
  • If any malicious or suspicious flags are present, or the AI rating is Medium or High, trigger a manual approval flow.

For auto-approval paths, the workflow calls Venafi TLS Protect Cloud using:

  • A pre-configured certificate issuing template
  • An application ID that defines which application the certificate is associated with

Venafi then generates the CSR and issues the certificate in accordance with organizational policy, without requiring manual intervention for every request.

For requests that require review, the workflow compiles a detailed, contextual summary that includes:

  • Requester identity and team details (resolved from Slack IDs)
  • VirusTotal metrics and the AI-generated narrative
  • Interactive Slack buttons such as “Submit for Approval” or “View CSR Details”

This summary is posted to a dedicated Slack approvers channel, where security or platform engineers can make an informed decision.

6. Issuance confirmation and Slack notifications

When Venafi completes issuance, the workflow sends a rich Slack block message back to the requesting team. This message typically includes:

  • CSR and certificate details such as Common Name, Issuer, and validity period
  • Team metadata including avatar and display name for context
  • Quick actions like:
    • “View CSR Details in Venafi”
    • “Revoke CSR” or other lifecycle management options

This closes the loop for the requester while ensuring that all relevant information is visible in the same collaboration environment where the request originated.

Subworkflows and enrichment patterns

To keep the primary workflow readable and reusable, several responsibilities are delegated to n8n subworkflows. These are invoked wherever identity or team context is required:

  • Slack user resolution – converts Slack user IDs into email addresses and human-friendly display names
  • Slack team resolution – converts Slack team IDs into team names and avatars

By centralizing these lookups, the architecture ensures consistent enrichment across different triggers and reduces duplication. It also makes it easier to evolve identity mapping logic without modifying the main CSR pipeline.

Security and operational best practices

When implementing this pattern in a production environment, several practices are recommended:

  • Credential management
    Store all credentials (Slack, VirusTotal, OpenAI, Venafi) in n8n’s credential store or a dedicated secrets manager. Enforce:
    • Regular API key rotation
    • Least-privilege scopes for each integration
    • Restricted access to credential configuration
  • Input validation and domain policy
    Apply strict domain regex validation and consider:
    • Explicit allow lists for internal or trusted domains
    • Deny lists for known-bad or high-risk TLDs
  • Rate limiting and resilience
    Both VirusTotal and Venafi enforce rate limits. Implement:
    • Backoff and retry logic in n8n for transient failures
    • Caching for repeated lookups of the same domain where appropriate
  • Auditability and logging
    Maintain logs of:
    • Incoming requests and requesters
    • VirusTotal and AI-derived risk assessments
    • Issuance decisions and approver identities

    These records support compliance, forensics, and continuous improvement of the policy.

  • Human-in-the-loop for elevated risk
    Route Medium and High risk cases to a security-owned Slack channel. Capture:
    • Who approved or rejected
    • Timestamp and rationale (where applicable)
  • Least privilege in Venafi
    Use Venafi application and template IDs that grant only the minimal issuance capabilities required by this workflow, segmented by environment where possible.

Testing, rollout, and operationalization

Before adopting this pattern in production, it is advisable to follow a staged rollout strategy:

  • Use a sandbox Venafi tenant and a dedicated Slack test channel to validate:
    • Modal layouts and block message formatting
    • Correct routing of approvals and notifications
  • Exercise test domains to observe VirusTotal behavior and adjust AI risk thresholds so they align with your organization’s risk appetite.
  • Simulate edge cases such as:
    • Missing or malformed fields
    • Very long notes or justifications
    • Concurrent requests for the same domain
  • Monitor n8n execution and build metrics dashboards that track:
    • Number of requests
    • Issued vs rejected or escalated requests
    • Average time from request to issuance

Troubleshooting common failure points

In practice, most operational issues surface in a few predictable areas:

  • No or unexpected Slack behavior
    Verify:
    • Webhook URL configuration in the Slack app
    • Event subscription types and scopes
    • That the Slack app is installed in the correct workspace and channels
  • VirusTotal or Venafi API errors
    Check:
    • API key validity and permissions
    • Rate limit headers and whether you are exceeding quotas
    • Request formats and required parameters in the n8n nodes
  • Unreliable or inconsistent AI outputs
    Improve:
    • Prompt specificity and constraints
    • Post-processing logic in n8n that validates the AI’s risk rating
    • Fallback behavior if the model returns unexpected structures

Why this n8n architecture is effective

The strength of this design lies in its combination of:

  • Deterministic checks using VirusTotal statistics and explicit conditions
  • AI assistance to summarize complex threat data into actionable risk ratings
  • Human oversight for elevated risk cases that should not be fully automated
  • Modularity through subworkflows that can be extended with:
    • Internal reputation or threat intelligence services
    • Configuration management database (CMDB) lookups
    • Integration with change management tools like Jira or ServiceNow

Because n8n orchestrates the entire lifecycle, it is straightforward to adapt the workflow to new certificate types, additional policy checks, or different approval paths without rewriting the core logic.

Next steps: adopting the workflow in your environment

To implement this automated CSR approval pattern in your own environment:

  1. Import the n8n workflow into a staging instance and connect it to a sandbox Venafi tenant, Slack test workspace, and non-production API keys.
  2. Refine AI prompts and risk thresholds so that the Low / Medium / High classification aligns with your internal security policy and tolerance for automation.
  3. Roll out gradually:
    • Start with low-risk, internal-only domains for auto-issuance.
    • Keep external or high-impact domains on manual approval until you have confidence in the signals and process.

As you scale usage, continue to monitor metrics on issuance time, rejection rates, and incident tickets related to certificate issues. This data will help demonstrate the operational value of the automation and guide further optimization.

Recommendation: Begin in a sandbox, validate the end-to-end flow, then progressively extend the workflow to additional teams, environments, and certificate types. Maintain strict security controls, keep humans in the loop for higher risk decisions, and continuously measure impact on both security posture and operational overhead.

Automate Certificate Requests: Venafi + Slack + n8n

Automate Certificate Requests: Venafi + Slack + n8n

Every security or operations team eventually hits the same wall: certificate requests pile up, approvals get stuck in tickets and chats, and urgent deployments stall while someone waits for a CSR. It is repetitive, stressful work that pulls your team away from higher-value projects.

What if that entire journey – from Slack request to issued certificate – could run almost on its own, with clear guardrails, security checks, and a friendly experience for engineers?

This article walks you through an n8n workflow template that does exactly that. It turns simple Slack requests into fully analyzed, risk-aware Certificate Signing Requests (CSRs) using VirusTotal and OpenAI, and then uses Venafi TLS Protect Cloud for automated, enterprise-grade issuance.

Think of it as a first big step toward a more automated, focused way of working. You set the rules once, then let the workflow handle the busywork while you focus on strategy, architecture, and growth.


From manual bottlenecks to automated momentum

Manual CSR generation and approval may feel “safe” because it is familiar, but it comes at a cost:

  • Slow, inconsistent approvals that delay releases
  • Human error in copy-paste steps and manual checks
  • Scattered audit trails across tickets, emails, and chats

By moving certificate requests into an automated n8n workflow, you create a repeatable, transparent process that supports your entire organization. The benefits compound over time:

  • Faster CSR issuance with clearly defined approval paths
  • Built-in risk checks using VirusTotal and AI analysis
  • Centralized visibility and a simple Slack-based experience for requesters
  • Reliable integration with Venafi for secure, enterprise-ready issuance

This is not just about saving a few minutes per request. It is about reclaiming hours each week, reducing firefighting, and giving your team a foundation they can build on as automation becomes a core part of how you work.


Shifting your mindset: automation as a partner

Adopting automation is not about replacing people. It is about partnering with tools that handle the repetitive steps so your team can focus on judgment, creativity, and long-term security strategy.

In this workflow, n8n orchestrates several powerful services:

  • Slack (Events API and modals) to collect user requests and provide real-time feedback
  • n8n Webhook to receive events from Slack and turn them into structured data
  • VirusTotal API to analyze requested domains for malicious indicators
  • OpenAI to summarize VirusTotal results and suggest a clear risk rating
  • Venafi TLS Protect Cloud to generate CSRs and issue certificates when approved
  • Subworkflows to enrich Slack user and team information for better context and auditing

Each component does one thing well. n8n ties them together into a single, understandable flow that your team can inspect, extend, and trust.


The journey: from Slack request to issued certificate

Let us walk through the workflow the same way your users will experience it, step by step. As you read, imagine where you can tweak the logic, add checks, or connect additional tools. This template is a starting point, not a limit.

1. A simple Slack modal starts the process

The journey begins in Slack, where engineers already spend much of their day. Instead of opening tickets or emailing security, they open a Slack modal dedicated to certificate requests.

The modal captures three fields:

  • Domain name
  • Requested validity period
  • Optional note for context or special requirements

Once submitted, Slack sends the payload to an n8n Webhook. The webhook node immediately parses the incoming data into a clean JSON object that the rest of the workflow can easily work with.

2. Smart routing keeps the UX smooth

After receiving the Slack event, the workflow uses a Switch node (router) to decide what needs to happen next. Depending on the event type, it can:

  • Open the request modal
  • Process a new submission
  • Handle interactive elements such as buttons or block actions

n8n responds to Slack quickly so the modal closes smoothly and the user gets instant confirmation that their request is in progress. This small detail makes automation feel responsive and trustworthy.

3. Enriching the request with human context

With the modal closed, the workflow extracts the key fields: domain, requested validity, and any notes. At the same time, it runs parallel subworkflows to add context:

  • Convert the Slack user ID into an email address
  • Resolve the Slack team ID into a human-readable team name and avatar

These details are merged back into the main flow so that every subsequent message, approval request, and audit record is easy to understand. This is where automation starts to feel personal rather than mechanical.

4. VirusTotal domain analysis for built-in security checks

Before a certificate is ever issued, the workflow checks the requested domain using the VirusTotal domain lookup API. It retrieves key indicators such as:

  • Last-analysis stats
  • Reputation values

To keep things efficient and cost-effective, the workflow stores only the essential verdicts, including:

  • malicious
  • suspicious
  • undetected
  • harmless
  • timeout
  • overall reputation

This compact snapshot is enough for downstream AI analysis and auditing, while saving tokens and processing overhead.

5. AI-powered summarization and risk assessment

Next, an OpenAI node receives the summarized VirusTotal output. Instead of asking your analysts to interpret raw numbers for every request, the AI standardizes the assessment and assigns a risk category:

  • Low – no significant flags, safe to auto-issue
  • Medium – minor concerns, recommend manual review
  • High – multiple engines flag malicious activity, block or require deep manual review

The AI returns a concise explanation and suggested next steps. This keeps decisions consistent across different analysts and shifts, and dramatically reduces the cognitive load for each request.

6. Automated issuance or human approval, based on risk

At this point, the workflow has everything it needs to choose the right path. Using the AI risk rating and the VirusTotal malicious count, n8n branches into one of two flows:

  • Auto-issue path
    If the number of malicious engines is zero and OpenAI rates the domain as Low risk, n8n calls the Venafi TLS Protect Cloud node. Venafi generates a CSR and issues a certificate automatically, according to your configured template and policies.
  • Manual approval path
    If the risk is Medium or High, the workflow crafts a rich Slack message for an approver channel. This message includes:
    • The AI analysis and risk rating
    • Key VirusTotal metrics
    • Requester identity and team information

    Security reviewers can then inspect the context and use a button to approve issuance when appropriate.

This is where automation and human judgment work together. Low-risk, routine requests glide through the system, while higher-risk cases get the attention they deserve.

7. Clear Slack notifications and complete audit trails

Once a certificate is issued, the workflow closes the loop with the requester. n8n sends a detailed Slack block message back to the channel, including:

  • Certificate issuance details
  • Validity dates
  • A link to the Venafi CSR or certificate record
  • Options to trigger revocation if needed

In the background, every step is logged inside the workflow for auditability:

  • Initial request
  • VirusTotal analysis
  • AI assessment
  • Decision path (auto-issue or manual)
  • Issuance and revocation actions

The result is a trail that compliance teams can review, without forcing your engineers to manually document every decision.


Implementation tips to set yourself up for success

As you adapt this n8n template to your environment, a few practical choices will help you scale confidently:

  • Validate user inputs in the Slack modal using regex for FQDNs, allowed TLDs, and wildcard rules
  • Use scoped API keys and secrets for Venafi, VirusTotal, and OpenAI, and store them securely in n8n credentials
  • Rate-limit VirusTotal calls and cache results for domains that are requested frequently, to avoid quota issues
  • Define clear SLAs and escalation paths for manual approvals so urgent deployments do not get stuck
  • Log every decision, including user, timestamp, and analysis summary, to support audits and incident reviews

These practices turn your workflow from a helpful script into a reliable service that your entire organization can depend on.


Security and compliance: building trust into automation

Automated certificate issuance is powerful, so it is important to align it with your security policies from day one. As you roll out this workflow, consider:

  • Defining which teams, domains, or environments are allowed to use auto-issuance
  • Restricting Venafi templates and issuance privileges to reduce blast radius
  • Keeping AI analysis explainable by storing the prompt, input snapshot, and output together
  • Implementing monitoring and alerts for unusual issuance patterns, such as spikes or repeated rejections

By treating automation as part of your formal security program, you build confidence with stakeholders and regulators while still moving faster.


Testing and rolling out your n8n certificate workflow

To make your transition smooth, treat rollout as a journey with clear stages. A simple checklist can help:

  1. Deploy the workflow to a staging Venafi environment and run end-to-end test requests
  2. Simulate malicious or suspicious domains in VirusTotal to confirm the manual approval path behaves correctly
  3. Verify Slack notifications, buttons, and modal lifecycle across both desktop and mobile clients
  4. Run a tabletop review with security, ops, and application teams to agree on thresholds, templates, and escalation rules

Once you trust the behavior, you can gradually expand usage from a small pilot group to more teams and environments.


Extending the workflow as your automation practice grows

One of the biggest advantages of using n8n is that your automation can evolve with your needs. This template is a solid foundation, and you can grow it over time. Some ideas:

  • Integrate with a CMDB to map domains to owners and automatically approve requests for known assets
  • Send issuance events to your SIEM or ticketing systems such as Jira or ServiceNow for change management
  • Incorporate additional threat intelligence sources or sandboxing tools for deeper domain analysis
  • Add certificate monitoring and automated renewal workflows triggered by Venafi or certificate expiration events

Each improvement makes your environment more resilient and your team more focused on strategic work rather than repetitive tasks.


Bringing it all together

This n8n workflow template offers a practical, secure pattern for automating certificate requests using Slack as the interface, VirusTotal and OpenAI for risk context, and Venafi for trusted issuance. It reduces friction for engineers, preserves strong security oversight, and gives you a clear, auditable process that can grow with your organization.

Most importantly, it demonstrates what becomes possible when you let automation handle the routine steps. You free your team to focus on architecture, threat modeling, and long-term improvements instead of chasing individual CSRs.

Ready to take the next step? Load the workflow template into your n8n instance, connect your Slack, VirusTotal, OpenAI, and Venafi credentials, and run staged tests. Start small, learn from each iteration, and keep refining the flow until it fits your organization perfectly.

If you want help adapting the template, reach out to your internal automation champions, contact our team, or join the n8n community to learn from others who are on the same journey.

Learn more about n8n | Venafi Docs | VirusTotal


This article describes a reference architecture and implementation guidance. Always validate this approach against your organization’s security policies and compliance requirements before enabling automated issuance in production.

Export XML to Google Sheets with n8n

Export XML to Google Sheets with n8n: Turn messy data into momentum

Every day, valuable data sits trapped in XML feeds, legacy systems, and old APIs. You know that if you could just get that data into Google Sheets, you could analyze it, share it, and turn it into real decisions. But doing it manually takes time, focus, and energy you would rather invest elsewhere.

This is where automation becomes a catalyst. With a simple n8n workflow, you can move from copy-paste drudgery to a system that quietly runs in the background, feeding your spreadsheets with fresh, structured data. In this guide, you will walk through an n8n template that automatically downloads an XML file, parses it into JSON, turns items into rows, creates a Google Sheet, writes the header row, and appends all your data – without you lifting a finger after setup.

Think of this workflow as a starting point. Once you have it running, you can adapt it, extend it, and build your own automation ecosystem on top of it.

The problem: XML everywhere, time nowhere

XML is still everywhere. Public data feeds, enterprise APIs, and older tools often expose their information as XML. That is fine for machines, but not ideal for people who want quick insights in a spreadsheet.

Without automation, you might be:

  • Downloading XML files manually
  • Copying and pasting values into Google Sheets
  • Writing one-off scripts that you have to maintain
  • Fixing errors caused by rushed or repetitive work

Over time, this slows you down and distracts you from higher-value work. The good news is that the problem is predictable, which makes it perfect for automation.

The mindset shift: from manual tasks to automated systems

Automation with n8n is not just about saving a few minutes. It is about shifting how you work. Instead of reacting to data needs, you design systems that keep data flowing for you.

With a single n8n workflow, you can:

  • Schedule an automated export from XML to Google Sheets
  • Normalize XML fields into consistent spreadsheet columns
  • Create or update Google Sheets programmatically
  • Reduce manual copy/paste and the risk of human errors

Once this template is in place, you are no longer the bottleneck. Your time is freed up for analysis, strategy, and growth. The workflow you are about to build is a concrete step toward that future.

The solution: an n8n template that does the heavy lifting

This tutorial is built around a ready-to-use n8n workflow template. It takes an XML feed, transforms it into structured data, and writes everything into a new Google Sheet.

Here is what the template does, end to end:

  • Manual Trigger – starts the workflow on demand when you are testing or running it manually.
  • Download XML File (HTTP Request) – fetches the XML source, for example https://www.w3schools.com/xml/simple.xml.
  • Parse XML content (XML node) – converts the XML payload into JSON objects that n8n can work with easily.
  • Split out food items (Item Lists) – takes the parsed list and turns each XML item into its own workflow item.
  • Create new spreadsheet file (Google Sheets) – creates a new Google Sheet titled My XML Data.
  • Define header row (Set) – uses the first item’s object keys to generate your column headers dynamically.
  • Write header row (Google Sheets update) – writes the header row to the new sheet, using executeOnce so it only runs one time.
  • Wait for spreadsheet creation (Merge – chooseBranch) – synchronizes the header write with the item stream so data is appended only after the sheet is ready.
  • Write data to sheet (Google Sheets append) – appends each item as a new row in your spreadsheet.

Once this is configured, you have a working pipeline from XML to Google Sheets that you can run, schedule, and extend.

Key building blocks of the workflow

1. HTTP Request node – Download your XML feed

The journey starts by pulling in the raw XML.

Configure the HTTP Request node to point to the URL that returns XML. For testing, you can use the W3Schools sample URL:

https://www.w3schools.com/xml/simple.xml

If your actual XML feed requires authentication, add the necessary headers or credentials in this node. This is your bridge from the outside world into your automated workflow.

2. XML node – Turn XML into JSON

Next, you transform that structured but awkward XML into JSON that n8n can handle with ease.

The XML node converts the XML payload into JSON. Pay close attention to:

  • Array handling options, so repeating elements are captured correctly
  • The path to the repeating elements, for example breakfast_menu.food in the sample feed

Getting this right ensures that your data is ready for the next step, where each item becomes its own row.

3. Item Lists node – Split into individual items

Once your XML is in JSON format, you want each XML record to become a single row in Google Sheets.

Use the Item Lists node and set fieldToSplitOut to the array property that contains your items. This transforms one array of objects into multiple workflow items. Each resulting item will map to a single row in your final spreadsheet.

4. Google Sheets nodes – Create, update, and append

The workflow then hands off to Google Sheets, where your data becomes visible, shareable, and actionable.

This template uses three core Google Sheets operations:

  • create spreadsheet – creates a new spreadsheet and returns the spreadsheetId, which is used in later nodes.
  • update (rawData=true) – writes the header row using a raw array of column names.
  • append – appends rows for each split item from your XML data.

Two important expressions help this workflow stay dynamic and reusable:

// Create header row dynamically from the first item
={{ [ Object.keys($("Split out food items").first().json) ] }}

// Use the created spreadsheet for updates and appends
={{ $("Create new spreadsheet file").first().json["spreadsheetId"] }}

These expressions mean you do not have to hard-code column names or spreadsheet IDs. The workflow adapts to your XML structure automatically.

Step-by-step: setting up your XML to Google Sheets automation

You are now ready to turn this template into a working system. Follow these steps to set it up in your own n8n instance:

  1. Import the workflow template into your n8n instance.
  2. Open the Download XML File (HTTP Request) node and set the URL to your XML source. If your feed is protected, add headers or authentication details.
  3. Run the XML node once and confirm that it correctly converts your file. In the Execution Preview, note the path to the repeating array, for example breakfast_menu.food.
  4. Update the Item Lists node’s fieldToSplitOut value to match that array path so each element becomes its own item.
  5. Configure Google Sheets credentials (OAuth2) in n8n and assign them to all Google Sheets nodes in the workflow.
  6. Execute the workflow one time. The Create new spreadsheet file node will create a sheet, and the Set node will derive the column headers from the first item.
  7. Open the created Google Sheet. You should see your header row at the top and one row per XML item appended below it.

Once you see that first successful run, you have taken an important step. You now have a repeatable process that can keep running while you focus on higher-impact work.

Troubleshooting and improving your workflow

As you adapt this template to real-world feeds, you might encounter a few issues. These are not roadblocks, just opportunities to refine your automation.

  • Malformed XML: If the XML node fails to parse the response, validate the XML with an external validator. In n8n, you can configure the HTTP Request node to return raw data, then test the XML node on that output to isolate the issue.
  • Authentication errors: For Google Sheets, make sure your OAuth2 credentials have the correct scopes (both Drive and Spreadsheets) and that the authenticated user or service account has access to the created spreadsheet.
  • Header mismatch: If different XML items contain different keys, normalize them before writing to Sheets. Use a Function or Set node to enforce consistent properties and ordering so your columns stay aligned.
  • Large datasets: Appending one row per item can become slow at scale. Consider batching items into groups of 50 to 100 and calling the Google Sheets append operation once per batch.
  • Rate limits: Respect Google Sheets API quotas. If you hit rate limits, add delays or implement exponential backoff for retryable errors in your workflow.

Each improvement you make here increases the reliability of your automation and builds confidence to automate even more processes.

Best practices for a robust XML to Google Sheets pipeline

To turn this template into a sustainable part of your toolkit, consider the following best practices:

  • Sanitize headers – Clean up column names by removing special characters and normalizing to lowercase or snake_case. This keeps your spreadsheets consistent and easier to work with in downstream tools.
  • Use executeOnce – Apply executeOnce on header and metadata nodes so the header row is written only once, even when multiple items pass through.
  • Monitor runs – Enable error notifications or set up logging for workflow failures. This helps you catch issues early instead of discovering them after a reporting deadline.
  • Secure credentials – Use environment-scoped credentials in n8n, restrict access, and rotate keys regularly to keep your integrations secure.
  • Re-run strategy – Design your workflow so it can safely re-run. For example, implement idempotent appends or track an external cursor to avoid duplicate rows if you need to replay a run.

These habits turn a simple template into a production-ready automation that you can trust.

Extending the template: from one workflow to an automation ecosystem

Once your XML to Google Sheets workflow is running, you have a powerful foundation. From here, you can expand in many directions to support your personal or business growth.

Ideas to extend this workflow include:

  • Schedule with Cron – Add a Cron node so the workflow runs daily or hourly, keeping your spreadsheet always up to date.
  • Filter or transform data – Insert Function or Set nodes before writing to Sheets to clean, filter, or enrich your data.
  • Send notifications – Trigger a Slack message or email once the import finishes or when an error occurs, so you stay informed without constantly checking.
  • Archive the XML – Store a copy of the raw XML in S3, Google Drive, or another storage service for auditing or historical analysis.

Each small addition turns your workflow into more than a one-off script. It becomes part of a broader automation strategy that supports your team, your business, and your goals.

Bringing it all together

This n8n workflow template is more than a technical example. It is a practical way to reclaim your time, reduce repetitive work, and build confidence in your ability to automate.

With just a few steps, you can:

  • Import XML data directly into Google Sheets
  • Eliminate manual copy-paste workflows
  • Lay the groundwork for more advanced automation

From here, you can iterate, improve, and adapt the workflow to new XML feeds and new use cases. Each improvement you make is an investment in a more focused, less distracted way of working.

Ready to take the next step? Import the template into n8n, connect your Google Sheets credentials, update the XML URL, and click execute. Watch your first automated import complete, then start imagining what else you can automate.

If you need help tailoring this to your specific XML feed, reach out to a consultant or share your scenario in the comments. Your next automation might be just one workflow away.

Call to action: Clone the template, subscribe for more n8n automation tutorials, and keep experimenting. Each workflow you build moves you closer to a fully automated, high-focus workflow.

Automate XML to Google Sheets with n8n

Automate XML to Google Sheets with n8n

Imagine this: every morning you open your laptop, grab a coffee, and then spend 20 minutes copy-pasting data from some ancient XML feed into Google Sheets. Again. And again. And again. At this point, the only thing more repetitive than the task is you complaining about it.

Good news – you can retire from manual XML copy-paste duty. With a simple n8n workflow, you can grab XML from a URL, turn it into structured data, and feed it directly into a shiny new Google Sheet. Automatically. On a schedule. While you do literally anything else.

This guide walks you through the exact n8n workflow template: which nodes to use, how to configure them, and how to avoid common XML-to-Google-Sheets headaches.

What this n8n workflow actually does

This workflow takes an XML feed and turns it into a neat, row-based Google Sheet. Under the hood, it:

  • Downloads an XML file from a URL
  • Parses that XML into JSON inside n8n
  • Splits repeating XML elements into individual items (perfect for rows)
  • Creates a brand new Google Sheet and writes a header row
  • Appends each XML item as a separate row in the sheet

The result: your XML data becomes human-readable, easy to filter, and ready for analysis or reporting, without you touching Ctrl+C or Ctrl+V ever again.

Before you start: what you need

To follow along with this XML to Google Sheets automation, make sure you have:

  • An n8n instance (cloud or self-hosted). This example uses n8n version 0.197.1 or later.
  • A Google account with Google Sheets API credentials configured in n8n (OAuth2 credential set up).
  • A sample XML URL to test with. The example workflow uses:
    https://www.w3schools.com/xml/simple.xml

Once those are in place, you are ready to build the workflow.

High-level workflow overview

Here is the full sequence of nodes you will use in n8n to automate the XML import into Google Sheets:

  1. Manual Trigger (or schedule / event trigger)
  2. HTTP Request – download the XML file
  3. XML – convert XML to JSON
  4. ItemLists – split repeating XML elements into separate items
  5. Google Sheets – create a new spreadsheet file
  6. Set – generate a dynamic header row
  7. Google Sheets – write header row
  8. Merge (chooseBranch) – wait until the sheet and headers are ready
  9. Google Sheets – append rows for each XML item

Next, let us walk through how to configure each node so everything works together smoothly.

Step-by-step: build the XML to Google Sheets workflow

1. Trigger – how the workflow starts

Start with a trigger node:

  • For testing: use a Manual Trigger. You can click Execute to run the workflow instantly.
  • For production: swap it later for a Schedule trigger (for regular imports) or a Webhook/event-based trigger (for near real-time updates).

For now, keep it simple with the Manual Trigger so you can iterate quickly.

2. HTTP Request – download the XML

Next, add an HTTP Request node to fetch your XML file. Configure it as follows:

  • Method: GET
  • URL: your XML feed URL, for example:
    https://www.w3schools.com/xml/simple.xml

The response body from this node will contain the raw XML. That is the lovely, unreadable stuff we are about to transform.

3. XML node – parse XML into JSON

Add an XML node and connect it after the HTTP Request node. Configure it to use the response from the previous node as the input.

The XML node converts the XML into JSON while keeping the structure intact. That means you will be able to access parts of the data using paths like:

breakfast_menu.food

This is the key step that turns your XML into something n8n can work with easily.

4. ItemLists – split repeating elements into items

Most XML feeds contain repeating elements, like a list of products, orders, or in the sample file, food items. To handle each of these as a separate row, add an ItemLists node.

Configure it to:

  • Target the repeating XML path, for example:
    breakfast_menu.food
  • Split those elements into separate items

After this node runs, each XML element becomes its own item in n8n, which is exactly what you want before pushing data into Google Sheets as individual rows.

5. Google Sheets – create a new spreadsheet file

Time to give your data a home. Add a Google Sheets node and set it up to create a new spreadsheet:

  • Resource: Spreadsheet
  • Operation: Create
  • Title: something descriptive like My XML Data

When this node runs, it creates a new Google Sheet and returns a spreadsheetId. You will reference that ID in later nodes using expressions, so keep this node handy.

6. Set node – build a dynamic header row

Instead of hard-coding column names, you can generate a header row automatically based on the keys in your data. Add a Set node after the ItemLists node.

Create a field, for example columns, and set its value using this n8n expression:

<!-- In the Set node 'columns' value -->
={{ [ Object.keys($("Split out food items").first().json) ] }}

What this does:

  • Looks at the first item produced by the ItemLists node (named something like Split out food items)
  • Extracts its keys with Object.keys()
  • Wraps them in an array so they can be used as a header row

The result is a JSON array of header names that match the XML fields, which keeps your sheet in sync with your data structure.

7. Google Sheets – write the header row

Now write that header row into your new Google Sheet. Add another Google Sheets node and configure it to update the sheet:

  • Operation: Update
  • Spreadsheet: use an expression to reference the spreadsheet created earlier:
= {{ $("Create new spreadsheet file").first().json["spreadsheetId"] }}

Then:

  • Feed in the header data from the Set node
  • Enable Raw Data (set rawData = true) so the array is written directly as the first row

At this point, your sheet exists and has a proper header row that matches your XML structure.

8. Merge (chooseBranch) – wait for everything to be ready

You now have two flows:

  • One that creates the spreadsheet and writes the header row
  • One that holds your split data items from the XML

To make sure the data rows are not appended before the sheet and headers exist, add a Merge node in chooseBranch mode.

Connect:

  • The branch that handles the header writing
  • The branch that holds the split XML items

The Merge node waits for both branches, then passes data forward once everything is ready. Think of it as traffic control for your workflow.

9. Google Sheets – append rows for each XML item

Finally, add one more Google Sheets node to append your data rows.

  • Operation: Append
  • Spreadsheet: again reference the ID from the create node:
= {{ $("Create new spreadsheet file").first().json["spreadsheetId"] }}

Then map the fields from each item (produced by the ItemLists node) to the correct columns. n8n will automatically append one row per item, turning each XML element into a row in your Google Sheet.

Key expressions used in this workflow

Here are the two main expressions you will rely on:

  • Get the spreadsheetId from the create node:
= {{ $("Create new spreadsheet file").first().json["spreadsheetId"] }}
  • Generate header columns from the first item keys:
= {{ [ Object.keys($("Split out food items").first().json) ] }}

These expressions help keep your workflow dynamic, reusable, and slightly magical.

Tips, best practices, and troubleshooting

1. Check the parsed JSON structure

After the XML node, open the output and inspect the JSON carefully. Find the exact path to your repeating elements, for example:

breakfast_menu.food

Use that path in the ItemLists node. If the path is wrong, your rows will not split correctly and you may end up with empty or weird-looking data.

2. Handle nested XML elements

XML loves nesting things. Google Sheets does not. If your XML has nested objects or attributes, flatten them before writing to the sheet.

Use a Set node or a Function node to:

  • Create a flat object
  • Convert nested structures into string values

This keeps your columns clean and prevents ugly JSON blobs from showing up in cells.

3. Respect Google Sheets rate limits and quotas

Google Sheets API is friendly, but it does have quotas. If you are appending a large number of rows in a short time:

  • Add small delays between batches
  • Group rows together and append them in chunks instead of one by one

This reduces API calls and helps you avoid hitting rate limits at the worst possible moment.

4. Add error handling and retries

Stuff happens. XML can be malformed, APIs can fail, and tokens can expire at the exact moment you least expect it.

To make your workflow more robust:

  • Use error workflows or the Execute Workflow node to implement retry logic
  • Log errors by sending a message to email or Slack when parsing fails or Google Sheets returns an error

This way, you know when things break and can fix them before anyone else notices.

5. Secure your Google credentials

Always store your Google OAuth credentials in the n8n credentials section. Avoid:

  • Embedding tokens directly in expressions
  • Sharing workflows that contain sensitive keys

For production setups, use environment variables and follow your standard security practices. Automation is great, leaking credentials is not.

6. Control your column order

Using Object.keys() to generate headers is convenient, but the order is based on key insertion order. If you:

  • Need a specific column order
  • Want to match an existing reporting template

Then define your headers manually in the Set node instead of auto-generating them. That gives you full control over how the sheet looks.

Testing and validating your workflow

Use the Manual Trigger to run the workflow and then open the resulting Google Sheet. Confirm that:

  • The header row exists and the column names match your expected fields
  • Each XML element (for example each food item) appears as its own row
  • Values are correctly mapped and look properly formatted in the cells

If something looks off or values are missing or nested unexpectedly, adjust:

  • The mappings in the append node
  • Or insert a Function or Set node to normalize and flatten values before writing them

Where this XML to Sheets automation really shines

This n8n template is especially useful if you regularly work with XML feeds like:

  • Daily inventory feeds exported in XML
  • Vendor price lists
  • Syndicated content or catalog imports
  • Legacy system exports that need to end up in a human-friendly Google Sheet

Any time you are stuck taking structured XML and manually massaging it into a spreadsheet, this workflow can probably take over the job.

Next steps and ways to extend the workflow

The basic workflow is already powerful, but n8n makes it easy to extend it without rewriting everything:

  • Swap the HTTP Request node for FTP, SFTP, or a Webhook if your XML comes from a different source
  • Add more Set or Function nodes to transform or clean data before writing it
  • Schedule the workflow to run automatically at fixed intervals

In other words, you can adapt this template to pretty much any XML-to-Google-Sheets scenario you run into.

Wrap up

Using n8n to automate XML imports into Google Sheets is a practical way to bridge older XML-based systems with modern, collaborative tools. Instead of manually copying and pasting XML into spreadsheets, you let the workflow:

  • Download the XML
  • Parse it into JSON
  • Split it into individual items
  • Create a spreadsheet
  • Write headers and append all rows

Once it is set up, your main job is to enjoy the fact that this tedious task now runs itself.

Try the template yourself

To get started:

  • Set up your Google Sheets OAuth credential in n8n
  • Import or recreate the nodes described in this guide
  • Use the sample XML URL or plug in your own feed
  • Run the workflow and check the generated Google Sheet

If you would like a ready-to-import JSON template or help tweaking the mapping for your specific XML format, reach out or leave a comment. It is often just a small adjustment to adapt this workflow to your data.

Enjoy automating, and may your days of manual XML copy-paste be officially over.