n8n: GitHub Release to Slack Automation

GitHub Releases to Slack with n8n: A Simple Automation You’ll Actually Use

Ever shipped a new release on GitHub, told yourself you’d “announce it in Slack in a minute,” then got distracted and forgot? You’re not alone.

This n8n workflow template quietly solves that problem for you. It listens for GitHub release events in a specific repository and automatically posts a nicely formatted message in a Slack channel. No copy-pasting, no missed updates, no “oops, I forgot to tell the team.”

In this guide, we’ll walk through what the workflow does, when it’s useful, how to set it up in n8n, and a few ideas to customize it for your own team.

What This n8n GitHub-to-Slack Workflow Actually Does

The template, called Extranet Releases, connects GitHub and Slack so your team is always up to date on new releases.

Here is what it handles for you:

  • Watches a specific GitHub repository: Mesdocteurs/mda-admin-partner-api.
  • Listens for release events: whenever a new release is created or updated.
  • Pulls key details from the GitHub payload:
    • Release tag name
    • Release body / changelog
    • Link to the release page (html_url)
  • Posts a Slack message in the #extranet-md channel with all those details.

Once it is active, every new release on that repo quietly triggers a Slack notification. You just keep shipping, and your team stays informed.

Why Bother Automating GitHub Release Announcements?

You might be thinking, “I can just paste the link into Slack myself.” Sure, you can. But will you always remember?

Manual announcements tend to be:

  • Slow – people might wait hours before hearing about a release.
  • Inconsistent – sometimes you include the changelog, sometimes you forget.
  • Error-prone – copy the wrong tag, miss the link, or post in the wrong channel.

With n8n handling it, you get:

  • Instant notifications as soon as a release is created.
  • Consistent formatting every single time.
  • No-code / low-code setup that you can easily extend later.

And since this is n8n, you are not locked into just Slack. You can plug in filters, email, Jira, or anything else you like as your workflow grows.

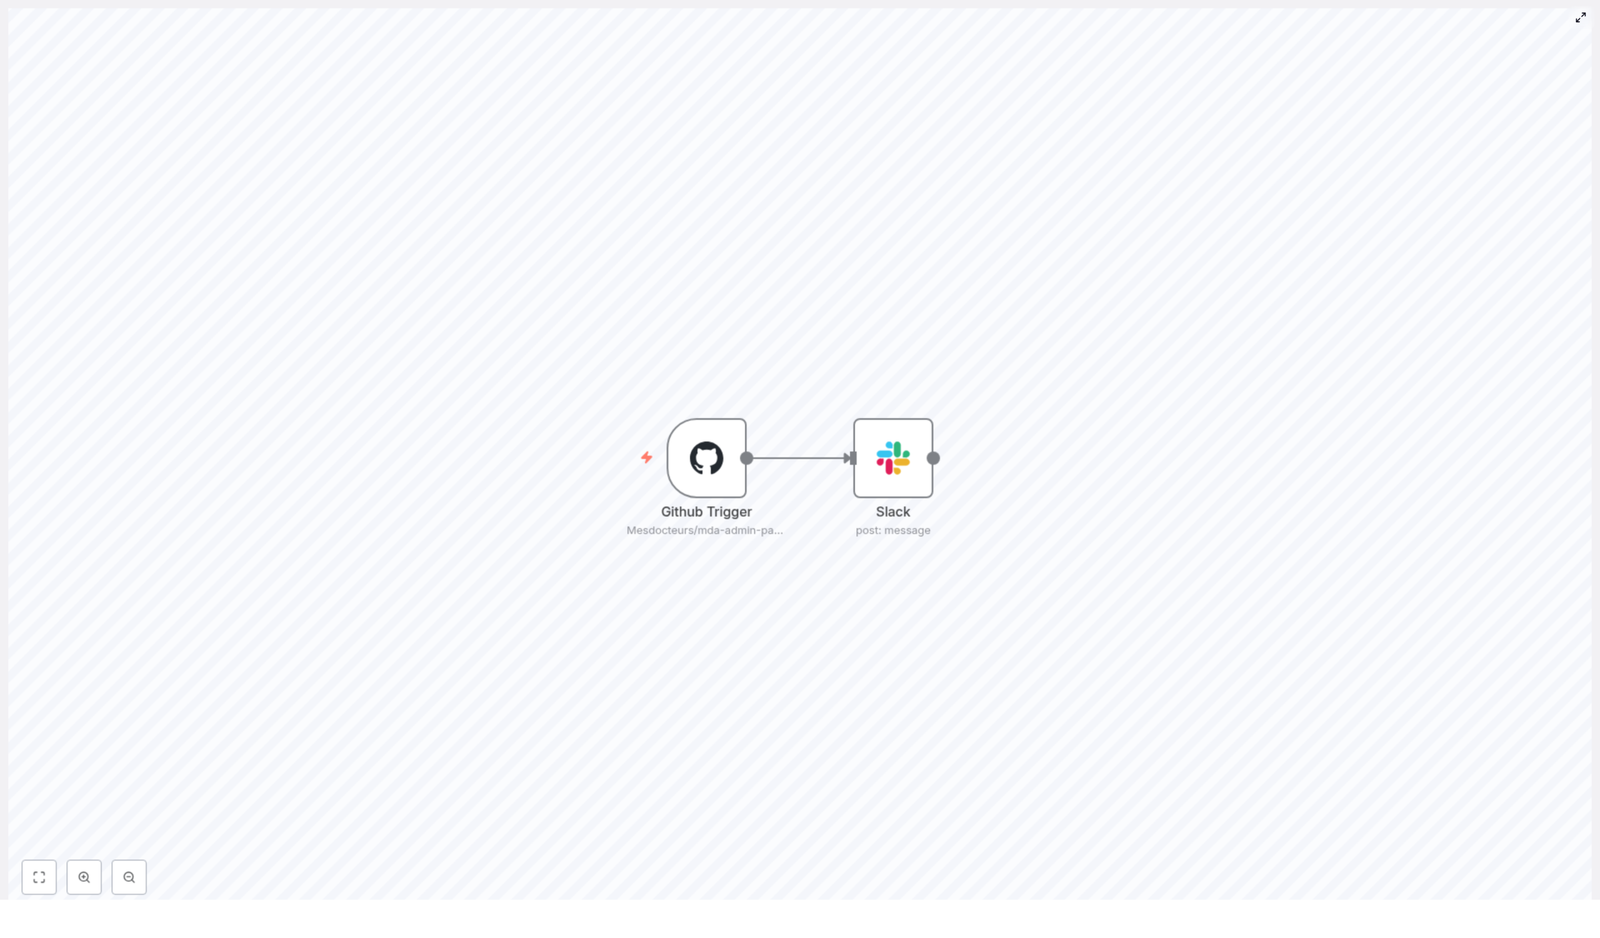
Under the Hood: The Two Main Nodes in This Workflow

This template is intentionally simple. It uses just two core nodes in n8n:

1. GitHub Trigger Node

This is where everything starts. The GitHub Trigger node listens for events from a specific repository using the GitHub API.

In this template, it is configured as follows:

  • Owner: Mesdocteurs
  • Repository: mda-admin-partner-api
  • Events: release

Whenever a release event happens, GitHub sends a payload that includes details like:

  • Tag name
  • Release body (your changelog)
  • Release URL
  • Author and other metadata

That payload is what the next node uses to build the Slack message.

2. Slack Node

Once n8n receives the GitHub event, the Slack node composes and sends the message into your chosen channel.

In the template, the Slack node is set up with:

  • Channel: extranet-md
  • As user: true
  • Text: an n8n expression that pulls values from the GitHub Trigger node

The message text uses an expression like this:

=New release is available in {{$node["Github Trigger"].json["body"]["repository"]["full_name"]}} !
{{$node["Github Trigger"].json["body"]["release"]["tag_name"]}} Details:
{{$node["Github Trigger"].json["body"]["release"]["body"]}}

Link: {{$node["Github Trigger"].json["body"]["release"]["html_url"]}}

In plain language, that expression says: “Look at the JSON from the GitHub Trigger node, grab the repository name, tag, body, and URL, and drop them into this Slack message.” That way, every notification is always up to date with the latest release info.

When This Workflow Is Especially Useful

This kind of GitHub to Slack automation fits nicely into a few common scenarios:

  • Partner-facing releases
    You ship new integration APIs or admin portals and want partners to know as soon as something new is available.
  • Internal release visibility
    Backend or frontend teams can see what is going to production without digging through GitHub.
  • Triggering follow-up work
    You can use the release event to kick off other processes, like updating documentation, dashboards, or tickets.

If your team ever asks “Is this live yet?” this workflow is an easy win.

How to Import and Turn On the Workflow in n8n

Ready to try it? Here is how to get the Extranet Releases workflow running in your own n8n instance.

  1. Open n8n and import the workflow
    Go to Workflows > Import in your n8n UI and paste the JSON for the Extranet Releases template.
  2. Set up your credentials
    You will need:
    • A GitHub API credential
      Use OAuth or a personal access token with appropriate repo webhook / read permissions.
    • A Slack API credential
      Typically a bot token with chat:write and channels:read (or the equivalent scopes you need).
  3. Attach the credentials to the nodes
    In the workflow editor, make sure:
    • The GitHub Trigger node uses your Github API credential.
    • The Slack node uses your Slack credential (for example the one associated with the extranet-md bot).
  4. Activate the workflow
    Once everything is wired up, click Activate. From that point on, n8n will listen for GitHub release events on the configured repository.

Testing: Make Sure Everything Works Before Relying On It

Before you trust this workflow for production announcements, it is worth giving it a quick test.

  • Create a release in GitHub
    In the configured repository, create a draft or full release. You can also re-tag and publish an existing one if you prefer.
  • Check your webhook setup
    If your GitHub Trigger relies on webhooks, confirm that the n8n webhook URL is correctly registered in your GitHub repo settings and is reachable from GitHub.
  • Review n8n execution logs
    Open the workflow executions in n8n and verify that:
    • The GitHub Trigger receives the payload.
    • The Slack node runs without errors.
  • Look in Slack
    Head to the #extranet-md channel and check that a message appeared with:
    • The correct repository name
    • The release tag
    • The changelog text
    • A link to the GitHub release page

Make It Your Own: Customizations and Enhancements

The template is intentionally minimal so you can easily extend it. Once the basic GitHub to Slack flow is working, here are some ideas to level it up.

1. Improve Slack Message Formatting

Plain text is fine, but you can go further. Try:

  • Using Slack Block Kit for sections, headings, and buttons.
  • Adding attachments that highlight breaking changes or key features.
  • Making the release link a clear call-to-action button.

All of this can be done directly in the Slack node by switching the message type and adjusting the JSON structure.

2. Add Filters and Conditional Logic

Maybe you do not want notifications for every single release. You can easily add an If node between GitHub and Slack to:

  • Send messages only for published releases.
  • Filter by tag patterns, such as only tags starting with v (for example v1.2.3).
  • Ignore pre-releases or drafts.

This keeps your Slack channels focused on the releases that truly matter to your audience.

3. Send Notifications to Multiple Channels or Tools

Different teams might need different levels of detail. You can:

  • Add more Slack nodes to post tailored messages to different channels, such as engineering, product, or partners.
  • Connect an Email node to send summary emails for important releases.
  • Use Jira or other issue-tracking nodes to update tickets when a release goes live.

All of this can branch from the same GitHub Trigger event.

4. Attach or Link to Release Artifacts

If you publish assets with your releases, you can pull those in too. For example:

  • Use the GitHub API node or an HTTP Request node to fetch release assets.
  • Include download links in your Slack message.
  • Store files in internal storage or other systems and share the links with your team.

This is especially handy if your releases include binaries, installers, or documentation bundles.

Security Tips, Reliability, and Troubleshooting

Since this workflow touches both GitHub and Slack, it is worth setting it up securely and knowing where to look if something breaks.

  • Use least-privilege credentials
    Create a GitHub token that is scoped only to the repositories and events you need.
  • Protect your n8n instance
    If you expose webhooks to GitHub, secure n8n behind a firewall, VPN, or reverse proxy where possible.
  • Add retry logic
    Configure error handling or retry behavior on the Slack node for transient network issues.
  • Check Slack permissions
    If messages do not show up, verify:
    • The Slack app has permission to post in the target channel.
    • The bot user is invited to that channel.
  • Review GitHub webhook logs
    In your GitHub repository settings, look at the webhook delivery logs to confirm:
    • Events are being sent.
    • n8n is returning a successful HTTP status code.

Putting It All Together

Automating GitHub release announcements with n8n is a small change that removes a recurring manual task, reduces missed communications, and gives your team immediate visibility into what is shipping.

The Extranet Releases template is a lightweight starting point that you can set up in minutes:

  • Import the JSON template into your n8n instance.
  • Connect your GitHub and Slack credentials.
  • Activate the workflow and publish a test release.

Watch your Slack channel fill with clean, consistent release messages, then tweak the formatting or add filters so it fits your exact workflow.

Want to try it now? Import the template, create a test release on GitHub, and see the Slack notification appear. From there you can experiment with Block Kit formatting, conditional logic, or extra integrations like email or Jira.

If you would like help adapting this workflow to your organization, adding attachments, or building more advanced automations around releases, feel free to reach out or drop a comment. It is a simple automation, but it can become the backbone of a very tidy release process.

n8n Chatbot for Orders: LangChain + OpenAI POC

n8n Chatbot for Orders: LangChain + OpenAI POC

This guide teaches you how to build a proof-of-concept (POC) conversational ordering chatbot in n8n using LangChain-style nodes and OpenAI. You will learn how each node in the workflow works together so you can understand, customize, and extend the template with confidence.

What you will learn

By the end of this tutorial, you will be able to:

  • Explain how a conversational ordering chatbot works inside n8n
  • Use the n8n chat trigger to start a conversation with users
  • Configure an AI Agent powered by OpenAI and LangChain-style tools
  • Use memory, HTTP requests, and a calculator inside an AI-driven workflow
  • Handle three core flows: viewing the menu, placing orders, and checking order status
  • Apply best practices for configuration, testing, and security

Why build this n8n chatbot POC?

Conversational ordering systems can increase conversions and make customer interactions smoother. Instead of building a full backend application, you can use n8n with LangChain-style tools and OpenAI to quickly prototype an intelligent assistant.

This POC focuses on a simple pizza-ordering assistant called Pizzaro. It is intentionally easy to extend and demonstrates how to:

  • Use OpenAI for natural language understanding
  • Maintain short-term memory across messages
  • Connect to external services using HTTP endpoints
  • Perform simple calculations such as totals or quantity checks

What the workflow can do

The final n8n workflow supports three main user scenarios:

  • Menu inquiries – When a user asks what is available, the assistant calls a product endpoint and returns up-to-date menu details.
  • Placing an order – When a user specifies their name, pizza type, and quantity, the assistant confirms the order, calls an order webhook, and provides a friendly confirmation.
  • Order status requests – When a user asks about an existing order, the assistant calls an order status endpoint and returns information like order date, pizza type, and quantity.

Concepts and architecture

Before we walk through the steps, it helps to understand the core components used in this POC.

Main building blocks in n8n

  • When chat message received – A chat trigger node that exposes a webhook and starts the workflow whenever a user sends a message.
  • AI Agent – The orchestrator of the conversation. It uses a system prompt and a set of tools (nodes) to decide what to do next.
  • Chat OpenAI – The language model node that generates responses and interprets user intent.
  • Window Buffer Memory – A memory node that stores recent messages so the agent can maintain context.
  • Get Products – An HTTP Request node that fetches the current menu from a product endpoint, for example GET /webhook/get-products.
  • Order Product – An HTTP Request node that creates a new order using a POST request, for example POST /webhook/order-product.
  • Get Order – An HTTP Request node that retrieves order status, for example GET /webhook/get-orders.
  • Calculator – A tool node that performs arithmetic operations used by the agent when it needs accurate numeric results.

All of these parts are wired together through the AI Agent. The agent decides which tool to call based on the user’s message and the system instructions you provide.

Step-by-step: Build the workflow in n8n

Step 1: Set up the chat trigger

Start with the When chat message received node. This is the entry point for your chatbot.

  • Webhook: The node exposes a URL that your frontend or test client can send messages to.
  • Access: Choose if the webhook should be public or protected based on your environment.
  • Initial message: Configure an optional initialMessages value to greet users and explain how to order.

Example initial message used in the POC:

"Hellooo! 👋 My name is Pizzaro 🍕. I'm here to help with your pizza order. How can I assist you?

📣 INFO: If you’d like to order a pizza, please include your name + pizza type + quantity. Thank you!"

Once this node is configured, any new chat message will trigger the workflow and pass the text into the AI Agent.

Step 2: Configure the AI Agent

The AI Agent node is the core of the workflow. It connects the language model, memory, and tools (HTTP requests and calculator) into a single decision-making unit.

In the AI Agent node:

  • Set the system message that defines the assistant’s role and behavior.
  • Attach the tools (Get Products, Order Product, Get Order, Calculator) so the agent can call them when needed.
  • Connect the memory node so the agent can keep track of the conversation.

Example system message used in the POC (simplified):

Your name is Pizzaro, and you are an assistant for handling customer pizza orders.

1. If a customer asks about the menu, provide information on the available products.
2. If a customer is placing an order, confirm the order details, inform them that the order is being processed, and thank them.
3. If a customer inquires about their order status, provide the order date, pizza type, and quantity.

This prompt tells the agent exactly when to fetch menu data, when to place an order, and when to check order status.

Step 3: Connect the Chat OpenAI model

Next, configure the Chat OpenAI node that the AI Agent will use as its language model.

  • API credentials: Add your OpenAI API key in n8n’s credentials manager and select it in the node.
  • Model choice: Pick a model that fits your cost and performance needs, for example gpt-4, gpt-4o, or gpt-3.5-turbo.
  • Security: Keep your API key secret and avoid hard-coding it in the workflow.

The AI Agent will send user messages and system prompts to this node, then use the responses to drive the conversation and decide which tools to call.

Step 4: Add Window Buffer Memory

The Window Buffer Memory node gives the agent short-term memory so it can remember what was said earlier in the conversation.

  • Window size: Choose how many recent messages to keep. A larger window preserves more context but uses more tokens.
  • Usage: This memory helps the agent recall details like the user’s name, the pizza type they mentioned, or an order it just created.

Connect this memory node to the AI Agent so that each new message includes the recent chat history.

Step 5: Configure the Get Products HTTP request

When a user asks about the menu, the AI Agent should call the Get Products tool. This is an HTTP Request node that returns available products.

Set it up as follows:

  • Method: GET
  • URL: Your product endpoint, for example https://yourdomain.com/webhook/get-products
  • Response format: The endpoint should return a JSON list of product objects.

Typical fields in each product object might include:

  • name – product name
  • description – short description of the pizza
  • price – price per unit
  • sku – unique product identifier

The AI Agent then uses this data to answer menu-related questions in natural language.

Step 6: Configure the Order Product HTTP POST

To place an order, the AI Agent uses the Order Product node. This is an HTTP Request node configured to send a POST request to your order endpoint.

Typical configuration:

  • Method: POST
  • URL: Your order endpoint, for example https://yourdomain.com/webhook/order-product
  • Body: JSON payload with order details

In the basic template, the entire chat input can be sent as the message body. For more reliability, you can have the agent extract structured fields and send a clear JSON object, such as:

{  "customer_name": "Jane Doe",  "product_sku": "MARG-001",  "quantity": 2,  "notes": "Extra cheese"
}

Design your endpoint so that it returns a unique order ID and status. The agent can then confirm the order back to the user, for example: “Your order has been placed. Your order ID is 12345.”

Step 7: Configure the Get Order HTTP request

For order status checks, the AI Agent uses the Get Order node to query your orders service.

Configure it like this:

  • Method: usually GET
  • URL: for example https://yourdomain.com/webhook/get-orders
  • Parameters: you may require an order ID, phone number, or email as an identifier.

The endpoint should return details such as:

  • Order date
  • Pizza type
  • Quantity

The agent then formats this information in a user-friendly way when answering questions like “What is the status of my order?”

Step 8: Use the Calculator tool

The Calculator node is used as a tool by the AI Agent when it needs precise numeric results.

Typical use cases include:

  • Adding up the total price for multiple pizzas
  • Applying discounts or coupons
  • Calculating tax or delivery fees

By delegating math operations to the Calculator node, you reduce the chance of the language model making arithmetic mistakes.

How the three flows work together

1. Menu inquiry flow

  1. User asks a question like “What pizzas do you have?”
  2. Chat trigger forwards the message to the AI Agent.
  3. AI Agent identifies a menu request based on the system prompt and user message.
  4. AI Agent calls the Get Products HTTP node.
  5. Products are returned as JSON.
  6. AI Agent summarizes the menu items using Chat OpenAI and replies to the user.

2. Placing an order flow

  1. User sends a message like “My name is Alex, I want 2 Margherita pizzas.”
  2. AI Agent uses memory and the model to extract name, pizza type, and quantity.
  3. Agent confirms the order details with the user if needed.
  4. Agent calls the Order Product HTTP POST node with structured JSON.
  5. Order endpoint returns an order ID and status.
  6. Agent thanks the user and shares the confirmation details, for example order ID and current status.

3. Order status flow

  1. User asks “What is the status of my order?” or “Where is order 12345?”
  2. AI Agent identifies a status request.
  3. If needed, the agent asks for the order ID or other identifier.
  4. Agent calls the Get Order HTTP node with the identifier.
  5. Order service returns date, pizza type, and quantity.
  6. Agent responds with a clear status update to the user.

Configuration tips and best practices

  • Validate user input: Sanitize and validate data before sending it to your order endpoint to avoid malformed or malicious requests.
  • Use structured JSON: When calling the Order Product endpoint, send a well-defined JSON object instead of raw text to reduce ambiguity.
  • Control webhook access: If your chatbot can place real orders or handle payments, limit access to the chat webhook or protect it with tokens.
  • Monitor token usage: Choose models and memory window sizes that balance cost and performance. Track usage so you do not exceed your budget.
  • Log responses: Log HTTP responses and agent decisions to simplify debugging and improve the assistant’s behavior over time.

Testing and debugging the workflow

Test each core flow separately before combining them.

  • Menu lookup: Send a menu question and confirm that the Get Products node is called and returns the expected JSON.
  • Placing an order: Try different order phrasings and verify that the Order Product node receives clean, structured data.
  • Order status: Check that the Get Order node is called with the correct identifier and that the response is correctly summarized.

Use n8n’s execution logs to inspect:

  • Inputs and outputs of each node
  • How the AI Agent chooses tools
  • Where errors or misunderstandings occur

If the agent misinterprets user intent or order details:

  • Refine the system prompt with clearer instructions.
  • Add a clarification step where the agent confirms extracted fields before placing an order.
  • Use a structured parser or schema-based extraction to enforce required fields.

Security considerations

Since this workflow connects to external APIs and uses an LLM, treat it as you would any other production-ready integration.

  • Protect credentials: Store your OpenAI key and backend service keys in n8n credentials, not in plain text.
  • Validate payloads: Check incoming data on your order endpoint and reject invalid or suspicious requests.
  • Rate limiting: Add rate limits on your public endpoints to prevent abuse or accidental overload.
  • Verify requests: If the chat webhook is public, use a verification token or HMAC to ensure requests originate from your frontend or trusted source.

Next steps and ways to extend the POC

This chatbot is designed to be modular, so you can easily add new capabilities as your use case grows.

Ideas for extending the workflow include:

  • Payment processing: Add Stripe or PayPal nodes after order confirmation to collect payments.
  • Notifications: Trigger SMS messages (Twilio) or email confirmations (SMTP) when an order is placed or updated.
  • Inventory and dynamic menus: Connect to a Google Sheet or database to manage inventory and update the menu in real time.
  • Multilingual support: Adjust the prompt so the model responds in the user’s language or detect language automatically.

Recap and FAQ

Quick recap

  • You built an n8n chatbot POC called Pizzaro that can handle menu questions, orders, and order status checks.
  • The core components are the chat trigger, AI Agent, Chat OpenAI, memory

POC: Chatbot Orders with n8n & LangChain

POC: Build a Pizza Order Chatbot with n8n and LangChain

Imagine handing off your repetitive order questions to a friendly digital assistant so you can focus on the work that really moves your business forward. In this guide, you will walk through a proof-of-concept (POC) n8n workflow that does exactly that: a conversational pizza ordering chatbot powered by n8n and LangChain.

By the end, you will not just have a working chatbot that can answer menu questions, take orders, and check order status. You will also have a reusable pattern for building more automated, focused workflows in your own world, whether you run a small shop or are experimenting inside a larger product team.

The starting point: too many simple questions, not enough time

Every growing business eventually hits the same wall. Customers keep asking:

  • “What is on the menu?”
  • “Can I order a pizza with this topping?”
  • “What is the status of my order?”

Each request is simple, but together they pull you or your team away from deeper work. You know automation could help, yet traditional solutions often feel heavy, opaque, and hard to iterate on.

This is where n8n and LangChain can change your trajectory. With a visual workflow and an AI agent, you can build a transparent, auditable conversational assistant that you can tweak, extend, and grow over time.

Shifting your mindset: from manual handling to smart delegation

Before diving into the template, it helps to shift how you think about automation. Instead of trying to build a “perfect” chatbot from day one, treat this pizza bot as a safe playground:

  • Start small – handle simple menu inquiries and orders first.
  • Keep everything visible – use n8n’s visual nodes to see exactly what happens at each step.
  • Iterate quickly – refine prompts, endpoints, and logic as you test with real conversations.

This POC is not just about pizza. It is a pattern for how you can gradually automate more of your customer interactions without losing control or clarity.

What this n8n + LangChain POC actually does

The workflow connects ChatGPT, short-term memory, and simple HTTP endpoints so an AI agent can:

  • Respond to menu questions using a “Get Products” endpoint
  • Accept new orders and send them to an “Order Product” endpoint
  • Check the status of existing orders via a “Get Order” endpoint

Everything is orchestrated by an AI agent node in n8n that uses LangChain components. The logic stays visible in the n8n UI, while OpenAI handles natural language understanding.

High-level architecture of the workflow

Here are the main building blocks you will see in the template:

  • When chat message received – chat trigger that starts the workflow when a user sends a message.
  • AI Agent – a LangChain agent, guided by a system prompt (“Pizzaro the pizza bot”), that decides which tools to use.
  • Chat OpenAI – the language model that interprets user intent and generates responses.
  • Window Buffer Memory – short-term memory so the bot can keep recent context in a multi-turn conversation.
  • Get Products – HTTP GET tool that returns available menu items as JSON.
  • Order Product – HTTP POST tool that creates a new order.
  • Get Order – HTTP GET tool that retrieves the status of an existing order.
  • Calculator – optional helper tool for totals, quantities, or simple math.

These pieces are intentionally simple. The power comes from how they combine into a clear, testable workflow that you can expand later.

Core design principles that keep this POC practical

1. Let the AI agent handle intent

The AI agent is the “brain” of the workflow. It receives the user’s message and decides which tool to call, for example:

  • Menu lookup
  • Order creation
  • Order status check

A strong system prompt guides this behavior. In this POC, the prompt includes instructions like:

If a customer asks about the menu, provide the available products.
If placing an order, confirm details and call the order tool.
If asking about order status, use the order status tool.

This approach keeps your logic flexible. You can refine the instructions over time without rewriting code.

2. Keep state small, simple, and accessible

Instead of building a full database for a POC, the workflow uses Window Buffer Memory. This gives your chatbot short-term memory of recent messages, so it can:

  • Remember a user’s name during the conversation
  • Handle clarifying questions
  • Support multi-turn ordering flows

Because the memory window is limited, it stays efficient and easy to manage while still feeling conversational.

3. Use HTTP tools as a bridge to your systems

The integration layer is intentionally straightforward:

  • Get Products – returns catalog JSON
  • Order Product – accepts an order payload
  • Get Order – returns order details by id or user info

In production, these endpoints might connect to microservices, a database, or a Google Sheet. In a POC, they can point to n8n webhooks, mock APIs, or simple serverless functions. This keeps your experimentation light while still mirroring a real-world architecture.

Your journey: from blank canvas to working chatbot

Let’s walk through the setup step by step. Think of this as your first automation chapter. You can follow it exactly, then adapt it to your own use case once it is running.

Step 1 – Create the chat trigger

Start by adding the “When chat message received” node. This is the entry point of your conversational workflow.

Configure:

  • An initial greeting message
  • Public webhook access if you want easy external testing

Example greeting used in the template:

Hellooo! 👋 My name is Pizzaro 🍕. I'm here to help with your pizza order. How can I assist you?

📣 INFO: If you’d like to order a pizza, please include your name + pizza type + quantity. Thank you!

This sets the tone and gives users a clear way to interact from the first message.

Step 2 – Add and configure the AI Agent

Next, connect the chat trigger node to an AI Agent node.

In the AI Agent configuration:

  • Attach a Chat OpenAI node as the language model.
  • Attach a Window Buffer Memory node for short-term memory.
  • Define a system prompt that sets expectations for Pizzaro’s behavior.

Example system prompt:

Your name is Pizzaro, and you are an assistant for handling customer pizza orders.

1. If a customer asks about the menu, provide information on the available products.
2. If a customer is placing an order, confirm the order details, inform them that the order is being processed, and thank them.
3. If a customer inquires about their order status, provide the order date, pizza type, and quantity.

This prompt is your main control surface. As you test and improve the chatbot, you can refine these instructions to guide the agent toward more accurate and helpful behavior.

Step 3 – Add the integration tools as agent tools

Now you will connect the AI agent to the real work: your endpoints and utilities. Attach the following tools as agent tools:

  • Get Products (GET) – returns catalog JSON when users ask questions like “What is on the menu?”
  • Order Product (POST) – accepts an order payload after the agent has confirmed details with the user.
  • Get Order (GET) – retrieves order details based on an order id or other identifying info.
  • Calculator – optional, but useful for totals, discounts, or quantity calculations.

With these tools wired in, the agent can move from “chatting” to “taking action” in your systems.

Step 4 – Design structured responses and payloads

For the agent to work reliably, your HTTP tools should return and accept structured JSON. This makes it easier for the model to extract and reuse fields in its responses.

Example payloads:

GET /webhook/get-products
Response: { "products": [{"id": 1, "name": "Margherita", "price": 9.99}, ...] }

POST /webhook/order-product
Request: { "name": "Alice", "productId": 1, "quantity": 2 }
Response: { "orderId": "ORD-1001", "status": "processing", "date": "2025-09-01" }

With this structure, the AI agent can easily confirm details back to the user, such as:

  • Order date
  • Pizza type
  • Quantity
  • Order id and status

This is where your chatbot starts to feel like a real assistant, not just a demo.

Testing your new automated assistant

Once everything is connected, it is time to see your work in action. Trigger the chat webhook and try a few realistic scenarios:

  1. Ask for the menu
    Send: “Show me the menu”
    Expected: The agent calls Get Products and lists available pizzas.
  2. Place an order
    Send: “My name is Sam. I want 2 Margheritas.”
    Expected: The agent parses the details, confirms them, calls Order Product, and returns a confirmation with order id and status.
  3. Check order status
    Send: “What is the status of my order ORD-1001?”
    Expected: The agent calls Get Order and replies with the order date, pizza type, and quantity.

Each successful test is a small but meaningful step in reclaiming your time and proving that automation can support your work, not complicate it.

Tips to improve accuracy and reliability

As you experiment and iterate, a few practices will help your n8n chatbot perform more consistently:

  • Refine the system prompt – be explicit about when the agent should call each tool and how it should respond.
  • Keep JSON consistent – use stable field names and shapes in your HTTP responses so the model can reliably extract data.
  • Validate user input – check names, quantities, and product ids. If something is missing or unclear, instruct the agent to ask follow-up questions.
  • Limit memory scope – keep the Window Buffer Memory focused on recent, relevant turns to reduce confusion or drift.

Think of this as continuous tuning. Small adjustments here can significantly boost the quality of the experience for your users.

Security and production considerations

When you are ready to move beyond a POC and into a more production-like setup, keep these safeguards in mind:

  • Protect webhooks with authentication (HMAC, tokens) and avoid exposing unnecessary endpoints publicly.
  • Sanitize and validate all user inputs before sending them to back-end services.
  • Log transactions and maintain an order audit trail in persistent storage.
  • Apply rate limiting for both OpenAI and your own APIs to control costs and prevent abuse.

These steps help you scale your automation with confidence instead of worry.

Growing beyond pizza: how to extend this POC

This workflow is intentionally modular. Once you are comfortable with the basics, you can extend it to support richer customer journeys. Some common next steps include:

  • Payment integration – connect Stripe or another payment provider after order confirmation.
  • Delivery tracking – integrate courier or delivery APIs and surface tracking info through the Get Order tool.
  • Personalization – store customer preferences in a database and let the bot remember favorite orders.
  • Analytics and reporting – build dashboards for order volume, popular items, and peak times.

Every improvement you make here can be reused in other workflows: support bots, internal tools, booking assistants, and more.

What this template unlocks for you

This n8n + LangChain POC is more than a pizza demo. It is a practical, visual example of how to:

  • Connect AI to real business endpoints with clear, auditable logic
  • Prototype conversational experiences without heavy engineering
  • Iterate quickly in a low-risk environment, then scale what works

Once you have this template running, you have a foundation you can return to whenever you want to automate the next repetitive interaction in your business.

Ready to take the next step?

You do not have to start from scratch. You can import the ready-made workflow, plug in your credentials, and begin experimenting within minutes.

To get started:

  • Import the provided workflow into n8n.
  • Configure your OpenAI credentials in the Chat OpenAI node.
  • Point the HTTP tools to mock endpoints, n8n webhooks, or your real catalog and order services.

If you need a starter template for webhooks or want to use something simple like a Google Sheet as your backend, you can adapt the endpoints without changing the overall pattern.

Call to action: Import the template, run a few test conversations, and notice how it feels to let an automated assistant handle the basics. Then, adjust the system prompt and tools to match your own business. Each tweak moves you closer to a more focused, automated workflow that gives you back time and clarity.

n8n Agent: Twitter Reply Guy Workflow

n8n Agent: The Story Of A Twitter Reply Guy Workflow

The marketer who was tired of missing the right conversations

By the time Sam opened Slack each morning, the most interesting Twitter conversations were already over.

Sam worked as a marketer for a growing AI tools directory, a carefully curated collection of AI products organized into clear categories. The team knew that many great users discovered them through social media, especially when someone asked on Twitter, “What is the best AI tool for X?” or “Any recommendations for AI tools that do Y?”

The problem was simple and painful: those questions were happening constantly, and Sam could not keep up. Slack alerts from their social listening tool poured into a channel: new tweets, threads, mentions, and random noise. By the time Sam clicked into a promising tweet, either someone else had already replied, or the conversation had cooled off.

Sam did not want a spammy bot that auto-replied to everything. They wanted something smarter. A kind of “Twitter Reply Guy” that would:

  • Notice genuinely useful questions about AI tools
  • Decide whether it was appropriate to reply
  • Pick the most relevant page from their AI tools directory
  • Write a short, friendly, non-annoying reply
  • Report back to Slack so the team could see what was happening

That was when Sam discovered an n8n workflow template called the “Twitter Reply Guy” agent.

Discovering the Twitter Reply Guy workflow in n8n

Sam had used n8n before for basic automations, but this template felt different. It combined Slack triggers, filters, HTTP requests, LangChain LLM prompts, and Twitter API nodes into a single end-to-end automation designed for safe, targeted outreach.

The pitch was straightforward: connect Slack, Twitter, and an AI Tools directory API, then let an LLM decide which tweets deserve a reply. No more drowning in alerts. No more manually opening every single tweet.

Sam imagined a future where the AI Tools directory replied only when it could actually help, with short messages that linked directly to the best category page. The key was quality over volume, and the workflow promised exactly that.

How the idea turned into a working n8n agent

Before Sam imported the template, they sketched the high-level architecture on a whiteboard. The workflow had two big phases, and understanding them made everything click.

  • Phase 1 – Evaluate Tweet Listen for Slack webhook alerts, filter for Twitter-origin messages, fetch full tweet content, and use an LLM to decide if the tweet is a good candidate for a reply.
  • Phase 2 – Post Reply For tweets that pass the checks, fetch AI Tools categories, ask an LLM to pick the best category and write a reply, delay slightly to respect rate limits, then post the reply on Twitter and log everything back to Slack.

It felt more like orchestrating a careful conversation partner than building a bot. Sam imported the template into n8n and began walking through the nodes, one by one, as if they were characters in the story.

When Slack pings, the story begins

Listening to Slack: the spark of every interaction

Every reply started with a single Slack alert. The slack_trigger node was the entry point. Sam configured it to receive webhook alerts from their social listening or monitoring setup. Each payload carried metadata about a tweet, including an “Open on web” link that pointed directly to the tweet on X (Twitter).

Sam realized this link was crucial. Later in the flow, the workflow would extract the tweet ID from that URL, then call Twitter’s API to get full details. But first, the agent needed to make sure it was dealing with the right kind of alert.

Filtering the noise: only real tweets allowed

The next few nodes felt like a bouncer at the door of a party.

  • filter_only_twitter_source This node inspected the Slack attachment fields and checked that the Source field was “X (Twitter)”. If the alert was from anywhere else, it simply stopped. No Reddit, no blogs, no random integrations slipping through.
  • exclude_self_account Sam did not want the brand replying to its own tweets. This node filtered out tweets authored by the owner account, such as @aiden_tooley or whichever handle was configured. The agent would never talk to itself.
  • exclude_retweets Retweets usually were not good candidates for a thoughtful reply. This node looked for “RT” in the message text and removed those from the queue. The goal was to focus on original posts and direct questions.

Even at this early stage, Sam could see how the workflow protected against low-quality interactions. But there was one more gate before the LLM got involved.

A quick gate before deeper evaluation

The should_evaluate node acted as a lightweight decision point. It decided whether to continue or to stop the workflow early. If the gate failed, the workflow reacted in Slack with an “x” emoji to mark the tweet as skipped. If it passed, the tweet moved forward, and the workflow prepared to fetch the full content.

Sam liked this visible feedback. The Slack reactions would give the team a simple way to scan which tweets were considered and which were discarded, without clicking through each one.

Diving into the tweet: content, context, and safety

Extracting and fetching the tweet details

Once a tweet passed the initial filters, the workflow went hunting for details.

  • extract_tweet_id This node parsed the “Open on web” link from the Slack payload and pulled out the tweet ID. Without that ID, nothing else could happen.
  • fetch_tweet_content Using the ID, the workflow called Twitter’s syndication endpoint and retrieved the full JSON payload. That included the tweet text, author, replies, and other metadata.
  • get_tweet_content (Set node) To keep things clean for the LLM, this node normalized the tweet text into a tweet_content variable. Downstream prompts would not have to guess where the text lived.

Now the agent had the actual words the user had written. It was time to decide if a reply from the AI tools directory would be helpful or inappropriate.

The critical judgment call: should we reply at all?

The heart of the evaluation was the evaluate_tweet node, a LangChain chain powered by an LLM. Sam opened the prompt and read it carefully. It did more than just ask “Is this tweet relevant?”

The prompt instructed the model to:

  • Decide whether the tweet was a good candidate for a reply that linked to the AI tools directory
  • Return a clear boolean flag named is_tweet_good_reply_candidate
  • Provide a chain of thought explaining the reasoning
  • Enforce strict safety rules, such as:
    • No replies to harmful or nefarious requests
    • Avoid replying to tweets that start with “@” if they were clearly replies in an ongoing conversation

For Sam, this was the turning point. Instead of a blind bot, the workflow used an LLM to act as a cautious editor, deciding when silence was better than speaking.

Parsing the LLM’s decision and closing the loop in Slack

The next node, evaluate_tweet_output_parser, took the LLM’s response and shaped it into structured JSON. It extracted two key fields:

  • chainOfThought – the reasoning behind the decision
  • is_tweet_good_reply_candidate – true or false

If the tweet was not a good candidate, the workflow would post a message into the original Slack thread explaining why, attach the LLM’s reasoning, and react with an “x”. Sam liked that every no was documented. The team could audit the decisions and refine the prompts later.

If the flag was true, though, the story continued. Now the agent needed to figure out what to share.

Finding the right resource: connecting to the AI tools directory

Pulling in the categories from the AI Tools API

For good replies, the workflow moved into the discovery phase.

  • fetch_categories This node called the AI Tools categories API at http://api.aitools.inc/categories to retrieve a list of available category pages. Each category included a title, description, and URL.
  • get_category_content A small code node then formatted that list into a structured string. It joined together the category title, a concise description, and the URL in a way that was easy for the LLM to read in the next prompt.

At this point, the workflow knew two big things: what the person on Twitter had said, and what pages existed in the AI tools directory. It was time to match them.

Letting the LLM write the perfect short reply

The write_tweet node was another LangChain chain, but this time focused on creation rather than evaluation. The prompt gave the LLM both the tweet_content and the formatted list of categories, then asked it to:

  • Choose a single best category URL from the list
  • Write a short, helpful, and friendly reply
  • Follow specific style rules:
    • Keep it short and direct
    • Avoid starting with the word “check”
    • Prefer phrases like “may help” over “could”
    • Always include a valid URL from the provided category list

Sam tested a few sample tweets. The replies were surprisingly natural. They read like a helpful person dropping into a conversation with a relevant link, not a stiff promotional script.

Verifying the reply before it goes live

To keep things safe and structured, the write_tweet_output_parser node validated the LLM’s output. It checked that:

  • The response was a structured object
  • The final tweet content included a real URL that came from the category list
  • The chain of thought explaining why that category was chosen was captured

Only once everything passed these checks did the workflow prepare to actually reply on Twitter.

From decision to action: posting on Twitter and reporting back

Respecting rate limits and posting the reply

Sam knew Twitter could be strict about automation. The workflow handled this with a small but important step.

  • delay A short wait, often around 65 seconds, gave breathing room between actions. This helped avoid triggering Twitter rate limits or suspicious spikes in activity.
  • post_reply_tweet Using Twitter OAuth2 credentials and the previously extracted tweet ID as inReplyToStatusId, this node posted the final reply. The agent was no longer just thinking about replies, it was actually joining conversations in real time.

Closing the loop: sharing outcomes in Slack

Sam did not want a black box. They wanted visibility into every decision. The final part of the workflow handled that.

  • share_tweet_content and reactions
    • For successful replies, the workflow posted the reply text and the reasoning into the original Slack thread, then added a checkmark reaction to show success.
    • For skipped or rejected tweets, it left an “x” reaction and shared the chain of thought explaining why the tweet was not a good candidate.

Within a day of turning the workflow on, Sam could scroll through the Slack channel and see a clear narrative: which tweets were evaluated, which were answered, and which were intentionally left alone.

Staying safe, compliant, and non-spammy

Before rolling this out fully, Sam double checked the safety and moderation aspects. The workflow already had strong guardrails, but it helped to summarize them for the team.

  • Safety by design The evaluation prompt explicitly avoided harmful or nefarious requests. The agent refused to reply when the tweet asked for assistance with wrongdoing or unethical behavior.
  • Human-in-the-loop options For borderline or high-visibility tweets, Sam considered adding an approval step. Instead of auto-posting, the workflow could send the draft reply into Slack and wait for a human reaction or button click.
  • Rate limiting Delays, backoff strategies, and careful monitoring helped respect Twitter API limits and avoid temporary blocks.
  • Avoiding spammy behavior The workflow focused on helpful, low-volume replies, not mass posting. Sam configured it to prioritize high-value questions or influential accounts, keeping the brand’s presence thoughtful rather than noisy.

How Sam monitored and improved the automation

Once the agent was live, Sam treated it like a junior teammate that needed feedback and metrics.

  • Logging decisions in Slack The LLM’s chain-of-thought was logged directly into Slack threads. This gave transparency into why a tweet was answered or skipped and made it easier to tune prompts.
  • Tracking reply performance Sam started tracking basic metrics:
    • Number of replies posted
    • Engagement, such as likes, follows, and replies
    • Clicks and downstream traffic to AI tools category pages
  • Error and retry visibility HTTP and API errors were logged so Sam could fix OAuth issues, parsing problems, or rate limit errors quickly.

Best practices Sam followed while scaling the agent

As the workflow proved itself, Sam wrote down a few best practices for the rest of the team.

  • Credential management Store Slack, Twitter, and OpenAI or Anthropic keys securely in n8n credentials and rotate them regularly.
  • Prompt tuning Iterate on both evaluation and reply prompts, as well as the output parsers, to reduce false positives and keep replies high quality.
  • A/B testing reply styles Small changes in phrasing could improve click-through rates. Sam experimented with variations in tone and structure to find what resonated best.
  • Human review for high-stakes tweets For big accounts or sensitive topics, Sam added a human approval step instead of auto-posting.
  • Scaling carefully As alert volume grew, Sam planned to shard or queue tweets, using additional delays or queues to stay within rate limits and maintain quality.

When things go wrong: how Sam debugged the workflow

Not everything worked perfectly on the first try. A few early issues taught Sam how to troubleshoot efficiently.

  • Missing tweet ID When the workflow failed to reply, Sam checked that the Slack payload actually contained the “Open on web” link and that the extract_tweet_id node parsed it correctly.
  • LLM hallucinations If the model tried to invent URLs, Sam tightened the output parser and made sure the prompt included the actual category URLs directly, instructing the LLM to only pick from those.
  • Posting errors When Twitter replies failed, the fix was usually in OAuth2 scopes or formatting of inReplyToStatusId. Once corrected, the replies went through reliably.
  • Rate-limit errors Increasing the delay node values, adding exponential backoff, and queuing retries helped smooth out spikes.

The resolution: a quiet but powerful shift in engagement

A few weeks later, Sam noticed something subtle but important. The AI tools directory was appearing in more Twitter conversations where it truly belonged. Users were clicking through to category pages that matched their questions. The Slack channel, once chaotic, now told a clean story of evaluated tweets, thoughtful replies, and clear reasons for skipped posts.

The n8n “Twitter Reply Guy” workflow had become a reliable agent, not a noisy bot. It combined event triggers, filters, HTTP calls, and LLM-driven decision making to create a safe

Automate Form Translation with n8n and RAG

Automate Form Translation with n8n and RAG

Managing multilingual form submissions and turning them into translated, searchable records can quickly become a bottleneck. This reference guide describes a production-ready n8n workflow that automates the entire pipeline using webhooks, OpenAI embeddings, Supabase vector storage, a Retrieval Augmented Generation (RAG) agent, Google Sheets for logging, and Slack alerts for error notifications.

The workflow is available as the “Translate Form Submissions” n8n template. This article reorganizes the original walkthrough into a more technical, documentation-style format so you can deploy, understand, and extend the template with confidence.

1. Workflow Overview

This n8n workflow is designed for product, operations, and data teams that need to:

  • Automatically translate and normalize free-text form submissions.
  • Index submissions semantically for search and analytics using embeddings and a vector store.
  • Maintain a structured, auditable log of every processed submission in Google Sheets.
  • Receive Slack alerts whenever processing fails or an exceptional condition is detected.

Core technologies used:

  • n8n as the low-code automation and orchestration engine.
  • OpenAI embeddings to convert text chunks into vectors.
  • Supabase vector store to persist embeddings and support semantic search.
  • RAG agent that combines a chat model, vector tool, and memory for context-aware translation and normalization.
  • Google Sheets for logging and downstream reporting.
  • Slack for proactive error alerts.

2. Architecture & Data Flow

The template implements a linear but robust pipeline that starts with an HTTP webhook and ends with logged results and optional alerts. At a high level, the workflow performs the following steps:

  1. Webhook Trigger receives a POST request containing the form submission payload.
  2. Text Splitter splits long submissions into overlapping chunks to optimize embedding quality and cost.
  3. OpenAI Embeddings converts each chunk into a numeric vector representation.
  4. Supabase Insert writes vectors and metadata into a Supabase vector index (translate_form_submissions).
  5. Supabase Query + Vector Tool exposes the vector index as a tool that can be called by the RAG agent for semantic retrieval.
  6. Window Memory retains short-term context across the agent interaction.
  7. Chat Model + RAG Agent uses the retrieved context and memory to generate a translated and normalized output.
  8. Google Sheets Append logs the outcome for auditing and analytics. If an error occurs, a Slack Alert is sent via the agent’s onError branch.

The workflow is designed so that each node is responsible for one clear function: ingestion, transformation, storage, retrieval, reasoning, logging, or alerting. This separation simplifies debugging and future extension.

3. Node-by-Node Breakdown

3.1 Webhook Trigger

Role: Entry point for external form submissions.

  • Node type: Webhook
  • HTTP Method: POST
  • Path: translate-form-submissions (final URL is typically /webhook/translate-form-submissions depending on your n8n deployment)
  • Expected payload: JSON body with one or more fields containing free-text form responses.

Typical sources: front-end forms, Typeform, Google Forms (via Apps Script or middleware), or any service that can send JSON via POST.

Implementation notes:

  • Use the Webhook node’s Response configuration to return a clear, deterministic status (for example, HTTP 200 plus a short confirmation message) to the caller.
  • For stricter validation, you can add a Function or Code node immediately after the webhook to:
    • Check required properties (for example submission_id, text).
    • Normalize or sanitize HTML, line breaks, or unwanted characters.
  • Malformed or missing fields can be handled by short-circuiting to an error branch that logs the failure and optionally notifies Slack.

3.2 Text Splitter

Role: Break long submissions into smaller chunks that are more suitable for embedding and retrieval.

  • Chunk size: 400 characters
  • Chunk overlap: 40 characters

Why chunking matters:

  • Shorter segments reduce token usage per embedding call and therefore cost.
  • Overlapping chunks preserve context across boundaries, which improves recall in semantic search.

Edge considerations:

  • Very short submissions may result in only one chunk, which is expected and does not affect correctness.
  • Extremely long submissions will generate multiple chunks; ensure your OpenAI usage limits and Supabase index can handle the volume.

3.3 OpenAI Embeddings Node

Role: Convert each text chunk into a vector representation using an OpenAI embedding model.

  • Node type: OpenAI Embeddings
  • Model: text-embedding-3-small
  • Credentials: OpenAI API key configured in n8n credentials.

Configuration notes:

  • Ensure the node is configured to iterate over all incoming items from the Text Splitter node so each chunk is embedded.
  • Where possible, let n8n batch items to reduce HTTP overhead and latency. Exact batching behavior depends on your node configuration and n8n version.

Error handling:

  • API rate limits or temporary failures can be handled by enabling retries at the workflow or node level.
  • For persistent failures, route the error to the onError branch so the Slack Alert node can notify your team.

3.4 Supabase Insert (Vector Store)

Role: Persist embeddings into a Supabase vector index so that they can be queried later via semantic search.

  • Node type: Supabase (Vector Store)
  • Mode: insert
  • Index name: translate_form_submissions

Recommended metadata fields:

  • Original submission ID (for example submission_id).
  • Timestamp of the submission.
  • Detected or declared language, if available.
  • Source or channel (for example form_type or product_area).

Storing metadata alongside vectors enables more precise filtering when running queries. For instance, you can later restrict retrieval to a specific product line or language.

3.5 Supabase Query + Vector Tool

Role: Provide the RAG agent with a semantic retrieval mechanism over the Supabase vector index.

  • Node types: Supabase Query, Vector Tool
  • Usage: The Vector Tool exposes semantic search as a callable tool for the agent, backed by the Supabase index.

Configuration notes:

  • Configure the query to use the same index (translate_form_submissions) that the Insert node writes to.
  • Set the number of results (k) to return per query and, where supported, a similarity threshold to reduce noise.
  • Optionally filter by metadata (for example language or form type) to narrow the context the agent receives.

This retrieval layer is what makes the workflow a RAG pipeline instead of a simple translation script. The agent can pull in semantically similar past submissions or contextual documents to inform its output.

3.6 Window Memory

Role: Maintain short-term memory for the RAG agent so it can reason over multiple retrieved chunks and maintain continuity within the current interaction.

  • Node type: Window Memory

Behavior:

  • Stores a configurable number of recent messages or turns so the agent has access to immediate context without persisting long-term history.
  • Useful if a single form submission results in multiple agent calls or if you enrich the interaction with additional system or tool messages.

3.7 Chat Model + RAG Agent

Role: Execute the core reasoning, translation, and normalization logic using a chat model augmented by the vector tool and memory.

  • Components: Chat Model node, RAG Agent node, Vector Tool, Window Memory.
  • System message: You are an assistant for Translate Form Submissions

Capabilities:

  • Calls the Vector Tool to retrieve relevant context from Supabase.
  • Uses Window Memory to keep track of recent messages.
  • Generates a normalized, translated representation of the submission.

Prompt and output format:

  • Define a strict, structured output format in the system or user prompt, for example:
    • JSON object with fields such as original_text, language, translation, tags, status.
  • Deterministic output is crucial if you plan to parse the agent output in downstream nodes (Google Sheets, databases, or other APIs).

Error behavior:

  • If the agent or underlying chat model request fails, the workflow should route to an onError branch where the Slack Alert node is connected.
  • You can also choose to log failed attempts to a separate sheet or table for later inspection.

3.8 Google Sheets Append (Audit Log)

Role: Persist a structured log of each processed submission, including status and key attributes.

  • Node type: Google Sheets
  • Operation: append
  • Document ID: your SHEET_ID (store securely, for example via credentials or environment variables)
  • Sheet name: Log

Typical columns:

  • Status (for example success or error).
  • Submission ID.
  • Timestamp.
  • Language.
  • Optional Tags or other classification fields produced by the agent.

This log can feed dashboards, reporting pipelines, or manual review workflows. Since it is append-only, it also serves as an audit trail for compliance and debugging.

3.9 Slack Alert

Role: Notify your team when the RAG agent or another critical node encounters an error or exceptional condition.

  • Node type: Slack
  • Channel: for example #alerts
  • Message template: Translate Form Submissions error: {$json.error.message}

Usage pattern:

  • Connect the Slack node to the onError branch of the RAG agent or other key nodes.
  • Include enough context in the message (submission ID, environment, timestamp) to make triage easier.

4. Step-by-Step Configuration Guide

  1. Create the workflow and Webhook Trigger:
    • Create a new workflow in n8n.
    • Add a Webhook node with method POST and path translate-form-submissions.
    • Save and activate (or test in manual mode) to obtain the full webhook URL.
  2. Add the Text Splitter:
    • Insert a Text Splitter node after the Webhook.
    • Set chunkSize to 400 and chunkOverlap to 40.
    • Map the form text field from the webhook payload to the Text Splitter input.
  3. Configure OpenAI Embeddings:
    • Add an OpenAI Embeddings node connected to the Text Splitter.
    • Select the text-embedding-3-small model.
    • Configure your OpenAI API credentials in n8n and link them to this node.
  4. Insert vectors into Supabase:
    • Add a Supabase (Vector Store) node in insert mode.
    • Configure Supabase credentials (URL, API key) in n8n.
    • Set the index name to translate_form_submissions.
    • Map embeddings and any relevant metadata (submission ID, timestamp, language) to the appropriate fields.
  5. Set up Supabase Query and Vector Tool:
    • Add a Supabase Query node that targets the same index.
    • Expose this query via a Vector Tool node so the RAG agent can call it for contextual retrieval.
    • Configure parameters like the number of results and any filters you need.
  6. Configure Window Memory, Chat Model, and RAG Agent:
    • Add a Window Memory node to store recent context.
    • Add a Chat Model node using your OpenAI chat model credentials.
    • Add a RAG Agent node that:
      • Uses the Chat Model node as its language model.
      • Has access to the Vector Tool for retrieval.
      • Uses Window Memory to maintain short-term context.
      • Includes a clear system prompt, for example:
        You are an assistant for Translate Form Submissions. Always return JSON with fields: original_text, language, translation, tags, status.

Build Your First AI MCP Server with n8n

Build Your First AI MCP Server with n8n

Imagine letting an AI safely create calendar events for you, generate test data, or clean up text, all while your credentials and logic stay tucked away inside n8n. That is exactly what this n8n MCP server template is built for.

In this guide, we will walk through what the template does, how the pieces connect, when you would want to use it, and how to get it running in your own n8n setup. Think of it as sitting down with a friend who has already wired everything up and is now showing you around.

First things first: what is an MCP server?

Let us start with the basics. MCP stands for Model-Calling-Protocol. An MCP server is basically a safe toolbox that a language model can use.

Instead of giving an AI full access to your accounts or APIs, you expose a small set of controlled tools. Each tool has:

  • A clear name
  • Structured inputs (parameters)
  • Structured outputs (responses)

In n8n, these tools are exposed through MCP Trigger nodes. The AI does not see your API keys, credentials, or internal workflow logic. It only sees a stable interface that it can call.

Using n8n as an MCP server is powerful because you can:

  • Visually build and combine tools in workflows
  • Add validation and sanitization before anything reaches external services
  • Log and audit what the AI is doing
  • Extend or change tools without touching the AI model itself

If you have ever wished you could “let the AI do it” without handing it the keys to everything, MCP is exactly that layer of safety and control.

What this n8n MCP template gives you

This template is a fully wired example of an MCP server and client setup inside n8n. It is ready to run and includes two main tool groups:

  • My Functions MCP – text conversion, random user data, and jokes
  • Google Calendar MCP – search, create, update, and delete calendar events

Under the hood, you will find:

  • An AI Agent node (OpenAI 4o) that decides which tool to use
  • MCP Trigger nodes that expose your tools via production URLs
  • MCP Client tools that connect to those MCP endpoints using SSE (server-sent events)
  • Sub-workflows for concrete tools, such as:
    • Convert text to upper or lower case
    • Generate random user data
    • Fetch jokes from an external API
  • Google Calendar tools for:
    • Searching events
    • Creating events
    • Updating events
    • Deleting events
  • A Switch node and helper nodes that map incoming MCP requests to the right tool logic

So you end up with a small, focused AI agent that can handle text utilities and calendar management, all routed through n8n.

How the whole thing fits together

Let us walk through the architecture in plain language so you can see how data flows through the system.

  1. A user sends a prompt to the AI Agent
    For example, via a chat trigger in n8n: “Convert this text to lower case” or “Add a meeting with John tomorrow at 2 pm.”
  2. The AI Agent chooses a tool
    The AI Agent node (OpenAI 4o) reads your system prompt and decides whether it needs to call a function, such as one of the MCP tools.
  3. The AI calls an MCP Client tool
    When the AI wants to use a tool, it calls the corresponding MCP Client node. This client:
    • Connects to the MCP Trigger’s SSE endpoint
    • Sends a structured request that includes a function name and parameters
  4. The MCP Trigger runs the right sub-workflow
    The MCP Trigger node receives the request and passes it into a sub-workflow (or local nodes) that actually implement the tool logic.
  5. A structured response is sent back to the AI
    The sub-workflow returns a clean, predictable response. The MCP Trigger sends that back to the AI Agent through SSE, and the AI uses it to answer the user.

The key idea: your credentials and detailed logic live safely inside n8n. The AI only sees the MCP interface, which you control.

When would you use this template?

This template is ideal if you:

  • Want an AI agent that can perform real actions (like managing your calendar) without exposing raw credentials
  • Need structured, predictable tool calls instead of free-form prompts
  • Prefer a no-code / low-code way to design and update tools
  • Plan to grow from simple text utilities to more advanced internal systems or CRMs

You can start with the included tools, then gradually add your own sub-workflows while keeping the same MCP pattern.

Step 1: Activate the MCP Trigger and set the SSE endpoint

Before anything works, the MCP Trigger nodes need to be live and the MCP Client tools need to know where to connect.

  1. Activate the workflow
    Open the template workflow and turn it on. MCP Triggers only expose production endpoints when the workflow is active.
  2. Copy the MCP Trigger production URL
    Click an MCP Trigger node, for example:
    • My Functions Server
    • Google Calendar MCP

    In n8n, copy the Production URL that appears. This is the SSE endpoint your MCP Client will use.

  3. Paste the URL into the MCP Client tool
    Open the matching MCP Client node, such as:
    • My Functions
    • Calendar MCP

    Paste the production URL into the sseEndpoint parameter. That tells the client exactly where to connect for tool calls.

Once this is done for each pair of MCP Trigger and MCP Client, the AI Agent can start calling your tools.

Digging into the tools: what you get out of the box

My Functions MCP: text utilities & simple helpers

The My Functions MCP sub-workflow is a nice starting point because it shows how to handle multiple operations behind a single MCP endpoint. It works like this:

  • The MCP request comes in with a function name and a payload.
  • A Switch node looks at the function name and routes the request to the right branch.
  • Each branch implements one operation and returns a structured response.

The included operations are:

  • Convert text to UPPERCASE
  • Convert text to lowercase
  • Return random user data
  • Get jokes

To keep things consistent, the sub-workflow uses Set nodes to format outputs. That way, every MCP response follows a predictable shape, which is exactly what the AI model needs to stay reliable.

Random user data & jokes: working with external APIs

Two of the helper tools are great examples of how to mix internal logic and external APIs inside an MCP tool:

  • Generate random user data
    This sub-workflow takes a numeric parameter that tells it how many users to generate. It returns simple objects with fields like:
    • firstName
    • lastName
    • email

    Perfect for testing, demos, or seeding fake data.

  • Get jokes
    This tool calls an external jokes API, then cleans up and returns the result in a tidy format that the AI can easily use in responses.

Once you understand these, you can plug in your own APIs or internal services in the same pattern.

Google Calendar MCP tools: let the AI manage your schedule

The template also includes a complete set of Google Calendar actions wired through n8n:

  • SearchEvent
  • CreateEvent
  • UpdateEvent
  • DeleteEvent

These nodes are connected to a Google Calendar OAuth credential in n8n. A few important points to keep in mind:

  • Set up Google OAuth first
    Before you activate the calendar MCP, configure your Google Calendar OAuth credential in n8n and make sure it is authorized for the calendar you want to use.
  • Parameters are passed through from MCP
    Things like limit and time range come from the MCP request and are forwarded to the Google Calendar nodes. The AI can ask “What is my schedule for next week?” and the workflow translates that into concrete parameters.
  • Sanitize event content
    When creating events, use descriptive but safe summaries and descriptions. Avoid dumping raw user prompts directly into your calendar entries.

Once this is set up, your AI can search your calendar, add meetings, adjust times, or cancel events, all through the MCP layer.

Trying it out: example prompts to test your MCP server

After activating the workflow and wiring up the SSE endpoints, you can start chatting with the AI Agent and watch the tools in action. Here are some prompts you can try:

  • Convert this text to lower case: EXAMPLE TeXt
  • Convert this text to upper case: example TeXt
  • Generate 5 random user data
  • Please obtain 3 jokes
  • What is my schedule for next week?
  • I have a meeting with John tomorrow at 2pm. Please add it to my Calendar.
  • Adjust the time of my meeting with John tomorrow from 2pm to 4pm, please.
  • Cancel my meeting with John, tomorrow.

Behind the scenes, each of these prompts triggers the same pattern:

  • The AI chooses a tool based on your request.
  • The MCP Client sends a structured function call.
  • The MCP Trigger runs the matching sub-workflow.
  • The response is formatted by Switch and Set nodes and returned to the AI.

This consistent structure is what makes MCP-based automation so reliable.

Staying safe: best practices & security tips

Because MCP endpoints can be exposed over the internet, it is worth taking a bit of time to lock things down. Here are some practices you should follow:

  • Protect MCP Triggers with authentication
    If your n8n instance is publicly reachable, do not leave MCP Triggers wide open. Use API keys, tokens, or a reverse proxy with access control.
  • Validate all incoming parameters
    Treat every input from the AI as untrusted. In your sub-workflows, add checks for required fields, types, and ranges before calling external services.
  • Expose only what is needed
    Keep your toolset minimal. Only give the AI the actions it truly needs, especially for sensitive systems like CRMs or internal APIs.
  • Log calls for auditing
    Store metadata about MCP calls in a database or secure log inside n8n. This helps you debug, monitor usage, and meet compliance requirements if needed.
  • Keep credentials inside n8n
    For third-party services like Google Calendar, always use n8n’s credentials system. Never embed secrets in MCP responses or expose them to the AI.

Common issues and how to fix them

MCP Client cannot connect

If your MCP Client tool is failing to connect, check the following:

  • Is the workflow with the MCP Trigger active?
  • Did you paste the correct Production URL into the sseEndpoint field?
  • Can the environment where the client runs reach your n8n instance, or is a firewall or network rule blocking it?

Calendar operations are failing

When Google Calendar actions do not work as expected, verify:

  • Your Google OAuth credential is configured and authorized correctly.
  • The Google Calendar node can pass its own test in n8n.
  • The event IDs you use for update or delete operations are valid and belong to the connected calendar.

The AI behaves in unexpected ways

If the AI is not calling tools correctly, or is returning oddly structured data, focus on the system prompt and examples:

  • Refine the AI Agent’s system message to clearly describe:
    • Which tools exist
    • When to use each tool
    • The exact structure for function calls and responses
  • Use the template’s example requests as a base and tweak them to match your use case.

Growing your MCP server: ideas for extensions

Once the basic template is running smoothly, you can start turning it into your own AI-powered automation hub. Some ideas:

  • Add rate limiting or quotas per client to prevent abuse.
  • Build richer sub-workflows for:
    • CRM operations
    • Email automation
    • Internal tools and databases
  • Return more complex structured objects that the AI can combine in multi-step plans.
  • Use memory nodes to keep conversation context and let the AI remember previous actions.

The pattern stays the same: MCP Trigger at the front, sub-workflows inside n8n, and an AI Agent that calls tools when needed.

Wrapping up: why this template makes your life easier

This n8n template gives you a practical, secure starting point for building an MCP server and clients. You get:

  • Safe, controlled AI access to tools like Google Calendar
  • Simple text utilities and helper functions ready to use
  • A clear, extensible pattern for adding your own tools
  • Full control over validation, logging, and security

Instead of wiring everything from scratch, you can focus on what you want the AI to do, not how to glue all the pieces together.

Next steps: try it in your own n8n instance

Ready to see it in action?

Here is a quick checklist:

Insert & Update Airtable Records with n8n

Insert & Update Airtable Records with n8n (Without Losing Your Mind)

Imagine this: you carefully add a record to Airtable, then realize you immediately need to update it with extra info that only appears after it is created. So you copy the ID, paste it somewhere, update the record, try not to mix it up with 10 other IDs, and swear you will automate this “later”.

This workflow template is that “later”. It shows you how to use n8n to insert a record into Airtable, grab it back by a filter or by its ID, and then update it – all on autopilot. No more copy-paste Olympics, just a clean insert-and-update automation that runs reliably every time.

In this guide you will:

  • See how the n8n + Airtable workflow is structured
  • Learn how to insert, find, and update Airtable records with expressions
  • Avoid common mistakes like broken IDs, bad filters, and field name typos
  • Get a simple “upsert-style” pattern for Airtable using n8n

Why this n8n + Airtable pattern is so useful

Many real-world automations follow the same annoying pattern:

  1. You create (append) a new record in Airtable.
  2. Airtable generates an ID or a computed value only after creation.
  3. You then need to update that same record with more data.

Airtable only returns the record ID after the record is created through the API. That means if you want to update that same record, you must either:

  • Carry the returned ID forward through your n8n workflow, or
  • Re-query the table using a filter (for example with filterByFormula) and then update the matching record.

This template shows both styles. You will see how to:

  • Append a record
  • Optionally list it again using a filter
  • Pass the ID into an update step

Once this is set up, you can stop worrying about which record is which and let n8n handle the boring parts.

Quick tour of the workflow

The template workflow uses a small set of nodes that work together like a tiny assembly line:

  • Manual Trigger – Lets you test everything by clicking “Execute”. Later you can replace this with a webhook, schedule, or any other trigger.
  • Set – Builds the initial payload for the new Airtable record.
  • Airtable (Append) – Creates the new record in your Airtable base.
  • Airtable1 (List) – Optionally finds the created record using filterByFormula.
  • Set1 – Prepares the updated values and carries the record ID forward.
  • Airtable2 (Update) – Updates the existing record by its ID.

You can keep the List step if you need to search by a field, or skip it and use the ID directly from the Append response. Both approaches are covered below.

Step-by-step setup guide

1. Manual Trigger – for easy testing

Start with a Manual Trigger node. It is perfect for iterating on your workflow because you can just hit “Execute” and watch what happens at each step.

Once everything works, you can swap this node for:

  • a Webhook (for incoming HTTP requests)
  • a Schedule (for cron-style runs)
  • or any other n8n trigger you like

2. Set – build the initial Airtable payload

Next, add a Set node. This is where you define the fields that will be sent to Airtable when creating the record. For example:

{  "ID": 3,  "Name": "n8n"
}

These keys should match the fields you plan to use in your Airtable table. In the Set node you can:

  • Hard-code values for testing (like the example above)
  • Or use expressions that come from previous nodes

Later, in the Append node, you will map these fields using expressions such as:

{{$node["Set"].json["Name"]}}

3. Airtable (Append) – create a new record

Now add an Airtable node and set its operation to Append. This is the node that actually creates the record in your Airtable table.

In the Fields section of the Airtable Append node:

  • Add field names exactly as they exist in your Airtable base (case-sensitive).
  • Map each field to a value from the Set node or another source.

For example:

  • Name = {{$node["Set"].json["Name"]}}

After the Append operation runs successfully, Airtable returns the created record in the node output, including its id. That output is pure gold for the rest of your workflow.

You have two options from here:

  1. Preferred – Use the Append response directly and pass the ID forward. Example expression to access the ID:
    • {{$node["Airtable"].json["id"]}} for a single item
    • {{$node["Airtable"].json[0]["id"]}} if the node returns an array
  2. Alternative – Re-query the table with a List operation using filterByFormula (useful when you must find the record by a non-unique field).

4. Airtable1 (List) – optionally find the created record

If you choose to re-query, add another Airtable node and set it to List. This node uses filterByFormula to find records that match your criteria.

Example formula:

filterByFormula: Name='n8n'

A few key details:

  • filterByFormula must use field names exactly as they are in Airtable, including capitalization.
  • The formula must follow Airtable’s formula syntax rules.
  • If the filter is not unique, the node may return multiple records in an array.

When multiple records are returned, you will typically work with the first one:

  • {{$node["Airtable1"].json[0]["id"]}}

If you want to be extra safe, you can add an If node after this to check whether any records were found before attempting an update.

5. Set1 – prepare your update fields and carry the record ID

Now add another Set node, called something like Set1. This node prepares all the values needed for the update step and, importantly, passes the record ID along.

In the template, Set1 originally only sets the Name field. To update a specific record correctly, you must also include the record ID.

Example Set1 configuration (with keepOnlySet set to true):

"recordId": {{$node["Airtable1"].json[0]["id"]}}
"Name": "nodemation"

Or, if you are using the ID from the Append node instead of List, you might use:

"recordId": {{$node["Airtable"].json[0]["id"]}}
"Name": "nodemation"

Later, in the update node, you will reference this ID with:

{{$node["Set1"].json["recordId"]}}

6. Airtable2 (Update) – update the record by ID

Finally, add another Airtable node and set its operation to Update. This node will modify the existing record using the ID passed from Set1.

Configure it like this:

id: {{$node["Set1"].json["recordId"]}}
fields:  Name: {{$node["Set1"].json["Name"]}}

You can add more fields here as needed. The crucial part is that the id field points to the correct record ID expression.

Common mistakes (and how to not fall into them)

Even with a simple flow, a few small gotchas can cause big headaches. Here are the usual suspects:

  • Incorrect ID expression
    In some templates, Airtable2 uses:
    {{$node["Airtable1"].json["id"]}}

    But when the List operation returns an array, you must reference an index:

    {{$node["Airtable1"].json[0]["id"]}}

    A safer pattern is to capture the ID in Set1 and then use:

    {{$node["Set1"].json["recordId"]}}
  • No record found during List
    If your filter does not match anything, the List node returns zero items. Add an If node after Airtable1 to check the number of items and stop or handle the error gracefully.
    Example condition: Number of items > 0.
  • Multiple records match the filter
    If your filter is not unique, the List node returns an array of records. You can either:
    • Refine your filter so it matches exactly one record, or
    • Explicitly choose which index to use, typically [0].
  • Field name mismatches
    Airtable field names are case-sensitive and must match exactly in:
    • The Airtable nodes in n8n
    • Your filterByFormula expressions

    A stray capital letter can silently break your filter.

Error handling & best practices for Airtable automations

To keep your n8n + Airtable integration solid, here are some simple best practices:

  • Use If nodes for sanity checks Any node that might return zero items (like List) should usually be followed by an If node to check the output length and handle failures gracefully.
  • Prefer using the Append response directly If you only need to update the record you just created, use the ID from the Append node instead of running a separate List. It is faster and avoids edge cases.
  • Respect Airtable rate limits When inserting or updating many records, batch your operations and keep Airtable’s request limits in mind so you do not run into throttling.
  • Use a unique key field Create a dedicated field like externalId or integrationKey in Airtable. This makes lookups and “upsert-style” flows much more reliable.
  • Log successes and failures Consider sending logs to Slack, another Airtable table, or a logging service. It makes debugging much easier when something inevitably goes sideways.

Minimal working expressions you can copy

Here are some ready-to-use expressions for your nodes:

  • In Airtable Append node fields
    Name = {{$node["Set"].json["Name"]}}
  • In Set1 to capture ID from Append
    recordId = {{$node["Airtable"].json[0]["id"]}}
  • In Airtable2 (Update) to reference the ID
    id = {{$node["Set1"].json["recordId"]}}

Advanced: how to fake an upsert in Airtable with n8n

Airtable does not offer a true “upsert” operation out of the box. That said, you can mimic it with n8n using one of these patterns:

  1. List then Update or Append
    • Use a List node with a unique external ID (for example externalId='123').
    • If a record is found, run an Update.
    • If no record is found, run an Append.
  2. Append then immediate Update
    • Append the record.
    • Use the returned ID from the Append node.
    • Run an Update right after, adding any extra fields or computed values.

Both approaches let you keep Airtable in sync with external systems without manually tracking which records already exist.

Testing checklist before you call it done

Before you declare victory over repetitive Airtable tasks, run through this quick checklist:

  • Confirm the correct Airtable base and table are set in your credentials and nodes.
  • Double-check your filterByFormula in the List node. If in doubt, test it in the Airtable API playground first.
  • Inspect the node outputs during manual runs to see exactly where the id lives in the JSON.
  • Use n8n’s Execute Node feature to test one node at a time and validate expressions before you connect the whole flow.

Quick fix summary for the template

To make the insert-and-update Airtable template work reliably, follow this short recipe:

  1. In Airtable (Append), map your fields from the Set node.
  2. Either:
    • Use the Append node’s response directly to get the ID, or
    • If you re-query with List, capture the ID in Set1 using something like:
      {{$node["Airtable1"].json[0]["id"]}}
  3. In Airtable2 (Update), set the id field to:
    {{$node["Set1"].json["recordId"]}}
  4. Add an If node after Airtable1 to make sure at least one record was found before trying to update it.

Next steps

Load this template into your n8n instance, tweak the field names to match your Airtable base, and run a few manual tests. Once it is stable, hook it up to your real trigger and let it quietly handle the boring work in the background.

If you want more help, you can share your updated workflow JSON or screenshots of the node outputs and expressions. With that, it is easy to spot exactly where an ID or field mapping is going wrong.

Happy automating, and may your days of copy-pasting Airtable IDs be officially over.

Automate Webinar Registrations to KlickTipp with n8n

How One Marketer Stopped Copy-Pasting Webinar Leads and Let n8n Do the Work

On a rainy Tuesday afternoon, Lena stared at the same spreadsheet she had opened every week for months. As the marketing manager for a growing coaching business, her job was to fill webinars and turn signups into clients. The problem was not getting registrations. The problem was what came after.

Every new webinar meant the same routine: export registrations from JotForm, clean up phone numbers, fix dates, double-check LinkedIn URLs, import everything into KlickTipp, create new tags, pray nothing broke, and hope she had not forgotten anyone.

By the time she finished, the first reminder email should already have gone out.

That afternoon, after yet another import error in KlickTipp, she decided something had to change.

When manual webinar registrations start to break your funnel

Lena’s workflow looked familiar to many marketers:

  • JotForm captured webinar registrations
  • Data landed in a spreadsheet with mixed formats and typos
  • She manually imported contacts into KlickTipp
  • Tags for each webinar and date were created by hand

It worked, but only barely. Manual imports were slow, error-prone, and stressful. If she was late with the import, registrants missed reminder emails. If a phone number had the wrong format, KlickTipp complained. If she mistyped a tag name, segments split and campaigns broke.

Lena knew she needed automation, not another “best practices” spreadsheet. That is when a colleague mentioned an n8n workflow template that could connect JotForm to KlickTipp and handle the messy parts for her.

Discovering an n8n template that connects JotForm and KlickTipp

Lena had heard of n8n, but never used it in production. The idea of a ready-made template that was already set up for webinar registrations and KlickTipp sounded almost too good to be true.

She opened the template description and saw exactly what she had been doing by hand, but translated into a reliable workflow:

  • Validate, format, and map form submissions into KlickTipp subscribers
  • Normalize phone numbers and dates
  • Check LinkedIn URLs before they ever hit the CRM
  • Create and apply tags automatically, only when needed
  • Keep her contact data clean and segmented for better email marketing

If this worked, it would turn her weekly copy-paste marathon into a background process.

How the automation journey starts: the JotForm webhook trigger

Lena decided to give it one afternoon. She opened n8n and imported the workflow JSON from the template. At the heart of it was a simple idea: whenever someone submits her JotForm webinar registration, n8n wakes up automatically.

The workflow began with a JotForm Trigger node. Instead of exporting CSV files, JotForm would now send each new booking directly to n8n in real time.

She configured it:

  1. In JotForm, she pasted the n8n webhook URL into the form’s webhook settings.
  2. In n8n, she selected the correct form ID in the JotForm trigger node.

With that, the first piece of the puzzle was in place. No more waiting for exports. Every registration would trigger the workflow instantly.

The messy middle: transforming raw form data into clean CRM records

Of course, Lena knew that “just sending data” was not enough. The real pain had always been in the details. Phone numbers came in with spaces and plus signs, dates used different formats, and LinkedIn URLs were sometimes just random text.

The n8n template handled this with a node aptly named Convert and set webinar data. This was where the magic – and the relief – really started.

Normalizing phone numbers before KlickTipp ever sees them

In her spreadsheets, Lena used to manually strip out spaces and symbols from phone numbers. Sometimes she forgot, and KlickTipp rejected the contact.

The workflow’s transformation logic took care of that by:

  • Removing everything except digits
  • Replacing a leading + with 00 to keep an international format compatible with KlickTipp

That way, every phone number was normalized to numeric-only format with a consistent prefix. No more API errors due to inconsistent formats.

Turning birthdays and webinar start times into reliable timestamps

Dates were another constant headache. The template already had a solution for that. It converted:

  • Birthdays into UNIX timestamps in seconds
  • Webinar start times from a YYYY-MM-DD HH:mm format into ISO 8601, adjusted for the Germany timezone offset, then into UNIX timestamps

For Lena, this meant:

  • Consistent birthday data across all contacts
  • Accurate scheduling fields in KlickTipp
  • Reliable segmentation based on event times, such as “all attendees of last month’s webinar”

Validating LinkedIn URLs before they break your CRM

Some registrants pasted full LinkedIn URLs, others wrote “linkedin.com/me” or just their name. Previously, these messy entries landed directly in KlickTipp and cluttered her records.

The workflow checked the LinkedIn profile field to see if it looked like a valid URL. If it failed validation, a fallback value was used instead. That small check prevented broken links from polluting her CRM and made the data much more trustworthy.

Scaling numeric fields for better custom field compatibility

One surprise Lena found in the template was a transformation for numeric data, such as “work experience in years”. In the example, the workflow multiplied this value by 100.

At first it seemed odd, but the comment in the node clarified it. Some KlickTipp custom fields expect specific units or scaled representations. By scaling values before they reached KlickTipp, the workflow ensured the data fit those expectations perfectly.

The turning point: getting subscribers and tags into KlickTipp automatically

Once the data was clean, the next problem was getting it into KlickTipp without breaking her segments. This was where Lena had always felt the most pressure. One wrong import, and her automations went sideways.

The template handled this part in several coordinated steps.

Subscribing or updating contacts in KlickTipp

The first KlickTipp-related node, Subscribe contact in KlickTipp, took the transformed data and created or updated the subscriber record. Lena connected her KlickTipp API credentials in the n8n credentials manager, then mapped fields like:

  • First name
  • Last name
  • Birthday (as a UNIX timestamp)
  • LinkedIn URL
  • Work experience (scaled value)
  • Webinar start timestamp
  • Free-text notes

She made sure matching custom fields already existed in KlickTipp, so the data had a clear destination. One node, and her registrants were now flowing directly into her email tool with all the right fields in place.

Building a smart array of tags from JotForm

The next challenge was tagging. Lena’s campaigns depended on tags like:

  • Specific webinar selection
  • Chosen date
  • Reminder interval

In the past, she created these tags manually and hoped she remembered the exact naming. The workflow changed that. A node called Define Array of tags from JotForm took form values and built a dynamic array of tags based on what the registrant had chosen.

Each new signup could carry its own combination of tags, ready to trigger the right email sequences in KlickTipp.

Preventing duplicate tags with a Merge and conditional checks

But what if a tag already existed? Lena had seen countless tag lists where “Webinar-June-01” and “webinar-june-01” were treated as different segments. The template had an answer for that too.

First, a node fetched the list of all existing tags from KlickTipp. Then a Merge node with conditional checks performed a left join between:

  • Tags coming from JotForm
  • Tags already stored in KlickTipp

This comparison allowed the workflow to:

  • Identify which tags already existed
  • Create only the missing ones
  • Aggregate all relevant tag IDs into a single list

Finally, the Tag contact node applied both existing and newly created tags to the subscriber in one operation. No duplicates, no manual cleanup, and no guessing whether a tag already existed.

From theory to reality: Lena’s first full test

With everything connected, Lena was ready for the moment of truth. She submitted a test entry through JotForm, filled in all fields, and watched n8n’s execution log.

To keep herself honest, she followed a small testing checklist.

What she checked during testing

  • Webhook delivery: She confirmed that JotForm posts were reaching n8n by checking recent executions for the JotForm trigger.
  • Data mapping: When a test failed, she inspected the output of the Convert node to see if any values were malformed before they hit KlickTipp.
  • Timezone and date formats: She double-checked that incoming dates matched the expected YYYY-MM-DD HH:mm format.
  • Tag behavior: She looked for any duplicated tags in KlickTipp and, if needed, adjusted the tag matching logic in the Merge node, including case sensitivity and exact value matching.

After two minor tweaks, her test contact appeared in KlickTipp exactly as she wanted: clean fields, valid LinkedIn URL, proper timestamps, and a neat set of tags that matched the webinar and reminder settings she had chosen.

Locking in reliability: adding best practices and safeguards

Once the workflow ran smoothly, Lena took a step back and thought about reliability. If this was going to replace her manual process, it had to be robust.

Validating inputs as early as possible

She tightened validation directly in JotForm wherever she could:

  • Phone number patterns to reduce messy formats
  • URL validation rules for LinkedIn profiles

The cleaner the data at the source, the less work the workflow had to do later.

Error handling and notifications

To avoid silent failures, she added an extra node for error handling. If an execution failed, the workflow could send a notification, so she knew exactly when something went wrong and what needed attention.

Respecting privacy and API limits

Her company operated under strict privacy rules, so she made sure:

  • They had a lawful basis for processing personal data
  • Only necessary data was stored
  • All KlickTipp API credentials were securely managed inside n8n

She also kept an eye on KlickTipp’s API rate limits and configured retries and backoffs for transient failures. No more sudden surprises during big webinar launches.

Customizing the workflow to match her marketing strategy

Once the core automation was stable, Lena started to see new possibilities. The template was not just a replacement for her manual work. It was a foundation she could build on.

  • She set up an immediate welcome email in KlickTipp that triggered as soon as a contact was created.
  • She extended tag naming to include audience segments and language preferences based on additional form fields.
  • She mapped extra custom fields like company, job title, and marketing source for deeper segmentation.
  • She added an extra webhook to send analytics events to their tracking system so every registration counted as a server-side conversion.

What started as a way to save time became a better way to run their entire webinar funnel.

How the new workflow changed her webinar lifecycle

A few weeks later, during a major product webinar, Lena noticed something different. She was not frantically cleaning spreadsheets or double-checking tags. Instead, she watched the numbers in KlickTipp grow in real time.

Here is what the n8n template made possible:

  • Automatic enrollment of webinar attendees into pre-webinar email sequences and reminder automations in KlickTipp
  • Segmentation by experience level or interest based on custom fields, which then triggered tailored follow-up sequences
  • Smart tag usage that allowed her to remove no-shows from future campaigns or grant access to on-demand recordings after the event

Her team could focus on content and strategy while the workflow quietly handled the logistics.

The resolution: from manual drudgery to reliable automation

Looking back, Lena realized the biggest win was not just saving a few hours each week. It was consistency. Every registration followed the same path:

  • Captured by JotForm
  • Transformed by n8n into clean, validated data
  • Pushed into KlickTipp with correct custom fields
  • Tagged intelligently, with new tags created only when needed
  • Ready for precise segmentation and timely follow-up

The n8n webinar registration template for KlickTipp gave her a reliable, repeatable way to move bookings from JotForm into her email marketing system with:

  • Clean data and normalized phone numbers
  • Accurate timestamps for birthdays and event times
  • Automated tag creation and application
  • Less administrative overhead and fewer mistakes

Her follow-up campaigns improved, reminders were always on time, and every registrant received the right messages without manual intervention.

Ready to become the “Lena” of your team?

If you recognize yourself in Lena’s story, you do not have to keep wrestling with exports and imports. This n8n template is already structured for JotForm and KlickTipp, with production-ready logic for data validation, formatting, and tag management.

To get started:

  1. Import the workflow JSON into n8n.
  2. Connect your JotForm and KlickTipp accounts.
  3. Match your custom fields for names, birthday, LinkedIn URL, work experience, webinar timestamps, and notes.
  4. Run a few test submissions and refine mappings if needed.

Once it is running, you can extend it with welcome emails, advanced segmentation, or analytics events, just like Lena did.

Call to action: Try the template now, import the workflow into n8n and run a test submission. If you want help tailoring it to your specific form fields or tag naming conventions, reach out for a 30-minute consultation and get a version that fits your funnel perfectly.

Read PDFs in n8n: Read Binary File + Read PDF

Read PDFs in n8n Without Losing Your Mind: Read Binary File + Read PDF

Manually copying text out of PDFs is a special kind of torture. Highlight, copy, paste, fix weird line breaks, repeat. If you are doing this more than once, you deserve better.

That is where n8n comes in. With just two nodes, Read Binary File and Read PDF, you can turn stubborn PDF files into clean, usable text that flows through your automations like it always belonged there.

This guide walks you through a simple n8n workflow that:

  • Reads a PDF from disk (for example /data/pdf.pdf).
  • Extracts searchable text using the Read PDF node.
  • Makes that text available to any downstream node for processing, indexing, or sending around the internet.

What this n8n PDF workflow actually does

At a high level, the workflow looks like this:

  1. Something triggers the workflow (manual, webhook, schedule, you name it).
  2. Read Binary File grabs the PDF file from your n8n environment and turns it into binary data.
  3. Read PDF takes that binary data and extracts the readable text from it.
  4. You use the extracted text in later nodes for emails, search indexing, or AI magic.

That is it. No more copy-paste marathons, just two nodes quietly doing the boring stuff for you.


Before you start: what you need

  • An n8n instance running on desktop, Docker, or n8n cloud.
  • A PDF file that n8n can actually see.
    • For Docker, put it in a mounted folder, for example /data/pdf.pdf.
  • A bit of basic n8n knowledge: how to add nodes, connect them, and execute a workflow.

If you are comfortable dragging nodes onto the canvas and clicking “Execute”, you are ready.


Quick-start: import the example workflow

If you prefer to start from something that already works instead of building from scratch, here is a minimal JSON workflow you can import into n8n:

{  "nodes": [  {"name":"On clicking 'execute'","type":"n8n-nodes-base.manualTrigger","position":[680,400],"parameters":{},"typeVersion":1},  {"name":"Read Binary File","type":"n8n-nodes-base.readBinaryFile","position":[880,400],"parameters":{"filePath":"/data/pdf.pdf"},"typeVersion":1},  {"name":"Read PDF","type":"n8n-nodes-base.readPDF","position":[1090,400],"parameters":{},"typeVersion":1}  ],  "connections": {  "Read Binary File": {"main":[[{"node":"Read PDF","type":"main","index":0}]]},  "On clicking 'execute'": {"main":[[{"node":"Read Binary File","type":"main","index":0}]]}  }
}

Import that into your n8n instance, point it at your own PDF, and you are already halfway to automated PDF bliss.


Step-by-step setup (with just enough detail)

1. Add a trigger so the workflow actually runs

First, drop in a trigger node. For testing, the Manual Trigger is perfect:

  • Add the Manual Trigger node.
  • Use the “Execute workflow” button to run it on demand.

Once you move to production, you can swap this for something more serious like:

  • An HTTP Request or Webhook trigger.
  • A Schedule trigger to process PDFs regularly.
  • A file watcher style trigger if you use integrations that support that pattern.

2. Read Binary File: get the PDF into n8n

Next, drag in the Read Binary File node and connect it to your trigger. Configure it like this:

  • File Path: the path to your PDF inside the n8n runtime, for example:
    • /data/pdf.pdf
  • Binary Property (optional): this is where the file contents are stored in the item’s binary section.
    • By default, it uses something like data or file.
    • After running the node, check the Execution Data to see the exact property name.

Run the workflow once, click on the Read Binary File node, and inspect the output. You are looking for:

  • A binary section that confirms the file was read successfully.
  • The property name inside binary, for example data. You will need this for the next node.

Think of this node as the “bring the PDF to the party” step.

3. Read PDF: extract the text and stop suffering

Now for the fun part. Add a Read PDF node and connect it to Read Binary File.

Configure the Read PDF node:

  • Binary Property: enter the exact binary property name from the previous node, for example:
    • data
  • Page Range (optional):
    • Use this if you only need specific pages instead of the whole document.
    • Handy when the PDF is huge and you only care about page 1 or the last page.
  • Output:
    • The node outputs JSON that includes the extracted text.
    • The text is usually in a field like text. Check the execution output to confirm the exact property name.

Click Execute again and inspect the Read PDF node’s output. If your PDF has selectable text, you should now see clean, readable content sitting in the JSON output instead of inside a locked file.

If the PDF is just scanned images with no text layer, you will get little or nothing back. That is normal, and it means you need OCR, not just text extraction. More on that in troubleshooting.


Using the extracted PDF text in your automations

Once the Read PDF node has done its job, the text is available to any node downstream. This is where the real automation fun begins.

Common use cases

  • Email the contents Use the extracted text as the body of an email, or include it as part of a summary.
  • Index for search Send the text to Elasticsearch, Algolia, or a vector store so you can search or embed it.
  • Run AI or NLP Feed the text into an AI node or external API for summarization, classification, or entity extraction.

Accessing the text in a Function node

Here is a simple Function node example that takes the text from Read PDF and exposes it under a new field:

// simple Function node that returns the extracted text as a new field
const text = items[0].json.text || '';
return [{ json: { extractedText: text } }];

Adjust text if your property name is different.

Using expressions in other nodes

You can also use the extracted text directly in any node parameter with an expression, for example:

{{$node["Read PDF"].json["text"]}}

Again, swap text with your actual property name if needed.


Troubleshooting: when your PDF refuses to cooperate

Sometimes PDFs like to be difficult. Here is how to handle the most common issues.

1. “File not found” in Read Binary File

If the Read Binary File node complains that it cannot find the file, check:

  • File path correctness Make sure the path you entered matches the path inside the n8n runtime, not just your local machine.
  • Docker volume mapping If you use Docker, map a host folder to something like /data:
    -v /host/path:/data

    Then place your PDF inside that folder and reference it as /data/pdf.pdf.

  • Permissions Confirm that the n8n process has permission to read the file.

2. Empty text or weird gibberish

If the Read PDF node returns nothing useful, the PDF is probably a scanned document without an embedded text layer.

Important detail: the Read PDF node only extracts existing text. It does not perform OCR.

For scanned PDFs, consider:

  • Using an OCR tool like Tesseract via the Execute Command node.
  • Calling an OCR API such as Google Vision or AWS Textract.
  • Converting each page to an image and running OCR on each image.

Once you have OCR output, you can feed that text back into the rest of your workflow.

3. Binary property mismatch in Read PDF

If Read PDF complains about missing binary data, it usually means the binary property name does not match.

Fix it by:

  1. Opening the Read Binary File node output.
  2. Looking under the binary section for the property name, for example data.
  3. Pasting that exact name into the Binary Property field of the Read PDF node.

One small typo here and the node will pretend it never saw your file.


Advanced automation ideas for PDF processing

Once you have the basic PDF-to-text pipeline working, you can start to get fancy.

  • Process multiple PDFs in a folder List files, then use a SplitInBatches node to loop through each file and send it through Read Binary File and Read PDF.
  • Extract specific fields with Regex After extracting text, use a Function node and regular expressions to pull out invoice numbers, dates, totals, or other structured data.
  • Automatic OCR fallback Run Read PDF first, then:
    • If the extracted text is empty, trigger an OCR service automatically.

This way you get the best of both worlds: fast extraction when text is available and OCR only when necessary.


Security and performance considerations

PDFs often contain sensitive data, so it is worth being a bit paranoid in a good way.

  • Access control Limit who can access your n8n instance, especially if it handles personal or confidential documents.
  • Data hygiene Before storing extracted text long term, consider redacting or cleaning sensitive parts.
  • Large PDFs and memory Very large PDFs can be heavy to process. If you hit memory issues:
    • Split the document into smaller files or page ranges.
    • Process pages in batches instead of all at once.

Recap: from stubborn PDF to usable text

By combining the Read Binary File and Read PDF nodes in n8n, you get a simple, reliable way to extract text from PDFs that live on your server or inside a container.

Key points to remember:

  • Use Read Binary File to load the PDF into a binary property.
  • Point Read PDF at that exact binary property name.
  • Read PDF only works on searchable text, not raw scanned images.
  • Once extracted, the text can be emailed, indexed, or fed into AI and NLP workflows.

If you want to extend this to cloud storage like Google Drive or S3, or to add a proper OCR fallback, you can build on the same pattern and just change how the file is fetched or how you handle empty text.


Next steps: try the n8n PDF template

Ready to stop manually wrestling with PDFs and let automation do the boring parts?

  1. Import the example workflow into your n8n instance.
  2. Point the Read Binary File node at your own PDF path.
  3. Execute the workflow and inspect the Read PDF output.
  4. Hook the extracted text into email nodes, search indexing, or AI processing.

If you have a specific PDF use case, like invoices, reports, or contracts, you can build a production-ready workflow with OCR, error handling, and storage integration on top of this base.

Boost Chat Responses with Bright Data & Gemini AI

Boost Chat Responses with Bright Data & Gemini AI

What this n8n template actually does (in plain language)

Imagine your chatbot could talk like a human and also quickly look things up on Google, Bing, or Yandex whenever it needs fresh info. That is exactly what this n8n workflow template is built for.

It connects Google Gemini (PaLM) with Bright Data’s MCP Search Engine tools inside an n8n self-hosted setup. The result is a chat experience that:

  • Understands what the user is asking
  • Decides when it needs real-time web data
  • Runs a live search through Bright Data (Google, Bing, or Yandex)
  • Summarizes the results with links and snippets
  • Sends the final answer back to the chat and to a webhook for further processing

So instead of a “frozen in time” AI model, you get a conversational assistant that can pull in current information and still keep the flow of the conversation.

When should you use this template?

This workflow is a good fit whenever you want a chatbot or AI assistant that needs to be:

  • Up to date – for news, pricing, product changes, or anything that changes often
  • Verifiable – you want to show users where your answers came from
  • Automated – you need to trigger other systems when a reply is generated

Some practical examples:

  • A customer support bot that checks live product pages or knowledge base articles
  • A research assistant that summarizes recent articles and gives source links
  • A competitive intelligence helper that fetches current competitor pages or pricing

If any of those sound familiar, this template can save you a lot of manual wiring.

Why pair Google Gemini with Bright Data?

Gemini is great at reasoning, explaining, and chatting. The catch is that it only “knows” what it was trained on. It does not automatically know what happened yesterday or what changed on a website this morning.

Bright Data’s MCP Search tools fill that gap by giving Gemini live signals from search engines. When you combine them in n8n, you get:

  • Real-time search results from Google, Bing, or Yandex
  • Traceable sources like SERP URLs, titles, and short descriptions
  • Webhook notifications so every response can trigger logging, analytics, or other automations
  • Regional flexibility by picking the search engine that works best for your audience

In short, Gemini handles the “thinking” and conversation, while Bright Data handles the “looking things up.” n8n ties it all together.

How the workflow is structured in n8n

Let’s walk through the main building blocks first, then we will see how they all work together.

  • Chat Trigger – starts the workflow whenever a new chat message arrives
  • AI Agent (n8n agent) – coordinates Gemini, memory, and tools like the search engine
  • Google Gemini chat model – interprets user intent and drafts the response
  • MCP Client tools – call Bright Data’s search_engine tool for Google, Bing, or Yandex
  • Memory – keeps a short buffer of the conversation so replies stay in context
  • Webhook / HTTP Request – sends the final answer to an external endpoint for logging or integrations

Step-by-step: what happens when a user sends a message

1. Chat message triggers the flow

The whole thing starts with a chat trigger node in n8n. Whenever a user sends a message, this node fires and passes the message payload to the AI Agent node.

2. The AI Agent decides what to do

The AI Agent node is configured to use Google Gemini as its language model. It gets a system prompt that tells it how to behave and when to use Bright Data’s MCP Search Engine tools.

The logic usually looks like this:

  • If the question needs current or factual data, the agent should call a search tool.
  • It should then read and summarize the top search results.
  • It must answer concisely, include source links, and also trigger a webhook notification.

If the question is more general or does not need live data, the agent can just respond directly using Gemini.

3. Bright Data search via MCP Client

When a search is needed, the agent uses the MCP Client node to call Bright Data’s search_engine tool. You can pick which engine to hit, for example:

  • google
  • bing
  • yandex

The search results typically come back in a markdown-style list that includes:

  • URL
  • Title
  • Short description or snippet

The agent then parses these SERPs, uses them as evidence, and weaves them into a natural language answer.

4. Reply to the user and notify via webhook

Once the agent has its final response, two things happen:

  • The answer is returned to the chat, so the user sees the reply with references.
  • An HTTP Request node sends the same response (plus any extra metadata you want) to a webhook endpoint.

That webhook can feed your analytics, update a CRM, trigger a Slack notification, or kick off any other downstream automation you like.

Getting set up in n8n

Self-hosted n8n and community node

This template is designed for self-hosted n8n and uses the community MCP Client node for Bright Data. Before importing the workflow, you will need to:

  • Install the MCP Client community node in your n8n instance
  • Configure MCP client credentials (STDIO) for your Bright Data MCP account

API keys, credentials, and rate limits

There are two main sets of credentials to secure:

  • Google Gemini (PaLM) API key
  • Bright Data credentials for the MCP Search Engine tools

Bright Data enforces scraping and query rate limits, so it is worth planning for:

  • Batching or throttling search requests
  • Caching frequent queries
  • Guarding against unnecessary or repeated searches

This helps you avoid hitting service caps or accidentally running up costs.

Designing the AI Agent prompt

The system prompt you give the agent is what keeps it on track. A simple example used in this template is:

"You are a helpful assistant. Use MCP Search Engine assistant tools for Bright Data for Google, Bing or Yandex Search. Important: Return the response to Chat and also perform the webhook notification of responses."

On top of that, it is a good idea to add a few guardrails, such as:

  • Only call search tools when the question clearly needs live or factual data
  • Include source URLs and short snippets in the final answer
  • Keep replies concise but informative

Staying safe: security and compliance

Because this workflow reaches out to external websites and handles user input, it is worth keeping a few basics in mind:

  • Avoid sending sensitive personal data to third-party search tools.
  • Monitor and log queries to catch abuse or unexpected usage.
  • Respect website Terms of Service and scraping rules. Bright Data’s MCP helps with technical compliance, but legal responsibility is still on you.

Tips for testing and debugging

Before you roll this out to real users, it is smart to play with it in a safe environment.

  • Use a test or sandbox self-hosted n8n instance.
  • Point the HTTP Request node to tools like webhook.site or requestbin so you can inspect outgoing webhook payloads.
  • Log the raw SERP results from Bright Data. Seeing the exact URLs, titles, and snippets makes it easier to fine-tune your prompts.
  • Use the n8n Manual Trigger node to run the workflow with sample queries as you tweak things.

Performance and cost optimization

Once everything works, you will probably want to make it faster and cheaper to run. A few ideas:

  • Cache frequent queries for a short time window (for example, 5 to 30 minutes) so you do not re-run the same search over and over.
  • Use targeted searches with filters like site: when you know where the answer is likely to live. That cuts noise and processing time.
  • Limit the number of search results that the agent processes, such as the top 3 to 5 results. This reduces token usage and speeds up responses.

Common issues and how to fix them

Problem: MCP Client returns an empty SERP

If you are getting no search results back, check:

  • That the query is encoded correctly
  • Which search engine you selected (google, bing, or yandex)
  • Your Bright Data configuration and credentials

It also helps to run the same query directly in a browser to confirm that it should return results.

Problem: The AI Agent seems to ignore search tools

If the agent never calls the Bright Data tools, verify:

  • That the system prompt clearly instructs it to use the MCP Search Engine tools when needed
  • That the tool outputs are properly wired into the agent node in n8n
  • That tool names and mappings in the MCP Client List node match what the agent expects

Making the most of this template

Using Google Gemini with Bright Data through n8n is a very practical way to give your chatbot real-time, verifiable knowledge without hand-coding a whole integration from scratch.

A good rollout path might look like this:

  1. Start with a single search engine (for example, Google).
  2. Refine your system prompt and tool usage rules.
  3. Add caching and basic rate limiting.
  4. Then expand to multiple search engines and more webhook consumers as your needs grow.

Ready to try it?

If you are excited to give your chatbot real-time search superpowers, here is a simple way to get started:

  1. Spin up or use your existing self-hosted n8n instance.
  2. Install the MCP Client community node for Bright Data.
  3. Import this template and plug in your Google Gemini and Bright Data credentials.
  4. Test with a few sample queries and watch the SERPs and webhooks in action.

You can also download the template and follow the README in the Bright Data MCP repository for step-by-step setup details.

If you would like help tailoring this workflow to your stack or use case, feel free to reach out to your automation team or drop a comment with what you are trying to build.


Disclaimer: This workflow uses community nodes and Bright Data MCP tools and is intended for self-hosted n8n deployments. Make sure you follow all relevant terms of service for any content that is scraped or processed.