AI Agent to Chat with Airtable (n8n + OpenAI)

AI Agent to Chat with Airtable: Build a Smarter, More Focused Workflow with n8n + OpenAI

Imagine talking to your Airtable data like you talk to a teammate. No more digging through views, building complex filters, or exporting to spreadsheets. With a single message, you ask a question and get back exactly what you need – summaries, charts, maps, and insights that help you act faster.

This is what an AI chat agent for Airtable makes possible. Using an n8n workflow template powered by OpenAI, you can turn natural language questions into precise Airtable searches, filters, and visualizations. In this guide, you will walk through the journey from manual data wrangling to conversational data access, and see how this template can become a foundation for a more automated, focused way of working.

From Manual Filters To Conversational Insight

Most teams already rely on Airtable to store business-critical information. Product catalogs, orders, leads, support tickets, projects, campaigns – they all live there. The challenge is not storing the data, it is turning that data into answers quickly.

Without automation, you might find yourself:

  • Clicking through multiple views and filters to answer simple questions
  • Exporting CSVs into spreadsheets to run basic calculations
  • Copying and pasting data into other tools to create charts or maps
  • Losing time context-switching between tools and tabs

These tasks are important, but they are not the best use of your focus or creativity. An AI agent changes the dynamic. Instead of you adapting to the tool, the tool adapts to you.

Shifting Your Mindset: Let the Agent Do the Heavy Lifting

Building an AI agent for Airtable is not just a technical exercise. It is a mindset shift. You are moving from “I need to build a view for this” to “I will just ask a question.”

With a conversational AI agent connected to Airtable, you can:

  • Turn natural-language questions into Airtable searches and filters
  • Automatically aggregate, count, and summarize records
  • Generate visual outputs like maps and charts on demand
  • Keep context across multiple questions in the same conversation

Instead of manually configuring filters every time, you describe what you want: “Show me orders where Status is Shipped in March” or “Find tickets mentioning timeout or error with priority greater than 3.” The agent translates those requests into Airtable formulas and API calls for you.

This template is a practical way to start thinking in terms of automation-first workflows. You do not have to reinvent your entire system. You can start with one workflow, see the impact, then expand.

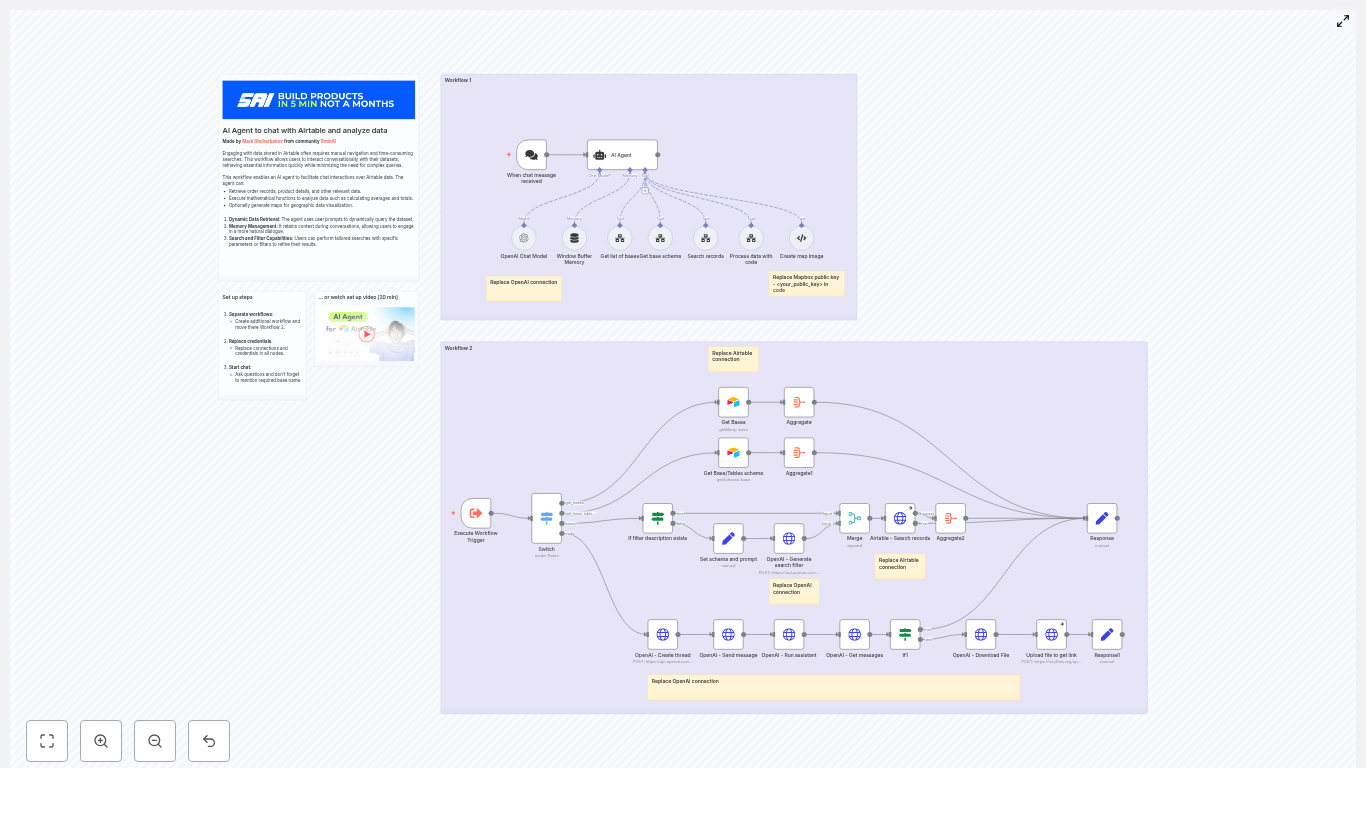
Meet Your New Workflow: n8n + OpenAI + Airtable

The provided n8n workflow template orchestrates a full conversational agent around your Airtable data. It is designed to be modular, safe, and extensible, so you can adapt it to your needs as you grow.

At a high level, the workflow connects four key pieces:

  1. A chat entry point that receives user messages
  2. An AI agent powered by OpenAI that interprets intent and chooses tools
  3. Specialized tools and sub-workflows that talk to Airtable and other APIs
  4. Code and visualization helpers that transform raw data into insights

Let us walk through the main components so you can see how everything fits together and where you can customize and extend it.

Core Components of the n8n AI Agent Workflow

1. Chat Trigger: The Conversation Starting Point

The journey begins when a user sends a message. The Chat Trigger node in n8n:

  • Starts the workflow whenever a new chat message arrives
  • Captures the message content
  • Includes a session identifier so the agent can maintain conversational context

This context is what allows the agent to understand follow-up questions like “What about last month?” without you repeating all the details.

2. AI Agent (OpenAI): The Brain of the Operation

The AI agent node, backed by OpenAI, is responsible for understanding what the user wants and deciding what to do next. It:

  • Interprets the user’s message and intent
  • Chooses which tools to call, such as search, code, or map generation
  • Builds structured requests to Airtable and other services
  • Uses a memory buffer to store recent conversation history for coherent follow-ups

Instead of you manually choosing views or writing formulas, the agent uses the available tools and your Airtable schema to construct the right queries on the fly.

3. Tools and Sub-workflows: Your Agent’s Skill Set

The power of this template comes from a set of reusable tools that the agent can call whenever needed. Each tool focuses on a specific task:

  • Get list of bases – Retrieves all available Airtable bases so the user can select the correct one. This is especially helpful if your organization has multiple bases for different teams or products.
  • Get base schema – Fetches table and field definitions so the agent knows exactly which fields exist and what types they are. This is essential for building accurate filters and queries.
  • Search records – Sends search requests to the Airtable API using formulas or filters generated by the agent. This is where natural language is turned into precise Airtable filter formulas.
  • Process data with code – Runs custom logic for aggregations, math operations, or transforming data into formats suitable for charts or images. This helps ensure numerical accuracy and flexible post-processing.
  • Create map image – Uses Mapbox to convert geolocation fields into a static map image link, enabling quick geographic visualizations of your Airtable records.

Each of these tools is a building block. You can use them as-is, combine them in new ways, or add your own tools as your automation needs expand.

Turning Natural Language Into Airtable Filters

One of the most transformative aspects of this workflow is its ability to convert free-text filter descriptions into valid Airtable formula filters. This is what allows you to speak in plain language while still getting precise results.

The workflow uses a staged approach to generate robust filters:

  1. Fetch the table schema so the agent knows the exact field names and data types it can work with.
  2. Send a structured prompt to OpenAI that describes Airtable formula best practices and examples, such as:
    • Using SEARCH(LOWER(...)) for case-insensitive text matching
    • Combining conditions with AND() and OR()
    • Handling date comparisons and type-specific checks
  3. Validate and merge the generated formula into the HTTP request body sent to the Airtable API.

This approach helps ensure that:

  • Filters are syntactically correct and aligned with Airtable’s formula language
  • Text comparisons are case-insensitive when needed
  • Field types are respected, so numeric and date fields are handled properly

The result is a workflow that reliably turns “Find tickets mentioning timeout or error and priority greater than 3” into a working Airtable formula without manual intervention.

Quick Setup: From Template to Working AI Agent

You do not need to start from scratch. The provided n8n template gives you a ready-made foundation that you can adapt in minutes. Here is how to get it running:

  • Clone the workflow into your n8n instance or import the template directly.
  • Update the credentials:
    • OpenAI API key
    • Airtable token
    • Optional Mapbox public key if you want map visualizations
  • Confirm base_id and table_id values, or rely on the Get list of bases tool to let users choose the base interactively.
  • Start with simple test queries, such as “Show me orders where Status = Shipped in March.”
  • Enable pagination and set sensible limits for large datasets so the workflow remains fast and reliable.

Once the basics are in place, you can iterate. Try different prompts, add new tools, and refine the system message or schema prompts to better match your business logic.

Working Safely: Best Practices for Reliable Automation

As you give an AI agent more power over your data, it becomes even more important to design for safety, clarity, and control. This template already bakes in good practices, and you can strengthen them further as you grow.

Data Minimization and Field Exposure

  • Expose only the minimum necessary fields to the agent.
  • Avoid including sensitive or confidential fields in conversations if they are not needed for the query.

Logging and Observability

  • Log user queries, generated filters, and returned record IDs.
  • Use these logs for auditing, debugging, and improving prompts or tool behavior over time.

Model Control and Prompt Safety

  • Limit the OpenAI model scope with a clear and controlled system message.
  • Reduce prompt injection risk by validating outputs against strict JSON schemas when possible.
  • Keep the agent’s capabilities focused and predictable.

Accurate Calculations and Aggregations

  • Use the dedicated code tool node for arithmetic, aggregations, and chart preparation.
  • Avoid relying on the language model itself to compute numbers.

These practices help you build an AI agent that is not only powerful but also trustworthy, auditable, and compliant.

Troubleshooting and Fine-tuning Your Agent

As you experiment and expand the workflow, you may run into common issues. These are not roadblocks, they are opportunities to tune your system and deepen your understanding.

Incorrect Filter Syntax

If the Airtable API returns an error, inspect the generated filter formula. Common adjustments include:

  • Wrapping text comparisons with SEARCH and LOWER for case-insensitive matches
  • Using VALUE() when comparing numeric values stored as text

Missing Fields in the Schema

Always fetch the table schema before generating filters. If a field is missing from the schema, the agent might reference a non-existent column, which will cause failures. Ensuring the schema is fresh and accurate helps the agent build valid queries every time.

Handling Large Result Sets

When working with large tables:

  • Set a default limit on the number of records returned.
  • Ask for explicit user confirmation before fetching all records.
  • Use pagination and aggregation to reduce payload sizes and keep responses fast.

Seeing It in Action: Example User Journeys

To understand the impact on your day-to-day work, it helps to see how typical flows feel when powered by this AI agent.

1. Sales Summary in Seconds

User: “Show me total revenue for Q2 by region.”

Agent actions:

  • Retrieve the schema to understand which fields represent revenue, dates, and regions
  • Search or filter records for Q2
  • Send the matching records to the code node to sum revenue and group by region
  • Return a table of totals, along with an optional map image to visualize performance by region

What might have taken several exports and pivot tables becomes a single conversation.

2. Support Ticket Investigation

User: “Find tickets mentioning ‘timeout’ or ‘error’ and priority > 3.”

Agent actions:

  • Generate an Airtable formula using SEARCH for case-insensitive substring matching
  • Combine conditions with AND and OR so both text and priority filters apply
  • Return the matching records and a short summary of counts or trends

Instead of building a complex filter manually, you describe the problem, and the agent does the rest.

Extending the Template as Your Automation Matures

This workflow is not a closed box. It is a starting point you can grow with. As your confidence and needs evolve, you can extend the template in powerful ways.

  • Role-based access control so only certain users can view specific fields or tables.
  • Webhook triggers that notify Slack or email when the agent finds critical records, such as high-priority tickets or overdue tasks.
  • Scheduled reports that run the same prompts automatically on a schedule and upload CSV results to cloud storage.

Each extension brings you closer to a fully automated, insight-on-demand environment where your team spends more time making decisions and less time preparing data.

Security and Compliance for Production Data

When you connect AI to live business data, security is non-negotiable. This template can fit into a secure, compliant environment when you follow a few essential guidelines.

  • Mask or redact PII before sending content to the OpenAI API if that data is not strictly needed for the query.
  • Use environment secrets in n8n for all keys and tokens, and avoid hardcoding credentials in shared workflows.
  • Maintain an audit trail of model prompts, generated filters, and actions for regulatory and internal compliance.

These practices help you scale your AI usage without compromising trust or governance.

Your Next Step: Turn Curiosity Into Automation

This n8n workflow template brings together a conversational AI agent, Airtable, and optional Mapbox visualization to make data exploration intuitive and fast. With schema-aware filter generation, dedicated code tools for accurate math, and modular tools for maps and more, it gives non-technical users a powerful new way to interact with data.

Most importantly, it is a stepping stone. You can start small, automate a single repetitive reporting task, then gradually build a richer AI-powered layer on top of your Airtable bases.

Ready to try it?

  • Import the workflow into your n8n instance.
  • Add your OpenAI and Airtable credentials, plus Mapbox if you want maps.
  • Run a few test queries and see how it changes the way you think about your data.

From there, keep iterating. Adjust prompts, refine safety rules, add new tools, and let your workflow evolve with your business.

Want support tailoring it to your specific base and logic, or need a security review before going live? Reach out for a guided setup and customization so you can move faster with confidence.

Send Telegram Messages with n8n Webhook

Send Telegram Messages with n8n Webhook

Integrating Telegram with n8n through a webhook is an efficient way to centralize alerts, notifications, and operational messages. This guide presents a compact, production-ready n8n workflow that accepts an HTTP request, forwards the payload to a Telegram chat, and returns a structured confirmation response. It is designed for automation engineers and operations teams who want a reliable, low-maintenance pattern for sending messages to Telegram from any external system.

Use Case and Value Proposition

n8n is an open-source automation platform that enables you to orchestrate APIs and services using visual workflows. Telegram offers a robust bot API that is widely adopted for operational alerts and lightweight chatbots. When combined via an HTTP webhook in n8n, you can:

  • Expose a simple HTTP endpoint that any system can call.
  • Forward message content directly into a Telegram chat or group.
  • Return a clear, human-readable confirmation to the calling system.

This pattern is particularly effective for:

  • Cron jobs and scheduled scripts that need to push status updates.
  • CI/CD pipelines that should notify teams on build or deploy events.
  • Monitoring and alerting tools that integrate via webhooks.
  • Internal tools that require fast, no-code notification routing.

What the Workflow Delivers

The template implements a minimal, yet complete, integration between an HTTP endpoint and Telegram. Specifically, it:

  • Listens for an HTTP GET request on a defined webhook path.
  • Reads a query parameter from the request and uses it as the Telegram message text.
  • Sends the message to a preconfigured Telegram chat ID using a bot credential.
  • Builds a friendly confirmation string that includes the Telegram recipient name and the message content.
  • Returns this confirmation as the HTTP response to the webhook caller.

This structure keeps the workflow small and maintainable while still being suitable for production use.

Prerequisites

Before importing and running the workflow, ensure you have:

  • An operational n8n instance, either cloud-hosted or self-hosted.
  • A Telegram bot token created via @BotFather.
  • The numeric chat ID for the Telegram user or group that should receive messages.
  • Basic familiarity with n8n concepts such as nodes, credentials, and expressions.

Architecture Overview

The workflow is intentionally minimal, with three core nodes that handle the complete request lifecycle:

  1. Webhook node – Exposes an HTTP endpoint and passes incoming parameters into the workflow.
  2. Telegram node – Uses the Telegram API credential to send the message to a specific chat ID.
  3. Set node – Constructs a human-readable response string that is returned to the original caller.

The Webhook node triggers the workflow, the Telegram node performs the outbound API call, and the Set node formats the final output. The workflow is configured so that the HTTP response is driven by the last node in the chain.

Workflow Template JSON

You can import the following JSON directly into n8n to create the workflow template:

{  "id":"5","name":"bash-dash telegram","nodes":[{"name":"Webhook","type":"n8n-nodes-base.webhook","position":[450,450],"webhookId":"b43ae7e2-a058-4738-8d49-ac76db6e8166","parameters":{"path":"telegram","options":{"responsePropertyName":"response"},"responseMode":"lastNode"},"typeVersion":1},{"name":"Set","type":"n8n-nodes-base.set","position":[850,450],"parameters":{"values":{"string":[{"name":"response","value":"=Sent message to {{$node[\"Telegram\"].json[\"result\"][\"chat\"][\"first_name\"]}}: \"{{$node[\"Telegram\"].parameter[\"text\"]}}\""}]}},"options":{}},"typeVersion":1},{"name":"Telegram","type":"n8n-nodes-base.telegram","position":[650,450],"parameters":{"text":"={{$node[\"Webhook\"].json[\"query\"][\"parameter\"]}}","chatId":"123456789","additionalFields":{}},"credentials":{"telegramApi":"telegram_bot"},"typeVersion":1}],"active":true,"settings":{},"connections":{"Set":{"main":[[]]},"Webhook":{"main":[[{"node":"Telegram","type":"main","index":0}]]},"Telegram":{"main":[[{"node":"Set","type":"main","index":0}]]}}}

Important: Update the following before using in production:

  • chatId – Replace 123456789 with your actual Telegram chat ID.
  • credentials – Point to your own Telegram bot credential in n8n.
  • path – Adjust the webhook path if you want a custom endpoint.
  • Query parameter name – This example expects a query parameter called parameter that contains the message text.

Detailed Node Configuration

1. Telegram Credential Setup

First configure secure access to the Telegram API:

  • In n8n, navigate to Credentials and create a new Telegram credential.
  • Provide the bot token obtained from @BotFather.
  • Assign a clear name, for example telegram_bot, so it is easy to reference in workflows.
  • Ensure the credential is stored securely and never commit the token to version control or share it in logs.

2. Webhook Node – HTTP Entry Point

Next, define the inbound interface that external systems will call:

  • Method: GET (you can also use POST later if you prefer JSON bodies).
  • Path: telegram or another unique path, for example alerts-telegram.
  • Response Mode: Last Node so that the response from the Set node is returned to the caller.
  • Response Property Name: set to response in the node options, which aligns with the Set node configuration.

For the basic template, the incoming message text is read from the query parameter parameter, for example:

?parameter=Hello%20from%20n8n

3. Telegram Node – Message Dispatch

The Telegram node is responsible for sending the actual message to your chat:

  • Text: Use an expression that references the query parameter from the Webhook node:
    = {{$node["Webhook"].json["query"]["parameter"]}}
  • ChatId: Set the numeric chat ID of the user or group you want to notify.
  • Credentials: Select the Telegram credential you created, for example telegram_bot.
  • Additional Fields: Leave empty for this simple use case or extend later for more advanced Telegram features.

When executed, this node uses the Telegram API to send the text content to the specified chat, and the API response becomes available to downstream nodes.

4. Set Node – HTTP Response Formatting

The Set node prepares a concise and informative message for the HTTP response. Configure it as follows:

  • Add a new string field named response.
  • Use this expression as the value:
    =Sent message to {{$node["Telegram"].json["result"]["chat"]["first_name"]}}: "{{$node["Telegram"].parameter["text"]}}"

This expression reads the recipient’s first name from the Telegram API response and the original message text from the Telegram node parameters, then combines them into a human-readable confirmation string. Because the Webhook node is configured with Response Mode: Last Node and responsePropertyName: response, this string is returned to the caller as the HTTP response body.

End-to-End Execution Flow

Once all nodes are configured and the workflow is active, the execution sequence is:

  1. An external system sends an HTTP request to the n8n webhook URL.
  2. The Webhook node parses the query parameter and passes it to the Telegram node.
  3. The Telegram node sends the message to the configured chat ID and exposes the result payload.
  4. The Set node constructs the final confirmation string using data from the Telegram node.
  5. The webhook returns this confirmation to the original HTTP caller.

Triggering and Testing the Webhook

After activating the workflow, you can test it with a simple curl command:

curl 'https://your-n8n-instance/webhook/telegram?parameter=Hello%20from%20n8n'

Expected behavior:

  • The configured Telegram chat receives the message Hello from n8n.
  • The HTTP response contains a confirmation similar to: Sent message to John: “Hello from n8n”, where John is taken from the chat.first_name field in the Telegram API response.

For local development or non-public environments, you can use a tunneling solution such as ngrok to expose your n8n instance temporarily for testing.

Troubleshooting and Diagnostics

If the integration does not behave as expected, validate the following:

  • Telegram credentials: Confirm that the bot token is correct and that the bot is active.
  • Chat ID: Ensure you are using the correct ID:
    • For direct user chats, use the user’s numeric Telegram ID.
    • For groups, invite the bot to the group and obtain the group ID.
  • Node execution logs: In n8n, inspect the execution data for the Telegram node to review the raw Telegram API response and identify potential errors.
  • Network reachability: Verify that the system sending the webhook can access the n8n instance URL and that there are no firewall or DNS issues.

Security Best Practices for Webhook to Telegram

When exposing webhooks that can trigger outbound messages, security and access control are critical. Consider the following measures:

  • Webhook authentication: Protect the endpoint using a secret token or parameter, for example: ?token=abc123. Validate this token within the workflow before sending any Telegram messages.
  • Transport security: Serve your n8n instance over HTTPS to protect credentials and message content in transit.
  • Least privilege for bots: Limit the permissions of the Telegram bot to only what is required for your use case.
  • Credential hygiene: Rotate Telegram bot tokens periodically and revoke any token that might be exposed or compromised.

Advanced Enhancements and Extensions

Once the basic pattern is in place, you can extend the workflow to support more complex automation scenarios:

  • Use POST and JSON payloads: Switch the Webhook node to POST and parse JSON bodies to handle richer message structures, attachments, or metadata.
  • Rich Telegram messages: Utilize Telegram node additional fields to send images, enable Markdown formatting, or include inline keyboards.
  • Structured API responses: Extend the Set node (or replace it with a Function/FunctionItem node) to return structured JSON responses tailored to the calling system.
  • Error handling and retries: Add IF nodes, error branches, or dedicated logging workflows to capture failures, retry transient errors, or store error details in a database.
  • Multi-tenant support: Parameterize chatId by looking it up from a datastore based on an incoming token, username, or system identifier, allowing a single webhook to route messages to multiple destinations.

Summary

This three-node n8n workflow provides a clean, production-ready pattern for sending Telegram messages via a webhook. It is well suited for alerting, operational notifications, and lightweight chatbot interactions. By importing the template, configuring your Telegram credential and chat ID, and applying basic security measures, you can have a robust Telegram notification endpoint running in minutes.

Next step: Import the template into your n8n instance, map it to your own Telegram bot and chat, and trigger the webhook from one of your existing systems. For more automation patterns and advanced n8n workflows, consider exploring additional templates and recipes tailored to your stack.

Outlook Inbox Manager Template for n8n

Outlook Inbox Manager Template for n8n

By 9:15 a.m., Lena’s day already felt lost.

As the operations lead at a fast-growing SaaS startup, she spent her mornings buried in Microsoft Outlook. Urgent tickets, billing questions, promo pitches, and random newsletters all landed in the same inbox. She tried rules, color coding, and folders, but nothing kept up with the pace.

Important messages went unanswered for hours. Billing emails slipped through the cracks. Promotional offers clogged her view. The more the team grew, the worse it got.

One Monday, after missing yet another high-priority outage email, Lena decided something had to change. That search led her to an n8n workflow template called Outlook Inbox Manager, an automation that promised to classify emails, clean them with AI, and even draft or send responses on her behalf.

This is the story of how she turned a chaotic Outlook inbox into an automated, reliable system using n8n.

The problem: An inbox that controls your day

Lena’s inbox was not just busy, it was noisy. Every new message demanded a decision:

  • Is this urgent or can it wait?
  • Is this a billing question that needs a careful reply?
  • Is this yet another promotion that needs a polite no?

She was spending hours each week doing the same manual tasks:

  • Scanning subject lines and bodies to guess priority
  • Moving emails into High Priority, Billing, or Promotions folders
  • Writing nearly identical responses to billing questions
  • Politely declining promotional offers one by one

It was not strategic work. It was triage. What Lena wanted was simple: a way to automate Outlook inbox management so she could focus on real conversations and decisions.

Discovery: Finding the Outlook Inbox Manager template

While exploring n8n templates, one title caught her eye: Outlook Inbox Manager. The description sounded like it had been written for her:

An automated n8n workflow that:

  • Classifies incoming Outlook emails into High Priority, Billing, and Promotion
  • Moves messages to the right folders automatically
  • Uses AI to clean HTML-heavy emails for better processing
  • Creates draft replies for billing inquiries
  • Sends polite declines for promotional emails

If it worked, her daily grind of triaging Outlook could almost disappear.

So she decided to try it.

Rising action: Bringing the workflow to life in n8n

Lena opened her n8n instance, imported the template JSON, and watched the workflow appear on her canvas. It looked like a small assembly line for email decisions, with every step clearly mapped out.

Step 1 – Outlook listens for every new email

At the very start was the Microsoft Outlook Trigger node. This would sit quietly on her inbox and fire whenever a new message arrived. No more manual refreshing, no more checking folders.

She connected her Microsoft Outlook OAuth2 credentials in the trigger and subsequent Outlook nodes, then tested the connection. Success. Every new email would now enter this workflow automatically.

Step 2 – Cleaning the chaos with AI

Next in line was a node called Clean Email (AI). Lena knew many of her customer emails were packed with HTML signatures and formatting that made parsing painful.

The Clean Email node used a language model to:

  • Strip out unnecessary HTML tags
  • Normalize the message body
  • Preserve all original content while turning it into clean, readable text

She connected her OpenAI credentials here, though the template also supported Google Gemini or Palm. Now the workflow would feed only clean text into the AI classifier, not messy HTML.

Step 3 – Teaching the workflow to recognize intent

The next node was where the magic happened: Text Classifier.

This AI-driven classifier would look at the cleaned email and assign it to one of three categories:

  • High Priority
  • Billing
  • Promotion

Under the hood, it combined keyword lists with AI context analysis. The default rules were already close to what Lena needed:

  • High Priority: urgent, ASAP, outage, escalation
  • Billing: invoice, payment, subscription, outstanding balance
  • Promotion: promo code, limited-time, special offer

She tweaked the keywords to match her team’s vocabulary, then adjusted the prompts so the model would be conservative at first. She wanted fewer false positives while she was still gaining trust in the automation.

Step 4 – Automatically sorting Outlook folders

Once the classifier decided on a category, the workflow branched into Folder Moves and Actions.

For each email, n8n would:

  • Move High Priority messages to a dedicated High Priority folder
  • Send Billing-related emails to a Billing folder
  • File promotional content into a Promotion folder

Lena configured folder paths inside the Outlook nodes so they matched her existing structure. The goal was simple: open Outlook and see an inbox that already knew what belonged where.

Step 5 – Agents that write like a human

The final part of the workflow was what really got her attention: Agents & Auto-Responses.

There were two agent nodes in the template, each powered by her chosen language model:

  • Billing Agent
  • Promotion Agent

Billing Agent: Drafts that are ready to send

Whenever an email was classified as Billing, the Billing Agent would:

  • Generate a draft response in Outlook for a human to review
  • Sign off as a representative of Lena’s company
  • Send a Telegram notification to the billing team with the details

Lena customized the system message for this agent so it understood her business context and policies. She added instructions like:

“You are a billing assistant for a SaaS company. Provide clear, concise, and friendly responses. Ask for invoice numbers if not provided, and never promise refunds without confirmation.”

This way, the drafts felt on-brand and accurate, but still left room for human oversight before sending.

Promotion Agent: Polite declines on autopilot

For emails tagged as Promotion, the Promotion Agent took a different role. It would:

  • Compose a polite decline to promotional offers
  • Use the Send Email node to reply automatically when configured to do so

These were the emails Lena always meant to respond to, but rarely had the time. Now, she could let the workflow send a courteous “no, thank you” without lifting a finger.

The turning point: First real-world test

With credentials connected and prompts tuned, Lena was ready for a live test. She sent a few sample emails from a personal account:

  • Subject: “URGENT: Our billing portal shows a past due invoice”
  • Subject: “Limited-time promo code for your team”
  • Subject: “Outage on EU servers – escalation needed”

Here is how the workflow handled the first one, in real time:

  1. The Microsoft Outlook Trigger fired as soon as the email arrived.
  2. The Clean Email (AI) node removed HTML artifacts and normalized the body.
  3. The Text Classifier recognized the words “billing portal” and “invoice” and tagged it as Billing.
  4. The email was moved into the Billing folder in Outlook.
  5. The Billing Agent generated a draft reply, ready for a billing specialist to review and send.
  6. A Telegram notification pinged the team with a link to the draft and a summary of the issue.

For the promotional email, the workflow neatly filed it into the Promotion folder and, after Lena enabled auto-send, replied with a friendly decline.

For the outage escalation, the classifier put it in High Priority, and Lena added a separate notification step to make sure her on-call team never missed such messages again.

In a single morning of configuration and testing, her inbox started behaving like a well-trained assistant.

Refining the system: Best practices Lena adopted

Once the core workflow was running, Lena spent a few days watching how it behaved and fine-tuning it. She followed several best practices that made the automation both safe and effective.

1. Start conservative with classification

At first, she kept the classification thresholds conservative so fewer emails were auto-moved. She:

  • Monitored which emails landed in each category
  • Adjusted keyword lists in the Text Classifier
  • Iterated on prompts to handle edge cases

Only after she trusted the accuracy did she expand the scope of what was automated.

2. Keep humans in the loop for sensitive topics

For anything involving money, contracts, or risk, Lena decided drafts were safer than auto-send. The Billing Agent always created drafts, not final emails.

This approach kept response times fast, while preserving human review for high-impact conversations.

3. Use rich, contextual prompts for AI agents

She learned that the more context she gave the agents, the better their replies became. Her system messages included:

  • Preferred tone of voice
  • Billing policies and refund rules
  • When to ask for extra details like invoice numbers

By treating prompts like internal playbooks, she made sure AI-generated drafts sounded like her team, not a generic bot.

4. Log and monitor everything

To build long-term confidence, Lena enabled logging and notifications. For High Priority items, she set up alerts via Telegram, and later experimented with Slack integrations for team visibility.

By reviewing classification outcomes regularly, she could refine the workflow and keep accuracy improving over time.

Staying safe: Security and privacy in the workflow

Because emails often carry sensitive information, Lena took security and privacy seriously from day one. As she rolled out the Outlook Inbox Manager template, she followed a few guidelines:

  • Avoid sending highly sensitive financial data to third-party AI models unless covered by clear data agreements.
  • Prefer enterprise or private AI deployments if required by compliance policies.
  • Restrict access to the n8n instance so only authorized team members can view or edit workflows and credentials.
  • Use n8n’s audit capabilities to track changes to workflows and monitor credential usage.

The result was an automation system that respected both productivity and compliance.

Looking ahead: How Lena plans to expand the workflow

Once the core template was stable and trusted, Lena started thinking about what else she could automate. The Outlook Inbox Manager template was just a starting point.

On her roadmap:

  • Multi-language support so international customers receive replies in their native language.
  • Attachment analysis to automatically extract invoice numbers or order IDs from PDFs or images.
  • CRM or ticketing system integration to open support tickets for High Priority issues directly from n8n.
  • Rate limiting and batching to control AI model usage and keep costs predictable.

Because the template was built on n8n, extending it with new nodes and branches felt natural rather than overwhelming.

The resolution: An inbox that finally works for her

A few weeks later, Lena noticed something she had not felt in months: her mornings were calm.

Her Outlook inbox was no longer a chaotic mix of everything. It was a filtered, organized view of what truly needed her attention. Billing drafts appeared ready for review. Promotions were answered without effort. High Priority issues surfaced with clear alerts.

The Outlook Inbox Manager template for n8n had not just saved her time, it had given her back control of her day.

How you can follow the same path

If Lena’s story feels familiar, you can follow the same steps to automate your own Outlook inbox with n8n.

Set up the Outlook Inbox Manager template

  1. Import the template JSON into your n8n instance.
  2. Connect your Microsoft Outlook OAuth2 credentials in the Outlook Trigger and related nodes.
  3. Connect your OpenAI or alternative language model credentials for the Clean Email and agent nodes. The template supports GPT models and Google Gemini or Palm.
  4. Adjust classification keywords and categories in the Text Classifier to match your organization’s language.
  5. Customize the Billing Agent system message with your business context, billing rules, and FAQs so AI-generated drafts are accurate and on-brand.
  6. Test with sample emails, then iterate on prompts and thresholds until classification and drafts feel right.

From there, you can expand the workflow to match your team’s unique processes, tools, and channels.

Ready to automate your inbox?

If you are tired of living in Outlook, the Outlook Inbox Manager template can be your turning point, just as it was for Lena. Import the template into n8n, connect your Outlook and AI credentials, and start reclaiming hours of manual email work every week.

Need help tailoring billing prompts, adding CRM integrations, or tuning classification? Reach out to your automation specialist or join the n8n community to learn from others who are already running similar workflows in production.

Your inbox does not have to be the bottleneck. Let automation handle the routine, so you can focus on what actually moves your business forward.

Outlook Inbox Manager: Automate Email Triage

Outlook Inbox Manager: Automate Email Triage With n8n And AI

High-volume inboxes are a persistent operational bottleneck. The Outlook Inbox Manager template for n8n combines Microsoft Outlook, large language models (LLMs), and messaging integrations to automatically classify, route, and respond to inbound email. The result is a consistent, auditable triage process that reduces manual workload and improves responsiveness to critical communication.

This article explains the use case, architecture, and configuration of the template in a way that is suitable for automation engineers and operations leaders. You will find a detailed overview of the core nodes, AI agents, routing logic, and recommended best practices for deployment in production environments.

Why Use n8n And AI To Automate Outlook?

Automating Outlook with n8n and AI enables a structured, policy-driven approach to email handling. Key benefits include:

  • Time savings at scale – Automatically classify and route billing, promotional, and high-priority emails without manual sorting.
  • Standardized communication – Generate consistent draft or automatic replies for recurring email types and categories.
  • Improved visibility – Push critical notifications to Telegram or other channels so urgent items are never buried in the inbox.
  • Extensibility – Add new categories, swap LLM providers, or connect downstream systems such as ticketing, CRM, or finance tools.

For teams that manage shared mailboxes, vendor communication, or customer escalations, this template provides a robust starting point that can be adapted to specific workflows and compliance requirements.

High-Level Workflow Overview

The Outlook Inbox Manager template implements a structured triage pipeline. At a high level, the workflow:

  1. Listens for new messages in Outlook using a Microsoft Outlook Trigger.
  2. Normalizes and cleans the email body with an LLM so it is easier to classify.
  3. Classifies the cleaned content into predefined categories using a Text Classifier node.
  4. Routes the email into appropriate Outlook folders based on category.
  5. Invokes AI agents to draft or send responses for selected categories.
  6. Sends Telegram alerts for high-priority and important financial messages.

Out of the box, the template supports three primary categories, which you can extend or refine:

  • High Priority – Urgent issues, outages, escalations.
  • Billing – Invoices, payments, subscriptions, financial queries.
  • Promotion – Marketing communications, offers, newsletters.

Core n8n Nodes And Components

1. Microsoft Outlook Trigger

The entry point of the workflow is the Microsoft Outlook Trigger node. It connects to your Outlook account via OAuth2 and periodically polls for new emails.

Key configuration options:

  • Authentication – Use Microsoft Outlook OAuth2 credentials configured in n8n.
  • Polling interval – Define how frequently n8n checks for new messages. The template defaults to every minute, but you can adjust based on volume and latency needs.
  • Folder scope – Optionally restrict the trigger to a specific mailbox folder (for example, only monitor the primary inbox or a shared mailbox).

2. Clean Email Node

Raw emails often include HTML, signatures, and formatting that can degrade classification quality. The Clean Email node uses an LLM to:

  • Strip HTML tags and unnecessary markup.
  • Normalize whitespace and line breaks.
  • Preserve the full semantic content while returning a clean, plain-text representation.

This cleaned body is then passed downstream to the classifier and agents, which significantly improves prompt clarity and classification accuracy.

3. Text Classifier Node

The Text Classifier is the central decision node in the workflow. It receives the cleaned email content and assigns it to one of the configured categories based on descriptions and example phrases.

The template ships with three default categories:

  • High Priority – Phrases related to system failures, urgent issues, escalations, or time-sensitive actions.
  • Billing – Language mentioning invoices, billing cycles, payment status, subscriptions, or account balances.
  • Promotion – Wording typical of marketing campaigns, offers, discounts, and newsletters.

You can extend this node to include additional categories, such as:

  • Support
  • Sales
  • HR or Recruitment

For each new category, provide a concise description and several example phrases. This improves the LLM’s ability to disambiguate between similar intents and yields more reliable routing.

4. Routing And Actions

After classification, the workflow branches into different routing paths. For each category, the template applies a combination of folder moves, agent calls, and notifications.

  • High Priority Folder + Telegram Alert
    High-priority messages are moved into a dedicated Outlook folder. The workflow also sends a Telegram notification so operational teams can react quickly to urgent issues.
  • Billing Folder + Billing Agent
    Billing-related emails are moved into a specific Billing folder. A Billing Agent node generates a draft reply in Outlook, and a Telegram notification is sent to inform you that a draft is ready for review.
  • Promotion Folder + Promotion Agent
    Promotional content is moved into a Promotion folder. The Promotion Agent can optionally send a polite decline or acknowledgment email using a pre-defined template, depending on how you configure the Send Email node.

These routing paths can be extended to integrate with other tools, such as ticketing systems, CRMs, or internal APIs.

AI Agents In The Workflow

The template uses dedicated AI agents for handling specific categories. Each agent is configured with a system prompt and access to tools, such as creating drafts or sending emails via Outlook.

Billing Agent

The Billing Agent is designed to:

  • Interpret billing-related queries or invoices.
  • Generate a context-aware draft reply that aligns with your billing policies.
  • Create the draft in Outlook so a human can review and approve before sending.

This pattern provides automation without sacrificing control for sensitive financial communication.

Promotion Agent

The Promotion Agent focuses on marketing and promotional emails. By default, it:

  • Applies a concise, polite decline or acknowledgment template.
  • Uses the Send Email node to deliver an automatic response when configured to do so.

You can easily adapt its system prompt to reflect your brand tone, opt-out policies, or any compliance-related wording.

Model Choices

The template includes support for multiple LLM providers. Out of the box, it is wired to both:

  • OpenAI models, such as gpt-4o-mini / 4o mini.
  • Google Gemini (for example, Flash 2.0) via the corresponding n8n nodes.

You can select a single provider or combine them, for example, using a faster model for cleaning and classification and a more nuanced model for drafting complex responses.

Step-by-Step Setup Guide

To deploy the Outlook Inbox Manager template in your n8n instance, follow these steps:

  1. Import the template
    Load the Outlook Inbox Manager template into your n8n environment. This will create all required nodes and connections in a single workflow.
  2. Configure credentials
    Connect the necessary credentials in n8n:
    • Microsoft Outlook OAuth2 for the trigger, folder moves, draft creation, and sending emails.
    • OpenAI or Google PaLM / Gemini credentials for the LLM-based nodes (cleaning, classification, and agents).
    • Telegram Bot token if you want instant notifications for high-priority or billing messages.
  3. Adjust the polling interval
    In the Microsoft Outlook Trigger node, set the polling frequency that matches your operational needs and API rate limits. The template is configured to poll every minute by default.
  4. Customize classification categories
    Open the Text Classifier node and:
    • Review the definitions for High Priority, Billing, and Promotion.
    • Add or remove categories as needed.
    • Refine example phrases using your organization’s terminology to improve classification accuracy.
  5. Tailor agent prompts
    For the Billing and Promotion agents:
    • Edit the systemMessage and tool instructions to reflect your tone, brand voice, and escalation rules.
    • Include standard sign-offs, disclaimers, or legal text if required.
  6. Test with sample emails
    Before enabling in production:
    • Send representative test emails for each category.
    • Verify that messages are classified correctly and moved to the expected folders.
    • Confirm that billing drafts are created and that Telegram notifications are sent when expected.
    • Check that any automatic replies from the Promotion Agent are accurate and on-brand.
  7. Activate the workflow
    Once you are satisfied with the behavior in test scenarios, enable the workflow in n8n. Monitor initial executions closely during the first days of production use.

Advanced Customization Ideas

The template is intended as a foundation. Automation professionals can extend it in several directions:

  • Support ticket integration
    Add a “Support” category in the Text Classifier and connect it to tools such as Zendesk, Jira, or ServiceNow to automatically create tickets from relevant emails.
  • Finance workflow automation
    Route vendor invoices to a shared finance mailbox and automatically upload attachments to cloud storage (for example, S3 or Google Cloud Storage) for downstream processing.
  • Sentiment-aware prioritization
    Integrate sentiment analysis to detect angry or highly negative messages and treat them as high priority even if they do not match explicit keyword patterns.
  • Granular reply strategies
    Enable full auto-reply for promotional content, while maintaining draft-only behavior for billing or other sensitive categories.
  • Analytics and auditing
    Log classification results and routing decisions into a Google Sheet or database. Use this data to monitor model performance, refine prompts, and support internal audits.

Security And Privacy Considerations

When automating email handling, security and compliance must be treated as first-class requirements. Consider the following practices:

  • Least privilege for Outlook access
    Limit the mailboxes and folders accessible by the Outlook credentials. Avoid granting broader access than necessary.
  • Data handling for LLM providers
    If your LLM provider has specific data policies, sanitize or redact personally identifiable information (PII) before sending content. Where possible, run models in a private cloud or on-premise GPU environment.
  • Cross-system exposure
    Drafts, logs, and Telegram notifications may contain sensitive text. Review what content is shared across systems and configure retention appropriately.
  • Credential security
    Store credentials in n8n using encryption, and rotate keys and tokens regularly in line with your organization’s security standards.

Testing And Troubleshooting

Before scaling usage, validate the workflow thoroughly. Run the workflow in manual mode in n8n or send controlled test emails and observe each node execution.

Common troubleshooting approaches include:

  • Misclassification issues
    If emails are routed to the wrong category:
    • Add more specific example phrases for each category.
    • Ensure the Clean Email node produces clear, concise text for the classifier.
  • Draft creation failures
    If billing drafts do not appear in Outlook:
    • Re-check Outlook OAuth2 credentials and permissions.
    • Verify that the Create Draft node uses valid recipients and folder settings.
  • LLM or prompt-related errors
    Inspect logs from LLM nodes to identify prompt formatting or token limit issues. Improving the cleaning step or simplifying prompts often resolves these problems.
  • Notification overload
    If Telegram alerts are too frequent:
    • Introduce a rate limiter node.
    • Change the pattern to send a periodic digest rather than real-time notifications.

Deployment Checklist

Before rolling out the Outlook Inbox Manager to production users, confirm that:

  • All required credentials (Outlook, LLM providers, Telegram) are connected and tested.
  • Classification categories are aligned with your business terminology and use cases.
  • Agent prompts are tailored, including tone of voice, sign-offs, and any legal disclaimers.
  • Telegram or alternative notification channels are configured where needed.
  • The workflow is enabled and monitored closely for the first 48-72 hours to catch edge cases.

Conclusion And Next Steps

The Outlook Inbox Manager template provides a practical, extensible framework for AI-driven email triage in Outlook. By combining n8n’s orchestration capabilities with LLM-based classification and response generation, you can reduce inbox noise, ensure timely handling of critical messages, and standardize repetitive communication.

Getting started is straightforward: import the template into your n8n instance, connect your credentials, customize categories and prompts, then validate behavior with a set of sample emails.

If you prefer expert assistance with configuration, policy alignment, or advanced integrations, you can engage support for hands-on setup and prompt engineering tailored to your organization.

Contact us to schedule a configuration session or to discuss custom integrations with your existing systems.

Automate LinkedIn Contributions with n8n & AI

Automate LinkedIn Contributions with n8n & AI

Ever stare at LinkedIn thinking, “I should really be more active here,” then get lost in other work? You are not alone.

If you want to show up consistently, share smart insights, and stay visible in your niche, but you do not have time to hunt for posts and write thoughtful replies every week, this n8n workflow template is going to feel like a superpower.

In this guide, we will walk through an automation that:

  • Finds fresh LinkedIn Advice articles on topics you care about
  • Pulls out the key topics and existing contributions
  • Uses AI to write unique, helpful responses for each topic
  • Sends everything to Slack and logs it in NocoDB
  • Runs on a schedule so you keep showing up, week after week

Think of it as your “LinkedIn engagement assistant” that quietly works in the background while you focus on everything else.


Why bother automating LinkedIn contributions at all?

LinkedIn rewards people who show up regularly with thoughtful input. When you consistently comment on relevant content, you:

  • Build credibility as someone who knows their stuff
  • Stay visible to your network and potential clients or employers
  • Attract conversations, collaborations, and opportunities

The problem is not the value of doing this. It is the time it takes.

Finding the right articles, reading them, pulling out the topics, then writing something original for each one can easily eat an hour or two every week. That is exactly the part this n8n workflow automates for you.

With n8n plus an AI model, you can:

  • Let automation discover new LinkedIn Advice content on your chosen topic
  • Have AI draft unique, topic-specific contributions for you to review and use
  • Keep everything organized in a database like NocoDB and instantly share it with your team via Slack
  • Stick to a consistent posting rhythm by running the whole thing on a schedule

You still stay in control of what you actually post, but the heavy lifting is done for you.


What this n8n LinkedIn workflow actually does

Let us zoom out for a second and look at the workflow from a high level. On each run, n8n will:

  1. Trigger itself on a schedule, for example every Monday at 08:00
  2. Search Google for LinkedIn Advice articles related to your chosen topic
  3. Pull LinkedIn article URLs out of the Google search HTML
  4. Split and deduplicate the links so each article is handled once
  5. Fetch each article’s HTML and extract the title, topics, and existing contributions
  6. Send that content to an AI model, which writes a unique paragraph of advice per topic
  7. Post the AI-generated contributions to a Slack channel and store them in NocoDB

So every time it runs, you end up with a list of curated LinkedIn articles, plus ready-to-use, AI-generated contributions that you can quickly review and post under your own name.


What you need before you start

You do not need to be a hardcore developer to use this, but you will need a few things set up:

  • An n8n instance (cloud or self-hosted)
  • An OpenAI API key or other supported LLM credentials configured in n8n
  • Slack OAuth2 credentials added in n8n to post messages to your workspace
  • A NocoDB project and API token
    You can also use Airtable or Google Sheets instead, if you prefer those tools.
  • Basic comfort with:
    • CSS selectors for grabbing elements from HTML
    • Simple JavaScript for the link extraction step

Once those are in place, you are ready to walk through the workflow nodes.


How the workflow is built in n8n

Let us go through the main nodes, in the order they run. You can follow this to understand the template or to rebuild / tweak it yourself.

1. Schedule Trigger – keep your cadence on autopilot

The whole automation starts with a Schedule Trigger node. This is what tells n8n when to run the workflow.

Typical setup:

  • Frequency: Weekly
  • Day: Monday (or whatever works for you)
  • Time: 08:00

Set it once, and your LinkedIn contribution engine quietly runs in the background at the same time every week.

2. Set your topic for Google search

Next up is a Set node that defines the topic you care about. Think of it as telling the workflow, “This is what I want to be known for.”

Example value:

  • Topic = "Paid Advertising"

This topic gets plugged into the Google search query, so you can easily switch from “Paid Advertising” to “Marketing Automation”, “Product Management”, or any other niche without touching the logic of the workflow.

3. Google Search with an HTTP Request

Now we need fresh LinkedIn Advice articles. To do that, the workflow uses an HTTP Request node to call Google with a targeted search query.

Example query:

site:linkedin.com/advice "Paid Advertising"

The HTTP node returns the raw HTML of the search results page. We are not using an official Google API here, we are simply fetching the HTML so we can scan it for LinkedIn Advice URLs in the next step.

4. Extract LinkedIn article links with a Code node

Once we have the Google results HTML, we need to pull out the actual LinkedIn Advice article links.

This is where an n8n Code node comes in. It uses a regular expression to find URLs that match the LinkedIn Advice pattern.

Example regex used in the template:

const regexPattern = /https:\/\/www\.linkedin\.com\/advice\/[^%&\s"']+/g;

The Code node scans the HTML, grabs all matching URLs, and returns them as an array. These then get turned into individual items so each link can be processed on its own.

5. Split and merge to keep URLs unique

Google might show the same LinkedIn article in multiple results, so we need to avoid double-processing.

The workflow uses two nodes here:

  • Split Out node
    This takes the array of URLs and creates one item per link.
  • Merge node (with keepUnique behavior)
    Configured to merge on the URL field, it removes duplicates so each article is only processed once.

Result: a clean list of unique LinkedIn Advice URLs ready for content extraction.

6. Fetch article HTML for each LinkedIn URL

For every unique URL, the workflow uses another HTTP Request node to retrieve the full article HTML.

This HTML is exactly what we need for the next step: extracting the title, topics, and existing user contributions using CSS selectors in the HTML Extract node.

7. Extract title, topics, and contributions with HTML Extract

Now we get into the structure of the LinkedIn Advice page. The workflow uses an HTML Extract node to pull out specific elements.

In the template, these example selectors are used:

  • ArticleTitle: .pulse-title
  • ArticleTopics: .article-main__content
  • ArticleContributions: .contribution__text

These may change over time if LinkedIn updates its DOM, so if extraction breaks, you will want to inspect the page and adjust the selectors. The same pattern works if you ever decide to adapt this workflow to another site with a similar structure.

8. Generate AI-powered contributions with an LLM node

Once we have the article title and topics, it is time to bring in the AI.

The workflow sends the extracted content to an OpenAI / LLM node with a carefully structured prompt. The goal is to create original, topic-specific advice that complements what is already in the article.

The prompt typically asks the model to:

  • Read the article title and topics
  • Write one unique paragraph of advice per topic
  • Avoid repeating suggestions that are already mentioned in the existing contributions

Example prompt structure (simplified):

ARTICLE TITLE
{{ArticleTitle}}

TOPICS:
{{ArticleTopics}}

Write a unique paragraph of advice for each topic.

You can tune the model settings to match your style:

  • Lower temperature for more conservative, on-brand responses
  • Higher temperature for more creative, varied ideas

Think of this node as your brainstorming partner that never gets tired.

9. Post results to Slack and log them in NocoDB

Finally, the workflow takes the AI-generated contributions and does two things:

  • Posts to Slack
    A Slack node sends a formatted message to a channel of your choice. This is great for:
    • Sharing draft contributions with your team
    • Reviewing and editing before posting on LinkedIn
    • Keeping everyone aligned on what is going out
  • Saves a record in NocoDB
    A NocoDB node creates a new row with fields like:
    • Article title
    • Article URL
    • AI-generated contribution

    This gives you a searchable history of your ideas and comments, which you can reuse, repurpose, or analyze later.

At the end of each run, you have a neat bundle of curated content, AI suggestions, and a permanent record of everything generated.


Customizing the workflow to fit your style

The template works out of the box, but you will probably want to tweak it so it feels like it was built just for you.

Refine your Google search query

Instead of a broad topic, you can target specific subtopics or multiple related keywords. For example:

site:linkedin.com/advice "marketing automation" OR "PPC"

Adjusting the query lets you home in on the exact type of content and conversations you want to be part of.

Use your preferred database

The example uses NocoDB, but the workflow is essentially just storing structured rows of data. You can easily swap in:

  • Airtable
  • Google Sheets
  • Another database or spreadsheet tool supported by n8n

The logic stays the same, only the storage node changes.

Shape the AI’s voice

The prompt is where you teach the AI how to sound.

  • Add instructions like “Write in a friendly, professional tone”
  • Specify your audience, for example “Speak to B2B marketers”
  • Set temperature lower for predictable, on-brand wording
  • Set it higher if you want more creative, varied responses

Spend a bit of time here and the AI will feel much closer to your natural voice.

Filter which articles get processed

If you want to be picky about what gets through, you can add filters, for example:

  • Only process articles whose title contains certain keywords
  • Skip articles with too few extracted topics

This keeps your queue full of only the most relevant content.

Add error handling

The real world is messy. Links break, APIs rate limit, HTML changes.

To make the workflow more robust, consider adding:

  • Error handling branches that:
    • Skip broken or unreachable URLs
    • Log errors to a separate database or Slack channel
  • Retry logic or exponential backoff for HTTP and LLM requests

This way, a few problematic links will not derail the entire run.


Privacy, rate limits, and best practices

Before you let this workflow run on autopilot, it is worth keeping a few guidelines in mind.

  • Respect publisher terms
    This workflow only fetches public LinkedIn article HTML and generates original contributions. Avoid scraping private or restricted content, and always stay within platform terms of service.
  • Watch API rate limits
    Google, LinkedIn, and your LLM provider may throttle requests. Use logging and, if needed, exponential backoff to avoid hitting hard limits.
  • Stay compliant and respectful
    Make sure your prompts and outputs follow platform policies. Avoid generating content that targets or makes claims about identifiable individuals.

And always remember: AI is a helper, not a replacement for your judgment.


Quick troubleshooting guide

Things not working as expected? Here are a few common issues and where to look first.

  • No links found in Google results
    Try:
    • Updating your Google search query
    • Inspecting the raw HTML to see if Google changed its DOM
    • Testing your regex against the returned HTML to confirm it still matches LinkedIn Advice URLs
  • Wrong or missing HTML extraction
    If titles or topics are coming back empty:
    • Open a sample article in your browser
    • Inspect elements and confirm the CSS selectors
    • Update the selectors in the HTML Extract node to match the current LinkedIn structure
  • Duplicate articles being processed
    If you see the same article more than once:
    • Check the Merge node configuration
    • Confirm it is set to keep unique items based on the URL field

Putting it all together

This n8n workflow takes the repetitive grind out of staying active on LinkedIn. It discovers relevant LinkedIn Advice articles, extracts the important bits, uses AI to generate unique and thoughtful contributions, and shares everything with you and your team via Slack while keeping a clean record in NocoDB.

You stay in control of what actually gets posted, but you no longer have to start from a blank page every time.

Ready to give it a spin?

  • Download or open the n8n template from this walkthrough
  • Plug in your OpenAI, Slack, and NocoDB (or Airtable / Google Sheets) credentials
  • Set your topic in the Set node
  • Turn on the schedule trigger and let it run

If you want help fine-tuning the prompt, swapping databases, or integrating this with a broader content system, you can reach out to the team or join the Let’s Automate It community for support and more templates.

Call-to-action: Download the

Chat with Airtable: AI Agent n8n Workflow

Build an AI Agent to Chat with Airtable Using n8n and OpenAI

Imagine opening a chat window, asking a simple question about your Airtable data, and instantly getting clear answers, charts, or maps – without touching a single formula. That is the shift this n8n workflow template creates.

Instead of wrestling with filters, field names, and manual calculations, you can talk to your Airtable base in natural language and let an AI agent do the heavy lifting. This workflow connects n8n, OpenAI, and Airtable so you can query, filter, and analyze your records conversationally, and free your time for work that actually moves your business forward.

The Problem: Your Data Is Powerful, But Hard To Talk To

Airtable is an incredible place to store and organize information, but when it is time to extract insights, things can get complicated fast. You often have to:

  • Remember exact field names and types
  • Write and debug filterByFormula expressions
  • Manually aggregate, sort, and calculate results
  • Copy data into other tools for charts, maps, or reports

Every one of those steps interrupts your focus and slows down decision making. Over time, that friction adds up and you stop asking deeper questions of your data, simply because it is too much work.

The Possibility: A New Way To Work With Airtable

Now imagine a different mindset. Instead of “How do I build this filter?”, you ask “What do I want to know?” and type that directly into a chat:

  • “Show me 10 pending orders where Price > 50.”
  • “Count how many active users signed up in March.”
  • “Plot customer locations on a map.”
  • “What is the average order value for Product X by region?”

The AI agent translates your natural-language request into Airtable filters, runs the search, performs the math, and can even generate visualizations for you. Instead of fighting with syntax, you stay focused on strategy, insight, and action.

This is not just a neat trick. It is a mindset shift toward automation-first work, where repetitive logic gets delegated to an AI-powered workflow, and you reclaim your time for higher-value thinking.

The Template: Your Launchpad To Conversational Airtable

To make this vision practical, this n8n template gives you a ready-made AI agent that connects to Airtable and responds to chat-style queries. You can import it, plug in your credentials, and start exploring your data in a more intuitive way.

At a high level, the solution is built as two complementary workflows inside n8n:

  • Workflow 1 – Handles incoming chat messages and orchestrates the AI agent
  • Workflow 2 – Executes the actual Airtable searches, schema lookups, code processing, and map generation

Together, they form a flexible foundation you can adapt, extend, and improve over time as your automation skills grow.

How The Architecture Works Behind The Scenes

Workflow 1 – Chat Trigger And AI Agent Orchestration

Workflow 1 is where the conversation begins. It receives user input, keeps context, and decides which tools to invoke.

  • When chat message received
    This is the entry point for user messages. It can be a webhook or chat trigger that sends the text into n8n whenever someone asks a question.
  • AI Agent
    This is the central decision maker powered by a large language model (LLM). It evaluates the user’s request and chooses which internal tool to call, such as:
    • get_bases
    • get_base_tables_schema
    • search
    • code
    • create_map

    Instead of just replying in plain text, the agent constructs structured commands that Workflow 2 can execute reliably.

  • OpenAI Chat Model & Window Buffer Memory
    The OpenAI Chat Model generates the reasoning and tool calls, while the Window Buffer Memory node keeps recent conversation context. This allows follow-up questions like “Now group that by region” to build on previous results.

Workflow 2 – Tools, Airtable Integration, And Data Processing

Workflow 2 receives structured commands from Workflow 1 and performs the actual operations against Airtable and other services.

  • Execute Workflow Trigger
    This node acts as the gateway. It receives internal commands from Workflow 1 and passes them into a Switch node that routes each request to the correct tool.
  • Get list of bases / Get base schema
    These nodes fetch your Airtable bases and table schema. The AI agent uses this information to reference the exact field names and types, which is essential for generating valid formulas and accurate queries.
  • Search records (custom tool wrapper)
    This custom tool runs Airtable searches using a generated filterByFormula. It can also limit returned fields and apply sorting, which keeps responses fast and focused.
  • Process data with code
    When the user asks for calculations or visualizations, the workflow sends raw data to a code node. This tool handles aggregation, averages, sums, and can generate chart or image data. It ensures numeric precision and avoids the ambiguity of having the LLM do math directly.
  • Create map image
    For geographic questions, this node uses Mapbox to return a static map image URL. You simply replace the placeholder Mapbox public key with your own token and the workflow can plot customer locations or any other spatial data.

Key Nodes That Power The Experience

AI Agent

The AI agent node is the “brain” of the system. It takes in the raw chat message, checks prior context through memory, and looks at the Airtable schema when needed. From there, it decides whether to:

  • Get base or schema information
  • Run a search with filters
  • Send data to the code node for calculations or charts
  • Create a map visualization

Instead of just producing text, the agent returns structured tool calls so that the rest of the workflow can operate in a predictable and repeatable way. This is what makes the automation robust enough to build on.

OpenAI – Generate Search Filter

This node is dedicated to turning human-friendly filter descriptions into Airtable-compatible formulas. It uses a JSON schema prompt so the model returns a clean object like:

{ "filter": "..." }

For example, a user request might result in:

AND(SEARCH('urgent', LOWER({Notes})), {Priority} > 3)

By constraining the output format, you get valid filters that plug directly into the Airtable API, which keeps the automation stable and predictable.

Airtable – Search Records

This node performs a POST request to Airtable’s listRecords endpoint using the generated filterByFormula. It also supports:

  • Limiting fields to only what is requested
  • Applying sorting rules
  • Handling pagination and aggregating results when needed

The result is a clean dataset that can be returned to the user or passed along to the code node for further processing.

Process Data With Code

Whenever the user asks something like “average order value” or “sum of sales by month,” this node steps in. It receives raw records and then:

  • Performs numeric operations such as count, sum, average, or grouping
  • Prepares chart-ready data structures
  • Can generate images or chart URLs if you wire it to a visualization service

By using a code node for math and visualization logic, you get reliable results and a clear place to customize how your numbers are calculated and displayed.

From Idea To Action: Setting Up The Workflow

Turning this template into a working AI agent is a straightforward process. Here is how to get started and build confidence step by step.

  1. Import the template into your n8n instance
    Add the template to your n8n environment. You can keep the two workflows linked together or separate them if you prefer a more modular setup.
  2. Replace credentials
    Update all credential references:
    • OpenAI API keys
    • Airtable API token and base access
    • Mapbox public key for map images

    The workflow includes sticky notes that highlight where to plug in these values.

  3. Confirm base and table IDs
    In the Execute Workflow Trigger test commands, check that the Airtable base and table IDs match your actual setup. Run a simple test call to verify that the connection is working.
  4. Run simple test prompts
    Start with clear, focused questions such as:
    • “Show me 10 pending orders where Price > 50.”
    • “Count how many active users signed up in March.”

    This helps you validate filter generation and confirm that the workflow is returning the right data.

As you gain confidence, you can move on to more complex prompts involving grouping, averages, or maps, and then refine the workflow to match your exact business logic.

Note inside the workflow: remember to replace OpenAI connections, Airtable connection, and your Mapbox public key (your_public_key).

Examples Of Natural-Language Queries You Can Try

Once everything is connected, you can begin exploring your Airtable data conversationally. Here are some ready-made prompts to spark ideas:

  • “Show top 20 orders from last month where Status = ‘Shipped’ and total > 100.”
  • “Count how many active users signed up in March.”
  • “Plot customer locations on a map.”
    The workflow will return a Mapbox image URL so you can visualize your geographic distribution.
  • “Average order value for Product X grouped by region.”
    The code node takes care of computing the averages and structuring the results.

Use these as a starting point, then adapt them to your own fields, tables, and business questions. The more you experiment, the more you uncover new ways to automate your analysis.

Best Practices For Reliable, Fast Automation

To keep your AI-powered Airtable chat agent accurate and responsive, it helps to follow a few practical guidelines.

  • Always fetch the base schema first
    Make sure the workflow retrieves the base schema before running searches. This allows the model to reference exact field names and types, which reduces errors in generated formulas.
  • Limit returned fields
    Return only the fields the user needs. This keeps payloads smaller, speeds up responses, and makes it easier to process data in the code node.
  • Use the code node for all aggregation
    For counts, sums, averages, and other numeric operations, rely on the code node instead of the LLM. This guarantees numeric correctness and keeps logic transparent.
  • Sanitize and validate user inputs
    If user input is inserted into formulas, validate or sanitize it to avoid malformed expressions or formula injection-like issues within Airtable.
  • Keep conversation memory focused
    Use a short, relevant memory window. For very long chats, purge or compress older context so you avoid token bloat and keep the model focused on the latest question.

Troubleshooting And Common Pitfalls

As you refine this workflow and adapt it to your own Airtable setup, you may run into a few common issues. Here is how to handle them confidently.

  • Filter fails or query errors
    If an Airtable query fails, run a test search without any filter to confirm that your base and table IDs are correct. Once that works, reintroduce the filter and inspect the generated formula.
  • Schema mismatches
    Ensure that the schema node returns field names exactly as Airtable defines them. Pay attention to case sensitivity and whitespace, since these can affect formula behavior.
  • Missing or incorrect credentials
    If nodes fail to connect, double-check that you have replaced all placeholder credentials for OpenAI and Airtable. The workflow includes sticky notes to guide you to the right places.
  • Map images not loading
    If map images do not appear, confirm that the Mapbox public key in the Create map image node has been replaced with your actual Mapbox public token.

Security Considerations As You Scale

As your automation grows, so does the importance of security. Keep these practices in mind:

  • Store all API keys in n8n credentials, not in plain text inside the workflow
  • Limit Airtable tokens to the minimum scope required for the workflows you run
  • If you generate downloadable files or send data to temporary upload endpoints, redact or restrict any sensitive PII before it leaves your system

By treating security as part of your automation design, you can scale this AI agent safely across your team or organization.

Extending The Workflow As Your Automation Matures

This template is a starting point, not a ceiling. Once you are comfortable with the basics, you can extend the workflow to support more tools and richer experiences.

Here are a few directions to grow:

  • Add more tools
    Connect Slack, email, or Google Sheets by adding new tool wrappers. For example, send summary reports to a Slack channel or log key metrics in a Google Sheet.
  • Introduce role-based responses
    Customize what different users can see. You could restrict certain fields or tables based on user role, so each person gets the right level of visibility.
  • Schedule recurring reports and alerts
    Use n8n scheduling to trigger the workflow daily, weekly, or monthly. Generate automated reports like “daily sales summary” or “weekly new signups” and deliver them where your team works.

Each improvement you make builds your automation muscle and moves you closer to a workflow where manual reporting and ad-hoc analysis are largely handled for you.

Take The Next Step: Try The Template

You now have a clear picture of what this AI agent can do, how it is structured, and how it can grow with you. The final step is to put it into action.

Here is a simple path to get started:

  1. Import the template into your n8n instance
  2. Replace OpenAI, Airtable, and Mapbox credentials
  3. Confirm base and table IDs in the Execute Workflow Trigger test commands
  4. Run a few simple prompts and watch the agent build filters, run searches, and process results
  5. Iterate: tweak fields, adjust code logic, and extend tools as your needs evolve

If you prefer a guided walkthrough, you can follow the step-by-step setup video (around 20 minutes): Watch setup video.

Ready to automate more of your Airtable workflows? Import the template, plug in your credentials, and ask your first question. Treat this as your starting point, then refine, extend, and make it truly your own. If you need help adapting it to your base or mapping your schema, share your base name and a sample query and you can be guided through the changes.

Reminder: inside the workflow, replace the OpenAI and Airtable connections and your Mapbox public key before going live.

Automate ASMR Video Production with n8n

Automate ASMR Video Production with n8n: One Creator’s Journey From Idea to Vertical Video

On a quiet Tuesday night, Mia stared at her content calendar and sighed.

Her ASMR TikTok account had finally started to grow. Followers loved her soft tapping, slow camera moves, and atmospheric visuals. But the part no one saw was the grind behind each 20-second vertical clip. Ideas lived in a messy Google Sheet, prompts were drafted by hand, videos were rendered in yet another tool, and then everything had to be uploaded, labeled, and tracked.

By the time Mia finished 3 short ASMR videos, she felt like she had edited a full-length film.

She knew she needed a different approach – something that could turn her Google Sheets ideas into published vertical videos without swallowing her entire week. That is when she discovered an n8n workflow template that promised to automate ASMR video production, from concept to final vertical clip.

The Problem: Too Many Repetitive Steps, Not Enough Creative Time

Mia’s bottleneck was not a lack of ideas. It was the repetitive pipeline:

  • Planning scenes and keeping track of them in Google Sheets
  • Writing detailed prompts for each 8-second ASMR moment
  • Sending those prompts to an AI video tool and waiting for renders
  • Downloading, organizing, and merging clips
  • Uploading everything to Google Drive and manually updating her sheet

Every step was small, but together they added hours to her workflow. She wanted to scale up her ASMR content, especially vertical TikTok-style videos, yet the manual process made that impossible.

While searching for “automate ASMR video production with n8n,” she stumbled across an automation template that connected Google Sheets, OpenAI, Kie AI, and Google Drive into a single n8n workflow. It claimed to turn simple spreadsheet rows into finished 9:16 ASMR videos with almost no manual intervention.

Curious, and a little skeptical, she decided to try it.

The Discovery: An n8n Workflow That Turns a Sheet Into a Production Line

The template described an end-to-end n8n workflow that would:

  • Read ASMR video concepts from a Google Sheet
  • Use OpenAI to generate cinematic, JSON-safe prompts for each scene
  • Send those prompts to an AI video generator like Kie AI
  • Wait for the vertical clips to render, then download and store them
  • Merge the clips into a single final video
  • Upload everything to Google Drive and update the original sheet row

For Mia, this sounded like a small studio team living inside a workflow: planning, generating, rendering, and filing her ASMR videos automatically.

She opened n8n, imported the template, and began tailoring it to her own creative process.

Act 1: Setting Up the Source of Truth in Google Sheets

The first thing Mia had to do was bring order to her ideas.

Triggering the Workflow and Fetching “Ready” Concepts

In the template, everything started with a trigger node in n8n. Mia could run it manually when she was ready, or schedule it to fire at specific times. The trigger passed control to a Google Sheets node that pulled in rows where the Status column was set to “Ready.”

Each row in her sheet became a blueprint for one ASMR video. She structured it like this:

  • Concept Name – the theme of the video
  • Scene Consistency Block – background, color palette, camera height, overall mood
  • Scene 1 Action – an 8-second ASMR motion
  • Scene 2 Action
  • Scene 3 Action
  • Status – Ready, Complete, Error, etc.

This sheet became her single source of truth. If a row was marked “Ready,” the workflow would pick it up, process it, and later mark it as “Complete” or “Error.”

Act 2: Organizing Assets in Google Drive

Next, Mia needed a place for all the raw and final videos to live. She used to drag files into random folders, then hunt for them later. The template solved that too.

Creating and Sharing a Folder Per Concept

For each sheet row, an n8n node created a dedicated folder in Google Drive. The folder name followed a pattern like:

ID - Concept

So if her sheet row had ID 7 and the concept was “Soft brush on velvet,” the folder might be called 7 – Soft brush on velvet.

The workflow then adjusted sharing permissions. If she wanted to use other services or accounts downstream, she could make the folder accessible without exposing everything in her Drive. This structure meant every asset for a given ASMR video lived in one traceable place.

Act 3: Turning Simple Actions Into Cinematic AI Prompts

Mia’s biggest time sink had always been writing prompts. For each 8-second ASMR action, she had to think about environment, lighting, camera style, and what she did not want the AI to generate.

The template handed that job to OpenAI.

Generating Scene Prompts With OpenAI

Inside n8n, a node took the Scene Consistency Block and each of the three scene actions from the sheet, then passed them to an OpenAI model similar to GPT-4.

The prompt template instructed the model to output very specific, repeatable generation prompts with sections like:

  • Environment & Setting
  • Lighting Setup
  • Core Action (8-second description)
  • Style & Camera (macro, 4K, camera motion)
  • Negative Prompts (no blur, no watermarks, no text)

The result was three JSON-safe prompt strings, one for each scene, formatted so they could be sent straight into the AI video rendering API without extra cleanup. The consistency block made sure all scenes shared the same background, color palette, and camera height for a cohesive final vertical clip.

Act 4: Watching the AI Render Vertical ASMR Clips

With the prompts ready, Mia reached the most nerve-racking part of her old process: rendering. Previously she would paste prompts into an AI tool, wait, refresh, and hope the output matched her vision.

The workflow template handled this with a calm, repeatable pattern.

Calling the AI Video Generator (Kie AI)

An HTTP Request node in n8n took each of the three prompts and sent them to an AI video API such as Kie AI. It included parameters like:

  • prompt – the JSON-safe prompt string
  • aspectRatio – set to 9:16 for vertical videos

The API responded by creating a render task. The workflow then:

  • Polled a record-info or similar endpoint to check the status
  • Waited when the clip was still rendering
  • Downloaded the final video file when ready
  • Uploaded that clip into the Google Drive folder created earlier

Looping Through Scenes Without Blocking Everything

To keep the automation efficient, Mia used split and loop-in-batches nodes. Each scene prompt went through the same render pipeline, but n8n managed them in batches instead of one giant blocking process.

A switch node checked whether the render was complete. If not, the workflow waited, then polled again. This pattern meant her automation could handle slow renders gracefully without locking up the entire workflow.

Act 5: From Separate Clips to a Finished Vertical Video

Once all three scenes finished rendering, Mia had a folder full of short vertical clips. In the past she would open a video editor, drag them in, and export a final file by hand. This time, n8n finished the job for her.

Merging Clips and Uploading the Final Video

Several nodes in the template gathered the three clips and passed them to a media merge step. The workflow combined them in order, creating a smooth ASMR story with three 8-second actions back to back.

The merged file was uploaded to the same Google Drive folder as final_video.mp4. Then the workflow returned to her Google Sheet and updated the original row:

  • Drive Folder URL – link to the folder containing all clips and the final video
  • Status – changed from “Ready” to “Complete”

For Mia, this felt like magic. She would mark a row “Ready,” and some time later, her sheet would show “Complete” with a Drive link to a fully produced ASMR vertical video.

Prompt Design Lessons Mia Learned for ASMR & TikTok Verticals

As she iterated, Mia discovered that good prompt design made the automation shine. The template’s guidance helped her refine her own style:

  • Be specific about surfaces and props
    Instead of “a bowl on a table,” she used phrases like “a matte black ceramic bowl on a pale oak surface.” This led to more visually satisfying ASMR scenes.
  • Include audio behavior cues
    Even though the AI focused on visuals, she added lines like “microphone-close up on crisp finger tapping sounds” to align visuals with the kind of ASMR audio she would layer in post-production.
  • Use a Scene Consistency Block
    She kept the same background, color palette, and camera height across all scenes. This “Scene Consistency Block” ensured the final merged video looked cohesive.
  • Limit each Core Action to 8 seconds
    Clear, single motions per scene created punchy, watchable vertical clips.
  • Write strong negative prompts
    She explicitly forbade text, logos, watermarks, and drastic lighting changes to avoid distracting or inconsistent renders.

Behind the Scenes: Costs, Security, and Reliability

As Mia’s output grew, she had to think like a producer, not just a creator. The template helped her address cost, security, and error handling so the automation stayed safe and sustainable.

Watching Costs

AI video rendering can be resource-intensive. Mia checked her video API provider’s pricing and estimated a cost per clip. Then she added simple guardrails in n8n, such as limiting the number of renders per day, so a single batch of ideas would not accidentally blow through her monthly budget.

Securing Secrets & Permissions

  • She stored all API keys and OAuth credentials inside n8n credentials, never as raw values in Google Sheets.
  • Drive folders were shared with the minimum permissions required. Public links were set to viewer-only, and write access was restricted to the services that genuinely needed it.

Handling Errors Gracefully

To avoid silent failures, Mia configured:

  • Retries on unstable API calls
  • Clear error logging inside n8n

If a render failed, the workflow updated the corresponding Google Sheet row with Status = “Error” and included the error message. That way she could quickly see which concept needed attention instead of guessing.

When Things Go Wrong: Troubleshooting the Workflow

As she experimented with more concepts, Mia ran into a few predictable issues. Fortunately, the template had guidance for those too.

  • API rate limits
    If she pushed too many prompts or render requests at once, APIs sometimes responded with rate limit errors. She added exponential backoff and simple queuing logic in n8n so the workflow slowed down and retried instead of failing outright.
  • File size and duration limits
    She checked that her merge node supported the resolution and duration of her 9:16 clips. When she experimented with longer videos, she adjusted settings to stay within limits.
  • Prompt output formatting
    She made sure to instruct OpenAI to return plain JSON-safe strings. This prevented parsing errors when the prompts were passed into the video API.

Scaling Up: From One Creator to a Content Machine

Within a few weeks, Mia had gone from manually crafting a handful of ASMR TikToks to running a small production line powered by n8n. That is when she started thinking bigger.

Batching Concepts

Instead of working on one idea at a time, she filled her Google Sheet with multiple rows and scheduled the workflow to run in batches. She also capped concurrent renders so she did not overload her video API or her budget.

Reusing Scene Consistency Blocks

She created a library of Scene Consistency Blocks for different series, like “soft pastel bedroom” or “dark studio with spotlight.” These reusable blocks gave each series a recognizable look and made it easy to spin up new concepts with a consistent aesthetic.

Automated Publishing (Optional)

Once she trusted the core workflow, Mia considered adding an upload API step to publish directly to platforms like TikTok or YouTube Shorts. With a few extra nodes, she could schedule posts or send final files to a separate upload service as part of the same n8n automation.

The Turning Point: From Overwhelmed to In Control

The real turning point came when Mia realized she no longer dreaded “content production days.” Instead of juggling tools, she spent her time where it mattered most:

  • Brainstorming better ASMR concepts
  • Refining her Scene Consistency Blocks
  • Tuning prompts for more cinematic, soothing visuals

Her Google Sheet turned into a dashboard. Rows moved from “Ready” to “Complete,” each with a Drive link to a finished vertical video. The n8n workflow quietly handled everything in between.

Resolution: What This n8n Automation Really Delivers

By the end of her experiment, Mia had proved something to herself:

A simple Google Sheet, combined with n8n, OpenAI, and an AI video generator, can become a fully automated ASMR video production line.

The workflow:

  • Removes repetitive manual tasks
  • Speeds up experimentation and iteration
  • Maintains a consistent visual aesthetic across multiple vertical videos
  • Scales ASMR content production without burning out the creator

Try the Same Journey: Your Next Steps

If you see yourself in Mia’s story, you can follow the same path in a low-risk way.

  1. Create a Google Sheet with a Scene Consistency Block and three simple 8-second actions for a single ASMR concept.
  2. Import this n8n template and connect your Google Sheets, Google Drive, OpenAI, and video API credentials.
  3. Mark one row as Status = “Ready”, run the workflow, and examine the results.
  4. Iterate on your prompts, refine the consistency block, and adjust the cost guardrails to fit your monthly budget.

If you want to go deeper, you can export your sheet and tune the prompt templates further, or extend the workflow with automated publishing steps.

Need help with the raw n8n template or OpenAI prompt rules? You can use the ready-made workflow file and a sample prompt package to get started quickly and safely.

Automate LinkedIn Contributions with n8n & AI

Automate LinkedIn Contributions with n8n & AI

Use n8n to systematically discover LinkedIn Advice articles, extract their content, and generate AI-assisted contributions that your team can review and post. This reference-style guide documents a reusable n8n workflow that:

  • Searches Google for LinkedIn Advice posts on a defined topic
  • Extracts article URLs and parses article content, topics, and existing contributions
  • Generates new contributions via an AI model (for example, GPT-4o-mini)
  • Stores the results in NocoDB and sends them to Slack for review

1. Use case & benefits

1.1 Why automate LinkedIn contributions?

Maintaining consistent, high-quality engagement on LinkedIn is effective for visibility and trust, but manually:

  • Searching for relevant LinkedIn Advice threads
  • Reading each article and existing contributions
  • Drafting original, useful replies

is time-consuming and difficult to scale.

This n8n workflow automates the discovery and drafting steps so that you can:

  • Maintain a regular presence without daily manual effort
  • Find relevant LinkedIn Advice articles using targeted Google queries
  • Generate unique, conversation-starting contributions per topic using AI
  • Store all drafts in a database and share them with your team via Slack

Human review is still recommended before posting, but most of the repetitive work is handled by automation.

2. Workflow architecture

2.1 High-level flow

  1. A trigger node starts the workflow on a schedule or on demand.
  2. A Set node defines the topic that will be used in the Google search.
  3. An HTTP Request node runs a Google search scoped to LinkedIn Advice pages.
  4. A Code node extracts all LinkedIn Advice URLs from the search results HTML.
  5. A Split Out node converts the URL array into individual items.
  6. A Merge node optionally deduplicates against previously processed items.
  7. An HTTP Request node fetches each LinkedIn article’s HTML.
  8. An HTML node extracts the article title, topics, and existing contributions.
  9. An AI node generates new contributions per topic based on the extracted data.
  10. Slack and NocoDB nodes send the results to a channel and store them in a table.

2.2 Core components

  • Triggers – Schedule Trigger or manual trigger to control execution cadence.
  • Data acquisition – HTTP Request nodes to query Google and fetch LinkedIn HTML.
  • Parsing & transformation – Code node (regex) and HTML node (CSS selectors) to extract links and article content.
  • AI generation – An OpenAI-compatible node to generate contributions.
  • Output & storage – Slack node for team visibility and NocoDB node for persistent storage.

3. Node-by-node breakdown

3.1 Trigger configuration

3.1.1 Schedule Trigger

Node type: Schedule Trigger

Purpose: Start the workflow on a recurring schedule.

Typical configuration:

  • Mode: Every Week
  • Day of week: Monday
  • Time: 08:00 (your local time)

You can adjust the schedule to match your desired cadence. Weekly is a good baseline for sustainable engagement. Alternatively, you can use the regular Manual Trigger node when testing or when you want full manual control.

3.2 Topic definition for Google search

3.2.1 Set Topic node

Node type: Set

Purpose: Define the search topic that will be interpolated into the Google search query.

Example configuration:

  • Field name: topic
  • Value: Paid Advertising or Marketing Automation or any niche you target

This value is referenced later in the HTTP Request node that calls Google. Keeping it in a Set node makes it easy to change or parameterize via environment variables or input data if needed.

3.3 Retrieve LinkedIn Advice articles via Google

3.3.1 HTTP Request – Google search

Node type: HTTP Request

Purpose: Perform a Google search restricted to LinkedIn Advice pages and the configured topic.

Key parameters:

  • Method: GET
  • URL: typically something like https://www.google.com/search?q=site:linkedin.com/advice+{{$json["topic"]}}

The query uses site:linkedin.com/advice to limit results to LinkedIn Advice content, then appends the topic from the Set node. The node returns the raw HTML of the Google search results, which is then parsed.

Edge cases:

  • Google may present captchas or blocking behavior for frequent or automated requests. Apply rate limiting and use realistic headers (for example, a user-agent string) to reduce the risk of blocks.
  • If you switch to a dedicated search API, keep the downstream parsing logic aligned with the new response structure.

3.4 Extract LinkedIn Advice URLs

3.4.1 Code node – extract article links

Node type: Code

Purpose: Run a regular expression on the Google search HTML to capture LinkedIn Advice URLs.

Logic:

  • Input: HTML returned by the Google HTTP Request node.
  • Regex pattern: targets URLs matching https://www.linkedin.com/advice/... or similar.
  • Output: An array of unique URLs that point to LinkedIn Advice articles.

This node filters out non-advice URLs and focuses only on pages under the LinkedIn Advice path.

Potential issues:

  • If Google changes the HTML structure of its search results, the regex may need adjustment to continue capturing URLs reliably.
  • Ensure you handle duplicates in this node or in a later deduplication step.

3.5 Split results into individual items

3.5.1 Split Out node

Node type: Split Out (Item Lists or similar)

Purpose: Convert the array of URLs from the Code node into individual n8n items so each article can be processed independently.

Each resulting item contains a single LinkedIn Advice URL. This allows n8n to handle each article in its own execution path, either sequentially or in parallel, depending on your configuration and environment.

3.6 Merge and deduplicate items

3.6.1 Merge node – dedupe

Node type: Merge

Mode: Keep Non-Matches

Purpose: Combine the newly extracted URLs with a previous set of processed items and avoid reprocessing duplicates.

Typical usage:

  • Input 1: Newly discovered URLs from the current run.
  • Input 2: Previously stored URLs (for example, from a database or previous workflow iteration).
  • Comparison: Based on the URL field to identify duplicates.

This step is optional but recommended if you are running the workflow regularly and want to avoid generating contributions for the same article multiple times.

3.7 Fetch LinkedIn article HTML

3.7.1 HTTP Request – article fetch

Node type: HTTP Request

Purpose: Retrieve the raw HTML for each LinkedIn Advice article.

Key parameters:

  • Method: GET
  • URL: the LinkedIn Advice URL from the current item.

Considerations:

  • LinkedIn may enforce rate limits or anti-scraping measures. Respectful intervals between requests and realistic headers can reduce the risk of being blocked.
  • Monitor HTTP status codes. For example, handle 4xx or 5xx responses gracefully, either via n8n error workflows or conditional logic, so a single failed request does not break the entire run.

3.8 Parse article title, topics, and contributions

3.8.1 HTML node – extract content

Node type: HTML

Purpose: Use CSS selectors to extract structured data from the LinkedIn Advice HTML.

Fields typically extracted:

  • ArticleTitle
    • Selector: .pulse-title (or the specific LinkedIn title selector used in your workflow).
    • Result: The visible title of the LinkedIn Advice article.
  • ArticleTopics
    • Selector: targets the main content area or a topic list element.
    • Result: The primary topics or sections that the article covers.
  • ArticleContributions
    • Selector: the element(s) that contain existing user contributions or replies.
    • Result: A list or concatenated text of visible contributions, used to avoid duplication.

Edge cases:

  • If LinkedIn changes the HTML structure or class names, selectors may break. In that case, update the CSS selectors in this node and re-test.
  • Some articles may have few or no visible contributions. The AI prompt should handle this case without errors.

3.9 AI-based contribution generation

3.9.1 AI node – LinkedIn Contribution Writer

Node type: OpenAI (or compatible AI node)

Purpose: Generate unique, topic-specific contributions for each LinkedIn Advice article using the extracted data.

Typical input fields to the prompt:

  • ArticleTitle
  • ArticleTopics
  • ArticleContributions (existing replies to avoid repetition)

Model configuration:

  • Model: for example, gpt-4o-mini or another OpenAI-compatible model.
  • Temperature: adjust to control creativity vs. determinism.

Prompt behavior:

  • Instruct the model to provide helpful advice for each topic.
  • Explicitly request that it avoid repeating points already present in ArticleContributions.
  • Optionally specify tone, length, formatting (for example, bullet points), and any brand voice guidelines.

Quality considerations:

  • If the AI output is too generic, refine the prompt with clearer constraints and examples.
  • If responses are too long, explicitly limit character count or number of bullets.

3.10 Post results to Slack and save to NocoDB

3.10.1 Slack node – share contributions

Node type: Slack

Purpose: Send the AI-generated contributions to a Slack channel for review and collaboration.

Typical message content:

  • Article title and URL
  • Generated contribution text
  • Topic or category

Use your Slack OAuth credentials and select the appropriate channel. This step keeps the team in the loop and ensures that contributions can be edited or approved before posting to LinkedIn.

3.10.2 NocoDB node – store contributions

Node type: NocoDB (Create Row / CreateRows)

Purpose: Persist each generated contribution in a structured database for tracking and analytics.

Typical fields:

  • Post Title
  • URL
  • Contribution (AI-generated text)
  • Topic
  • Person (owner, reviewer, or intended poster)

You can later extend the schema to include engagement metrics or posting status.

If you prefer a different storage backend, such as Airtable or Google Sheets, replace the NocoDB node with the corresponding integration node while preserving field mappings.

4. Prerequisites & configuration notes

4.1 Required services

  • n8n instance
    • Cloud or self-hosted deployment with access to HTTP Request, Code, HTML, Slack, and AI nodes.
  • OpenAI (or compatible) API credentials
    • Used by the AI node to generate contributions.
  • Slack credentials
    • Slack OAuth token or app credentials with permission to post to the selected channel.
  • NocoDB project & API token
    • Configured table to store contribution records.
  • Basic knowledge of CSS selectors
    • Required to maintain and adjust HTML extraction in case LinkedIn changes its DOM structure.

4.2 Google search query configuration

In the Google HTTP Request node, customize the query string to include your topic. A typical search pattern is:

site:linkedin.com/advice "Paid Advertising"

Adjust the quoted phrase to your target niche. You can also add additional keywords or filters to refine or broaden results.

5. Customization & advanced usage

5.1 Tuning the search query

  • Narrow results by using quoted phrases, additional keywords, or negative keywords.
  • Broaden results by removing quotes or adding related terms.
  • Date filtering can be handled manually in the query or by applying additional logic downstream based on article metadata, if available.

5.2 Refining the AI prompt

To align AI-generated contributions with your brand and goals:

  • Specify tone (for example, practical, friendly, analytical).
  • Request short, actionable tips or more in-depth commentary depending on your strategy.
  • Ask for bullet points if you prefer concise LinkedIn comments.
  • Include instructions to end with a question to encourage conversation, such as asking for others’ experiences.

5.3 Changing destination storage

If you prefer a different data store:

  • Airtable
    • Replace the NocoDB CreateRows node with an Airtable Create or Update node.
  • Google Sheets
    • Use the Google Sheets node to append rows with the same field mapping (Post Title, URL, Contribution, Topic, Person).

Automate SERP Tracking with n8n and ScrapingRobot

Automate SERP Tracking with n8n and ScrapingRobot

Systematic monitoring of Google search results is a critical activity for SEO and competitive intelligence. Doing this manually does not scale and often introduces inconsistencies. This guide describes how to implement a production-ready n8n workflow that uses the ScrapingRobot API to collect Google SERP data, normalize and rank the results, then store them in your own data infrastructure for ongoing analysis and reporting.

Use case overview: Automated SERP tracking in n8n

This workflow is designed for SEO teams, data engineers, and automation professionals who need to:

  • Track large keyword sets across multiple markets or domains
  • Maintain a historical SERP dataset for trend analysis
  • Feed dashboards, BI tools, or internal reporting
  • Detect ranking changes and competitor movements quickly

The pattern is simple but powerful: pull keywords, request SERP data via ScrapingRobot, parse and enrich the results, assign positions, and persist the data into your preferred destination.

Benefits of automating SERP collection

Automating SERP tracking with n8n and ScrapingRobot provides several concrete advantages:

  • Scalability – Monitor hundreds or thousands of keywords without manual effort.
  • Consistency – Capture data in a standardized format suitable for time-series analysis.
  • Integration – Connect easily to databases, spreadsheets, and dashboards already in your stack.
  • Speed of insight – Surface ranking shifts and competitor entries on a daily or weekly cadence.

Once the workflow is in place, it can run unattended on a schedule, providing an up-to-date SERP dataset for your SEO and analytics initiatives.

Requirements and setup

Before building the workflow, ensure you have the following components available:

  • An n8n instance (self-hosted or n8n cloud)
  • A ScrapingRobot account with an active API key
  • A keyword source, for example:
    • Airtable
    • Google Sheets
    • SQL / NoSQL database
    • Or a simple Set node for static test keywords
  • A destination for SERP results, such as:
    • Airtable
    • Google Sheets
    • Postgres or another SQL database
    • Any other storage system supported by n8n

Align your naming conventions early, particularly for the keyword field, so that downstream nodes can reference it consistently.

Architecture of the n8n SERP workflow

The workflow follows a clear sequence of automation steps:

  1. Trigger – Start the workflow manually for testing or via a schedule for production.
  2. Keyword ingestion – Pull keywords from your data source or define them in a Set node.
  3. ScrapingRobot request – Use an HTTP Request node to retrieve Google SERP data per keyword.
  4. Normalization – Extract and structure relevant SERP fields using a Set node.
  5. Result splitting and filtering – Split organic results into individual items and filter out invalid entries.
  6. Context enrichment – Attach the original search query to each result row.
  7. Position assignment – Use a Code node to compute the ranking position for each result.
  8. Persistence – Store the enriched, ranked data in your analytics datastore.

The following sections walk through each of these stages in detail.

Building the workflow step by step

1. Configure trigger and keyword source

Start with a Manual Trigger node while you are developing and debugging the flow. Once the workflow is stable, you can replace or augment this with a Cron or Schedule trigger to run daily, weekly, or at any interval appropriate for your SEO monitoring needs.

Next, define your keyword source. You have two main options:

  • Connect to an external data source (recommended for production) such as Airtable, Google Sheets, or a database table that stores your keyword list.
  • Use a Set node for initial testing or simple use cases. For example:
["constant contact email automation", "business workflow software", "n8n automation"]

Standardize on a field name, such as Keyword, to avoid confusion later. All subsequent nodes should reference this field when constructing requests and enriching results.

2. Call ScrapingRobot to fetch Google SERPs

With keywords in place, add an HTTP Request node configured to send a POST request to the ScrapingRobot API. This node will call the GoogleScraper module and pass the current keyword as the query parameter.

Typical JSON body configuration:

{  "url": "https://www.google.com",  "module": "GoogleScraper",  "params": {  "query": "{{ $json[\"Keyword\"] }}"  }
}

Key configuration points:

  • Authentication – Provide your ScrapingRobot token. You can do this via headers or query parameters, depending on your ScrapingRobot configuration and security preferences.
  • Batching – Use n8n’s batch options to process multiple keywords in manageable chunks instead of sending thousands of requests at once.
  • Rate limiting – Respect ScrapingRobot’s quotas and rate limits. If necessary, introduce throttling or delays to avoid being rate-limited or blocked.

3. Normalize and structure SERP data

The ScrapingRobot response is a JSON payload that can contain multiple sections. To make downstream processing easier, introduce a Set node immediately after the HTTP Request node and extract only the fields you care about.

Typical fields to retain include:

  • organicResults
  • peopleAlsoAsk
  • paidResults
  • searchQuery (or equivalent query field)

By normalizing the structure early, you reduce complexity in later nodes and make the workflow more maintainable and resilient to minor API changes.

4. Split organic results into individual rows

Most ranking analysis focuses on organic results. To work with each organic result as its own record, use n8n’s SplitOut (Split In Batches / Split Items) node on the organicResults array.

This step converts a single SERP response into multiple items, one per result. After splitting, add a Filter node to remove any entries that have empty or missing titles. This avoids storing meaningless rows and keeps your dataset clean.

5. Preserve keyword context on each item

Once the organic results are split, each item represents a single SERP result but may have lost direct access to the original keyword context. To maintain that relationship, use a Set node to copy the searchQuery or Keyword field onto every item.

This ensures that every row in your final dataset clearly indicates which keyword produced that result, which is essential for grouping and ranking logic as well as downstream analytics.

6. Assign SERP positions with a Code node

At this stage, you have many items across multiple search queries. To compute a position value (1-N) for each result within its respective query, add a Code node using JavaScript.

The following example groups items by searchQuery and assigns incremental positions within each group:

// Get all input items
const items = $input.all();

// Group items by searchQuery
const groupedItems = items.reduce((acc, item) => {  const searchQuery = item.json.searchQuery || 'default';  if (!acc[searchQuery]) acc[searchQuery] = [];  acc[searchQuery].push(item);  return acc;
}, {});

// Assign positions within each group
const result = Object.values(groupedItems).flatMap(group =>  group.map((item, index) => ({  json: {  ...item.json,  position: index + 1  }  }))
);

return result;

This approach:

  • Retains all original JSON fields from the ScrapingRobot response and your earlier Set nodes.
  • Adds a new position field that represents the 1-based rank for each result within a given query.
  • Supports multiple keywords in a single workflow run by grouping on searchQuery.

7. Persist enriched SERP data

With positions assigned, the final step is to write the enriched records to your storage layer. You can use any n8n-supported integration, such as:

  • Airtable – For quick, spreadsheet-like storage and lightweight dashboards.
  • Google Sheets – For teams already using Google Workspace.
  • Postgres or other SQL databases – For scalable, queryable storage integrated with BI tools.

When designing your schema, consider storing at least the following fields:

  • keyword or searchQuery
  • position
  • title
  • url
  • snippet or description
  • timestamp or crawl date

Optionally, you may also store the raw SERP JSON for each keyword in a separate table or column to enable future re-processing when you want to extract additional attributes.

Operational best practices

Rate limits and performance

  • Respect ScrapingRobot quotas – Implement batching and delays to stay within your plan limits and avoid throttling.
  • Shard large keyword sets – For tens of thousands of keywords, split them into multiple workflow runs or segments to balance load.
  • Scale n8n workers – If you are self-hosting n8n, consider running multiple workers for parallel processing, within your infrastructure constraints.

Data quality and deduplication

  • Use composite keys – Combine keyword + url as a unique identifier to deduplicate records and prevent duplicate inserts.
  • Validate SERP fields – Filter out rows with missing titles or URLs to keep your dataset clean.
  • Store raw responses – Persist the unmodified JSON from ScrapingRobot in a separate field or table if you anticipate changing your parsing logic later.

Monitoring, error handling, and scheduling

  • Error handling – Use n8n’s error workflows or retry logic to handle transient API failures gracefully.
  • Logging – During development, add console.log statements in the Code node to inspect grouping and position assignment.
  • Scheduling – Run the workflow daily or weekly, depending on how volatile your SERP environment is and how fresh your data needs to be.

Scaling and cost considerations

When expanding from a small test set to thousands of keywords, both infrastructure and API costs come into play.

  • Workload partitioning – Segment your keyword list by project, domain, or language and run separate workflows for each segment.
  • Parallelism vs. quotas – Balance the number of concurrent requests against ScrapingRobot’s allowed throughput.
  • Storage optimization – Store only the fields you actually use for analysis in your primary table. Archive raw JSON separately if required to keep storage costs predictable.

Troubleshooting common issues

If the workflow is not producing the expected results, review the following checkpoints:

  • Authentication – Confirm that your ScrapingRobot API token is valid and correctly configured in the HTTP Request node.
  • Response structure – Inspect the raw API response in n8n to ensure that organicResults exists and contains entries.
  • Field naming – Verify that the Keyword field used when building the request body matches the field name from your keyword source.
  • Code node behavior – Check the Code node for exceptions. Use temporary console.log statements to inspect grouped items and confirm that searchQuery is present and correctly populated.

Conclusion

By combining n8n’s workflow automation capabilities with ScrapingRobot’s SERP extraction, you can build a robust, repeatable process for collecting and analyzing search ranking data at scale. The pattern described here – fetch, normalize, split, enrich with context, assign positions, and store – is flexible and can be adapted to many SEO and analytics scenarios.

Once implemented, this workflow becomes a foundational piece of your SEO data infrastructure, enabling dashboards, reporting, and deeper analysis without manual SERP checks.

Call to action: Deploy this workflow in your n8n instance, connect your keyword source, and configure your ScrapingRobot API key to start collecting SERP data automatically. If you need support tailoring the workflow for large-scale tracking or integrating with your analytics stack, reach out for hands-on assistance or consulting.

Automate Assigning GitHub Issues with n8n

Maintaining an active GitHub repo can feel like juggling flaming torches. New issues pop up, people comment, some folks want to help, and suddenly you are spending more time assigning tickets than actually working on them. That is where this n8n workflow template comes in.

This guide walks you through a ready-made n8n automation for GitHub issue assignment that:

  • Automatically assigns issues to the creator when they ask for it
  • Lets commenters claim issues with a simple “assign me” message
  • Politely replies if someone tries to grab an issue that is already taken

We will look at what the template does, when it is useful, how each node works, and how you can tweak it to fit your own workflow. Think of it as having a friendly, always-on triage assistant for your repo.

When should you use this n8n GitHub auto assignment workflow?

If you maintain an open-source project or any busy repository, you probably recognize these pain points:

  • You keep forgetting to assign issues as they come in
  • Contributors comment “assign me” but you see it hours (or days) later
  • Multiple people try to claim the same issue and confusion follows
  • You manually apply the same labels and rules over and over

This workflow is perfect if you want to:

  • Speed up responses to new issues and volunteers
  • Encourage contributors to self-assign in a structured way
  • Standardize assignment rules across multiple repositories
  • Reduce mental overhead so you can focus on actual work

In short, if your GitHub notifications feel out of control, this automation can quietly take over the boring parts.

What this n8n GitHub template actually does

The template is built around a GitHub Trigger node and a few decision nodes that react to two types of events:

  • issues events (like when a new issue is opened)
  • issue_comment events (when someone comments on an issue)

From there, the workflow:

  1. Listens for new issues and new comments
  2. Checks whether someone is asking to be assigned, using a regex like “assign me”
  3. If the issue is unassigned:
    • Assigns the issue creator if the request is in the issue body
    • Assigns the commenter if they volunteer in a comment
  4. If the issue is already assigned:
    • Posts a friendly comment explaining that someone else has it

Everything happens automatically in the background as GitHub events come in through the webhook.

Node-by-node tour of the workflow

Let us walk through the main nodes in the template so you know exactly what is going on under the hood.

1. GitHub Trigger node

This is where the magic starts. The GitHub Trigger node listens to your repository and fires whenever something relevant happens.

Configuration highlights:

  • Events: issues and issue_comment
  • Repository: your target repo name
  • Authentication: a GitHub OAuth token with the appropriate repo (or public_repo) scope

Once this trigger is active, n8n will register the webhook with GitHub and start receiving payloads for new issues and comments.

2. Switch node – deciding what type of event it is

Next, the workflow uses a Switch node to figure out whether the incoming event is a new issue or a new comment.

It reads the action property from the webhook payload using an expression like:

={{$json["body"]["action"]}}

You then configure rules so that:

  • opened goes down the “new issue” path
  • created goes down the “new comment” path

This simple branch is what lets you handle issue creation and comments with different logic in the same workflow.

3. Detecting “assign me” intent with regex

Both the issue path and the comment path need to figure out one key thing: is this person asking to be assigned?

To do that, the workflow uses a regular expression. The template includes a practical pattern like:

/[a,A]ssign[\w*\s*]*me/gm

This matches phrases such as “Assign me” or “assign me please”. A slightly more flexible option you can use is:

/\bassign( me|ing)?\b/i

Here is what is going on there:

  • \b makes sure you match whole words, not partial strings
  • ( me|ing)? allows “assign me” or “assigning”
  • i makes it case insensitive, so “Assign” and “assign” both work

You can tweak this regex depending on how your contributors usually phrase their requests.

4. Checking if the issue is already assigned

Before assigning anyone, the workflow checks whether the issue is still free to claim. It looks at the length of the assignees array in the payload:

={{$json["body"]["issue"]["assignees"].length}}

If the length is 0, the issue is unassigned and safe to give to someone. If it is greater than 0, the workflow knows there is already an assignee and can respond accordingly.

5. Assigning the issue creator

When a new issue is opened and the body contains “assign me” (or your chosen pattern), the Assign Issue Creator node kicks in.

It uses a GitHub edit operation to:

  • Set the assignee to the user who created the issue
  • Optionally add a label such as assigned to make the status clear

The node pulls key values from the webhook payload using expressions like:

owner: ={{$json["body"]["repository"]["owner"]["login"]}}
repository: ={{$json["body"]["repository"]["name"]}}
issueNumber: ={{ $json["body"]["issue"]["number"] }}

For the actual assignee, it uses the issue creator’s login:

= {{$json.body.issue["user"]["login"]}}

That way, the moment someone opens an issue and asks to be assigned, it is theirs without you lifting a finger.

6. Assigning a commenter who volunteers

On the comment path, the workflow looks for “assign me” in the comment text instead of the issue body. If the regex matches and the issue has no assignees, it uses the Assign Commenter node.

This node is very similar to Assign Issue Creator, but the assignee comes from the comment user:

= {{$json["body"]["comment"]["user"]["login"]}}

Again, you can also add labels like assigned when you update the issue. This makes it obvious at a glance that someone has claimed it.

7. Handling already-assigned issues with a friendly comment

What if someone tries to claim an issue that is already assigned? Instead of silently ignoring them or overwriting the existing assignee, the workflow uses an Add Comment node.

This node posts a short reply such as:

Hey @username,

This issue is already assigned to otheruser 🙂

You can customize the wording, of course, but the idea is to keep communication clear and public so nobody is left wondering what happened.

8. NoOp nodes

You will also see NoOp and NoOp1 nodes in the template. These are simply placeholder nodes used as “do nothing” branches when conditions are not met. They help keep the workflow structure clean and explicit.

Key configuration details at a glance

GitHub credentials and permissions

To keep everything secure and reliable, make sure you:

  • Use a GitHub token with the minimum required scope:
    • repo for private repos
    • public_repo if you only work with public repos
  • Store the token in n8n credentials, not hard-coded directly into nodes
  • Confirm that the token belongs to a user with write access to the repository

Also keep in mind that the GitHub API has rate limits. This particular workflow only makes a few calls per event, so it is usually fine, but if you later expand it to bulk operations, you may want to think about backoff or batching strategies.

How to test your GitHub issue auto assignment workflow

Once everything is configured, it is worth running through a quick checklist to make sure the automation behaves as expected.

  1. Deploy and activate the workflow in n8n
    When the GitHub Trigger node is active, n8n will handle webhook registration with GitHub automatically.
  2. Test issue creation with “assign me”
    Create a new issue in your repo and include “assign me” (or your regex phrase) in the issue body. The workflow should:
    • Assign the issue to the creator
    • Add any configured labels (like assigned)
  3. Test claiming through a comment
    On an unassigned issue, post a comment that includes “assign me”. The workflow should:
    • Assign the issue to the commenter
    • Apply labels if configured
  4. Test conflict handling
    On an already-assigned issue, post another “assign me” comment from a different account. You should see the Add Comment node reply to explain that the issue is already taken.

Troubleshooting common issues

If something does not work on the first try, here are a few things to check.

  • Webhook is not firing
    Make sure the GitHub Trigger node is active, the webhook is correctly registered for the right repo, and the subscription is still valid in your GitHub repository settings.
  • Expressions show undefined
    Open the node’s test view in n8n and inspect the incoming JSON payload. Sometimes GitHub payload structures change slightly or differ between events. Update your expressions so paths like $json["body"]["issue"]["number"] match the actual payload.
  • Permission errors
    If you see 4xx errors from GitHub, double-check:
    • The token scopes (repo vs public_repo)
    • That the token owner has write access to the repository
  • Regex not matching contributor messages
    If people use different phrasing like “can I work on this?” or “I’d like to take this”, you can loosen or expand your regex to catch more variations.

Sample JSON snippet from the template

Here is a small piece of configuration-like JSON that reflects the core logic of the template:

{  "events": ["issue_comment","issues"],  "switch": {  "value1": "={{$json[\"body\"][\"action\"]}}",  "rules": ["opened","created"]  },  "if_no_assignee": {  "condition": "={{$json[\"body\"][\"issue\"][\"assignees\"].length}} == 0",  "regex": "/assign( me|ing)?/i"  }
}

This snippet shows how the workflow listens to both issue and comment events, checks the action, and only proceeds with assignment if there are no assignees yet and the regex matches.

Ideas to extend and customize the workflow

Once you have the basic auto assignment running, you can start layering on more advanced automation. Here are some enhancement ideas:

  • Team-based assignments
    Map certain keywords or labels to GitHub teams instead of individual users. For example, “frontend” could assign @org/frontend-team.
  • Smarter label automation
    Automatically apply labels like triage, good first issue, or priority levels based on keywords in the issue title or body.
  • Approval step for sensitive work
    For big or security-sensitive issues, route the request to maintainers for review before auto-assigning.
  • Throttle repeated claims
    Add logic that prevents the same user from spamming “assign me” comments across multiple issues in a short period.
  • Dashboard and notifications
    Log assignments to a spreadsheet, database, or a Slack channel so your team has a clear overview of who is working on what.

Why this n8n template makes your life easier

At its core, this workflow is simple, but it solves a very real problem: manual triage does not scale. By letting your contributors self-assign issues with a tiny bit of structure, you:

  • Make your project more welcoming
  • Reduce the time you spend on admin tasks
  • Keep assignment rules consistent and visible
  • Encourage faster collaboration

And because it is built in n8n, you can easily adapt it to your team’s policies, add new branches, or plug it into other tools you already use.

Ready to try the GitHub issue auto assignment template?

If you want to stop manually assigning every issue and comment, you can start with this template as a solid base.

Here is what to do next:

  1. Import the template into your n8n instance
  2. Configure your GitHub credentials and select the target repository
  3. Review the regex and labels to match your project style
  4. Activate the workflow and run through the test steps above

If you would like help customizing this flow for team assignments, labels, or approval steps, you can always reach out or follow more of our n8n automation tutorials.

Get the template »Subscribe for more n8n automation guides