Automate Receipt Data Extraction with AI and Airtable

Automate Receipt Data Extraction with AI and Airtable

Introduction

Manual receipt handling is still a major friction point in expense management, even for teams that already use digital tools. Collecting receipts, reading amounts, and keying data into spreadsheets or finance systems is slow, error prone, and difficult to scale.

With n8n, you can build an end-to-end, production-grade automation that ingests receipts from Google Drive, uses an AI model to extract structured information, and writes the results into Airtable for real-time reporting. This article explains how the provided n8n workflow template works, how its core nodes interact, and what you need to deploy it in a professional environment.

Solution Architecture Overview

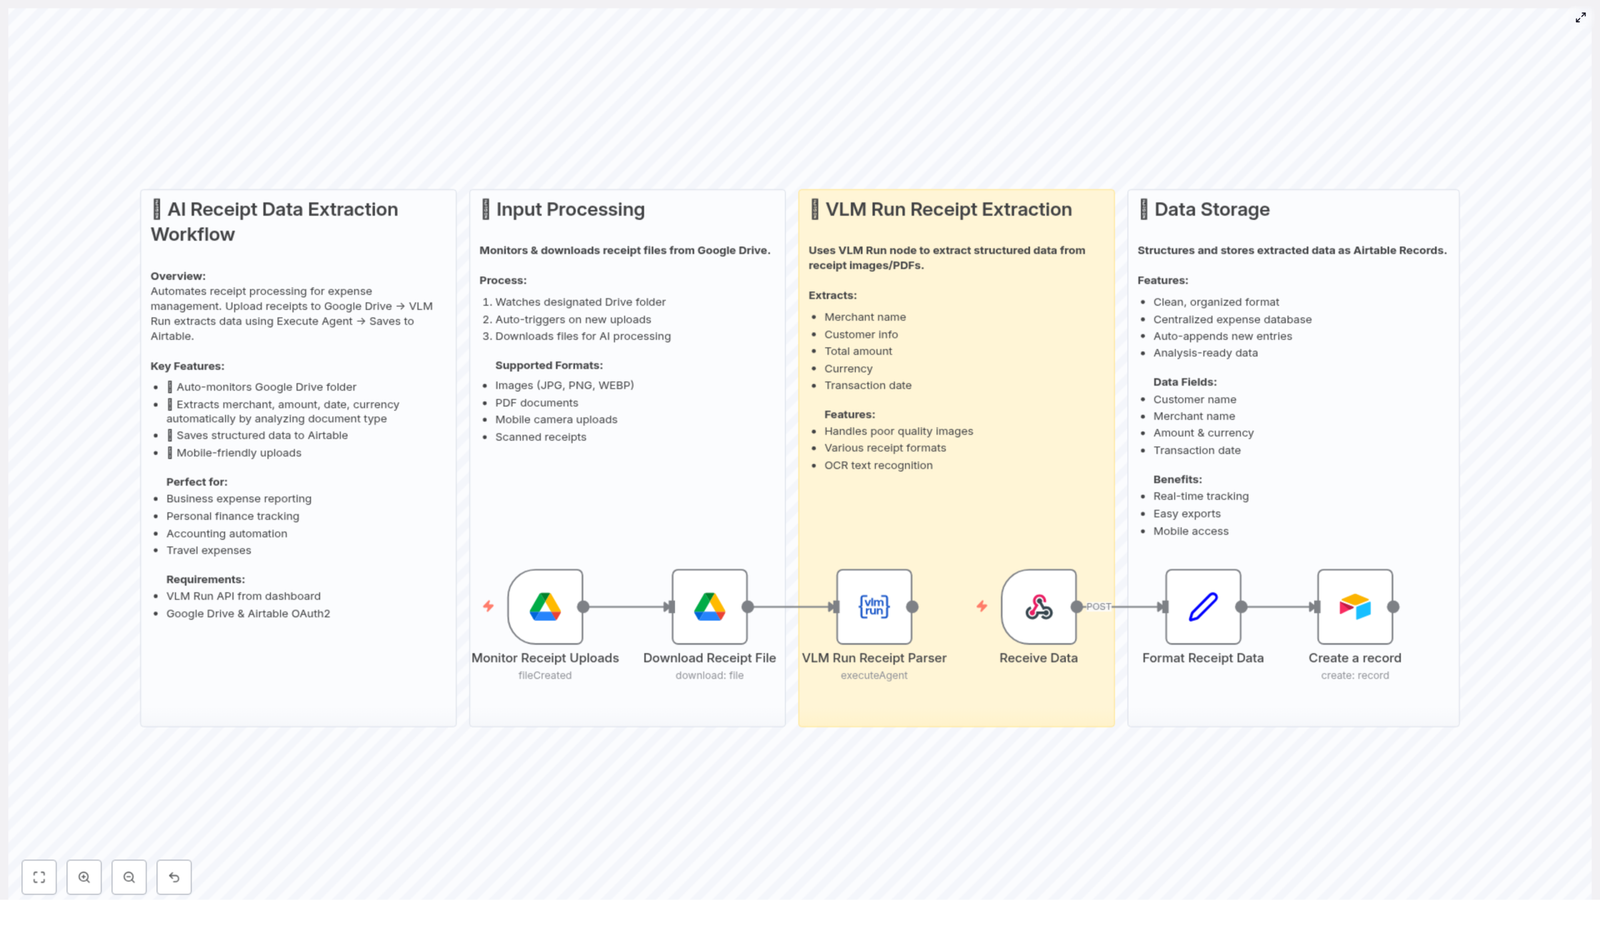
The workflow implements a complete receipt processing pipeline. It connects three main components in n8n:

  • Google Drive – Serves as the input channel where users or systems upload receipt files.
  • VLM Run AI extraction – A visual language model that performs OCR and intelligent parsing to identify key receipt fields.
  • Airtable – Stores normalized receipt data in a structured base, enabling centralized expense tracking and downstream analytics.

Together, these integrations create a continuous flow: new file in Google Drive triggers AI extraction, which then populates a clean record in Airtable without human intervention.

End-to-End Workflow in n8n

The template is designed as a reusable n8n workflow that can run unattended. At a high level, it follows these stages:

  1. File detection – Monitor a Google Drive folder for new receipts.
  2. File ingestion – Download the receipt file into the workflow.
  3. AI processing – Send the file to VLM Run for OCR and field extraction.
  4. Data normalization – Map and format the AI output into a consistent schema.
  5. Data persistence – Create or append a record in Airtable with the extracted values.

This structure follows automation best practices by clearly separating input monitoring, processing logic, and storage, which makes the workflow easier to maintain and extend.

Input Handling with Google Drive

The automation starts at the point where receipts are captured. In most organizations, this is either a shared folder or an upload destination from scanners and mobile devices. The n8n template uses Google Drive as this entry point.

Supported Receipt Formats

The workflow is configured to work with common file types generated by scanners, cameras, and export tools:

  • Image formats: JPG, PNG, WEBP
  • PDF documents, including scanned PDFs

This flexibility allows users to simply drop any receipt image or PDF into the monitored folder and let the workflow handle the rest.

Key Google Drive Nodes and Triggers

  1. Google Drive Trigger
    The workflow uses a Google Drive Trigger node to watch a specific folder. It checks for new files at a regular interval (for example, every minute) and initiates processing when a receipt appears. This pull-based polling schedule is suitable for stable, predictable automation in production environments.
  2. File Download
    Once a new file is detected, a follow-up Google Drive node downloads the receipt into n8n. The binary data is then passed forward to the AI extraction step.

By isolating monitoring and download in separate nodes, you can later extend the workflow with additional pre-processing, such as file-type validation or routing by folder.

AI-powered Receipt Parsing with VLM Run

After ingestion, the workflow sends the receipt file to VLM Run, a visual language model optimized for understanding receipts. This is the core intelligence layer of the automation.

Role of the VLM Run Node

The VLM Run integration in n8n passes the binary receipt file to the AI service, which performs:

  • Optical character recognition (OCR) to read printed or scanned text from the image or PDF.
  • Contextual interpretation to distinguish between merchant name, totals, taxes, and other fields.
  • Layout-agnostic parsing so it can handle different receipt formats, designs, and image qualities.

This approach is significantly more robust than simple text extraction, especially for low-quality photos or diverse receipt templates.

Fields Extracted from Each Receipt

The workflow is configured to pull out the most relevant expense attributes for downstream reporting:

  • Merchant Name
  • Customer Information (for example, customer name or identifier when available)
  • Total Amount
  • Currency
  • Transaction Date

These fields provide enough structure for most expense management and reconciliation use cases, while remaining generic enough to adapt to different industries.

AI Extraction Capabilities

  • High-quality OCR that works across printed and scanned receipts.
  • Resilience to varied layouts and receipt designs.
  • Handling of image quality differences, such as slightly blurred or low-light photos.

In practice, this means users do not need to standardize receipt layouts before automation, which lowers operational overhead.

Structuring and Storing Data in Airtable

Once the AI step returns the parsed data, the workflow transforms it into a structured record and writes it to Airtable. Airtable functions as the central, always-on database for expense tracking.

Data Model in Airtable

The template assumes an Airtable base with fields that align with the extracted values. Typical columns include:

  • Customer Name
  • Merchant Name
  • Amount & Currency
  • Transaction Date

In n8n, an Airtable node maps each AI output field to the corresponding column. This mapping step is where you can customize the schema to match your existing financial or operational models.

Advantages of Airtable for Expense Tracking

  • Real-time visibility – New receipts appear as structured records shortly after upload, which enables near real-time monitoring of spend.
  • Simple exports and integrations – Airtable data can easily be exported or connected to BI tools, accounting platforms, or additional n8n workflows.
  • Mobile-friendly interface – Teams can review, filter, and annotate expenses on the go using Airtable’s mobile apps.

This combination of AI-powered extraction and Airtable’s usability provides a robust yet accessible solution for both finance teams and operational stakeholders.

Why Automate Receipt Data Extraction with n8n?

Automating this workflow delivers measurable benefits for organizations that process receipts frequently or at scale.

  • Time savings – By eliminating manual data entry, finance and operations teams can focus on higher value tasks such as analysis, policy enforcement, and vendor management.
  • Error reduction – AI-based extraction reduces typographical errors and inconsistent formatting that often occur with manual transcription.
  • Improved reporting – Clean, structured data in Airtable enables deeper financial analysis, trend tracking, and more accurate forecasting.
  • Anywhere access – With Google Drive and Airtable as cloud-native components, users can upload and review receipts from any location or device.

For automation professionals, this workflow is also a pattern that can be replicated in other document-processing use cases, such as invoice extraction or contract metadata capture.

Implementation Requirements

To deploy and run this n8n template, you will need the following prerequisites:

  • VLM Run API account to access the AI extraction service and authenticate the VLM Run node.
  • Google Drive OAuth2 credentials to allow n8n to monitor and download files from the designated receipt folder.
  • Airtable OAuth2 credentials to write structured records into your Airtable base securely.

Once these credentials are configured in n8n, you can import the template, adjust folder IDs and table mappings, and then activate the workflow in your preferred environment.

Next Steps

If you are looking to modernize and streamline expense management, this n8n workflow template provides a solid, extensible foundation. It combines reliable cloud storage, advanced AI extraction, and flexible data modeling into a single automated pipeline.

Deploy the template, adapt the Airtable schema to your reporting needs, and integrate it with your existing finance stack to unlock fully automated receipt processing.

For additional n8n automation patterns, AI integrations, and workflow design best practices, explore our other blog posts and tutorials.

Automated Invoice Processing with n8n: Folder & AI Workflow

Automated Invoice Processing with n8n: Folder & AI Workflow

What You Will Learn

In this guide, you will learn how to use an n8n workflow template to fully automate your invoice processing with Google Drive and AI. By the end, you will understand how to:

  • Automatically create and maintain a year and month based folder structure in Google Drive
  • Watch a Google Drive folder for new PDF invoices and process each file
  • Use AI to extract structured invoice data from PDFs, including scanned documents
  • Move and rename invoices intelligently based on their content
  • Log all invoice data into a Google Sheets document for reporting and auditing

This article walks through the concepts first, then gives you a clear step by step explanation of how the n8n template works.


Concept Overview: How the Workflow Works

This n8n workflow connects Google Drive, AI tools, and Google Sheets to create a complete automated invoice pipeline:

  • Folder structure management – Ensures that your Google Drive has a consistent folder hierarchy like Buchhaltung / Rechnungen / 2024 / 01.
  • Incoming invoice processing – Detects new PDF invoices in an input folder and processes each one automatically.
  • AI powered data extraction – Uses Google Gemini with LangChain to read the invoice and extract key fields such as invoice number, customer, dates, and amounts.
  • Intelligent filing & renaming – Moves each invoice into the correct year and month folder and renames the file based on its contents.
  • Documentation & reporting – Appends all extracted data into a Google Sheets spreadsheet for accounting and tracking.

In practical terms, you drop a PDF invoice into a Google Drive folder, and the workflow takes care of the rest: reading, organizing, and documenting it.


Prerequisites

Before using the template, make sure you have:

  • An n8n instance where you can import and run workflows
  • A Google Drive account with:
    • A main folder for invoices, for example: Buchhaltung / Rechnungen
    • An input folder where new invoices will arrive
  • A Google Sheets spreadsheet that will store invoice records
  • Access to Google Gemini and LangChain through n8n for AI based extraction

Step 1 – Folder Structure Management in Google Drive

The first part of the workflow ensures that your Google Drive has a clean, predictable folder structure for invoices. This structure is important because later steps rely on year and month folders to file invoices correctly.

1.1 Define the years to manage

The workflow starts with a Set node that defines which years should exist in your invoice archive. For example, you might specify 2023, 2024, and 2025.

This list is then split so that each year is processed individually.

1.2 Loop through each year

A Split Out node (or similar iteration node) takes the list of years and loops through them one by one. For each year, the workflow:

  • Checks if a folder with that year already exists inside Buchhaltung / Rechnungen on Google Drive
  • Creates the year folder if it does not exist

1.3 Create month subfolders

Once the year folder is confirmed or created, the workflow ensures that all 12 month subfolders exist inside that year:

  • 01 for January
  • 02 for February
  • 12 for December

For each month, the workflow performs a preventative check to avoid duplicates. If a month folder is missing, it creates it. If it is already there, it skips creation.

1.4 Key nodes used for folder management

  • Set node – Lists the years that should exist
  • Split Out (or similar) – Iterates through each year
  • Google Drive nodes – Search for existing folders and create new ones when needed
  • Conditional node – Checks whether a folder already exists before creating it

After this step, your Google Drive has a stable folder structure ready for automatic filing of invoices.


Step 2 – Monitoring & Processing Incoming Invoices

The second part of the workflow handles new incoming PDF invoices. It uses a trigger to watch a specific Google Drive folder and then processes each invoice file in turn.

2.1 Watch the input folder with Google Drive Trigger

The workflow starts reacting when a new file is added to your designated input folder in Google Drive. This is done with the Google Drive Trigger node, which automatically starts the workflow whenever a new PDF invoice appears.

2.2 List and loop through invoice files

  1. Search Files – A Google Drive node searches the input folder and lists the invoice PDFs that need to be processed.
  2. Loop through files – The workflow then loops over this list so that each invoice file is processed one by one in a controlled manner.

2.3 Download and read the PDF

  1. Get File – For each invoice, a Google Drive node downloads the PDF file so that n8n can work with its content.
  2. Extract From PDF – A PDF extraction node converts the PDF into readable text. This step is designed to handle both digital PDFs and scanned documents, so even image based invoices can be processed.

2.4 Use AI to extract structured invoice data

  1. Information Extractor – This is where AI comes in. Using Google Gemini and LangChain, the workflow analyzes the extracted text and identifies key invoice fields, such as:
    • Company name
    • Customer name
    • Invoice number
    • Invoice date and other relevant dates
    • Net amount
    • VAT (tax) amount
    • Total amount if needed
    • Month and year of the invoice
    • List of articles or line items
    • Customer number

The result is a structured data object that can be used for filing, renaming, and reporting.


Step 3 – Intelligent Filing & Renaming

Once the invoice data has been extracted, the workflow uses it to decide where the file should be stored and what it should be called.

3.1 Determine the correct year and month

Using the extracted month and year, the workflow identifies which folders on Google Drive should contain this invoice. It then:

  • Searches for the correct year folder
  • Searches for the correct month folder inside that year
  • Creates the folder if, for some reason, it does not exist yet

3.2 Move the invoice into the right folder

After confirming the folder path, the workflow moves the original invoice file from the input folder into the corresponding year and month subfolder, for example:

Buchhaltung / Rechnungen / 2024 / 03

3.3 Rename the invoice file based on its content

To keep files easy to search and understand at a glance, the workflow renames each invoice using a logical naming convention. A typical pattern might include:

  • Customer name
  • Invoice month
  • Invoice year

For example: CustomerName_2024-03_Invoice.pdf

This makes it much easier to identify invoices directly from the file name without opening each PDF.


Step 4 – Documentation & Reporting in Google Sheets

The final part of the workflow focuses on record keeping and reporting. All the structured data extracted by the AI is written into a Google Sheets document.

4.1 Append invoice data to a tracking sheet

A Google Sheets node takes the extracted fields and appends them as a new row in your chosen spreadsheet. Typical columns might include:

  • Date of invoice
  • Customer name
  • Invoice number
  • Net amount
  • VAT amount
  • Total amount
  • Month and year
  • Customer number
  • File path or link to the stored PDF

This creates a centralized, always up to date record of all invoices that can be used for accounting, audits, and internal reporting.


Benefits of This n8n Invoice Workflow

By combining Google Drive, AI, and Google Sheets, this n8n template delivers:

  • Full automation – Incoming invoices are handled from start to finish without manual steps.
  • AI powered data extraction – Google Gemini and LangChain provide accurate and fast extraction of invoice details, even from scanned PDFs.
  • Consistent file organization – Year and month folders keep your invoices neatly sorted for easy navigation.
  • Centralized documentation – A single Google Sheets document gives you a complete overview of all processed invoices.
  • Reduced human error – Automated steps minimize the risk of misfiling or missing important invoice data.

How to Get Started

  1. Prepare Google Drive
    • Create a main folder for invoices, for example: Buchhaltung / Rechnungen
    • Set up an input folder where new PDF invoices will be uploaded or received
  2. Set up Google Sheets
    • Create a spreadsheet for invoice tracking
    • Add columns for the fields you want to store, such as dates, amounts, and invoice numbers
  3. Import the n8n template
    • Open your n8n instance
    • Import the provided workflow template from the link below
  4. Configure credentials
    • Connect your Google Drive account in n8n
    • Connect your Google Sheets account
    • Configure access to Google Gemini and LangChain for the Information Extractor node
  5. Customize the workflow
    • Adjust the list of years in the Set node if needed
    • Point the Google Drive Trigger to your chosen input folder
    • Adapt the naming convention and sheet columns to match your accounting format
  6. Test with sample invoices
    • Upload a few test PDF invoices to the input folder
    • Confirm that folders are created, files are moved and renamed, and data appears correctly in Google Sheets

Quick FAQ

Do I need to create all year and month folders manually?

No. The workflow automatically checks for missing year and month folders and creates them as needed, based on the years you define in the Set node.

Can this workflow handle scanned PDF invoices?

Yes. The Extract From PDF node is designed to handle scanned documents, and the AI based Information Extractor uses the resulting text to identify key invoice fields.

What if my invoice format is different?

You can customize the AI prompt or configuration in the Information Extractor node to better match your invoice layout. You can also adjust the fields that are written to Google Sheets.

Is it possible to change the file naming convention?

Yes. The renaming logic can be edited in the relevant n8n node. You can include or remove elements like customer name, invoice number, month, or year to fit your internal standards.


Next Steps

Automating invoice processing with n8n helps streamline your accounting, reduce manual work, and improve accuracy. Once your Google Drive and Sheets are prepared, you can import this template, connect your accounts, and adapt the workflow to your exact needs.

Start exploring what else you can automate with n8n to make your business processes more efficient and intelligent.

Automatisierte Rechnungserfassung mit n8n Workflow

Automatisierte Rechnungserfassung mit n8n: Technische Referenz zum Workflow-Template

1. Überblick

Dieses n8n Workflow-Template automatisiert die gesamte Verarbeitung von PDF-Rechnungen in Google Drive. Es kombiniert strukturierte Ordnerverwaltung mit KI-basierter Datenerkennung und dokumentiert alle extrahierten Rechnungsdaten zentral in Google Sheets. Ziel ist eine wiederholbare, wartbare und klar nachvollziehbare Automatisierung der Rechnungserfassung.

Der Workflow adressiert zwei zentrale Aufgabenbereiche:

  • Automatisierte Ordnerstruktur auf Google Drive für Jahres- und Monatsordner im Bereich Buchhaltung.
  • Automatisierte Verarbeitung eingehender PDF-Rechnungen inklusive Textextraktion, KI-Auswertung, Verschieben und Umbenennen der Dateien sowie Protokollierung in Google Sheets.

2. Architektur des Workflows

Der Workflow ist logisch in zwei Teilprozesse gegliedert, die in einem n8n Workflow kombiniert werden können:

  1. Ordnerstruktur-Erstellung
    Initiale oder wiederkehrende Anlage der Jahres- und Monatsordner auf Google Drive.
  2. Rechnungseingang & Verarbeitung
    Ereignisgesteuerte Verarbeitung neu eingehender PDF-Dateien im Eingangsordner.

Technische Kernkomponenten:

  • Trigger: Google Drive Trigger für neue Dateien.
  • Dateioperationen: Nodes für Abruf, Verschieben und Umbenennen von Dateien auf Google Drive.
  • Textextraktion: Node zur Extraktion von Text aus PDF-Dateien.
  • KI-Verarbeitung: Information Extractor Node mit Google Gemini KI zur strukturierten Datenauswertung.
  • Datenpersistenz: Node zum Schreiben der extrahierten Daten in ein Google Sheets Dokument.
  • Steuerlogik: Loop-Mechanismen und Prüfungen auf vorhandene Ordner, um doppelte Strukturen zu vermeiden.

3. Node-by-Node Breakdown

3.1 Ordnerstruktur automatisiert erstellen

3.1.1 Eingabe und Iteration der Jahre

Der Workflow beginnt mit der Auswahl der Jahre, für die Ordner erstellt werden sollen. Dies kann typischerweise über eine feste Liste oder eine dynamische Eingabe im Workflow erfolgen.

  • Die Liste der Jahre wird in einzelne Items aufgeteilt.
  • Ein Loop Over Items-Schritt iteriert über jedes Jahr und führt die nachfolgenden Prüf- und Erstellungsprozesse für jedes Jahr separat aus.

3.1.2 Prüfung: Jahresordner schon vorhanden?

Der Node Jahresordner schon vorhanden? prüft, ob im Hauptordner Buchhaltung / Rechnungen auf Google Drive bereits ein Unterordner für das aktuelle Jahr existiert.

  • Aktion: Suche im Hauptordner nach einem Unterordner mit dem Namen des jeweiligen Jahres.
  • Ergebnisfall A – Ordner existiert: Der Workflow überspringt die Erstellung dieses Jahresordners und fährt mit dem nächsten Jahr fort.
  • Ergebnisfall B – Ordner existiert nicht: Es wird ein neuer Jahresordner angelegt und anschließend die Monatsstruktur erzeugt.

3.1.3 Erstellung von Jahres- und Monatsordnern

Wenn kein Jahresordner vorhanden ist, wird dieser zunächst erstellt. Danach wird eine Liste aller Monate erzeugt, etwa in der Form “01”, “02”, …, “12” oder mit ausgeschriebenen Monatsnamen, je nach Implementierung im Template.

  • Für jeden Monat in dieser Liste wird ein Monatsordner im entsprechenden Jahresordner erzeugt.
  • Die Struktur folgt dem Muster:
    Buchhaltung / Rechnungen / <Jahr> / <Monat>

Diese automatisierte Struktur sorgt für konsistente Ablagepfade und erleichtert sowohl die manuelle als auch die automatisierte Weiterverarbeitung von Rechnungen.

3.2 Verarbeitung eingehender Rechnungen

3.2.1 Google Drive Trigger

Der Node Google Drive Trigger überwacht den definierten Eingangsordner, typischerweise Rechnungsablage, auf neue Dateien.

  • Trigger-Bedingung: Eine neue Datei wird in den Ordner Rechnungsablage hochgeladen.
  • Einschränkung: In der Praxis sollte der Trigger auf PDF-Dateien konfiguriert sein, da der Workflow auf PDF-Rechnungseingänge ausgelegt ist.
  • Aktion: Bei Erkennung einer neuen PDF-Datei startet der Workflow die nachfolgenden Verarbeitungsschritte.

3.2.2 GetFile: Datei abrufen

Der Node GetFile lädt die neu eingegangene Datei aus Google Drive herunter.

  • Verwendet die vom Trigger übergebene File ID oder andere Metadaten.
  • Stellt sicher, dass der binäre Dateiinhalt im Workflow verfügbar ist, damit die PDF-Extraktion erfolgen kann.

3.2.3 ExtractFromPDF: Textinhalt extrahieren

Der Node ExtractFromPDF übernimmt die Textextraktion aus der heruntergeladenen PDF-Datei.

  • Eingabe: Binärer PDF-Inhalt aus dem GetFile-Node.
  • Ausgabe: Reiner Text, der den Rechnungsinhalt abbildet.
  • Hinweis: Bei komplex formatierten PDFs oder gescannten Dokumenten kann die Qualität der Textextraktion variieren. Der Workflow ist jedoch so ausgelegt, dass auch komplexere Layouts durch nachgelagerte KI-Verarbeitung robust behandelt werden.

3.2.4 Information Extractor: KI-basierte Datenerkennung mit Google Gemini

Der Node Information Extractor verwendet Google Gemini KI, um aus dem extrahierten Text strukturierte Rechnungsdaten zu generieren.

  • Eingabe: Vollständiger Rechnungstext aus dem ExtractFromPDF-Node.
  • Verarbeitung: Der Text wird von der KI analysiert, um relevante Felder zu identifizieren.
  • Typische extrahierte Felder:
    • Unternehmen (Rechnungsaussteller)
    • Kunde
    • Rechnungsnummer
    • Rechnungsdatum
    • Nettobetrag
    • Mehrwertsteuer (MwSt.)
    • Monat
    • Jahr
    • Artikelanzahl
    • Kundennummer

Diese strukturierte Ausgabe bildet die Grundlage für die nachfolgende Ordnerzuordnung, Dateibenennung und Eintragung in Google Sheets.

3.2.5 GetYearFolder und GetMonthFolder: Zielordner bestimmen

Anschließend werden die passenden Zielordner auf Google Drive ermittelt, in die die Rechnung verschoben werden soll.

  • GetYearFolder:
    • Verwendet das aus der Rechnung extrahierte Jahr.
    • Sucht im Hauptordner Buchhaltung / Rechnungen nach dem entsprechenden Jahresordner.
  • GetMonthFolder:
    • Verwendet den extrahierten Monat.
    • Sucht im gefundenen Jahresordner den passenden Monatsordner.

Die zuvor automatisiert erstellte Ordnerstruktur (siehe Abschnitt 3.1) stellt sicher, dass für das jeweilige Jahr und den Monat bereits ein Ordner vorhanden ist. Andernfalls sollte die Ordnerstruktur-Erstellung vorab ausgeführt werden.

3.2.6 MoveFile: Rechnung verschieben

Der Node MoveFile verschiebt die eingegangene PDF-Rechnung aus dem Eingangsordner Rechnungsablage in den ermittelten Jahres- und Monatsordner.

  • Eingabe: File ID der ursprünglichen Datei und Zielordner-ID aus GetMonthFolder.
  • Ergebnis: Die Datei liegt nicht mehr im Eingangsordner, sondern in der strukturierten Ablage unter
    Buchhaltung / Rechnungen / <Jahr> / <Monat>

3.2.7 UpdateFileName: Konsistente Dateibenennung

Der Node UpdateFileName sorgt für ein einheitliches und aussagekräftiges Benennungsschema der Rechnungsdateien.

  • Typisches Muster: Kunde Monat Jahr
  • Basis: Verwendet die durch die KI extrahierten Felder wie Kunde, Monat und Jahr.
  • Zweck: Erleichtert die manuelle Suche, Sichtung und Zuordnung von Rechnungen in Google Drive.

3.2.8 AddToOverview: Zentrale Übersicht in Google Sheets

Zum Abschluss werden alle relevanten Rechnungsdaten in einem Google Sheets Dokument protokolliert.

  • Der Node AddToOverview fügt eine neue Zeile in einem konfigurierten Google Sheet hinzu.
  • Eingetragene Daten umfassen typischerweise:
    • Unternehmen
    • Kunde
    • Rechnungsnummer
    • Datum
    • Nettobetrag
    • MwSt.
    • Monat
    • Jahr
    • Artikelanzahl
    • Kundennummer
    • Optional Verweis auf den Dateipfad bzw. die File ID

Dieses Google Sheets Dokument dient als zentrale Übersicht für Auswertungen, Buchhaltung und Controlling.

4. Konfigurationshinweise

4.1 Google Drive Konfiguration

  • Stellen Sie sicher, dass der Hauptordner Buchhaltung / Rechnungen in Google Drive vorhanden ist.
  • Richten Sie den Eingangsordner Rechnungsablage ein, der vom Google Drive Trigger überwacht wird.
  • Konfigurieren Sie im Google Drive Trigger die korrekten Pfade und Filter, vorzugsweise auf PDF-Dateien.

4.2 Google Sheets Konfiguration

  • Erstellen Sie ein Google Sheets Dokument, das als zentrale Übersicht dient.
  • Definieren Sie Spalten, die den extrahierten Feldern entsprechen, zum Beispiel:
    • Datum, Rechnungsnummer, Unternehmen, Kunde, Nettobetrag, MwSt., Monat, Jahr, Artikelanzahl, Kundennummer.
  • Verknüpfen Sie das Sheet im Node AddToOverview und ordnen Sie die Felder den Spalten korrekt zu.

4.3 KI- und PDF-Extraktion

  • Stellen Sie sicher, dass die Credentials für Google Gemini bzw. die verwendete KI-Integration korrekt eingerichtet sind.
  • Prüfen Sie im Node Information Extractor, dass die Felder, die extrahiert werden sollen, mit den später verwendeten Feldern in den nachfolgenden Nodes übereinstimmen.
  • Für PDFs mit ungewöhnlichem Layout oder gescannten Dokumenten kann die Erkennungsqualität schwanken. Testen Sie typische Rechnungsformate Ihres Unternehmens, um sicherzustellen, dass die wichtigsten Felder zuverlässig extrahiert werden.

4.4 Ordnerstruktur und Jahre

  • Passen Sie die Liste der Jahre im Ordnererstellungs-Teil des Workflows an die benötigten Zeiträume an.
  • Die Monatsordner können nach Bedarf numerisch oder mit Namen benannt werden, sollten jedoch konsistent mit der Logik in GetMonthFolder sein.
  • Die Prüfung Jahresordner schon vorhanden? verhindert doppelte Jahresordner und ist daher für wiederholte Ausführungen geeignet.

5. Besondere Features, Edge Cases und Hinweise

5.1 Besondere Features

  • KI-gestützte Extraktion: Die Nutzung von Google Gemini KI ermöglicht das Auslesen relevanter Rechnungsdaten auch aus komplex strukturierten PDFs.
  • Dynamische Ordnererstellung: Vor der Erstellung neuer Ordner wird geprüft, ob die Struktur bereits existiert. Dadurch werden doppelte Jahres- und Monatsordner vermieden.
  • Flexible Anpassbarkeit: Der Workflow kann unkompliziert auf andere Jahre, alternative Ordnerstrukturen oder zusätzliche Felder erweitert werden.
  • Konsistente Dateibenennung: Einheitliche Dateinamen vereinfachen die Suche und reduzieren Verwechslungen in der Ablage.
  • Zentrale Dokumentation: Die Google Sheets Übersicht unterstützt Auswertung, Buchhaltung und Reporting, ohne dass die eigentlichen PDF-Dateien geöffnet werden müssen.

5.2 Edge Cases und praktische Hinweise

  • Fehlende oder unklare Felder: Wenn bestimmte Rechnungsinformationen im PDF nicht eindeutig erkennbar sind, kann die KI diese unter Umständen nicht korrekt extrahieren. In solchen Fällen sollten die Einträge im Google Sheet geprüft und bei Bedarf manuell korrigiert werden.
  • Monats- und Jahreszuordnung: Die Zuordnung zum richtigen Jahres- und Monatsordner basiert auf den extrahierten Werten. Stimmt das Datumsformat in der Rechnung nicht mit den Erwartungen überein, kann die Zuordnung fehlerhaft sein. Testen Sie daher verschiedene Lieferantenrechnungen.
  • Vorhandene Ordnerstruktur: Wenn bereits eine manuell angelegte Struktur existiert, prüft der Workflow diese zunächst. Es werden keine doppelten Jahresordner angelegt, vorhandene Strukturen können weiter genutzt werden.

6. Erweiterung und Anpassung

6.1 Anpassung der Dateibenennung

Das im Node UpdateFileName verwendete Benennungsschema kann einfach angepasst werden. Zum Beispiel können Sie zusätzlich die Rechnungsnummer oder den Nettobetrag in den Dateinamen aufnehmen, um die Wiedererkennbarkeit weiter zu erhöhen.

6.2 Anpassung der Ordnerlogik

  • Sie können weitere Ebenen einführen, etwa nach Kunden oder Projekten, sofern die entsprechenden Felder zuverlässig extrahiert werden.
  • Die bestehende Jahres- und Monatslogik bleibt dabei als Basis erhalten und kann um zusätzliche Hierarchieebenen ergänzt werden.

6.3 Erweiterung der Google Sheets Übersicht

  • Fügen Sie zusätzliche Spalten hinzu, zum Beispiel für Zahlungsstatus oder interne Notizen.
  • Ergänzen Sie im AddToOverview-Node die Zuordnung dieser neuen Felder, falls Sie im Workflow weitere Informationen ermitteln oder manuell hinzufügen.

7. Fazit & Nächste Schritte

Mit diesem n8n Workflow-Template automatisieren Sie die Verarbeitung von PDF-Rechnungen von der Ablage im Eingangsordner bis zur strukturierten Archivierung und zentralen Dokumentation in Google Sheets. Die Kombination aus KI-gestützter Informationsextraktion und klarer Ordnerstruktur reduziert manuelle Arbeit, senkt Fehlerquoten und schafft eine transparente

Ultimate Guide to Automating Email Workflow with AI and n8n

Ultimate Guide to Automating Email Workflow with AI and n8n

From Inbox Overwhelm to Focused Work

Most professionals know the feeling of opening their inbox and instantly losing focus. Important messages are buried under promotions, social updates, and endless notifications. You start the day with good intentions, then suddenly it is noon and you have done nothing but manage email.

Automation gives you a different path. Instead of reacting to every new message, you can design a system that sorts, summarizes, and even replies for you. In this guide, you will walk through a powerful email automation workflow built with n8n, Gmail, OpenAI’s language models, and Google Sheets. It is not just a technical setup, it is a foundation for reclaiming your time and attention.

Shifting Your Mindset: Let Your Inbox Work For You

Automation is not about replacing you. It is about removing the repetitive, low-value tasks that drain your energy so you can focus on the conversations and decisions that actually matter.

Think of this workflow as your personal email assistant that:

  • Checks your inbox every few minutes without fail
  • Understands what type of email just arrived
  • Decides how to handle it based on clear rules you define
  • Creates summaries, logs data, and even writes replies

Once this is in place, you are no longer starting from chaos. You are reviewing a curated, organized inbox that already did most of the work for you.

How the n8n Email Automation Workflow Works

This workflow template uses n8n as the automation engine, connecting Gmail, OpenAI, and Google Sheets into a single, smart system. Here is the core flow:

  1. Trigger: Every 5 minutes, n8n checks for new emails in your Gmail account.
  2. Classification: An AI text classifier powered by OpenAI’s GPT-4o-mini model analyzes each email.
  3. Categorization: Each email is assigned to a specific category such as Promotions, Social, Personal, Sales, Recruitment, Receipts, or Misc.
  4. Automated Actions: Based on the category, the workflow takes different actions like labeling, summarizing, forwarding, logging, or replying.

Once you understand this structure, you can start to customize, extend, and turn this into your own email command center.

Step 1: Intelligent Email Categorization With AI

The first big transformation comes from getting instant clarity on what each email is about. Instead of manually scanning subjects and snippets, the workflow uses a Text Classifier node in n8n that sends the email content to OpenAI.

The classifier looks at the subject line and the email snippet and assigns one of these predefined labels:

  • Promotions: Marketing, newsletters, and promotional campaigns.
  • Social: Social media notifications and platform updates.
  • Personal: Messages from friends, family, or close contacts.
  • Sales: Client communications, sales inquiries, and related documents.
  • Recruitment: Job applications, hiring discussions, and recruiter outreach.
  • Receipts: Transactional emails such as invoices, payment confirmations, and receipts.
  • Misc: Everything that does not neatly fit in the other categories.

With this single step, your inbox becomes structured data that n8n can act on. You move from reacting to emails one by one to managing categories with clear rules.

Step 2: Tailored Actions For Each Email Category

Once an email is categorized, the workflow does not stop at labeling. It triggers specific, meaningful actions for each type of message. This is where you start to see real time savings and a calmer inbox.

Promotions: Keep Marketing Noise Under Control

Promotional emails are important at times, but they should not interrupt your deep work. For emails labeled as Promotions, the workflow:

  • Applies a promotions label in Gmail
  • Marks the email as read automatically

You can still review these later, but they no longer clutter your primary inbox or demand immediate attention.

Social: Summarize And Log Your Notifications

Social notifications can be useful signals, but they are rarely urgent. For emails categorized as Social, the workflow uses OpenAI to generate a concise summary, then logs that information into Google Sheets.

The process looks like this:

  • Send the email content to an OpenAI node for summarization
  • Append or update a row in a Google Sheet with:
    • Email ID
    • Date
    • Subject line
    • AI-generated summary
    • Snippet ID

Instead of digging through dozens of notifications, you can scan a single sheet and see what happened across your accounts at a glance.

Personal: Draft Thoughtful Replies Automatically

Personal emails deserve care, but you do not always have the time or energy to draft the perfect response immediately. For Personal emails, the workflow:

  • Sends the email content to OpenAI
  • Generates a personalized response draft
  • Saves that reply as a Gmail draft

Each draft is formatted with clear paragraph breaks and always signs off with “Best, Jono”. You can then review, tweak if needed, and send. The emotional effort of starting from a blank page is gone, while your tone and presence remain.

Sales: Respond To Opportunities Automatically

Sales conversations move quickly. Slow replies can mean missed opportunities. For Sales emails, the workflow takes a bolder step:

  • Uses an OpenAI model to compose a professional, context-aware reply
  • Formats the message with appropriate paragraph breaks and signs off with “Best, Jono”
  • Sends the reply automatically from Gmail

This lets you stay responsive to clients even when you are in meetings, traveling, or focused on deep work. You can always refine the prompt and logic in n8n to match your brand voice and sales style.

Recruitment: Keep Hiring Conversations Organized

Recruitment emails can be easy to lose in a busy inbox, yet they are often high impact. For Recruitment messages, the workflow:

  • Applies a dedicated recruitment label in Gmail

This is a simple starting point that you can extend. For example, you might later add steps to log candidates in a sheet, notify your team, or create tasks in your project management tool.

Receipts: Centralize Your Financial Records

Receipts and transactional emails are critical for bookkeeping, but they do not need your active attention. For emails categorized as Receipts, the workflow:

  • Forwards the email to a specific Gmail account, such as a finance, accounting, or record keeping address

This keeps your financial records centralized and makes life easier at tax time or during reporting, all without manual forwarding.

Misc: Keep Everything Labeled And Searchable

Not every email fits neatly into a box. For Misc emails, the workflow:

  • Applies a miscellaneous label
  • Leaves the email without any additional automated action

Even here, you still benefit from basic organization and easier search, and you can later refine your categories or add new rules as patterns emerge.

Step 3: Summarization And Logging With OpenAI And Google Sheets

Beyond handling emails in the moment, this workflow also helps you build a structured history of your communication. The integration with OpenAI and Google Sheets is a key part of that.

For social emails in particular, the workflow:

  • Generates a short, clear summary using an OpenAI node
  • Writes that summary, along with metadata like email ID, date, subject, and snippet ID, into a Google Sheet

Over time, this becomes a valuable log that you can filter, analyze, or connect to other dashboards. You are not just reacting to email, you are quietly building a data layer for your communication.

Step 4: Smarter Replies With OpenAI Language Models

The most visible impact of this workflow is in how it handles replies for Sales and Personal emails. By connecting n8n to OpenAI’s language models, you get intelligent, human-like responses that respect your tone and structure.

The system is configured so that:

  • Sales emails receive a fully automated reply, sent directly from Gmail
  • Personal emails receive a drafted reply, saved as a Gmail draft for your review
  • All replies use appropriate paragraph breaks for readability
  • Every message ends with the sign-off “Best, Jono” for consistency

This balance between automation and control lets you move faster while still staying in charge of the conversations that matter most.

Why This n8n Email Workflow Is A Growth Tool, Not Just A Convenience

Once you put all of these pieces together, you get more than a clever automation. You get a system that can grow with you and your business.

  • Time-saving: Repetitive tasks like sorting, labeling, summarizing, and replying are handled for you, freeing hours each week.
  • Consistency: Every reply is polite, professional, and on brand, with a unified tone and sign-off.
  • Organization: Your inbox is cleaner, your labels are meaningful, and important data is logged in Google Sheets.
  • Scalability: You can extend this workflow with more categories, more conditions, or deeper integrations as your needs evolve.

Most importantly, this setup gives you momentum. Once you see how much difference one workflow can make, you start to notice other parts of your work that are ready for automation too.

Using The Template As Your Starting Point

You do not have to build all of this from scratch. The n8n workflow template already connects Gmail, OpenAI, and Google Sheets for you and includes the logic for categorization, labeling, forwarding, summarization, and replying.

You can:

  • Import the template into your n8n instance
  • Connect your Gmail, OpenAI, and Google Sheets credentials
  • Adjust labels, prompts, and destinations to match your workflow
  • Iterate and expand as you discover new use cases

Treat this template as a foundation. Start with the default behavior, then refine the AI prompts, tweak the reply style, or plug in additional tools as your processes mature.

Your Next Step: Build The Future Of Your Inbox

Every automated workflow you create is a small investment that keeps paying you back. This email automation with n8n and OpenAI is a powerful first step toward a more focused, intentional way of working.

If you are ready to reduce inbox stress, respond faster, and free up time for the projects that move you forward, start with this template, make it your own, and keep experimenting. Each improvement brings you closer to an inbox that truly serves you.

Automated Reddit Engagement Workflow for Sales & Marketing

Automated Reddit Engagement Workflow for Sales & Marketing

Picture This: You, Reddit, And A Million Tabs Open

You know the drill. You jump into Reddit to find potential leads, answer questions, and be a helpful human in sales and marketing subreddits. Two hours later you have 14 open tabs, 3 half-written replies, and the sinking feeling that you still missed the best posts of the day.

Manually hunting for relevant threads, checking if they are worth replying to, and then actually writing thoughtful comments is… a lot. It is important for trust-building and pipeline, but also a perfect example of “this should really be automated by now.”

Good news: that is exactly what this n8n workflow template is for. It automates Reddit engagement using AI-generated comments and Slack notifications, while still keeping you in control of what actually gets posted. Think of it as a very diligent assistant that never forgets to check Reddit at 7 PM.

What This Reddit Automation Workflow Actually Does

This n8n workflow connects Reddit, OpenAI, and Slack to help sales and marketing teams engage authentically in relevant subreddits without living inside Reddit all day.

At a high level, the workflow:

  • Monitors specific subreddits for fresh posts related to sales, automation, and AI agents
  • Uses an AI “Comment Agent” to draft thoughtful, human-like replies
  • Filters out low-quality or irrelevant posts so you are not spamming
  • Sends the best opportunities and suggested comments to a Slack channel for your review

You still approve and personalize the final comment, but the heavy lifting of discovery and first-draft writing is handled for you. Goodbye repetitive Reddit trawling, hello focused conversations with people who actually want help.

Inside The Workflow: How The Automation Works

Let us walk through the key building blocks of the workflow so you know exactly what is happening behind the scenes.

1. Schedule Trigger – Your Daily “Reddit Check-In” Robot

The workflow kicks off with a schedule trigger. It is configured to run every day at 7 PM, so you consistently catch fresh posts without having to remember to log in and search manually.

This timing helps you:

  • Stay on top of new conversations while they are still active
  • Build a habit of reviewing potential replies once per day instead of constantly context-switching

2. Multi-Subreddit Search – Casting A Wide, Targeted Net

Next, the workflow uses Reddit’s API to search across multiple subreddits at once. It scans the following communities:

  • Automate
  • AI_Agents
  • salesdevelopment
  • SaaSSales
  • AskMarketing

Within those subreddits, it looks for posts that mention keywords such as:

  • “AI Agent”
  • “Sales Automation”
  • “Lead Qualification”

This combination of targeted subreddits and focused keywords helps the workflow surface exactly the kind of threads where sales and marketing teams can add value, especially around sales tech, SDR workflows, and automation tools.

3. Merge Results And Filter For Fresh Posts

Once the searches run, all the posts from those five subreddits are merged into a single collection. Instead of bouncing between tabs and feeds, you get one clean list of opportunities.

The workflow then applies a time filter that removes anything older than 24 hours. That way you are not replying to week-old posts that everyone else has already forgotten. The automation keeps your outreach timely and relevant, without you manually checking post timestamps.

4. AI-Driven Comment Generation With A “Comment Agent”

This is where the fun part kicks in. Each qualifying post is sent to a Comment AI Agent powered by OpenAI’s GPT-4. The agent receives a structured prompt with details like:

  • Post title
  • Body text
  • Comment count
  • Upvote ratio
  • Subreddit name

Armed with that context, the AI applies a set of rules so it is not just replying to everything in sight. It:

  • Replies only if the subreddit is friendly to sales, startups, and tools, and not openly hostile to anything that looks like marketing
  • Requires a solid upvote ratio and engagement level to reduce the risk of spamming quiet or low-quality threads
  • Prioritizes posts where the original poster is clearly asking for help with SDR workflows, lead qualification, or scaling sales processes
  • Writes in a casual, peer-to-peer tone with empathy, while making subtle, non-pushy mentions of tools or solutions

The result is a draft comment that sounds like something a helpful colleague would write, not a generic sales pitch dropped from orbit.

5. Structured Output Parsing And Smart Filtering

After the AI generates its response, the workflow parses the output into a structured JSON format. This JSON includes:

  • A flag that indicates whether the AI recommends replying to this post at all
  • The full text of the suggested comment if a reply is recommended

Another filtering step then checks that recommendation. Only posts where the AI explicitly suggests replying move forward in the workflow. This extra layer keeps your team focused only on the strongest opportunities, rather than drowning in borderline cases.

6. Slack Notification – Human Review Before Anything Goes Live

Finally, for the posts that pass all the filters, the workflow sends a message to a designated Slack channel. Each Slack notification includes:

  • The Reddit post ID or link
  • The AI-generated comment idea

Your sales or marketing team can then:

  • Review the suggested comment
  • Tweak the wording to match your voice or add specific details
  • Post the final reply directly on Reddit

This setup strikes a balance between automation and authenticity. The workflow handles discovery and drafting, while humans keep the final say so your brand stays trusted and personal.

Why This n8n Reddit Workflow Is Worth Setting Up

If you are wondering whether it is worth automating your Reddit engagement, here is what this workflow brings to the table.

  • Scalable engagement: The workflow automatically vets posts across multiple subreddits and finds the best ones for outreach, so your team can scale activity without scaling burnout.
  • Authentic conversations: AI-generated replies are designed to be empathetic, conversational, and genuinely helpful, which leads to better discussions and less “ugh, another bot” reactions.
  • Serious time savings: No more manually refreshing Reddit, scanning every thread, and starting from a blank comment box each time. SDRs and founders can focus on actual conversations and qualified leads.
  • Cross-subreddit coverage: By monitoring several sales and marketing communities at once, you gain a broader view of what people are asking, struggling with, and looking to buy.

How To Start Using The Template (Without Losing Your Mind)

You do not need to rebuild this from scratch. The workflow is available as an n8n template that you can plug into your existing setup and customize.

  1. Open the template: Use the link below to view the workflow template in n8n.
  2. Connect your accounts: Add your Reddit credentials or app, configure OpenAI (for GPT-4), and hook up your Slack workspace and channel.
  3. Adjust the schedule: Keep the daily 7 PM trigger or change it to a time that fits your team’s review habits.
  4. Tune your keywords and subreddits: Stick with the default five subreddits and keywords, or expand them to fit your niche while keeping the same logic.
  5. Refine the AI prompts: If needed, adjust the Comment Agent prompts so the tone matches your brand and your tolerance for tool mentions.
  6. Test on a small scale: Run the workflow for a few days, review the Slack suggestions, and fine-tune filters before ramping up.

Tips, Next Steps, And Staying Human In An Automated World

Automation is great, but you still want to sound like a real person, not a robot that just discovered Reddit. A few practical tips:

  • Always review before posting: The workflow is designed around human-in-the-loop review. Keep that step. It protects your brand and keeps replies high quality.
  • Personalize the AI drafts: Add a sentence about your own experience, your product use cases, or a quick example. Small edits go a long way.
  • Watch subreddit culture: Even with filters, each community has its own vibe. Pay attention to what works and adjust your prompts or filters accordingly.
  • Iterate your criteria: Over time you may find that certain keywords, engagement thresholds, or subreddits perform better. Tweak the workflow to focus more on what converts.

Wrap Up: Less Tab-Hopping, More Real Conversations

This automated Reddit engagement workflow is a practical blend of AI and human judgment. It helps startups, sales teams, and marketers discover relevant conversations, draft helpful replies, and show up consistently in the right subreddits, without turning into full-time Reddit lurkers.

If you are a founder, SDR leader, or marketer trying to build trust and capture qualified leads from Reddit, this approach lets you do it at scale without spamming or burning out.

Ready to upgrade your Reddit engagement strategy? Try this AI-powered comment workflow with Slack notifications and give your sales outreach a boost, while still keeping it real and authentic.

Sync Excel with Postgres DB Seamlessly

Sync Excel with Postgres DB Seamlessly

From Manual Busywork to Confident Automation

If you are still copying and pasting data from Excel or Google Sheets into your database, you are spending energy on work that software can handle for you. Every manual update, every repeated export, every double check for errors takes time away from the deeper, strategic work that actually grows your business.

Automating the sync between Excel and a Postgres database is not just a technical upgrade. It is a mindset shift. It is choosing consistency over chaos, clarity over confusion, and systems over stress. With n8n and this ready-to-use workflow template, you can turn a routine chore into a reliable, background process that quietly supports your goals every day.

Why Connecting Excel and Postgres Changes the Game

Excel and Google Sheets are familiar, flexible, and great for quick edits or collaboration. Postgres is powerful, structured, and ideal for dashboards, applications, and long-term growth. When you sync them, you get the best of both worlds.

  • Consistency: Keep a single, trusted source of truth instead of multiple conflicting versions of the same spreadsheet.
  • Automation: Replace manual data entry with a repeatable n8n workflow that runs on its own schedule.
  • Flexibility: Continue using Excel’s familiar interface while your data is stored in a robust Postgres database.
  • Scalability: Prepare your data for BI dashboards, internal tools, or customer-facing software without changing how your team works overnight.

This template helps you bridge the gap between where you are now and a more automated, scalable way of working. You do not need to rebuild everything at once. You can start here, then iterate and expand.

Shifting Your Mindset: Let the Workflow Work for You

Instead of asking, “How do I keep this spreadsheet up to date?” you can start asking, “How can I design a system that keeps my data accurate for me?” That is where n8n comes in.

With this n8n workflow template, you:

  • Define when and how your sync should run.
  • Trust your data to stay aligned between Excel or Google Sheets and Postgres.
  • Free yourself from repetitive admin tasks so you can focus on analysis, strategy, and growth.

You do not need to be a developer to start. The template gives you a working foundation that you can customize over time as your needs evolve.

What This n8n Template Actually Does

This workflow is designed to automate the complete journey of your spreadsheet data into a Postgres database, with the option to extend it into a full two-way sync. At a high level, it:

  1. Triggers on your preferred schedule or event.
  2. Fetches rows from an Excel or Google Sheets table.
  3. Sanitizes data, especially date formats, so everything is consistent.
  4. Upserts records into your Postgres database, avoiding duplicates.
  5. Supports two-way sync if you want to push changes from Postgres back to Excel.

Each step is already wired for you in the template. Your role is to connect your accounts, map your columns, and adjust the details to match your real data.

Step 1 – Choose How Your Sync Is Triggered

The first decision is simple: when should this workflow run? n8n gives you flexible trigger options so the sync fits your rhythm instead of forcing you into a new one.

  • Manual Trigger: Run the sync with a click whenever you are ready. Ideal for testing or occasional updates.
  • Schedule Trigger: Automate the sync at fixed intervals, for example every hour or once a day, so your data stays fresh without you thinking about it.
  • Execute Workflow Trigger: Call this sync from another workflow, for example after a file upload or a data import step in another automation.

Start manually while you experiment. Once you trust the flow, switch to a scheduled trigger to fully unlock the time savings.

Step 2 – Fetch Rows from Excel or Google Sheets

Next, the workflow uses the Excel node (or Google Sheets, if that is where your data lives) to pull in the rows you want to sync.

In this step you will:

  • Select the target worksheet and table that contain the data you want to move into Postgres.
  • Optionally set a row limit if you want to test with a smaller subset before syncing everything.

By letting n8n handle the data retrieval, you avoid exports, downloads, and version confusion. Your spreadsheet becomes a living source that feeds your database automatically.

Step 3 – Clean Up and Standardize Date Formats

One of the most common problems when moving data from Excel to a database is inconsistent date formats. Excel might store dates as serial numbers, strings, or mixed formats, which can break queries or reports in Postgres.

This template solves that with a Code node that:

  • Converts Excel serial date numbers into JavaScript date objects.
  • Parses string-based dates so they are interpreted correctly.
  • Reformats every date into a consistent MM/DD/YYYY format before it reaches your database.

The result is clean, predictable data that you can trust for reporting and analysis. You do not have to fix dates by hand or worry about hidden formatting issues later.

Step 4 – Upsert Data into Your Postgres Database

Now comes the part where your spreadsheet data turns into a reliable, queryable dataset. Instead of just inserting everything blindly, this workflow uses an upsert strategy.

Upsert means:

  • If a row with the same unique identifier already exists in Postgres, it is updated.
  • If it does not exist yet, it is inserted as a new row.

To make this work smoothly, you will:

  • Ensure that your Excel or Google Sheets columns match your Postgres table columns, so n8n can map them automatically.
  • Manually map fields where column names differ, so each value lands in the right place.
  • Configure the matching column, for example a unique ID like no, so the workflow can detect duplicates correctly.

With upserts in place, you can rerun the workflow as often as you like without worrying about duplicate records or missing updates. Your database simply reflects the current state of your spreadsheet.

Step 5 – Optional Two-Way Sync Back to Excel

Once you have a reliable one-way sync from Excel to Postgres, you can take automation a step further. If your team continues to edit data in the database or through tools connected to Postgres, you might want those changes reflected back in Excel.

This template is designed with that in mind. You can extend it to:

  • Pull updated data from Postgres.
  • Write those changes back into Excel or Google Sheets.
  • Maintain a full bi-directional sync so both tools stay aligned.

You do not have to build everything at once. Start with the one-way sync, get comfortable, then add the return path when you are ready to deepen your automation.

Real-World Use Cases: Growing Beyond Spreadsheets

This n8n template is especially powerful for teams and organizations that are moving from spreadsheet-only workflows to more scalable, database-backed systems. Some typical scenarios include:

  • Building dashboards where Excel remains the data entry tool, and Postgres powers the visualizations.
  • Migrating operational data into a database to support internal tools, while still letting non-technical users work in Excel.
  • Preparing a central Postgres database that will later feed customer portals, analytics platforms, or custom software.

In all of these situations, the goal is the same: keep the ease of use of Excel while gaining the robustness, performance, and integration power of Postgres. This workflow template helps you take that step without disrupting your team’s habits overnight.

Your Next Step: Start Simple, Then Improve

You do not need a perfect data model or a complex architecture to begin. Start with the sheet you update most often. Connect it to Postgres using this template. Run a manual sync, review the results, then schedule it once you are confident everything looks right.

From there, you can:

  • Add more sheets or tables.
  • Refine your mappings and data transformations.
  • Combine this workflow with other n8n automations to build a complete, connected system.

Each improvement saves you a little more time, reduces a little more friction, and brings you closer to a workflow where data simply flows where it needs to go.

Get Started With the n8n Template

If you are ready to stop wrestling with manual exports and start building a more automated, focused workflow, this template is your shortcut. It gives you a tested structure for syncing Excel with Postgres so you can focus on refining, not reinventing.

Automate your Excel to database workflow today, schedule your syncs, and let n8n handle the repetitive work in the background. Your future self, with cleaner data and more time to think, will thank you.

Ready to boost your data workflow and grow with automation? Start syncing Excel with Postgres now.

How to Automate Live Demo Scheduling with Outlook and Zoom

How to Automate Live Demo Scheduling with Outlook and Zoom Using n8n

Overview

Coordinating live demos manually through back-and-forth emails is inefficient, error-prone, and difficult to scale. By combining Microsoft Outlook for availability management, Zoom for virtual meetings, and n8n as the automation layer, you can deliver a fully automated demo booking experience that is both reliable and user-friendly.

This article describes a production-ready n8n workflow template that automates the entire process, from capturing client details to generating Zoom links and updating Outlook events. It is written for automation professionals and teams that want to standardize demo scheduling and avoid double bookings.

Workflow Architecture and Core Components

The workflow connects three main elements:

  • Client-facing form to collect contact details and preferred demo date.
  • Microsoft Outlook calendar to manage and validate pre-configured demo time slots.
  • Zoom to automatically create online meeting rooms for confirmed demos.

n8n orchestrates these components through a sequence of nodes that:

  1. Capture and normalize client input.
  2. Query Outlook via Microsoft Graph API for available demo slots.
  3. Present valid time options and capture the client’s selection.
  4. Create a Zoom meeting programmatically.
  5. Update the Outlook calendar event with booking details.
  6. Return a confirmation and trigger calendar invitations.

Prerequisites and Technical Requirements

Before implementing the workflow, ensure the following are in place:

  • Microsoft Outlook account with pre-created calendar events designated as “Online Meeting Slot” for all available demo times.
  • Zoom account configured with OAuth2 credentials that allow access to the Zoom API for meeting creation.
  • n8n running either self-hosted or in the cloud, with appropriate credentials set up for Microsoft Graph and Zoom integrations.

Pre-creating standardized “Online Meeting Slot” events is a best practice that keeps availability under strict control and prevents ad hoc bookings from conflicting with other commitments.

Step 1 – Capture Client Details and Preferred Demo Date

The workflow begins when a client submits a form or request that feeds into n8n. At a minimum, the form should collect:

  • Company trade name
  • Contact full name
  • Contact role
  • Contact email address and phone number
  • Preferred demo date

In n8n, this information is typically captured via a trigger node (for example, a Webhook, a form integration, or a CRM event) and stored as a structured data object. Maintaining consistent field names and formats at this stage simplifies downstream processing, especially when merging data into calendar events and Zoom meeting configurations.

Step 2 – Validate Availability in Outlook Using Microsoft Graph API

Once the preferred date is received, the workflow queries the Outlook calendar to identify suitable demo slots. Using the Microsoft Graph API, n8n searches for calendar events that:

  • Are scheduled on the requested date.
  • Match a specific naming convention, such as “Online Meeting Slot”.

This pattern enforces a clear separation between general calendar events and time blocks reserved for demos. It ensures that only pre-approved windows are surfaced to clients, which is critical for predictable scheduling.

If the query returns no matching slots for the chosen date, the workflow can respond to the client by requesting an alternative date. This avoids presenting unavailable times and prevents dead ends in the booking process.

Step 3 – Offer the Best-Fit Time Slots to the Client

When matching “Online Meeting Slot” events are found, the workflow extracts the most relevant options and returns them to the client. A common approach is to:

  • Sort the available slots chronologically.
  • Select the top 3 nearest times on the requested date.

These options are then formatted into a clear, human-readable format, for example:

Wednesday 20 August 2025 11:00

Providing a concise list of structured options simplifies decision-making for the client while preserving control over your internal time windows.

Step 4 – Capture and Consolidate the Client’s Final Selection

After the client chooses a specific time from the list of available slots, n8n merges that choice with the initial form data. The workflow now holds a complete booking payload that includes:

  • Client company and contact information.
  • Preferred and final confirmed date and time.
  • Associated Outlook event identifier for the selected slot.

Consolidating these details into a single data structure is essential for the next steps, where the workflow will create a Zoom meeting and update the Outlook event in a consistent manner.

Step 5 – Automatically Create a Zoom Meeting via API

With a confirmed time slot, the workflow calls the Zoom API using the configured OAuth2 credentials. The n8n Zoom node (or an HTTP Request node with Zoom’s API) is used to create a new meeting with parameters such as:

  • Topic including the client’s company name, for example Live Demo – Acme Corp.
  • Start time aligned with the selected Outlook slot.
  • Duration matching your standard demo length.
  • Timezone consistent with the calendar configuration.

The API response returns the Zoom meeting URL and related metadata, which will be embedded into the Outlook event and shared with the client.

Step 6 – Update the Outlook Event with Booking and Zoom Details

Next, the workflow updates the original “Online Meeting Slot” event in Outlook so that it accurately reflects the confirmed booking. Typical updates include:

  • Inserting the Zoom meeting link into the event body or location field.
  • Appending client contact information such as name, company, email, and phone number.
  • Changing the event subject from “Online Meeting Slot” to “Booked Live Demo”.
  • Setting the event status to busy to prevent double bookings of the same time slot.

This step is critical for calendar integrity. It ensures that your team sees the event as a confirmed demo rather than an open slot, and it blocks other bookings from overlapping with that time.

Step 7 – Provide Client Confirmation and Calendar Invite

Finally, the workflow returns a confirmation to the client and triggers calendar distribution. The client receives:

  • A confirmation page or message summarizing the booked demo date, time, and Zoom link.
  • A calendar invite automatically generated from the updated Outlook event, which can be added directly to their calendar.

This closing step delivers a professional experience, reduces follow-up questions, and ensures all parties have synchronized information about the upcoming demo.

Key Benefits of Automating Demo Scheduling with n8n

  • Eliminates repetitive manual scheduling by automating the entire process from form submission to calendar invite.
  • Reduces double bookings and human error through strict use of pre-defined Outlook slots and automatic status updates.
  • Improves client experience with guided, interactive selection of available times and instant confirmation.
  • Integrates Outlook and Zoom seamlessly so that meeting links, availability, and invites stay in sync.
  • Offers flexible customization using n8n nodes, allowing you to adapt the workflow to your internal processes, CRMs, or additional notifications.

Best Practices for Implementation

  • Standardize naming for demo slots, such as always using “Online Meeting Slot”, to simplify filtering in Microsoft Graph queries.
  • Define a consistent demo duration and timezone to avoid confusion when creating Zoom meetings and calendar events.
  • Log key steps in n8n (for example, slot selection and Zoom meeting creation) for easier debugging and auditing.
  • Test the workflow with internal users before exposing it to clients to validate time formatting, email content, and edge cases where no slots are available.

Conclusion

By connecting client intake forms, Outlook calendar availability, and Zoom meeting creation through n8n, you can fully automate live demo scheduling. The workflow described here delivers a smooth experience from initial request to confirmed booking, while significantly reducing manual workload and the risk of scheduling conflicts.

For teams that run frequent product demos or consultations, this automation is a scalable foundation that can be extended with CRM updates, follow-up reminders, or post-demo surveys.

Next Steps

If you are ready to streamline your demo scheduling, you can start from this workflow template and adapt it to your environment, branding, and internal processes. Add extra validation, integrate with your CRM, or extend the notification logic as needed.

For tailored guidance or to explore additional automation patterns, reach out to our team and we will help you design workflows that align with your operational goals.

Automate Your Water Bill Calculations with Telegram Bot & Google Sheets

Automate Your Water Bill Calculations with Telegram Bot & Google Sheets

What You Will Learn

In this guide, you will learn how to build an automated water billing system using:

  • Telegram as a simple user interface for residents
  • Google Sheets as your central database and calculator
  • Google Gemini AI to read water meter values from images
  • n8n workflow automation to connect everything together

By the end, you will understand how the n8n workflow template works step by step, how each node contributes to the process, and how to adapt it for your own residential area or business.

How the Automation Works – Big Picture

Before we dive into the nodes and configuration, let us look at the overall flow from a resident’s perspective:

  1. A resident takes a photo of their water meter.
  2. They send the photo to a Telegram bot, with their name in the caption.
  3. The n8n workflow receives this message through the Telegram Trigger node.
  4. The workflow downloads the image and sends it to the Google Gemini AI model.
  5. Gemini reads the meter value (in cubic meters) from the photo and returns the number.
  6. n8n looks up the resident’s previous reading in Google Sheets.
  7. The workflow calculates the usage difference, multiplies it by the price per cubic meter, adds any fixed charge, and produces the total amount to pay.
  8. The new reading and billing details are appended as a new row in Google Sheets.
  9. Finally, n8n formats a clear bill message and sends it back to the resident on Telegram, including the amount and payment details.

All of this happens automatically after the resident sends a single Telegram message.

Why Use n8n for Water Bill Automation?

This n8n workflow template is ideal if you want to:

  • Improve accuracy by reducing manual reading and calculation errors
  • Save time by automating data entry and monthly bill preparation
  • Offer convenience so residents can submit readings and receive bills directly in Telegram

Because the workflow is template-based, you can reuse and adapt it without starting from scratch.


Step 1 – Prepare Your Google Sheet

First, you need a well-structured Google Sheet that will store all readings and calculations. Create a new sheet and add the following columns:

  • Nama (Name) – the resident’s name, matching the caption they send on Telegram
  • Volume Sebelumnya (Previous Volume) – the last recorded meter reading
  • Volume Saat Ini (Current Volume) – the new reading from the latest photo
  • Harga/m³ (Price per cubic meter) – your water price per cubic meter
  • Jumlah Bayar (Amount to Pay) – the calculated usage cost before fixed charges
  • Beban (Fixed Charge) – any base fee you charge every month
  • Total Bayar (Total Payment) – final amount after adding the fixed charge
  • Tanggal Input (Date Recorded) – the date the reading was recorded

This sheet will be read and updated by the n8n workflow whenever a new meter photo is submitted.

Step 2 – Create and Configure Your Telegram Bot

Next, create a Telegram bot that residents will interact with:

  1. Open the Telegram app.
  2. Search for @BotFather.
  3. Start a chat and use the command /newbot.
  4. Follow the prompts to give your bot a name and username.
  5. After creation, BotFather will send you a bot token.

Copy this token. You will use it in n8n to authenticate the Telegram Trigger node and the node that sends messages back to users.

Step 3 – Set Up Google Gemini AI for Image Reading

To automatically read the meter value from images, you will use the Google Gemini AI model:

  1. Go to Google AI Studio.
  2. Create or select a project and generate an API key for the Gemini model.
  3. Store this key securely and configure it in n8n where the Google Gemini Chat Model & Image Explainer node is used.

In the workflow, this node will receive the water meter photo, send it to Gemini, and get back the detected numeric reading in cubic meters.


Understanding the n8n Workflow Template

Now let us walk through the n8n workflow node by node so you know exactly how the template works and how the data flows.

1. Telegram Trigger – Starting the Workflow

Purpose: Start the automation when a user sends a message to your Telegram bot.

This node is configured to listen for incoming messages. In this use case, it expects:

  • An image (photo of the water meter)
  • A caption that contains the resident’s name

When such a message is received, the workflow is triggered and passes the message data to the next node.

2. Switch Node – Handling Different Message Types

Purpose: Make sure the workflow processes only the correct type of message.

The Switch node checks the incoming message type. It routes the execution so that only messages with an image are processed by the next steps. This helps avoid errors if someone sends text only or another unsupported format.

3. Get a File – Downloading the Meter Photo

Purpose: Retrieve the actual image file from Telegram.

Using the file information from the Telegram Trigger, this node:

  • Downloads the water meter photo
  • Makes the image available as binary data for the Gemini AI node

4. Google Gemini Chat Model & Image Explainer – Reading the Meter

Purpose: Extract the meter reading from the image using AI.

This node sends the downloaded image to the Gemini model along with a prompt that explains what to detect (for example, the numeric value in cubic meters). The Gemini model:

  • Analyzes the image
  • Recognizes the number shown on the water meter
  • Returns the detected reading to the workflow

The result is a numeric value that will be treated as the current volume.

5. Get row(s) in sheet – Reading Data from Google Sheets

Purpose: Retrieve existing billing data for the specific resident.

This node connects to your Google Sheet and fetches rows that match the resident’s name (taken from the Telegram caption). It pulls all historical rows for that user so that the workflow can determine the last recorded reading.

6. Find Latest Row – Identifying the Previous Reading

Purpose: Find the most recent record for this resident.

From the rows returned by Google Sheets, this node selects the latest entry. That row contains the Volume Sebelumnya (Previous Volume), which is required to calculate how much water has been used since the last reading.

7. Calculate Bill – Performing the Billing Logic

Purpose: Calculate the amount the resident needs to pay.

Using the previous volume and the new volume from Gemini, this node:

  • Computes the usage difference: Volume Saat Ini – Volume Sebelumnya
  • Multiplies the difference by Harga/m³ (Price per cubic meter)
  • Adds the Beban (Fixed Charge)
  • Outputs:
    • Jumlah Bayar (Amount to Pay) before fixed charge
    • Total Bayar (Total Payment) after adding the fixed charge

8. Prepare Data for Sheet & Append Row – Updating the Spreadsheet

Purpose: Store the new reading and billing result in Google Sheets.

This step prepares a new row with all required columns:

  • Nama (Name)
  • Volume Sebelumnya (Previous Volume)
  • Volume Saat Ini (Current Volume)
  • Harga/m³ (Price per cubic meter)
  • Jumlah Bayar (Amount to Pay)
  • Beban (Fixed Charge)
  • Total Bayar (Total Payment)
  • Tanggal Input (Date Recorded)

The Append Row operation then adds this new record to the bottom of your Google Sheet, keeping a complete history of all readings and bills.

9. Format Bill Message – Creating a Clear Telegram Response

Purpose: Build a user-friendly message with billing details.

This node takes the calculated values and formats them into a readable message, for example:

  • Previous volume and current volume
  • Usage in cubic meters
  • Price per cubic meter
  • Fixed charge
  • Total amount to pay
  • Optional: payment link or instructions

The goal is to provide all key information so the resident understands how the bill was calculated.

10. Send Bill to Telegram – Delivering the Result

Purpose: Send the final bill message back to the resident.

The last node uses the Telegram API to deliver the formatted bill to the same chat that sent the meter photo. You can also include a direct payment link or bank details in this message.


Example Water Bill Calculation

To make the billing logic concrete, consider this example:

  • Previous volume: 535 m³
  • Current volume: 545 m³

Usage difference:

  • 545 – 535 = 10 m³

If the price per cubic meter is Rp3,000, then:

  • Usage cost: 10 × 3,000 = Rp30,000
  • Fixed charge (Beban): Rp3,000
  • Total to pay: Rp33,000

This is exactly the type of calculation the Calculate Bill node performs automatically for every new reading.


Benefits of Automating Water Billing with n8n

Accuracy

By using AI to read meter images and a consistent formula in your workflow, you reduce mistakes that often occur with manual readings and manual spreadsheet edits.

Efficiency

Once set up, the n8n template takes care of the entire process from image input to bill output. You no longer need to type in readings, run formulas, or send individual messages.

Convenience for Residents

Residents simply send a Telegram photo and receive their bill back in the same app. There is no need to log in to a portal, fill out forms, or handle complex steps.


Quick Recap

  • You created a Google Sheet with columns for name, previous volume, current volume, pricing, fixed charge, total payment, and date.
  • You set up a Telegram bot using @BotFather and obtained a bot token.
  • You generated a Google Gemini API key and used it in n8n to read meter values from images.
  • You learned how each n8n node works:
    • Telegram Trigger and Switch for handling incoming messages
    • Get a File and Gemini for image processing
    • Google Sheets nodes for reading and appending data
    • Custom logic nodes for calculating and formatting bills
    • Telegram send node for delivering the final bill

FAQ

Do residents always need to include their name in the caption?

Yes. The workflow uses the caption text as the Nama (Name) to match and update the correct rows in Google Sheets. Make sure your instructions to residents are clear about this.

Can I change the water price or fixed charge?

Yes. Adjust the Harga/m³ and Beban values in your Google Sheet or in the calculation logic within the n8n workflow, depending on how the template is configured.

Is it possible to reuse this workflow for other utilities?

In many cases, yes. The same pattern of “photo + AI reading + spreadsheet + calculation + message” can be adapted for electricity, gas, or other meter-based billing, with appropriate changes to labels and formulas.


Next Steps

This Telegram-based water bill automation template combines AI, Google Sheets, and n8n to simplify monthly billing for residential communities and small businesses. To implement it yourself, start by:

  1. Creating the Google Sheet with the required columns.
  2. Setting up your Telegram bot with BotFather.
  3. Configuring the Gemini API key in n8n.
  4. Importing and customizing the n8n workflow template.

If you would like a ready-to-use n8n workflow or need help customizing it, you can contact our support team or leave a comment with your questions.

Automated Email Categorization and Response Workflow

Automated Email Categorization and Response Workflow

Overview

This n8n workflow template delivers a fully automated email management pipeline by connecting Gmail with AI-driven classification and response logic. It combines a Gmail Trigger, an OpenAI-powered Text Classifier, and category-specific actions to sort, label, summarize, and respond to incoming messages with minimal manual intervention.

Designed for professionals and automation teams, this workflow runs on a 5-minute polling interval, analyzes each new message, assigns a semantic category, and then executes tailored downstream actions in Gmail and Google Sheets. The result is a more structured inbox, faster response times, and standardized communication at scale.

Key Capabilities

  • Automatic detection of new emails in Gmail on a 5-minute schedule
  • AI-based classification of messages using an OpenAI GPT-4o-mini model
  • Automated Gmail labeling aligned with the detected category
  • Category-specific handling, including summaries, drafts, auto-replies, and forwarding
  • Persistent logging of relevant information in Google Sheets for reporting and audit

Workflow Architecture

1. Gmail Trigger – Inbound Email Monitoring

The workflow begins with a Gmail Trigger node configured to monitor your inbox. It checks for new messages every 5 minutes and initiates the workflow each time a new email is detected. This polling-based trigger ensures that:

  • No manual refresh or intervention is required
  • Processing remains near real-time without overloading the Gmail API
  • All subsequent AI and automation logic only runs when new data is available

2. AI Text Classification with OpenAI

Once an email is captured by the trigger, its subject and snippet are passed to a Text Classifier node. This node uses the OpenAI GPT-4o-mini model to interpret the content and assign a high-level intent category.

The classifier maps each email into one of the following predefined categories:

  • Promotions
  • Social
  • Personal
  • Sales
  • Recruitment
  • Receipts
  • Misc

Using a language model for classification provides greater flexibility compared to static keyword rules, which is particularly beneficial in production environments where email content and formats can vary significantly.

3. Automated Gmail Labeling

After classification, the workflow applies a corresponding Gmail label to each message. For example, promotional emails may receive a label such as CATEGORY_PROMOTIONS, while other categories receive their own dedicated labels.

This structured labeling strategy:

  • Improves inbox organization for end users
  • Enables downstream filtering, reporting, or routing rules
  • Provides a clear audit trail of how emails were categorized by the automation

Category-Specific Automation Logic

Once an email is categorized and labeled, the workflow branches into different execution paths. Each category has its own handling logic designed around common operational requirements.

Promotions

Promotional emails are typically high volume and low priority. For this category, the workflow:

  • Applies the appropriate Gmail label for promotions
  • Marks the email as read automatically

This keeps the inbox clear of clutter while still retaining the messages for later reference if needed.

Social

Social notifications can be informative, but they are rarely urgent on an individual basis. For Social emails, the workflow:

  • Generates a concise summary using the OpenAI integration
  • Appends the summary and relevant metadata to a Google Sheet

This creates a consolidated log of social activity, which is valuable for tracking engagement trends or periodic review, without the need to inspect each notification separately.

Personal

For Personal emails, the workflow focuses on assisting rather than fully automating the response. It:

  • Uses AI to draft a personalized reply based on the email content
  • Creates a Gmail draft with the generated response

The human recipient can then review, edit, and send the draft, ensuring that sensitive or high-touch communications maintain a human approval step while still benefiting from AI-assisted writing.

Sales

Sales inquiries often require fast, consistent, and professional responses. For the Sales category, the workflow:

  • Generates a sales-oriented reply using the OpenAI model
  • Automatically sends the reply to the original sender via Gmail

This pattern is ideal for standard inquiries, lead qualification responses, or initial follow-ups, where speed and consistency are critical.

Recruitment

Recruitment-related emails are labeled for streamlined access and later processing. In this template:

  • The email is tagged with the appropriate recruitment label
  • No additional automated actions are executed within the current workflow

This provides a foundation that can be extended with further automation, such as ATS integration, candidate scoring, or interview scheduling.

Receipts

For Receipts, the workflow supports internal finance or record-keeping processes. It:

  • Forwards the email to an internal address, for example an accounting or archival inbox

This ensures that payment confirmations and transaction records are routed to the appropriate internal stakeholders or systems without manual forwarding.

Misc

Any email that does not clearly fit another category is assigned to Misc. For these:

  • The workflow applies a generic label to mark them as miscellaneous

This prevents uncategorized messages from being ignored while still keeping them distinguishable from higher priority classes.

Operational Benefits

  • Time efficiency: Routine sorting, routing, and responses are handled automatically, which reduces manual triage and frees staff for higher value work.
  • Inbox organization: Consistent labeling and handling rules keep Gmail accounts structured and easier to navigate, even at high email volumes.
  • Consistent communication: AI-generated responses maintain a professional tone and standardized messaging for both personal-assist and fully automated replies.
  • Centralized records: Storing summaries in Google Sheets provides a lightweight reporting and audit layer for social and other non-critical communications.

Implementation Considerations and Best Practices

  • Start with the provided categories, then refine or extend them as you learn from real traffic.
  • Review AI-generated drafts for personal and sensitive categories before enabling full auto-send behavior.
  • Use Gmail labels strategically so that they can support additional filters, dashboards, or downstream n8n workflows.
  • Monitor performance and misclassifications to continuously improve your prompts and classification logic.

Get Started

Deploy this n8n workflow to modernize your email operations, reduce inbox noise, and improve response times with AI-driven automation. It is suitable for individual professionals, sales teams, customer operations, and any organization that manages a high volume of inbound email.

If you would like to adapt this template to your specific processes or integrate it with additional systems, contact us to discuss a customized automation design.

Automate LinkedIn Lead Enrichment & Email Outreach

Automate LinkedIn Lead Enrichment & Email Outreach (Without Losing the Personal Touch)

If you spend a good chunk of your day hunting for LinkedIn profiles, checking company details, and then trying to write personalized emails for every lead, you know how exhausting that can get. The good news? You can hand most of that work over to automation.

This n8n workflow template is built to do exactly that. It pulls in your leads, finds their LinkedIn profiles, enriches their company data, and then uses AI to write warm, tailored emails for you. Think of it as a smart assistant that never gets tired of research and outreach.

What This n8n Workflow Actually Does

Let’s break it down in simple terms. This workflow:

  • Starts with leads from a source like Google Sheets
  • Finds the right LinkedIn profile for each person
  • Grabs and enriches company information from LinkedIn
  • Uses AI to write personalized email subject lines and bodies

The result is a smooth, end-to-end system that takes you from raw lead data to ready-to-send, highly relevant emails.

When You Should Use This Template

This workflow is especially handy if you:

  • Run outbound sales or business development and want to scale without spamming
  • Have a list of leads but not enough context about them or their companies
  • Spend too much time searching LinkedIn manually
  • Want to personalize your email outreach but can’t write every message from scratch

If that sounds like your day-to-day, this template can seriously lighten your workload.

How the Workflow Flows (Step by Step)

Step 1 – Bring In Your Leads & Kick Off Smart Search

Everything starts with your lead list. Typically, this lives in a Google Sheet, with simple columns like:

  • First Name
  • Last Name
  • Company

The workflow takes these fields and turns them into a targeted Google search. It combines the person’s name with their company and narrows results to LinkedIn using a query like:

[First Name] [Last Name] [Company] site:linkedin.com

That way you are not just searching the whole internet. You are giving Google a very specific instruction to find the right LinkedIn profile for each lead.

Step 2 – Filter Out The Noise And Keep Only Real Profiles

Google’s search results can include all kinds of LinkedIn pages, so the workflow needs to be picky. This is where URL validation comes in.

The workflow checks each returned URL and keeps only the ones that match the pattern for personal profiles:

https://www.linkedin.com/in/...

Anything that does not fit that pattern is ignored. This validation step is crucial because it:

  • Prevents you from accidentally using company pages or random LinkedIn URLs as personal profiles
  • Improves the quality of your enrichment data
  • Reduces the risk of messy or mismatched lead information later on

All of this is handled automatically using regex filtering and logic inside the n8n workflow, so you do not have to double check every link by hand.

Step 3 – Enrich The Company Details For Each Lead

Once the person’s LinkedIn profile is identified, the workflow turns its attention to their company. After all, a good outreach email is not just about the person, it is also about where they work and what their business does.

Here is how it works:

  1. Check for a company LinkedIn URL on the profile
    If the person’s LinkedIn profile already contains a link to their current company page, the workflow grabs that URL right away.
  2. If it is missing, run a company search
    No company URL? No problem. The workflow performs another Google search, this time targeting LinkedIn company pages using a pattern like:
    https://www.linkedin.com/company/...
    It then selects the best matching result for that company.
  3. Enrich the company data
    With the correct company LinkedIn URL in hand, the workflow enriches the company profile. This can include details like what the company does, its size, and other context that makes your outreach more relevant.

The end result is a richer, more complete picture of both the person and their organization, which makes your emails feel informed rather than generic.

Step 4 – Let AI Help You Write Personalized Emails

Now for the fun part. Once the workflow has gathered all this enriched data, it taps into AI to help you write emails that actually sound like a human wrote them.

Using OpenRouter’s chat model, the workflow:

  • Combines the person’s details with their company information
  • Generates personalized subject lines tailored to each lead
  • Writes email bodies in a warm, conversational style

The AI uses the context from the enrichment step, so your emails can mention relevant details about the person’s role or company focus. That way, your outreach feels specific and thoughtful, not like a copy-paste blast.

You still stay in control, of course. You can review, tweak, or extend these emails, but you are no longer starting from a blank page for every single lead.

Why This Workflow Makes Your Life Easier

So what do you actually gain by using this n8n template instead of doing everything manually?

  • Save Time
    The workflow automates the repetitive parts of lead enrichment, like searching LinkedIn, verifying URLs, and collecting company info. Your sales or marketing team can focus on actual conversations instead of data digging.
  • Stay Accurate
    With regex-based URL filtering and structured logic, you reduce human error. No more copy-pasting the wrong profile or mixing up companies.
  • Send More Relevant Outreach
    AI-generated emails use real context from both the person and their company, so your messages feel tailored and thoughtful.
  • Improve Conversion Rates
    When leads receive emails that clearly took their situation into account, they are more likely to respond, book a call, or move forward in your funnel.

Putting It All Together

This LinkedIn lead enrichment and email outreach template turns a messy, manual process into a clean, automated workflow:

  1. Import leads from Google Sheets
  2. Find and validate the correct LinkedIn profile
  3. Locate and enrich the company’s LinkedIn page
  4. Generate personalized, AI-assisted emails ready for outreach

It is a practical way to scale your lead generation while keeping your outreach human and relevant.

Ready To Try The n8n Workflow Template?

If you are ready to stop juggling spreadsheets, browser tabs, and half-written emails, this template is a great starting point. You can plug it into your n8n setup, connect it with your existing tools, and customize it as you grow.

Give it a spin and see how much smoother your lead enrichment and outreach can feel.