Automate LinkedIn Job Data Scraping to Google Sheets with n8n and Bright Data
Overview
This n8n workflow template automates the full pipeline of collecting live LinkedIn job postings, transforming the data, and persisting it into Google Sheets. It uses Bright Data’s Dataset API to extract active job listings based on user-defined filters, then cleans and normalizes the response before appending structured records into a Google Sheets template.
The automation is suitable for technical users, recruiters, sales teams, and growth professionals who need a repeatable, parameterized way to query LinkedIn jobs by location, keyword, and other filters, then work with the results in a spreadsheet for analysis or outreach.
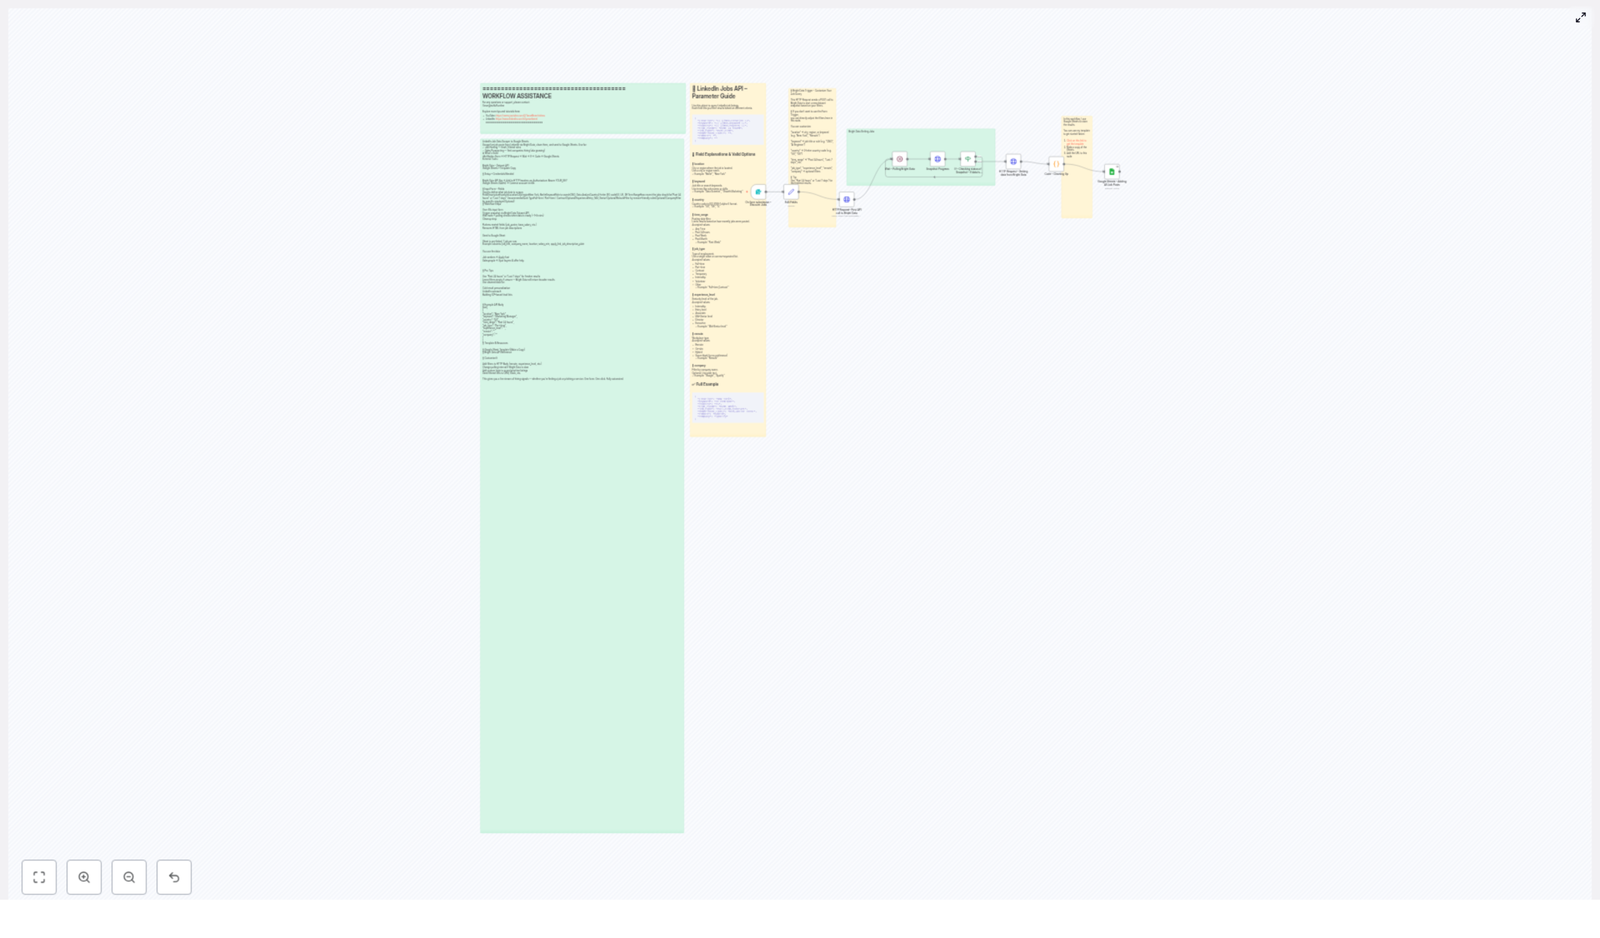
Workflow Architecture
At a high level, the workflow follows this sequence:
- Form Trigger collects search parameters from the user.
- HTTP Request node sends those parameters to Bright Data to initiate a LinkedIn jobs snapshot.
- Wait and If nodes implement a polling loop until the snapshot is ready.
- HTTP Request node retrieves the completed dataset from Bright Data.
- Code node cleans, flattens, and normalizes the job records.
- Google Sheets node appends the cleaned data to a predefined spreadsheet template.
Primary Components
- n8n Nodes: Form Trigger, HTTP Request, Wait, If, Code, Google Sheets
- External Services:
- Bright Data Dataset API for LinkedIn job snapshots
- Google Sheets Template for structured storage and analysis
Node-by-Node Breakdown
1. Form Trigger – Collecting User Input
The workflow begins with a Form Trigger node. This node exposes a web form where users define the parameters of the LinkedIn job search. The form acts as the primary input layer for the automation and controls what Bright Data will scrape.
Required Form Fields
- Location: City or region to target (for example, “Berlin”, “San Francisco Bay Area”).
- Keyword: Search term such as job title or core skill (for example, “Data Engineer”, “Salesforce”).
- Country Code: ISO format country code (for example, “US”, “DE”, “GB”).
Optional Filters
The form can also expose optional inputs that map directly to Bright Data’s LinkedIn jobs filters:
- Time range (for example, “Past 24 hours”, “Last 7 days”) to restrict results to recently posted jobs.
- Job type (for example, full-time, part-time, contract, internship).
- Experience level (for example, entry-level, mid-senior, director).
- Remote flag to distinguish between on-site, hybrid, and remote roles.
- Company name to focus the search on specific employers.
If optional fields are left blank, the workflow passes more general search criteria to Bright Data, resulting in a broader dataset.
2. HTTP Request – Triggering a Bright Data Snapshot
The next step is an HTTP Request node configured with a POST method. This node sends the form inputs to the Bright Data Dataset API to start a LinkedIn jobs snapshot.
Key Configuration Points
- Method:
POST - URL: Bright Data Dataset API endpoint for LinkedIn jobs snapshots.
- Authentication: Bright Data API credentials configured in n8n (API key or token).
- Body:
- Includes fields such as
location,keyword,country, and any optional filters provided by the user. - Maps form fields to the Bright Data LinkedIn jobs schema.
- Includes fields such as
The Bright Data API responds with metadata for the snapshot request. Most importantly, it returns an identifier or reference that is later used to poll for completion and retrieve the dataset once it is ready.
3. Wait & If – Polling for Snapshot Completion
Bright Data does not return the final dataset immediately. Instead, it creates a snapshot job that typically completes in 1 to 3 minutes. To handle this asynchronous process, the workflow uses a combination of:
- Wait node to pause execution for a defined interval.
- If node to check whether the snapshot is ready.
Polling Logic
- The workflow waits for a short time window (for example, 30 to 60 seconds) using the Wait node.
- After the wait period, an HTTP Request node (configured with
GET) checks the snapshot status using the identifier returned in step 2. - An If node evaluates the status field in the response:
- If status indicates completed, the workflow proceeds to data retrieval.
- If status indicates pending or processing, execution loops back through another Wait period and status check.
Edge Cases & Practical Notes
- In normal conditions, the snapshot completes within 1 to 3 minutes. If Bright Data takes longer, the polling loop continues until the completion condition is met.
- You can adjust the Wait interval and maximum number of polling attempts in n8n to balance responsiveness with API usage.
- If the API returns an error status, the workflow can be configured to fail, send a notification, or branch into a custom error-handling path (for example, logging or alerting), depending on your n8n setup.
4. HTTP Request – Retrieving and Cleaning the Dataset
Once the snapshot is marked as complete, another HTTP Request node is used to fetch the actual job data.
Data Retrieval
- Method:
GET - URL: Bright Data dataset URL for the completed snapshot.
- Authentication: Same Bright Data credentials as the initial POST request.
The response contains the raw LinkedIn job postings, often with nested structures and HTML content that are not directly suitable for spreadsheet usage.
Code Node – Data Cleaning & Normalization
A Code node processes the retrieved records and prepares them for Google Sheets. The logic typically includes:
- Flattening nested properties so that multi-level JSON fields become simple key-value pairs.
- Removing HTML tags from job descriptions and other text fields to improve readability.
- Normalizing field names and formats so that each job record matches the Google Sheets column structure.
Common transformations might include:
- Extracting text-only job descriptions from HTML content.
- Converting nested company or location objects into simple strings.
- Ensuring that URLs, salary information, and application links are in consistent formats.
The output of the Code node is a clean, uniform array of job records, each ready to be appended as a row in the spreadsheet.
5. Google Sheets Node – Persisting Data
The final step uses the Google Sheets node to append the cleaned job data to a pre-configured spreadsheet template.
Google Sheets Configuration
- Authentication: Google Sheets credentials set up in n8n.
- Mode: Append mode to add new rows at the bottom of the sheet.
- Spreadsheet: The provided Google Sheets template (see link below) or a custom sheet with the same column structure.
- Columns (typical fields):
- Job title
- Company
- Location
- Salary (if available)
- Application link
- Additional metadata from Bright Data, as mapped in the Code node
Each cleaned job listing becomes a single row in the sheet. Over time, the sheet accumulates a structured history of LinkedIn job postings that match your search criteria.
LinkedIn Jobs API Field Reference (via Bright Data)
The workflow relies on Bright Data’s LinkedIn jobs dataset, which supports several key filter parameters. These are mapped from the form input to the API request body.
Core Filter Fields
location– City or region where the job is based.keyword– Primary search term, typically a job title or skill.country– ISO format country code (for example,US,DE).
Additional Filter Fields
time_range– Time window for when jobs were posted (for example, “Past 24 hours”, “Last 7 days”).job_type– Nature of employment (for example, full-time, part-time, contract).experience_level– Seniority level (for example, entry-level, associate, mid-senior).remote– Remote work setting, depending on Bright Data’s schema (for example, remote only vs on-site).company– Specific company name to narrow the results.
By combining these filters, you can tightly tailor the dataset to your use case, whether that is focused job hunting, competitive intelligence, or identifying hiring signals for sales outreach.
Use Cases & Benefits
- Real-time hiring insights – Continuously capture fresh job postings that match your criteria.
- Prospecting lists – Identify companies that are actively hiring and build targeted lead lists.
- Outreach personalization – Use job details such as role, location, and requirements to craft highly relevant cold emails or LinkedIn messages.
- Automated lead generation – Convert hiring activity into sales signals without manual research.
Configuration Tips & Best Practices
Filtering Strategy
- Use time filters like “Past 24 hours” or “Last 7 days” to keep the dataset focused on the most recent opportunities.
- Leave optional filters blank if you want to run broader discovery queries and then refine later in Google Sheets.
- Combine
keywordwithlocationandcountryfor more relevant and geographically consistent results.
Data Quality & Outreach
- Leverage the cleaned job descriptions and company fields to segment your sheet by industry, seniority, or tech stack.
- Personalize outreach messages using specific role requirements and responsibilities extracted from the job data.
Operational Considerations
- Monitor Bright Data API usage and rate limits when running the workflow frequently or at scale.
- Consider scheduling the workflow in n8n (for example, daily or hourly) around your prospecting or job search cadence.
- Handle potential API errors or timeouts by configuring n8n error workflows or notifications, especially in production scenarios.
Getting Started
To implement this automated LinkedIn job scraping pipeline:
- Import the n8n workflow template linked below.
- Configure your Bright Data credentials in the HTTP Request nodes.
- Set up your Google Sheets credentials and connect the Google Sheets node to the provided template or your own copy.
- Adjust the form fields, filters, and Code node mappings as needed for your specific use case.
Use this Google Sheets template as a starting point and adapt the columns to your data model:
Get the Google Sheets Template
Advanced Customization
More advanced users can extend or adapt the workflow in several ways:
- Additional processing nodes – Insert extra Code or Function nodes to enrich data, categorize roles, or score leads.
- Multi-destination outputs – In addition to Google Sheets, send the cleaned data to CRMs, databases, or messaging tools.
- Conditional branching – Use If nodes to route different job types or seniority levels into separate sheets or pipelines.
- Notification hooks – Add email, Slack, or other notification nodes to alert you when new high-priority roles appear.
Support & Further Learning
If you need help configuring or extending this n8n workflow, you can reach out directly:
Email: Yaron@nofluff.online
Tutorials and walkthroughs: YouTube | LinkedIn
Template Access
Load the ready-made n8n template to accelerate setup and adapt it to your environment:
Summary
This n8n workflow, powered by Bright Data’s LinkedIn jobs dataset and integrated with Google Sheets, delivers a continuous, filterable stream of live job postings. By automating scraping, cleaning, and storage, it reduces manual research and provides a reliable foundation for job search, recruiting, and sales prospecting workflows with minimal ongoing effort.