Auto-Send Daily Meeting List to Telegram

Automatically Send a Daily Google Calendar Meeting Summary to Telegram with n8n

Maintaining real-time visibility into your daily meetings is essential for efficient time management, especially in fast-paced, distributed teams. This guide demonstrates how to implement an n8n workflow that queries Google Calendar every morning, compiles a structured list of the day’s events, and delivers it to you via Telegram, with an optional Slack notification for status updates.

Use Case Overview

This automation is designed for professionals who rely heavily on calendar-driven workflows and want a concise, reliable snapshot of their schedule delivered to a messaging channel they already use. By integrating Google Calendar, Telegram, and optionally Slack, the workflow centralizes daily agenda visibility without any manual effort.

Core Capabilities

  • Run on a fixed schedule every morning using the n8n Schedule Trigger.
  • Retrieve all events from a specified Google Calendar between today and tomorrow.
  • Normalize key fields such as event title, start time, and attendees.
  • Generate a human-readable, Markdown-compatible message summarizing your meetings.
  • Send the compiled agenda to a Telegram chat via a bot, with optional Slack delivery.

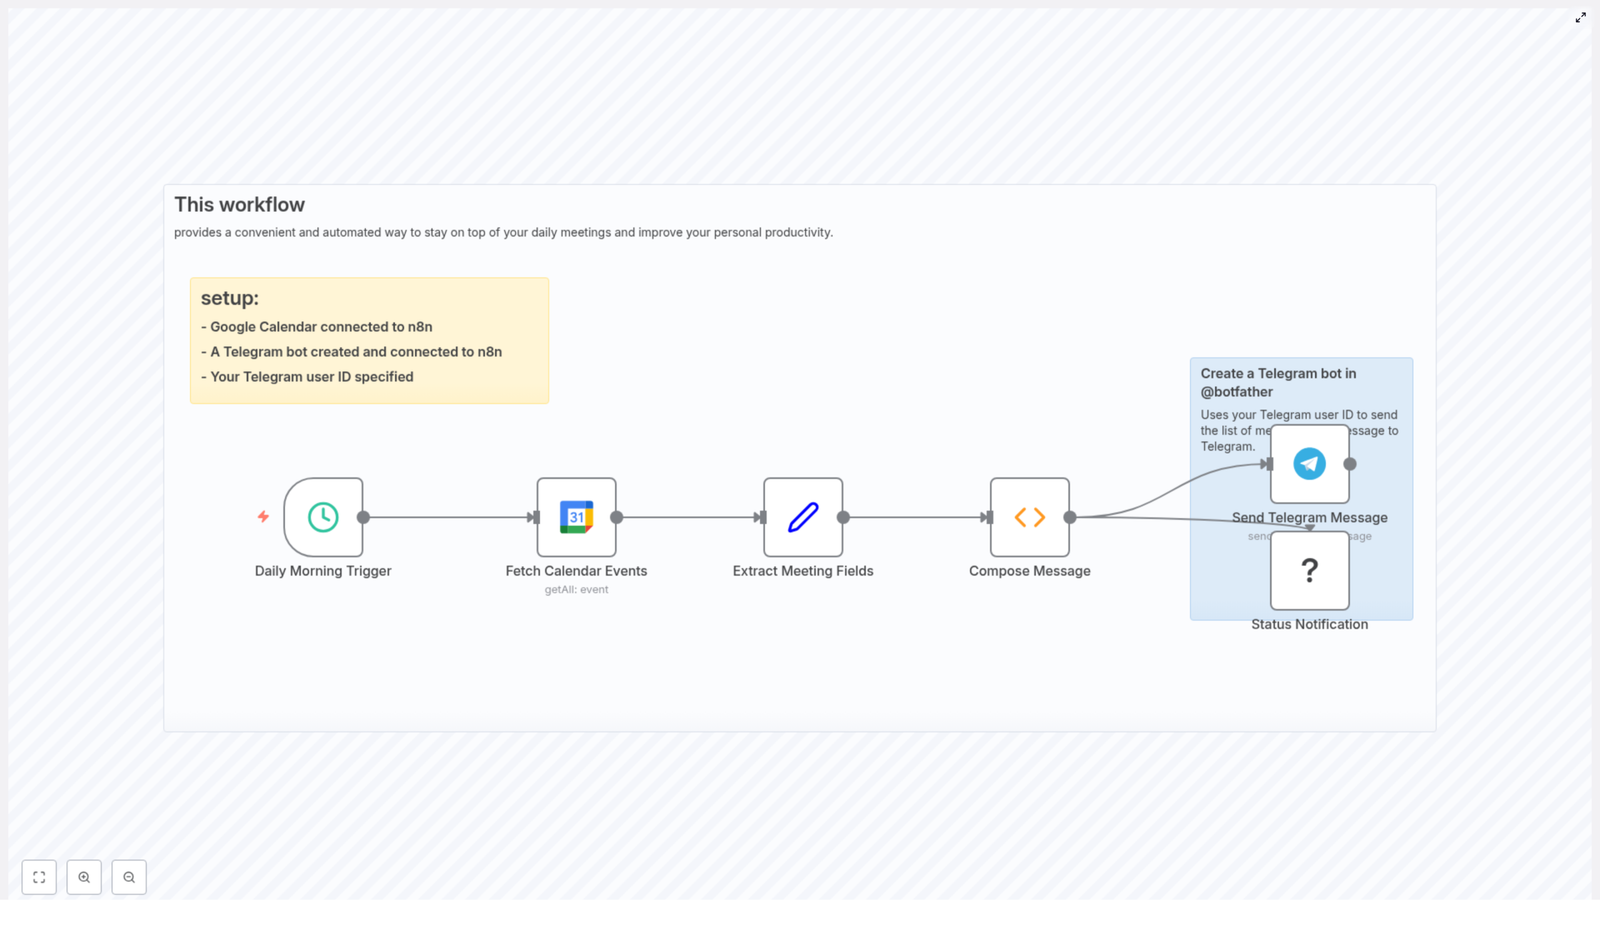
High-Level Workflow Architecture

The workflow is composed of a small set of well-defined nodes, each responsible for a specific part of the process. Understanding their roles helps when extending or troubleshooting the automation.

Key Nodes and Responsibilities

  • Schedule Trigger – Initiates the workflow at a defined time each day.
  • Google Calendar (getAll) – Fetches all events for the current day using timeMin and timeMax boundaries.
  • Set – Normalizes and extracts relevant fields from each event (summary, start, attendees).
  • Function – Composes the final message text, handling time zones, all-day events, and empty guest lists.
  • Telegram – Sends the formatted message to a specified user or chat via a Telegram bot.
  • Slack (optional) – Provides an additional notification channel for team visibility or status updates.

Step-by-Step Implementation in n8n

1. Configure the Schedule Trigger

Start by defining when this workflow should run. Typical configurations are early morning (for example 06:00) so that the agenda is ready before the workday starts.

  • Add a Schedule Trigger node.
  • Set the trigger to run daily at your desired time, such as 06:00.
  • Verify that the workflow timezone matches your locale. In the reference template, the timezone is set to Asia/Tehran. Adjust this to your own region to avoid time discrepancies.

2. Connect Google Calendar and Retrieve Events

The Google Calendar node is responsible for pulling the events that will appear in your daily summary.

Create Google Calendar credentials:

  • In n8n, set up an OAuth2 credential for Google Calendar.
  • Grant the necessary scopes to read calendar events and attendees.

Configure the Google Calendar node:

  • Operation: getAll
  • Calendar: select or paste the calendar ID. This can be a personal calendar, a shared team calendar, or a room calendar.
  • Options > timeMin: = {{ $today }}
  • Options > timeMax: = {{ $today.plus({ days: 1 }) }}
  • singleEvents: true to expand recurring events into individual instances.

This configuration restricts the results to events starting from the beginning of “today” up to the start of “tomorrow”, which effectively scopes the query to a single calendar day.

3. Normalize Event Data with a Set Node

To simplify downstream processing, the raw Google Calendar output should be mapped into a consistent structure using a Set node. This is an important best practice in n8n workflows, as it isolates external API responses from internal logic.

In the Set node, create fields such as:

  • Name => = {{ $json.summary }}
  • Time => = {{ $json.start }}
  • Guests => = {{ $json.attendees }}

This mapping ensures that every event item entering the Function node has a predictable schema, which simplifies message composition and future enhancements.

4. Build a Human-Readable Agenda in a Function Node

The Function node composes the final text that will be sent to Telegram. The version below has been refined to correctly handle time zones, all-day events, character encoding, and scenarios where no guests are specified.

// Compose Message (Function node)
let message = '*Your meetings today are:*\n\n';
if (items.length === 0) {  message = 'You have no meetings scheduled for today.';  return [{ json: { message } }];
}
for (const item of items) {  const timeObj = item.json.Time || {};  let dateTimeStr = '';  if (timeObj.dateTime) {  const dt = new Date(timeObj.dateTime);  const tz = timeObj.timeZone || 'UTC';  dateTimeStr = new Intl.DateTimeFormat('en-US', { hour: 'numeric', minute: 'numeric', timeZone: tz }).format(dt);  } else if (timeObj.date) {  // all-day event  dateTimeStr = timeObj.date;  } else {  dateTimeStr = 'Time not available';  }  const name = item.json.Name || 'No title';  message += `• ${name} | ${dateTimeStr}\n`;  const guests = item.json.Guests || [];  if (Array.isArray(guests) && guests.length) {  message += '  - Guests: ' + guests.map(g => g.email || g).join(', ') + '\n';  } else {  message += '  - Guests: None\n';  }
}

return [{ json: { message } }];

Implementation notes:

  • The output is Markdown-style text. In the Telegram node, you can enable Markdown parsing by setting the appropriate parse mode, or keep it as plain text if preferred.
  • The Intl.DateTimeFormat locale is set to en-US. Adjust this to match your regional format or language.
  • All-day events are identified via start.date and printed as a date string instead of a specific time.

5. Integrate Telegram for Daily Delivery

With the message prepared, the next step is to send it to Telegram. This requires a bot token and your chat ID.

  1. In Telegram, start a conversation with @BotFather and create a new bot. Save the bot token provided.
  2. Send a message to your new bot from your personal Telegram account.
  3. Retrieve your chat ID, for example by using the Telegram getUpdates API or a helper/user-ID bot.
  4. In n8n, create a Telegram credential using the bot token.
  5. Configure the Telegram node to:
    • Use the created credential.
    • Send the message field from the Function node to your chat ID.
    • Optionally set the parse mode to Markdown if you want formatted output.

6. Optional: Add Slack as a Secondary Notification Channel

If your team collaborates in Slack, you can duplicate or adapt the message for a Slack channel or DM.

  • Add a Slack node after the Function node.
  • Connect it to your Slack workspace using an appropriate credential.
  • Send the same message field to a channel or user for visibility, for example as a daily status post.

Operational Considerations and Troubleshooting

Handling Time Zones Correctly

Google Calendar event start objects may include a timeZone field. If it is present, the Function node uses it when formatting the time. If it is absent, the code falls back to UTC by default, although you may wish to align this with your workflow timezone.

Most issues where meeting times appear incorrect can be traced back to inconsistent timezone settings between Google Calendar, n8n, and the formatting logic. Ensure that:

  • The workflow timezone matches your primary working timezone.
  • You understand whether events are stored in a specific timezone or as floating times.

All-Day Events

All-day events in Google Calendar expose start.date rather than start.dateTime. The provided Function code checks for this field and prints the date directly. If you prefer a custom label, you can prepend text like “All-day” to the output for those events.

Guest Visibility and Permissions

If attendee information is missing, it is usually due to either:

  • Calendar permissions that do not allow reading attendees.
  • Events that do not have any guests defined.

Verify that the connected Google account has sufficient access to the calendar and that you are allowed to view guest lists. The Function node safely handles empty or missing guest arrays and outputs “Guests: None” by default.

Formatting and Encoding in Telegram

For predictable rendering across platforms:

  • Use either plain text or a single, consistent parse mode (for example Markdown) in the Telegram node.
  • Avoid inserting special or non-breaking characters that may display incorrectly in some clients.
  • Test a few sample messages manually to validate formatting before enabling the workflow in production.

Advanced Enhancements and Extensions

Once the core workflow is in place, there are several ways to refine it for more advanced scenarios.

  • Keyword-based filtering: Add a filter node or additional logic to only include events whose summary matches specific patterns, such as “Meeting”, “Client”, or particular room names.
  • Time-based grouping: Group events into segments such as morning, afternoon, or evening, or limit the output to the next 3 upcoming meetings.
  • Pre-meeting reminders: Use additional scheduled workflows or logic that calculates offsets from event start times to send reminders X minutes before each meeting.

Security and Privacy Best Practices

Since this workflow processes calendar data, including attendee information, it is important to treat credentials and content with care.

  • Store Google and Telegram credentials securely within n8n and avoid hard-coding tokens in Function nodes.
  • Restrict your Telegram bot’s usage and avoid exposing it in public or shared environments without proper controls.
  • Be cautious when sending summaries to group chats, especially if they include sensitive meeting titles or guest lists.
  • Avoid logging full event payloads to public logs in production environments.

Practical Examples

  • Shared room calendar: Automatically post daily room bookings to a Telegram or Slack group for office administrators.
  • Personal agenda: Receive a private daily schedule on your phone each morning to assist with planning and prioritization.
  • Consulting and client work: Summarize the day’s client calls and project meetings for quick review before starting work.

Getting Started with the Template

To implement this solution quickly:

  • Import the provided n8n template into your instance.
  • Connect your Google Calendar and Telegram credentials.
  • Run the workflow manually once to validate the output and formatting.
  • Adjust message wording, locale settings, or additional channels such as Slack or email as needed.

After validation, enable the workflow so it runs automatically at your chosen time every day.

Automate Viral X Tweets with n8n & GPT-4

Automate Viral X Tweets with n8n & GPT-4

Imagine waking up to fresh, on-brand tweets going out while you sleep, without you scrambling for ideas or staring at a blinking cursor. That is exactly what this n8n workflow template helps you do.

In this guide, we will walk through how to use n8n and GPT-4 to automatically generate and post tweets to X (formerly Twitter), keep them within the 280-character limit, schedule them in a natural way, and even ping your team in Slack when something goes live. We will also talk about prompt design, safety, and a few smart upgrades you can add later.

What this n8n workflow actually does

Let us start with the big picture. This template is built to:

  • Generate tweet ideas using GPT-4 based on your niche and style
  • Check that each tweet fits within X’s 280-character limit
  • Post the tweet to X using your account and API credentials
  • Send a Slack notification so your team knows what went out and when
  • Run automatically on a schedule, with timing that looks human rather than robotic

Under the hood, the workflow uses a handful of well-chosen n8n nodes that play nicely together. You get automation without losing control over your brand voice.

Why bother automating tweets at all?

If you are already posting manually, you might wonder: do I really need automation?

Here is where it helps:

  • Consistency without burnout – Staying active on X is easier when you are not constantly chasing ideas or reminders.
  • Scale your content – With GPT-4 handling first drafts, you can test more ideas, hooks, and angles without extra effort.
  • Better experiments – You can tweak prompts, compare performance, and refine what “viral” looks like for your audience.
  • Natural cadence – With smart scheduling, you avoid spammy posting patterns while still showing up regularly.

So instead of spending energy on “What do I tweet today?”, you can focus on strategy and analysis.

High-level workflow overview

Here is the core flow of the template, from start to finish:

  • Schedule Trigger – Runs every 6 hours with a randomized minute for natural timing.
  • Manual Trigger – Lets you run the workflow on demand for testing or one-off tweets.
  • Set Influencer Profile – Stores your niche, style, and inspiration to guide GPT-4.
  • Generate Tweet Content – Calls GPT-4 to create a single tweet.
  • Tweet Length Check – Confirms the tweet is within 280 characters.
  • Post Tweet to X – Publishes the tweet using the X API.
  • Slack Notification – Sends a message to your team with the tweet details.

Now let us unpack each part so you can customize it confidently.

Scheduling tweets so they look human

Schedule Trigger node

The Schedule Trigger is what keeps your account active without you lifting a finger.

In this template, it is set to run every 6 hours. To avoid a “bot-like” pattern, you randomize the minute field so tweets do not always drop at something obvious like 12:00 or 18:00.

Use this expression in the minute field:

={{ Math.floor(Math.random() * 60) }}

This simple trick makes your posting times feel more organic and can help you avoid potential downranking from overly predictable behavior.

Manual Trigger for testing

Alongside the schedule, there is a Manual Trigger node. This is perfect when you are:

  • Testing a new prompt
  • Debugging the workflow
  • Manually reviewing tweets before you let the schedule run on its own

Think of it as your “preview and refine” button.

Teaching GPT-4 to tweet like your brand

Set Influencer Profile node

Before GPT-4 writes anything, you tell it who it is “pretending” to be. That happens in the Set node, where you define variables such as:

  • niche – The main topic or space you operate in
  • style – The tone or voice you want (e.g. “very personal”)
  • inspiration – Books, creators, or strategies that shape the style

Example values used in this template:

  • Niche: Modern Stoicism
  • Style: Very personal
  • Inspiration: Books and influencer strategies like “Contagious” and “How to Win Friends and Influence People”

These values are passed into the AI prompt so your tweets feel consistent, not random.

Generate Tweet Content with GPT-4

Next comes the OpenAI node, where GPT-4 (or GPT-4-turbo) generates the actual tweet text.

Key configuration points:

  • Model selection – Choose GPT-4 or GPT-4-turbo, depending on your access and cost preferences.
  • Output format – Make sure the response is in a format your workflow expects, such as plain text or structured JSON.
  • Clear instructions – Tell the model to keep the tweet under 280 characters and output only the tweet, nothing extra.
  • Dynamic variables – Inject niche, style, and other fields from the Set node into the prompt.

Here is an example of system instructions used in the workflow:

=You are a successful modern Twitter influencer. Your tweets always go viral.
=You have a specific writing style: {{ $json.style }}
=You have a very specific niche: {{ $json.niche }}
=Answer with the viral tweet and nothing else. Keep the tweet within 280 characters.

This keeps GPT-4 focused: it writes a single, punchy tweet tailored to your brand, not a long essay or list of ideas.

Keeping tweets within 280 characters

Tweet Length Check (If node)

Even if you tell GPT-4 to stay under 280 characters, it can occasionally get wordy. To avoid errors with the X API, you add a simple length check using an If node.

In n8n, you can use an expression like:

={{ $json.message.content.tweet.length }} <= 280

If the condition is true, the workflow continues and posts the tweet. If it is false, you can handle it by regenerating the tweet or routing it for manual review, depending on how strict you want to be.

This small safeguard saves you from failed API calls and keeps everything compliant with X’s character limit.

Publishing to X with the Twitter/X node

Post Tweet to X

Once the tweet passes the length check, the Twitter/X node publishes it to your account using OAuth2 credentials.

When you configure this node, keep these best practices in mind:

  • Rate limits – Respect X’s API rate limits and handle error responses gracefully.
  • Retries – Consider adding retry logic or a fallback path if posting fails temporarily.
  • Media support – If you plan to add images or threads later, you will need extra steps to handle media uploads before posting.

At this stage, your automation is already powerful: you are generating, validating, and posting tweets without manual work.

Keeping your team in the loop with Slack

Slack Notification node

After a tweet goes live, the workflow sends a Slack message so your team can see exactly what was posted and when.

Typical Slack notification content might include:

  • The tweet text
  • A timestamp
  • Optionally, a link to the tweet

This makes it easy to:

  • Monitor automated content in real time
  • Jump in quickly if something needs to be edited, deleted, or replied to
  • Share wins internally when a tweet starts taking off

Designing prompts that actually feel “viral”

The quality of your tweets depends heavily on your prompt, not just the model. A few small changes can have a big impact.

Prompt design tips for viral-style tweets

  • Be specific – Spell out the format you want, for example: “1 short insight + 1 memorable line + 1 hashtag.”
  • Use examples – Feed in one or two of your top-performing tweets as style references.
  • Limit the output – Explicitly say “Return only the tweet text” and remind it to respect the 280-character limit.
  • Encourage emotion and shareability – Ask for rhetorical questions, strong hooks, or short personal anecdotes. If it fits your brand, you can also ask for emojis or a specific type of call to action.

Over time, you can keep tuning the prompt as you learn what resonates most with your audience.

Testing, tuning, and tracking performance

Even with automation, this is not a “set it and forget it” situation. You will get better results if you treat it like an experiment.

How to iterate on your workflow

  • A/B test prompts – Clone the OpenAI node, tweak the instructions, and use a branching node to split traffic between variations.
  • Watch your metrics – Track impressions, engagement, replies, and link clicks on X.
  • Feed winners back into the system – Take your best tweets and include them as style examples in the prompt so GPT-4 learns what “good” looks like for you.

The more you iterate, the more your automated tweets will start to feel like your best manual ones.

Staying ethical and compliant

Automated content can be powerful, but it also comes with responsibility. You want growth, not trouble.

Ethics, safety, and platform rules

  • Avoid impersonating real people or making misleading or false claims.
  • Follow X’s developer policies, terms of service, and respect all rate limits.
  • Use human review at the start, especially for sensitive topics or regulated industries.

Keeping a human in the loop during early stages helps you refine tone, avoid risky content, and maintain a consistent brand voice.

Advanced upgrades for your n8n X automation

Once the core workflow is stable and you are happy with the outputs, you can start layering on more advanced features.

Ideas for enhancements

  • Sentiment or toxicity checks – Run the tweet through a moderation or sentiment node before posting.
  • Automatic images – Add AI image generation and attach media to tweets for more visual impact.
  • Engagement-based follow-ups – Trigger actions like auto-liking, replying, or posting a follow-up thread when a tweet crosses a certain engagement threshold.
  • Data logging – Store tweet content and performance metrics in Google Sheets or a database for deeper analysis later.

These additions can turn a simple posting bot into a smarter, feedback-driven content system.

Step-by-step setup checklist

Ready to put this into action? Here is a compact checklist you can follow:

  1. Install n8n and set up credentials for:
    • OpenAI (for GPT-4)
    • X/Twitter API
    • Slack
  2. Import the workflow template or recreate the nodes:
    • Schedule Trigger
    • Manual Trigger
    • Set (Influencer Profile)
    • OpenAI (GPT-4)
    • If (Tweet Length Check)
    • Twitter/X
    • Slack
  3. Fill in the Set node with your own niche, style, and inspiration values.
  4. Customize the OpenAI prompt and choose your preferred GPT-4 model.
  5. Use the Manual Trigger to test outputs, refine prompts, and confirm that tweets are safe, on-brand, and under 280 characters.
  6. Once you are happy with the results, enable the Schedule Trigger and monitor logs and Slack notifications for the first few days.

Wrapping up: Your viral tweet machine, on autopilot

With n8n and GPT-4 working together, you can keep your X account active, consistent, and on-brand without babysitting every single post. You set the rules, define the voice, and let the workflow handle the repetitive parts.

Start small, keep a human eye on things while you fine-tune, and use analytics to guide improvements. Over time, this setup can become a reliable engine for testing ideas and growing your audience.

Call to action: Import the template into your n8n instance, plug in your OpenAI and X credentials, and run it manually to preview a few tweet outputs. When you are happy with them, turn on the schedule and let it run.

If you would like a bit more help, I can also:

  • Refine a prompt tailored to your specific niche
  • Help you turn the workflow JSON into a clean, downloadable n8n import file
  • Suggest key KPIs to track and a sample Google Sheet structure for logging performance

Reply with your niche and goals, and I will put together a ready-to-use prompt and configuration you can drop straight into this workflow.

Google Indexing Sitemap Workflow (n8n)

Automate Sitemap Indexing with Google Indexing API and n8n

If you publish content regularly, you probably know the feeling: you hit “publish”, then wait and hope Google notices your new page quickly. Sometimes it happens fast, other times it takes days. What if you could gently tap Google on the shoulder every time your sitemap updates, without lifting a finger?

That is exactly what this n8n workflow template does. It grabs your sitemap, pulls out every URL, and uses the Google Indexing API to let Google know what changed, all while respecting quotas, handling errors, and pinging you on Slack if something goes wrong.

In this guide, we will walk through what the template does, when to use it, and how each node works, so you can tweak it for your own site with confidence.

What this n8n sitemap indexing workflow actually does

At a high level, this workflow is your quiet background assistant for Google indexing. Once configured, it can run on a schedule or whenever you trigger it manually. Each run:

  • Fetches your sitemap.xml (or sitemap index)
  • Converts the XML into JSON so it is easy to work with in n8n
  • Extracts each URL from the sitemap
  • Prepares the payload for the Google Indexing API
  • Sends URL notifications to Google in controlled batches
  • Waits between requests to respect rate limits
  • Checks responses and alerts you in Slack if there is a problem

Think of it as an automated “please re-crawl this” system that keeps Google up to date on your most important URLs.

Why bother automating sitemap indexing?

You can absolutely submit URLs manually, but that gets old fast. Automation starts to make sense when:

  • You publish new articles or product pages frequently
  • You push big updates or redesigns and want Google to react quickly
  • You want fewer manual steps in your SEO workflow
  • You need to stay within Google Indexing API quotas without thinking about it

Using the Google Indexing API can significantly shorten the time it takes for key pages to show up or refresh in search results. Connecting that API to your sitemap with n8n means:

  • No more copy-pasting URLs into tools
  • Consistent, repeatable indexing behavior
  • Built-in rate limiting so you do not accidentally hit Google’s daily caps
  • Automatic alerts when something breaks, instead of silent failures

When this template is a good fit

This workflow is especially handy if:

  • Your site already exposes a proper sitemap.xml or sitemap index
  • You want a low-maintenance way to notify Google of updates
  • You are comfortable setting up a Google Cloud service account
  • You use Slack (or are happy to set it up) for alerts

If that sounds like you, this template can save you a lot of repetitive work.

How the workflow runs, from trigger to Slack alert

Let us look at the flow from start to finish, then we will break down each node in more detail.

  1. A trigger starts the workflow, either manually or on a schedule.
  2. n8n fetches your sitemap via HTTP.
  3. The sitemap XML is converted to JSON.
  4. Each URL entry is extracted into its own item.
  5. The workflow prepares a clean payload with the URL and notification type.
  6. URLs are processed in batches (often one by one) to stay within quota.
  7. Each URL is sent to the Google Indexing API with authenticated credentials.
  8. The response is checked to confirm success.
  9. A short wait is inserted to respect rate limits.
  10. If something fails or quota is exceeded, a Slack notification is sent and the workflow stops safely.

Triggers: run once, or let it run itself

Manual Trigger

Sometimes you just want to hit a button and run indexing right after a big release. That is where the Manual Trigger node comes in. Use it when you are testing the workflow or when you want to force a one-off indexing run.

Schedule Trigger

For ongoing sites, you will probably lean on the Schedule Trigger. In the template example, it is set to run daily at 01:00, but you can adjust that to suit your publishing rhythm. Scheduling gives you:

  • Regular coverage of new or updated content
  • Less chance of forgetting to notify Google
  • A predictable pattern for API usage and quotas

Fetching and parsing your sitemap

Fetch Sitemap (HTTP Request)

The first real action step is the HTTP Request node that downloads your sitemap. You simply point it at the URL of your sitemap, such as:

  • https://yourdomain.com/sitemap.xml
  • Or a sitemap index file if your site uses multiple sitemaps

This node is configured to return the raw XML. That XML is then passed along to the next node for parsing.

Convert XML to JSON

Working directly with XML in n8n gets messy fast, so the template uses a Convert XML to JSON node. It:

  • Turns the XML structure into JSON
  • Normalizes and trims fields so you get clean data
  • Makes tags like <loc> easily accessible in later steps

Once the sitemap is in JSON form, it is much easier to loop through each URL and build the payloads Google expects.

Extracting URLs from the sitemap

Extract URLs (splitOut)

Next, the workflow uses a splitOut step to pull out the array of URL objects, usually found at urlset.url in a typical sitemap. The idea is simple:

  • Each sitemap entry becomes a separate item in n8n
  • Each item contains one URL record with its loc value

This structure makes it straightforward to iterate over every single sitemap entry and send it to the Indexing API.

Prepare URL (Set node)

Before calling Google, the workflow standardizes the data. The Set node:

  • Creates a field called url
  • Populates it with the value from the sitemap’s <loc> tag

The Indexing API does not need much. The only required fields are:

  • url – the full page URL you want indexed
  • type – usually URL_UPDATED or URL_REMOVED

Keeping the payload minimal helps avoid accidental schema errors and keeps things clean.

Controlling speed with batching and waits

Batch Splitter (Split In Batches)

Google’s Indexing API has quotas. For many projects, the default is 200 calls per day. To avoid burning through that too quickly, the template uses a Split In Batches node.

In the provided configuration:

  • batchSize is set to 1, so each URL is processed individually
  • This gives you precise control over timing and error handling

You can adjust the batch size, but starting with 1 is a safe way to ensure you respect limits and can easily see what is happening per URL.

Rate Limit Wait

Right after a successful API call, the workflow pauses using a Wait node. The example uses a 2 second delay, which is often enough for moderate volumes.

You can tune this based on your situation:

  • Shorter waits if you index only a handful of URLs per day
  • Longer waits, or an exponential backoff strategy, if you index large lists or hit 429/5xx responses

The key idea is that you are in control of how aggressively you use your quota.

Talking to Google: Indexing API request details

Publish URL Notification (HTTP Request with Google credentials)

This is where the magic happens. The workflow sends a POST request to:

https://indexing.googleapis.com/v3/urlNotifications:publish

The HTTP Request node is configured to:

  • Use a Google Cloud service account credential stored in n8n
  • Send a JSON body with:
    • url – the page from your sitemap
    • type – typically URL_UPDATED or URL_REMOVED

Setting up Google credentials

To authenticate correctly, you will need:

  • A Google Cloud Service Account with access to the Indexing API
  • The Indexing API enabled in your Google Cloud project
  • The service account JSON key added as a credential in n8n

Some key points:

  • Create a dedicated service account just for the Indexing API
  • Grant it the minimum required permissions for the relevant project
  • Upload the JSON key into n8n’s credential store, or use Workload Identity where supported

Once that is in place, n8n handles authentication for each request to the Indexing API.

Checking responses and handling errors

Check Index Response (If node)

After each call to the Indexing API, the workflow does not just assume success. The If node inspects the response, typically looking at:

urlNotificationMetadata.latestUpdate.type

If this equals URL_UPDATED (or the expected type), the workflow treats that URL as successfully processed and moves on to the Wait node. If the response indicates a failure or an unexpected state, the workflow branches to the error path.

Slack Notification + Quota Exceeded Error

When something goes wrong, you want to know about it. The workflow includes a Slack node and a controlled Stop and Error node. Together they:

  • Send a message to your chosen Slack channel describing the error
  • Stop the workflow gracefully to avoid hammering the API or repeating failures

This is especially useful if:

  • Your quota has been exceeded
  • You get a non-recoverable error from Google
  • There is a misconfiguration or unexpected response format

Instead of silently failing for hours, you get a clear ping in Slack so you can investigate.

Configuration checklist: what you need to set up

Before you rely on this workflow in production, run through this quick setup list:

  • Create and configure a Google Cloud service account with Indexing API permission
  • Enable the Indexing API in your Google Cloud project
  • Download the service account JSON key and add it to n8n credentials
  • Set your sitemap URL in the Fetch Sitemap HTTP Request node
  • Adjust batchSize in the Split In Batches node according to your quota and needs
  • Configure the Wait node duration to space out requests appropriately
  • Set up Slack credentials and pick a channel for alerts
  • Test the workflow manually with a small set of URLs before enabling the schedule

Best practices to keep things smooth

Respect quotas and tune your batching

Always keep an eye on your daily Indexing API quota in Google Cloud. If you are indexing lots of URLs:

  • Spread indexing across multiple days
  • Increase the Wait time between requests
  • Consider requesting higher quotas from Google if your use case justifies it

Use a sitemap index if you have many sitemaps

If your site generates multiple sitemap files, you have two main options:

  • Point the Fetch Sitemap node at a sitemap index and iterate through each sitemap listed there
  • Run this workflow separately for each sitemap file

Either way, the goal is the same: cover all your important URLs without manually managing long lists.

Retry logic and backoff strategies

Network hiccups and transient errors are normal. For production workloads, it is smart to implement:

  • Retries for 5xx and 429 responses
  • Increasing wait intervals between retries (exponential backoff)

The template ships with a simple linear wait between requests. You can extend it with additional logic to back off more aggressively when errors appear.

Selective indexing to save quota

You do not always need to re-index everything. You can add filters before batching, for example:

  • Only index URLs where lastmod is within the last 30 days
  • Skip certain sections or content types that rarely change

This keeps your Indexing API calls focused on high-value pages and helps you stay well within quota.

Monitoring and logging

For better visibility, consider logging results somewhere persistent, such as:

  • A database table
  • A spreadsheet
  • A dedicated logging service

Tracking both successes and failures over time makes it easier to spot patterns, debug issues, and prove that your indexing automation is working as intended.

Troubleshooting common issues

  • 401 / 403 errors: Double-check that:
    • The Indexing API is enabled in your Google Cloud project
    • Your service account has the correct permissions
    • You are using the correct credentials in n8n
  • Quota exceeded:
    • Reduce the number of URLs processed per run
    • Increase the Wait node delay between API calls
    • Consider spreading indexing across multiple days
  • Invalid payload:
    • Confirm the request body is a JSON object with exactly url and type
    • Make sure the URL is fully qualified (including protocol)
  • Empty sitemap or missing URLs:
    • Verify that the Fetch Sitemap node is hitting the correct URL
    • Check that the Convert XML to JSON node is mapping to the right path, usually urlset.url.loc
    • Inspect the raw XML if needed to confirm structure

Security considerations

Your Google service account key is powerful, so treat it like a secret:

  • Store it only in n8n’s credential system, which encrypts data at rest
  • Limit the service account to the minimum permissions required
  • Rotate keys periodically
  • Monitor IAM logs for unusual activity

Good security hygiene here keeps both your project and your indexing pipeline safe.

Wrapping up

This n8n template gives you a solid, ready-to-customize foundation for automating sitemap indexing with the Google Indexing API. Out of the box, it:

  • Fetches and parses your sitemap
  • Iterates through URLs safely, in batches
  • Honors rate limits with controlled waits
  • Checks Google’s responses for success
  • Notifies your team on Slack when something goes wrong

With a few tweaks to batching, backoff, and filters, you can scale it to match most publishing workflows, from small blogs to larger content sites.

Ready to automate your indexing pipeline?

n8n Lead Scoring Workflow with MadKudu & Hunter

n8n Lead Scoring Workflow with MadKudu & Hunter

Imagine a world where your best leads rise to the top automatically, your sales team always knows who to contact next, and you never waste time chasing low quality prospects. That is exactly what this n8n lead scoring workflow with MadKudu and Hunter is designed to unlock for you.

With a single automated flow, you can capture leads from any form, verify their email addresses, enrich and score them with MadKudu, then alert your team via Slack or email the moment a hot lead appears. Instead of sorting spreadsheets and guessing who to prioritize, you get a focused, high impact pipeline that supports real growth.

The problem: manual lead triage drains your energy

If you have ever opened your CRM or inbox to a flood of new leads, you already know the challenge. Someone has to decide who is worth a follow up, who is a perfect fit, and who is likely to waste your time. Doing this by hand is:

  • Slow and repetitive
  • Inconsistent from one person to another
  • Prone to errors and missed opportunities
  • A distraction from real relationship building

Every minute you spend manually checking email addresses, Googling companies, and scoring leads is a minute you are not talking to customers or improving your product. At scale, that friction becomes a real growth blocker.

The mindset shift: let automation qualify for you

Automation is not just about saving a few clicks. It is about changing how you work. When you let tools like n8n, MadKudu, and Hunter take over repetitive qualification tasks, you free up time and mental space for higher value work.

This workflow invites you to adopt a new mindset:

  • Trust data-driven scoring instead of gut feeling alone
  • Standardize what “hot lead” means for your team
  • Respond faster and more consistently to your best opportunities
  • Continuously refine your process instead of starting from scratch each time

Think of this template as a starting point, not a finished product. It is a foundation you can customize, extend, and evolve as your business grows.

The possibility: an always-on lead scoring engine

With this n8n lead scoring workflow, every new form submission can automatically follow a clear, reliable path:

  • Capture the lead from any form or website
  • Verify the email address with Hunter
  • Enrich and score the lead with MadKudu
  • Check if the lead qualifies as “hot” based on your threshold
  • Notify your team instantly via Slack or email when a high-fit lead appears

Instead of wondering which leads to work on, your team receives focused alerts that say, “This one is worth your time.” Over weeks and months, that consistency compounds into better conversion rates, shorter response times, and a more predictable pipeline.

The workflow as your practical tool for growth

Let us walk through how this template actually works in n8n, step by step. You will see that behind the transformation is a simple, understandable sequence of nodes that you can adapt to your own stack.

High level template flow

The workflow follows a mostly linear path with a few key decision points:

  1. Form Trigger captures the lead’s email from any form.
  2. Hunter Email Verification checks if the email is deliverable.
  3. Validate Email (If node) routes only valid emails forward.
  4. MadKudu Lead Scoring (HTTP Request) enriches and scores the lead.
  5. Customer Fit Check (If node) compares the score to your hot-lead threshold.
  6. Notifications send Slack and/or Gmail alerts for high-fit leads, while low-fit leads can be logged or ignored.

Each of these steps is a building block. You can keep them as-is, or extend the chain with CRM creation, tagging, or nurturing flows as your automation skills grow.

Step 1: Form Trigger – where the journey begins

Every lead’s journey into your automated scoring engine starts with the Form Trigger node. In the template, it collects the lead’s business email, but you are not locked into a single form provider.

You can:

  • Use the built-in n8n Form Trigger
  • Swap in Typeform or Google Forms
  • Use a webhook from your website or landing page

The key is simple: make sure the email field from your form flows into the next node. Once that is in place, every new submission automatically enters the scoring pipeline.

Step 2: Hunter Email Verification – protect your time and budget

Before you invest in enrichment and scoring, you want to know that the email address is actually usable. That is where the Hunter Email Verification node comes in.

Hunter returns statuses such as valid, risky, or invalid. The template uses an If node called Validate Email to check this result and only forward valid emails to MadKudu. This simple filter helps you:

  • Avoid wasting MadKudu API calls on bad addresses
  • Improve the quality of leads that reach your sales team
  • Control costs related to enrichment and outreach

By verifying first, you keep your workflow lean and focused on leads that can actually convert.

Step 3: MadKudu Lead Scoring – turn data into insight

Once an email is verified, the workflow sends it to MadKudu for enrichment and predictive scoring. This is where raw contact information becomes insight your sales team can act on.

The template uses an HTTP Request node to call MadKudu’s persons endpoint by email. MadKudu then returns:

  • customer_fit.score – a numeric score that represents how well the lead matches your ideal customer profile
  • Top signals and enriched data about the person and company

Make sure your MadKudu API key is configured in n8n credentials and referenced in this HTTP Request node. Once connected, every valid email that enters the workflow gets scored automatically.

Step 4: Customer Fit Check – define your “hot lead” standard

Automation is powerful when it reflects your own definition of success. The Customer Fit Check node is where you translate your ideal customer profile into a simple rule.

This If node checks whether $json.properties.customer_fit.score is greater than a threshold you define. In the template, the default is 60, but you should adjust this to fit your business.

For example:

  • Higher threshold means fewer notifications, but each one is a stronger fit
  • Lower threshold means more alerts for SDRs to triage, which can be useful if your team prefers volume

If the condition is true, the workflow treats the lead as “hot” and triggers notifications. If it is false, the lead is routed to a low-fit path where you can log, nurture, or simply ignore it depending on your strategy.

Step 5: Notifications with Slack and Gmail – act at the right moment

Once a lead passes the fit check, the workflow moves into action mode. This is where your team feels the impact of automation most clearly.

The template sends:

  • A formatted Slack message to a channel you choose
  • An alert via Gmail (or another email provider you configure)

You can customize the message templates to include:

  • First name and company
  • Email and domain
  • Top MadKudu signals and the customer_fit.score

With these alerts in place, your sales team does not have to dig through dashboards. The right leads simply show up where they already work, ready for fast follow up.

Setup checklist: prepare your workflow for launch

Before you activate this n8n lead scoring template, walk through this checklist to make sure everything is wired correctly:

  • Create and add MadKudu API credentials in n8n and link them in the HTTP Request node (HTTP header auth as in the template).
  • Add a Hunter API key in n8n and select it in the Hunter node credentials.
  • Configure your Gmail or SMTP credentials for email alerts, or choose another email node if you prefer.
  • Set your Slack app credentials and specify the channel where hot lead alerts should appear.
  • Update the recipient email in the Hot Lead Email Notification node so the right person receives instant alerts.
  • Adjust the customer fit threshold in the Customer Fit Check node to match your ICP (ideal customer profile).

Once these pieces are in place, you have a fully functional scoring engine ready to run in the background of your business.

Testing your workflow: build confidence before going live

Testing is where you turn a promising idea into a reliable system. n8n makes this easy with its Test Workflow feature and sample data in the Form Trigger pinData.

To test the full journey:

  1. Click Test Workflow in n8n and submit an example email through the Form Trigger.
  2. Confirm that Hunter returns a valid status for the email.
  3. Check that MadKudu responds with a customer_fit.score and top_signals.
  4. If the score meets your threshold, verify that both Slack and Gmail receive the correctly formatted message.

Run this a few times with different emails and scores. As you see the workflow behave consistently, you gain the confidence to let it run automatically on real leads.

Customization ideas: evolve the template with your needs

One of the biggest advantages of building this in n8n is that you are never stuck with a rigid system. You can start simple, then gradually layer on sophistication as your team and volume grow.

Adapt the entry point

  • Replace the Form Trigger with Typeform, Google Forms, or a custom webhook from your website.
  • Map the email field from your chosen source into the Hunter node.

Fine tune lead volume

  • Raise the MadKudu score threshold to focus on fewer, higher quality alerts.
  • Lower the threshold to give SDRs more leads to review manually.

Deepen CRM and nurturing integration

  • Use MadKudu signals to automatically add tags in your CRM for segmentation.
  • Log low-fit leads to a spreadsheet, Airtable, or your CRM for later nurturing instead of dropping them.
  • Extend the workflow to create leads in Salesforce, HubSpot, or Pipedrive when a lead passes the fit check.

Every small improvement you make here saves you time repeatedly in the future. Over time, your workflow becomes a unique asset that reflects exactly how your business wants to prioritize and respond.

Security and cost: automate responsibly

As you scale automation, it is important to balance power with responsibility. This workflow uses external APIs, so keep these points in mind:

  • Use Hunter to verify emails before calling MadKudu to reduce unnecessary enrichment costs.
  • Monitor your Hunter and MadKudu API usage and quotas so you stay within your plan.
  • Store all API credentials securely in n8n and avoid exposing them in logs, code, or public channels.
  • Minimize exposure of PII (personally identifiable information) when sending notifications, especially in shared Slack channels.

With these practices in place, you can enjoy the benefits of automation while protecting your data and budget.

Troubleshooting: turn roadblocks into learning

If notifications are not arriving or something feels off, use it as an opportunity to understand your system more deeply. Common checks include:

  • Review n8n execution logs for errors in the MadKudu or Hunter nodes.
  • Confirm that your API keys are correct, active, and have remaining quota.
  • Verify that the If node conditions reference the correct JSON path, for example $json.properties.customer_fit.score.
  • Test Slack and Gmail credentials independently in n8n to rule out authentication or permission issues.

Each issue you solve makes you more confident and capable with n8n, which pays off when you build your next automation.

Lead scoring best practices to maximize impact

To get the most value from this workflow over time, treat it as a living system rather than a one-time setup. A few best practices:

  • Define an internal SLA for how quickly sales should act on a hot lead, for example “respond within 1 hour”.
  • Monitor conversion rates from scored leads and refine your MadKudu model and thresholds as you learn.
  • Enrich lead data with firmographic and behavioral signals to improve predictive accuracy.
  • Set up analytics to measure lift from automated lead routing, such as win rate, time-to-contact, and MQL to SQL conversion.

As you tune these elements, your lead scoring engine becomes more accurate, more aligned with your strategy, and more valuable to your team.

From idea to action: your next step with n8n

This n8n lead scoring workflow with MadKudu and Hunter is a lightweight yet powerful starting point. It verifies emails, applies predictive scoring, and alerts your sales team when high-fit leads appear. Most importantly, it frees you from manual triage so you can focus on meaningful conversations and strategic work.

You do not have to automate everything at once. Start with this template, get comfortable, and then keep iterating. Each improvement you make is a step toward a more focused, more scalable way of working.

Ready to move from theory to practice?

  • Import this template into your n8n instance.
  • Add your MadKudu and Hunter credentials.
  • Set your notification email and Slack channel.
  • Adjust your customer fit threshold.
  • Use the built-in example data to test and refine.

If you need help customizing thresholds or connecting your CRM, collaborate with your automation team or explore the n8n documentation. With each iteration, you will build a workflow that fits your business like a glove.

Take action now: activate the workflow and start receiving high quality lead alerts today. Let this be the first of many automations that give you back time, focus, and momentum.

Lead Qualification with Form, MadKudu & n8n

Lead Qualification with Form, MadKudu & n8n

Picture this: you open your inbox on Monday morning and you are greeted by 137 new “Contact us” form submissions. Half of them are free email addresses, a few are clearly spam, and somewhere in that pile is a dream customer your sales team will not see until Thursday. Fun, right?

If you are tired of manually copy-pasting emails into tools, eyeballing domains, and guessing who deserves a fast follow-up, this n8n workflow template is here to rescue your sanity. It automatically verifies emails, scores leads, and pings your team in Slack when someone actually looks promising.

Below is a complete guide to what this n8n workflow does, how it works with your form, Hunter, and MadKudu, and how to get it running without losing an afternoon to repetitive setup tasks.

Why bother automating lead qualification?

Collecting leads is the easy part. Qualifying them fast and accurately is where revenue teams actually win deals.

When you do lead triage by hand, a few things usually happen:

  • Sales gets slowed down while someone plays “inbox sorter.”
  • SDRs spend time on low-quality or fake leads instead of real buyers.
  • High-intent prospects wait too long and quietly disappear.

An automated lead qualification workflow in n8n fixes this by:

  • Verifying emails with Hunter before anyone touches them.
  • Scoring and enriching leads with MadKudu so you know who is actually a good fit.
  • Routing only qualified, high-fit leads to sales in Slack.
  • Gracefully handling low-fit or invalid leads so they do not clog your pipeline.

The result is a reliable, transparent pipeline where your team sees the best leads first, and the boring filtering work happens automatically in the background.

What this n8n workflow template actually does

This workflow connects your web form to Hunter, MadKudu, and Slack using n8n as the conductor. The flow looks like this:

  1. Form Trigger – A lead submits a form (Typeform, Google Forms, or your own HTML form) and n8n receives the data.
  2. Hunter Verification – The workflow sends the submitted email to Hunter to check if it is valid.
  3. Email Valid Check – An IF node checks Hunter’s status:
    • Valid emails continue to MadKudu for scoring.
    • Invalid or suspicious emails go to an Invalid Email Handler.
  4. MadKudu Scoring – MadKudu’s persons endpoint enriches the lead and returns a customer_fit.score plus top signals.
  5. Fit Score Check – Another IF node compares the score to your threshold (for example, 60).
  6. Slack Notification / Routing – High-fit leads trigger a nicely formatted Slack message for sales. Low-fit leads are sent to a Low Fit Handler for nurturing or CRM tagging.

In short: the template turns “random form submissions” into a sorted list of real opportunities, with Slack acting as the alert system for the good ones.

Before you start: credentials checklist

To keep everything secure and avoid hardcoding secrets, you will first add a few credentials in n8n.

1. Add credentials in n8n

In the Credentials section of n8n, set up:

  • MadKudu API using HTTP header authentication.
  • Hunter API for email verification.
  • Slack using a Bot token with permission to post messages.

Once these are stored in n8n’s credentials manager, your nodes can reference them securely without exposing keys in the workflow itself.

Step 1: Capture leads with a form trigger

The workflow starts whenever someone fills out your form. You can use:

  • n8n’s built-in Form Trigger.
  • Any webhook-enabled form, such as Typeform or Google Forms.
  • A custom HTML form that sends data to an n8n webhook URL.

At minimum, collect:

  • Business email (the star of the show).
  • First and last name (optional but helps sales sound human).
  • Company domain if you have it.

Use n8n’s test mode to submit a sample entry and confirm that the payload shows up correctly in the execution view. This simple step saves a lot of “why is this empty” debugging later.

Step 2: Let Hunter deal with sketchy emails

Next, the workflow sends the submitted email to Hunter so you do not waste time chasing addresses like fake123@totallyreal.biz.

Hunter – Email Verification node

Configure the Hunter Verification node to receive the email from the form trigger. Hunter responds with a validation result that includes a status field, such as:

  • valid
  • invalid
  • accept_all
  • disposable

Use an IF node as the Email Valid Check:

  • If status is valid, send the lead to MadKudu for scoring.
  • If status is invalid or disposable, route it to an Invalid Email Handler. This can be a simple log, a no-op, or an automated follow-up asking the user to correct their email.

Result: Sales never even sees the junk, and your CRM stays cleaner than your average inbox.

Step 3: Score your leads with MadKudu

Now that you have a verified email, it is time to see if this lead is actually worth a fast response.

MadKudu – Lead Scoring node

Use an HTTP Request or MadKudu-specific node (depending on how your n8n instance is set up) to call MadKudu’s persons endpoint with the verified email.

MadKudu returns:

  • customer_fit.score – a numeric score representing how well this lead matches your ideal customer profile.
  • top signals – qualitative reasons why the lead is a good or bad fit.

Feed this response into a second IF node, the Fit Score Check, and compare customer_fit.score to your chosen threshold, for example:

  • High-fit: score > 60 – send to Slack for immediate sales attention.
  • Low-fit: score <= 60 – route to a Low Fit Handler (nurture list, CRM tagging, or marketing automation).

You can adjust the threshold later, but starting around 60 is a common baseline.

Step 4: Ping sales in Slack with rich context

For high-fit leads, the workflow sends an alert straight into a designated Slack channel so your reps can move quickly, without digging around for details.

Slack notification and message formatting

Set up a Slack Notification node that posts to your chosen sales or revenue channel. Use the data from MadKudu and the form to build a clear, high-signal message. For example:

⭐ Got a hot lead for you {{ $json.properties.first_name }} {{ $json.properties.last_name }} from {{ $json.company.properties.name }} ({{ $json.company.properties.domain }}) based out of {{ $json.company.properties.location.state }}, {{ $json.company.properties.location.country }}.

{{ $('MadKudu Scoring').item.json.properties.customer_fit.top_signals_formatted }}

This template includes:

  • Lead name.
  • Company name and domain.
  • Location (state and country).
  • MadKudu’s formatted top-fit signals so reps know why the lead is prioritized.

Feel free to add links to your CRM or lead record so SDRs can jump straight into action with one click.

What about low-fit and invalid leads?

Not every lead is ready for your A-team right away, and some are not even real. That is normal. The workflow handles both cases without manual triage.

Invalid Email Handler

For leads that fail Hunter’s email check, you can:

  • Log them for reporting or fraud detection.
  • Trigger an automated email asking for a valid business address.
  • Notify marketing if you see a pattern of suspicious submissions.

Low Fit Handler

For leads that pass email verification but do not meet your MadKudu threshold, send them to a Low Fit Handler that might:

  • Add them to a nurture sequence.
  • Tag them as low priority in your CRM.
  • Feed them into marketing automation for long-term qualification.

This way, you are not throwing leads away, you are just not asking your sales team to chase every single one.

Fine-tuning your MadKudu score threshold

MadKudu gives you two powerful things: a numeric customer fit score and a set of qualitative signals. To get the most from this workflow, you should tune your threshold instead of guessing forever.

Recommended approach:

  • Start with a threshold around 60 for high-fit leads.
  • Run simple A/B tests with slightly higher or lower thresholds.
  • Monitor conversion rates for leads that were routed to sales.
  • Adjust the threshold and which signals you care about as your ICP and business evolve.

Over time, this turns your Slack channel into a curated feed of genuinely valuable opportunities instead of a notification firehose.

Best practices for a smooth n8n workflow

To keep this workflow stable and friendly to your future self, keep these tips in mind:

  • Test end-to-end in n8n’s test mode before going live so you can inspect each node’s output.
  • Log decision points like email verification, score, and routing choices so you can audit what happened later.
  • Keep Slack messages short and action-oriented, with links to CRM or lead pages whenever possible.
  • Add rate limits and error handling around external API calls to Hunter and MadKudu to prevent workflow failures during spikes.
  • Consider enrichment fallbacks such as Clearbit if MadKudu or Hunter returns incomplete data.

Troubleshooting checklist

If something feels off, run through this quick list before tearing the workflow apart.

  • No Slack message? Check the Slack credential, channel name, and ensure the bot has permission to post in that channel.
  • MadKudu returns no score? Verify the email format, confirm the email exists in MadKudu’s system, and make sure you have not hit your API quota.
  • Hunter returns a weird status? Inspect the email syntax and domain. Look out for catch-all or disposable addresses, which may require special handling.
  • Workflow errors in n8n? Open the execution log, re-run test inputs, and inspect each node’s output to see where the failure occurs.

Where this workflow really shines

This template is especially useful if you:

  • Are an early-stage startup trying to keep sales focused on enterprise-fit leads instead of every free email sign-up.
  • Run a marketing team that wants to automate nurturing while surfacing high-intent prospects automatically.
  • Work in customer success and want to spot upsell opportunities from inbound form responses.

In all of these cases, n8n plus Hunter plus MadKudu gives you a clean, automated pipeline instead of a messy inbox ritual.

Wrap-up: from “who is this?” to “ping sales now”

Automating lead qualification with n8n, Hunter, and MadKudu cuts response times, boosts SDR efficiency, and makes sure your sales team is spending time on the best opportunities instead of playing email detective.

Start with a conservative threshold, watch how those leads convert, and then iterate. The workflow is flexible, so you can tweak routing, scoring thresholds, and Slack formatting as your process matures.

Ready to ship this workflow?

  1. Set up your MadKudu, Hunter, and Slack credentials in n8n.
  2. Connect your form or webhook and test with a sample lead.
  3. Activate the workflow and let automation handle the boring part.

If you would like a copy of the n8n JSON template or help tuning thresholds and Slack alerts, we are happy to help.

Contact n8nBazar support to get a hand with setup or optimization.

Sync Google Sheets with Postgres using n8n

Sync Google Sheets with Postgres using n8n: A Workflow Story

By the time Lena opened her laptop on Monday morning, she already knew what her day would look like. Again.

As the operations lead at a fast-growing startup, she was the unofficial “data router.” Sales reps logged leads in a shared Google Sheet, customer success updated another sheet with onboarding progress, and finance had yet another sheet for billing details. All of it was supposed to end up in a Postgres database that powered dashboards and internal tools.

In reality, that meant Lena spent hours every week exporting CSVs, importing them into Postgres, fixing mismatched columns, and answering the same question from her team over and over:

“Is the data up to date?”

Most days, the honest answer was “sort of.”

The Problem: When Your Google Sheets Become a Liability

Google Sheets had been the perfect starting point. It was easy, everyone could collaborate, and no one had to ask engineering for help. But as the company grew, the cracks started to show.

  • Someone would change a column name in the sheet, quietly breaking the next import.
  • Another person would forget to update the spreadsheet for a few days, so Postgres would show stale data.
  • Manual imports meant late-night syncs and the constant risk of missed rows or duplicates.

What used to feel flexible now felt fragile. The spreadsheets were still the canonical source of truth, but the Postgres database was where reporting and internal tools lived. If the two were not in sync, people made bad decisions on bad data.

Lena knew she needed a reliable, repeatable way to keep a Google Sheet and a Postgres table perfectly synchronized, without babysitting CSV files. She wanted:

  • Reliable scheduled updates, with no manual exports
  • Consistent data mapping and validation
  • Automatic inserts and updates, without duplicate records
  • Slack notifications when changes occurred, so the team stayed informed

She did not want to write a custom script, maintain a brittle integration, or wait for engineering bandwidth.

The Discovery: A Ready-to-Use n8n Template

One afternoon, while searching for a “no code Google Sheets to Postgres sync,” Lena stumbled across n8n. It promised flexible, workflow-based automation that could connect her tools without heavy engineering work.

What caught her eye was a template that did exactly what she needed: read data from Google Sheets, compare it to a Postgres table, insert or update rows accordingly, and send a Slack summary. All as a reusable n8n workflow.

She realized she did not have to design the sync from scratch. The template already followed a clear pattern:

  • Use a Schedule Trigger to run the sync on a recurring schedule
  • Retrieve Sheets Data from Google Sheets
  • Select Postgres Rows to see what already existed
  • Split Relevant Fields so only important columns were compared
  • Compare Datasets to find new and changed records
  • Insert Postgres Rows for brand new entries
  • Update Postgres Rows where values had changed
  • Notify Changes in Slack so no one had to ask “is it done?”

It sounded like exactly the kind of automation she had been wishing for.

Setting the Stage: Prerequisites Before Lena Hit “Run”

Before she could bring the workflow to life, Lena gathered what she needed:

  • An n8n instance, which she set up in the cloud
  • A Google account with access to the spreadsheet her team used
  • Postgres database credentials and the target table where data should live
  • A Slack webhook for notifications, so the team would see sync results in their main channel

With everything ready, she imported the template into n8n and began tailoring it to her own setup.

Rising Action: Building the Automated Sync in n8n

1. Giving n8n Access: Adding Credentials

The first step was to teach n8n how to talk to her tools.

Inside n8n, Lena added credentials for Google Sheets and Postgres. For Google Sheets, she used OAuth and made sure the connected account had read access to the shared spreadsheet. For Postgres, she plugged in the host, port, database name, user, and password, then clicked “Test” to confirm the connection worked.

She liked that n8n stored these securely, instead of hardcoding passwords in nodes.

2. Deciding When the Sync Should Run: Schedule Trigger

Next, she opened the Schedule Trigger node. This was where she could finally stop worrying about “Did I remember to sync the data?”

She considered two common options:

  • Every hour for near real-time sync, ideal for sales and operations
  • Every night for daily batch updates, which would reduce load

For now, she chose an hourly interval, balancing freshness with system load. The trigger would quietly kick off the entire workflow without her lifting a finger.

3. Pulling the Source of Truth: Retrieving Google Sheets Data

With timing in place, Lena turned to the data itself.

In the Google Sheets node, she entered the document ID and selected the correct sheet (gid). She configured it to return the specific range that contained her dataset, making sure the header row was consistent.

She double-checked that column names would not change unexpectedly. Fields like first_name, last_name, town, and age were stable and descriptive enough to map cleanly into Postgres.

4. Seeing What Was Already There: Selecting Postgres Rows

Next, she had to see what already existed in the database.

Using a Postgres node set to the select operation, Lena fetched rows from the target table. She pulled only the columns that mattered for comparison and matching, such as first_name and last_name.

For her current dataset, returning all rows was fine. She made a note that if the table ever grew very large, she might filter or batch the query to avoid performance issues.

5. Reducing Noise: Splitting Relevant Fields

Her spreadsheets had more columns than she needed for syncing. Some were notes, some were experimental fields, and she did not want them to accidentally trigger updates.

That is where the Split Relevant Fields (Split Out) node came in. She used it to normalize and extract only the fields that mattered for comparison and writing to Postgres.

By trimming the dataset at this stage, she reduced noise and avoided unintended updates from unrelated columns.

6. The Heart of the Story: Comparing Datasets

Now came the crucial moment. Lena wanted the workflow to answer one key question: “What changed?”

The Compare Datasets node did exactly that. She configured the matching fields, choosing first_name and last_name as the keys for identifying the same person across both systems. (She made a note that if they ever added unique IDs, she would switch to those as more reliable keys.)

Once configured, the node produced three distinct outputs:

  • In A only – rows present only in Google Sheets, representing new records to insert
  • In both – rows that existed in both Google Sheets and Postgres, candidates for updates if values differed
  • In B only – rows found only in Postgres, which she could optionally use later for deletes or flags

This was the turning point. Instead of staring at two spreadsheets or CSV files, n8n was doing the comparison for her, every hour, reliably.

The Turning Point: Writing Back to Postgres

7. Welcoming New Data: Inserting Postgres Rows

For the rows that existed “In A only,” Lena connected that output to a new Postgres node set to the insert operation.

She used auto-mapping to quickly align columns, then reviewed the mapping to be sure only the intended fields were inserted. The workflow would now automatically create new records in the Postgres table whenever someone added a new row to the Google Sheet.

No more “Did you remember to import the new leads?” Slack messages.

8. Keeping Existing Data Fresh: Updating Postgres Rows

Next, she attached the “In both” output of the Compare Datasets node to another Postgres node, this time configured for update operations.

She defined matchingColumns using first_name and last_name, then mapped the fields that should be updated, such as age and town. Any time those values changed in Google Sheets, the corresponding records in Postgres would be updated automatically.

It meant that the database would quietly stay in sync as people edited the spreadsheet, without forcing them to learn a new tool.

9. Closing the Loop: Notifying Changes via Slack

Lena knew her team liked visibility. If data changed silently, someone would still ping her to ask if everything was working.

So she added a Slack node, connected to the outputs of the insert and update branches. Using a webhook, she posted a concise summary message to a dedicated channel, something like:

“Google Sheets → Postgres sync completed. Rows were inserted or updated.”

She also included counts of inserted and updated rows, so the team could see at a glance how much had changed in each run.

Testing the Workflow: From Nervous Click to Confident Automation

Before trusting the schedule, Lena decided to test everything manually.

  1. She clicked to run the Schedule Trigger node once, kicking off the entire flow.
  2. She inspected the output of each node, paying close attention to Compare Datasets, Insert, and Update nodes.
  3. She opened her Postgres table and confirmed that new rows had been inserted and existing ones updated correctly.
  4. She checked Slack and saw the summary message appear with the correct counts.

On the first run, she caught a small issue: one column header in Google Sheets did not match the name used in the Postgres mapping. A quick rename in the sheet and a tweak in n8n fixed it.

She also noticed that some names had leading spaces or inconsistent capitalization. To handle this, she considered adding a normalization step, such as trimming whitespace or converting values to lowercase before comparison, so that minor formatting differences would not break matching.

Best Practices Lena Adopted Along the Way

As she refined the workflow, Lena ended up following several best practices that made the sync more robust:

  • Use stable matching keys – She avoided free-text fields where possible and planned to introduce unique IDs for long term reliability.
  • Validate data types – She made sure numeric and date fields were converted to the correct types before writing to Postgres.
  • Limit dataset size – She kept an eye on sheet and table growth, ready to filter or batch the sync if things got too large.
  • Implement error handling – She configured error notifications so that if a Postgres operation failed, admins would be alerted.
  • Maintain an audit trail – She added a last_synced timestamp column in Postgres to track when each record was last updated.

Security Considerations That Kept Her Team Comfortable

Because the workflow touched production data, Lena also worked with engineering to ensure it was secure:

  • They created a dedicated Postgres user with only the permissions needed for this workflow, such as SELECT, INSERT, and UPDATE.
  • They used a Google service account limited to the specific spreadsheet, instead of granting broad access.
  • They stored all credentials in n8n’s encrypted credential manager, never in plain text within nodes.

This way, the automation was not only convenient but also aligned with their security practices.

Troubleshooting: How She Handled Early Hiccups

Like any real-world automation, the first few days revealed small issues. Thankfully, they were easy to resolve:

  • Mismatch on field names – When a header in Sheets did not match the column name used in n8n, the mapping failed. She standardized headers and avoided ad-hoc renames.
  • Large dataset timeouts – As the sheet grew, she watched for timeouts and planned to break the sync into smaller jobs if necessary.
  • Duplicate rows – When duplicate entries appeared, she strengthened the matching logic and considered adding a unique ID column to the sheet.

Each fix made the workflow more resilient and predictable.

The Resolution: From Manual Chaos to Reliable Automation

A few weeks later, Lena realized something had changed. No one was asking her if the database was up to date.

The Google Sheet and the Postgres table were quietly staying in sync, hour after hour. New rows flowed in automatically. Updated values propagated without anyone touching a CSV. Slack messages summarized each run so the team always knew what had changed.

What used to be a fragile, manual process had become a repeatable data pipeline.

The n8n template had given her a modular starting point. Over time, she added extra steps for data normalization, advanced validation, and more detailed notifications. The core, however, stayed the same: a reliable sync between Google Sheets and Postgres.

Your Turn: Bring This n8n Story Into Your Own Stack

If you recognize yourself in Lena’s story, you do not have to keep living in spreadsheet chaos. You can use the same n8n workflow template to automate your Google Sheets to Postgres sync and reclaim the hours you spend on manual imports.

Here is how to get started:

  • Import the n8n workflow template into your n8n instance.
  • Add your Google Sheets and Postgres credentials.
  • Configure the Schedule Trigger, matching fields, and column mappings.
  • Run a manual test, inspect node outputs, and verify the results in Postgres.
  • Enable the schedule and let the sync run automatically.

If you want help customizing the workflow for your specific schema, adding data validation steps, or handling edge cases like deletes and duplicates, reach out or subscribe to our newsletter for more n8n automation templates and tutorials.

Get started now: import the template, configure your credentials, and run the sync. Then share your results or questions in the comments. Your next “Lena moment” might just be one workflow away.

Convert Email to Webpage & Telegram Alert

Convert Email to Webpage & Telegram Alert

Ever tried to show someone an email and ended up forwarding, screenshotting, redacting, and then regretting your life choices? This n8n workflow exists so you never have to do that again.

With this automation, every new email can magically turn into a short-lived HTML webpage, get a neat Telegram notification with a preview link, then quietly self-destruct after a while. No messy inbox forwarding, no permanent storage, and no “who has access to this again?” confusion.


What this n8n template actually does

This workflow listens to your inbox, grabs new emails, converts the HTML body into a private GitHub Gist, and sends a Telegram message with a handy preview button. After a delay that you define, it cleans up both the Gist and the Telegram message.

In practice, that means you can:

  • Open an email in your browser without needing to forward it or store it on your server long term
  • Share invoice previews or sensitive content with teammates in a controlled, temporary way
  • Surface important emails directly into a Telegram channel or chat for quick visibility

Everything is short-lived, controlled, and automated, so you can spend less time copy-pasting and more time doing things that are not copy-pasting.


How the workflow flows (high-level overview)

Here is the bird’s-eye view of the automation:

  • IMAP Email Trigger – Watches your mailbox for new, unread emails.
  • Create GitHub Gist – Saves the email’s HTML content as a private Gist named email.html.
  • Telegram Notification Sender – Sends a Telegram message with a button that opens the rendered Gist page.
  • Deletion Delay – Waits for a set period (for example, 3 hours) so the link is temporary.
  • Delete GitHub Gist & Telegram Message – Deletes both the Gist and the Telegram message once the delay is over.

So from “new email arrives” to “everything is cleaned up,” the entire lifecycle is automated.


Step-by-step setup in n8n

Let’s walk through how to configure each node so you can get from “inbox chaos” to “clickable previews” in a few minutes.

1. IMAP Email Trigger – listen for new emails

Start with the IMAP Email Trigger node. This is the part that keeps an eye on your inbox so you do not have to hit refresh every 3 seconds.

  • Set the mailbox to monitor, for example INBOX.
  • Use the options to fetch only UNSEEN messages so you do not process the same email twice.

The node outputs the email in a resolved format, including fields like:

  • html – the email HTML body
  • from – sender details
  • to – recipient details

These fields will be referenced by the later nodes, so make sure the trigger is working correctly before moving on.

2. Create GitHub Gist (HTTP Request) – turn email into a webpage

Next, add an HTTP Request node to create a private Gist via the GitHub API. This is where your email body becomes a temporary HTML page.

Configure it to:

  • Use your predefined GitHub API credentials in n8n for authentication
  • Send a POST request to the Gist API endpoint
  • Provide a JSON body that includes the HTML content as email.html

Example request body (works nicely with n8n expressions):

{  "description": "{{ $json.date }} - from {{ JSON.stringify($json.from.value[0].address).slice(1, -1) }}",  "public": false,  "files": {  "email.html": {  "content": "{{ JSON.stringify($json.html).slice(1, -1) }}"  }  }
}

Make sure you add the right header:

  • Accept: application/vnd.github+json

The Gist is created privately (public: false), so it will not show up in your public profile. You will share a link to a rendering endpoint or a GitHub Pages proxy that displays the HTML in a more user-friendly way.

3. Telegram Notification Sender – ping yourself (or your team)

Now that your email lives in a Gist, it is time to notify the right people via Telegram.

Use the Telegram node to send a message to a chat or channel, and:

  • Enable HTML parse mode so your message formatting looks nice
  • Include an inline keyboard with a button that links to the public rendering of the Gist

Example message template:

📧 <b>You've got mail!</b>

A new email arrived from: <code>{{ $node["IMAP Email Trigger"].json.from.value[0].address }}</code>

🔗 Preview: [Open email](<gist-render-url>)

If you do not want Telegram to show a big link preview, set disable_web_page_preview to true.

For security and sanity, use environment variables for your chat ID, for example:

  • $env.TELEGRAM_CHAT_ID instead of hard-coding IDs directly in the node

The node will also return a message_id, which you will need later when you clean up the Telegram message.

4. Deletion Delay – let the link live a little

To keep things ephemeral, insert a Wait (or similar delay) node after sending the Telegram message.

  • Set the delay to your preferred lifetime, for example 3 hours.

During this time, the Gist and the Telegram message remain available. Once the timer is up, the workflow continues and starts the cleanup phase.

5. Delete GitHub Gist & Telegram Message – cleanup crew

After the delay, it is time to remove all traces of the temporary preview.

  1. Delete the GitHub Gist
    Use another HTTP Request node to send a DELETE request to:
    https://api.github.com/gists/{{id}}

    Make sure you pass the correct Gist ID from the earlier Gist creation step.

  2. Delete the Telegram message
    Use the Telegram node with the deleteMessage operation, providing:
    • The chat ID (for example from $env.TELEGRAM_CHAT_ID)
    • The saved message_id from when the message was first sent

    The notification disappears from the chat once this runs.

Result: no leftover links, no permanent message history, just a clean audit trail if you decide to log events elsewhere.


Where the HTML gets hosted

By default, the Gist HTML can be accessed via direct Gist URLs, but the template example uses a simple renderer that turns the Gist into a friendlier webpage.

The renderer (from the original repo) lets you use a URL like:

http://your-domain/?iloven8n=project&id={{gist_id}}

By hosting a lightweight renderer, you can:

  • Control the styling and layout of the preview
  • Add authentication if you want stricter access
  • Limit who can view it based on IP, token, or any other rule you like

This gives you a lot more flexibility than just linking to raw Gist content.


Security & privacy considerations

Even though the content is temporary, it is still email, so treat it carefully.

  • Store your GitHub API credentials and Telegram bot token safely using n8n credentials or environment variables, not hard-coded strings.
  • Keep gists private (public: false) and use short expiration windows, for example 1 to 6 hours.
  • If you need stronger access control, host an authenticated renderer on your own domain instead of sending users directly to raw Gist URLs.
  • Watch out for attachments and remote images in email HTML, since they might trigger external resource calls. Consider sanitizing or inlining resources where possible.

With a bit of care, you get the convenience of previews without turning your email into a public art installation.


Troubleshooting & handy tips

If something does not work on the first try, here are the usual suspects:

  • Gist not created? Check that your GitHub token has the gists scope enabled.
  • No emails are triggering? Confirm your IMAP credentials, mailbox name (case can matter), and that you are filtering by UNSEEN correctly.
  • Telegram message will not delete? The message must have been posted by your bot, and the bot needs permission to delete messages in that chat or channel.
  • High email volume? Use n8n features like splitInBatches or rate limiting so your workflow and APIs do not get overwhelmed.

Ideas for leveling up this workflow

Once you have the basic “email to temporary webpage” workflow running, you can start adding extras.

  • Sanitize or strip tracking pixels and external requests from the email HTML for better privacy.
  • Extract attachments and upload them to a secure file store instead of embedding them in the HTML.
  • Adjust retention dynamically based on email priority, for example instant deletion for low-priority messages, longer retention for important ones.
  • Log deletion events to a secure audit store to help with compliance or internal reviews.

Think of this template as a base layer you can customize to match your team’s security and workflow needs.


Putting it all together

This n8n template gives you a compact, practical way to:

  • Convert incoming emails into short-lived web previews
  • Notify teams or channels via Telegram with direct preview links
  • Automatically clean up both the content and the notifications after a set time

Perfect when you want quick collaboration without long-term storage or inbox clutter.

To get started:

  1. Import the workflow into your n8n instance.
  2. Configure your GitHub and Telegram credentials.
  3. Set up the IMAP Email Trigger with your email account.
  4. Run a test email and click your shiny new preview link.

If this workflow saves you from even one more “can you forward me that email?” thread, it is already doing its job.

Feel free to star the project repository, share your improvements, or reach out if you need help tailoring the automation to your own use case.

Ready to deploy? Import the template, wire up your credentials, send a test message, and enjoy watching repetitive email tasks quietly disappear into the automation void.

Interest Lookup Workflow with n8n & Facebook API

Interest Lookup Workflow with n8n & Facebook API

Imagine turning a simple chat message into a complete, ready-to-use audience research report. No more clicking through interfaces, copying results, or repeating the same search over and over. With a single hashtag in Telegram, you can launch a fully automated n8n workflow that talks to the Facebook Graph API, compiles ad interests into a clean CSV, and shares the report with your team in Telegram and Slack.

This guide walks you through that transformation step by step. You will see how a small automation can remove friction from your day, free up your focus, and become a powerful building block for a more automated, scalable marketing workflow.

From manual searching to focused, automated research

Marketers, founders, and growth teams know the feeling: you need Facebook ad interests that match a new campaign idea, and you need them fast. You open Facebook Ads Manager or the Graph API explorer, type in a few keywords, export, clean, repeat. It is slow, repetitive, and easy to make mistakes.

Now imagine a different approach. You type a quick message in a Telegram channel, something like #interest coffee. A few moments later, a CSV appears in the same channel, and your team gets a Slack notification that the report is ready. No extra tabs, no manual exports, no lost time.

That is the shift this n8n interest lookup workflow is designed to create. It replaces manual lookup with a simple, reliable trigger and a repeatable pipeline. Once it is running, you can focus on strategy, creative, and experimentation instead of mechanics.

Adopting an automation mindset

This workflow is more than a one-off tool. It is a mindset change. Each time you find yourself repeating the same steps to research audiences, you have an opportunity to automate and reclaim that time.

By building this interest lookup workflow in n8n, you are:

  • Turning Telegram into a powerful command center for research
  • Standardizing how interests are searched, structured, and shared
  • Creating a reusable pattern that you can extend to other APIs and channels

Think of it as your first step toward a more automated marketing stack. Once you see how easily a chat message can trigger a complex sequence, it becomes natural to ask: what else can I automate?

What this n8n template helps you achieve

At its core, this workflow listens for a specific hashtag in a Telegram channel, uses that message as a search query for the Facebook Graph API, converts the response into a CSV, and distributes the result back to your team.

Key capabilities you gain

  • Trigger Facebook ad interest lookups directly from Telegram using a hashtag like #interest
  • Filter messages so the automation only runs in a specific Telegram channel
  • Extract and parse the hashtag and the search phrase from the message
  • Call the Facebook Graph API to search for ad interests
  • Flatten and normalize the API response into a structured CSV file
  • Send the CSV back to Telegram and notify a Slack channel when the report is ready

All of this runs automatically once configured. Your role becomes sending clear queries and using the results, not wrestling with interfaces.

The journey of a single hashtag: workflow overview

To understand the power of this template, follow the path of a single message, for example: #interest coffee lovers.

  1. You post the message in your chosen Telegram channel.
  2. n8n listens to new messages via a Telegram Trigger node.
  3. An IF node checks that the message is in the right channel and starts with #interest.
  4. Code nodes safely extract and split the message into hashtag and search phrase.
  5. The Facebook Graph API node searches for ad interests based on your phrase.
  6. Another code node flattens the nested JSON response into table-like rows.
  7. A final code node extracts the important fields for each interest.
  8. The Spreadsheet node converts the data into a CSV file.
  9. Telegram receives the CSV as a document in the original channel.
  10. Slack gets a notification that the report has been delivered.

From your perspective, it feels almost magical: one hashtag, one message, one report. Under the hood, n8n is quietly orchestrating every step.

Node-by-node: building the workflow in n8n

Let us break down the workflow so you can confidently adapt and extend it. You will see that each node has a clear purpose, and together they form a powerful, linear pipeline.

1. TelegramTrigger – listening for opportunities

Start with the Telegram Trigger node. This is how n8n listens for new messages in your Telegram channel.

Configuration steps:

  • Connect your Telegram bot using its API token.
  • Set a webhook ID so Telegram can push updates to n8n.

The node receives the full Telegram message object, including:

  • chat.id for the channel or conversation
  • message.text for the message content
  • Additional metadata that you can use later if needed

This is your entry point. Every new message is a potential trigger for automation.

2. MessageFilter (IF) – focusing on the right messages

Next, use an IF node, often named MessageFilter, to make sure the workflow only runs when it should. This keeps your automation focused and prevents accidental triggers.

Configure two conditions:

  1. Chat ID check: the chat.id must equal your target channel, for example -1001805495093.
  2. Hashtag check: the message text must start with #interest.

If both conditions are true, the workflow continues. If not, the flow can end in a simple NoOperation node. This small guardrail makes the automation predictable and safe.

3. MessageExtractor (Code) – safely reading the text

To work with the message content, add a Code node called MessageExtractor. Its job is to safely pull out the text from the incoming JSON, even if the structure changes slightly.

let inputData = items[0].json;
let messageContent = '';
if (inputData.message && inputData.message.text) {  messageContent = inputData.message.text;
}
return [{ json: { messageContent } }];

The output is a clean messageContent field that you can reuse in the next nodes. This step keeps your workflow resilient and easier to debug.

4. MessageSplitter (Code) – turning a message into a query

Now you need to separate the hashtag from the actual search phrase. A second Code node, often named MessageSplitter, uses a regular expression to do exactly that.

The regex used is:

/#(\w+)\b(.*)/

This pattern:

  • Captures the tag word, for example interest
  • Captures everything after the hashtag as the search phrase

The node outputs two fields:

  • extractedContent – the hashtag keyword
  • remainingContent – the phrase you want to send to Facebook as the query

At this point, your human-friendly message is transformed into a machine-friendly search term.

5. FacebookGraphSearch – tapping into Facebook ad interests

Now comes the core of the workflow: querying the Facebook Graph API for ad interests that match your search phrase.

Add the Facebook Graph API node, often named FacebookGraphSearch, and configure it to call the ad interest search endpoint:

search?type=adinterest&q={{ $json.remainingContent }}&limit=1000000&locale=en_US

Important details:

  • You must connect a valid Facebook Graph API credential with the required permissions for ad interest search.
  • The q parameter is dynamically filled from $json.remainingContent, which comes from your Telegram message.
  • limit and locale can be adjusted based on your needs and API constraints.

With this node in place, every Telegram query becomes a structured ad interest search against Facebook.

6. InterestsToTable (Code) – flattening nested JSON

Facebook returns a nested JSON structure, which is powerful but not very CSV friendly. To make it easier to work with, add a Code node named InterestsToTable.

This node iterates over the response and flattens keys and subkeys into an array of row-like objects, often shaped as:

  • Item
  • SubItem
  • Value

By converting nested structures into a simple table format, you gain a lot of flexibility. It becomes straightforward to select and normalize only the fields that matter most to your targeting decisions.

7. ExtractVariables (Code) – focusing on meaningful fields

Next, add a Code node called ExtractVariables. This node takes the flattened rows and produces a clean, consistent object for each interest.

Typical fields you will want to output are:

  • name
  • audience_size_lower_bound
  • audience_size_upper_bound
  • path
  • description
  • topic

The result is an array of well-structured interest objects that are ready to be exported or analyzed. This is where your raw API data becomes a usable report.

8. SpreadsheetCreator – turning data into a CSV report

To share your results easily with your team, use the Spreadsheet node, often called SpreadsheetCreator.

Configuration tips:

  • Set the node to convert the array of interest objects to a CSV format.
  • Choose a filename such as report.csv.
  • Ensure the node outputs a binary file that can be attached in messaging apps.

This step turns your automation into something tangible: a report that anyone can open, filter, and use, regardless of their technical background.

9. TelegramSender – delivering results where work happens

Now that your CSV exists, it is time to send it back to the channel that requested it. Add a Telegram node, often named TelegramSender.

Configure it to:

  • Use the sendDocument operation
  • Set chatId to your target channel ID
  • Attach the CSV file from the previous node
  • Optionally include a friendly caption, for example: “Here is your interest report for ‘coffee lovers’.”

The people who requested the data get it exactly where they started: in the same Telegram thread, without leaving their flow.

10. SlackNotifier – keeping the wider team in sync

Finally, add a Slack node, often named SlackNotifier, to post a short confirmation message in a Slack channel of your choice.

This is optional, but powerful for visibility. You can send a simple notification like:

New Facebook interest report delivered to Telegram for query: "coffee lovers".

Now your team does not need to constantly check Telegram. They can see at a glance when new research is ready.

Setup and permissions: preparing your tools

Before you run the workflow, make sure all your services are connected and authorized. Investing a few minutes here saves countless hours later.

  • Telegram: Add your Telegram bot to the target channel and grant it permission to read messages and send documents.
  • Facebook Graph API: Ensure your Facebook app has access to the Marketing API or the adinterest search endpoint. Follow Facebook documentation on developers.facebook.com to create an app, request access, and generate tokens.
  • Slack: Use a Slack token or app with permission to post messages to the selected channel.

Once these connections are in place, the workflow can run end to end with a single message.

Testing, learning, and improving your workflow

Automation is not just about getting it right once. It is about iterating and making the workflow more robust and useful over time. Here are some practical ways to test and refine.

  • Validate your filters: Send different messages in your Telegram channel and confirm that the IF node only passes through messages that match your hashtag and channel ID.
  • Inspect API responses: Use temporary debug nodes or log statements in your Code nodes to examine the Facebook response before flattening. This helps you adapt to any changes in the API structure.
  • Start small with limits: Use a smaller limit in the Graph API call during development to avoid long responses and to speed up testing.
  • Handle rate limits: If you plan to run frequent or bulk lookups, monitor API quotas and consider adding retries or short pauses to stay within limits.

Each test run is a chance to learn, refine, and build your confidence with n8n.

Security and best practices for sustainable automation

As your automation footprint grows, security and reliability become even more important. Integrating a few best practices early keeps your workflow safe and maintainable.

  • Use n8n credentials: Store API keys and tokens in n8n credentials, not directly in Code nodes or environment variables that are easy to expose.
  • Sanitize inputs: Treat Telegram input as untrusted. Clean or validate it before using it in queries to reduce the risk of injection-like issues.
  • Respect privacy and policies: Follow Facebook terms, avoid storing sensitive personal data, and respect advertising and privacy rules.
  • Separate environments: Use different tokens for development, staging, and production, and rotate them periodically.

These habits help you scale your automation safely as more workflows and teams depend on it.

Ideas to optimize and extend your interest lookup template

Once the basic workflow is live, you have a strong foundation. From here, you can experiment and adapt it to your unique processes.

  • Cache common searches: Store frequent queries and results in a database so repeated requests can be served instantly without new API calls.
  • Use multiple hashtags: Support additional tags like #audience and map them to different locales, limits, or search strategies.
  • Send summaries: Before attaching the full CSV, post a short summary message with the top 3 to 5 interests and their audience sizes.
  • Sync to analytics tools: Automatically push results to Google Sheets, a data warehouse, or your BI tool for long term analysis.

Each enhancement turns this template into a more powerful part of your marketing and automation ecosystem.

Troubleshooting common issues along the way

As with any integration, you might encounter a few bumps. Here is how to quickly diagnose and correct the most common ones.

  • Empty Facebook results: Check the q parameter and confirm that your app has the correct permissions for ad interest search. Sometimes a small change in query wording can make a difference.
  • Missing fields in the CSV: Inspect the flattening logic in InterestsToTable and ExtractVariables. Facebook may adjust response keys between API versions, so you might need to update your mapping.
  • Telegram upload failures: Verify that the bot is in the correct channel, has

Azure DevOps PR to DingTalk Notification

Send DingTalk Notifications for Azure DevOps Pull Requests with n8n

Want your team to actually notice new pull requests without living inside Azure DevOps all day? This n8n workflow connects Azure DevOps with DingTalk so your reviewers get automatic, nicely formatted notifications in the group chat, complete with @mentions and PR details.

The setup uses three main ingredients: an n8n workflow, a simple MySQL mapping table, and a DingTalk group robot webhook.

What this n8n template actually does

Let’s start with the big picture. Once you plug in this template, here’s what happens whenever a pull request is created in Azure DevOps:

  • Azure DevOps fires a Service Hook when a PR is created
  • n8n receives that event through a webhook trigger
  • A MySQL table is queried to match Azure DevOps users to DingTalk accounts
  • A code node builds a clean, markdown-formatted message with all the important PR info
  • The workflow sends that message to a DingTalk group robot, @mentioning the right reviewers

In other words, your team sees “Hey, here’s a new PR, here’s who opened it, here are the reviewers, and here’s who needs to take action” right inside DingTalk, without anyone having to copy links or ping people manually.

When should you use this workflow?

If any of these sound familiar, this template is probably a good fit:

  • Your code lives in Azure DevOps, but your team communicates in DingTalk
  • PR reviews are slow because people miss notifications or forget to check Azure DevOps
  • You want consistent, readable PR notifications in chat, not random copy-pasted links
  • You’d like to @mention reviewers automatically instead of tagging them by hand

Once it is in place, you get faster reviews, better visibility, and fewer “Hey, did you see my PR?” messages.

How the workflow is structured

The n8n template is intentionally compact but covers the full journey from PR event to DingTalk message. It uses four main nodes:

  1. PR Webhook Trigger – An n8n Webhook node that receives POST requests from Azure DevOps Service Hooks whenever a pull request is created.
  2. Load Account Map – A MySQL node that queries a mapping table where you store relationships between Azure DevOps accounts and DingTalk users.
  3. Build DingTalk Payload – A Code node that:
    • Parses the incoming PR payload
    • Matches the PR creator and reviewers to DingTalk names and mobiles
    • Builds the final markdown text and @mention data
  4. Send DingTalk Webhook – An HTTP Request node that posts the message to your DingTalk group robot webhook URL.

Each piece has a clear job, which makes it easy to tweak or extend later.

What you need before you start

Before importing the n8n template, make sure you have these in place:

  • An n8n instance where you can import and run workflows
  • An Azure DevOps project with permission to create Service Hooks
  • A DingTalk group robot (custom bot) with a webhook URL or access token
  • A MySQL database where you can create a simple user mapping table

Setting up the MySQL mapping table

The secret to clean @mentions is a small mapping table that connects Azure DevOps accounts to DingTalk identities. You only need a very simple schema:

CREATE TABLE tfs_dingtalk_account_map (  TfsAccount VARCHAR(255) NOT NULL,  UserName  VARCHAR(255),  DingTalkMobile VARCHAR(255)
);

What each field is used for

  • TfsAccount – The Azure DevOps uniqueName (often an email-style string) that appears in the PR webhook payload. This is what the workflow uses to match users.
  • UserName – An optional, human-friendly display name that you want to show in DingTalk messages.
  • DingTalkMobile – The phone number tied to the user’s DingTalk account, used to @mention them via the DingTalk robot. The robot expects mobile numbers when building mentions.

Once this table is populated for your team, the workflow can automatically translate Azure DevOps users into DingTalk mentions.

How the mapping and message-building logic works

Curious what the Code node is doing behind the scenes? Here’s the flow inside the Build DingTalk Payload node:

  1. It reads the pull request event payload that came in through the PR Webhook Trigger.
  2. It loads the account mapping data that the MySQL node returned.
  3. It tries to match:
    • The PR creator’s Azure DevOps account to a DingTalk name and mobile
    • Each reviewer’s Azure DevOps account to a DingTalk entry as well
  4. If a match is found for the PR creator, their display name in the message is replaced with the DingTalk-friendly name from the mapping table.
  5. For reviewers, it collects the corresponding mobile numbers into an atMobiles array, which is part of the DingTalk robot message format.
  6. If the payload indicates that a team is being notified or an “@all” style marker is present, it sets isAtAll to true instead of building a specific mobile list.
  7. It appends a line in the message body that calls out the mapped reviewers and asks them to review the PR.
  8. Finally, it returns an object containing:
    • text – the final markdown message
    • atMobiles – the list of mobile numbers to @mention
    • isAtAll – a boolean flag for mentioning everyone

    which is passed on to the HTTP Request node that talks to DingTalk.

This approach keeps the message readable for humans while making sure the right DingTalk accounts actually get notified.

Connecting Azure DevOps to n8n via Service Hooks

Next, you need Azure DevOps to send PR events into your n8n workflow. You do that with a Service Hook:

  1. In your Azure DevOps project, go to Project Settings > Service Hooks.
  2. Create a new subscription and pick the Web Hooks service.
  3. Choose the event type Pull request created. You can later add other PR events if you want more notifications.
  4. Paste the n8n webhook URL from your PR Webhook Trigger node into the URL field.
  5. Set the HTTP method to POST.
  6. Use the Test option in Azure DevOps to make sure the request reaches n8n, then save the subscription.

Once that is done, every new PR will automatically trigger your workflow.

Configuring the DingTalk group robot

On the DingTalk side, you just need a custom bot that can receive webhook messages:

  1. In your DingTalk group, add a custom robot. Configure it with either:
    • a signing secret, or
    • an access_token

    and copy the webhook URL that DingTalk gives you.

  2. In n8n, open the Send DingTalk Webhook HTTP Request node and set that URL. It usually looks like:
    https://oapi.dingtalk.com/robot/send?access_token=YOUR_TOKEN
  3. Make sure:
    • The robot is allowed to @mention users by mobile number
    • The phone numbers in your MySQL table match the phone numbers on the DingTalk accounts

After that, the workflow can post messages directly into your group chat with proper @mentions.

Importing and wiring up the n8n template

Ready to plug everything together? Here is a quick setup path inside n8n:

  1. In n8n, click Import and paste the workflow JSON for this template.
  2. Create a MySQL credential in n8n and assign it to the Load Account Map node so it can query your mapping table.
  3. Edit the webhook path in the PR Webhook Trigger node, then copy the generated URL and use that in your Azure DevOps Service Hook.
  4. Store your DingTalk robot token in an HTTP Request credential, then configure the Send DingTalk Webhook node to use that credential instead of hardcoding the token.
  5. Activate the workflow and create a test pull request in Azure DevOps to see the message appear in DingTalk.

Security best practices

Since this workflow connects multiple systems, it is worth locking things down a bit:

  • Use a secret or non-obvious path for the n8n webhook, and if possible, restrict access by IP so only Azure DevOps can call it.
  • Store your DingTalk access_token inside n8n credentials, not in the workflow JSON or plain text fields.
  • Limit database permissions so that only the n8n service account can access the tfs_dingtalk_account_map table.

Testing the workflow and fixing common issues

How to test the full flow

Once everything is wired up, walk through a full end-to-end test:

  1. Create a test pull request in Azure DevOps.
  2. Open the Azure DevOps Service Hook delivery logs and confirm that the webhook call succeeded.
  3. Check n8n’s execution list to see the webhook run, and inspect the output of each node if needed.
  4. Look at your DingTalk group to verify that:
    • The PR message shows up with the expected markdown formatting
    • The correct reviewers are @mentioned

Common problems and how to diagnose them

  • No message in DingTalk Make sure the webhook URL in the HTTP Request node is correct, and check any logs or error messages from the DingTalk robot. Also verify that the n8n execution finished successfully.
  • @mentions are not working Double-check that the mobile numbers in your MySQL mapping table exactly match the mobile numbers in DingTalk. Confirm that the robot is allowed to mention users by mobile.
  • Users are not being mapped correctly Inspect the Build DingTalk Payload node output. Look at the reviewer uniqueName values in the Azure DevOps payload and make sure they match the TfsAccount values in your mapping table. Since this is string-based matching, even small differences can break it.

Ideas for customizations and advanced tweaks

Once the basics are running smoothly, you can take the workflow further to match your team’s style:

  • Listen to additional Azure DevOps events like “PR updated” or “PR merged” and send different notifications or route them to other DingTalk groups.
  • Extend the mapping logic to support multiple aliases per user or pull identity data from a dedicated identity service API instead of a static MySQL table.
  • Add simple rate limiting or batching in n8n if you have very busy repositories and want to reduce notification noise.
  • Enrich the message with more PR metadata, such as:
    • Source and target branch names
    • Direct links to the PR
    • Commit summaries
    • Reviewer info or avatars where applicable

Because this is all running in n8n, you can keep iterating on the workflow visually as your team’s needs change.

Conclusion

This n8n template gives you a lightweight, practical way to keep everyone in the loop when new pull requests land in Azure DevOps. By centralizing user mapping in MySQL, formatting messages nicely with markdown, and using DingTalk robot mentions, it makes sure the right reviewers see the right PRs at the right time.

Want to give it a spin? Import the workflow into your n8n instance, hook it up to your MySQL mapping table, add your DingTalk robot credentials, and connect Azure DevOps via a Service Hook. Then create a test PR and watch the notification show up in your group chat.

If you need to adapt the template for different notification formats or want to integrate similar flows with other chat tools like WeChat Work, Slack, or Microsoft Teams, you can build on the same pattern and reuse most of the logic.

Call to action: Import the workflow, run a test PR, and then iterate. Tweak the message, refine your user mapping, and adjust which events you listen to until the notifications fit your team’s workflow perfectly.

WhatsApp Sales Alerts with n8n + Twilio

Automate Sales Opportunity Alerts with n8n and Twilio WhatsApp

On a rainy Tuesday afternoon, Alex, a sales operations lead at a fast-growing B2B startup, stared at yet another angry email from a regional manager.

“We missed this 120k opportunity. Again. No one followed up in time. How is this still happening?”

Alex knew the pattern all too well. New opportunities entered the CRM, reps were buried in email, and by the time anyone noticed a big deal, the prospect had already gone cold. Notifications were scattered across inboxes, Slack channels, and CRM dashboards no one refreshed often enough.

What Alex needed was simple in theory: instant, reliable sales alerts on a channel reps actually checked. In practice, it felt like a messy, cross-tool nightmare.

That was the day Alex found an n8n workflow template that used Twilio and WhatsApp to automate sales opportunity alerts, complete with escalation for high-value deals.


The problem: slow reactions to hot opportunities

Alex’s sales team was fast on calls, but slow on awareness. New opportunities were created in Salesforce and HubSpot all day long, yet:

  • Reps only saw new deals if they happened to be in the CRM
  • Email alerts were delayed or buried under other notifications
  • High-value opportunities did not reliably reach managers in time

Alex watched as opportunities worth six figures slipped through the cracks. Time-to-first-contact was inconsistent, managers only heard about big deals after the fact, and there was no clear audit trail of who was alerted when.

One morning, while searching for “n8n sales notifications WhatsApp,” Alex came across a workflow template that promised exactly what the team needed.


The discovery: a WhatsApp alert system built on n8n + Twilio

The template description caught Alex’s eye right away. It used:

  • n8n as the visual automation engine
  • Twilio WhatsApp API to send messages to reps and managers
  • A CRM webhook as the trigger whenever a new opportunity was created
  • MySQL to map CRM owners to their WhatsApp numbers

In short, the workflow would:

  • Receive a CRM webhook when a new opportunity was created
  • Look up the opportunity owner’s WhatsApp number in a MySQL table
  • Build a formatted WhatsApp message with customer, deal value, stage, and CRM link
  • Send the alert via Twilio WhatsApp
  • Escalate to a manager automatically if the deal size exceeded a threshold
  • Log the notification in the workflow for auditing

This was exactly the system Alex had imagined, already wired together. The only thing left was to adapt it to the company’s CRM and data.


Inside the workflow: how the pieces fit together

Before making any changes, Alex opened the n8n workflow to understand its architecture. The visual canvas told a clear story of how data would flow:

  • Webhook (receive-crm-opportunity-webhook) – Entry point that waits for JSON payloads from the CRM whenever a new opportunity is created.
  • MySQL (load-owner-phone-map) – Queries a table named crm_owner_phone_map to match the CRM owner’s email to their WhatsApp number and manager’s number.
  • Code (build-whatsapp-message) – Normalizes the webhook payload, finds the owner mapping, formats the WhatsApp message text, and computes a recommended action based on deal size.
  • If (check-deal-threshold) – Compares the opportunity’s dealValue against an escalation threshold, set by default to 100000.
  • HTTP Request (send-whatsapp-to-owner / send-escalation-to-manager) – Calls the Twilio API to send WhatsApp messages to the owner and, for large deals, to the manager.
  • NoOp (log-notification-sent) – A placeholder node marking completion and providing a hook for logging or extensions later.

Instead of a tangled set of custom scripts, Alex now had a clear, maintainable automation path. The next step was to wire it up to the real tools the team used every day.


Rising action: wiring the CRM to WhatsApp in n8n

Step 1 – Teaching the CRM to talk to n8n

The first hurdle was getting the CRM to send opportunity data into the workflow. Alex configured the company’s CRM (in this case, Salesforce, though HubSpot or Pipedrive would have worked too) to POST a JSON payload to the n8n webhook URL exposed by the receive-crm-opportunity-webhook node.

The webhook was set up to receive key fields, including:

  • opportunityId
  • customerName or accountName
  • dealValue or amount
  • closeDate
  • ownerEmail or owner.email
  • opportunityUrl for direct access back to the CRM

With the webhook URL in place, the first test payload successfully appeared in n8n’s execution log. The story had officially moved from theory to reality.

Step 2 – Creating the owner-to-WhatsApp map

Next, Alex needed a reliable way to map CRM owners to their WhatsApp numbers, along with manager escalation contacts. The template suggested a simple MySQL table, so Alex created it using the following SQL:

CREATE TABLE crm_owner_phone_map (  OwnerEmail VARCHAR(255) NOT NULL PRIMARY KEY,  OwnerName VARCHAR(255) NOT NULL,  WhatsAppPhone VARCHAR(20) NOT NULL,  ManagerPhone VARCHAR(20)
);

Every phone number was stored in E.164 format, such as +14155551234, to match Twilio’s requirements. Once the table was populated with the sales team’s data, the load-owner-phone-map node could return the correct row based on the ownerEmail from the webhook.

Step 3 – Connecting Twilio WhatsApp

To bridge the gap between n8n and WhatsApp, Alex turned to Twilio:

  • Signed up for Twilio and enabled the WhatsApp API, starting with the Twilio Sandbox for safe testing.
  • Replaced YOUR_ACCOUNT_SID in the HTTP Request node URL with the actual Twilio Account SID.
  • Created HTTP Basic credentials in n8n, using the Twilio Account SID as the username and the Auth Token as the password.
  • Set the From parameter in the HTTP Request nodes to the Twilio WhatsApp-enabled number, for example whatsapp:+14155238886.

With these steps complete, the workflow was technically capable of sending WhatsApp messages. The only missing piece was the content of those messages.


The turning point: crafting the perfect WhatsApp alert

The heart of this automation lived in a single n8n Code node named build-whatsapp-message. Alex opened it and realized it did far more than just stitch strings together.

What the code node actually does

Inside the build-whatsapp-message node, the logic handled four critical tasks:

  • Mapping incoming webhook fields to internal variables like opportunityId, customerName, dealValue, closeDate, and ownerEmail.
  • Looking up the owner’s mapping from the MySQL node output, including WhatsAppPhone and ManagerPhone.
  • Formatting the deal value as currency and choosing a recommended action based on the size of the opportunity.
  • Returning structured JSON for downstream nodes, including messageText, recipientPhone, managerPhone, and other metadata.

The result was a clear, human-friendly WhatsApp alert that looked something like this:

🎯 *New Sales Opportunity Alert*

*Customer:* Acme Corp
*Deal Value:* $120,000.00
*Stage:* Proposal
*Expected Close:* 2025-11-01
*Opportunity ID:* OP-12345

📋 *Recommended Action:*
Schedule discovery call within 24 hours

🔗 View in CRM: https://crm.company.com/opportunity/OP-12345

Assigned to: Jane Sales

Alex tweaked the wording slightly to match the company’s tone, but kept the structure. The combination of key fields, clear next step, and direct CRM link meant reps could act within seconds of receiving the alert.


Escalation logic: making big deals impossible to ignore

Fast responses were great, but Alex also needed a way to guarantee that high-value deals attracted management attention. That is where the check-deal-threshold node came in.

This If node compared dealValue from the webhook to a configurable threshold, set by default to 100000. The logic was simple but powerful:

  • If dealValue is less than or equal to the threshold, only the owner receives a WhatsApp alert.
  • If dealValue is greater than the threshold, the workflow sends the owner’s message and a second escalation message to the manager, often with an extra alert banner or stronger call to action.

Alex adjusted the threshold to match the company’s policy on what counts as a “major deal” and verified that the manager number from ManagerPhone in the MySQL table was correctly passed into the Twilio HTTP Request node.

From that point on, any opportunity above the threshold would trigger an automatic manager alert, no extra configuration needed.


Bringing it all together: importing and configuring the template

With the logic clear and the building blocks ready, Alex imported the workflow template into n8n and customized a few final details:

  • Updated MySQL credentials in the load-owner-phone-map node to point to the production database.
  • Configured the Twilio HTTP Basic credentials in n8n to use the live Twilio account.
  • Adjusted the code in build-whatsapp-message to match the exact CRM opportunity URL pattern and field names used internally.

What started as a scattered notification problem was now a tightly wired automation, ready for real-world testing.


Testing the new WhatsApp sales alert workflow

Before rolling this out to the entire team, Alex needed proof that it worked end to end. The testing process followed a clear checklist:

  1. Used the Twilio Sandbox for WhatsApp to verify message delivery without impacting real customers or numbers.
  2. Triggered a sample webhook from the CRM, and also tried sending a test payload via curl or Postman to the n8n webhook URL.
  3. Checked that the MySQL query returned the correct row for the test ownerEmail, including the owner’s and manager’s phone numbers.
  4. Inspected the build-whatsapp-message node output in n8n to confirm messageText, recipientPhone, and managerPhone were all correct.
  5. Monitored the Twilio console for message delivery status and any API errors.

Within minutes, Alex’s phone buzzed with a WhatsApp message that looked exactly like the template. A second message arrived on the manager’s phone for a high-value test deal, confirming that the escalation path worked perfectly.


Keeping it safe and clean: best practices Alex followed

As the workflow moved from test to production, Alex put a few safeguards in place to keep the automation secure and respectful of the team’s attention.

  • Ensured the n8n instance was served over HTTPS and restricted webhook access with methods like IP allowlists or HMAC signatures where possible.
  • Stored Twilio credentials inside n8n’s credential manager, not in code or publicly visible workflow fields, and used environment variables for production deployments.
  • Validated and sanitized incoming webhook payloads, especially fields that appeared in the message text, to avoid injection or formatting issues.
  • Planned rate limits and considered debouncing multiple updates for the same opportunity so reps would not be spammed with too many alerts.

These small steps ensured that the workflow was not just effective but also secure and sustainable.


When things go wrong: how Alex troubleshoots

Not every test went smoothly. A few early runs surfaced configuration issues that Alex resolved using a simple troubleshooting playbook:

  • If WhatsApp messages failed with authorization errors, Alex double-checked the Twilio Account SID and Auth Token in n8n credentials.
  • For To phone number errors, Alex confirmed that the numbers were in E.164 format and, when using the Twilio Sandbox, that they were registered or approved for testing.
  • Used n8n’s execution logs to inspect inputs and outputs for each node. The structured JSON from the code node made it easy to spot parsing or mapping issues.
  • Relied on retries configured in the HTTP Request nodes to handle transient network failures without manual intervention.

With each fix, the workflow became more robust and reliable, giving Alex confidence to roll it out company-wide.


The resolution: a more responsive, data-driven sales team

Within a week of going live, the impact was obvious. Reps started responding to new opportunities faster, often within minutes of creation. Managers received automatic alerts for large deals, giving them time to support the reps with strategy and resources.

The sales floor felt different. Instead of chasing down information in the CRM, people were reacting to WhatsApp alerts that contained everything they needed to act:

  • Customer name and deal value
  • Stage and expected close date
  • Opportunity ID and direct CRM link
  • A clear recommended next action

Behind the scenes, n8n and Twilio handled the heavy lifting, while the MySQL mapping and code node kept everything personalized and on-brand. The workflow remained lightweight and extensible, easy to adapt to other CRMs or additional channels later.

For Alex, the missed 120k deal became a turning point instead of a recurring nightmare.


Try the same n8n + Twilio WhatsApp workflow in your team

If you recognize Alex’s story in your own sales process, you can follow the same path:

  1. Import the ready-to-use n8n workflow template.
  2. Connect your MySQL database and create the crm_owner_phone_map table.
  3. Configure Twilio WhatsApp, set your Account SID, Auth Token, and WhatsApp-enabled number.
  4. Point your CRM webhook to the n8n receive-crm-opportunity-webhook URL.
  5. Run a test webhook and watch your first WhatsApp sales alert arrive.

This n8n + Twilio WhatsApp automation gives your sales team instant visibility into new opportunities and a reliable escalation path for high-value deals. It is flexible enough to work with Salesforce, HubSpot, Pipedrive, and other CRMs, and simple enough to customize for your own fields and message style.

Ready to see it in action? Import the template into n8n, send a test payload, and start measuring how much faster your team responds to new opportunities.

If you want help tailoring the message template, adjusting the escalation threshold, or mapping your CRM fields into the code node, share a sample of your CRM webhook payload and we can suggest the exact tweaks you need.