AI-Powered Newsletter Agent with n8n & LangChain

How to Build an AI-Powered Newsletter Agent with n8n

Producing a high-quality AI newsletter at scale requires more than a single prompt. You need a robust pipeline for content ingestion, intelligent story selection, structured copy generation, and controlled human review. This guide describes a production-ready n8n architecture that uses S3, LangChain-style LLM prompts, and Slack to build an automated newsletter agent. The workflow selects top stories, generates structured sections, crafts optimized subject lines, and outputs a final email-ready markdown file.

Use Case: Why Automate Your Newsletter Workflow?

For teams publishing frequent AI or technology newsletters, manual workflows quickly become a bottleneck. Editors spend time collecting links, pasting content into documents, enforcing style rules, and iterating on subject lines. An AI-powered newsletter agent built on n8n centralizes these tasks into a single, repeatable workflow that:

  • Reduces time to produce each edition by automating ingestion and drafting
  • Maintains a consistent editorial voice and formatting across issues
  • Scales output without adding proportional editorial headcount
  • Keeps humans in control via structured review and approval steps

The result is a reliable, auditable pipeline that fits naturally into an automation-first stack.

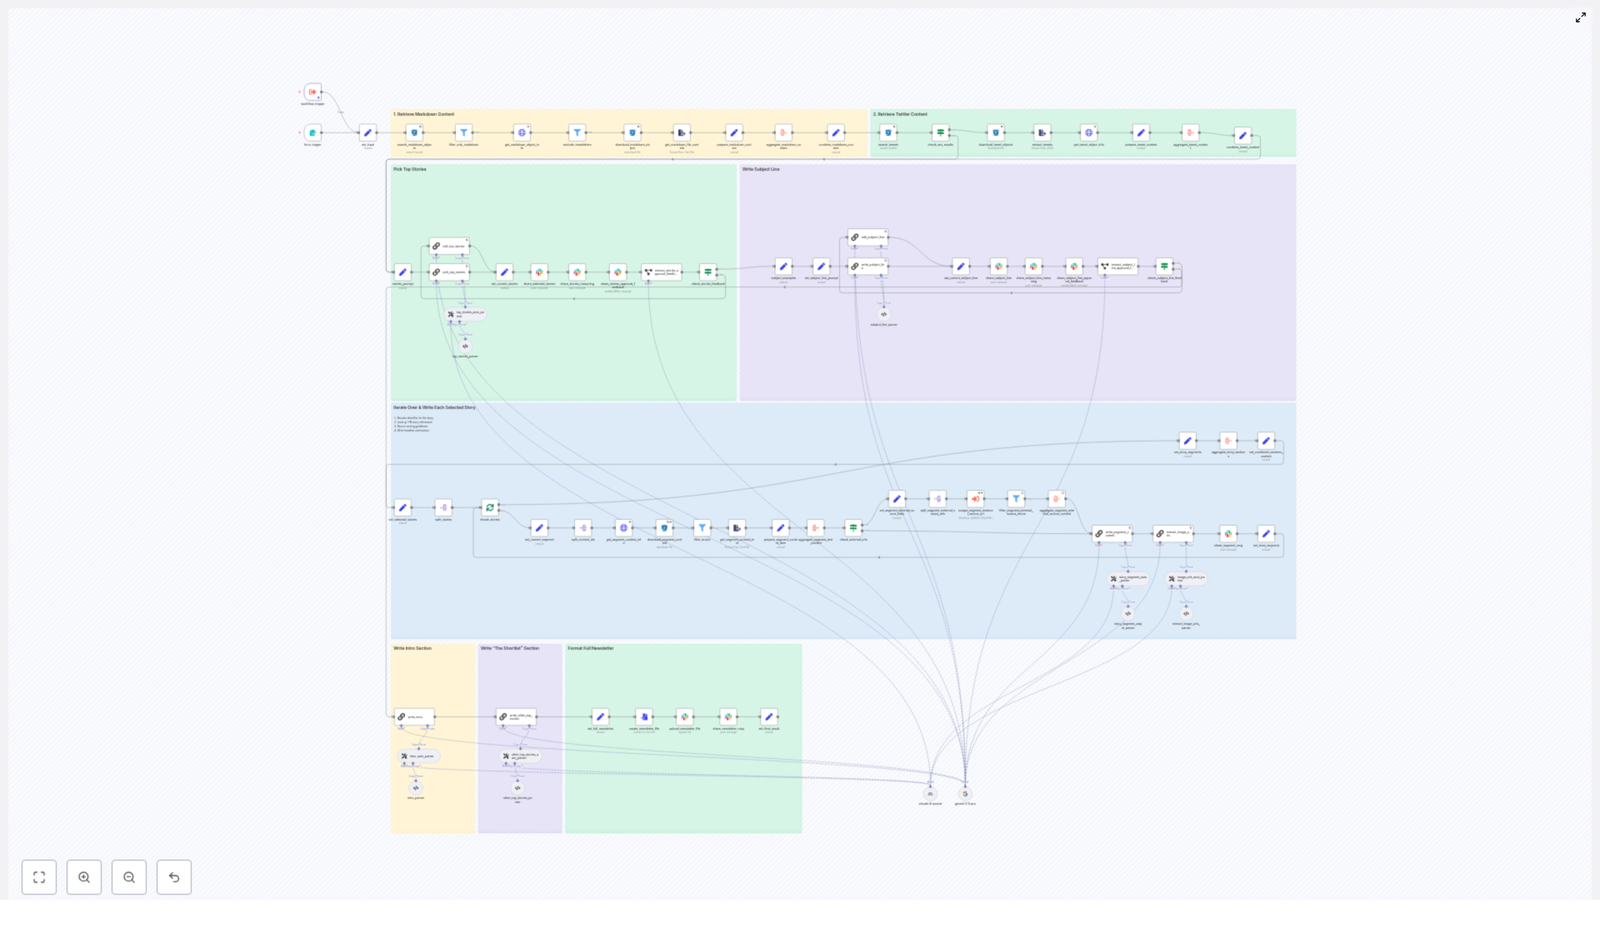
Solution Overview: High-Level Architecture

The n8n workflow is organized into a series of stages that mirror a typical editorial process, but with automation at each step:

  • Trigger and ingestion – start the workflow for a given date and pull candidate content from S3
  • Filtering and preparation – normalize markdown and tweet content, attach metadata, and remove duplicates
  • AI-driven story selection – use an LLM with a structured prompt to select the top stories
  • Segment generation – generate Axios-style sections for each selected story
  • Intro, shortlist, and subject line – produce the opening, secondary stories, and optimized subject lines
  • Image extraction and asset bundling – collect and deduplicate image URLs for editorial selection
  • Human-in-the-loop review – manage approvals and targeted revisions via Slack
  • Final output – assemble a single markdown newsletter file and supporting assets

Core Components and Workflow Design

1. Triggering the Workflow and Ingesting Content

The workflow starts with a date-based form trigger. An editor (or an upstream system) submits the publication date and can optionally attach the previous newsletter edition for context. This date parameter is then used to query an S3 bucket for candidate content:

  • Markdown files representing curated articles, notes, or summaries
  • Tweet-based content stored as objects with a matching prefix

Each matching S3 object is downloaded and passed into the processing pipeline. At this stage, the workflow focuses on collection only, without making editorial decisions.

2. Filtering, Normalization, and Canonical Content Items

Once the raw files are available in n8n, a set of processing nodes prepares the corpus for LLM consumption:

  • Relevance filtering to keep only valid markdown sources and discard noise or unsupported file types
  • Exclusion of previously published items to avoid repetition across issues
  • Parsing and normalization to build a canonical representation of each content piece

Each canonical item typically includes:

  • A stable identifier that maps directly to the S3 object
  • Metadata such as authors, external-source-urls, and image-urls
  • The raw text body in a consistent format suitable for prompting

Aggregation nodes then merge these canonical items into a single source corpus for the date, ready for AI-based selection.

3. AI-Based Story Selection with Structured Prompts

To select the most relevant content, the workflow uses an LLM node configured with a LangChain-style prompt. The model receives the aggregated corpus and is instructed to identify the best stories for the edition based on:

  • Relevance to the newsletter’s focus (for example AI developments)
  • Potential impact on readers
  • Overall interest and novelty

The LLM returns a structured JSON payload that includes:

  • top_selected_stories – four items, with the first designated as the lead story
  • Chain-of-thought style reasoning for internal review and audit

This structured output is sent to a Slack channel so editors can review the selected stories and the reasoning behind them before any long-form content is generated.

4. Segment Generation for Each Selected Story

After the selection is approved or adjusted, the workflow splits the top_selected_stories array into individual items and processes each story independently. For every selected story, n8n performs the following sequence:

  1. Fetch source content by identifier from S3, ensuring a direct mapping back to the original object
  2. Aggregate external-source URLs linked to that story for accurate referencing
  3. Invoke a dedicated LLM prompt to generate a structured, Axios-like newsletter segment

The segment prompt is designed to produce a consistent format:

  • The Recap – a concise summary of the story
  • Unpacked – three bullet points that explain implications or details
  • Bottom line – a closing takeaway for readers

Validation nodes then check each segment against strict constraints, including:

  • Exact bullet counts
  • Markdown syntax and headings
  • Limits on the number of links and adherence to allowed sources

This discipline ensures the newsletter output remains consistent and email-ready, even as content varies from issue to issue.

5. Generating the Intro, Shortlist, and Subject Line

With the main segments finalized, the workflow focuses on the framing elements that drive engagement and readability.

Newsletter intro and secondary stories

A separate LLM prompt generates the opening section of the newsletter. The prompt instructs the model to produce:

  • A greeting tailored to the newsletter’s audience
  • Two short paragraphs that set context for the edition
  • A transition phrase, including the line In today’s AI recap:
  • A four-item bulleted list that previews the key stories

Another prompt is responsible for the “Other Top AI Stories” shortlist. This section surfaces additional items that did not make the main segments but are still valuable to readers.

Subject line optimization and pre-header text

A dedicated LLM node then analyzes the lead story and the overall edition to produce:

  • A primary subject line optimized for opens
  • A complementary pre-header that reinforces the main hook
  • Several alternative subject lines (typically 5 to 8) for A/B testing and experimentation

These variations enable marketing teams to test performance without manually drafting multiple options.

6. Image Extraction and Asset Bundling

Visual assets are handled by a dedicated image-extraction step. This node scans:

  • The generated content
  • Referenced external sources

It collects direct image URLs, focusing on common formats such as jpg, png, webp, and svg. The workflow then:

  • De-duplicates image URLs to avoid redundancy
  • Packages the set of candidate images into an image bundle

This bundle is attached to the Slack review message so editors can quickly choose a hero image and any supporting visuals for the edition.

7. Human Review, Feedback, and Targeted Re-runs

Human-in-the-loop control is central to the design. Once the AI steps complete, the workflow posts a comprehensive summary to a Slack channel, including:

  • The selected stories and their identifiers
  • Subject line options and pre-header text
  • Chain-of-thought reasoning for transparency
  • The image URL bundle

Slack nodes implement a straightforward Approve / Add Feedback flow. If editors approve, the pipeline proceeds to final assembly. If they request changes, the workflow routes the relevant JSON back into specific nodes for re-processing. For example, you can:

  • Regenerate only the subject line and pre-header
  • Adjust story selection without re-running the entire pipeline

This targeted re-run strategy preserves efficiency and keeps iteration focused on the components that need refinement.

Final Deliverables: What the Workflow Produces

When the pipeline completes successfully, you receive a coherent set of assets ready for distribution and further automation.

  • A single markdown file with the complete newsletter:
    • Intro section
    • Four main story segments
    • “Other Top AI Stories” shortlist
  • The primary subject line, pre-header, and 5 to 8 alternative subject lines
  • Chain-of-thought reasoning and content identifiers posted to Slack for auditability
  • An image URL bundle for hero and supporting images
  • Optionally, an uploaded markdown file in Slack plus a permalink to the newsletter draft

Implementation Best Practices and Tuning Tips

Modular, Constrained Prompt Design

For reliability and maintainability, separate prompts by function rather than using a single monolithic prompt. In practice this means:

  • One prompt for story selection
  • One prompt for segment writing
  • One prompt for intro and shortlist
  • One prompt for subject line and pre-header generation

Each prompt should enforce a strict output schema. Examples include:

  • JSON arrays of fixed length for selected stories
  • Exact markdown structure for segments and headings
  • Explicit limits on bullets, links, and character counts

These constraints make downstream parsing predictable and reduce the need for manual cleanup.

Use Stable Identifiers as the Source of Truth

Every content object in S3 should have a stable identifier. Treat this identifier as the single source of truth across the workflow:

  • Include identifiers in the selection JSON produced by the LLM
  • Use them for all fetch operations back to S3
  • Reference them in Slack messages and audit logs

This approach simplifies debugging, backtracking, and compliance checks, since each generated segment can be traced to its original source material.

Link and Image URL Validation

To maintain quality and avoid broken assets, enforce strict rules on external links and images:

  • Allow only URLs that appear in the original source materials
  • Avoid guessing or constructing deep links that were not provided
  • Validate that image URLs end with standard extensions such as .jpg, .png, .webp, or .svg
  • Deduplicate image URLs before presenting them to editors

Graceful Error Handling

In a production environment, transient failures are inevitable. Configure n8n to handle them gracefully:

  • Use node-level error handling with “continue on error” for non-critical tasks such as external scraping
  • Log failures and surface them in the Slack review so editors know where manual intervention is required
  • Design branches that allow the workflow to complete with partial automation instead of failing the entire run

Security and Compliance Considerations

While the workflow deals primarily with content, security and compliance still matter, especially in enterprise environments.

  • Store API keys and S3 credentials in n8n credential objects, not in plain-text nodes
  • Avoid including sensitive PII in content objects or prompts
  • Restrict the Slack review channel and use scoped app tokens with minimal permissions
  • When publishing externally, ensure:
    • Linked sources are licensed for public reuse
    • Quoted material is properly attributed

Getting Started: Adapting the Template to Your Stack

To implement this pattern with your own content, start with a clear data model and then iterate on prompts and constraints.

  1. Define your S3 schema:
    • Decide on identifiers, external-source-urls, and image-urls fields
    • Standardize markdown structure for ingested content
  2. Create modular LLM prompts for selection, segment writing, intros, and subject lines, each with explicit schemas.
  3. Clone the example n8n workflow template, plug in your credentials and model endpoints, and adjust node configurations to match your S3 layout.
  4. Populate S3 with test data for a single date and run the pipeline end-to-end to validate behavior.
  5. Connect Slack, specify the review channel, and invite stakeholders to test the approval and feedback loop.

Try it now: Use a sample n8n workflow as a starting point, run it against a small S3 dataset, and refine prompts and validation rules based on editorial feedback. Incrementally tighten constraints until the output requires minimal manual editing.

If you would like a copy of the workflow diagram or an editable n8n template, contact our team or leave a comment. We can share an export of the workflow and the associated prompt library so you can accelerate your own AI-powered newsletter automation.

Automate Pinterest Analysis with AI Content Suggestions

Automate Pinterest Analysis & AI-Powered Content Suggestions

This guide describes a complete n8n workflow template that automates Pinterest data collection, stores pins in Airtable for historical analysis, and uses OpenAI to generate AI-powered content suggestions. It is intended for technical users who want a repeatable, maintainable automation pipeline that turns Pinterest engagement into a structured content strategy.

1. Workflow Overview

The automation is built as an n8n workflow that orchestrates multiple services using dedicated nodes and credentials. At a high level, the workflow:

  • Runs on a schedule using an n8n Schedule Trigger
  • Calls the Pinterest API to retrieve pins for a given account
  • Normalizes the raw API response with an n8n Code node and flags pins as organic
  • Upserts the normalized records into an Airtable base for persistent storage
  • Feeds the stored data to an OpenAI-powered AI agent for trend analysis and new pin ideas
  • Sends a summarized recommendation report via email or another notification channel

The same architecture can be extended with additional data sources or more advanced AI prompts, but this template focuses on a robust baseline for Pinterest analysis and AI content suggestions.

2. System Architecture

The workflow connects five core components. Each is represented by one or more n8n nodes:

  1. Schedule Trigger (n8n) – defines how often the workflow runs (for example, daily or weekly at a fixed time).
  2. Pinterest API – accessed via an n8n HTTP Request node that fetches pins.
  3. Preprocessing layer – an n8n Code node that transforms the raw Pinterest response into a clean, consistent schema and tags pins as Organic.
  4. Airtable – receives normalized records via an Upsert operation, keyed by pin_id to prevent duplicates.
  5. AI Agent and Summarization (OpenAI) – consumes Airtable data, detects trends, generates new pin concepts, and outputs a concise summary that is delivered by an email or messaging node.

n8n manages credential storage and execution flow, while Pinterest, Airtable, and OpenAI provide the external capabilities for data, persistence, and analysis.

3. Pinterest API Integration

3.1. Obtain Pinterest API Access

Before building the workflow, you need a valid Pinterest API token:

  1. Register a developer application in your Pinterest account.
  2. Create an access token for the app.
  3. Use this token as a Bearer token in all API calls.

Basic request format for listing pins:

GET https://api.pinterest.com/v5/pins
Header: Authorization: Bearer YOUR_ACCESS_TOKEN

Store the token in a secure location, preferably in n8n credentials or an external secrets manager. Follow these best practices:

  • Rotate tokens on a regular schedule.
  • Do not hardcode tokens directly in Code nodes.
  • Respect Pinterest rate limits to avoid throttling or temporary bans.

3.2. HTTP Request Node Configuration

In n8n, use an HTTP Request node to call the Pinterest API:

  • Method: GET
  • URL: https://api.pinterest.com/v5/pins
  • Authentication: typically via a custom header using n8n credentials
  • Headers:
    • Authorization: Bearer {{$credentials.pinterestAccessToken}} (example)

Configure pagination, filters, or additional query parameters as needed based on your Pinterest account requirements. The template assumes a straightforward retrieval of pins, which is then processed downstream.

4. n8n Workflow Structure

4.1. Schedule Trigger

The workflow starts with an n8n Schedule Trigger node that defines the execution cadence:

  • Set recurrence to daily or weekly, depending on how frequently you want new analysis.
  • Optionally, choose a specific time (for example, 8:00 AM) to align with reporting cycles.

This node does not require external credentials and simply triggers the downstream nodes according to the chosen schedule.

4.2. Pinterest Data Retrieval

Immediately after the trigger, the HTTP Request node calls the Pinterest API and returns a JSON response. The structure typically includes an array of pin objects within a property such as items.

The subsequent Code node expects the response in this general format:

  • item.json.items is an array of pins.
  • Each pin contains fields like id, created_at, title, description, and link.

If your Pinterest API response format differs, adjust the Code node logic accordingly so that it correctly iterates through the response structure.

4.3. Preprocessing & Normalization (Code Node)

The Code node standardizes the raw Pinterest data into a schema compatible with your Airtable base and adds a type field set to Organic. This helps differentiate organic pins from other types (for example, paid pins) in later analysis.

Example n8n JavaScript Code node implementation:

// n8n JavaScript Code node example
const outputItems = [];
for (const item of $input.all()) {  if (item.json.items && Array.isArray(item.json.items)) {  for (const subItem of item.json.items) {  outputItems.push({  id: subItem.id || null,  created_at: subItem.created_at || null,  title: subItem.title || null,  description: subItem.description || null,  link: subItem.link || null,  type: "Organic"  });  }  }
}
return outputItems;

This code:

  • Iterates over all incoming items from the HTTP Request node.
  • Checks that item.json.items exists and is an array.
  • For each subItem (pin), creates a simplified object with:
    • id
    • created_at
    • title
    • description
    • link
    • type set to "Organic"
  • Returns the transformed array for the next node.

If any of the expected fields are missing, the code assigns null. This avoids runtime errors when Airtable receives the data, but you can add validation or filtering if you want to exclude incomplete records.

5. Airtable Integration

5.1. Airtable Schema Design

Create an Airtable base and table dedicated to Pinterest data. At a minimum, define the following fields:

  • pin_id (primary key or unique field, used as the match key)
  • title
  • description
  • link
  • created_at
  • type (for example, Organic, Paid)

You can also add additional metrics that you plan to collect over time:

  • views
  • saves
  • clicks
  • impressions

These fields make it possible to perform historical and comparative analysis, and they provide richer input data for the AI layer.

5.2. Airtable Upsert Node Configuration

In n8n, use the Airtable node in Upsert mode to avoid creating duplicate records:

  • Operation: Upsert
  • Base ID: your Airtable base identifier
  • Table: the Pinterest table you created
  • Match Field: pin_id (mapped from the id field in the Code node output)

The Upsert operation will:

  • Update an existing record if a row with the same pin_id already exists.
  • Insert a new record if no matching pin_id is found.

This approach ensures that repeated workflow runs enrich and refresh your dataset instead of generating duplicates.

6. AI Analysis Layer with OpenAI

6.1. Connecting Airtable to the AI Node

After data is stored in Airtable, add a step in your workflow to retrieve relevant records (for example, the most recent pins or a specific date range). Feed these records into an AI Agent node that uses OpenAI.

The AI node should receive a structured set of records, typically in JSON format, so it can analyze topics, formats, and performance patterns.

6.2. Prompt Design for Trend Detection and Suggestions

The core of the AI layer is the prompt that instructs the model what to do with the data. A typical prompt for this use case might include:

  • Instructions for detecting trends in topics, posting times, and creative formats.
  • Guidelines for generating new pin concepts aligned with the target audience.
  • Constraints for producing a concise, actionable summary for marketing stakeholders.

Example prompt:

You are a data analysis expert. Pull the table records and identify trends in topics, formats, and posting cadence. Produce 6 new pin concepts with title, short description, recommended board, and CTA. Keep it concise for the marketing team.

You can refine this prompt to specify desired output formats, such as bullet lists or JSON, depending on how you intend to parse or display the results in downstream nodes.

7. Structure of AI-Generated Suggestions

To make the AI output directly usable by your content team, define a consistent structure for each suggestion. A high quality suggestion typically includes:

  • Pin title with a clear, compelling hook
  • 1-sentence description summarizing the content
  • Suggested image or visual concept, such as:
    • Infographic
    • Product shot
    • Step-by-step tutorial graphic
  • Target audience or board where the pin should be posted
  • Call to action (CTA), for example:
    • Link to a blog article
    • Product page
    • Newsletter sign-up
  • Short rationale explaining why the pin is likely to perform well, tied to observed trends in your existing data.

By guiding the AI to include all of these components, you increase the chance that each suggestion is immediately actionable and easy to reproduce.

8. Delivery & Notification Layer

Once the AI node generates its analysis and recommendations, the workflow uses an n8n messaging node to deliver the results to stakeholders.

8.1. Email Delivery

The template is designed to use an email node such as:

  • Gmail node
  • SMTP node

Configure the node to:

  • Set the recipient to the marketing manager or content team mailing list.
  • Use a clear subject line, for example, “Weekly Pinterest Performance & AI Suggestions”.
  • Include the AI-generated summary and pin ideas in the email body.

8.2. Alternative Channels

Instead of or in addition to email, you can send the summary via:

  • Slack node
  • Microsoft Teams integrations

Choose the channel that best fits your team’s workflow and notification preferences.

9. Operational Considerations & Best Practices

9.1. Including Organic and Paid Data

The example Code node tags all records as type = "Organic". If you also track paid pins, extend your data ingestion logic so that:

  • Paid pins are imported into the same Airtable table.
  • The type field is set to "Paid" for those records.

This allows you to compare organic versus paid performance and identify creative that converts well enough to justify additional promotion.

9.2. Data Retention and Enrichment

For deeper analysis and more accurate AI suggestions, consider:

  • Storing long-term metrics such as views, saves, clicks, and impressions.
  • Adding the Pinterest board name associated with each pin.
  • Tagging images with color or theme attributes for creative analysis.
  • Storing landing page UTM parameters to support attribution across channels.

The richer your dataset, the more nuanced the AI’s trend detection and recommendations can be.

9.3. Monitoring and Error Handling

To keep the workflow reliable in production, implement monitoring and basic safeguards:

  • Log failed Pinterest API calls and send alerts via Slack or email.
  • Respect Pinterest rate limits and enable retries with exponential backoff where appropriate.
  • Use Airtable Upsert with

Build a Visa Requirement Checker with n8n

How a Frustrated Founder Built a Visa Requirement Checker With n8n and Vector Search

On a rainy Tuesday evening, Lena stared at her support inbox and sighed.

She was the founder of a small travel startup that helped digital nomads plan long stays abroad. Business was growing, but one problem refused to go away. Every day, dozens of people asked the same types of questions in slightly different ways:

  • “Do I need a visa to work from Portugal for 60 days?”
  • “Can I transit through Canada on my Indian passport?”
  • “Is a 10-day tourist trip to Germany from India visa free?”

Her team had collected official embassy pages, PDFs, and policy documents. They tried keyword search, tags, even a basic FAQ chatbot. Still, the answers were often incomplete, outdated, or simply wrong when users phrased questions differently or in another language.

Lena knew she needed something more reliable. Something that could read complex visa rules, understand nuance, and still be auditable. That is when she discovered an n8n workflow template that used embeddings and a vector database to power a Visa Requirement Checker.

The Problem: When Keyword Search Fails Real Travelers

Lena’s existing setup relied on simple keyword matching. It worked fine for obvious queries, but visa rules are rarely obvious. Policies change, exceptions are buried in footnotes, and documents exist in multiple languages. Keyword search kept missing the point.

She saw issues like:

  • Subtle differences between “tourist visit,” “business visit,” and “remote work” not captured by keywords
  • Multilingual content where the query language did not match the document language
  • Users asking natural questions that did not contain the exact words in the policy text

She needed semantic understanding, not just string matching. That is when she learned about embeddings and vector search, and how n8n could orchestrate everything into a single, automated workflow.

The Breakthrough: Semantic Search With Embeddings and Weaviate

Lena discovered an n8n template that promised exactly what she needed: a scalable Visa Requirement Checker built on semantic search. The idea was simple but powerful.

Instead of searching by keywords, the system would:

  1. Convert visa documents into vector embeddings
  2. Store them in a vector database (Weaviate in the template)
  3. Compare user questions with document embeddings using semantic similarity
  4. Feed the most relevant snippets into an LLM to generate a clear answer

By turning text into embeddings, the workflow could understand that “10-day tourist stay” is related to “short-term Schengen tourism visit,” even if the wording was different. That was exactly the nuance Lena was missing.

Inside the Workflow: The Invisible Machine Behind the Assistant

As Lena imported the template into her n8n instance, she saw a compact but powerful architecture. Each node played a specific role in the journey from user question to final answer.

The Core Components

The workflow relied on several key building blocks:

  • Webhook – The public entry point that accepts POST requests from her frontend or any automation trigger
  • Splitter – A helper that breaks long legal documents into smaller chunks to improve embedding quality
  • Embeddings – A node that sends text chunks to Cohere (or another provider) to create vector representations
  • Insert – The bridge to Weaviate that stores embeddings with rich metadata in a class named visa_requirement_checker
  • Query and Tool – The retrieval layer that pulls the most relevant chunks for each user query
  • Memory – A short-term context buffer for multi-turn conversations
  • Chat/Agent – The orchestrator that calls an LLM (Anthropic in the template) and composes the final response
  • Sheet – A Google Sheets integration that logs questions and answers for analytics and auditing

On the surface, users would just see a simple “Ask about visa requirements” box. Underneath, this workflow would quietly handle everything.

Rising Action: Lena Starts Wiring the System Together

To turn the template into a working Visa Requirement Checker, Lena followed the steps, but in her mind, they became part of a story: a user asks a question, the system reads through the law, and returns a grounded, explainable answer.

Step 1 – The Webhook: Opening the Door

First, she configured an n8n Webhook node to receive POST requests from her web app. The payload included:

  • user_question – The natural language query
  • country_of_origin
  • destination_country
  • Optional document uploads or URLs to official sources

If processing needed to be asynchronous, the webhook returned a 202 status code, confirming that the question was accepted and being processed. Input validation here helped her avoid incomplete or malformed requests.

Step 2 – The Splitter: Teaching the System to Read Long Documents

Lena’s data sources were long PDFs and dense legal pages. Feeding them into an embeddings model as a single block would be inefficient and noisy. The template solved this with a Splitter pattern.

Long documents were cut into smaller chunks, for example:

  • Chunk size: about 400 characters
  • Overlap: about 40 characters to preserve context between chunks

This approach kept enough context for the model to understand the text while staying within token limits and improving retrieval accuracy.

Step 3 – Embeddings: Turning Text Into Vectors

Each chunk then flowed into an Embeddings node. In the template, Cohere was used by default, but the node could be easily switched to OpenAI, Anthropic, or another provider.

Crucially, Lena kept metadata attached to every embedding:

  • Source URL
  • Document title
  • Chunk index
  • Country and language
  • Last-updated date
  • Source type, such as official government page or third-party explanation

This metadata would later allow precise filtering and explainable answers. She wanted to know exactly which paragraph a response came from.

Step 4 – Insert: Building the Knowledge Base in Weaviate

Next, the Insert node wrote the embeddings and metadata into Weaviate. She created a class called visa_requirement_checker, which became the central index for all visa-related knowledge.

Weaviate’s approximate nearest neighbor (ANN) search meant that, when a user asked a question, the system could quickly find the most semantically similar chunks, not just those with matching keywords. Metadata filters made it easy to restrict results to a specific country, region, or date range, so outdated or irrelevant rules stayed out of the answer.

Step 5 – Query + Tool: Finding the Right Paragraphs

With the knowledge base in place, Lena turned to the retrieval flow. When a user asked a question, the workflow ran a Query against Weaviate to fetch the top-k most relevant chunks.

Those retrieved snippets were then wrapped by a Tool node. This node made the context available to the agent so the LLM could “see” the exact text that explained the policy. The assistant was no longer guessing. It was reading.

Step 6 – Memory: Remembering the Conversation

Visa questions are rarely one-and-done. Users often ask follow-ups like “What if I stay longer?” or “Does this apply if I have a US visa?”

To handle this, Lena enabled a Memory buffer. It stored short-term session context such as previous questions, clarifications, and decisions. This allowed the assistant to support multi-turn conversations without having to fully reshape the retrieval step on every interaction.

Step 7 – Chat/Agent: Crafting the Final Answer

Finally, the agent node pulled everything together. It built a prompt that included:

  • The user’s current question
  • The retrieved document chunks from Weaviate
  • Relevant session memory

The node then called an LLM, Anthropic in the template, to generate a clear, citation-backed answer. Lena configured the prompt to enforce several rules:

  • Answer concisely and reference which document or paragraph the information came from
  • Be explicit when information is missing, uncertain, or possibly outdated
  • Offer concrete next steps, such as linking to official embassy pages or contact forms

Behind the scenes, a Sheet node logged each question and answer to Google Sheets, giving Lena a transparent audit trail and analytics for future improvements.

The Turning Point: A Real Query Puts It to the Test

With everything wired up, Lena was ready to test the workflow with a real-world scenario that her support team saw almost daily.

A user asked:

“Do I need a visa to travel from India to Germany for a 10-day tourist stay?”

Here is how the workflow handled it, step by step:

  1. The Webhook node received the question and metadata such as origin country (India) and destination (Germany).
  2. The Query node searched Weaviate for the most relevant chunks related to Germany entry requirements and Schengen short-stay rules.
  3. The Tool node packaged these snippets, and the agent composed an answer that referenced the official German foreign office page and the specific paragraph that applied to short-term tourism.
  4. The Sheet node logged the entire exchange to Google Sheets for later review and analytics.

For the first time, Lena saw a response that was both natural and grounded in verifiable sources, with citations pointing back to the exact policy text.

Staying Safe and Accurate: Best Practices Lena Adopted

As she prepared to roll this out to real users, Lena focused on reliability, security, and long-term maintainability.

Making Metadata Work Harder

She expanded the metadata stored with each embedding to include:

  • Country and region
  • Last-updated date
  • Language
  • Source type, such as official embassy, government gazette, or third-party explanation

This allowed her to filter retrieval results by country or date and avoid surfacing stale or irrelevant guidance. If a rule changed, she could re-index documents and be sure that older chunks would not sneak back into answers.

Handling Rate Limits and Batching

Since embeddings and LLM calls can be rate limited, Lena configured the workflow to:

  • Batch embedding requests where feasible
  • Use backoff and retry logic in n8n to handle transient errors
  • Monitor usage to avoid hitting provider limits unexpectedly

This kept the system stable, even as more users began to rely on it.

Security, Compliance, and PII

Visa-related questions sometimes included personal details. To stay compliant, Lena:

  • Encrypted sensitive data at rest
  • Restricted access to the Weaviate instance
  • Avoided logging full passport numbers, national IDs, or other highly sensitive identifiers
  • Implemented a policy to purge sensitive records when no longer needed

The goal was to provide helpful guidance without turning the system into a liability.

Dealing With Ambiguity and Edge Cases

No model is perfect. When the LLM expressed uncertainty or when the source documents were unclear, Lena’s workflow provided a safe fallback:

  • Link to the relevant official embassy or government guidance
  • Recommend contacting an immigration lawyer for complex cases
  • Offer to collect more context, such as length of stay, visa type, or travel dates

This kept users safe and aligned the assistant with real-world legal complexity.

From Prototype to Production: Testing, Scaling, and Monitoring

Before deploying the Visa Requirement Checker broadly, Lena treated it like any other critical product feature.

Testing and Validation

She created a test suite of representative queries across multiple countries and visa types. For each query, she defined:

  • Expected documents or paragraphs that should be cited
  • Acceptable answer patterns

She then used automated checks to validate that:

  • Retrieval results referenced the correct documents
  • Precision and recall metrics stayed within acceptable ranges after content updates

This gave her confidence that changes to the knowledge base would not silently break answers.

Scaling and Monitoring in Production

As usage grew, Lena began tracking:

  • Query latency through the workflow
  • Embeddings throughput
  • Vector store size and performance
  • Prompt costs for the LLM

Weaviate’s sharding and horizontal scaling options helped her keep retrieval fast even as the number of documents increased. To control LLM costs, she experimented with truncating or compressing retrieval context while preserving the most relevant chunks.

Keeping Up With a Moving Target: Content Updates

Immigration rules do not stand still, and Lena knew that a one-time import of documents would not be enough. She set up a content ingestion pipeline that periodically fetched and re-indexed:

  • Official embassy pages
  • Government gazettes
  • Other authoritative sources

Using the Insert node, she could upsert updated embeddings and maintain a changelog for traceability. When a rule changed, the new version would be reflected in answers without manual intervention in each node.

Deployment: How Lena Put It All Online

To move from her local experiments to a production-ready assistant, Lena followed a straightforward deployment checklist.

  1. Provisioned a Weaviate instance and created a class called visa_requirement_checker.
  2. Configured embeddings provider credentials, such as Cohere or OpenAI, inside n8n.
  3. Added LLM credentials, using Anthropic in her case, for answer generation.
  4. Set the Webhook URL in her frontend to point to the n8n webhook node.
  5. Connected Google Sheets to log requests and answers for analytics and auditing.

She ran a final round of tests, checked logs, and gradually rolled out the new assistant to a segment of her users before making it available to everyone.

The Resolution: A Smarter, Trustworthy Visa Requirement Checker

Weeks later, Lena opened her support dashboard and smiled. Repetitive visa questions had dropped sharply. When they did appear, they were often more advanced or nuanced, because the basic entry requirements were already answered by the assistant.

Her team could now focus on edge cases and higher-value support, while travelers received fast, citation-backed guidance grounded in official documents.

By combining n8n with semantic search and a vector database, Lena had built a Visa Requirement Checker that was:

  • Flexible – Easy to adapt to new countries, visa types, and languages
  • Auditable – Every answer could be traced back to specific documents and paragraphs
  • Accurate – Retrieval and generation were clearly separated, keeping responses tied to real sources

What started as a frustrating support problem became a competitive advantage for her travel startup.

Your Turn: Build Your Own Visa Requirement Checker With n8n

If you are facing similar challenges, you do not have to start from scratch. You can import the same n8n workflow template, connect your own data sources, and adapt it to your list of countries and visa types.

To get started:

  1. Import the n8n workflow JSON into your n8n instance, self-hosted or on n8n.cloud.
  2. Connect your Cohere or other embeddings provider credentials.
  3. Set up Weaviate and create the visa_requirement_checker class.
  4. Add your LLM credentials,

Automated Job Application Parser with n8n & Pinecone

Automated Job Application Parser with n8n & Pinecone

Every recruiter knows the feeling of being buried under resumes. PDFs, Word files, LinkedIn exports, free-text forms, and emails all competing for your attention, while the clock is ticking and great candidates are slipping away.

What if that chaos could quietly organize itself in the background, while you focus on conversations, culture fit, and strategic hiring decisions instead of copy-paste work?

In this guide, you will walk through a complete journey from manual overwhelm to a streamlined, automated Job Application Parser built with n8n, OpenAI embeddings, Pinecone, a RAG (retrieval-augmented generation) agent, Google Sheets, and Slack. The template you are about to explore is not just a workflow, it is a foundation you can grow, extend, and customize as your hiring process matures.


From inbox chaos to clarity: why automate job application parsing

Modern hiring rarely looks tidy. Applications arrive as:

  • Resumes and CVs in multiple formats
  • Cover letters with rich but unstructured text
  • LinkedIn profiles and portfolio links
  • Custom forms that vary by role or campaign

Manually parsing this information is slow and error-prone. Details get missed, data ends up scattered across tools, and recruiters spend more time processing than evaluating. Automation changes that story.

By using an automated Job Application Parser with n8n and Pinecone, you can:

  • Speed up candidate triage and initial screening
  • Extract consistent key fields such as skills, experience, and education
  • Turn unstructured resumes into searchable vectors for later queries and matching
  • Log every application reliably and trigger targeted Slack alerts for your team

This workflow becomes your quiet assistant, standardizing data in the background so you can spend more time on high-value hiring decisions.


Adopting an automation mindset

Before diving into nodes and configuration, it helps to see this template as a starting point, not a finished product. You are building a system that will grow with your team.

As you follow the steps, keep this mindset:

  • Iterate, do not wait for perfection. Start with a basic parser, then refine prompts, fields, and alerts as you see real data flow through.
  • Automate the repetitive parts first. Use the template to remove the most tedious manual steps, then layer on more intelligence over time.
  • Design for searchability and reuse. Vector storage in Pinecone and structured outputs mean you can reuse the same data for future workflows like matching, talent pools, and analytics.

The template below gives you a robust, production-ready backbone. From there, you can experiment, extend, and shape it around your unique hiring process.


The high-level architecture: how the workflow comes together

The n8n template follows a clear pipeline that turns raw application data into structured, searchable insights. At a high level, it:

  1. Receives job applications via an n8n Webhook Trigger
  2. Splits large documents into smaller chunks with a Text Splitter
  3. Generates OpenAI embeddings for each chunk
  4. Stores those vectors in a Pinecone index for retrieval
  5. Queries Pinecone when context is needed, using a Vector Tool
  6. Uses a RAG Agent (OpenAI chat + vector tool + memory) to produce structured summaries
  7. Appends results into Google Sheets as a lightweight applicant log
  8. Sends Slack alerts on errors or high-priority candidates

Each piece plays a specific role, and together they create a repeatable, scalable process that can handle hundreds or thousands of applications with minimal extra effort.


Walking through the workflow: node by node

1. Webhook Trigger – your automated intake door

The journey begins with a Webhook node in n8n. You expose an endpoint, for example:

POST /new-job-application-parser

This endpoint receives incoming applications, which can include:

  • Raw resume text
  • Base64 encoded PDFs or other document formats
  • Applicant metadata such as email, name, and position applied for
  • Source tags like job board, referral, or campaign

Keep validation strict at this step. Reject malformed payloads early so downstream nodes only handle clean, well-structured data. This is where you set the tone for reliability in your entire automation.

2. Text Splitter – preparing content for embeddings

Resumes can be long and dense, so the next step is to break them into manageable chunks. The template uses a Text Splitter node that:

  • Splits text into chunks of about 400 characters
  • Overlaps chunks by about 40 characters to preserve context

You can tune chunkSize and chunkOverlap based on your typical resume length and the embedding model you use. The goal is to keep enough context for meaningful embeddings while staying within token limits.

3. Embeddings (OpenAI) – turning text into vectors

Next, you convert each chunk into a vector using OpenAI embeddings, for example:

text-embedding-3-small

For every chunk, store rich metadata so you can reconstruct context later. Common fields include:

  • applicant_id
  • original_filename
  • chunk_index
  • A short text excerpt

This metadata is what allows your retrieval step to not only find relevant content, but also connect it back to the right candidate and original file.

4. Pinecone Insert and Query – your searchable memory

Once you have embeddings, you insert them into Pinecone. A typical index name might be:

new_job_application_parser

Configure the Pinecone index so that:

  • The vector dimension matches your embedding model
  • Metadata fields align with what you store in n8n

Later, when a recruiter or another workflow needs a summary or deeper analysis, you use a Pinecone Query node, often tied to a Vector Tool node, to retrieve the nearest neighbor vectors. Those vectors provide the contextual snippets that the RAG agent will use to understand the candidate and generate structured output.

5. Window Memory – keeping the conversation on track

To give your RAG agent a sense of continuity, you can use window memory. This node holds the last N interactions so the model can:

  • Remember previous questions or follow-ups
  • Maintain context across several steps in the parsing or review process

This becomes especially valuable if you build interactive recruiter tools on top of the same agent, where follow-up questions about a candidate are common.

6. RAG Agent – transforming raw data into insights

The RAG Agent is the heart of the workflow. It combines:

  • An OpenAI chat model
  • The Vector Tool connected to Pinecone
  • Window memory for recent context

You give it a clear system prompt, for example:

"You are an assistant for New Job Application Parser tasked with extracting structured fields and summarizing candidate fit."

The agent receives:

  • Retrieved context from Pinecone
  • The applicant’s raw data and metadata

It then returns structured output such as:

  • Candidate name
  • Contact info
  • Experience summary, including years and notable roles
  • Top skills
  • Education
  • Fit score with a short justification

This is where unstructured resumes turn into actionable insights your team can quickly scan, filter, and act on.

7. Append Sheet (Google Sheets) – building a simple applicant log

To give your team an easy way to review parsed results, you connect a Google Sheets Append node. Each parsed application becomes a new row with columns such as:

  • timestamp
  • applicant_id
  • position
  • parser_status
  • Full agent output or key structured fields

This effectively creates a lightweight applicant tracking log that non-technical teammates can filter, sort, and explore without ever logging into n8n or Pinecone.

8. Slack Alert – keeping the team informed in real time

Finally, you bring the workflow to life with Slack notifications. A Slack node can send messages to a #recruiting or #alerts channel when:

  • An error occurs during parsing
  • A candidate is flagged as a strong match by the agent

Craft clear, actionable error messages so that debugging is quick. Over time, you can refine these alerts to highlight only the most important events and avoid notification fatigue.


Step-by-step: setting up the n8n job application parser

Now that you understand the architecture, here is how to bring the template to life inside n8n.

  1. Create the n8n workflow and Webhook.
    Add a Webhook node, expose a public endpoint or configure secure ingress, and validate incoming requests to ensure payloads meet your expected schema.
  2. Add and configure the Text Splitter.
    Insert a Text Splitter node and tune chunkSize and chunkOverlap for your resumes. The template uses 400 characters with 40 characters overlap as a strong starting point.
  3. Connect OpenAI embeddings.
    Set up OpenAI credentials in n8n, then add an Embeddings node using a model such as text-embedding-3-small. Map your resume chunks into this node.
  4. Set up Pinecone and insert vectors.
    Create a Pinecone project and index. Add your Pinecone API credentials in n8n, then attach a Pinecone Insert node to store embeddings along with metadata.
  5. Optionally add Pinecone Query and Vector Tool.
    To power retrieval for your RAG agent, add a Pinecone Query node and connect it to a Vector Tool node. This lets the agent fetch the most relevant chunks for each candidate.
  6. Create the Chat Model and Agent.
    Add a Chat Model node using OpenAI chat, then an Agent node. Define a clear system prompt and provide example behavior so the agent outputs structured data, for example JSON or a plain text table.
  7. Wire Google Sheets and Slack.
    Attach a Google Sheets Append node to capture structured results and status. Add a Slack node that triggers on error paths or when the agent flags high-priority candidates.
  8. Test thoroughly with real-world edge cases.
    Use a suite of sample resumes: images-only PDFs, non-English CVs, very long documents, and partially filled forms. Verify outputs, alerts, and performance before going live.

As you test, keep adjusting prompts, chunk sizes, and fields. This is where your workflow evolves from a generic parser into a tool tailored to your hiring style.


Designing prompts for clear, structured output

Prompt design is where you shape how the RAG agent thinks and responds. For automation, you want outputs that are both human-friendly and machine-readable.

Two effective patterns are:

  • Delimited JSON. Ask the agent to respond only with JSON. This makes it easy to parse and write to Google Sheets or other systems.
  • YAML-like key-value pairs. Slightly more readable for humans, but still structured enough for parsing in n8n.

Here is an example system instruction snippet you might use:

"Return the parsed applicant fields as a JSON object with keys: name, email, phone, summary, skills (array), experience_years, education, fit_score (0-100), notes."

As you iterate, you can refine these keys, add role-specific fields, or request different formats depending on downstream tools.


Scaling your parser: performance, costs, and growth

Once your workflow is running smoothly, it is natural to think about volume. The good news is that embedding and vector operations are generally inexpensive compared to full LLM calls, especially at scale.

To keep your system efficient and cost-conscious:

  • Batch embedding requests wherever possible
  • Choose an embedding model that balances quality and price for your use case
  • Use Pinecone namespaces or multiple indices to separate data by job role or tenant in multi-tenant setups
  • Cache frequent queries and pre-filter candidates so you limit RAG agent calls to the most promising profiles

This is where your workflow becomes a long-term asset, capable of supporting growing hiring needs without constant manual intervention.


Protecting candidate data: security and compliance

With great automation comes great responsibility. Candidate information is highly sensitive, so your workflow should respect privacy from day one.

Key practices include:

  • Use secure transport (HTTPS) for all webhook and API communication
  • Restrict access to your Pinecone index and Google Sheets to authorized users only
  • Ensure logs and error messages do not expose unnecessary PII
  • Define retention policies and align with relevant regulations such as GDPR

By building security into the workflow now, you create a trustworthy foundation for everything you automate next.


Testing your n8n job application parser

Before you rely on this parser for real candidates, put it through a structured testing checklist. This step gives you confidence and reveals opportunities for improvement.

  • Feed resumes in multiple formats such as .docx, PDF, and plain text
  • Validate that structured outputs match your expected schema and field types
  • Simulate partial or malformed inputs and confirm Slack error alerts fire correctly
  • Measure average time-to-parse to ensure you meet internal SLAs or response expectations

As you test, treat every unexpected case as a chance to refine prompts, validation, or error handling.


Troubleshooting and continuous improvement

Even well-designed workflows need occasional tuning. Here are some common issues and how to approach them:

  • Inconsistent JSON from the agent.
    Tighten your prompt instructions and include explicit JSON examples. Remind the model to return only JSON, with no extra commentary.
  • Sparse or irrelevant retrieval results.
    Increase chunk overlap, store larger context excerpts, or adjust your similarity threshold in Pinecone queries.
  • High Pinecone query latency.
    Review your index configuration, region selection, and any unnecessary query parameters. Ensure your index is located close to your n8n environment.

Each improvement you make here compounds over time, turning your parser into a stable, trusted part of your hiring infrastructure.


From a single workflow to a hiring automation ecosystem

Once your Job Application Parser is stable, you are only a few steps away from a broader automation ecosystem. With the same foundation, you can:

  • Trigger automated screening tests based on parsed skills or experience
  • Initiate interview scheduling workflows with candidates who meet certain criteria
  • Sync parsed data into your ATS or CRM for richer candidate profiles
  • Build dashboards that show pipeline health, skill distributions, or time-to-parse metrics

This template is a powerful stepping stone. It frees your time, increases consistency, and opens the door to more ambitious automations that support your team and your candidates.


Take the next step: try the n8n job application parser template

You now have a clear picture of how the workflow works and how it can transform your hiring process.

AI Logo Sheet Extractor to Airtable (n8n Guide)

AI Logo Sheet Extractor to Airtable (n8n Guide)

Ever stared at one of those giant logo sheets and thought, “Wow, this would be fun to copy into Airtable by hand”? Yeah, nobody ever.

If you are tired of squinting at tiny logos, guessing product names, and manually typing attributes into a spreadsheet, this n8n workflow template is your new best friend. It takes a single uploaded image of a logo sheet, lets an AI vision agent do the heavy lifting, then neatly stuffs everything into Airtable as structured, linkable records.

In other words: you upload an image, the workflow does the boring bits, and you get a clean Airtable knowledge graph out of it.

What this n8n workflow actually does

This ready-made automation takes a logo sheet image and turns it into structured records in Airtable using an AI vision-enabled LangChain agent. It identifies tools, infers attributes, and maps relationships between competitors, then performs deterministic upserts into Airtable so you do not end up with duplicates every time you re-run it.

It is especially handy for:

  • Market research and ecosystem maps
  • Product comparison visuals
  • “AI landscape” slides that keep showing up in every deck

Instead of manually transcribing logos and categorizing tools, you can:

  • Upload an image via a simple form
  • Let an AI agent extract tool names, attributes, and similar tools
  • Upsert attributes and tools directly into Airtable
  • Maintain normalized relationships between Tools and Attributes, plus mapped competitors

High-level workflow overview

Here is the full end-to-end flow, minus the human suffering:

  1. You submit a form with a logo-sheet image and an optional prompt.
  2. n8n passes the uploaded image to an AI vision-capable LangChain agent.
  3. The agent returns structured JSON with an array of tools and their details:
    • name
    • attributes (like category, feature, role)
    • similar (other tools it considers similar)
  4. n8n parses and validates that JSON using a Structured Output Parser so everything downstream is predictable.
  5. For each attribute, the workflow checks Airtable, creates the attribute if needed, and stores the record IDs.
  6. For each tool, it computes a deterministic hash, upserts the tool in Airtable, and links:
    • Attributes (via their record IDs)
    • Similar tools (also via record IDs, after ensuring they exist)
  7. The final result is an enriched Tools table in Airtable with Attributes and Similar fields as proper linked records.

Core n8n nodes and what they do

Form Trigger – how the logo sheet enters the chat

Node: Form Trigger

This is where the user uploads the logo sheet image and, optionally, adds a custom prompt for the AI. A typical path might look like:

/form/logo-sheet-feeder

The node collects:

  • The logo-sheet image file (binary data)
  • An optional text prompt with hints for extraction

LangChain AI Vision Agent – the “I see logos” brain

Node: Retrieve and Parser Agent (LangChain / AI Vision)

This node is the core extraction engine. It receives:

  • The uploaded image (as binary)
  • A system prompt that tells the agent exactly what JSON structure to return
  • An optional user prompt from the form

Important configuration detail:

  • passthroughBinaryImages = true so the agent can actually see and analyze the uploaded image.

The agent is instructed to return a JSON array of tools with fields: name, attributes, and similar.

Structured Output Parser – JSON babysitter

Node: Structured Output Parser

AI sometimes likes to “get creative” with formats. This node keeps it in line by:

  • Validating the JSON output from the agent
  • Enforcing a consistent schema so all downstream n8n nodes receive predictable fields

The result is a clean array of tools ready for Airtable processing, instead of surprise strings and half-open brackets.

Data normalization and attribute creation

This part of the workflow splits the tools array and iterates through every attribute string returned by the agent.

For each attribute, the workflow:

  • Looks up the attribute in the Airtable Attributes table
  • Creates the attribute if it does not exist yet (upsert behavior)
  • Captures the Airtable record ID for later linking

A wait or merge step is used so that all attribute records are fully created before the workflow starts mapping them to tools. That way, when tools get created, the attribute IDs are already available and ready to be linked.

Tool creation and deterministic upsert

Next, the workflow processes each tool from the parsed JSON.

For each tool, it:

  • Lowercases the tool name
  • Runs it through a crypto node to generate a deterministic hash (MD5-style)
  • Uses that hash to upsert the tool into the Airtable Tools table
  • Links the tool to:
    • Attribute record IDs
    • Similar tool record IDs (once those are ensured to exist)

The deterministic hash is the secret weapon here. It guarantees idempotency so re-processing the same logo sheet will not create duplicate tool entries. You can run the workflow multiple times with the same image and your Airtable will stay clean.

Competitor mapping – filling the “Similar” field

The workflow also handles the similar tools returned by the agent.

For each similar tool name it:

  • Applies the same hashing + upsert logic in the Tools table
  • Ensures those similar tools exist as proper records
  • Replaces the plain-text names with Airtable record IDs

The final result is a Tools.Similar field that is a linked-record array, not just a list of strings. So you end up with a navigable mini knowledge graph of tools and their competitors, straight from a static logo sheet.

Airtable schema you need before starting

Before you hit “activate” in n8n, set up your Airtable base with two tables: Tools and Attributes.

Tools table

  • Name – single line text
  • Attributes – link to Attributes table, allow multiple
  • Similar – link to the same Tools table, allow multiple
  • Hash – single line text (stores the deterministic hash)
  • Optional fields:
    • Description
    • Website
    • Category

Attributes table

  • Name – single line text
  • Tools – link to Tools table, allow multiple

Once this schema is in place, the workflow can safely upsert and link everything automatically.

Agent prompt and JSON format to expect

To keep the AI agent behaving nicely, you give it a clear system prompt and a JSON schema example. The goal is perfectly formatted JSON that n8n can parse without guesswork.

Example system instruction (simplified):

<system>
You will receive an image containing many logos. Extract each product/tool name you can identify and list attributes you can infer from the image context (category, role, feature). Return a JSON array of objects like:
[  {  "name": "ToolName",  "attributes": ["Attribute A", "Attribute B"],  "similar": ["OtherTool1", "OtherTool2"]  }
]
</system>

Example of expected output from the agent:

[{"name":"Pinecone","attributes":["Storage Tool","Memory management"],"similar":["Chroma","Weaviate"]}, {"name":"Chroma","attributes":["Storage Tool","Memory management"],"similar":["Pinecone","Weaviate"]}]

That output is exactly what the Structured Output Parser and the Airtable nodes will work with.

How to set it up – quick checklist

Here is the simplified setup guide so you can go from “logo chaos” to “Airtable graph” without guesswork.

  1. Spin up n8n
    Provision an n8n instance and make sure the LangChain / OpenAI (or other LLM) integration is installed and configured.
  2. Prepare Airtable
    Create the Tools and Attributes tables exactly as described above and generate a Personal Access Token in Airtable.
  3. Add credentials in n8n
    In n8n, set up:
    • Airtable credentials using your Personal Access Token
    • Your OpenAI or LLM provider credentials for the LangChain agent
  4. Import or recreate the workflow
    Bring in the template or rebuild it in your own n8n instance. In the agent node, verify that:
    • passthroughBinaryImages is enabled
    • The system prompt includes the JSON schema example
  5. Activate and test
    Turn on the workflow and test it with a sample logo sheet image. Check Airtable to confirm:
    • Tools are created or updated correctly
    • Attributes and Similar fields are properly linked
    • No duplicate tools appear when you re-run the same image

Tips for getting better AI logo extraction

AI is great, but it is not a mind reader and it does not like blurry logos. A few tweaks can dramatically improve results.

  • Use the optional prompt wisely
    Add hints like: “Extract vendor names and categorize as ‘Storage’, ‘Orchestration’, ‘Model Provider’, etc.”
  • Feed it decent images
    If logos are tiny or low contrast, crop the image or upload a higher-resolution version before running the workflow.
  • Add a validation agent for critical use cases
    If accuracy really matters, chain a second agent that checks tool names against a public dataset or web search.
  • Run multiple passes, let hashing save you
    You can run the workflow several times and merge results. The deterministic hash-based upsert prevents duplicate records.

Common failure modes and how to avoid headaches

AI vision is powerful, but not perfect. Here are typical issues and how to handle them before they annoy you too much.

  • Missed names
    Fix by:
    • Using higher-resolution images
    • Adding a quick manual review step in n8n before final upsert
  • Incorrect attribute guesses
    Mitigate by:
    • Adding a human approval node or review UI step for attributes
    • Tightening the system prompt to narrow down allowed attribute types
  • Duplicate or variant names (like “OpenAI” vs “Open AI”)
    Address with:
    • Normalization rules (lowercase, trimming, pattern replacement)
    • A fuzzy-match dedupe step before upserting into Airtable

Security and data privacy notes

Before you start uploading every screenshot in your downloads folder, keep privacy in mind:

  • Avoid images with sensitive personal data.
  • Remember that the agent will send image content to your AI provider if you are using a hosted LLM. Check that provider’s data usage and retention policies.
  • If you need everything to stay on-prem or private, configure an on-prem model or a private LangChain endpoint instead of a public LLM API.

Why this workflow is worth keeping

This n8n template is a practical way to convert visual logo sheets into structured Airtable records without sacrificing your weekend to copy-paste duty. It:

  • Automates repetitive data entry from images
  • Uses deterministic hashes to keep upserts idempotent and avoid duplicates
  • Builds a lightweight knowledge graph in Airtable by linking tools, attributes, and similar competitors

Once it is running, you can treat logo sheets as input fuel for your research database instead of a chore.

Next steps and how I can help

If you want to go further with this automation, I can:

  • Provide a ready-to-import n8n JSON export based on this template
  • Help refine your prompts to improve extraction quality and consistency
  • Add a validation agent or review UI step to flag uncertain results before they hit Airtable

Call to action: Try the workflow with a sample logo sheet, inspect the Airtable output, and then reach out if you want help tuning prompts, refining your Airtable schema, or getting the n8n export. A little setup now means you never have to manually type “Pinecone, vector database, storage” into a spreadsheet again.

Build with n8n Developer Agent: Automate Workflow Creation

Build with the n8n Developer Agent: A Story of Automating Workflow Creation

Discover how one automation lead turned vague, natural language requests into fully importable, production-ready n8n workflows using the n8n Developer Agent template, LLMs, and standard integrations.

The Problem: Drowning in “Can You Just Automate This?” Requests

Every Monday morning, Lena opened her inbox with a mix of curiosity and dread.

As the automation lead at a fast-growing SaaS company, she had become the unofficial “workflow wizard.” Product managers, marketers, and support leads all came to her with the same kind of message:

  • “Can you just set up something that saves Gmail attachments to Google Drive?”
  • “Could we auto-sync CRM updates to Google Sheets and ping Slack?”
  • “Is there a way to parse invoices from email and push them to cloud storage?”

None of these requests were hard for Lena, at least not individually. The real problem was scale.

Each request meant opening n8n, dragging nodes, wiring connections, setting credentials, testing, renaming, documenting, and then doing it all again for the next team. Prototyping alone could eat up hours. Standardizing naming conventions and documenting credentials was another layer of work.

She knew there had to be a better way to turn natural language requests into working n8n workflows, without manually building each one from scratch.

The Discovery: A Template That Writes n8n Workflows For You

One afternoon, while browsing the n8n community for ideas, Lena came across something that made her stop scrolling.

The description read: “n8n Developer Agent – a multi-agent workflow template that automates the creation of complete n8n workflows from plain-language prompts.”

It sounded almost too good to be true. A template that:

  • Took a simple chat-style request like “Create a workflow to save new Gmail attachments to Google Drive”
  • Used LLMs, memory, and developer tools to understand the intent
  • Generated valid, importable n8n JSON
  • Automatically created the workflow inside her n8n instance

If this worked, it could change how her entire team built automations.

What the n8n Developer Agent Actually Is

Lena dug into the details.

The n8n Developer Agent was not just another example workflow. It was a multi-agent automation template designed specifically to translate natural language into executable n8n workflow JSON.

At a high level, it combined:

  • A Chat Trigger to receive plain-language prompts from users
  • A Main Agent that interpreted intent and orchestrated tools
  • A Developer Tool that constructed full workflow JSON, including nodes, connections, and settings
  • LLMs and Memory using GPT/OpenRouter for generation, with optional Claude Opus 4 (Anthropic) for deeper reasoning and file analysis
  • An n8n API node that created the workflow directly in her n8n instance

In other words, it was a “developer in a box” for n8n workflow creation, tailored for automation engineers and power users like her, but accessible enough that non-developers could describe what they wanted in natural language.

Why Lena Realized Her Automation Team Needed This

As she read through the template description, Lena could see the benefits lining up with her pain points.

  • Faster prototyping – Turn a user request into a working workflow in minutes instead of hours.
  • Standardized implementations – Let the agent enforce consistent node naming, connections, and settings.
  • Empowered non-developers – Product managers and analysts could describe automations in natural language and get something usable back.
  • Built-in governance – Generated workflows came with sticky notes and configuration hints for credentials and testing.

For a team that needed to move quickly without losing control, this was exactly the kind of automation layer she had been missing.

Inside the Black Box: How the Developer Agent Works in Practice

Before trusting it with her production instance, Lena wanted to understand the flow from end to end.

The Core Components She Found

She opened the template and walked through each piece:

  • Chat Trigger – The entry point that listened for a natural language request like “Create an n8n workflow that triggers on new Gmail messages, filters by sender, and saves attachments to a Google Drive folder.”
  • Main Agent (n8n Developer) – The “brain” that took the raw prompt, managed memory, chose which models to call, and orchestrated the rest of the tools.
  • Developer Tool – A specialized tool whose only job was to return a fully formed n8n workflow JSON object with name, nodes, connections, and settings.
  • LLMs and Memory – GPT/OpenRouter as the primary generator, plus optional Anthropic Claude Opus 4 for deeper reasoning and file analysis, all supported by a memory buffer that kept context across turns.
  • n8n API node – The final step that took the JSON, created the workflow in her n8n instance, and returned a link for review.

The Typical Flow, Seen Through Lena’s Eyes

  1. A teammate sends a request through the chat trigger, for example: “Create a workflow to save new Gmail attachments to Google Drive.”
  2. The Main Agent analyzes the request, pulls in relevant docs or templates (for example, Google Drive nodes from a docs repository), and calls the Developer Tool.
  3. The Developer Tool generates a complete n8n JSON object, including nodes, connections, and initial settings.
  4. The n8n API node imports that JSON as a new workflow and returns a direct link so Lena can open, test, and refine it.

It was exactly what she had hoped for: a repeatable pattern that turned plain language into a working automation skeleton in her own n8n instance.

The Setup: Turning an Idea Into a Working Developer Agent

Convinced enough to try it, Lena decided to set up the template in a sandbox instance of n8n first. She followed a clear sequence to get everything running.

1. Connecting Her LLM Providers

She started by configuring her primary language model:

  • Added an OpenRouter credential for the main generation tasks.
  • Kept the option open to plug in OpenAI if needed.
  • Connected Anthropic Claude Opus 4 as an optional second model for more complex reasoning and file analysis.

This gave the Main Agent enough intelligence to interpret prompts and design workflows with context.

2. Adding n8n API Credentials

Next, she created a dedicated n8n API credential and attached it to the node responsible for creating workflows. That single step was what allowed the Developer Agent to:

  • Take the generated JSON
  • Call the n8n API
  • Spin up a new workflow automatically in her sandbox instance

3. Connecting Google Drive for Documentation Context

Lena’s team kept internal n8n documentation and sample workflows in Google Drive, so she took advantage of the template’s optional integration.

She linked a Google Drive credential to the “Get n8n Docs” node. That way, the Developer Agent could:

  • Fetch existing docs or templates
  • Use them as context for building more accurate workflows
  • Generate automations that aligned with her team’s best practices

4. Deciding How to Trigger the Agent

For her first tests, Lena wanted simplicity. She configured the trigger routing like this:

  • For quick development and testing, she connected the Chat Trigger directly to the workflow builder.
  • She noted that for a future multi-agent setup, she could instead use the provided “When executed by another workflow” trigger, so other workflows could call the Developer Agent as a service.

5. Running the First Real Test

With everything wired up, Lena typed her first real prompt into the Chat Trigger:

“Create an n8n workflow that triggers on new Gmail messages, filters by sender, and saves attachments to a Google Drive folder.”

Within moments, the agent responded with:

  • An importable workflow JSON object
  • A direct link to the newly created workflow in her n8n instance

She opened it and saw a structured, named, and connected workflow already in place. It was not perfect, but it was a solid starting point that saved her at least an hour of manual building.

The Turning Point: Understanding the Key Nodes That Made It Work

To really trust the system, Lena wanted to understand what each critical node was doing behind the scenes.

Chat Trigger

This node listened for incoming chat-style messages and passed the unmodified user request straight to the Main Agent. For testing, she kept it connected directly. Later, she planned to wrap it behind another workflow to route prompts from internal tools.

Main Agent (n8n Developer)

The Main Agent acted as the central decision maker. It:

  • Forwarded the exact user prompt to the Developer Tool
  • Managed conversational memory so the agent could maintain context
  • Decided when to call which language model
  • Relied on a system message that forced the Developer Tool to return only valid n8n JSON

Developer Tool

This was the piece that felt the most like magic. The Developer Tool:

  • Returned a fully formed n8n workflow JSON object
  • Included all required keys like name, nodes, connections, and settings
  • Produced workflows that the Main Agent then validated before passing them to the n8n API node

n8n API Node

Finally, the n8n API node took the validated JSON and:

  • Created the workflow directly in her n8n instance
  • Used a final Set node to format a clickable workflow link
  • Returned that link so Lena could immediately open and review the generated automation

Once she saw how each piece fit together, the Developer Agent stopped feeling like a black box and started looking like a reliable teammate.

Keeping It Safe: Best Practices and Security Lena Put in Place

Lena knew that letting an LLM create workflows in her instance could be powerful, but also risky if left uncontrolled. She put a few guardrails in place from day one.

  • Restricted LLM access to trusted internal users so random teammates could not generate unexpected workflows.
  • Reviewed every generated workflow before moving it anywhere near production. The built-in sticky notes helped by flagging required credentials and testing steps.
  • Separated credentials by environment, using distinct dev, staging, and prod credentials to avoid cross-environment changes.
  • Logged and audited each generation by saving both the original prompt and the generated JSON to a secure location for future reference and compliance.

With these practices in place, the Developer Agent became a safe accelerator instead of a risk.

When Things Go Wrong: How She Troubleshoots the Developer Agent

Not every generation was flawless, but the template gave her clear ways to debug issues.

When the Agent Returned Invalid JSON

On one early test, the response included extra markdown characters around the JSON. The import failed.

She checked the configuration and saw the note: the Developer Tool’s output must not be wrapped in markdown or extra text. The system prompts in the template were designed to enforce JSON-only output, starting with { and ending with }.

To fix it, she updated the system message to be very explicit about this requirement. After that, the JSON came back clean and importable.

When Credentials Were Missing

Another time, she hit a “missing credentials” error for Google Drive. The fix was straightforward:

  • Confirm that Google Drive, Anthropic, and n8n API credentials were correctly configured
  • Double check that each credential was attached to the correct node in the template

Once corrected, the Developer Agent could again pull docs, call LLMs, and create workflows without interruption.

How Lena’s Team Started Using the Developer Agent

As Lena gained confidence, she opened the Developer Agent up to more of the team.

They quickly found recurring use cases where it shined:

  • Quick integrations such as CRM to Google Sheets to Slack notifications, useful for sales and operations dashboards.
  • Inbound processing such as parsing emails, extracting invoices, and uploading them to cloud storage for finance.
  • Internal developer tooling where engineers could describe standardized workflows and have templates generated programmatically.

Instead of manually building every single workflow, Lena’s team started with a generated draft, then customized and hardened it for production. The time-to-prototype shrank dramatically, and non-developers felt more involved in shaping their own automations.

The Resolution: From Bottleneck to Automation Partner

Within a few weeks, Lena noticed a shift.

Her inbox still had plenty of “Can you automate this?” messages, but now her answer looked different. Instead of saying, “I will build it,” she would say, “Describe what you want in the Developer Agent, then I will review and finalize it.”

The n8n Developer Agent template had become a powerful way to:

  • Accelerate automation development
  • Reduce manual configuration and repetitive setup work
  • Make automation more accessible across her organization

By combining LLMs, a focused Developer Tool that outputs importable workflow JSON, and native n8n creation through the API node, her team could now convert plain-language requirements into working automations quickly and consistently.

What She Did Next

Lena’s rollout plan was simple:

  1. Keep the Developer Agent in a sandbox instance for initial experiments.
  2. Connect OpenRouter and Anthropic credentials, plus the n8n API credential.
  3. Invite a small group of power users to try clear, well scoped prompts.
  4. Iterate on system messages, prompt patterns, and docs until the generated workflows matched her team’s standards.

From there, scaling the approach to more teams felt natural.

Ready to follow Lena’s path? Import the n8n Developer Agent template into your own n8n instance, connect your LLM and n8n API credentials, and start turning natural language into real workflows.

Import the n8n Developer Agent template

Call to Action

If you want help tailoring the Developer Agent to your own environment, reach out to an n8n consultant or join the n8n community forums. Share your prompts, compare generated workflows, and learn best practices from other teams who are building smarter automations with n8n.

Backup n8n Workflows to Gitea Repository

Backup n8n Workflows to a Gitea Repository

Picture this: you spend hours crafting the perfect n8n workflow, everything runs smoothly, you feel like an automation wizard… then one day you tweak a node, hit save, and suddenly nothing works. You do the classic “Ctrl+Z stare” at the screen, but there is nothing to undo. That sinking feeling? Completely optional, if you have proper backups.

This guide walks you through an n8n workflow template that automatically exports all your workflows and backs them up to a Gitea Git repository. It checks if each workflow file already exists, creates it if needed, or updates it when things change, all on a recurring schedule. In other words, it quietly does the boring stuff in the background so you never have to.

Why bother backing up n8n workflows to Gitea?

Because “I’ll remember what I changed” is not a backup strategy.

Automating your n8n workflow backups gives you:

  • Recovery after mistakes – roll back from configuration errors, accidental deletes, or “I just wanted to try something” incidents.
  • Self-hosted control – Gitea is a lightweight, self-hosted Git service, so you control storage, privacy, and retention.
  • Version history – each workflow is stored in Git, so you get proper versioned backups using standard Git semantics.
  • API-friendly automation – the Gitea contents API plays nicely with n8n, so the whole thing runs via simple HTTP calls.

Combine n8n with Gitea and you get a neat little system that quietly tracks how your workflows evolve over time, without you manually exporting JSON files like it is 2009.

What this n8n backup template actually does

This workflow template handles the full loop of “export from n8n, sync to Gitea, repeat on a schedule”. At a high level, it works like this:

  • Schedule trigger runs periodically, for example every 45 minutes, so backups happen on autopilot.
  • Globals node stores reusable variables like repo.url, repo.name, and repo.owner so you do not hardcode URLs everywhere.
  • n8n (API) node fetches the list of workflows from your n8n instance.
  • ForEach (split) node loops through each workflow one by one.
  • GetGitea (HTTP) node checks if a JSON file for that workflow already exists in the Gitea repository.
  • Exist (IF) node decides whether the file exists and routes to the correct path.
  • Base64EncodeCreate / Base64EncodeUpdate (Code) nodes pretty-print each workflow as JSON and encode it in base64, exactly how the Gitea contents API expects it.
  • PostGitea (HTTP) node creates a new file in the repo if it does not exist yet.
  • PutGitea (HTTP) node updates an existing file when the workflow has changed, using the file SHA returned by Gitea.

The result: every workflow in your n8n instance ends up as a separate JSON file in your Gitea repository, automatically kept up to date.

Before you start: what you need in place

Before you hit “Execute workflow” with wild optimism, make sure you have:

  • An n8n instance with permission to call the n8n API or otherwise retrieve workflows.
  • A Gitea instance and repository ready to store backups, for example a repo named workflows.
  • A Gitea Personal Access Token with repository read and write permissions.
  • Basic familiarity with n8n nodes and credentials configuration, so you can plug in tokens and URLs without guesswork.

How the workflow decides when to create or update files

The template is not just blindly overwriting files. It is a bit smarter than that:

  1. GetGitea tries to fetch {workflow-name}.json from the configured Gitea repository using the contents API.
  2. If Gitea returns a 404, the file does not exist. The Exist IF node sends the item down the “create” branch, where:
    • The workflow JSON is pretty-printed and base64 encoded in the Base64EncodeCreate Code node.
    • PostGitea creates a brand-new file in the repo.
  3. If the file exists, the template:
    • Pretty-prints and base64-encodes the current workflow JSON in the Base64EncodeUpdate Code node.
    • Compares this with the content field returned by Gitea (after decoding).
    • The Changed IF node checks if the content is different. If it is, PutGitea updates the file and includes the file’s sha to create a new commit.

So only changed workflows generate new commits, and unchanged ones are left alone. Your Git history stays clean instead of becoming a wall of identical “no-op” commits.

Encoding details: why all the base64?

Gitea’s contents API expects file contents in base64, not plain JSON. The template handles this with small Python Code nodes that:

  • Take the workflow JSON payload from the incoming item.
  • Serialize it as pretty-printed JSON, with indentation that is easy for humans to read in the repo.
  • Convert the string to UTF-8 bytes and then base64 encode it.
  • Return an object with an item field containing that base64 string, which the HTTP POST and PUT nodes send to Gitea.

You get readable JSON in Git, and Gitea gets exactly the format its API expects. Everyone is happy.

Step-by-step setup guide

Now for the fun part: turning this from “nice idea” into “actually running”. Here is how to configure the template in your n8n instance.

1. Set up global repository variables

Open the Globals node and fill in your Gitea details:

  • repo.url – for example https://git.your-domain.com
  • repo.name – for example workflows
  • repo.owner – the user or organization that owns the repository

These variables keep the rest of the workflow clean, so if you ever move the repo or change the URL, you only update it in one place.

2. Create and configure your Gitea token

  1. In Gitea, go to Settings → Applications → Generate Token and create a Personal Access Token with repository read and write permissions.
  2. In the n8n credentials manager, create a new HTTP Header credential for Gitea with:
    Header name: Authorization
    Header value: Bearer YOUR_PERSONAL_ACCESS_TOKEN
    

Make sure there is a space after Bearer, or Gitea will reject the request and silently judge you with 401s.

3. Attach the token to the HTTP nodes

Open each of the HTTP nodes in the workflow and assign the Gitea Token credential you just created:

  • GetGitea – checks if a workflow file already exists.
  • PostGitea – creates new files for workflows that are not yet in the repo.
  • PutGitea – updates existing files when workflows change.

Once this is done, n8n can talk to Gitea without you manually copying tokens into every request.

4. Configure the n8n API node

Find the node named n8n in the template. This is the API node that retrieves your workflows. Make sure it has the right authentication to list all workflows in your instance.

Depending on how you run n8n, this might use:

  • A built-in n8n credential type, or
  • A generic HTTP or token-based credential that can call the n8n API.

Once it can enumerate workflows, you are ready to test the whole backup process.

Testing the backup workflow

Before you trust this with your entire automation empire, give it a quick test run:

  1. Configure the n8n API node to use a single test workflow first, then run the workflow manually.
  2. Open your Gitea repository and confirm that a new file appears, usually named something like <workflow-name>.json, with the expected JSON content and commit message.
  3. Make a small change to the test workflow in n8n, then run the backup workflow again. Check Gitea to verify that:
    • The existing file was updated, not duplicated.
    • A new commit was created for the change.

Once you are happy with the results, you can switch the API node back to backing up all workflows and let the schedule trigger handle it automatically.

Security tips and troubleshooting

Keep your repo and tokens safe

  • Use a private repository for backups so your workflows are not publicly visible.
  • Rotate Personal Access Tokens regularly and keep scopes as minimal as possible.
  • Prefer an organization-owned repository for team setups so backups are not tied to a single user account.

Common issues and how to fix them

  • HTTP 401 or 403 from Gitea
    Check the Authorization header format and confirm the token has repo read and write permissions.
  • 404 from GetGitea
    This is normal when a file does not exist yet and is the expected path for creating new files. If it happens unexpectedly, verify the file path and ensure names are properly URL encoded, for example using encodeURIComponent.
  • Base64 comparison mismatches
    Make sure both the template and Gitea use the same canonical formatting. The template already pretty-prints the JSON before encoding so the comparison is consistent.
  • Very large workflows timing out
    For huge workflows, you might need to increase the request timeout on the HTTP nodes or adjust how you handle particularly large content.

Example Gitea request bodies

For reference, here is roughly what the workflow sends to Gitea.

Creating a file with POST:

{  "content": "BASE64_ENCODED_JSON",  "message": "Add workflow: <workflow-name>"
}

Updating a file with PUT (including SHA):

{  "content": "BASE64_ENCODED_JSON",  "sha": "FILE_SHA",  "message": "Update workflow: <workflow-name>"
}

The sha comes from the previous GetGitea response and tells Gitea which version you are updating, so it can create a new commit.

Ideas for extending the template

Once the basic backup is running smoothly, you can level it up a bit:

  • Add richer commit messages that include workflow ID, version, or timestamps.
  • Create tags or branches for nightly or weekly snapshots.
  • Send notifications via email or Slack when a backup fails or when a new commit is created.
  • Implement retention logic to prune old backups after a certain period.

The template already covers the essentials, so extensions like these are just icing on top.

Wrapping up: turn “oops” into “no problem”

Backing up n8n workflows to a Gitea repository turns your fragile, single-copy workflows into versioned, auditable, and recoverable assets. This template gives you:

  • Scheduled exports of all workflows.
  • Smart create vs update logic using the Gitea contents API.
  • Correct base64 encoding of pretty-printed JSON.
  • Clean credential handling for secure API access.

Import the template into your n8n instance, update the Globals node with your repo details, attach your Gitea Token credential to the HTTP nodes, and activate the schedule trigger. Run a few manual tests, then let automation take over the repetitive backup work.

If you want to go further, you can build on this to commit entire repo trees or switch to Git over SSH instead of the REST API. And if you ever find yourself breaking a workflow on a Friday afternoon, you will be very glad this is quietly running in the background.

Build an AI Newsletter Agent with n8n

Build an AI Newsletter Agent with n8n

Imagine sitting down to write your newsletter and realizing most of the work is already done. The best stories are picked, the sections are drafted in a consistent tone, and the final markdown is ready to ship. That is exactly what this n8n AI newsletter workflow template helps you do.

In this guide, we will walk through how the workflow works, when it makes sense to use it, and how it can quietly take over the repetitive parts of your newsletter pipeline while you stay in control of the editorial decisions.

What this n8n AI newsletter workflow actually does

This template is a full end-to-end newsletter automation pipeline built in n8n. It takes you from raw content to a polished markdown draft that is ready for your email platform or CMS.

At a high level, the workflow:

  • Grabs markdown files and tweet content for a specific date from a storage bucket
  • Filters out anything that has already appeared in previous newsletters
  • Uses large language models (LLMs) to choose the top stories and propose subject lines
  • Enriches each selected story with source text and URLs
  • Writes Axios-style sections for each story with bullets and a bottom line
  • Generates the intro, a shortlist of other notable stories, and several subject line options
  • Assembles everything into a final markdown file and sends it to Slack or your publishing stack

So instead of wrestling with a blank page, you are reviewing and tweaking a strong first draft.

Why bother automating your newsletter?

If you have produced a newsletter for more than a few weeks, you know the drill: gather links, skim articles, avoid repeating yourself, summarize everything, and then format it nicely. It is a lot of small, repetitive tasks that add up.

An AI newsletter agent in n8n helps you:

  • Cut down on manual busywork by automating collection, filtering, and first-draft writing
  • Maintain a consistent voice through repeatable prompts and style rules
  • Iterate faster on ideas, subject lines, and layouts without rebuilding everything from scratch
  • Keep humans in the loop so you still make the editorial calls and approve the final output

The result is not a robot replacing you. It is more like having a very fast assistant who preps everything so you can focus on judgment, nuance, and strategy.

When to use this n8n newsletter template

This workflow is especially useful if:

  • You publish a recurring newsletter (daily, weekly, or monthly)
  • Your content sources are already stored as markdown files, tweets, or similar structured content
  • You want to keep your editorial voice but stop doing the same mechanical steps over and over
  • You are comfortable reviewing and approving AI-generated drafts rather than writing from scratch every time

If that sounds like you, this template gives you a production-ready starting point instead of a blank n8n canvas.

How the n8n newsletter workflow is structured

Let us walk through the core pieces of the workflow, from the moment it is triggered to the final export. Think of it as a series of reusable modules that you can tweak or extend as needed.

1. Trigger and input collection

Everything starts with telling the workflow which edition you are working on.

You can kick off the workflow with:

  • A form trigger where you pass in the target date and the previous newsletter content
  • Or a scheduled trigger if you want it to run automatically on specific days

The workflow then searches your storage bucket (like S3 or Cloudflare R2) for content that matches that date. Typically this includes:

  • Markdown files
  • Tweets or tweet threads

All of this raw content is aggregated and passed along for later filtering, selection, and writing.

2. Content filtering so you do not repeat yourself

Next, filter nodes clean up the incoming content. The workflow:

  • Compares candidate content against the previous newsletter to avoid duplicate coverage
  • Keeps only markdown objects, so you are not mixing in irrelevant file types

This step keeps the feed focused on fresh, date-specific stories and protects you from accidentally featuring the same item across multiple editions.

3. Story selection with LLMs

Once the content is filtered, it is time for the AI to help you decide what is actually worth featuring.

The workflow combines the markdown and tweet content, then sends it through an LLM prompt designed for chain-of-thought selection. The model evaluates each piece for:

  • Relevance
  • Impact
  • Novelty

From there, it outputs a structured list of four top stories, including one primary lead story. The template enforces strict rules so the LLM returns:

  • Identifiers for each selected story
  • External source URLs
  • Clear explanations for why items were included or excluded

This keeps the selection step transparent and machine-readable, which is critical for debugging and later analysis.

4. Content resolution and enrichment

Now that you know which stories to feature, the workflow needs to gather everything required to write about them properly.

For each selected story, n8n:

  • Resolves the content identifiers and fetches the corresponding files from your bucket
  • Extracts plain text from those files
  • Collects any associated external URLs

There is also an optional enrichment step. The pipeline can scrape external URLs to:

  • Pull in extra context and background
  • Fetch images if they are available

By the end of this step, each story has a complete bundle of source material ready for the writing node.

5. Section writing in an Axios-like style

This is where the newsletter starts to feel real. Each story is passed to an LLM writing node with a carefully designed prompt that enforces a specific structure and tone.

For every story, the LLM is asked to produce:

  • A bolded recap at the top
  • Three unpacked bullet points that explain context and implications
  • A short, two-sentence section labeled Bottom line

The style is intentionally similar to an Axios-like tone: clear, punchy, and structured. To keep the AI grounded, the prompt also:

  • Restricts the model to facts that appear in the provided sources
  • Requires that any links included are drawn from the known external URLs

This significantly reduces hallucinations and keeps the writing tethered to your actual source material.

6. Intro, shortlist, and subject line generation

With the main sections drafted, the workflow moves on to the more editorial-feeling pieces.

Dedicated prompt templates generate:

  • A newsletter intro that includes a dynamic greeting and a smooth transition into the main stories
  • A curated list of other top stories that did not make the main sections but are still worth mentioning
  • Several subject line options with reasoning for each suggestion

The workflow then selects a best subject line and generates a pre-header. Both are shared with your editorial team, typically via Slack, so you can quickly review, tweak, or swap them before sending.

7. Final assembly and export

Once all the pieces are ready, n8n assembles the full newsletter.

The workflow:

  • Combines the intro, main sections, and shortlist into a single markdown document
  • Converts that markdown into a file
  • Uploads the file to Slack or your CMS

From there, you can either:

  • Trigger downstream distribution to your email service provider or publishing platform
  • Or treat the exported file as a draft, give it a final editorial pass, and then hit send manually

Design choices, guardrails, and best practices

A workflow like this is powerful, but only if it is designed with the right constraints. Let us look at some key considerations that keep the AI helpful and reliable.

Editorial guardrails

To maintain quality and trust, it is important to be strict about what the LLM is allowed to do. In this template you can:

  • Use filter nodes and explicit prompts to avoid hallucinations and repetitive phrasing
  • Require the model to only quote or link to URLs that appear in the source content
  • Insert an approval step, often via Slack or another human-in-the-loop mechanism, before anything is considered final

These editorial guardrails keep the AI in a supportive role rather than letting it publish unchecked content.

Data provenance and traceability

For serious editorial workflows, you need to know where every claim came from. The template encourages you to keep:

  • Content identifiers
  • External-source URLs
  • Authorship metadata

intact from end to end. This makes it easier to:

  • Trace statements back to original sources
  • Give editors the context they need to verify facts
  • Audit decisions and refine prompts over time

Modularity for easier tweaking

The workflow is intentionally modular so you can adjust it without breaking everything. Core stages like:

  • Ingestion
  • Selection
  • Enrichment
  • Writing
  • Publishing

are designed as separate, reusable units. That means you can:

  • Swap in different language models for testing
  • Experiment with new prompt styles
  • A/B test subject lines or section formats

without having to redesign the entire pipeline.

Rate limits and cost control

Working with LLMs also means you need to think about performance and cost. A few practical strategies built into this approach:

  • Batch LLM calls whenever possible to reduce overhead
  • Use smaller, cheaper models for low-risk tasks like extraction or simple classification
  • Reserve larger, more capable models for creative or high-impact text, such as intros, lead sections, or subject lines
  • Cache external URL fetches so you are not scraping the same page repeatedly

This keeps the workflow responsive and cost effective as your volume grows.

Security and compliance considerations

Even if your newsletter is public facing, the underlying data often is not. Treat your inputs and outputs as sensitive by default.

With this template, you should:

  • Restrict access to the storage bucket that holds your source content
  • Store API credentials securely in n8n credentials, not hard coded in nodes
  • Encrypt exported drafts in transit

If your sources contain any PII, add:

  • An automated redaction step, or
  • A manual review gate before distribution

so you do not accidentally publish sensitive information.

Practical tips for running this template smoothly

Once you import the template and hook up your own sources, a few habits will make your life easier.

  • Start small. Begin with a small, trusted set of feeds to see how the prompts behave before scaling up.
  • Use verbose output while tuning. Let the LLM output be more descriptive and detailed while you are adjusting prompts, then tighten the schema for production.
  • Log decisions. Record why a story was included or excluded in an audit channel. This helps with transparency and future prompt tuning.
  • Empower editors. Expose quick-edit actions, like replacing a headline or swapping sources, as workflow inputs so editors can make changes without touching the underlying automation.

Common issues and how to fix them

Even with a solid template, you will occasionally run into edge cases. Here are some typical failure modes and how to handle them.

Hallucinated links or invented facts

Problem: The LLM adds URLs or details that are not in your original sources.

Mitigation:

  • Enforce strict prompt rules that limit the model to facts and URLs from the provided materials only
  • Add a post-generation validator that checks every URL against the known source list and flags or rejects anything new

Malformed structured output from LLMs

Problem: The model returns JSON or structured data that does not match the expected schema, which can break downstream nodes.

Mitigation:

  • Use an output parser that validates the JSON schema
  • If validation fails, automatically retry generation with corrective instructions to the model

Duplicate coverage across editions

Problem: The same story appears in multiple newsletters.

Mitigation:

  • Compare candidate content identifiers against the previous newsletter’s content field
  • Automatically filter out any matches before the selection step

Where you can take this next

Once your base pipeline feels stable and trustworthy, you can start layering on more advanced automation.

Some natural next steps include:

  • Automatically scheduling publishing to an ESP such as Mailchimp or SendGrid after human approval
  • Running A/B tests on subject lines and feeding open rate data back into the workflow for ongoing optimization
  • Adding multi-language support with translation nodes and localized LLM prompts

Each of these builds on the same core pattern: structured content in, AI-assisted transformation, human review, and automated output.

Wrapping up

By combining n8n with carefully designed LLM prompts and strong editorial guardrails, you can build a reliable AI newsletter agent that saves time and scales your editorial capacity without giving up control.

Provenance tracking, approval gates, modular design, and clear security practices keep the workflow both powerful and safe. Instead of spending hours on repetitive tasks, you spend minutes reviewing a polished draft.

Call to action: Want to try the exact starter workflow described here? Reach out to our team to get the n8n template, sample prompts, and recommended credential setup. And if you are interested in more ways to automate content pipelines with LLMs and no-code tools, make sure to subscribe for future guides.

Build an n8n Newsletter Agent: Automate AI Newsletter Production

Build an n8n Newsletter Agent: Automate AI Newsletter Production

High-frequency newsletters, especially in fast-moving domains like AI, require a repeatable and auditable editorial pipeline. The n8n workflow template for a Content – Newsletter Agent provides exactly that: an end-to-end system that ingests markdown and tweet content, surfaces the most relevant AI stories, drafts newsletter sections, generates subject lines, and prepares the final edition for publishing. This guide explains the architecture of that workflow, the key nodes and integrations, and how to adapt it to your own production environment.

Why automate your newsletter workflow with n8n?

Manual newsletter production does not scale well when you are dealing with multiple content sources, tight deadlines, and the need for consistent editorial standards. An automated newsletter pipeline in n8n helps you:

  • Aggregate multiple inputs such as markdown files, tweet archives, and scraped web pages in a single workflow.
  • Apply editorial rules programmatically, including date filters, deduplication, and format checks.
  • Standardize structure for recurring sections like lead story, shortlists, intros, and summaries.
  • Integrate review and distribution with Slack approval loops and downstream publishing tools.

For teams shipping daily or weekly AI updates, this approach reduces cycle time, removes repetitive work, and enforces a consistent editorial voice.

End-to-end architecture of the Newsletter Agent

The template is organized as a series of logical stages, each implemented as dedicated sections or sub-workflows in n8n. This modular structure improves maintainability and makes it easier to troubleshoot failures in production.

High-level stages

  1. Input and content discovery
  2. Filtering and deduplication
  3. Story selection and ranking with LLMs
  4. Segment writing and section generation
  5. Intro, subject line, and pre-header creation
  6. External scraping and image extraction
  7. Review, file creation, and publishing

The sections below detail the responsibilities and typical nodes used in each stage.

Stage 1: Input and content discovery

The workflow begins by collecting all relevant content for a target publication date. This stage is responsible for defining the scope of the edition and preparing raw material for later processing.

Core triggers and retrieval nodes

  • Form trigger: Accepts the intended publish date and, optionally, the previous newsletter content. This allows the workflow to avoid reusing items that were already covered.
  • S3 search and download: Queries an object store (for example S3) to find markdown documents and tweet archives that match the specified date. These objects typically represent research notes, announcements, or curated social content.
  • Metadata API calls: Fetches metadata for each file or object. The workflow uses this metadata to determine inclusion, track identifiers, and manage downstream linking.

At the end of this stage, the system has a structured set of candidate items, each with associated metadata and raw content, ready for filtering.

Stage 2: Filtering and deduplication

Before any AI-driven selection occurs, the workflow enforces strict filters to ensure that only valid and fresh content proceeds.

  • Format filtering: Non-markdown objects and existing newsletter files are excluded to prevent accidental reprocessing or misclassification.
  • Date enforcement: Only items that match the requested publication date are kept. This avoids including stale or future-dated content.
  • Deduplication logic: The workflow checks for overlap with prior editions, especially when previous newsletter content is provided via the form trigger. This reduces redundant coverage across issues.

These safeguards improve editorial quality and keep the AI story selection focused on the current cycle.

Stage 3: Story selection and ranking with LLMs

Once the candidate set is clean, the workflow uses AI to identify the most important stories and explain why they matter.

AI-driven selection workflow

  • Aggregation of text and tweets: Relevant markdown content and tweet archives are combined into a single context for analysis.
  • LangChain or LLM nodes: The workflow invokes LLM-based nodes to evaluate the aggregated content against editorial guidelines, such as relevance, novelty, and impact.
  • Story ranking and selection: The AI proposes a ranked list of top stories, often with metadata such as category or priority.
  • Structured reasoning capture: Along with the selected stories, the workflow stores a structured chain-of-thought style explanation for inclusion and exclusion decisions. This reasoning is invaluable for transparency, debugging model behavior, and supporting Slack-based editorial review.

By encoding editorial criteria into prompts and schemas, this stage turns raw content into a curated set of newsletter-worthy items.

Stage 4: Segment writing and section generation

For each selected story, the workflow generates a fully formed newsletter segment that adheres to a defined style guide.

Per-story processing steps

  • Identifier resolution: The workflow resolves internal identifiers or references to find the underlying markdown, external links, and relevant tweets.
  • Source aggregation: All related content for a story is combined into a coherent context, including internal notes and external URLs.
  • LLM writing prompts: A writing-focused LLM node uses a prompt that encodes your editorial style. For example, you can specify Axios-style bullets, a “Recap” section, or any other preferred format.
  • Structured output generation: For each story, the model produces:
    • a lead paragraph that frames the story,
    • three unpacking bullets that highlight key details or implications, and
    • a concise two-sentence bottom line.

The result is a consistent set of story segments that can be assembled into a newsletter with minimal manual editing.

Stage 5: Intro, subject line, and pre-header creation

Beyond the individual stories, the workflow also generates the framing elements necessary for email performance and reader engagement.

  • Intro paragraph: A dedicated prompt summarizes the edition, sets context, and highlights the most significant items. It can reference the selected stories and their themes.
  • Subject line generation: Specialized LLM nodes create multiple subject line options, often optimized for clarity and open rates.
  • Pre-header text: The workflow can generate complementary pre-header copy that reinforces the subject line and provides additional context.

These steps typically integrate with human-in-the-loop review via Slack to ensure that the final subject line and intro meet brand and tone requirements.

Stage 6: External source scraping and image extraction

Many stories reference external URLs that can enrich the newsletter with additional context or visual assets. The template includes optional sub-workflows to handle this.

  • Scraper sub-workflow: When a story includes external links, the workflow can call a scraper to retrieve page content and metadata. This allows the LLM to ground its summaries in the actual page text rather than just link titles.
  • Image extraction nodes: Dedicated nodes scan scraped pages for image assets and extract direct image URLs. These can be used for editorial visuals, social sharing, or hero images in the newsletter.

By separating scraping and extraction into sub-workflows, you can reuse this logic for other automations and maintain clear boundaries for failure handling.

Stage 7: Review, file creation, and publishing

The final stage assembles all components into a publishable artifact and routes it through your approval and distribution channels.

  • Markdown assembly: All story segments, the intro, and any additional sections are combined into a single markdown document that represents the full newsletter.
  • File creation and storage: The workflow saves the assembled markdown as a file, typically in object storage or a content repository, with consistent naming and metadata.
  • Slack or channel upload: The draft newsletter is posted to Slack or other communication tools for review, using message formatting that highlights key sections and subject line options.
  • Publishing or scheduling: After approval, the workflow can trigger your email platform or another downstream system to publish or schedule the newsletter.

This stage closes the loop between automation and human oversight, ensuring that editors retain control without manually assembling every edition.

Key design patterns in the template

Modular nodes and sub-workflows

The workflow separates major responsibilities such as ingest, selection, writing, scraping, and publishing into distinct sections or sub-workflows. This modularity:

  • simplifies unit testing and incremental rollout,
  • limits the blast radius of failures, and
  • makes it easier to reuse components in other automations.

Human-in-the-loop editorial checks

Throughout the pipeline, Slack sendAndWait nodes introduce controlled pauses for human review. Typical checkpoints include:

  • approval of selected stories and their reasoning,
  • review of subject line and pre-header options, and
  • final sign-off on the assembled markdown.

This pattern provides quality control and quick feedback cycles without sacrificing the efficiency gains of automation.

Strict schema enforcement and parsing

Output parser nodes enforce structured JSON formats for all LLM outputs, including:

  • story lists and rankings,
  • intro and section content, and
  • subject line candidates with associated metadata.

By validating that each AI response matches a defined schema, the workflow reduces ambiguity, catches failures early, and ensures that downstream aggregation and rendering are reliable.

Implementation and customization best practices

1. Start with a narrow scope

In production environments, it is advisable to introduce automation in phases. A common path is:

  1. Automate ingestion, filtering, and story selection first.
  2. Validate selection quality against human-curated baselines.
  3. Add automated drafting and subject line generation once you are confident in the upstream stages.

2. Stabilize prompts and schemas

For LLM-based steps, treat prompts and schemas as core infrastructure:

  • Keep prompts explicit, with clear instructions on style, tone, and structure.
  • Use strict JSON schema parsers for every LLM output that downstream nodes depend on.
  • Fail fast when schema validation fails, rather than silently accepting malformed outputs.

3. Version control your prompts

Store prompt templates in files under version control and reference them from the workflow. This approach:

  • enables A/B testing of prompt variants,
  • provides an audit trail for changes, and
  • simplifies rollback if a new prompt negatively affects quality.

4. Guard against hallucinations and incorrect links

To maintain factual integrity:

  • Restrict the model to using only information present in the ingested content.
  • Do not allow the LLM to invent links or external references.
  • When external URLs are included, require a scraping or verification step before inserting them into the final output.

5. Design robust error handling

Differentiate between critical and non-critical failures:

  • Use onError: continueRegularOutput for non-critical nodes, such as optional image extraction, so the newsletter can still be produced.
  • Fail hard and alert on issues that affect identifier lists, URL integrity, or schema validation, since these can corrupt the final edition or break links.

Testing and monitoring the workflow

Before moving to full production, validate the pipeline with a structured checklist:

  • Are story identifiers preserved exactly as in the source metadata?
  • Do all LLM outputs conform to the expected JSON schema and include required fields?
  • Are external URLs passed through unchanged from the original sources?
  • Does the Slack approval flow reach the correct reviewers and handle responses as intended?
  • Are images extracted as direct image URLs instead of HTML pages or thumbnail wrappers?

Continuous monitoring of these aspects will help you catch regressions early when prompts or dependencies change.

Security, privacy, and compliance considerations

Production-grade newsletter automation must align with security and compliance standards.

  • Credential management: Store secrets in n8n credentials or environment variables rather than embedding them directly in workflows.
  • Web scraping compliance: Respect robots.txt, site terms, and licensing constraints when scraping external sources.
  • Data protection: Avoid exposing sensitive or internal-only content in public channels such as open Slack workspaces. Apply redaction or filtering where necessary.

Example use cases in production environments

  • Daily AI newsletter that consolidates research notes, product announcements, and social signals into a consistent format for subscribers.
  • Weekly industry roundup for enterprise clients, combining curated commentary, external links, and visual assets.
  • Internal executive briefings that compile top internal documents and external articles into a digest for leadership teams.

Conclusion

An n8n-based Newsletter Agent provides a robust, transparent pipeline for converting raw content into a polished, high-quality newsletter. By combining modular workflow design, strict schema enforcement, and targeted human review steps, teams can scale their publishing cadence without sacrificing editorial standards.

Interested in deploying this for your organization? If you need a customized version of this n8n template, we offer consultancy and prompt engineering services to align the workflow with your editorial style, infrastructure, and volume requirements. Contact us for a tailored implementation roadmap.

Call to action: Schedule a free 30-minute consultation to map your current content sources to an automated n8n pipeline and receive a step-by-step migration plan.

AI Logo Sheet Extractor to Airtable

AI Logo Sheet Extractor to Airtable: Enterprise-Grade Logo Intelligence with n8n

Logo landscapes, market maps, and vendor sheets are rich with competitive intelligence, yet they are difficult to operationalize at scale. The AI Logo Sheet Extractor to Airtable workflow template for n8n transforms static logo sheets into structured, queryable data with minimal manual effort.

Using an AI vision and language agent, this workflow ingests an uploaded logo-sheet image, extracts product or tool names, identifies attributes and similarity relationships, then creates or updates records in Airtable. The result is a continuously updated, normalized database of tools and attributes that can power research, analytics, and monitoring workflows.

Overview of the Automation

At a high level, the workflow connects a public form endpoint in n8n to an AI agent and an Airtable backend. The process is fully automated from file upload to database update:

  • A user submits a logo sheet via a form endpoint.
  • An AI agent analyzes the image and outputs structured JSON with tools, attributes, and similar tools.
  • The workflow validates and normalizes the output.
  • Attributes and tools are upserted into Airtable, with relationships created between them.

Why Automate Logo Sheet Extraction?

Manually transcribing logo sheets into spreadsheets or databases is slow, inconsistent, and prone to errors. For teams that regularly analyze vendor maps or competitive landscapes, automation delivers clear advantages:

  • Consistent extraction of tool names and contextual attributes from images.
  • Automatic detection of similarity or competitor relationships encoded in the layout.
  • Reliable upserts into Airtable tables for Tools and Attributes, with proper linking.
  • Scalability to process many logo sheets with very limited manual intervention.

Key Workflow Components in n8n

The template is built from a sequence of n8n nodes that together implement a robust extraction and upsert pipeline.

Primary Nodes and Responsibilities

  • On Form Submission Public form trigger that exposes an HTTP endpoint for file upload. Users can submit a logo-sheet image and an optional free-text prompt for additional context.
  • Map Agent Input Prepares the payload for the AI agent. It maps the uploaded image and any user-provided prompt into the structure expected by the agent node.
  • Retrieve and Parser Agent (LangChain / OpenAI) Vision-enabled AI agent that reads the logo sheet and generates structured JSON. It returns a list of tools, each with associated attributes and similar tools.
  • Structured Output Parser Validates and normalizes the AI output into a predictable JSON schema. This step reduces downstream failures by enforcing a consistent structure.
  • Attribute Creation Loop Iterates through extracted attributes, checks for their existence in Airtable, and creates any missing attribute records.
  • Tools Upsert Generates deterministic hashes for tool names, then creates or updates tool records in Airtable. It also links tools to attributes and to their similar tools.

AI Output Format

The AI agent is instructed to return a strictly structured JSON object. A typical response looks like:

{  "tools": [  {  "name": "airOps",  "attributes": ["Agentic Application", "AI infrastructure"],  "similar": ["Cognition", "Gradial"]  },  {  "name": "Pinecone",  "attributes": ["Storage Tool", "Memory management"],  "similar": ["Chroma", "Weaviate"]  }  ]
}  

This predictable schema is critical for reliable Airtable mapping and for maintaining idempotent behavior across workflow runs.

Airtable Data Model and Mapping Logic

Recommended Airtable Schema

The workflow assumes an Airtable base with two core tables:

  • Tools Fields:
    • Name (single line text)
    • Hash (single line text, deterministic key from tool name)
    • Attributes (linked records to Attributes)
    • Similar (linked records to Tools)
    • Description (optional)
    • Website (optional)
    • Category (optional)
  • Attributes Fields:
    • Name (single line text)
    • Tools (linked records to Tools)

Deterministic Hashing for Idempotent Upserts

To avoid duplicate tool records when the same logo appears on multiple sheets or the same sheet is processed again, the workflow computes a deterministic MD5 hash of each tool name.

This hash is used as a stable matching key for upserts:

  • If a tool with the same hash exists, the workflow updates it.
  • If not, a new tool record is created.

This pattern ensures idempotent behavior and significantly reduces the risk of duplicate entries in Airtable.

End-to-End Setup Guide

1. Configure Airtable and Credentials

  1. Create the Tools and Attributes tables with the fields described above.
  2. Generate an Airtable Personal Access Token.
  3. Add this token as an Airtable credential in n8n, following your standard secrets management practices.

2. Expose the Form Trigger in n8n

The workflow uses a form trigger endpoint (for example at path /logo-sheet-feeder) to accept input:

  • Enable file uploads for the logo-sheet image.
  • Optionally, provide a text field for a custom prompt or context, such as target industry or specific labeling instructions.

3. Configure the AI Agent Prompt

Within the Retrieve and Parser Agent node, the system message should clearly define the task and output schema. The agent should be instructed to:

  • Extract every visible product or tool name from the image.
  • Derive a list of attributes for each tool, such as category, functionality, platform, or integration type.
  • Identify and list similar or competitive tools that appear near each tool on the logo sheet.
  • Return a valid JSON object that strictly follows the expected schema.

Best practice: include a few representative examples of logo sheets and desired JSON outputs directly in the system prompt. This significantly improves consistency and reduces hallucinations. If you are using OpenAI models like gpt-4o, ensure that:

  • Vision capabilities are enabled for your account.
  • The node is configured to accept image inputs.

4. Test, Observe, and Refine

After configuration, submit a sample logo sheet through the form endpoint:

  • Inspect the execution in n8n, node by node.
  • Review the AI agent output for completeness and correctness.
  • Verify that Airtable records are created or updated as expected, including links between Tools and Attributes and the Similar relationships.

If tools are missed or attributes look incomplete, refine the prompt, improve image quality, or add additional examples to the system message.

Operational Tips, Quality Controls, and Troubleshooting

Image Quality Considerations

The accuracy of AI extraction is tightly coupled to image quality:

  • Use higher resolution images where logos and text are legible.
  • Avoid heavy compression or artifacts that obscure text.
  • Prefer logo sheets with sufficient contrast between background and logos.

Handling Ambiguous or Unreadable Logos

When the AI model cannot confidently read a logo or name, it may skip that entry. For high-stakes use cases:

  • Add a manual review step downstream to validate or enrich extracted data.
  • Use a secondary agent that flags low-confidence items for human verification.

Prompt Engineering Best Practices

To improve reliability:

  • Provide multiple labeled examples that mirror your typical logo-sheet layouts.
  • Include negative examples that explicitly show what incorrect output looks like.
  • Reinforce constraints, such as requiring valid JSON and adherence to the exact schema.

Scaling, Rate Limits, and Resilience

For large batches of logo sheets or very high-resolution images:

  • Monitor API rate limits for your AI provider.
  • Add retry and exponential backoff logic around the AI agent node and Airtable operations.
  • Consider queuing or scheduling to smooth out peak loads.

Advanced Extensions and Enhancements

Once the base workflow is in place, you can extend it with additional automation patterns:

  • Multi-agent validation: Run a second AI agent to cross-check the first agent’s output and reconcile discrepancies.
  • OCR fallback: Integrate Tesseract or a cloud OCR service to capture small or low-contrast text that the vision model might miss.
  • Automated category taxonomy: Extend the attribute creation logic to map tools into a controlled category taxonomy and apply tags automatically.
  • Analytics and dashboards: Build Airtable or BI dashboards to visualize competitive clusters, category coverage, and market evolution over time.

Security and Privacy Considerations

Logo sheets may include proprietary branding or sensitive contextual information. To operate responsibly:

  • Ensure images are handled in line with your organization’s data governance and compliance requirements.
  • Keep your Airtable Personal Access Token secret and store it as an environment variable or secure credential in n8n.
  • If processing third-party or regulated content, validate that your AI provider and deployment model align with relevant regulations and contractual obligations.

Typical Use Cases

  • Competitive research Convert industry landscape images into a searchable Airtable base for rapid competitor analysis.
  • Product cataloging Ingest vendor lists, partner maps, or ecosystem diagrams and build a structured inventory of tools and capabilities.
  • Market monitoring Periodically process updated vendor charts to identify new entrants, category shifts, and ecosystem changes.

Sample Workflow Output

Below is an excerpt representative of a real run from the workflow’s pinned data:

{  "tools": [  {  "name": "airOps",  "attributes": ["Agentic Application", "AI infrastructure"],  "similar": ["Cognition", "Gradial"]  },  {  "name": "Pinecone",  "attributes": ["Storage Tool", "Memory management"],  "similar": ["Chroma", "Weaviate"]  }  ]
}  

Conclusion and Next Steps

The AI Logo Sheet Extractor to Airtable workflow is a practical, production-ready starting point for turning static logo sheets into structured, relational data. With a well-designed prompt, appropriate image quality, and optional validation layers, you can achieve high accuracy and move towards a near zero-touch process.

To get started, configure the Airtable schema, import the template into n8n, connect your Airtable and AI credentials, and submit your first logo sheet. From there, you can iterate on prompts, add validation, and integrate the resulting data into your broader analytics or automation stack.

Call to Action

If you would like the exact n8n workflow file or need help tailoring this automation to your specific research or product operations use case, reach out or download the template from the project repository. In a few minutes, you can go from raw logo sheets to a structured Airtable database ready for analysis.