Automate Golf Bookings with n8n (Step-by-Step)

Automate Golf Bookings with n8n: A Step-by-Step Guide

This guide explains how to use an n8n workflow template to fully automate golf coaching and game booking requests. The workflow orchestrates Google Sheets, scheduled triggers, JavaScript Code nodes, and SMTP email delivery, with a strong focus on secure handling of sensitive data. It is intended for automation professionals, n8n power users, and operations teams who want a robust, repeatable booking process.

Overview of the Golf Auto Booking Workflow

The Golf Auto booking template automates the end-to-end process of generating and sending booking requests to a concierge or golf club. Instead of manually checking a spreadsheet and composing emails, the workflow:

  • Reads booking entries from a Google Sheet.
  • Applies timing logic to determine when a request should be sent.
  • Calculates a target booking date, typically the next Sunday or a date 5 days in the future.
  • Formats the date into a human-friendly string, for example 25th May 2025.
  • Builds personalized HTML email bodies for each person or family.
  • Sends the email from the relevant sender account via SMTP.

The result is a consistent, auditable, and low-maintenance automation that reduces manual effort and minimizes the risk of errors or missed bookings.

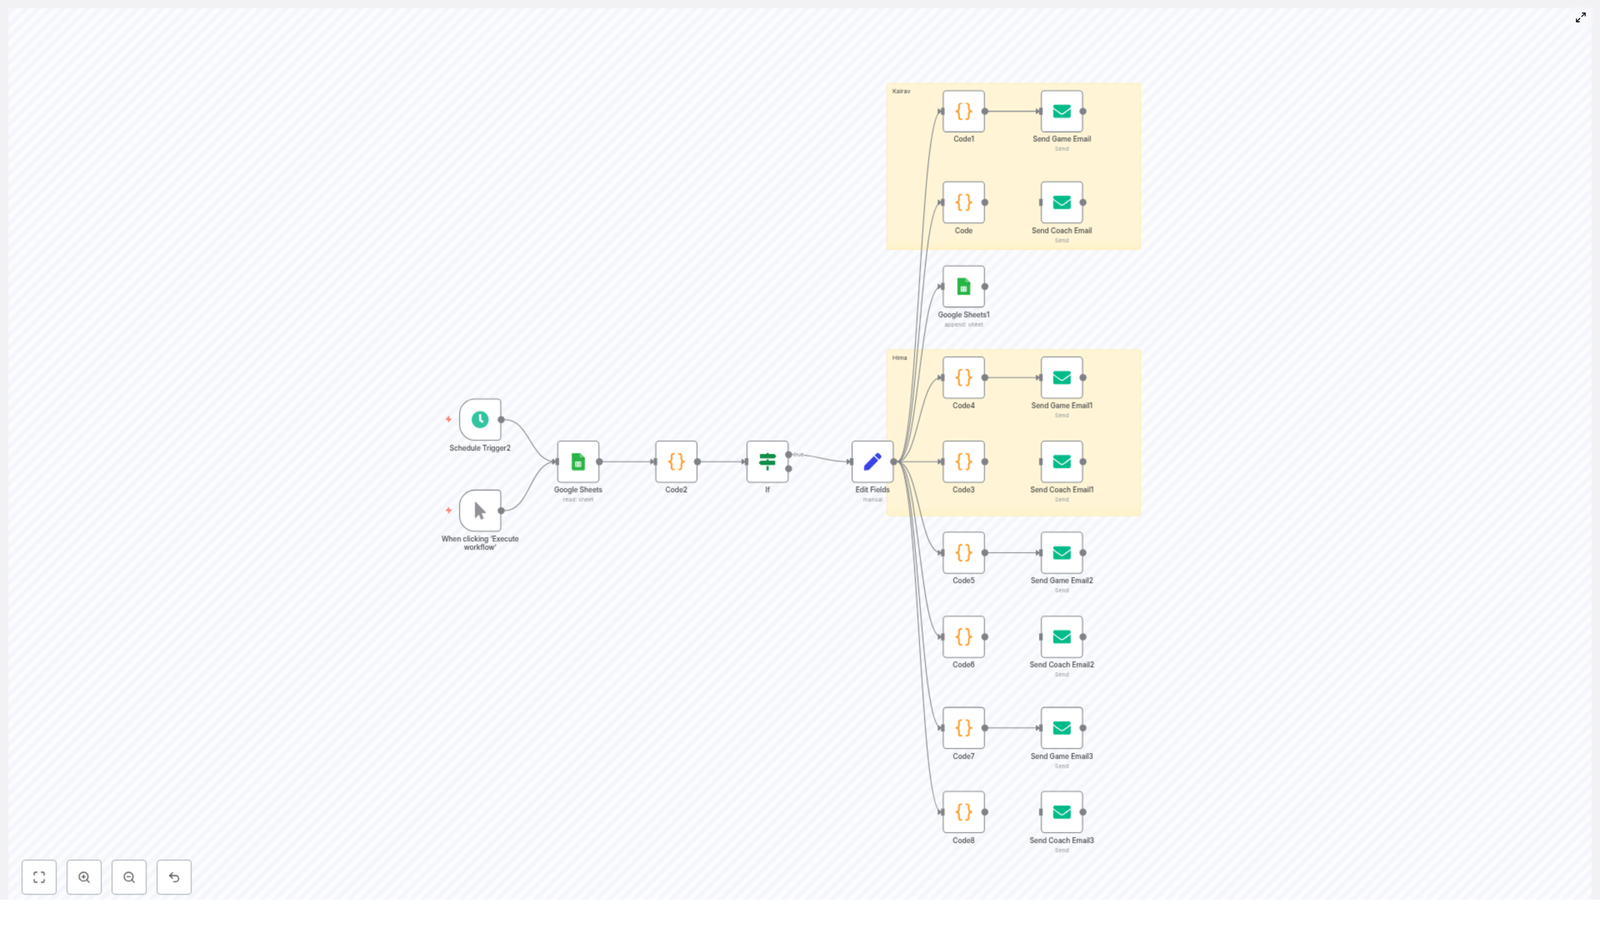
Core Architecture and Key Nodes

The workflow combines several n8n node types to implement scheduling, data access, business logic, and outbound communication. The main components are:

Triggering and Control

  • Schedule Trigger – Runs the workflow automatically based on a cron expression, for example every day at a specific time. The template is configured for the Asia/Kolkata timezone by default and can be adapted to any timezone as required.
  • Manual Trigger – Allows you to start the workflow on demand, which is useful for initial setup, debugging, and regression testing after changes.
  • If node – Evaluates conditions to determine whether a booking entry should be processed, for example whether the row was created on the current day or whether it has already been handled.

Data Storage and Mapping

  • Google Sheets (Read / Append) – Acts as the primary data store for booking requests. The workflow reads rows that contain new or pending bookings and can append metadata such as a processed timestamp or status flag.
  • Set / Edit Fields – Normalizes and maps fields from Google Sheets into a structure that downstream Code and Email nodes can consume. This is where you define which columns correspond to names, dates, coach fields, or card details (for the last 4 digits only).

Business Logic and Email Generation

  • Code nodes (JavaScript) – Implement the core logic:
    • Perform date arithmetic and timezone adjustments.
    • Calculate the booking date (for example 5 days from now or the next Sunday).
    • Format dates with ordinal suffixes (st, nd, rd, th) and readable month names.
    • Generate customized HTML email bodies for each individual or family, with variants for coaching sessions and general games.
  • Email Send (SMTP) – Sends the generated HTML emails to the concierge or club using the appropriate sender address. Each sender is configured with its own SMTP credential.

Date, Timezone, and Formatting Logic

Accurate date calculation is central to the workflow. The template uses a timestamp that represents a date 5 days in the future, typically stored in a field such as afterFiveDays. Code nodes convert this timestamp to a JavaScript Date object and then derive several values:

  • The correctly formatted day number with an ordinal suffix, for example 1st, 2nd, 3rd, 4th.
  • The full month name using the locale, for example May.
  • A final formatted string, for example 25th May 2025, which is embedded in the HTML email.

The workflow also includes logic to handle timezones, particularly to compute reference times such as 8:00 AM IST from UTC-based timestamps. This ensures that booking requests are aligned with the local time expectations of the club or concierge.

Example Date Formatting Function

The following sample function illustrates how the day suffix and month name are calculated in a Code node:

function formatDate(dateObj) {  const day = dateObj.getDate();  const month = dateObj.toLocaleString('default', { month: 'long' });  const j = day % 10, k = day % 100;  let suffix = 'th';  if (j === 1 && k !== 11) suffix = 'st';  else if (j === 2 && k !== 12) suffix = 'nd';  else if (j === 3 && k !== 13) suffix = 'rd';  return `${day}${suffix} ${month}`;
}

In the template, this logic is integrated into broader Code nodes that also compute values such as nextSundayISO and return the final formattedDate string to downstream nodes.

Personalized Email Composition and Delivery

The workflow is designed to handle multiple senders and recipient contexts. For example, it can send booking requests on behalf of different families or individuals such as Kalrav, Hima, Minaben, and Jasubhai. For each of these, there are two main variants:

  • Coaching session email – Includes a coach field and structured details relevant to a coaching booking.
  • General game email – Focuses on tee times and game details without a coach attribute.

Each relevant Code node returns a structured output that typically includes:

  • emailBody – The complete HTML body of the email, including the formatted date and any personalized fields such as names, phone numbers, or last 4 digits of a card.
  • formattedDate – The human-readable date string used inside the email.
  • nextSundayISO – An ISO-formatted date for internal use or logging.

The corresponding Email Send (SMTP) nodes then use these fields to send the email to the concierge address from the appropriate sender account. Each sender account is mapped to its own SMTP credential, which is configured in n8n’s credentials manager.

Step-by-Step Configuration Guide

To deploy and adapt the Golf Auto booking template in your own n8n environment, follow these steps.

1. Import and Inspect the Workflow

  1. Import the provided workflow JSON into your n8n instance.
  2. Open the workflow and review the high-level structure, including triggers, Google Sheets nodes, Code nodes, and Email Send nodes.

2. Configure Credentials

  1. Set up a Google Sheets OAuth2 credential with access to the workbook that stores your booking data.
  2. Configure SMTP credentials for each sender email account that will be used to send booking requests.
  3. Store all credentials in n8n’s credential manager, not in Code nodes or environment variables that are committed to source control.

3. Connect Google Sheets

  1. Open each Google Sheets node and specify:
    • The spreadsheet ID for your booking workbook.
    • The sheet name or gid where booking rows are stored.
  2. Ensure that column headers in the sheet match the expectations of the workflow, for example:
    • timestamp for the time the entry was created.
    • Columns for name, phone, coach, and any other required fields.
  3. If you plan to track processed bookings, verify that the node responsible for appending or updating rows is configured with the correct columns for status and processed timestamps.

4. Adjust Scheduling and Timezone Settings

  1. Open the Schedule Trigger node and edit the cron expression to match your operational schedule, for example daily at 7:00 AM local time.
  2. Review the workflow timezone setting. The template uses Asia/Kolkata by default. Change this to your primary timezone if required, and align any date calculations in Code nodes accordingly.

5. Customize Business Logic and Email Content

  1. Open the relevant Code nodes and adjust:
    • Names, family identifiers, and contact numbers.
    • Last 4 digits of the card used for identification (never full card numbers).
    • Preferred times, for example 8:00 am or 9:00 am.
    • Location text, coach names, and any other contextual information.
  2. Update the HTML structure in the email templates if you want to match a specific branding or format, while keeping the dynamic placeholders for formattedDate and other personalized fields.

6. Test and Validate

  1. Use the Manual Trigger to run the workflow with sample data.
  2. Inspect node outputs in the n8n execution view to confirm:
    • Google Sheets rows are read correctly.
    • Date calculations and formattedDate values are accurate.
    • HTML email bodies are generated as expected.
  3. Send test emails to a non-production address and verify rendering, personalization, and sender details.
  4. If you are appending data back to Google Sheets, confirm that processed rows are correctly updated and that duplicate processing is avoided.

Security and Privacy Best Practices

The workflow may handle personal and payment-related data, including cardholder names, last 4 digits of payment cards, and dates of birth. Automation professionals should treat this data carefully and apply security-by-design principles.

  • Limit stored card data – Never store full card numbers or CVV codes in Google Sheets or any plain-text system. Restrict storage to the last 4 digits only, and only if needed for identification.
  • Restrict access – Use least-privilege access for both the Google Sheets file and the n8n instance. Apply role-based access control so only authorized users can view or modify sensitive workflows and data.
  • Use PCI-compliant providers – For any transaction flows that touch payment data, integrate with PCI-compliant gateways or tokenization services. Do not handle full PAN or CVV in this workflow.
  • Protect credentials – Store SMTP and Google credentials in n8n’s credential manager or environment variables managed by your infrastructure. Never hard-code credentials in Code nodes or workflow parameters.
  • Comply with data protection laws – Review and comply with applicable regulations such as GDPR or regional privacy laws before storing or processing personal data. Define retention and deletion policies for booking data.

Troubleshooting and Operational Monitoring

When running this workflow in production, you will occasionally need to diagnose issues related to email delivery, date logic, or Google Sheets access. The following checks are recommended.

  • Email not sending
    • Verify that SMTP credentials are valid and active.
    • Confirm that the configured sender addresses are allowed by your email provider. Some providers restrict automated or scripted sending.
    • Check for rate limits or spam filters that might block outbound messages.
  • Incorrect date formatting or timing
    • Inspect the value of afterFiveDays and other date fields passed into the Code nodes.
    • Confirm that timezone settings in the workflow and in any date calculations are aligned.
    • Use the execution logs to view intermediate values like formattedDate and nextSundayISO.
  • Google Sheets errors
    • Check OAuth scopes to ensure the credential has read and write access to the target spreadsheet.
    • Verify the spreadsheet ID and sheet gid or name.
    • Confirm that the sheet has the expected header row and that column names match the workflow configuration.
  • Debugging logic issues
    • Use n8n’s execution logs to inspect JSON output at each node.
    • Temporarily add console.log-style debug statements inside Code nodes to surface critical values.

Extending and Scaling the Workflow

Once the base template is stable, you can extend it to support additional channels, approval flows, and monitoring capabilities. Some practical extensions include:

  • SMS confirmations – Integrate with Twilio or another SMS provider to send a confirmation message to the player after the email request is sent.
  • Approval steps – Add a Webhook-based approval flow or a simple UI step where a concierge or admin can confirm or reject a slot, then update the Google Sheet with a confirmation status.
  • Retry and error logging – Implement automatic retries for failed email sends and write failures to a dedicated sheet or logging system for manual review.
  • Calendar integration – Connect to Google Calendar or another calendar API to create actual events for each confirmed booking, ensuring end-to-end visibility for players and staff.

Conclusion and Next Steps

The Golf Auto booking template demonstrates how n8n can orchestrate scheduled triggers, Google Sheets, JavaScript logic, and SMTP to automate a real-world booking process. By standardizing date calculations, personalizing email content, and enforcing security best practices, the workflow delivers reliable and repeatable automation for golf clubs, concierges, and private groups.

To get started, import the template into your n8n instance, configure your Google Sheets and SMTP credentials, and run a manual test to validate the end-to-end flow. You can reuse the date-formatting function and HTML email patterns in your own workflows if you prefer to integrate this approach into a broader automation stack.

Need help tailoring this workflow to your club or team? Reach out or leave a comment and we will help you adapt the automation to your specific booking rules, data model, and infrastructure.

Automate Golf Booking with n8n & Google Sheets

Automate Golf Booking with n8n & Google Sheets

From Manual Chores To Effortless Golf Bookings

If you love golf but dread the constant back-and-forth of booking coaching sessions or tee times, you are not alone. Manually tracking dates, sending emails, double-checking card details and remembering who needs what booking each week can quietly eat up your energy and focus.

This is exactly where automation becomes a powerful ally. With a simple yet flexible n8n workflow, Google Sheets and SMTP email, you can turn a repetitive admin chore into a smooth, reliable system that runs in the background while you focus on your game, your work or your family.

In this article, you will walk through that journey. You will start with the problem, shift into what is possible with the right mindset, then explore a practical n8n template that automates golf bookings from end to end. Use this as a starting point to build your own automated ecosystem, one workflow at a time.

Why Automate Your Golf Bookings?

Every recurring task is an opportunity to reclaim time. Golf bookings are a perfect example. Once you automate them, you unlock:

  • Freedom from repetition – No more typing the same booking emails week after week.
  • Fewer mistakes – Standardized booking details reduce errors in dates, times or card-holder info.
  • Consistency for everyone – Family members or multiple players get the same quality of service, every time.
  • Scalability – As bookings grow, your workload does not. The workflow simply handles more data.

Instead of reacting to each booking need, you design a system once and let n8n take care of the rest. That shift from “doing” to “designing” is where real productivity and peace of mind begin.

Adopting An Automation Mindset

Before diving into nodes and code, it helps to approach this workflow with the right mindset:

  • Start small, think big – This golf booking flow might be your first step, but the same pattern can later power other automations for your home, work or club.
  • Iterate, do not aim for perfection – Launch a basic version, then refine date logic, email wording or sheet structure as you learn.
  • Let data guide improvements – As the workflow runs, your logs and sheets will show where to enhance timing, reliability or personalization.

With that mindset, the template below becomes more than a single-use tool. It becomes a building block in a growing automated workflow ecosystem.

The n8n Golf Booking Template At A Glance

This n8n workflow connects three main components:

  • Google Sheets as your booking log and trigger source.
  • n8n core nodes for scheduling, logic, transformation and code.
  • SMTP email nodes to send polished HTML booking requests to your concierge or club.

The flow reads booking triggers from your sheet, calculates the target booking date, builds a standardized HTML email with booking and card-holder details, and sends it automatically. You can run it on a schedule or on demand, and you can easily extend it for more people, more locations or different booking types.

Step 1 – Triggers That Respect Your Time

Schedule Trigger and Manual Trigger

The workflow usually starts with a Schedule Trigger node. You can configure it to run at a specific time each day, for example every morning, to check whether a new booking should be created. This keeps your bookings proactive and consistent.

Alongside that, a Manual Trigger is included for ad-hoc runs. If you want to test changes, or quickly send a one-off booking request, you can trigger the workflow whenever you like.

Together, these triggers give you both automation and control, so you are never locked into a rigid system.

Step 2 – Using Google Sheets As Your Booking Brain

Google Sheets (Read & Append)

Google Sheets acts as the central source of truth for your golf bookings. In this template, the sheet:

  • Stores your booking-tracking log and trigger data.
  • Provides the timestamp or conditions that tell n8n when to create a new booking.
  • Can record a timestamp after a booking is scheduled, so you avoid sending duplicates.

The workflow uses a Google Sheets node to read the latest rows, analyze whether a booking is due, then optionally append a new entry or timestamp once the booking email has been sent. This simple sheet-driven approach makes the system easy to inspect and modify without touching code.

Step 3 – Smart Date Logic That You Control

Code Nodes (JavaScript)

Accurate dates are the backbone of any booking automation. In this workflow, Code nodes with JavaScript handle all the date logic in one place so you can maintain and adjust it easily.

These nodes are used to:

  • Parse the spreadsheet timestamp and compute the difference in days from the current date.
  • Decide whether a booking should be created based on that difference.
  • Calculate the booking target date, such as an afterFiveDays date or the next Sunday, depending on your preference.
  • Set a fixed booking time, for example 8:00 AM or 9:00 AM local time, and convert it into an ISO timestamp for reliable storage and comparison.
  • Format the date into a friendly string like 25th May with the correct ordinal suffix (1st, 2nd, 3rd, 4th) and full month name for the email.
  • Construct the HTML email body, including booking and card-holder details, in a structured and reusable way.

By centralizing this logic in code nodes, you get a clear, maintainable place to fine-tune how and when your bookings are created without rewriting the rest of the flow.

Step 4 – Directing The Flow With Clear Decisions

If Node (Decision)

Not every run of the workflow should send an email. The If node acts as your decision gate.

For example, the workflow can:

  • Check the time difference between now and the last entry in the sheet.
  • Proceed only if that difference meets your criteria for creating a new booking.

This simple decision step prevents duplicate booking requests and ensures that every email sent has a clear purpose.

Step 5 – Preparing Clean, Reusable Data

Set Node (Edit Fields)

To keep your workflow organized, a Set (Edit Fields) node is used to shape and map data for the later steps. Here you can:

  • Store the computed booking date and time.
  • Define recipient email addresses.
  • Set placeholders for card-holder and verification details.

This makes your email nodes simpler, more readable and easier to duplicate when you want to support additional family members or booking types.

Step 6 – Sending Polished HTML Booking Emails

Email Nodes (SMTP)

Finally, one or more SMTP email nodes send your booking request to the concierge or club. The template:

  • Builds a consistent HTML email body using the values prepared in previous nodes.
  • Supports separate flows for coach and game bookings, so your messages stay clear and correctly labeled.
  • Allows multiple sender accounts, so you can send emails on behalf of different family members while keeping everything in one workflow.

Once set up, you can trust that every outgoing email includes the right details, formatting and tone without you typing a single line each time.

Designing The Email Experience

Sample Email Structure

The workflow constructs a structured HTML email so your concierge receives all the information needed in one clean message. A typical email includes:

  • Greeting and purpose – A short introduction that clarifies the email is a booking request.
  • Booking details – Coach or game type, date, time and location so there is no confusion.
  • Verification details – Card-holder name, last four digits, registered mobile and date of birth, with careful handling of sensitive information.
  • Closing and contact information – A polite sign-off and any additional contact details if needed.

You can easily customize the wording to match your personal style or your club’s standard format while keeping the structure intact.

Staying Secure While You Automate

Security & Privacy Best Practices

Because this workflow can include card-holder verification data, it is important to follow security best practices as you scale it:

  • Avoid full card numbers – Never store complete card numbers in Google Sheets or emails. Use only the last 4 digits for verification.
  • Protect sensitive credentials – Use secure vaults like environment variables, HashiCorp Vault or n8n credentials for SMTP logins and API keys.
  • Limit sensitive data in logs – Mask or redact personal information in logs or shared spreadsheets, especially if others have access.

By combining automation with thoughtful security, you create a system that is both powerful and trustworthy.

Scaling Your Workflow For Families, Teams Or Clubs

Scaling The Workflow

Once the basic flow is running smoothly, you can expand it to handle more people and more complexity without adding more manual work.

  • Multiple tabs or columns – Use a dedicated Google Sheet tab for each family member or booking type, or add columns to map recipient and booking type.
  • Parameterized settings – Make coach name, location and time configurable so different templates can share the same code nodes.
  • Resilient email delivery – Add retry logic or exponential backoff in case of SMTP failures, so temporary issues do not block bookings.
  • Audit-friendly logging – Log outgoing emails and responses, and store receipt IDs or timestamps in a hidden sheet column for easy tracking.

These enhancements turn a personal helper into a robust booking system that can support a household, a team or even a club.

Keeping Things Running Smoothly

Troubleshooting Tips

As you experiment and adapt this workflow, you might occasionally run into issues. Here are some focused checks to keep you moving forward:

  • Unexpected dates – If dates look off, double-check timezone handling in your code nodes. The sample workflow uses IST offset logic when scheduling bookings for 8:00 AM IST.
  • Email delivery problems – When emails do not send, review your SMTP credentials and the email node’s error messages. For Gmail, confirm that SMTP is allowed and that OAuth or app passwords are configured correctly.
  • Empty or incorrect sheet data – If Google Sheets returns empty rows, adjust the range configuration or use a fixed range so the workflow reads only valid data.

Each small fix you make increases your confidence and helps you build more advanced automations later.

Adapting The Template To Your Style

How To Adapt The Workflow

This template is intentionally flexible so you can shape it around your life and your club’s processes. Common customizations include:

  • Adjusting the trigger cadence – Edit the Schedule Trigger’s cron expression to run more or less frequently, or at times that fit your routine.
  • Adding more recipients – Duplicate the email nodes and map different sender credentials for each family member or player.
  • Switching data sources – Replace Google Sheets with Airtable, PostgreSQL or another datastore using the corresponding n8n integration nodes.

Every tweak you make teaches you more about n8n and sets you up to automate other parts of your personal or business workflows.

Your Next Step In The Automation Journey

Conclusion

Automating golf bookings with n8n, Google Sheets and SMTP email nodes is more than a convenience. It is a practical example of how you can move from manual repetition to intentional systems that support your goals.

With a few core building blocks – schedule triggers, sheet integrations, code nodes for date logic and structured email nodes – you create a reliable, repeatable booking process that can serve multiple people and booking types without extra effort each week.

Once you experience how much time and mental space this single workflow saves, you will start to see other areas of your life and work that are ready for automation too.

Start Automating Your Golf Bookings Today

Call To Action

If you want to explore this in your own setup, you do not have to start from a blank canvas. You can use the existing n8n template as a foundation, then customize it for your club, residence or family.

Need help tailoring it or integrating it into a larger system? Reach out for support or guidance, or download the example workflow and experiment at your own pace.

Take your first step now:

  • Export or prepare your Google Sheet with booking data.
  • Configure your SMTP credentials securely in n8n.
  • Paste and adapt the date-formatting code nodes from the template.
  • Run a manual test, verify the email output, then switch on the schedule.

Each run of this workflow is a reminder that your time is valuable and that automation can support the life and work you actually want to focus on.

n8n LinkedIn Scraper with Bright Data & Gemini

n8n LinkedIn Scraper with Bright Data & Google Gemini

Imagine grabbing a LinkedIn profile, cleaning it up, and turning it into a structured JSON resume in just one automated flow. No copying, no pasting, no manual parsing. That is exactly what this n8n workflow template does for you.

Using Bright Data to reliably fetch LinkedIn pages and Google Gemini to understand and structure the content, this workflow turns public LinkedIn profiles into clean JSON resumes plus a separate skills list. It is perfect if you are working on recruiting automation, resume parsing, or building searchable candidate profiles.

What this n8n LinkedIn scraper actually does

At a high level, this template:

  • Takes a LinkedIn profile URL as input
  • Uses Bright Data to scrape the profile content (in markdown or HTML)
  • Feeds that content to Google Gemini to turn messy markup into readable text
  • Extracts a structured JSON Resume from that text, including experience, education, and more
  • Pulls out a dedicated skills list for search and matching
  • Saves the results and sends notifications via webhook and Slack

So instead of manually reviewing profiles, you get machine-readable data that can plug straight into your ATS, analytics, or search tools.

When you would want to use this workflow

This template is especially handy if you:

  • Run a recruiting or staffing operation and need consistent resume data
  • Build internal tools for talent search or candidate matching
  • Want to analyze skills across a large pool of LinkedIn profiles
  • Need a repeatable way to turn public LinkedIn data into JSON resumes

Because Bright Data handles the page retrieval and Gemini handles the semantic parsing, the workflow is resilient to layout differences and minor changes in LinkedIn profiles.

How the workflow is structured

The n8n workflow runs through a series of stages that each handle one piece of the pipeline:

  • Input & config – you provide the LinkedIn URL, Bright Data zone, and notification webhook
  • Scraping – Bright Data retrieves the profile as markdown or raw content
  • Text cleanup – Google Gemini converts that content into clean, plain text
  • Resume extraction – a JSON Resume extractor structures the candidate data
  • Skill extraction – a dedicated extractor builds a focused skills list
  • Storage & alerts – results are written to disk and sent out via webhook/Slack

Let us walk through each stage in n8n so you know exactly what is happening and where you can tweak things.

Step-by-step walkthrough of the n8n nodes

1. Manual Trigger & Set node – feeding the workflow

You start with a Manual Trigger node so you can easily test the workflow. Right after that, a Set node stores the key inputs you will reuse throughout the flow:

  • url – the LinkedIn profile URL you want to scrape (the template ships with an example URL you can replace)
  • zone – your Bright Data zone name, for example static
  • webhook_notification_url – the endpoint that should receive the final structured data

This makes it easy to swap in different profiles or zones without digging into multiple nodes.

2. Bright Data HTTP Request – scraping the LinkedIn profile

Next comes the HTTP Request node that talks to the Bright Data API. This is where the actual scraping happens.

Key settings to pay attention to:

  • Set the request method to POST
  • Include the zone and url in the request body, using the values from the Set node
  • Choose the response format, for example:
    • raw with data_format=markdown works well to get a cleaned version of the page
  • Configure authentication using headers or bearer token credentials, stored securely in n8n Credentials

Once this node runs, you have the LinkedIn profile content in a structured format that is much easier for an LLM to understand.

3. Markdown to Textual Data with Google Gemini

The scraped content still contains markup and layout noise, so the next step is to feed it into a Google Gemini LLM node.

Here, you give Gemini a prompt that tells it exactly what you want:

  • Return plain textual content only
  • Strip out links, scripts, CSS, and any extra commentary
  • Keep important structure like headings, work history, and education sections intact

The goal is to transform messy markdown or HTML into a clean narrative that still reflects the profile sections. This makes the next extraction step much more accurate.

4. JSON Resume Extractor – turning text into structured data

Now that Gemini has produced readable text, a structured extraction node takes over and converts that text into a standardized JSON Resume format.

This node uses a JSON schema that typically includes:

  • basics – name, contact details, summary
  • work – companies, positions, dates, responsibilities, highlights
  • education – schools, degrees, dates
  • awards, publications, certificates
  • skills, languages, interests, projects

By enforcing a consistent schema, you make it easy to index, store, and compare resumes across your whole candidate pool.

5. Skill Extractor – building a clean skills list

Skills are often the most important part for search and matching, so the template includes a dedicated Skill Extractor node.

This node reads the profile text and outputs a focused array of skills, usually with optional descriptions. The result looks something like this:

[  { "skill": "JavaScript", "desc": "Frontend development, Node.js" },  { "skill": "Data Analysis", "desc": "ETL, cleaning, visualization" }
]

You can use this list directly for tagging, filters, or search queries in your ATS or internal tools.

6. Binary & Storage nodes – saving your results

Once you have both the JSON Resume and the skills array, the workflow moves on to storage.

Here is what typically happens:

  • Convert the JSON payloads to binary where needed for file operations
  • Write the file to disk or to a storage bucket

In the template, the skills JSON is written as an example file at d:\Resume_Skills.json. You can easily adjust the path or swap in cloud storage like S3 or GCS, depending on your environment.

In addition, the structured data is also sent out to a webhook so that other systems can react to it right away.

7. Notifications via Webhook & Slack

Finally, the workflow lets you know when everything is done.

Two main notifications are included:

  • An HTTP Request node that sends the structured JSON to your webhook_notification_url
  • A Slack node that posts a summary message to a channel of your choice

This makes it easy to trigger downstream processing, update your ATS, or simply alert your team that a new profile has been parsed.

Setting up your environment & credentials

Before you hit run in n8n, make sure you have the following pieces in place:

  • A Bright Data account with a configured zone Store your API key securely in n8n Credentials.
  • Google PaLM / Gemini API access These credentials power the LLM nodes that do the text transformation and extraction.
  • OpenAI credentials (optional) Only needed if you want to swap in or combine OpenAI models with Gemini.
  • A webhook endpoint for notifications You can use a service like webhook.site for testing.
  • Correct storage permissions for writing files locally or to cloud buckets

Once these are configured in n8n, you can import the template, plug in your credentials, and start testing with a sample LinkedIn URL.

Staying legal & ethical

Before you put this into production, it is important to think about compliance and responsible use. Make sure you:

  • Respect LinkedIn’s terms of service and any relevant scraping regulations where you operate
  • Follow data protection laws such as GDPR and CCPA when you process personal data

Use this workflow only for publicly available data, obtain consent where required, and apply rate limits plus respectful crawling practices to avoid overloading services.

Troubleshooting & performance tips

Things not looking quite right on the first run? Here are some practical tweaks:

  • If Gemini returns odd formatting or leftover HTML, adjust your prompts to explicitly strip links, metadata, and artifacts.
  • Experiment with Bright Data zone options, such as static vs JavaScript-rendered pages, depending on how complex the profile layout is.
  • Keep an eye on costs. Both Bright Data requests and LLM tokens can add up, so:
    • Batch requests where possible
    • Use sampling or limits when you are testing at scale
  • Add retry logic and exponential backoff to HTTP nodes to handle temporary network or API timeouts gracefully.

Ideas for extending the pipeline

Once you have the basic LinkedIn scraping and resume extraction working, you can build a lot on top of it. For example, you could:

  • Index JSON resumes into Elasticsearch or a vector database for semantic search and candidate matching
  • Enrich profiles with:
    • Company data
    • Skills taxonomy normalization
    • Certification verification
  • Aggregate skills from multiple profiles to create talent pools and skills heatmaps
  • Add deduplication and scoring logic to rank candidates by relevance for a particular role

This template is a solid foundation you can adapt to whatever recruiting or analytics stack you are building.

Sample JSON Resume output

To give you a feel for the final result, here is a simplified example of the JSON Resume format the workflow produces:

{  "basics": { "name": "Jane Doe", "label": "Software Engineer", "summary": "Full-stack developer" },  "work": [{ "name": "Acme Corp", "position": "Senior Engineer", "startDate": "2019-01-01" }],  "skills": [{ "name": "JavaScript", "level": "Advanced", "keywords": ["Node.js","React"] }]
}

Your actual schema can be extended, but this gives you a clear, machine-readable view of the candidate profile that is easy to index and query.

Wrapping up

This n8n LinkedIn scraper template shows how you can combine Bright Data for reliable profile retrieval with Google Gemini for powerful semantic parsing. The result is a scalable way to turn LinkedIn pages into high-quality JSON resumes and skills lists that plug straight into your automation and analytics workflows.

Next steps:

  • Import the template into your n8n instance
  • Configure your Bright Data, Gemini, and notification credentials
  • Run the flow on a test LinkedIn profile
  • Refine prompts or schema mappings so the output matches your exact data needs

Try the template in your own stack

Ready to stop copying and pasting LinkedIn profiles by hand? Spin up this template in your n8n instance and see how much time you save.

If you want to adapt the pipeline for your specific recruiting stack or analytics setup, feel free to customize the nodes, extend the schema, or plug in your own storage and search tools. And if you need deeper help or more advanced recipes, you can always reach out to the team or subscribe for updates.

Build a WhatsApp Chatbot with n8n & LangChain

Build a WhatsApp Chatbot with n8n & LangChain: Turn Your Website Into a Business Encyclopedia

Imagine if every guest question, every routine inquiry, and every “What time is check-out?” could be answered instantly, accurately, and with a friendly tone – without you or your team lifting a finger. That is the promise of this n8n workflow template.

In this guide, you will walk through a reusable n8n workflow that automatically scrapes your business website, turns it into a clean, deduplicated Business Encyclopedia, and powers a reliable WhatsApp AI concierge using LangChain and Google Gemini. It is especially powerful for hotels, restaurants, and service businesses that want a single, trustworthy source of truth for automated guest support.

Think of this template as a stepping stone. Once you set it up, you will not just have a chatbot. You will have the foundation for a more automated, focused way of working, where your time is freed up for the work that actually grows your business.

Keywords: WhatsApp chatbot, n8n workflow, business encyclopedia, LangChain, hotel AI agent, AI concierge, support automation.


The starting point: why traditional chatbots fall short

Most people try a support chatbot once and walk away disappointed. The answers feel generic, wrong, or outdated. Behind the scenes, there are two core problems:

  • The bot hallucinates or “makes things up” instead of admitting it does not know.
  • The information it relies on is scattered, stale, or not clearly connected to your real website content.

When a guest is asking about check-in times, parking, or cancellation policies, “close enough” is not good enough. You need a system that respects your information, stays within the facts, and gracefully escalates to a human when needed.

This is where the n8n WhatsApp chatbot template comes in. It is designed to be:

  • Grounded in your actual website content.
  • Defensive against hallucinations and guesswork.
  • Reusable and easy to adapt to different businesses and use cases.

Instead of starting from scratch, you start from a workflow that has already solved the hardest parts for you.


Shifting your mindset: from answering questions to building a knowledge asset

Before we dive into nodes and triggers, it helps to reframe what you are really building.

You are not just creating a WhatsApp chatbot. You are creating a Business Encyclopedia – a structured, traceable, always-available knowledge base that your AI agent can safely rely on. Once this exists, you can plug it into WhatsApp, your website, internal tools, or any other channel you choose.

This mindset shift matters because:

  • You stop treating support as a series of one-off answers and start treating it as a repeatable system.
  • You gain a single source of truth that your team and your AI can both trust.
  • You open the door to more automation over time, without losing control over accuracy.

The template you are about to explore is the bridge between that mindset and a concrete, working implementation in n8n.


The big picture: how the n8n WhatsApp chatbot workflow works

At a high level, this n8n workflow template has two main layers working together:

  1. Scrape & Build Encyclopedia (green layer) – turns your website into a structured Business Encyclopedia.
  2. WhatsApp Chatbot Agent (yellow layer) – uses that encyclopedia to answer real user questions via WhatsApp.

Both layers are designed to be reusable and extensible, so you can improve them as your business evolves.

Layer 1: Scrape & Build Encyclopedia (green layer)

This layer is responsible for transforming your website into a clean, deduplicated knowledge base. It includes:

  • Form trigger – Receives the website URL that you want to process.
  • map_website_urls – Crawls the site to discover pages and sitemap entries.
  • split_urls & exclude_media – Breaks the discovered URLs into scrape tasks and filters out media or irrelevant endpoints.
  • scrape_url – Downloads each page’s content and metadata.
  • aggregate → set_scraped_content – Combines all scraped content into a single payload.
  • build_encyclopedia – Uses a LangChain chain with an LLM to synthesize a deduplicated, traceable Business Encyclopedia.
  • set_encyclopedia_result – Stores the final encyclopedia so the chatbot can use it later.

Layer 2: WhatsApp Chatbot Agent (yellow layer)

This layer connects your Business Encyclopedia to real conversations on WhatsApp:

  • message_trigger / chat_trigger – Listens for incoming WhatsApp messages or chat events.
  • WhatsApp AI Agent – A LangChain agent that reads from the Business Encyclopedia and crafts responses.
  • gemini-2.5-pro – The LLM model node (Google Gemini) used in the template to generate answers.
  • memory (optional) – Short-term buffer to keep context for each WhatsApp user, so conversations feel more natural.
  • send_reply_message – Sends the final answer back to the user’s WhatsApp number.

Together, these layers let you move from a static website to a living, conversational AI concierge that is grounded in your real content.


Design principles: accuracy, integrity, and trust

This workflow is built with a very specific philosophy: the AI should never be more confident than your data. That is why the following constraints are baked into the design:

  • Single source of truth: All answers must be sourced from the Business Encyclopedia. The agent does not rely on external web search or unrelated knowledge bases as primary sources.
  • No invention: If a detail is missing from the encyclopedia, the agent is instructed not to make it up. Instead, it clearly states that the information is unavailable.
  • Human escalation: When the encyclopedia does not contain a requested detail, the agent guides the user to a human contact, such as a front desk phone number or a support email.
  • Professional tone: Responses are designed to be friendly, clear, and concierge-style, suitable for hospitality and service businesses.

This approach might feel stricter at first, but it is what builds long-term trust with your guests or customers. They quickly learn that if the bot answers, it is because the answer is actually known.


Diving deeper: what each key node is responsible for

map_website_urls (Firecrawl)

The map_website_urls node explores your site structure using Firecrawl. It looks at pages and sitemaps to figure out what should be scraped.

To get the best results:

  • Configure sensible limits to avoid overly aggressive crawling.
  • Use sitemap support if your website has a well-maintained sitemap.
  • Balance thoroughness with performance, especially for large sites.

scrape_url (Firecrawl)

The scrape_url node is where each page is actually fetched. It pulls down HTML and extracts useful metadata and text (often in markdown format).

For reliability:

  • Enable retry logic to handle temporary network issues.
  • Set reasonable timeouts so a single slow page does not block the entire workflow.

build_encyclopedia (LangChain chain)

This is your workflow’s “brain” for knowledge synthesis. The build_encyclopedia node runs a deterministic LangChain chain that turns messy, overlapping website content into a clean, structured Support Encyclopedia.

The prompt and logic in this node enforce several important behaviors:

  • Stable IDs: Each entry uses a kebab-case slug so you can reference it consistently.
  • Traceability: Every fact is linked back to its source page IDs, so you know where it came from.
  • Contradiction reporting: If different pages disagree, the node explicitly flags the contradiction instead of silently picking a side.
  • Unknowns are explicit: Missing data is marked as UNKNOWN, rather than invented.

This is what turns your scraped content into a dependable Business Encyclopedia that the WhatsApp AI agent can trust.


From encyclopedia to conversation: how the WhatsApp flow feels

Once the encyclopedia is built and stored, the yellow layer comes to life. Here is how a typical interaction flows:

Sample conversation: “What time is check-out?”

  1. message_trigger captures the incoming WhatsApp message and the user’s ID.
  2. The WhatsApp AI Agent searches the Business Encyclopedia for entries related to Check-In / Check-Out & Front Desk.
  3. If the encyclopedia contains the check-out time (for example, 12:00 PM), the agent replies with a friendly, clear message, optionally including a citation or escalation contact.
  4. If the encyclopedia does not contain that detail, the agent responds with something like:
    “I do not have that specific detail in our hotel encyclopedia. Please contact reception at +39 089875733 or booking@leagavipositano.com.”

The result is a chatbot that feels both capable and honest. It saves you time on routine questions and gracefully hands off edge cases to your team.


Best practices: launching your n8n WhatsApp chatbot with confidence

To get the most out of this template and keep it stable in production, keep these best practices in mind.

Responsible crawling and updating

  • Respect robots.txt: Configure Firecrawl to honor robots.txt and any crawl-delay directives.
  • Rate-limit crawls: Use limits and delays to avoid overloading your website server.
  • Schedule rebuilds: Plan periodic encyclopedia rebuilds (daily, weekly, or monthly) depending on how often your site changes.

Keep the model focused

  • Restrict model access: In production, do not allow the agent to browse the open web or tap into unrelated knowledge bases.
  • Enforce citations: Ensure prompts require the agent to base answers explicitly on encyclopedia entries.

Maintain a human safety net

  • Include escalation paths: Keep phone numbers, emails, or front desk contacts in the encyclopedia so the bot can redirect users when needed.
  • Log interactions: Store user queries and agent responses for auditing, improvement, and safety checks.

Security, privacy, and compliance: building trust into your automation

As you scale automation, trust becomes your most important asset. This workflow touches both website content and user messages, so consider the following:

  • Secure storage: Store scraped website content and the generated encyclopedia in encrypted storage where possible.
  • Data minimization: Avoid storing personal data from user messages unless it is necessary and aligned with your policies.
  • Regional compliance: Follow rules like GDPR when processing or transferring user data, and provide a way to purge user-specific logs upon request.

Getting these foundations right makes it easier to expand your automation later without running into compliance headaches.


Troubleshooting: sharpening your workflow over time

Part of the power of n8n is that you can iterate quickly. If something does not behave as expected, you can adjust and improve. Here are some common issues and what to check:

  • Pages missing from the encyclopedia: Review your map_website_urls node settings, sitemap coverage, and crawl limits.
  • Inconsistent answers: Inspect the build_encyclopedia node output for flagged contradictions or ambiguous data.
  • Hallucinated responses: Tighten the agent prompt to require exact-match citations from the encyclopedia, and disable any open-domain or fallback knowledge sources.

Each improvement you make is an investment in a more reliable, scalable support system.


Use cases: where this template creates real leverage

Although this workflow is demonstrated with hospitality in mind, it is flexible enough to support many scenarios where accurate, repeatable answers matter.

  • Hotel and hospitality AI concierge: Answer questions about check-in, check-out, amenities, spa hours, restaurant times, and local recommendations.
  • Local business support: Provide instant information about menus, opening hours, parking, policies, or event details.
  • Enterprise knowledge layer: Give customer support teams a reliable first-line AI that handles common questions before escalating to human agents.

Each use case starts with the same foundation: your website, turned into a Business Encyclopedia, accessed through a WhatsApp chatbot built on n8n and LangChain.


Your next step: turn this template into your automated concierge

You do not need to build everything from scratch. The template is ready for you to adapt and extend.

How to get started

  1. Export the n8n workflow template.
  2. Connect your web crawling credentials (for example, Firecrawl) so the workflow can map and scrape your site.
  3. Set your model credentials for Google Gemini or an equivalent LLM compatible with LangChain.
  4. Configure your WhatsApp provider so the message_trigger and send_reply_message nodes can send and receive real messages.
  5. Start with a sandbox website or a staging version of your site to validate scraping and encyclopedia synthesis.

Once you see your first successful conversation, you will have proof that your website can power a real-time, always-on, AI-driven concierge.

Keep iterating and expanding

After the initial setup, consider:

  • Adding booking links or reservation flows directly from the chatbot.
  • Enabling multi-language support so guests can interact in their preferred language.
  • Enhancing traceability with richer citations or logs for internal review.

If you want support tailoring this flow to your business, you can reach out for guidance, custom integrations, or a walkthrough of the template.

Start today: clone the workflow, run a test scrape, and watch your WhatsApp AI Agent deliver reliable, source-backed answers that free up your time and elevate your guest experience.


Author: The Recap AI – Practical templates and guides for building reliable AI-driven support. For consultancy and custom integrations, reply on WhatsApp or email our team.

Map Typeform to Pipedrive with n8n Automation

Map Typeform to Pipedrive with n8n Automation

Collecting structured responses in Typeform is only the first step. The real value appears when those responses are normalized, enriched, and delivered into your CRM in a predictable way. This documentation-style guide describes an n8n workflow template that transforms Typeform submissions into Pipedrive records, including an Organization, Person, Lead, and Note. It explains how to map human-readable Typeform answers to Pipedrive custom property option IDs, configure webhooks, and test the workflow safely.

1. Workflow overview

This n8n automation connects Typeform to Pipedrive using a series of nodes that perform field normalization, value mapping, and record creation. At a high level, the workflow:

  1. Receives completed Typeform submissions via a Typeform Trigger node.
  2. Normalizes and renames key fields using a Set node.
  3. Maps a human-readable company size answer to a Pipedrive custom field option ID in a Code node.
  4. Creates a Pipedrive Organization and sets a custom property for company size.
  5. Creates a Pipedrive Person linked to the Organization.
  6. Creates a Pipedrive Lead associated with both the Organization and Person.
  7. Creates a Pipedrive Note that stores the original form context for sales follow-up.

The workflow is fully visual within n8n and can be extended with additional business logic, enrichment services, or conditional routing as needed.

2. Why automate Typeform to Pipedrive with n8n?

Manually copying data from Typeform into Pipedrive is slow, repetitive, and error-prone. Automating this flow with n8n provides:

  • Consistent field mapping between Typeform questions and Pipedrive entities.
  • Faster lead routing by creating Organizations, People, Leads, and Notes in real time.
  • Configurable logic for mapping options like company size to Pipedrive custom field option IDs.
  • Extensibility so you can add enrichment, scoring, or notification steps without rewriting the integration.

Because n8n is node-based and visual, this template is a solid foundation that you can inspect, debug, and modify as your CRM process evolves.

3. Architecture and data flow

The workflow follows a linear, event-driven architecture triggered by Typeform webhooks. The data flow is:

  1. Inbound webhook from Typeform delivers the raw submission payload to n8n.
  2. Field normalization maps Typeform question labels to internal keys such as company, name, email, employees, and questions.
  3. Value mapping converts the textual employees answer (for example, < 20) into a Pipedrive custom field option ID (pipedriveemployees).
  4. Pipedrive Organization is created using the normalized company name and the mapped company size ID.
  5. Pipedrive Person is created and linked to the Organization using the returned org_id.
  6. Pipedrive Lead is created and associated to both the Organization and Person via their IDs.
  7. Pipedrive Note is created and attached to the Lead to preserve the original questions and answers for context.

Each node receives the output of the previous node, so failures or misconfigurations in one step typically surface immediately in the next. n8n’s execution data view can be used to inspect intermediate payloads during testing.

4. Node-by-node breakdown

4.1 Typeform Trigger node

Purpose: Start the workflow whenever a Typeform response is submitted.

Configuration steps:

  • Add a Typeform Trigger node to your n8n canvas.
  • Configure the node with:
    • Form ID: the Typeform form you want to listen to.
    • Webhook ID / URL: n8n will provide a webhook URL. Copy this URL into your Typeform form’s webhook settings.
  • In Typeform, enable the webhook for the target form and paste the n8n webhook URL.

Once configured, the node fires each time a respondent fully completes the form. The incoming JSON payload contains all question-answer pairs, metadata, and respondent details that you can reference in downstream nodes.

4.2 Set node – normalize incoming fields

Purpose: Extract specific fields from the Typeform payload, then rename them to stable, internal keys for easier use throughout the workflow.

In the Set node, you define new properties and map them from the Typeform response structure. Example mappings:

  • company → Typeform question: “What company are you contacting us from?”
  • name → Typeform question: “Let’s start with your first and last name.”
  • email → Typeform question: “What email address can we reach you at?”
  • employees → Typeform question: “How many employees?”
  • questions → Typeform question: “Do you have any specific questions?”

Using consistent keys like company, name, and employees simplifies expressions in later nodes and reduces coupling to the exact Typeform question labels.

4.3 Code node – map company size to Pipedrive option IDs

Purpose: Convert the human-readable company size answer from Typeform into a Pipedrive custom field option ID that Pipedrive expects.

Pipedrive stores option-type custom fields (for example, dropdowns or single-selects) internally as numeric option IDs. The Code node acts as a mapping layer between the text values from Typeform and these numeric identifiers.

Execution mode: Configure the Code node to run in runOnceForEachItem mode so each submission is processed independently.

Example JavaScript:

switch ($input.item.json.employees) {  case '< 20':  $input.item.json.pipedriveemployees = '59';  break;  case '20 - 100':  $input.item.json.pipedriveemployees = '60';  break;  case '101 - 500':  $input.item.json.pipedriveemployees = '73';  break;  case '501 - 1000':  $input.item.json.pipedriveemployees = '74';  break;  case '1000+':  $input.item.json.pipedriveemployees = '61';  break;
}
return $input.item;

This script reads the normalized employees value and sets a new property pipedriveemployees that contains the correct Pipedrive option ID.

Important: Replace the numeric IDs (59, 60, etc.) with your own Pipedrive option IDs. You can find these in Pipedrive under custom field settings for the relevant Organization field.

Edge case to consider: If a new answer option is added in Typeform or the text value changes, it will not match any case in the switch statement and pipedriveemployees will remain undefined. This typically results in the custom field not being set in Pipedrive. During testing, inspect the Code node output to verify that every possible answer is mapped correctly.

4.4 Pipedrive node – Create Organization

Purpose: Create a new Organization in Pipedrive and populate the company size custom field using the mapped option ID.

Add a Pipedrive node configured for the Organization resource and the Create operation.

Key parameters:

  • name: Use the normalized company field from the Set node or Code node. For example:
    {{$node["Map company size"].json["company"]}}
  • additionalFields → customProperties:
    • Set the Organization custom field that holds company size to the pipedriveemployees value from the Code node.

This ensures that the Organization is created with the correct company-size value in Pipedrive using the internal option ID instead of the human-readable label.

The node output includes the created Organization object, including its id, which is required in the next node to link the Person.

4.5 Pipedrive node – Create Person linked to the Organization

Purpose: Create a Person contact in Pipedrive and associate it with the Organization created in the previous step.

Add another Pipedrive node configured for the Person resource and the Create operation.

Key parameters:

  • name: Use the normalized name field from the Set node.
  • email: Use the normalized email field from the Set node.
  • org_id: Reference the id returned from the Create Organization node. This links the Person to the correct Organization.

The Person node output will include the new Person’s id, which is required when creating the Lead.

4.6 Pipedrive node – Create Lead and attach a Note

Purpose: Create a Lead in Pipedrive associated with both the Organization and Person, then store contextual details as a Note.

Lead creation:

  • Add a Pipedrive node configured for the Lead resource and the Create operation.
  • Set:
    • organization_id: Use the Organization id from the Create Organization node.
    • person_id: Use the Person id from the Create Person node.

After the Lead is created, the node output includes the Lead id, which you will use for the Note.

Note creation:

  • Add another Pipedrive node configured for the Note resource and the Create operation.
  • Attach the Note to the Lead using the Lead id from the previous node.
  • In the Note content, include:
    • The original questions and answers from the Typeform submission.
    • The interpreted company size or any additional context that is useful for sales teams.

This Note gives sales and account teams immediate context about what the respondent asked and how they described their company.

5. Configuration and testing guidelines

5.1 Pipedrive and Typeform credentials

  • Ensure that your Pipedrive credentials in n8n (API token or OAuth) have sufficient permissions to create Organizations, Persons, Leads, and Notes.
  • Verify that your Typeform credentials and webhook configuration are correct so that events are reliably delivered to n8n.

5.2 Safe testing strategy

  • Use a sandbox or staging Pipedrive account where possible. This prevents cluttering production with test data and avoids hitting production quotas.
  • Send test submissions from Typeform and inspect the n8n execution data to confirm:
    • All normalized fields (company, name, email, employees, questions) are populated correctly.
    • The Code node sets pipedriveemployees for every expected answer.
    • Pipedrive nodes receive valid IDs and return successful responses.
  • Log incoming payloads during early testing using:
    • A Debug or similar node to inspect the raw JSON payload.
    • Temporary logging to a file or external store if you need to compare multiple runs.

5.3 Field mapping maintenance

  • If you change Typeform question labels or add new choices, update:
    • The Set node mappings so the correct values are assigned to company, name, email, employees, and questions.
    • The Code node switch cases if you adjust company size ranges or labels.
  • If you modify Pipedrive custom fields, confirm that:
    • The internal custom field key in Pipedrive still matches what you configure in the Pipedrive node.
    • The option IDs used in the Code node are still valid and correspond to the correct options.

5.4 Error handling and resilience

  • Workflow error handling:
    • For non-critical steps, you can enable continue on fail in relevant nodes to prevent a single failure from stopping the entire run.
    • For critical failures, consider creating a dedicated error workflow in n8n that is triggered when executions fail.
  • Notifications:
    • Optionally add Slack or email notification nodes to alert your team when a submission cannot be synced to Pipedrive.
  • API limits and permissions:
    • If you encounter Pipedrive API limits or authentication errors, verify the Pipedrive node credentials and check rate limit or quota information in your Pipedrive account.

5.5 Duplicate detection considerations

This template creates new records for each submission. If your respondents can submit the form multiple times, you may want to add additional logic:

  • Check for an existing Organization by name or domain before creating a new one.
  • Check for an existing Person by email before creating a new contact.
  • Implement deduplication rules in Pipedrive or add n8n logic to skip or merge duplicates.

These enhancements are not part of the base template but are common extensions in production environments.

6. Extending and customizing the workflow

6.1 Data enrichment

To improve lead quality before inserting data into Pipedrive, you can:

  • Call enrichment APIs such as Clearbit or similar services between the Code node and the Create Organization node.
  • Use the enriched data to populate additional Organization or Person fields in Pipedrive.

6.2 Conditional routing and segmentation

Use n8n’s Switch or If nodes to:

  • Route enterprise-sized companies (for example, large employees ranges) to a specific Pipedrive pipeline.
  • Trigger immediate notifications to an account executive or sales channel for high-value leads.

6.3 Centralized field mapping configuration

To simplify maintenance of Typeform-to-Pipedrive mappings:

  • Store your mapping (for example,

Automate Unsplash to Pinterest with n8n

Automate Unsplash to Pinterest with n8n: A Story of One Marketer’s Breakthrough

On a rainy Tuesday afternoon, Mia stared at her Pinterest dashboard and sighed.

She was the solo marketer at a growing design studio, and Pinterest was supposed to be their secret traffic engine. The problem was simple and painful: every day, she hunted for fresh images on Unsplash, copied links, wrote new descriptions, tried to remember keywords, logged everything in a spreadsheet, then finally created pins. By the time she finished, she had barely enough energy left to think about strategy.

“There has to be a better way,” she muttered, watching her cursor blink over yet another blank pin description field.

That was the moment she decided to automate the entire Unsplash to Pinterest pipeline. Her search led her to an n8n workflow template that promised exactly what she needed: a way to capture Unsplash images and metadata, enrich them with AI, and send everything into a structured system that could power Pinterest posts automatically.

This is the story of how Mia went from manual chaos to a scalable, intelligent n8n workflow that used a webhook, Cohere embeddings, Supabase vector storage, and a RAG agent to generate Pinterest-ready content with an audit log and error alerts.

The Problem: Great Images, No Time, and Zero Context

Mia’s workflow looked familiar to many marketers:

  • Browse Unsplash for visual inspiration
  • Copy image URLs, titles, and tags into a spreadsheet
  • Write new Pinterest descriptions from scratch
  • Try to remember SEO keywords and brand tone each time
  • Hope nothing got lost between tools and tabs

Her pins were beautiful, but the process was slow and brittle. There was no audit log, no consistent metadata, and no way to reuse context from past images. If she forgot why she chose a particular image or how it performed, she had nothing structured to look back at.

What she really needed was:

  • A way to store and retrieve contextual metadata for each image
  • Automatic generation of pin titles and descriptions with an LLM
  • A reliable log of everything that happened, plus alerts when something failed

When she found an n8n template that connected a Webhook trigger to a Retrieval-Augmented Generation (RAG) agent, using Cohere embeddings and Supabase vector storage, it felt like the missing piece. The template promised to take raw Unsplash metadata, turn it into vectors, use a vector store to retrieve context, and let an AI agent generate Pinterest-friendly copy, all logged in Google Sheets with Slack alerts on failure.

The Plan: Build an Intelligent Unsplash to Pinterest Pipeline

Mia did not want another fragile script. She wanted a robust automation that could grow with her content library. The n8n workflow template she discovered was built around a clear pattern:

Webhook → Text Splitter → Embeddings → Supabase Vector Store → RAG Agent → Google Sheets Log → Slack Alert

Instead of manually juggling tools, this pipeline would:

  • Accept a POST request with Unsplash image data
  • Split and embed the text using Cohere
  • Store vectors in Supabase for semantic search
  • Use a Vector Tool and RAG Agent to generate descriptions
  • Log everything to Google Sheets
  • Ping Slack if anything went wrong

She decided to set up the exact template and adapt it to her studio’s needs.

Setting the Stage: Credentials and Checklist

Before touching any nodes in n8n, Mia grabbed a notebook and listed what she would need. The template’s setup checklist guided her:

  1. Create API keys for:
    • Cohere (for embeddings)
    • OpenAI (for the chat model)
    • Supabase (for vector storage)
    • Google Sheets (for logging)
    • Slack (for alerts)
  2. Provision a Supabase project with pgvector enabled
  3. Create a table and index named unsplash_to_pinterest
  4. Secure the webhook endpoint with a secret token or IP allowlist
  5. Plan a small test payload before connecting live Unsplash traffic

Once credentials were ready and Supabase was configured, she imported the n8n template and stepped into the flow that would change her daily routine.

Rising Action: Walking Through the n8n Workflow as a Story

The Entry Point: Webhook Trigger

In Mia’s new world, nothing started with copy-paste. It started with a simple HTTP request.

At the top of the workflow sat the Webhook Trigger node. Its path was set to /unsplash-to-pinterest, and it was configured to accept POST requests. This was where her Unsplash integration, or any scheduled job, would send image metadata.

She tightened security by using a signing secret and an IP allowlist so only trusted services could call this endpoint. That way, every time a new Unsplash image was selected, a structured payload could kick off the whole automation.

Her test payload looked like this:

{  "image_id": "abc123",  "title": "Sunset over coastal cliffs",  "description": "A dramatic sunset over rocky cliffs with warm orange light.",  "tags": ["sunset", "coast", "landscape"],  "unsplash_url": "https://unsplash.com/photos/abc123"
}

With a single POST, the story of each image began.

Breaking the Text Down: Text Splitter

Next in the chain was the Text Splitter. Mia had never thought about chunking text before, but embeddings work best when content fits within model limits.

The template came configured with:

  • chunkSize = 400
  • chunkOverlap = 40

This meant long descriptions or aggregated metadata would be split into overlapping segments, perfect for downstream embedding. For her typical Unsplash descriptions, these defaults worked well, but she knew she could adjust them later if her metadata grew longer or shorter.

Giving Text a Shape: Embeddings with Cohere

The story continued in the Embeddings (Cohere) node. Here, the text chunks from the splitter were turned into vector representations that captured semantic meaning.

The node used the embed-english-v3.0 model. Mia added her Cohere API key in the node credentials and watched as each chunk of description, title, and tags was transformed into a set of numbers that could later power semantic search.

These embeddings would become the backbone of her intelligent Pinterest descriptions, allowing the system to find related content and context as her library grew.

Where Memory Lives: Supabase Insert and Supabase Query

Now that the text had been embedded, Mia needed a place to store it. The template used Supabase as a vector store, and this was where her new content memory would live.

The Supabase Insert node wrote the newly generated vectors into a table and index named unsplash_to_pinterest. Each row included:

  • The vector itself
  • Associated metadata such as image_id, title, description, tags, and URL

Before this worked, she had to ensure:

  • The Supabase project had the pgvector extension enabled
  • The table schema matched what the node expected to insert

Later in the flow, the Supabase Query node came into play. It would read from the same unsplash_to_pinterest index and retrieve vectors similar to the current image. At query time, it pulled back the most relevant context so the RAG agent could write smarter, more connected descriptions.

Giving the Agent a Tool: Vector Tool

To make this vector store useful to the AI agent, the workflow introduced the Vector Tool node. This node exposed the Supabase index to the RAG agent as a tool named “Supabase – Vector context”.

In practice, this meant the RAG agent could call out to Supabase during generation, fetch related images and metadata, and weave that context into the final Pinterest description or title. Instead of writing in isolation, the agent could “look up” similar content and stay consistent with Mia’s visual themes and language.

Keeping the Conversation Coherent: Window Memory

As Mia explored the workflow, she noticed the Window Memory node. Its job was subtle but important: it stored recent conversation history and key context across the workflow run.

When the RAG agent and the chat model interacted, this memory helped them maintain state. If the same image or related images were processed in sequence, the agent could keep track of what had already been said, which improved the quality and consistency of generated descriptions.

The Turning Point: Chat Model and RAG Agent in Action

The real magic happened when the workflow reached the Chat Model (OpenAI) and the RAG Agent.

The Chat Model node pointed to OpenAI for natural language generation. Mia added her OpenAI API key and configured the model to write in her brand’s tone: friendly, descriptive, and SEO-aware.

The RAG Agent then became the orchestrator. It combined three critical ingredients:

  • The LLM from the Chat Model node
  • The vector store, accessed through the Vector Tool
  • The Window Memory context

When an Unsplash image payload arrived, the agent would:

  1. Use the vector tool to retrieve relevant context from Supabase
  2. Read the current image’s metadata and any similar past entries
  3. Generate a final output, such as:
    • An SEO-friendly Pinterest description
    • A compelling pin title

For the sample “Sunset over coastal cliffs” payload, the agent could produce a description that referenced the dramatic light, coastal landscape, and related sunset imagery already in the vector store. The result felt thoughtful rather than generic.

Proof and Accountability: Append Sheet with Google Sheets

Before this workflow, Mia’s “audit log” was a messy spreadsheet that she updated by hand. The template gave her a structured alternative.

The Append Sheet (Google Sheets) node logged each RAG agent output into a Google Sheet. Every time an image was processed, the workflow appended a new row to the Log sheet.

The mapping included a Status column that contained the agent’s text and any other fields she wanted to track. Over time, this sheet became:

  • An audit log of all generated Pinterest content
  • A review queue for manual approval, when needed
  • A source of data for analytics, such as engagement or scheduled post IDs

She later extended the sheet with extra columns for performance metrics and scheduling information, turning it into a lightweight content operations hub.

When Things Go Wrong: Slack Alert as a Safety Net

Mia knew that no automation is perfect. API limits, schema changes, or model issues could break the flow. The template anticipated this with a dedicated safety net.

If an error occurred in the RAG Agent, the workflow’s onError branch triggered the Slack Alert node. This node posted a message to a channel like #alerts, including details about the failure so her team could react quickly.

Instead of silently failing and leaving gaps in her content schedule, the workflow raised a hand in Slack and asked for help.

First Test: From Sample Payload to Pinterest-Ready Copy

With all nodes configured, Mia ran her first full test. She used curl to send the sample payload to the webhook:

{  "image_id": "abc123",  "title": "Sunset over coastal cliffs",  "description": "A dramatic sunset over rocky cliffs with warm orange light.",  "tags": ["sunset", "coast", "landscape"],  "unsplash_url": "https://unsplash.com/photos/abc123"
}

She watched the workflow in n8n:

  • The Webhook Trigger fired successfully
  • The Text Splitter chunked the description
  • Cohere generated embeddings for each chunk
  • Supabase Insert stored the vectors in unsplash_to_pinterest
  • Supabase Query retrieved relevant context
  • The Vector Tool provided that context to the RAG agent
  • The Chat Model and RAG Agent produced a Pinterest-friendly description
  • Append Sheet logged the output in Google Sheets

Nothing broke, and no Slack alerts arrived. The result was a polished description Mia could paste straight into Pinterest or send to a scheduling tool.

Monitoring, Scaling, and Staying Sane

Once the initial excitement wore off, Mia started thinking about the future. What would happen when she processed hundreds of images or when the team relied on this workflow daily?

She followed a few best practices from the template:

  • Test with tools like curl or Postman to validate end-to-end behavior before going live
  • Monitor n8n logs and cross check them with the Google Sheets log for consistency
  • Handle rate limits by:
    • Batching inserts to Supabase
    • Throttling requests to Cohere and OpenAI
  • Consider caching frequent queries if similar images were processed often
  • Prune old vector data if the Supabase storage grew too large or if outdated content was no longer needed

With these safeguards, the workflow could grow from a single marketer’s helper into a core part of the studio’s content engine.

Security and Privacy in Mia’s New Automation

As her team grew, Mia became more careful about security. The workflow handled API keys and user-submitted content, so she followed the template’s recommendations:

  • Stored all API keys using n8n credentials or environment variables, never in plain text
  • Ensured the webhook endpoint was protected with a secret token or IP allowlist
  • Verified that they had the right to republish any images and complied with Unsplash license terms

This gave her confidence that the automation would not introduce unexpected risks as more people on the team used it.

Customizing the Workflow to Fit Her Brand

Once the core pipeline was stable, Mia started tailoring the template to her studio’s needs.

Auto-posting to Pinterest

Instead of stopping at Google Sheets, she experimented with adding a Pinterest node or calling the Pinterest API directly. The goal was to create pins programmatically using:

  • The generated description
  • The title
  • The Unsplash image URL

This turned the workflow into a near end-to-end automation, from raw Unsplash data to live Pinterest content.

Moderation and Brand Voice

For some campaigns, she wanted a human in the loop. She added:

  • An AI moderation step to filter sensitive or off-brand content
  • A manual approval stage that used the Google Sheets log as a review queue

This kept the brand voice consistent and gave her creative team a chance to tweak copy before it went live.

Analytics and Reporting

Finally, she extended the Google Sheets log with new columns for:

  • Engagement metrics
  • Scheduled post IDs
  • <

Build an MQTT Topic Monitor with n8n & Vector DB

Build an MQTT Topic Monitor with n8n & Vector DB

Every MQTT message that flows through your systems carries a story: a sensor reading, an early warning, a quiet signal that something is about to go wrong or incredibly right. When your IoT fleet grows, those stories quickly turn into noise. Manually scanning logs or wiring together ad hoc scripts is not just tiring, it steals time from the work that actually grows your product or business.

This is where thoughtful automation changes everything. In this guide, you will walk through an n8n workflow template that transforms raw MQTT messages into structured, searchable, and AI-enriched insights. You will see how a simple webhook, a vector database, and an AI agent can help you reclaim time, reduce stress, and build a foundation for a more automated, focused way of working.

By the end, you will have a complete MQTT topic monitor that:

  • Ingests MQTT messages via a webhook
  • Splits and embeds text for semantic understanding
  • Stores vectors in a Redis vector index
  • Uses an AI agent with memory and vector search for context-aware analysis
  • Logs structured results into Google Sheets for easy tracking and reporting

From overwhelming MQTT streams to meaningful insight

As IoT deployments expand, MQTT topics multiply. Payloads become more complex, formats drift over time, and dashboards fill with alerts that are hard to interpret. You might recognize some of these challenges:

  • Semi-structured or noisy payloads that are hard to search
  • Repeated alerts that need explanation, not just another notification
  • Pressure to ship a proof of concept quickly, without building a full data platform

Trying to manually interpret every message is not sustainable. The real opportunity is to design a workflow that can understand messages at scale, remember context, and surface what actually matters. That is exactly what this n8n template is designed to do.

Adopting an automation-first mindset

Before diving into nodes and configuration, it helps to shift how you think about MQTT monitoring. Instead of asking, “How do I keep up with all this?”, ask:

  • “Which parts of this can a workflow reliably handle for me?”
  • “Where can AI summarize, categorize, and highlight issues so I do not have to?”
  • “How can I structure this now so I can build more advanced automations later?”

This template is not just a one-off solution. It is a reusable pattern: a streaming ingestion path combined with modern vector search and an AI agent. Once you see it working for MQTT, you can adapt the same pattern to other event streams, logs, and alerts.

Why this particular architecture works

The workflow uses a lightweight but powerful combination of tools: n8n for orchestration, embeddings for semantic understanding, Redis as a vector database, and an AI agent for contextual analysis. Together, they unlock capabilities that are hard to achieve with traditional keyword search or simple rule-based alerts.

This architecture is ideal for:

  • IoT fleets with noisy or semi-structured messages where you want semantic search over topics and payloads
  • Alert dashboards that need explanation, enrichment, or summarization instead of raw data dumps
  • Teams building fast proofs of concept who want to validate AI-driven monitoring before investing in heavy infrastructure

Think of it as a flexible foundation. You can start small, then extend it with more actions, routing logic, or additional tools as your needs grow.

The workflow at a glance

Here is the high-level flow of the n8n template you will be working with:

  • Webhook – receives MQTT messages forwarded via HTTP
  • Splitter – breaks long text into manageable chunks
  • Embeddings – converts text into vectors using an embeddings model
  • Insert – stores vectors in a Redis vector index (mqtt_topic_monitor)
  • Query + Tool – performs vector search and exposes it as a tool to the AI agent
  • Memory – keeps a buffer of recent conversational context
  • Chat / Agent – uses an LLM to analyze messages and create structured output
  • Sheet – appends structured results to Google Sheets

Next, you will walk through each part in order, so you can understand not only how to configure it, but also why it matters for your long-term automation strategy.

Step 1: Capture MQTT messages with a webhook

Your journey starts with a simple but powerful idea: treat every MQTT message as an HTTP payload that can trigger a workflow.

In n8n, configure a Webhook node. This node will accept POST requests from your MQTT broker or a bridge service such as mosquitto or any MQTT-to-webhook integration. The webhook expects a JSON body containing at least:

{  "topic": "sensors/temperature/device123",  "payload": "{ \"temp\": 23.4, \"status\": \"ok\" }",  "timestamp": "2025-01-01T12:00:00Z"
}

Adjust the structure to match your broker’s forwarding format, then:

  • Point your MQTT broker or bridge to the n8n webhook URL
  • Use authentication or IP restrictions in production to secure the endpoint

Once this is in place, every relevant MQTT message becomes an opportunity for automated analysis and logging, not just another line in a log file.

Step 2: Split long payloads into meaningful chunks

IoT payloads can be short and simple, or they can be large JSON objects, stack traces, or combined logs from multiple sensors. Large blocks of text are hard to embed effectively, and they can exceed token limits for models.

To handle this, the template uses a Splitter node with a character-based strategy:

  • chunkSize = 400
  • chunkOverlap = 40

This approach:

  • Breaks long text into smaller, coherent segments
  • Maintains a bit of overlap so context is not lost between chunks
  • Improves embedding quality for semantic search

You can tune these values based on your data shape and the token limits of your chosen embeddings model. If you notice that important context is being cut off, slightly increasing the overlap can help.

Step 3: Generate embeddings for semantic understanding

Next, you convert text into vectors that a machine can understand semantically. This is where your MQTT monitor becomes more than a simple log collector.

In the Embeddings node:

  • Configure your OpenAI API credentials or another embeddings provider
  • Choose a model optimized for semantic search, such as text-embedding-3-small or a similar option

Along with the vector itself, store useful metadata with each embedding, for example:

  • topic
  • device_id (if present in the payload)
  • timestamp
  • Any severity or status fields you rely on

This metadata becomes incredibly valuable later for filtered queries, troubleshooting, and dashboards.

Step 4: Store vectors in a Redis index

With embeddings ready, you need a place to store and search them efficiently. The template uses Redis (RedisStack/RedisAI) as a fast vector database.

In the Insert node:

  • Connect to your Redis instance using n8n’s Redis credentials
  • Use the vector index name mqtt_topic_monitor

Redis gives you high performance similarity search, which lets you quickly find messages that are semantically similar to new ones. For production use, keep these points in mind:

  • Ensure your Redis instance has sufficient memory
  • Define a TTL policy or schedule a cleanup workflow to manage retention
  • Consider sharding or partitioning indices if you have very large datasets

This step turns your MQTT stream into a living knowledge base that your AI agent can tap into whenever it needs context.

Step 5: Enable vector queries and agent tooling

Storing vectors is only half the story. To make them useful, your agent must be able to search and retrieve relevant entries when analyzing new messages.

The workflow uses:

  • A Query node to perform nearest neighbor searches in the Redis index
  • A Tool node that wraps this vector search as a retriever the AI agent can call

When a new MQTT message arrives, the agent can query the vector store to:

  • Find similar past messages
  • Identify recurring patterns or repeated errors
  • Use historical context to produce better explanations and suggested actions

This is where the workflow starts to feel like a smart assistant for your MQTT topics, not just a passive log collector.

Step 6: Add memory and an AI agent for rich analysis

To support more natural, evolving analysis, the workflow includes a Memory node and a Chat / Agent node.

The Memory node:

  • Maintains a chat memory buffer of recent interactions
  • Helps the agent remember what it has already seen and summarized

The Chat / Agent node then ties everything together. It:

  • Receives the parsed MQTT message
  • Optionally calls the Tool to search for similar vectors in Redis
  • Uses a configured language model (such as a Hugging Face chat model or another LLM) to produce structured output

The template uses an agent prompt that defines the expected output format, for example including fields like summary, tags, or recommended actions. You are encouraged to iterate on this prompt. Small refinements can dramatically improve the quality of the insights you get back.

Step 7: Log structured results to Google Sheets

Automation is most powerful when its results are easy to share, track, and analyze. To achieve that, the final step of this workflow appends a new row to a Google Sheet using the Sheet node.

Typical columns might include:

  • timestamp
  • topic
  • device_id
  • summary
  • tags
  • action

With this structure in place, you can:

  • Build dashboards on top of Google Sheets
  • Trigger additional workflows in tools like Zapier or n8n itself
  • Keep a simple but powerful audit trail of how your MQTT topics evolve over time

Practical guidance for reliable, scalable automation

Security and credentials

  • Protect your webhook with API keys, IP allowlists, or a VPN
  • Rotate credentials regularly for OpenAI, Hugging Face, Redis, and Google Sheets
  • Limit access to the n8n instance to trusted users and networks

Cost awareness

  • Embeddings and LLM calls incur usage-based costs
  • Start by sampling or batching messages before scaling to full volume
  • Monitor usage to understand which topics generate the most traffic and cost

Indexing and retention strategy

  • Always persist meaningful metadata such as topic, device_id, and severity
  • Use TTLs or scheduled roll-up processes to avoid unbounded vector growth
  • Partition indices by topic or device family if you expect very high scale

Model selection and performance

  • Choose embeddings models built for semantic search
  • Pick chat models that balance latency, cost, and safety for your use case
  • Monitor n8n execution logs and Redis metrics to catch latency or error spikes early

Troubleshooting along the way

Webhook not receiving messages

  • Double-check the webhook URL in your MQTT bridge configuration
  • Verify authentication and any IP restrictions
  • Use a request inspector such as ngrok or RequestBin to confirm the payload format

Poor embedding quality or irrelevant search results

  • Review your chunking strategy; ensure each chunk carries meaningful context
  • Adjust chunkSize and chunkOverlap if important information is split apart
  • Use metadata filters in your queries to reduce noise and increase precision

Slow or memory-heavy Redis vector queries

  • Increase available memory or optimize Redis index settings
  • Shard or partition indices by topic or device group
  • If scale requirements grow significantly, consider an alternative vector database such as Milvus or Pinecone

Real-world ways to use this template

Once you have the workflow running, you can start applying it to concrete use cases that directly support your operations and growth.

  • Alert summarization: Detect anomalous sensor patterns and have the agent generate human-readable summaries that you log to a spreadsheet or ticketing system.
  • Device troubleshooting: When a device reports an error, retrieve similar historical payloads and let the agent suggest probable root causes.
  • Semantic search over device logs: Search for relevant events even when different devices use slightly different schemas or field names.

As you gain confidence, you can extend the workflow to trigger notifications, create incident tickets, or call external APIs based on the agent’s output.

Scaling your MQTT automation

When you are ready to move from prototype to production, consider the following scaling strategies:

  • Batch embeddings where possible to reduce the number of API calls
  • Run multiple n8n workers to increase ingestion throughput
  • Partition vector indices by topic, device family, or region to keep nearest neighbor searches fast

Scaling does not have to be all or nothing. You can gradually expand coverage, starting with the topics that matter most to your team.

Configuration checklist for quick setup

Use this checklist to confirm your template is ready to run:

  • n8n Webhook: secure URL, accepts JSON payloads
  • Splitter: chunkSize = 400, chunkOverlap = 40 (adjust as needed)
  • Embeddings: OpenAI (or other) API key, model such as text-embedding-3-small
  • Redis: index name mqtt_topic_monitor, configured via n8n Redis credentials
  • Agent: Hugging Face or OpenAI model credential, prompt that defines structured output
  • Google Sheets: OAuth2 connector with append permissions to your chosen sheet

From template to transformation

Combining n8n with embeddings and a Redis vector store gives you far more than a basic MQTT topic monitor. It gives you a flexible, AI-powered pipeline that can semantically index, search, and summarize IoT data with minimal engineering overhead.

This template is a starting point, not a finished destination. As you work with it, you can:

MQTT Topic Monitor with n8n, Redis & Embeddings

Build an MQTT Topic Monitor with n8n, Redis and Embeddings

Imagine having a constant stream of MQTT messages flying in from devices, sensors, or services, and instead of digging through raw logs, you get clean summaries, searchable history, and a simple log in Google Sheets. That’s exactly what this n8n workflow template gives you.

In this guide, we’ll walk through how this MQTT Topic Monitor works, when you’d want to use it, and how to set it up step by step. We’ll use n8n, OpenAI embeddings, a Redis vector store, and a lightweight agent that writes summaries straight into Google Sheets.

If you’re dealing with IoT telemetry, sensor data, or any event-driven system and you want smarter, semantic search and automated summaries, you’re in the right place.

What this MQTT Topic Monitor actually does

Let’s start with the big picture. This n8n workflow listens for MQTT messages (via an HTTP bridge), breaks them into chunks, turns those chunks into embeddings, stores them in Redis, and then uses an agent to generate human-friendly summaries that are logged to Google Sheets.

Here’s what the template helps you do in practice:

  • Receive MQTT messages through a webhook
  • Split large payloads into smaller text chunks
  • Convert those chunks into vector embeddings with OpenAI (or another provider)
  • Store embeddings and metadata in a Redis vector store
  • Query Redis for relevant historical context when needed
  • Use an LLM-powered agent to summarize or respond based on that context
  • Keep short-term memory so the agent understands recent activity
  • Append final outputs to Google Sheets for logging, auditing, or reporting

So instead of scrolling through endless MQTT logs, you get searchable, contextualized data and a running summary that non-technical teammates can actually read.

Why use this architecture for MQTT monitoring?

MQTT is great for lightweight, real-time communication, especially in IoT and sensor-heavy environments. The downside is that raw MQTT messages are not exactly friendly to search or analysis. They’re often noisy, repetitive, and not designed for long-term querying.

This workflow solves that by combining:

  • n8n for workflow automation and orchestration
  • Text splitting to keep payloads embedding-friendly
  • Embeddings (for example OpenAI) to represent text semantically
  • Redis vector store for fast similarity search over your message history
  • An agent with memory to create summaries or answers using context
  • Google Sheets as a simple, shareable log

The result is:

  • Fast semantic search across MQTT message history
  • Automated summarization and alerting using an LLM-based agent
  • Cost-effective, lightweight storage and processing
  • Easy handoff to non-technical stakeholders via Sheets

If you’ve ever thought, “I wish I could just ask what’s been happening on this MQTT topic,” this setup gets you very close.

When should you use this n8n template?

This pattern is especially useful if you:

  • Manage IoT fleets and want summaries of device logs or anomaly flags
  • Work with industrial telemetry and need to correlate sensor data with past incidents
  • Run smart building systems and want semantic search across event history
  • Handle developer operations for distributed devices and want a centralized log with summaries

In short, if MQTT is your event pipeline and you care about searchability, context, and summaries, this workflow template will make your life easier.

High-level workflow overview

Here’s how the n8n workflow is structured from start to finish:

  • Webhook – Receives MQTT messages via HTTP POST from a broker or bridge
  • Text Splitter – Breaks long messages into smaller chunks
  • Embeddings – Uses OpenAI or another provider to embed each chunk
  • Redis Vector Store (Insert) – Stores embeddings plus metadata
  • Redis Vector Store (Query) – Retrieves relevant embeddings for context
  • Tool & Agent – Uses context, memory, and an LLM to generate summaries or responses
  • Memory – Keeps a short window of recent interactions
  • Google Sheets – Logs final outputs like summaries or alerts

Let’s unpack each part so you know exactly what is happening under the hood.

Node-by-node: how the workflow is built

1. Webhook – your MQTT entry point

The Webhook node is where everything starts. MQTT itself speaks its own protocol, so you typically use an MQTT-to-HTTP bridge or a broker feature that can send messages as HTTP POST requests.

In this workflow, the Webhook node:

  • Exposes a POST endpoint for incoming MQTT messages
  • Receives the payload from your broker or bridge
  • Validates authentication tokens or signatures
  • Checks that the payload schema is what you expect

It’s a good idea to secure this endpoint with an HMAC, token, or IP allowlist so only trusted sources can send data.

2. Splitter – breaking large payloads into chunks

MQTT payloads can be tiny, or they can be long JSON blobs full of logs, sensor readings, or diagnostic info. Embedding very large texts directly is inefficient and may hit model limits.

The Text Splitter node solves that by cutting messages into overlapping chunks, for example:

  • chunkSize = 400
  • chunkOverlap = 40

That overlap helps preserve context between chunks so embeddings still capture meaning, while staying within the token limits of your embedding model.

3. Embeddings – turning text into vectors

Once you have chunks, the Embeddings node converts each one into a vector representation using OpenAI or another embedding provider.

Alongside each embedding, you store metadata such as:

  • topic
  • device_id
  • timestamp

This metadata is important later when you want to filter or query specific devices, topics, or time ranges.

4. Redis Vector Store – insert and query

Redis works as a fast vector store where you can perform semantic search over your MQTT history.

There are two key operations in the workflow:

  • Insert – Store new embeddings and their metadata whenever a message arrives
  • Query – Retrieve similar embeddings when you need context for a summary or a question

This means that when your agent needs to summarize recent activity or answer “what happened before this alert,” it can pull in the most relevant messages from Redis instead of scanning raw logs.

5. Tool & Agent – generating summaries and responses

The Tool & Agent setup is where the magic happens. The agent uses:

  • Retrieved context from Redis
  • Short-term memory of recent interactions
  • A language model (OpenAI chat models or Hugging Face)

With this combination, the agent can:

  • Produce human-readable summaries of recent MQTT activity
  • Generate alerts or explanations based on incoming messages
  • Respond to queries about historical telemetry using semantic context

You configure prompt templates and safety checks so the agent’s output is accurate, relevant, and safe to act on. If you are worried about hallucinations, you can tighten prompts and add validation rules to the agent’s output.

6. Memory – keeping short-term context

The Memory node maintains a small window of recent messages or interactions. This helps the agent understand patterns such as:

  • A device repeatedly sending warning messages
  • A series of related events on the same topic

Instead of treating each message as isolated, the agent can reason over the last few exchanges and provide more coherent summaries.

7. Google Sheets – logging for humans

Finally, the Sheet node appends the agent’s output into a Google Sheet. This gives you:

  • A simple, persistent log of summaries, alerts, or key events
  • An easy way to share insights with non-technical stakeholders
  • A base for dashboards or further analysis

You can treat this as your human-friendly audit trail of what has been happening across MQTT topics.

Step-by-step setup in n8n

Ready to put this into practice? Here’s how to get the workflow running.

  1. Provision n8n
    Run n8n in the environment you prefer:
    • n8n.cloud
    • Self-hosted Docker
    • Other self-hosted setups

    Make sure access is secured with HTTPS and authentication.

  2. Create the Webhook endpoint
    Set up the Webhook node as the entry point. Then configure your MQTT broker or bridge to send messages as HTTP POST requests to this endpoint.
    Include an HMAC, token, or similar mechanism so only authorized clients can send data.
  3. Configure the Splitter node
    Adjust chunkSize and chunkOverlap to match your embedding model’s token limits and the typical size of your messages. You can start with something like 400 and 40, then tune as needed.
  4. Set up Embeddings credentials
    In n8n’s credentials manager, add your OpenAI (or alternative provider) API key. Connect this credential to the Embeddings node so each text chunk is turned into a vector.
  5. Deploy and configure Redis
    Use a managed Redis instance or self-hosted deployment. In the Redis vector store node:
    • Set connection details and credentials
    • Choose an index name, for example mqtt_topic_monitor
    • Ensure the index is configured for vector operations
  6. Configure the Agent node
    Hook up your language model (OpenAI chat model or Hugging Face) via n8n credentials. Then:
    • Wire the agent to use retrieved context from Redis
    • Connect the memory node so it has short-term context
    • Attach any tools or parsing nodes you need for structured output
  7. Connect Google Sheets
    Add Google Sheets credentials in n8n, then configure the Sheet node to append rows. Each row can store:
    • Timestamp
    • Topic or device
    • Summary or alert text
    • Any additional metadata you care about
  8. Test and tune
    Send sample MQTT messages through your bridge and watch them flow through the workflow. Then:
    • Adjust prompts for clearer summaries
    • Tune chunking parameters
    • Experiment with vector search thresholds and filters

Security and best practices

Since this workflow touches external APIs, data storage, and logs, it’s worth taking security seriously from day one.

  • Authenticate the Webhook
    Only accept messages signed with a shared secret, token, or from trusted IPs. Reject anything that does not match your expected headers or signatures.
  • Handle sensitive data carefully
    If your MQTT payloads contain PII or sensitive details, strip, anonymize, or redact them before creating embeddings. While embeddings are less directly reversible, they should still be treated as sensitive.
  • Apply rate limits
    For high-volume topics, consider throttling, batching, or queueing messages. This helps avoid API overage costs and protects your Redis instance from sudden spikes.
  • Monitor and retry
    Add error handling and retry logic in n8n for transient failures when talking to external APIs or Redis. A short retry with backoff can smooth over network blips.
  • Restrict access to Redis and Sheets
    Lock down your Redis instance and Google Sheets access to the minimum required. Rotate API keys regularly and avoid hard-coding secrets.

Tuning and scaling tips

Planning to run this in production or at larger scale? Here are some ways to keep it smooth and efficient.

  • Use a dedicated Redis instance
    Give Redis enough memory and configure the vector index properly, including distance metric and shard size, so queries stay fast.
  • Batch embedding calls
    If messages arrive frequently, batch chunks into fewer API calls. This helps reduce latency and cost.
  • Offload heavy processing
    Use the webhook mainly to enqueue raw messages, then process them with background workers or separate workflows. That way, your inbound endpoint stays responsive.
  • Manage retention
    You do not always need to keep embeddings forever. Consider pruning old entries or moving them to cold storage if long-term search is not required.

Common issues and how to debug them

Things not behaving as expected? Here are some typical problems and what to check.

  • No data reaching the webhook
    Confirm your MQTT-to-HTTP bridge is configured correctly, verify the target URL, and check that any required authorization headers or tokens are present.
  • Embedding failures
    Look at model limits, API keys, and payload sizes. If you hit token limits, lower chunkSize or adjust chunkOverlap. Also verify that your credentials are valid.
  • Redis errors
    Make sure the vector index exists, connection details are correct, and the credentials have permission to read and write. Check logs for index or schema mismatches.
  • Agent hallucinations or inaccurate summaries
    Tighten your prompts, provide richer retrieved context from Redis, and add validation rules or post-processing to the agent’s output. Sometimes simply being more explicit in the instructions helps a lot.

Real-world use cases

To recap, here are some concrete scenarios where this MQTT Topic Monitor pattern shines:

  • IoT fleet monitoring – Summarize intermittent device logs, surface anomalies, and keep a readable history in Sheets.
  • Industrial telemetry – Relate current sensor readings to past incidents using semantic search over historical events.
  • Smart buildings – Search and summarize events from HVAC, lighting, or access control systems.
  • DevOps for distributed devices – Centralize logs from many edge devices and generate concise summaries for on-call engineers.

Wrap-up and next steps

This MQTT Topic Monitor template turns noisy MQTT streams into something far more usable: searchable embeddings in Redis, context-aware summaries from an agent, and a clear log in Google Sheets that anyone on your team can read.

By combining text chunking, embeddings, a Redis vector store, and an LLM agent with memory, you get a scalable pattern for IoT monitoring, telemetry analysis, and event-driven workflows.

Ready to try it?

    <

Sync Jira Issues to Notion with n8n

Sync Jira Issues to Notion with n8n

On a rainy Tuesday afternoon, Alex stared at two browser tabs that had become the bane of their workday: Jira and Notion. As a product manager in a fast-moving SaaS startup, Alex was supposed to keep everyone aligned – engineers in Jira, leadership and stakeholders in Notion. In reality, Alex was stuck in copy paste purgatory.

Every new Jira issue meant another Notion card to create. Every status change meant another manual update. When something was deleted in Jira, it quietly lingered in Notion, making roadmaps and status boards confusing and unreliable. The more the team grew, the more chaotic it became.

One missed update led to a painful board review where a stakeholder asked about a “critical bug” that had been resolved days ago. The Jira ticket was closed, but the Notion board still showed it as “In progress.” That was the moment Alex decided this had to be automated.

The problem Alex needed to solve

Alex’s team used Jira as the canonical source of truth for issues, bugs, and feature work. Notion, on the other hand, was their shared brain – documentation, cross functional status boards, and executive summaries all lived there.

But manually syncing Jira issues into Notion meant:

  • Duplicated effort every time a new issue was created
  • Missed updates when statuses changed and no one had time to reflect it in Notion
  • Stale, misleading information in stakeholder dashboards
  • Confusion over which tool was the “real” source of truth

Alex did not want to replace Jira with Notion. They wanted Jira to stay the issue tracker, while Notion became a reliable, always up to date overview. What Alex needed was a way to keep Notion in sync with Jira automatically, without living in two tabs all day.

Discovering an n8n template that could help

While exploring automation options, Alex came across n8n, an open source workflow automation tool. Even better, there was a ready made n8n workflow template specifically designed to sync Jira issues to a Notion database.

This template promised to:

  • Create a Notion database page when a Jira issue is created
  • Update the corresponding Notion page when the Jira issue is updated
  • Archive the Notion page when the Jira issue is deleted

In other words, exactly what Alex needed. The tension shifted from “How do I do this at all?” to “Can I actually get this working without spending days wiring APIs together?”

How the automation works behind the scenes

Before turning it on, Alex wanted to understand how the template actually operated. That is where the n8n node sequence came into focus. The workflow followed a clear, logical pipeline:

  • Jira Trigger receives webhook events when issues are created, updated, or deleted
  • Lookup table (Code) converts Jira status names into the exact select labels used in Notion
  • IF node checks if the event is a new issue or an update/delete
  • Create database page builds a new Notion page for new Jira issues
  • Create custom Notion filters (Code) generates a JSON filter to find the correct Notion page by Issue ID
  • Find database page queries Notion for the matching page
  • Switch node routes the flow based on the specific Jira event type
  • Update issue or Delete issue updates or archives the Notion page

It was not magic. It was a series of clear steps that mirrored the life cycle of a Jira issue and translated it into Notion.

Rising action: setting up Jira, Notion, and n8n

To give this automation a fair shot, Alex blocked off an afternoon and started from the ground up.

Designing the Notion database as a mirror of Jira

First, Alex created a Notion database that would act as the synced overview of Jira issues. Following the template’s recommendations, the database included these properties:

  • Title – the issue summary
  • Issue Key – the Jira key, for example PROJ-123
  • Issue ID – the numeric Jira ID used for lookups
  • Link – a URL pointing directly to the Jira issue
  • Status – a select field with values matching the Jira workflow

Alex knew that these fields would become the backbone of the sync. If they were clean and consistent, everything else would be easier.

Importing the n8n workflow template

Next, Alex logged into their n8n instance and imported the provided workflow template. The skeleton was already there. All that remained was to connect Jira, Notion, and the template’s logic.

Inside n8n, Alex configured credentials:

  • Jira Cloud API credentials using their email and API token
  • A Notion integration token with access to the new database

Then they set the Notion database ID inside the Notion nodes and updated the Link property format to match their Jira site URL.

The turning point: wiring Jira to trigger n8n

The real pivot moment came when Alex configured Jira to talk to n8n. If that connection worked, the rest of the workflow would fall into place.

1. Jira Trigger – listening for issue events

In their Jira Cloud instance, Alex created a webhook and pointed it to the n8n webhook URL provided by the Jira Trigger node.

They selected the following events:

  • jira:issue_created
  • jira:issue_updated
  • jira:issue_deleted

This meant that every time someone on the team created, updated, or deleted an issue, Jira would send a payload to n8n, and the workflow would start its work.

2. Lookup table – translating statuses into Notion language

Next, Alex opened the Lookup table (Code) node. This was where Jira’s status labels would be translated into the exact select values used in Notion. The code looked something like this:

var lookup = {  "To Do": "To do",  "In Progress": "In progress",  "Done": "Done"
};

var issue_status = item.json.issue.fields.status.name;
// map to Notion select value

Alex adjusted the mapping to match their team’s specific Jira workflow and the Status options in the Notion database. They knew from experience that mismatched labels could cause subtle bugs, so they double checked casing and spelling.

3. IF node – deciding when to create a page

The IF node became the workflow’s first decision point. It checked whether the incoming event was jira:issue_created. If it was, the workflow would branch directly to creating a new Notion page. If not, it would prepare to find and update an existing one.

Alex liked the clarity of this logic. New issues took one path, updates and deletions took another.

4. Creating the Notion page for new issues

For new issues, the Create database page node handled the heavy lifting. Alex mapped each field from the Jira payload to the appropriate Notion property, using n8n expressions like:

Title: {{$node["On issues created/updated/deleted"].json["issue"]["fields"]["summary"]}}
Issue Key: {{$node["On issues created/updated/deleted"].json["issue"]["key"]}}
Issue ID: {{parseInt($node["On issues created/updated/deleted"].json["issue"]["id"])}}
Link: =https://your-domain.atlassian.net/browse/{{$node["On issues created/updated/deleted"].json["issue"]["key"]}}
Status: ={{$node["Lookup table"].json["Status ID"]}}

They replaced your-domain with their real Jira domain and ensured the Status property pointed to the value produced by the Lookup table node.

Keeping everything in sync when issues change

Creating pages was only half the battle. Alex needed updates and deletions in Jira to be mirrored reliably in Notion.

5. Building custom Notion filters

For updates and deletions, the workflow had to find the correct Notion page first. The Create custom Notion filters (Code) node generated a JSON filter that searched for the page where Issue ID matched the Jira issue ID.

This node produced a filterJson object that the next node would use to query Notion. It meant Alex did not have to rely on brittle title matching or manual lookups. The numeric Issue ID became the reliable link between both systems.

6. Finding the database page in Notion

The Find database page node used the Notion API to search the database with the generated filter. When it found a match, it returned the full page object, including the Notion page ID that would be needed for updates or archiving.

Alex ran a test update in Jira and watched in n8n’s execution preview as the correct Notion page was identified and passed along the workflow.

7. Switch node – update vs archive

Now the workflow needed to decide whether to update an existing page or archive it. The Switch node examined the webhookEvent value and routed the data accordingly:

  • If the event was jira:issue_updated, it flowed to Update issue
  • If the event was jira:issue_deleted, it flowed to Delete issue

This small branching step was the key to mirroring Jira’s life cycle accurately in Notion.

8. Updating and archiving Notion pages

Finally, the workflow reached its last actions:

  • Update issue refreshed the Notion page with the latest Title, Status, and any other mapped properties Alex had configured
  • Delete issue archived the Notion page to reflect the deletion in Jira

Alex chose to archive rather than permanently delete pages in Notion. That way, they could keep a clean board while still preserving a historical record in the background.

Setup checklist Alex followed

Looking back, Alex realized the process was much more manageable when broken into concrete steps. Here is the sequence they used to get from chaos to automation:

  1. Create a Notion database with properties:
    • Title
    • Issue Key (text or rich_text)
    • Issue ID (number)
    • Link (url)
    • Status (select)
  2. Import the provided n8n workflow/template into their n8n instance
  3. Configure credentials:
    • Jira Cloud API credentials (email and API token)
    • Notion integration token with access to the target database
  4. Update the Lookup table mapping to match Jira statuses and Notion select options exactly
  5. Set the Notion database ID in all Notion nodes and adjust the Link URL to their Jira site
  6. Enable the workflow in n8n and configure the Jira webhook to point to the n8n webhook URL

Once all of this was in place, Alex hit “Enable” on the workflow and created a test issue in Jira. Seconds later, a new page appeared in Notion, populated with the correct summary, key, link, and status. For the first time in months, Alex felt ahead of the work instead of chasing it.

When things go wrong: how Alex debugged early issues

Not everything worked perfectly on the first try. A few hiccups gave Alex the chance to understand the workflow more deeply and refine it.

  • Empty results from Find database page
    At first, some updates did not find a matching Notion page. Alex discovered the Issue ID stored in Notion was not being treated as a number. After ensuring the property type was numeric and checking the filterJson output in n8n’s execution preview, the problem disappeared.
  • Status mismatch
    When a status change in Jira failed to update correctly in Notion, Alex traced it back to the Lookup table node. A single capitalization difference in the Notion select options was enough to break the mapping. Once the labels matched exactly, Status updates flowed smoothly.
  • Permissions
    On another occasion, Notion pages simply would not update. The cause was access related: the Notion integration had not been granted explicit access to the database. After adding the integration and confirming the Jira API token and webhook were configured for the right site, the workflow stabilized.
  • Rate limits and bursts of activity
    During a large import of issues into Jira, Alex noticed a flood of webhooks hitting n8n. To avoid hitting limits, they considered batching or queuing updates and made a note to extend the workflow with debouncing logic if the team scaled further.

Taking the workflow further with enhancements

Once the core sync was reliable, Alex started to see new possibilities. The template was a starting point, not a ceiling.

  • Mapping more fields
    By adding properties like Assignee, Priority, or Due date to the Notion database, Alex could extend the Create and Update nodes to sync those fields too. This turned the Notion board into a richer, more informative view for stakeholders.
  • Including recent comments
    For critical issues, Alex wanted key comments to be visible in Notion. They added an extra step to fetch issue comments from Jira and append them to a Notion rich_text property or a sub page.
  • Exploring two way sync
    The idea of updating Jira from Notion was tempting. With a Notion webhook and Jira API node, a two way sync was possible. Alex knew to be careful here and considered using a flag or tag to prevent update loops where Jira and Notion would keep overwriting each other.
  • Handling attachments
    For design heavy tasks, Alex experimented with downloading attachments from Jira and uploading them into Notion as files or links, making the Notion overview even more complete.

Security and good practices Alex followed

As the workflow became part of the team’s daily operations, Alex made sure it was secure and maintainable.

  • All credentials were stored in the n8n credentials store, not hard coded in nodes
  • The Notion integration was limited to only the databases required for this sync
  • API tokens were scheduled for regular rotation
  • Webhook endpoints were reviewed periodically to ensure there was no unauthorized access

This gave Alex confidence that the automation was not just convenient, but also safe.

Example upgrade: syncing comments into Notion

One of Alex’s favorite improvements came when they added comment syncing. After an issue update, a Code node compared the last synced comment timestamp with the current list of comments in Jira. Any new comments were appended to a Comments property or directly into the Notion page content.

By keeping the comment sync idempotent, Alex avoided duplicates even when the workflow retried or processed multiple events quickly.

Resolution: from copy paste chaos to a single source of truth

Weeks later, during another stakeholder review, Alex noticed something different. Questions about issue status were answered in seconds. The Notion board reflected reality, not a snapshot from three days ago. Jira remained the engineering team’s primary tool, while Notion finally became the trusted, always current overview.

This n8n workflow had quietly become part of the team’s infrastructure. With a few property mappings and authentication tweaks, it kept Jira issues mirrored in Notion, centralizing summaries, statuses, and links. The hours Alex once spent manually syncing data were now invested in strategy and planning instead.

Call to action: If you see yourself in Alex’s story, you can follow the same path. Import the template into your n8n instance, connect your Jira and Notion accounts, adjust the mappings, and enable the workflow to start syncing. If

Sync Jira Issues and Comments to Notion with n8n

Sync Jira Issues and Comments to Notion with n8n

Keeping Jira and Notion aligned can dramatically cut down on context switching and manual updates. In this step-by-step guide, you will learn how to use an n8n workflow template to automatically sync Jira issues and their comments into a Notion database.

This tutorial focuses on teaching you how the workflow works, why each node is used, and how to adapt it to your own setup. You will walk through the full lifecycle: from a Jira webhook event, through mapping and filtering in n8n, to creating, updating, and archiving Notion pages.

What you will learn

  • Why syncing Jira issues to Notion is useful for teams
  • How the provided n8n workflow template is structured
  • How to configure the Jira Trigger node and process webhook events
  • How to map Jira statuses to Notion select values using a Code node
  • How to create, find, update, and archive Notion database pages from Jira events
  • Two different patterns for syncing Jira comments to Notion
  • Best practices, troubleshooting tips, and next steps to customize the workflow

Why sync Jira to Notion?

Many teams rely on Jira for issue tracking and Notion for documentation, knowledge sharing, and cross-team visibility. Without automation, keeping these two tools in sync usually means manual copying, constant tab switching, and outdated documentation.

By using n8n to sync Jira to Notion you can:

  • Give non-technical stakeholders read-only visibility into Jira issues directly in Notion
  • Preserve issue context (status, summary, links, comments) in a central knowledge base
  • Reduce manual copy and paste and keep Notion updated in near real-time

The workflow you will learn uses:

  • A Jira webhook trigger to react to issue events
  • Lightweight JavaScript (Code) nodes to map statuses and build filters
  • Notion database operations to create, update, or archive pages that mirror Jira issues

How the n8n workflow is structured

Before diving into the details, it helps to see the overall logic. The template follows this flow:

  1. Jira Trigger node receives events like issue created, updated, or deleted.
  2. Code (lookup) node maps the Jira issue status name to a Notion select value.
  3. IF node checks whether the event is an issue created event or something else.
  4. If it is a creation:
    • Notion – Create database page creates a new page and maps core fields.
  5. If it is an update or delete:
    • Code node builds a custom Notion filter based on Jira Issue ID.
    • Notion – Find database page (getAll) locates the matching Notion page.
    • Switch node routes to:
      • Update path for jira:issue_updated
      • Delete path for jira:issue_deleted (archive the page)

You can extend this same pattern to handle comment events and keep Notion updated with ongoing discussion from Jira.


Core concepts to understand first

Jira webhook events

Jira can send webhook payloads to n8n whenever certain events happen, such as:

  • jira:issue_created
  • jira:issue_updated
  • jira:issue_deleted

Each payload includes useful fields like issue.id, issue.key, issue.fields.summary, and the current status. These values are what you will map into Notion.

Using Issue ID as a unique identifier

To reliably match Jira issues with Notion pages, the workflow uses Jira’s internal Issue ID (not just the human-readable key like “PROJ-123”). This ID is stored in a Notion number property and is used later in filters to find the exact page to update or archive.

Mapping Jira status to Notion status

Jira and Notion often use slightly different wording for statuses. A simple lookup table in a Code node converts Jira status names to the select options you use in your Notion database. Keeping this mapping explicit avoids mismatches.


Step-by-step: building and understanding the workflow

Step 1 – Configure the Jira Trigger node

Start with the jiraTrigger node in n8n. Configure it to listen to the events you want to sync:

  • jira:issue_created
  • jira:issue_updated
  • jira:issue_deleted

If you also want to sync comments later, you can either:

  • Add a specific comment-created event like issue_comment_created, or
  • Parse comments from issue_updated payloads if your webhook includes that data.

Every time one of these events occurs, Jira sends a webhook to n8n and the Jira Trigger node passes the full payload to the next nodes in the workflow.

Step 2 – Map Jira status to Notion using a Code node

Next, use a Code node as a lookup table. Its job is to take the Jira status name from the webhook and return the corresponding Notion select value.

Example mapping:

// Example mapping (simplified)
const lookup = {  "To Do": "To do",  "In Progress": "In progress",  "Done": "Done"
};

// Assume you extracted the Jira status name into `issue_status`
return [  {  json: {  "Status ID": lookup[issue_status]  }  }
];

In your actual workflow, you will extract issue_status from the Jira payload (for example item.json.issue.fields.status.name) and then pass the mapped status to the Notion node.

Tip: Keep this mapping table short and well documented so you can easily update it when Jira or Notion workflows change.

Step 3 – Use an IF node to separate create vs update/delete

Now add an IF node to branch the workflow based on the event type. The IF node checks the webhookEvent field from the Jira payload.

  • If webhookEvent == "jira:issue_created":
    • Follow the true branch and create a new Notion page.
  • For any other event (update or delete):
    • Follow the false branch and first find the existing Notion page.

This separation keeps the logic clear: creations go directly to a Notion “Create Page” node, while updates and deletes must first locate the page to act on.

Step 4 – Create a Notion database page for new Jira issues

On the issue created branch, use the Notion node in Create mode to add a new page to your target database. Map at least the following properties:

  • Title: issue.fields.summary
  • Issue Key (rich_text): issue.key (for example “PROJ-123”)
  • Issue ID (number): issue.id (this is the unique identifier used later)
  • Link (url): the full Jira issue URL
  • Status (select): the mapped status value from your lookup Code node

You can also extend this mapping to include properties like assignee, priority, or labels as needed, but the fields above are the minimum required for reliable syncing.

Step 5 – Build custom Notion filters and find the existing page

On the update/delete branch, you first need to find the specific Notion page that corresponds to the Jira issue.

  1. Use a Code node to construct a JSON filter that matches your Notion database schema. The filter should target the Issue ID property you created earlier.
  2. Pass this filter to a Notion – Find database page (getAll) node, which queries the database with that filter and returns any matching page.

Conceptually, the filter will say: “Find all pages where the Issue ID property equals this Jira issue’s issue.id.”

If a matching page is found, its ID will be used by later nodes to update or archive the page. If none is found, you can decide whether to create a new page or simply stop the workflow for that event.

Step 6 – Route between update and delete with a Switch node

Once the Notion page is found, use a Switch node to branch based on the webhookEvent again. This node typically checks the same field as the IF node but now only for non-create events.

  • Case: jira:issue_updated
    • Send the execution to an Update issue path.
    • Use a Notion node in Update mode to modify properties such as:
      • Title (if the Jira summary changed)
      • Status (using the mapped Notion select value)
      • Optionally, append or update a comments section
  • Case: jira:issue_deleted
    • Send the execution to a Delete issue path.
    • Use the Notion node to archive the page instead of fully removing it, so the history remains in Notion.

At this point you have a complete one-way sync for the issue lifecycle: create, update, and delete events from Jira are reflected in Notion.


How to sync Jira comments to Notion

The base template focuses on the issue lifecycle. You can extend it to also sync subsequent comments from Jira into Notion. Below are two common patterns.

Option A – Use Jira comment webhooks and append Notion blocks

This option treats each new comment as a separate event and appends it to the existing Notion page as a new block.

  1. Enable comment events in Jira
    Configure your Jira webhook to send issue_comment_created (or equivalent) events to n8n.
  2. Add a comment event path in n8n
    In your workflow, handle the comment-created event similarly to issue updates:
    • Use the same “Create custom Notion filters” approach to find the page by Issue ID.
  3. Append a block to the Notion page
    Once you have the Notion page ID, use:
    • The Notion node in “append children” mode, or
    • An HTTP Request node to call the Notion API directly

    and add a new paragraph block that contains the comment text, author, and timestamp.

Pseudo-code for building a Notion append-block payload:

{  "parent": { "page_id": "<notion-page-id>" },  "children": [  {  "object": "block",  "type": "paragraph",  "paragraph": {  "text": [  {  "type": "text",  "text": {  "content": "[JiraComment] @author: comment text"  }  }  ]  }  }  ]
}

This pattern is ideal if you want each comment to appear as a separate, clearly visible block under the issue in Notion.

Option B – Store comments in a single Notion property

If you prefer a simpler setup, you can maintain a single Comments property in your Notion database (for example a rich_text or long-text field) and append new comments to that field.

For each comment event:

  • Find the page by Issue ID as before.
  • Read the existing value of the Comments property.
  • Append a new line with something like [timestamp] author: comment body.
  • Update the property with the combined text.

This approach is easier to implement but less flexible if you need rich formatting or separate blocks for each comment.

Example high-level comment sync flow

Regardless of whether you choose Option A or B, the logic usually looks like this:

  1. jiraTrigger receives a comment-created event.
  2. A Code node extracts:
    • Comment author
    • Created time
    • Comment body
  3. The workflow uses the Issue ID to find the corresponding Notion page.
  4. A Notion node or HTTP Request node:
    • Either appends a paragraph block with the comment, or
    • Updates the Comments property by appending text.

Best practices for a reliable Jira-to-Notion sync

  • Use a stable unique identifier
    Always store issue.id from Jira in a Notion number property and use it in filters. This is more reliable than only using issue.key.
  • Watch rate limits
    Both Jira and Notion have API rate limits. If you expect many events in a short time (for example a burst of comments), consider batching or debouncing events in n8n.
  • Keep status mapping small and clear
    Maintain your status lookup table in one Code node. When Jira workflows or Notion select options change, update it there to avoid inconsistent statuses.
  • Add error handling
    Use n8n’s error workflow features or additional branches to:
    • Send Slack or email notifications when Notion updates fail
    • Log errors with enough detail to debug payload and property mismatches
  • Secure your credentials
    Store your Notion API key and Jira credentials in n8n’s Credentials system. Do not hard-code secrets in Code nodes or plain fields.
  • Test