n8n RAG Agent with Supabase & Postgres

Build a RAG Agent with Memory using n8n, Supabase & Postgres

Ever had a user ask, “Wait, what did I say earlier?” and your chatbot just stares back like it has the memory of a goldfish? Or spent way too much time copy-pasting docs into prompts like some kind of highly paid human OCR?

This is exactly the kind of repetitive pain this n8n workflow template is here to fix. With it, you can build a Retrieval-Augmented Generation (RAG) agent that:

  • Remembers past conversations using Postgres chat memory
  • Finds the right information using a Supabase vector store
  • Ingests binary files from Google Drive and turns them into searchable embeddings

In other words, you get a chat agent that is not only smart, but also remembers what you told it and actually reads your documents. Let’s walk through what this template does, how the pieces fit together, and how to get it running without losing your weekend.

What this n8n RAG template actually does

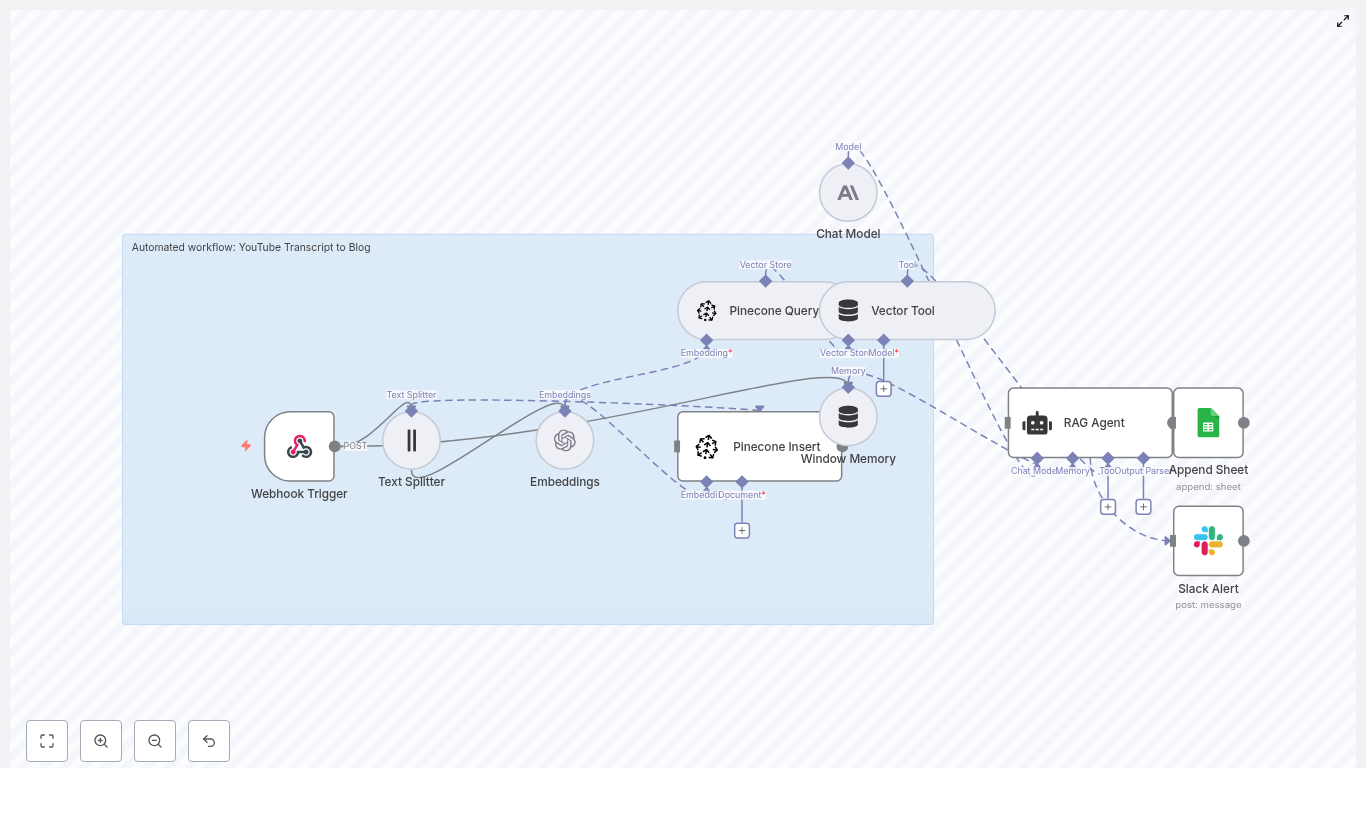
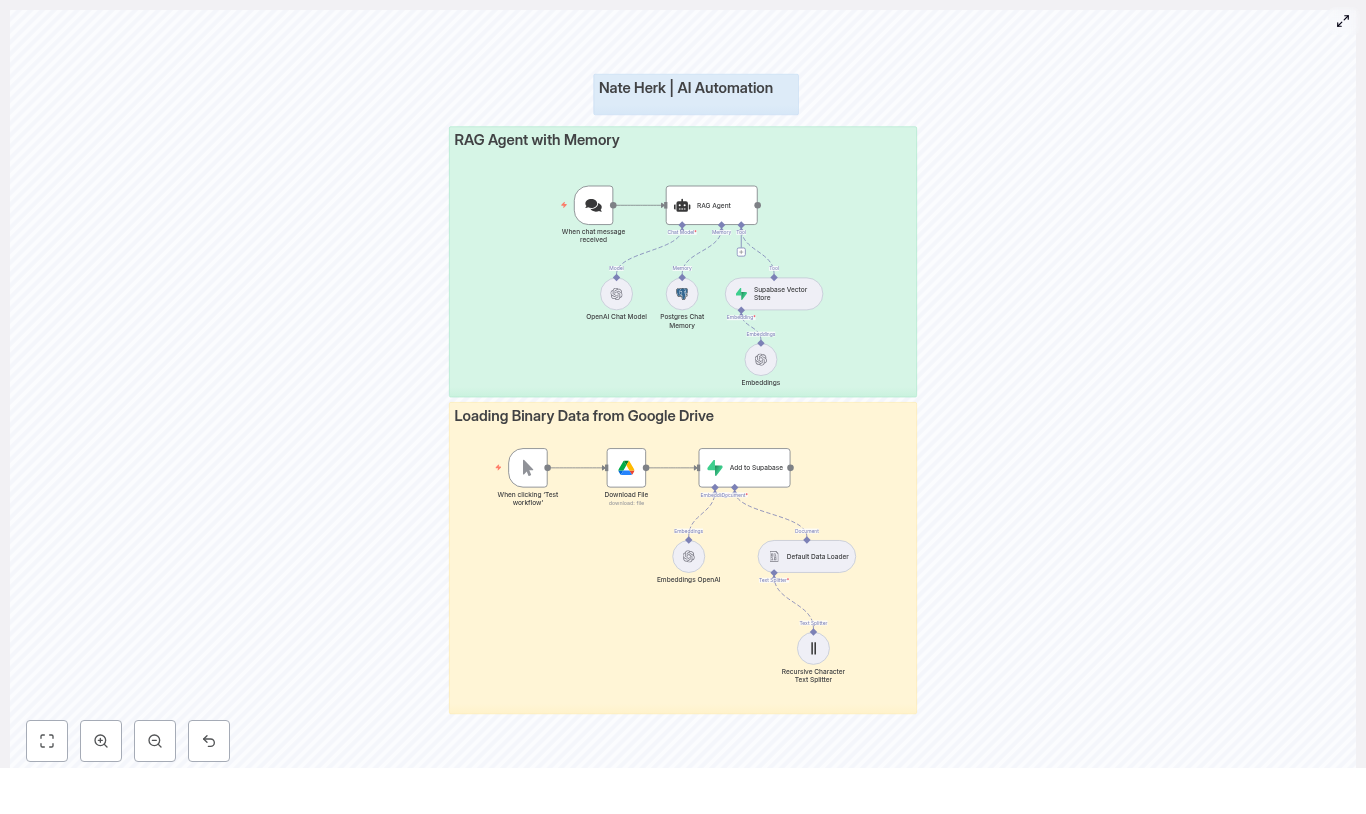
The workflow is split into two main superpowers, each represented as its own section in n8n:

1. RAG Agent with Memory (the conversational brain)

This part of the workflow is what users interact with. It:

  • Receives incoming chat messages
  • Uses an OpenAI chat model (like gpt-4o-mini or another supported model) to generate answers
  • Saves and loads chat history from Postgres so the agent remembers previous turns
  • Queries a Supabase vector store to pull in relevant document snippets at response time

The result is a context-aware RAG agent that can answer questions using your own knowledge base instead of hallucinating its way through life.

2. Loading Binary Data from Google Drive (the document pipeline)

This is the behind-the-scenes ingestion flow. It:

  • Downloads files from Google Drive
  • Splits them into manageable text chunks using a Default Data Loader and a Recursive Character Text Splitter
  • Generates embeddings for each chunk using OpenAI Embeddings
  • Stores those embeddings in Supabase so they can be retrieved later by the RAG agent

You can think of this as your “feed the brain” pipeline. Every time you run it, your agent gets a little smarter about your documents.

Meet the key workflow components

Let’s quickly introduce the main nodes so you know who is doing what inside the n8n workflow.

When chat message received

This trigger node is the front door. Whenever a user sends a chat message, this node fires and hands the message to the RAG agent. It is the starting point for every conversation.

RAG Agent

The RAG Agent node is the coordinator. It:

  • Calls the OpenAI chat model to generate responses
  • Loads and saves chat history using Postgres chat memory
  • Uses the Supabase vector store as a tool to fetch relevant documents based on the user’s query

It is the node that ties together language model, memory, and retrieval so your agent can respond with context.

OpenAI Chat Model

This node runs the conversational LLM. It uses:

  • The user’s latest message
  • Relevant document snippets from Supabase
  • Previous conversation turns from Postgres memory

to generate a coherent reply that feels like one continuous conversation rather than a series of disconnected one-liners.

Postgres Chat Memory

This node is responsible for remembering what was said. It persistently stores:

  • Conversation ids
  • Roles (user, assistant, system)
  • Message text
  • Timestamps

Future messages in the same session can reference this stored history, which improves personalization and keeps the agent from asking “Can you repeat that?” every 30 seconds.

Supabase Vector Store

This is where your document embeddings live. The vector store:

  • Stores embedding vectors along with metadata such as filename, chunk id, text snippet, and timestamp
  • Supports nearest-neighbor search for fast retrieval of relevant passages

Whenever the RAG agent needs context, it queries Supabase for the most relevant chunks to ground its answer.

Embeddings OpenAI

This node takes plain text or extracted content and turns it into vector embeddings. Those vectors are then written into Supabase so the RAG agent can find them later during retrieval.

Loading binary data flow (Google Drive to Supabase)

This part of the workflow is all about ingestion. It:

  • Downloads a file from Google Drive using your OAuth2 credentials
  • Uses a Default Data Loader to extract text
  • Applies a Recursive Character Text Splitter to break the text into usable chunks
  • Generates embeddings via OpenAI Embeddings
  • Inserts those embeddings into your Supabase vector table

Once this is done, your documents are fully searchable by the RAG agent.

How the end-to-end RAG flow works

Here is how everything comes together when the system is running.

  1. The user sends a message. The When chat message received node triggers and forwards the message to the RAG Agent.
  2. The RAG Agent:
    • Asks Postgres chat memory for recent conversation history
    • Queries the Supabase vector store to find the most relevant document passages
  3. The OpenAI Chat Model:
    • Combines the user’s message, retrieved documents, and chat memory
    • Generates a context-aware response

    The RAG Agent can then update Postgres memory with the latest user message and assistant reply.

  4. Separately, when you want to add new documents to your knowledge base, you:
    • Click Test workflow on the ingestion part of the flow
    • Download a file from Google Drive
    • Split the text into chunks
    • Compute embeddings
    • Insert those vectors into Supabase

Once both the chat and ingestion flows are configured, you have a full loop: ingest docs, embed them, store them, then query them during conversations.

Before you start: setup and prerequisites

You do not need a PhD in MLOps to use this template, but you do need a few things ready:

  • n8n instance (cloud or self-hosted)
  • Supabase project with the vector extension enabled or a configured vector table
  • Postgres instance for chat memory
    (this can be the same Postgres that backs Supabase if you prefer)
  • OpenAI API key for both chat and embeddings
  • Google Drive OAuth2 credentials to download binary files

On the database side, make sure your schemas are ready:

  • Supabase vector table Needs columns for:
    • Embedding vector
    • Metadata like filename
    • Chunk id
    • Text snippet
    • Timestamp
  • Postgres chat memory Should support:
    • Conversation id
    • Role
    • Message text
    • Timestamps

Quick configuration checklist

Once your infrastructure is ready, follow this simplified setup guide inside n8n.

  1. Import the template into n8n.
    Use the provided workflow template so you start with all nodes wired together.
  2. Configure your credentials.
    Fill in the credentials for each relevant node:
    • OpenAI API key in:
      • OpenAI Chat Model node
      • OpenAI Embeddings node
    • Supabase credentials in:
      • Supabase Vector Store node
      • Add to Supabase or equivalent insert nodes
    • Postgres credentials for the Postgres Chat Memory node
    • Google Drive OAuth2 credentials for the file download node
  3. Tune the RAG Agent behavior.
    Review the RAG Agent’s:
    • System prompt
    • Retrieval configuration (for example number of documents to fetch)
    • Memory window size
    • Tool permissions (so it can actually call the vector store)
  4. Test binary ingestion.
    Use the Test workflow trigger on the ingestion flow:
    • Download a sample file from Google Drive
    • Confirm that text is split into chunks
    • Check that embeddings are generated and successfully stored in Supabase
  5. Simulate chat queries.
    Try multi-turn conversations, for example:
    • Ask a question about a document you uploaded
    • Follow up with “And what about the second section?”
    • Verify that the agent remembers earlier messages and uses the correct document context

Troubleshooting: when your RAG agent acts weird

If something feels off, here are common issues and how to fix them without rage-quitting.

  • Irrelevant or low-quality retrievals
    Try:
    • Increasing the number of nearest neighbors returned from the vector store
    • Adjusting your text splitter settings so chunks are more semantically coherent
  • Embedding insertion errors in Supabase
    Double-check:
    • Embedding dimensionality matches the vector column definition
    • The Supabase vector column type is correctly configured for your embedding model
  • API rate limit issues
    If OpenAI or Supabase start complaining:
    • Monitor usage and rate limits
    • Add retry or backoff logic in n8n
    • Introduce rate-limiting if you expect high traffic
  • Slow or overloaded chat memory
    For Postgres performance:
    • Ensure the memory table is indexed on conversation id and timestamps
    • Optimize queries if you plan to support many concurrent sessions

Security and privacy: keep your data (and keys) safe

RAG agents are great, but you still need to treat data carefully:

  • Store API keys in secure places like environment variables or n8n credentials, not in random notes or screenshots
  • Use least-privilege roles for Supabase and Postgres so each service only has access to what it needs
  • If you handle sensitive user data:
    • Define data retention policies
    • Consider redacting sensitive fields before storage
    • Use encryption at rest for stored messages and document contents where appropriate

Best practices for a solid production RAG setup

Once everything is working, a few tweaks can make your life easier in the long run.

  • Use a text splitter tuned to your content.
    Legal contracts, support tickets, PDFs, and technical docs all benefit from different chunking strategies. Better chunks usually mean better retrieval.
  • Refresh embeddings when documents change.
    If your docs are updated regularly, schedule re-ingestion so the vector store does not serve outdated information.
  • Design memory retention rules.
    Keep long-term facts and important history, but truncate or archive casual chatter to control storage and keep retrieval focused on what matters.
  • Log behavior safely.
    With appropriate privacy safeguards, log:
    • What was retrieved
    • What the model responded with

    This helps you debug, improve prompts, and refine retrieval strategies.

Next steps: where to go after the first version

Once your n8n RAG agent with Supabase and Postgres is up and running, you can start leveling it up:

  • Add role-based access and multi-tenant routing.
    Serve multiple teams or customers from the same infrastructure while keeping data separated.
  • Introduce a feedback loop.
    Let users rate responses and use that feedback to:
    • Re-rank retrieved documents
    • Improve prompts and retrieval settings over time
  • Connect more tools to the RAG Agent.
    Extend it with:
    • Search APIs
    • Database queries
    • Function calls or other utilities

    so your agent can handle richer, task-oriented workflows instead of just Q&A.

Wrapping up

This n8n template gives you a practical starting point for building a RAG agent that is both conversational and grounded in your actual data. By combining:

  • OpenAI chat models
  • Postgres-based chat memory
  • Supabase vector search
  • Google Drive ingestion for binary files

you get a robust, production-ready workflow that turns repetitive manual tasks into automated magic.

Ready to try it? Import the workflow into your n8n instance, plug in your credentials, and hit Test workflow to start loading documents from Google Drive. Once the embeddings are in Supabase, your RAG agent is ready to chat with real context.

If you want help customizing the template for your use case, you can always reach out to the n8n community or check the documentation linked inside the workflow.

Call to action: Try the template now and subscribe to our newsletter for more tips on building production-grade RAG systems and automation patterns that save you from repetitive work.


Keywords: n8n RAG agent, Supabase vector store, Postgres chat memory, OpenAI embeddings, Google Drive ingestion, LangChain integration.

Crop Anomaly Detection Tool with Qdrant & Voyage AI

Crop Anomaly Detection Tool: How One Agronomist Used n8n, Qdrant & Voyage AI To Catch The Unknown

On a hot afternoon at the edge of a sprawling farm, Priya, an agronomist and data lead for a precision agriculture startup, stared at a dashboard that would not stop blinking red.

Her team had just rolled out a new field scouting app. Farmers were sending in thousands of crop photos every week. The idea was simple: classify each image into known crop types, then flag anything unusual for closer inspection. In practice, it was chaos.

Some images were mislabeled. Others contained pests and diseases that the training dataset had never seen. A few were not even farm crops at all. Her models tried to force every image into one of the known classes, and the result was a dangerous mix of overconfident predictions and missed anomalies.

What she needed was not just better classification. She needed a production-ready crop anomaly detection system that could say, with confidence, “this image does not belong to any known crop class.”

That search led her to an n8n workflow template built on Qdrant and Voyage AI.

The Problem: When “Unknown” Is The Most Important Class

Priya’s team managed a 29-class crop image dataset, covering staples and cash crops such as:

  • pearl_millet (bajra), tobacco-plant, cherry, cotton, banana, cucumber, maize, wheat
  • clove, jowar, olive-tree, soyabean, coffee-plant, rice, lemon, mustard-oil
  • vigna-radiati (mung), coconut, gram, pineapple, sugarcane, sunflower, chilli
  • fox_nut (makhana), jute, papaya, tea, cardamom, almond

Their classifiers were decent at telling wheat from maize or cotton from tobacco. What they could not do reliably was answer a different, far more critical question:

  • Is this photo a completely unknown plant species that slipped into the frame?
  • Does it show a pest, disease, or damage pattern that was not part of the original training data?
  • Is the image itself mislabeled or corrupted in the dataset?

In other words, they needed a system that could say, “this looks unlike anything we know,” instead of bending reality to fit a known label. That is where anomaly detection came in.

Discovering a Different Approach: Medoids, Embeddings and Vector Search

During a late-night search through developer forums and automation communities, Priya found a reference to an n8n-based workflow that combined Voyage AI multimodal embeddings with a Qdrant vector database.

The idea clicked immediately.

Instead of forcing each new image through a classification model, the workflow would:

  1. Turn the input image into a high dimensional embedding vector using a Voyage AI multimodal model.
  2. Compare that embedding against cluster centers (medoids) for each crop class stored in a Qdrant collection.
  3. Use per-cluster similarity thresholds to decide whether the image was close enough to any known crop type.
  4. If no medoid passed its threshold, mark the image as anomalous, likely a new or undefined crop.

This was not just classification. It was a compact and explainable anomaly detection pipeline, and it could be automated end to end inside n8n.

Setting the Stage: Building the Crop Collection in Qdrant

Before Priya could rely on the anomaly detector, she needed a solid foundation in Qdrant. That meant preparing the dataset and computing medoids for each crop class.

Step 1 – Preparing the dataset

Her team started with a public dataset, similar to the Kaggle “agricultural crops” dataset. They:

  • Downloaded all crop images.
  • Uploaded them to a cloud storage bucket accessible from their pipelines.
  • Kept labels and metadata intact for each image.

Step 2 – Populating Qdrant with embeddings

Using a separate n8n pipeline, they:

  1. Generated Voyage AI embeddings for each image.
  2. Uploaded these embeddings, along with labels and metadata, into a Qdrant collection.
  3. Used a free tier Qdrant Cloud cluster for initial experiments.

At this stage, Qdrant stored all points, but Priya knew the anomaly detection workflow would work best with medoids and cluster thresholds per crop class.

Step 3 – Computing medoids and thresholds

A dedicated “medoids setup” pipeline calculated, for each crop class:

  • The medoid point that best represented the class center.
  • A cluster threshold, a similarity score cutoff that a new image must reach to be considered part of that class.

In Qdrant, each medoid point received two crucial payload fields:

  • is_medoid (boolean) – marks the point as the medoid/centroid of its cluster.
  • is_medoid_cluster_threshold (float) – the minimum similarity score required for a match to that cluster.

This design meant that each crop class could have its own tolerance for variability. Classes with diverse images could have lower thresholds, while highly consistent crops could demand higher similarity. The system would stay robust even if the dataset was imbalanced.

The Turning Point: Wiring It All Together in an n8n Workflow

With Qdrant populated and medoids defined, Priya turned to the heart of the system: an n8n workflow template that would take any new image URL and decide if it belonged to a known crop or if it was anomalous.

How the n8n pipeline flows

Instead of a tangled mess of scripts, the workflow was clean and modular. Each node had a clear role.

  • Execute Workflow Trigger – The entry point. It receives the incoming image URL from another workflow, a webhook, or a scheduled job.
  • Set (Image URL hardcode) – Normalizes or hardcodes the image URL so downstream nodes always receive it in a consistent format.
  • Voyage Embeddings Request – Calls the Voyage AI multimodal embeddings API and transforms the image into an embedding vector suitable for vector search.
  • Qdrant Query – Sends the embedding to the Qdrant collection, requesting only points marked with is_medoid == true. This keeps queries efficient and focused on cluster centers.
  • Compare Scores (Code) – A small but critical code node. It inspects each returned medoid, compares its similarity score with the stored is_medoid_cluster_threshold, and decides whether the image is anomalous.

Helper nodes supported this core logic by:

  • Counting how many crop classes existed in the collection.
  • Setting the Qdrant query limit to match the number of medoids.

The decision logic that makes or breaks anomaly detection

In the Compare Scores node, Priya implemented the logic that would finally solve her original problem.

For each query:

  1. Qdrant returns a set of medoids with their similarity scores to the input image.
  2. The code node checks, for every medoid:
    • If similarity_score >= is_medoid_cluster_threshold, the image is considered a match for that cluster.
  3. If at least one medoid passes its threshold, the workflow:
    • Marks the image as not anomalous.
    • Reports the best matching crop class.
  4. If no medoid meets its threshold, the workflow:
    • Flags the image as a potential new or undefined crop.
    • Emits an alert for follow up by agronomists or data scientists.

In human readable form, the Compare Scores node returns one of two messages:

  • "Looks similar to {crop_name}" – when at least one medoid’s score is above its threshold.
  • "ALERT, we might have a new undefined crop!" – when none of the medoids meet their thresholds.

For Priya, this was the moment the system became truly useful. The workflow did not just output numbers. It gave clear, actionable decisions.

Deploying the Workflow: From Prototype to Production

Once the logic was tested on a few sample images, Priya needed to make it reliable and secure enough for daily use across farms.

Credentials and configuration

She configured the following in n8n:

  • Voyage AI API key using HTTP header authentication for the embeddings request node.
  • Qdrant Cloud credentials including the collection name and cloud URL.
  • Environment variables and n8n credential stores so that no secrets were hardcoded in the workflow.

With these in place, deploying the anomaly detection workflow was as simple as:

  1. Pointing the workflow to the correct Qdrant collection.
  2. Ensuring the medoid payload fields (is_medoid and is_medoid_cluster_threshold) matched the configuration.
  3. Connecting the workflow to upstream systems that provided image URLs, such as field apps or internal labeling tools.

Security and privacy in the field

Because the system processed real farm images, Priya enforced a few rules:

  • Only pass image URLs that the team was authorized to process.
  • Keep all API keys and credentials secure in n8n’s credential store or environment variables.
  • Restrict access to the workflow to trusted services and internal users.

Living With the Workflow: Troubleshooting and Tuning

Once farmers started sending thousands of images through the system, some patterns emerged. The workflow worked, but there were edge cases. Priya used a few key strategies to tune performance.

Common issues and how she fixed them

  • Low similarity scores for almost every image
    When embeddings looked uniformly low, she verified that:
    • The same Voyage AI model and version were used for both the original collection and the live queries.
    • No embedding drift had occurred due to a silent model upgrade.
  • Too many false positives (normal images flagged as anomalies)
    Priya:
    • Analyzed the similarity score distributions per cluster.
    • Adjusted medoid thresholds upward where needed.
    • Used cluster-wise ROC curves to find better thresholds per crop class.
  • Missing or misidentified medoids
    When some classes never matched, she checked that:
    • Medoids had been correctly flagged with is_medoid == true.
    • The is_medoid_cluster_threshold field was present and correctly named.
  • Scaling up
    As the dataset grew, she:
    • Kept queries efficient by always filtering on is_medoid == true.
    • Relied on Qdrant’s ability to scale a single collection while keeping medoid-only queries fast.

Measuring Success: Evaluation and Monitoring in Production

Priya knew that an anomaly detector is only as good as its long term behavior. To keep confidence high, she set up a simple evaluation and monitoring loop.

  • Validation set evaluation
    She used a held-out set of labeled images, including known anomalies, to:
    • Measure detection accuracy.
    • Track true positives and false negatives for anomalies.
  • Monitoring similarity distributions
    Over time, she:
    • Tracked the distribution of medoid similarity scores.
    • Set alerts when distributions shifted, a sign of concept drift or changing field conditions.
  • Human review of flagged anomalies
    For a sample of flagged images, domain experts:
    • Reviewed whether they were truly unknown crops.
    • Identified misclassifications or mislabeled data.
    • Fed confirmed new examples back into the dataset for future model updates.

What This Enabled: Real Use Cases on Real Farms

Once in place, the n8n, Qdrant and Voyage AI workflow changed how Priya’s team handled incoming images.

  • Field data capture
    Photos from scout walks were automatically checked against known farm crops. Anything unfamiliar was flagged for agronomists to review.
  • Quality control for datasets
    Before training new models, the pipeline scanned image datasets to detect mislabeled or corrupted images.
  • Species discovery and rare events
    Images that did not match any crop class surfaced possible new species, invasive weeds, or rare disease patterns that were not in the original dataset.
  • Multi modal extensions
    Where contextual metadata or text descriptions were available, Priya explored combining image and text embeddings to improve detection accuracy.

What had started as a problem of noisy labels and unknown plants turned into a flexible, extensible anomaly detection framework.

The Resolution: From Red Alerts to Reliable Insights

Weeks after deploying the workflow, the red alerts on Priya’s dashboard looked different. They were fewer, clearer, and far more meaningful.

Instead of random spikes from mislabeled data, the system highlighted images that truly did not belong to any known crop cluster. Some were new pest outbreaks. Others were weeds that had crept into fields. A few revealed labeling mistakes that would have poisoned future training runs.

Most importantly, the workflow was explainable. For every decision, Priya could see:

  • Which medoids were closest.
  • What the similarity scores were.
  • How those scores compared to per cluster thresholds.

It was no longer a black box model. It was a transparent, data driven pipeline that her team could trust, tune, and extend.

Try the Same n8n Template in Your Own Stack

If you already have a Qdrant collection and embeddings, you can plug this n8n crop anomaly detection workflow into your environment in minutes and start flagging unknown crops or anomalous images.

To reproduce Priya’s setup:

  1. Prepare a crops dataset and upload images to a cloud bucket.
  2. Create a Qdrant collection and upload image embeddings and metadata.
  3. Run a medoids setup pipeline to compute medoids and per cluster thresholds, setting is_medoid and is_medoid_cluster_threshold payload fields.
  4. Configure n8n credentials for Voyage AI and Qdrant securely.
  5. Deploy the anomaly detection workflow and point it to your Qdrant collection and cloud URL.

From there, you can:

  • Run the workflow on a sample image.
  • Tune per cluster thresholds using a validation set.

n8n AI Agent Tutorial: Multi-Level Workflow

n8n AI Agent Tutorial: Multi-Level Workflow

This article presents an advanced n8n workflow template that implements three progressively sophisticated AI agent levels: a Level 1 Expense Tracker, a Level 2 Research Assistant, and a Level 3 Multi-step Content Factory. The workflow combines LangChain-style agents, OpenAI models, conversational triggers, memory buffers, Google Sheets and Google Docs, image generation, and multiple research tools to automate real-world business processes end to end.

Overview: Why this multi-level template is important

AI-driven automation is rapidly becoming a core capability for modern operations, from finance and knowledge work to marketing and communications. This n8n template demonstrates how to design and orchestrate reusable AI agents that:

  • Accept natural language input through chat-style triggers
  • Leverage OpenAI models in a controlled and auditable way
  • Integrate with productivity tools like Google Sheets, Google Docs, and Gmail
  • Use external research and search tools such as Perplexity, Tavily, and Wikipedia
  • Generate visual assets through Replicate for content workflows

The result is a practical, extensible blueprint that can be adapted to a variety of use cases, including expense logging, research and reporting, and multi-channel content production.

Architecture: Three levels of AI agents in one n8n workflow

The template is structured as a layered architecture. Each level represents a distinct automation pattern and responsibility, while still following consistent design principles for prompts, tools, and memory.

Level 1 – Expense Tracker Agent

Objective: Provide a fast, conversational way to record and retrieve expenses using a chat interface connected to Google Sheets.

Primary components:

  • Trigger: When chat message received (chat trigger node)
  • Core model: OpenAI Chat Model node
  • Context management: Simple Memory buffer
  • Data store: Google Sheets tools for:
    • Searching existing expenses
    • Appending new rows to a shared sheet

Behavior and constraints:

The agent is configured with a strict system message that limits its scope to expense-related actions only. When a user sends a message such as an expense description, the agent:

  • Extracts structured fields, including:
    • Month
    • Year
    • Date
    • Notes
    • Amount
    • Category
  • Automatically categorizes the expense (for example, Eating Out, Travel, Software)
  • Appends a new row to a designated Google Sheet with the parsed data
  • Supports retrieval of past entries via filters on the same sheet

By constraining the system prompt and tools, this Level 1 agent is safe, predictable, and ideal for operational logging tasks.

Level 2 – Research and Reply Agent

Objective: Execute a robust two-step research workflow that gathers information from multiple sources, synthesizes findings, and prepares a draft email response.

Primary components:

  • Core model: OpenAI Chat Model node
  • Context management: Simple Memory node to maintain short-term conversation history
  • Research tools:
    • Wikipedia
    • Tavily Search
    • Perplexity
  • Output channel: Gmail node for creating email drafts

Behavior and constraints:

The agent is instructed, via its system prompt, to systematically use all three research tools for every user query. The workflow enforces a multi-source research pattern:

  1. Run queries against Wikipedia, Tavily, and Perplexity
  2. Aggregate and compare results to cross-check facts
  3. Produce a structured research summary, including:
    • Key findings
    • Supporting details
    • Explicit citations or source references
  4. Generate a concise email draft summarizing the research
  5. Save the draft to Gmail for later human review and sending

This approach improves accuracy and traceability, which is critical in professional research, analysis, and client communication workflows.

Level 3 – Content Factory: Multi-step Content Creation Agent

Objective: Deliver a fully automated content production pipeline that creates long-form blog content, X (Twitter) posts, LinkedIn posts, and associated images, then consolidates all assets into a single Google Doc.

Primary components:

  • Trigger: Chat trigger node that initiates the content workflow
  • Orchestrator: Content Factory agent node that coordinates subtools
  • Sub-agents and tools:
    • Blog post writer agentTool
    • Writer Tool for short-form copy
    • Tavily and Perplexity for topic research and SEO context
    • SerpAPI autocomplete for keyword exploration and SEO optimization
    • X post and LinkedIn post writer agents for social copy
  • Content repository: Google Docs (create and update nodes)
  • Image generation: Replicate image generation plus a status checker node to poll for completion
  • Models and memory: Multiple OpenAI Chat Model nodes and memory nodes to manage multi-step context

Behavior and orchestration flow:

Given a topic, the Content Factory agent orchestrates a sequence of steps:

  1. Create or initialize a Google Doc that will act as the central artifact
  2. Run research and keyword discovery using Tavily, Perplexity, and optionally SerpAPI
  3. Generate images for the blog and social posts using Replicate, polling until each asset is ready
  4. Produce a long-form, SEO-focused blog article, typically with H2 and H3 structure
  5. Generate platform-specific copy for X and LinkedIn, tailored to each channel
  6. Append all generated text and image URLs to the Google Doc in a structured format

The final output to the user is a single Google Doc URL containing the complete content package, which can then be reviewed, edited, and published.

Core building blocks: Node-by-node explanation

Chat Trigger

The workflow is typically initiated by the When chat message received node. This node can be connected to a webhook endpoint that integrates with:

  • Slack
  • Discord
  • Custom chat or web UI

The incoming message payload becomes the primary input to the relevant agent, which then uses its tools and prompts to decide the next actions.

OpenAI Chat Models and LangChain-style Agents

Across all three levels, multiple OpenAI Chat Model nodes are used. These are wrapped in agent nodes that follow a LangChain-style pattern:

  • A system prompt defines the agent’s role, constraints, and allowed tools
  • Tool nodes (such as Google Sheets, Tavily, Replicate) are exposed to the agent
  • Each agent is bound to a specific use case, for example:
    • Expense-only classification and logging
    • Mandatory multi-tool research and summarization
    • Coordinated content creation across formats

This encapsulation ensures that the language model behaves in a predictable, policy-compliant way and only interacts with the appropriate tools.

Memory Nodes

Memory buffer nodes provide short-term conversational context for each agent. They are particularly important when:

  • Users refine expense entries or ask follow-up questions
  • Research sessions involve iterative queries and clarifications
  • Content generation requires multiple passes or revisions on the same topic

By storing recent messages in a windowed buffer, the workflow maintains continuity without persisting unnecessary long-term data.

Tool Integrations and their roles

  • Google Sheets Tool:
    • Searches existing expense entries
    • Appends new rows for each parsed expense
    • Acts as a simple, auditable ledger for Level 1
  • Google Docs Tool:
    • Creates a central document for the Content Factory
    • Updates and appends content as each step completes
    • Provides a single reference document link for stakeholders
  • Gmail Tool:
    • Generates email drafts from Level 2 research outputs
    • Allows human review and approval before sending
  • Perplexity and Tavily:
    • Perform web-scale research and information retrieval
    • Help surface sources, citations, and recent information
  • Wikipedia:
    • Provides structured, encyclopedic background information
    • Useful as a stable reference point in research flows
  • SerpAPI (optional):
    • Offers autocomplete and search insights
    • Improves keyword discovery for SEO in the blog writer flow
  • Replicate:
    • Generates images for blog posts and social posts
    • Works with a status-check node to poll for completion of long-running jobs

Credential configuration and integration setup

Before running the workflow, configure the following credentials in n8n:

  1. OpenAI:
    • Store your OpenAI API key in n8n credentials
    • Select the appropriate model variants, for example:
      • gpt-4.1-mini
      • gpt-4.1
      • gpt-5-mini (as used in the template)
  2. Google Sheets, Google Docs, and Gmail:
    • Configure OAuth2 credentials for the chosen Google account
    • Ensure the target Sheets and Docs IDs are accessible to that account
    • Grant only the necessary scopes for security
  3. Perplexity, Tavily, Replicate:
    • Add API keys or header-based authentication in n8n
    • Verify any CORS or IP whitelisting requirements if applicable
  4. SerpAPI (optional):
    • Store the SerpAPI key in n8n credentials
    • Use it in the autocomplete and keyword research parts of the content flow

Customization strategies for advanced teams

This template is designed as a starting point. Automation and AI teams can extend and adapt it in several ways:

  • Expense Tracker enhancements:
    • Customize expense categories to match internal accounting codes
    • Introduce multi-currency handling and conversion logic
    • Add tax tags or cost center fields for financial reporting
  • Research layer extensions:
    • Connect to internal knowledge bases or wikis
    • Integrate a vector database for semantic search across internal documents
    • Apply stricter citation formatting for compliance-heavy domains
  • Content Factory integrations:
    • Push finalized content directly to CMS platforms such as WordPress or Ghost
    • Trigger publication workflows or approval chains in project management tools
    • Swap Replicate for another image generation provider or a self-hosted model

Best practices for secure and reliable AI automation

Combining AI with external tools and APIs requires careful attention to security, governance, and reliability. The following practices are recommended when deploying this template in production environments:

  • Least privilege access:
    • Limit OAuth scopes to only what is required
    • Restrict Google Sheets and Docs access to specific documents wherever possible
  • Secrets management:
    • Store all API keys and tokens in n8n credentials
    • Avoid embedding secrets directly in node parameters or shared templates
  • Input validation and guardrails:
    • Use system prompts to clearly define allowed actions and topics
    • Add validation or pre-check nodes to sanitize user input
    • Prevent data exfiltration by constraining accessible tools and outputs
  • Rate limiting and resilience:
    • Respect rate limits for OpenAI, Replicate, and research tools
    • Configure retry and backoff strategies in HTTP Request and tool nodes
  • Auditability and logging:
    • Maintain logs of agent activity and tool calls
    • Use Google Sheets or Docs metadata to track who triggered which workflow and when

Troubleshooting common issues

  • Authentication or permission errors:
    • Verify OAuth tokens are valid and not expired
    • Confirm that the Google account has access to the specified Sheets and Docs
    • Reauthorize credentials if scopes or accounts have changed
  • Inconsistent or low-quality model responses:
    • Refine system prompts to be more explicit about style and constraints
    • Adjust temperature and other model parameters
    • Test alternative model variants for your specific use case
  • Tool chaining failures:
    • Inspect intermediate node outputs using n8n’s execution logs
    • Add conditional branches and fallback logic when tools return empty or error responses
    • Introduce error handling nodes for more graceful degradation
  • Slow or long-running image generation:
    • Use the included status-check node to poll Replicate until assets are ready
    • Set sensible timeouts and notify users when generation may take longer

Real-world usage scenarios

Example 1 – Expense capture via chat:

User message: “Spent $12.50 on lunch at SuperCafe today”

The Level 1 agent:

  • Parses the message into structured fields
  • Classifies the category as Eating Out
  • Writes a row into Google Sheets such as:
    • Year: 2025

Automate Markdown Reports with n8n & Gmail

Automate Markdown Reports with n8n & Gmail

Ever written a great report in markdown, then sighed at the thought of turning it into a nicely formatted email? You’re not alone. Copying, pasting, tweaking fonts, fixing spacing, and praying it looks OK in Outlook can eat up way too much time.

That’s where this n8n workflow template comes in. It takes markdown content, converts it to clean HTML, and sends it out via Gmail automatically. You write once in markdown, hit run, and n8n handles the rest.

In this guide, we’ll walk through what the template does, when it’s useful, and how to set it up step by step. Think of it as your “markdown to email” autopilot.


What this n8n email workflow actually does

This workflow is built around a simple pattern:

  1. You (or another system) send in some markdown content plus email details.
  2. n8n converts that markdown into HTML that looks good in email clients.
  3. Gmail sends it out using OAuth2, so you never have to expose your password.

Under the hood, it uses three core n8n nodes:

  • Execute Workflow Trigger (workflow_trigger) – kicks off the workflow and receives inputs like markdown content, recipient email, and subject line.
  • Markdown to HTML (convert_to_html) – turns your markdownReportContent into HTML that is email friendly.
  • Gmail (send_email) – sends the generated HTML email using Gmail OAuth2 credentials.

In other words, this is a reusable n8n email workflow that takes “raw” markdown and turns it into automated HTML email reports with minimal effort.


When should you use this workflow?

If any of these sound familiar, this template will make your life easier:

  • You send recurring research reports, weekly summaries, or status updates.
  • Your team writes in markdown (Notion-style notes, docs, or internal tools) and you want those to go out as polished HTML emails.
  • You want a single source of truth for report content, without manually formatting every email.
  • You’re tired of formatting issues when sending markdown directly in email clients.

Automating markdown reports means:

  • Less manual work – no more copy/paste formatting every week.
  • Fewer mistakes – no more missing sections or wrong recipients.
  • Consistent formatting – every report looks the same, every time.

Whether you are sending a deep research report on Microsoft Copilot or a simple weekly update, this pattern gives you a reliable foundation to scale your email reporting.


How the n8n email workflow is structured

The beauty of this template is that it is intentionally simple but can be extended in lots of ways. At its core, it follows this flow:

  1. Trigger: Accept a JSON payload with markdown and email details.
  2. Convert: Use the Markdown node to convert markdown to HTML.
  3. Send: Use the Gmail node to deliver the HTML email.

Let’s go through the setup in a more hands-on way.


Step-by-step: setting up the markdown to HTML email workflow

Step 1: Create and configure the trigger

First, you need a way to start the workflow and pass in your report content. In most cases, you will use the Execute Workflow Trigger node, but you can swap this for any trigger that fits your use case, such as:

  • Webhook
  • Cron (for scheduled sends)
  • Manual execution

Configure the trigger to accept a JSON payload with three key fields:

{  "markdownReportContent": "# Report Title\nYour markdown content...",  "emailAddress": "recipient@example.com",  "subjectLine": "Weekly Research Report"
}

These fields map into the workflow and allow you to pass dynamic content. For example, you might send a research report about Microsoft Copilot, a weekly engineering summary, or a sales update.

As long as your payload includes markdownReportContent, emailAddress, and subjectLine, the rest of the workflow can run automatically.

Step 2: Convert markdown to HTML

Next, add the Markdown node to your workflow.

Configure it like this:

  • Set the mode to markdownToHtml.
  • Map the markdownReportContent field from the trigger to the Markdown node’s input.

The node will output a properly formatted HTML version of your markdown. This is important because email clients are notoriously picky. Sending raw markdown often leads to broken layouts, missing headings, or weird spacing.

By converting markdown to HTML in n8n, you get:

  • More reliable rendering in Gmail, Outlook, Apple Mail, and others.
  • Better control over styling.
  • A cleaner, more professional look for automated email reports.

Step 3: Configure Gmail to send HTML emails

Now it is time to send the email.

Add the Gmail node and configure it with OAuth2 credentials. This keeps authentication secure and avoids storing raw passwords inside n8n.

Key settings to configure:

  • sendTo – map this to emailAddress.
  • subject – map this to subjectLine.
  • message – map this to the HTML output from the Markdown node, for example: {{$json.data}} or the equivalent expression for your environment.

Using Gmail OAuth2 in n8n gives you:

  • Secure authentication without hard-coded passwords.
  • Automatic token refresh handling.
  • Compliance with Google’s security policies.

Once this node is configured, your workflow can take any markdown content and send it as a web-ready HTML email to the specified recipient.


Example payload: real-world testing

To see this workflow in action, you can test it with a realistic report. Here is an example payload the trigger node can accept:

{  "markdownReportContent": "Microsoft Copilot (MCP) is an advanced AI-powered assistant integrated across Microsoft 365...",  "emailAddress": "lucas@dlmholdings.com",  "subjectLine": "Deep Research Report on Microsoft Copilot (MCP)"
}

In the template, this kind of content is often stored in pinData so you can quickly test formatting and delivery. When you run the workflow with this payload:

  • The markdown research report is converted into HTML.
  • The Gmail node sends a polished HTML email to lucas@dlmholdings.com.
  • You can verify that headings, lists, and formatting look correct across email clients.

This is a great way to validate your n8n email workflow before wiring it into a larger system.


Taking it further: advanced tips & extensions

Once you have the basic markdown to HTML email workflow running, you can start extending it to match your real-world needs.

Send to multiple recipients

Need to send the same report to several people?

  • Map the sendTo field to a comma-separated list of email addresses, or
  • Use an IF or SplitInBatches node to loop over a list of recipients and send personalized messages.

This is especially helpful when you want to customize parts of the email per recipient while reusing the same markdown base.

Add attachments or images

Want your automated email reports to include files or visuals?

  • Use other nodes to fetch files from cloud storage or URLs.
  • Attach them in the Gmail node’s attachments field.

For inline images, you can:

  • Embed base64-encoded images directly in the HTML, or
  • Host images on a CDN or file server and reference them via URLs in the HTML content.

Styling and reusable templates

If you want your emails to look branded and consistent, you can enhance the HTML with templates:

  • Inject email-safe CSS directly into the HTML.
  • Use a small templating approach to merge variables like name, date, or report type.
  • Store templates in a database, file node, or external storage and load them at runtime.

This lets you keep your markdown focused on content while the template handles layout and styling.

Scheduling and full automation

You do not have to manually trigger these emails. To automate everything:

  • Swap the trigger node for a Cron trigger to send reports daily, weekly, or monthly.
  • Combine it with data collection nodes that build the markdown dynamically from:
    • Notion
    • Google Docs
    • Internal APIs or databases

This turns your n8n email workflow into a true reporting pipeline: collect data, generate markdown, convert to HTML, and send via Gmail, all on a schedule.


Security & compliance: what to keep in mind

Automated email reports are powerful, but you still want to be careful with security and data handling. A few important points:

  • Gmail OAuth2: Always prefer OAuth2 over password authentication. It is more secure and aligns with Google’s policies.
  • Data handling: Avoid sending sensitive PII or confidential data in plain emails. If you must, consider encryption or DLP tools.
  • Audit logs: Keep logging enabled for automated report generation so you can trace what was sent and when, similar to how you might track Copilot or other AI agent outputs.
  • Rate limits & quotas: Gmail has sending limits. For high-volume sending, consider batching or integrating with a transactional email service.

Troubleshooting: common issues & quick fixes

If something feels off, here are some of the usual suspects when working with a markdown to HTML n8n email workflow.

  • HTML rendering issues:
    • Test messages across Gmail, Outlook, and Apple Mail.
    • Use email-safe CSS and prefer inline styles for maximum compatibility.
  • Authentication errors:
    • Recreate or recheck your OAuth2 credentials in Google Cloud Console.
    • Confirm that the redirect URIs match your n8n instance exactly.
  • Malformed payloads:
    • Validate your JSON input before triggering the workflow.
    • Start with a simple test payload to verify conversion and delivery.
  • Large files:
    • Remember that Gmail has attachment limits.
    • For large assets, send links to shared storage instead of attaching files directly.

Why this workflow really matters

This might look like a small automation, but it solves a very real problem: turning content into consistent, shareable communication without manual effort.

By automating markdown to HTML conversion and email delivery in n8n, you get:

  • Consistent formatting across all your recurring reports.
  • Faster turnaround from draft to inbox.
  • Reproducible workflows that are easy to extend with analytics, personalization, or CRM integrations.

Whether it is a deep dive on Microsoft Copilot, a weekly leadership summary, or a product changelog, this n8n email workflow gives you a reliable pattern you can build on.


Try the n8n template for automated email reports

Ready to see it in action?

  1. Import the n8n workflow template into your n8n instance.
  2. Connect your Gmail OAuth2 credentials.
  3. Run a test with a markdown sample using the trigger payload.

You can paste the Microsoft Copilot research summary (or any markdown report you already have) into the markdownReportContent field, set your own emailAddress and subjectLine, then hit execute. Within seconds, you should see a clean HTML email in your inbox.

Call to action: Import this workflow, test it with your next markdown report, and share your results or questions in the n8n community. If you need a customized version for bulk sending, attachments, or advanced HTML templating, reach out for a tailored automation setup.


Keywords: n8n email workflow, markdown to HTML, automated email reports, Gmail OAuth2, executeWorkflowTrigger.

Automate YouTube Transcript to Blog with n8n

Automate YouTube Transcript to Blog with n8n

Got a great YouTube channel but not enough time to turn those videos into blog posts? You are not alone. Manually copying transcripts, cleaning them up, and turning them into SEO-friendly articles can eat your entire day.

In this guide, we will walk through a practical n8n workflow template that takes a YouTube transcript and automatically turns it into a polished blog post. It uses n8n, embeddings, Pinecone as a vector database, and a RAG (Retrieval-Augmented Generation) agent to do the heavy lifting for you.

By the end, you will know exactly what this automation does, when you should use it, and how it can quietly run in the background while you focus on making more content.

Why turn YouTube transcripts into blog posts automatically?

Think about each video as a little content goldmine. When you repurpose a YouTube transcript into a blog, you:

  • Reach people who prefer reading instead of watching
  • Build long-form, searchable content that can rank on Google
  • Give your audience another way to revisit your ideas and frameworks

The problem is the manual part. Copying, pasting, editing, formatting, adding headings, making it SEO-ready, and then logging everything somewhere for tracking can quickly become a full-time job.

This is where n8n shines. With a well-designed workflow, you can:

  • Cut your turnaround time from hours to minutes
  • Keep publishing consistent, even if your schedule is packed
  • Standardize your blog format so every post looks clean and professional

If you are posting videos regularly and want your blog to keep up without burning out, this automation is exactly what you need.

How the n8n YouTube transcript to blog workflow works

Let us start with the big picture. The workflow follows a fairly simple, repeatable pattern:

  • Webhook Trigger in n8n receives the YouTube video data or transcript
  • Text Splitter breaks the transcript into smaller chunks
  • Embeddings model converts each chunk into vectors
  • Pinecone stores those vectors along with metadata
  • Pinecone Query + Vector Tool feed the most relevant chunks to a RAG agent
  • RAG Agent generates an SEO-friendly blog post based on the transcript
  • Google Sheets + Slack log the result and optionally notify your team

So at a high level, your video transcript goes in, and a structured blog post comes out, with n8n coordinating the entire process in the middle.

When should you use this workflow?

This template is perfect if you:

  • Publish educational, explainer, or tutorial videos on YouTube
  • Want every video to have a matching blog post for SEO
  • Need a repeatable way to turn transcripts into long-form written content
  • Work with a content team that reviews and edits AI drafts

It is especially useful if you already use tools like the YouTube Data API, Zapier, or other automation tools, because the workflow starts with a simple webhook that can plug into almost anything.

Key building blocks of the workflow

Webhook Trigger: how your workflow gets the transcript

Everything starts with n8n’s Webhook node. This node listens for incoming POST requests and can accept:

  • A YouTube video_id
  • Raw transcript text
  • A video link plus metadata

That makes it easy to connect this workflow to the YouTube Data API, Zapier, or any custom script that can send a simple JSON payload.

Here is a sample payload you might send to the webhook:

{  "video_id": "abc123",  "title": "How to Optimize Video SEO",  "transcript": "Full transcript text...",  "published_at": "2025-01-01T12:00:00Z"
}

One important tip: keep the webhook response fast. Let the webhook acknowledge with a 200 quickly, then handle the heavy processing asynchronously so the sender is never stuck waiting.

Text Splitter: breaking long transcripts into chunks

Transcripts are usually long and messy. To make them usable for embeddings and retrieval, the workflow uses a Text Splitter node.

This node cuts the transcript into overlapping sections so that context is preserved from one chunk to the next. Typical settings look like:

  • chunkSize: around 350 to 500 characters
  • chunkOverlap: around 30 to 80 characters

The overlap is important. It gives the model continuity, so it does not suddenly lose context at the boundary between two chunks.

Embeddings: turning text into vectors

Once the transcript is split, each chunk is sent to an embeddings model, such as OpenAI text-embedding-3-small. The goal here is to convert text into numerical vectors that capture meaning, not just keywords.

These vectors make it possible to:

  • Search for similar content by meaning
  • Retrieve the most relevant parts of a transcript later
  • Give the RAG agent focused, on-topic context

Along with the vector, you can attach metadata like video_id and timestamp so you always know where a chunk came from.

Pinecone: storing and retrieving transcript chunks

Next, the workflow uses Pinecone as a vector database. There are two main actions here: Insert and Query.

Insert into Pinecone

Each embedding is stored in a Pinecone index, for example youtube_transcript_to_blog, along with useful metadata such as:

  • video_id
  • timestamp
  • chunk_text
  • speaker (if available)
  • original_url

This gives you a searchable history of all your videos and their transcript pieces.

Query Pinecone for relevant context

When it is time to generate a blog post, the workflow sends a query to Pinecone to fetch the most relevant chunks. For example, you might query with something like:

“Create a 1,200-word SEO blog post summarizing the main points and including headings about X.”

Pinecone responds with the top-k chunks that best match the query. Those chunks become the source material for your RAG agent.

Vector Tool and Window Memory: keeping the agent grounded

The Vector Tool in the workflow wraps the Pinecone query results into a format that the RAG agent can understand and use effectively. It basically says, “Here is the context you should rely on.”

Alongside that, Window Memory keeps short-term state while the agent is generating the content. This is helpful if you want to:

  • Iterate on the same draft
  • Ask for edits or additional sections
  • Keep the tone and structure consistent across generations

RAG Agent: turning transcript chunks into a blog post

The heart of the workflow is the RAG (Retrieval-Augmented Generation) agent. It combines:

  • The retrieved transcript chunks from Pinecone
  • A generative language model (like OpenAI or Anthropic)
  • A carefully designed system prompt

A typical system message might look like:

“You are an assistant for YouTube Transcript to Blog. Create an SEO blog post with headings, summaries, and a call-to-action.”

With that guidance, the agent uses the transcript context to write a coherent, grounded blog post that:

  • Follows a clear structure
  • Includes headings and subheadings
  • Reads like a human wrote it, not like a transcript dump

Google Sheets logging and Slack alerts

Once the blog is generated, the workflow can:

  • Append a row to Google Sheets with details like video ID, title, generation time, and a link to the draft
  • Send a Slack alert if something goes wrong or when a new post is ready for review

This makes it easy for your content or editorial team to track what was generated, review drafts, and catch any issues early.

Step-by-step: building the n8n YouTube transcript to blog workflow

Let us put everything together into a clear sequence you can follow:

  1. Create an n8n workflow
    Start with a Webhook node that listens for new transcripts or video events. This is the entry point for your YouTube data or transcript text.
  2. Split the transcript
    Add a Text Splitter node and configure it with:
    • chunkSize around 350 to 500 characters
    • chunkOverlap around 30 to 80 characters

    This prepares your transcript for embedding and retrieval.

  3. Generate embeddings
    Use an Embeddings node (for example, OpenAI text-embedding-3-small) to create a vector for each chunk. Attach metadata like video_id and timestamp to each record.
  4. Insert vectors into Pinecone
    Connect to your Pinecone index, such as youtube_transcript_to_blog, and insert the embeddings plus metadata. Confirm that indexing is working correctly.
  5. Query Pinecone to generate a blog
    When you want to create a post, query Pinecone for the top-k most relevant chunks using a natural language request like:
    “Create a 1,200-word SEO blog post summarizing main points and including headings about [topic].”
  6. Compose the RAG Agent call
    Build your RAG agent input with:
    • System message: role description and formatting rules
    • Tool input: the top-k chunks from Pinecone
    • User prompt: post title, target keywords, tone, and desired length

    The agent then uses the transcript context to write the actual blog post.

  7. Handle the output
    Once the HTML blog content is generated, you can:
    • Save it directly into your CMS
    • Append a new row to Google Sheets for logging and editorial review
    • Optionally send a Slack notification with a link to the draft

Prompt engineering and SEO-focused formatting

The magic is not just in the workflow, it is also in how you talk to the RAG agent. A clear, structured prompt can make the difference between a messy draft and a publish-ready article.

Here are example instructions you can bake into your system or user prompts:

  • Generate a clear H1 and multiple H2 headings
  • Include an excerpt and an SEO meta description
  • Use the primary keyword “YouTube transcript to blog” naturally at least 2 to 3 times
  • Write around 1,000 to 1,500 words with subheadings and bullet lists where it makes sense
  • End with a strong, clear call-to-action
  • Provide an SEO-friendly slug and a meta description between 150 and 160 characters

With this kind of structure, your generated posts are much more likely to be consistent, search-friendly, and easy to scan.

Best practices to get reliable, high-quality posts

To keep your automation both powerful and safe, it helps to follow a few best practices.

  • Human-in-the-loop review
    Especially for the first few runs, have someone read and lightly edit each post. This helps catch hallucinations, misinterpretations, and tone issues.
  • Tune chunk size
    If your content is highly technical or dense, try smaller chunks so each piece stays focused. For more conversational videos, slightly larger chunks may work fine.
  • Choose embedding models wisely
    Use a smaller, cost-effective embedding model for indexing. If budget allows, reserve more powerful models for the final generation step to improve quality.
  • Use rich metadata
    Store speaker names and timestamps. These can be used later for quoting, attribution, or adding “as mentioned at [time] in the video” style references.
  • SEO-aware output
    Encourage the model to add keyword-rich headings, internal links (if your CMS supports it), and structured sections like FAQs or summaries where appropriate.

Costs and performance: what to watch out for

This workflow has three main cost drivers:

  • Embedding generation
  • Pinecone vector storage and queries
  • Token usage for the generative language model

To keep things efficient and budget friendly, you can:

  • Batch embedding requests instead of sending one chunk at a time
  • Use a smaller embedding model for indexing and a higher-capacity model only for final content generation
  • Limit the number of top-k results from Pinecone, usually 3 to 6 chunks are enough for solid context

With a bit of tuning, you can keep cost per blog post quite manageable while still getting high-quality output.

Webhook payload and debugging tips

To keep your workflow easy to debug and maintain, send a concise, predictable payload into the webhook, like the example earlier. A few extra tips:

  • Return a quick 200 OK from the webhook so the sender is never blocked
  • Log key fields like video_id and title early in the workflow for easier troubleshooting
  • Use Slack alerts to notify you when an error occurs so you can jump in fast

Putting it all together

Automating your YouTube transcript to blog workflow with n8n, embeddings, Pinecone, and a RAG agent can completely change how you handle content.

Instead of manually turning every video into a blog post, you:

  • Feed transcripts into a single webhook
  • Let the workflow handle splitting, embedding, storing, and retrieval
  • Have a RAG agent generate structured, SEO-optimized blog content
  • Log everything to Google Sheets and keep your team in the loop via Slack

With good prompt engineering, rich metadata, and a simple human review loop, you can reliably scale blog creation from your existing video library without sacrificing quality.

Ready to build this workflow? If you want a starter n8n template, configuration examples, or help wiring this into your CMS, you can grab the template and start experimenting today.

Call-to-action:

Build an AI Voice Agent Workflow with n8n

Build an AI Voice Agent Workflow with n8n

On a rainy Tuesday afternoon, Mia stared at her Telegram notifications piling up on the side of her screen. As the operations lead for a fast-growing appointment-based business, she was supposed to confirm bookings, follow up with leads, and help the sales team reach out to new prospects. Instead, she was juggling voice notes, text messages, and a calendar that never quite reflected reality.

Some customers sent Telegram voice notes asking her to call their favorite clinic. Others dropped short text messages like “Can you book me a haircut at 4 pm today near downtown?” or “Please call my dentist and move my appointment.” Every time, Mia had to listen, interpret, look up businesses on Google Maps, find phone numbers, make a call, negotiate times, then finally create a Google Calendar event. By the time she finished a few requests, new ones were already waiting.

She knew there had to be a better way. That was when she discovered an n8n workflow template that promised exactly what she needed: a voice AI agent that could listen to Telegram messages, understand what people wanted, call the right contact or business, and book appointments directly into Google Calendar.

The problem: Too many messages, not enough hands

Mia’s core challenge was simple to describe but hard to fix. She needed:

  • A way to turn Telegram messages and voice notes into clear, actionable tasks.
  • An assistant that could look up personal contacts or nearby businesses automatically.
  • A reliable caller that could talk like a human, confirm details, and set appointments.
  • Automatic Google Calendar booking once a call was successful.

Doing all of this manually was slow and error-prone. She missed calls, double-booked time slots, and sometimes forgot to update the calendar. So when she found an n8n workflow for an AI voice agent, she decided to turn this chaos into a fully automated system.

The discovery: An n8n workflow that could actually make calls

The template she found promised exactly what she had been trying to build by hand. It described a workflow that:

  • Listens to incoming messages and voice notes on Telegram.
  • Uses OpenAI transcription to convert audio into text.
  • Normalizes both voice and text into a single input so the AI can understand it.
  • Lets an AI Agent decide whether to call a personal contact or search for a business on Google Maps.
  • Triggers a voice agent to make the call and then, if the call successfully books an appointment, creates a Google Calendar event.

In other words, Mia could go from “Can you call this salon and book me for tomorrow?” to a completed calendar booking without lifting a finger. The workflow would handle Telegram integration, OpenAI transcription, Google Maps scraping, automated calling, and calendar booking in one coherent system.

How the workflow fits together in Mia’s world

The Telegram doorway: where every request starts

Mia began by picturing the starting point of every interaction. For her customers, it was always Telegram. So the workflow needed a reliable entry point.

She added a Telegram Trigger node in n8n. This node would sit quietly in the background, listening for two types of updates:

  • message.text for regular chat messages.
  • message.voice for voice notes.

Right after the trigger, she connected a Switch node. That node became the traffic controller, checking whether the incoming Telegram update contained text or a voice message. From there, the story of each request would branch.

When customers speak: from voice notes to text with OpenAI

Most of Mia’s regulars preferred sending voice notes. “Hey Mia, could you book me a dentist appointment sometime next week after 3 pm?” was typical. Before, that meant she had to listen carefully and manually write down the details.

In the new workflow, the process looked different:

  1. The Switch node detected message.voice.
  2. A Telegram node downloaded the audio file from the message.
  3. The file was passed into an OpenAI transcription node, which converted the audio into text.
  4. The resulting transcription was extracted and prepared for the next step.

Text messages skipped this transcription part. They simply flowed straight ahead to the same place where all inputs would eventually meet.

The turning point: merging everything into one clear instruction

Mia knew that for her AI voice agent to work, it needed a single, consistent way of reading what customers wanted. Whether a request started as a voice note or a typed message, the AI should see just one unified payload.

That is where the Merge node came in.

She configured the Merge node to unify:

  • Transcribed text from voice notes.
  • Direct text messages from Telegram.

Along with the main text, she also included important metadata in the payload:

  • Chat ID and user ID, so the workflow always knew who was speaking.
  • The original audio URL, in case she ever needed to reference the source.
  • Intent hints or context that the AI Agent could use to better understand the request.

Now, no matter how the user spoke, the AI Agent would receive a clean, single text field and a rich context. That was the moment where the workflow stopped being a simple Telegram bot and started becoming a real AI voice assistant.

Meeting the AI Agent: deciding who to call and why

With the merged payload in place, Mia connected it to the heart of the system: the AI Agent node in n8n. This node was not just a model that generated text. It acted more like a smart coordinator that could call other tools and workflows.

Inside the AI Agent, Mia wired in several tools:

  • Personal Contact Finder to search her saved contacts and find phone numbers for people her customers mentioned by name.
  • Google Maps Scraper to look up local businesses by city, state, industry, country, and a specified number of results, usually defaulting to 5 if the user did not specify.
  • Voice Agent to actually place outbound calls using a defined context, opening message, relationship, and goal.
  • Google Calendar to create calendar events, but only after a successful booking was confirmed during the call.

For example, when a user wrote, “Can you find a hair salon in downtown Seattle and book me for Friday afternoon?”, the AI Agent would:

  1. Use Google Maps Scraper to find a few candidate salons and their phone numbers.
  2. Return a short list to the user for confirmation.
  3. After confirmation, pass the chosen business and context to the Voice Agent.
  4. Once the call succeeded and a time was agreed, create a Google Calendar event.

In Mia’s mind, she now had something that behaved a bit like a human assistant, only faster and always available.

How Mia actually built it: step-by-step inside n8n

1. Wiring up Telegram in n8n

Mia started by setting up her Telegram bot token inside n8n credentials. Then she added a Telegram Trigger node and configured the allowed updates so it could receive both text and voice messages.

From the trigger, she connected a Switch node that inspected the incoming update. The logic was simple:

  • If the update contained message.voice, send it down the transcription path.
  • If it contained message.text, send it directly toward the Merge node.

2. Handling transcription for voice notes

For the voice path, she added:

  1. A Telegram node configured to download the audio file from the voice message.
  2. An OpenAI transcription node (or another speech-to-text service) that accepted the downloaded file.
  3. Mapping logic to extract the transcription text and prepare it for merging.

This step turned every voice note into a clean text string that could be processed like any other message.

3. Normalizing everything before the AI Agent

Next, Mia used the Merge node to combine both paths. Whether the message came from the transcription branch or straight from text, the Merge node produced a single, normalized payload with:

  • A unified text field.
  • Chat and user identifiers.
  • Optional metadata like original audio URLs and intent hints.

This normalized payload was then passed to the AI Agent node so that the agent always saw the same structure and could reason reliably.

4. Configuring the AI Agent tools

Inside the AI Agent node, Mia configured several tool integrations:

  • Personal Contact Finder
    The AI could ask this tool to search her contact list and return a short candidate list when a user mentioned “my dentist” or “call John” without giving a number.
  • Google Maps Scraper
    She set up parameters such as:
    • City and state.
    • Industry or type of business.
    • Country code.
    • Result count, defaulting to 5 when the user did not specify a number.
  • Voice Agent
    This tool received:
    • Context about the call goal and any constraints.
    • An opening message to start the conversation.
    • Details about the caller’s name and relationship.
    • A fallback plan if the call did not go as expected.
  • Google Calendar
    Configured so that it only created events after the voice agent confirmed that an appointment had been successfully booked.

5. Building in safety rules and clear flow

To keep everything predictable and safe, Mia implemented several workflow rules directly in the template logic and prompts:

  • The AI must always ask the user to confirm which contact or business to call, especially when multiple matches are found.
  • Only one contact or business can be called per request, preventing accidental mass calling.
  • The AI should gather context such as:
    • Call goal (book, reschedule, confirm, etc.).
    • Preferred timeframes or date ranges.
    • A fallback plan if the first attempt fails.
  • Google Calendar events can only be created after the voice agent clearly marks the call as a successful booking.

With these rules in place, Mia felt confident that her AI voice agent would act responsibly and predictably.

Best practices Mia learned along the way

Always get user confirmation before calling

At first, Mia was tempted to let the AI immediately call the top result from Google Maps or the first contact match. She quickly realized that this could lead to awkward mistakes. Instead, she had the AI Agent:

  • Return a short, numbered list of candidate contacts or businesses.
  • Ask the user to choose one explicitly before making the call.

This small step not only reduced errors but also helped build trust with users and respected their privacy.

Limit call attempts and define fallbacks

Mia also defined clear fallback behavior. For example:

  • If the call failed, the voice agent might suggest trying again in 10 minutes.
  • If no one answered, the workflow could propose an alternative time slot.

The voice agent always returned explicit success or failure statuses. That allowed the workflow to decide whether to create a calendar event, send a follow-up message, or attempt another call.

Protecting transcripts and sensitive data

Because the workflow handled real names, phone numbers, and sometimes call recordings, Mia took data security seriously. She:

  • Stored transcriptions and contact data in an encrypted data store.
  • Restricted access to only the systems and people who truly needed it.
  • Reviewed local wiretapping and consent laws before logging any call recordings.

This made the AI voice agent not only efficient but also compliant and trustworthy.

Testing, debugging, and fine-tuning the automation

Before rolling the workflow out to her entire customer base, Mia spent time testing each piece in isolation. She created a simple plan:

  • Unit test each node
    She tested the Telegram Trigger with both text and voice messages, verified that the transcription node produced accurate text, and checked the Merge node’s output for different scenarios.
  • Use controlled sample messages
    She sent predictable messages and voice notes to verify that the AI Agent responded correctly and followed the rules.
  • Log payloads during development
    During testing, she logged full payloads to understand what was happening at each step, then removed or masked sensitive fields before moving to production logging.

Along the way, she encountered a few common issues:

  • Transcription quality required tweaking audio encoding and sometimes applying noise reduction.
  • Google Maps scraping consistency improved when she adjusted search queries and carefully formatted city, state, and country codes.
  • AI prompt engineering made a big difference. By embedding clear system instructions and examples, she got the agent to always confirm selections, ask for context, and follow the safety rules.

How Mia now uses the AI voice agent in real life

Once the workflow was stable, Mia started using it in several ways that echoed real-world use cases:

  • Appointment scheduling for services
    Customers sent a quick Telegram message like “Book me a manicure tomorrow afternoon near downtown.” The AI voice agent:
    • Found nearby salons using Google Maps.
    • Asked the customer to pick one.
    • Called the chosen business via the voice agent workflow.
    • Created a Google Calendar event after the appointment was confirmed.
  • Outbound follow-ups for sales
    Her sales team used the same system to have the AI call leads from a CRM or discover local businesses via Google Maps for outreach, then log success or failure and schedule meetings.
  • Personal assistant behavior
    For internal use, the bot could call team members or personal contacts to relay messages or set up quick sync meetings, all starting from a simple Telegram note.

Privacy, compliance, and consent in Mia’s setup

Mia knew that automated calling could be sensitive, so she built explicit consent flows into her Telegram conversations. Before the AI voice agent ever made a call, the user was informed that:

  • An automated system would place the call.
  • Details might be logged for scheduling and follow-up.
  • They could opt out at any time.

She stored consent records, added opt-out handling, and reviewed regulations like GDPR, CCPA, and local telecom rules. This kept her automation aligned with legal requirements and user expectations.

The outcome: from chaos to a calm, automated workflow

Within a few weeks of deploying the n8n template, Mia noticed something remarkable. Her Telegram inbox was still full, but her stress level was not. The AI voice agent quietly:

  • Listened to Telegram messages and voice notes.
  • Used OpenAI transcription to understand spoken requests.
  • Searched contacts and businesses through the Personal Contact Finder and Google Maps Scraper.
  • Placed outbound calls via the Voice Agent with clear goals and fallback plans.
  • Booked appointments and wrote them into Google Calendar only when they were truly confirmed.

What had started as scattered manual work turned into a reliable, scalable n8n workflow for voice AI automation.

Next steps: build your own AI voice agent in n8n

The same architecture that saved Mia’s day is available

n8n Webhook: Live ECB Euro Exchange Rates

n8n Webhook Workflow for Live ECB Euro Exchange Rates

This reference guide documents an n8n workflow that exposes the European Central Bank (ECB) daily Euro foreign exchange reference rates through a simple HTTP webhook. The workflow retrieves the ECB XML feed, converts it to JSON, normalizes the data into one item per currency, and responds with either the full rate set or a single currency based on an optional query parameter.

1. Workflow Overview

This n8n automation is designed as a lightweight, read-only API endpoint for live ECB EUR exchange rates. It is suitable for internal tools, dashboards, or backend services that need the latest EUR-based reference rates without integrating directly with the ECB XML feed.

Key capabilities

  • Expose a simple HTTP GET webhook endpoint that returns the latest ECB Euro exchange rates in JSON format.
  • Perform XML-to-JSON transformation inside n8n, avoiding external parsers or custom code.
  • Support query-based filtering using a foreign query parameter (for example, ?foreign=USD) to return a single currency rate.
  • Reduce stale data issues by appending a randomized query parameter to the ECB URL to avoid intermediary cache reuse.

Node sequence

The workflow is composed of the following nodes, executed in order:

  1. Webhook – Incoming HTTP trigger on path /eu-exchange-rate (GET).
  2. HTTP Request – Fetches https://www.ecb.europa.eu/stats/eurofxref/eurofxref-daily.xml with a random query parameter.
  3. XML (XML to JSON) – Parses the ECB XML response into JSON.
  4. Split In Batches / Item List Split (referred to here as Split Out Data) – Extracts the currency entries and emits one item per currency.
  5. If (has URL query) – Determines whether the incoming request includes a foreign query parameter.
  6. Filter (Filter the currency symbol) – Filters items by the requested currency symbol when foreign is present.
  7. Respond Asked Item – Returns the filtered single-currency result.
  8. Respond All Items – Returns the full rate list when no currency filter is provided.

2. Architecture & Data Flow

The workflow follows a linear, request-driven architecture:

  1. A client issues a GET request to the n8n webhook endpoint, optionally including a foreign query parameter.
  2. The Webhook node forwards control to the HTTP Request node, which retrieves the ECB XML feed with a random query suffix to avoid cache hits.
  3. The XML node converts the XML payload into a JSON object with nested structure.
  4. The Split Out Data node selects the nested array of currency entries and outputs a separate n8n item for each currency-rate pair.
  5. The If node evaluates the presence of query parameters. If a foreign symbol is provided, execution continues through the filter path. Otherwise, it bypasses filtering.
  6. On the filtered path, the Filter node keeps only the item whose currency matches the requested symbol. The Respond Asked Item node sends this single item back to the caller.
  7. On the unfiltered path, the Respond All Items node returns the full list of items (all currencies) as a JSON array.

All operations are performed per request, so each call to the webhook fetches and parses the current ECB daily XML file.

3. Node-by-Node Breakdown

3.1 Webhook Node – Incoming Trigger

  • Node type: Webhook
  • HTTP method: GET
  • Path: eu-exchange-rate

Example endpoint URL (adjust to your deployment):

GET https://your-n8n-instance/webhook/eu-exchange-rate

Without any query parameters, the workflow returns all available ECB reference rates as a JSON array. To request a single currency, clients include the foreign query parameter:

GET https://your-n8n-instance/webhook/eu-exchange-rate?foreign=USD

In this case, the workflow attempts to return only the USD rate. The Webhook node exposes the full query object to subsequent nodes, which is later inspected by the If and Filter nodes.

3.2 HTTP Request Node – Fetch ECB XML

  • Node type: HTTP Request
  • HTTP method: GET
  • Base URL: https://www.ecb.europa.eu/stats/eurofxref/eurofxref-daily.xml

To avoid stale responses from intermediary caches or CDNs, the node uses an expression to append a randomized numeric query parameter to the URL:

{{  "https://www.ecb.europa.eu/stats/eurofxref/eurofxref-daily.xml?"  + (Math.floor(Math.random() * (999999999 - 100000000 + 1)) + 100000000) 
}}

This expression generates a random integer between 100000000 and 999999999 and appends it as a query string, for example:

https://www.ecb.europa.eu/stats/eurofxref/eurofxref-daily.xml?567432198

As a result, each request uses a unique URL, which significantly reduces caching issues and helps ensure that the latest daily file is retrieved.

Response format: configure the HTTP Request node to return raw XML (for example, by setting Response Format to String or File, depending on your n8n version) so that the XML node can parse it correctly.

3.3 XML Node – XML to JSON Conversion

  • Node type: XML
  • Operation: XML to JSON

The XML node consumes the raw XML body from the HTTP Request node and converts it into a JSON object. After parsing, the ECB XML document is represented as nested JSON properties, which can be accessed using JavaScript-style property paths in expressions.

This transformation enables downstream nodes to work with the data using n8n’s standard JSON item model instead of raw XML.

3.4 Split Out Data Node – Extract Currency Array

  • Node type: Item list / Split (referred to as Split Out Data)
  • Input: JSON output from XML node
  • Target path: ['gesmes:Envelope'].Cube.Cube.Cube

The ECB JSON structure after parsing is nested under several Cube elements. The Split Out Data node uses the path:

['gesmes:Envelope'].Cube.Cube.Cube

to access the innermost array of currency entries. Each element of this array is an object with at least two properties:

[  { "currency": "USD", "rate": "1.0987" },  { "currency": "JPY", "rate": "152.34" },  ...
]

The node is configured to iterate over this array and emit one n8n item per object. This normalization step is critical for filtering and conditional responses later in the workflow.

3.5 If Node – Query Presence Check

  • Node type: If
  • Purpose: Detect whether the webhook was called with a query parameter.

The If node inspects the data coming from the Webhook node, typically checking whether the query object is non empty and specifically whether a foreign field is present. Conceptually, the condition is:

  • If the request includes a foreign query parameter, follow the “true” branch.
  • If not, follow the “false” branch and return all items.

This node does not modify the exchange rate data itself. It only controls the routing logic based on the inbound HTTP request metadata.

3.6 Filter Node – Filter the Currency Symbol

  • Node type: Filter (or similar item filtering node)
  • Input: Items from Split Out Data node
  • Condition: item.currency === $json["query"]["foreign"] (conceptually)

When the If node determines that a foreign query parameter is present, execution continues into the Filter node. This node compares each item’s currency property to the requested currency symbol supplied by the client. For example, if the query is:

?foreign=USD

then only items where currency equals USD are kept. All other items are discarded.

If there is no matching currency for the provided symbol, the filter will output an empty item list. How this case is handled depends on the configuration of the subsequent Respond node (for example, it may return an empty array or an empty object).

3.7 Respond Asked Item Node – Single Currency Response

  • Node type: Webhook Reply / Respond to Webhook
  • Input: Filtered item list (typically 0 or 1 item)

For requests that include foreign, this node sends the filtered result back to the original HTTP client. When there is exactly one match, the response is a single JSON object representing that currency-rate pair:

{  "currency": "USD",  "rate": "1.0987"
}

If the filter produced multiple items (which should not happen with valid ECB data and unique currency codes) or zero items, the actual response will reflect that configuration. In typical ECB usage, you should expect at most one item per currency code.

3.8 Respond All Items Node – Full Rate List Response

  • Node type: Webhook Reply / Respond to Webhook
  • Input: All items from Split Out Data node

When the If node determines that there is no foreign query parameter, the workflow bypasses the Filter node and passes all items directly to this Respond node. The response body is a JSON array of currency objects:

[  { "currency": "USD", "rate": "1.0987" },  { "currency": "JPY", "rate": "152.34" },  ...
]

This is the default behavior for simple GET requests without query filters.

4. Request & Response Examples

4.1 Full rate list (no query)

Request:

GET https://your-n8n-instance/webhook/eu-exchange-rate

Example response:

[  {"currency":"USD","rate":"1.0987"},  {"currency":"JPY","rate":"152.34"},  ...
]

4.2 Single currency rate (with foreign query)

Request:

GET https://your-n8n-instance/webhook/eu-exchange-rate?foreign=USD

Example response:

{  "currency":"USD",  "rate":"1.0987"
}

All rates are relative to EUR, as provided by the ECB reference feed.

5. Configuration Notes & Edge Cases

5.1 XML structure and Split path

The correctness of the ['gesmes:Envelope'].Cube.Cube.Cube path in the Split Out Data node depends on the exact JSON structure produced by the XML node. If the ECB XML format changes or your XML node settings differ, you may need to adjust this path.

Use the Execute Node feature on the XML node to inspect the raw JSON output and confirm that the nested Cube elements appear as expected.

5.2 Dealing with caching & ECB rate limits

  • The random query parameter on the ECB URL is intended to bypass intermediate caches that might otherwise serve outdated rates.
  • ECB endpoints are public, but they may enforce rate limits such as HTTP 429 (Too Many Requests) or 403 (Forbidden) under heavy load or misuse.
  • For high traffic scenarios, consider adding caching at the n8n level instead of requesting the ECB feed on every single webhook call.

5.3 XML parsing issues

If the XML node fails to parse the response, verify the following:

  • The HTTP Request node is configured to return the body as plain text or a format that the XML node supports.
  • No unexpected Content-Encoding or compression is interfering with the response. If necessary, adjust the HTTP Request node’s Response Format.
  • Optionally, set an explicit header in the HTTP Request node:
    Accept: application/xml

    to ensure you receive XML instead of another format.

5.4 Handling missing or invalid currency codes

  • If a client provides a currency symbol that is not present in the ECB feed, the Filter node will output zero items.
  • Depending on your Respond node configuration, this may result in an empty array, an empty object, or a default response. Adjust your response handling if you want to return a specific error message or HTTP status code for “currency not found”.

6. Customization & Advanced Usage

6.1 Adjusting the JSON response schema

If you want to return a different JSON structure, insert a Set node before the Respond nodes. Typical customizations include:

  • Renaming keys, for example:
    • currency to symbol
    • rate to value
  • Adding a base field:
    base: "EUR"
  • Converting the rate from string to number using an expression for easier downstream calculations.

6.2 Caching inside or outside n8n

To reduce the number of HTTP calls to the ECB endpoint, especially if your webhook is invoked frequently during the same day, you can:

  • Use an in-memory cache pattern inside n8n (for example, via a separate workflow that refreshes rates periodically and stores them in a database or key-value store).
  • Integrate an external cache such as Redis, a database, or an HTTP cache layer in front of your n8n instance.

The current template always fetches live data on each request, which is simple but may not be optimal under heavy load.

6.3 Supporting other ECB feeds (historical data)

The ECB provides additional XML endpoints, including 90-day and long term historical feeds. You can reuse the same workflow structure with small adjustments:

  • Change the HTTP Request node URL to the desired ECB historical or 90-day feed.
  • Verify the resulting XML structure and update the Split Out Data path if necessary.
  • Optionally add query parameters or logic to select specific dates from historical data.

6.4 Adding authentication to the webhook

If you expose this webhook publicly, you may want to restrict access. Common options include:

  • Using the Webhook node’s built-in authentication mechanisms (for example, HTTP Basic Auth or API key).
  • Implementing custom authentication logic in front of the workflow, such as a

Build a Dental Voice Agent with n8n & Gemini

Build a Dental Voice Agent with n8n & Gemini

Every busy dental practice eventually hits the same wall: the phones never stop ringing, your team is juggling calendars and insurance questions, and patients are left waiting for callbacks. It is stressful, reactive, and it pulls focus away from the care that really matters.

What if your front desk could feel lighter, your schedule more organized, and your patients better served, all without adding more staff? That is where automation comes in.

This guide walks you through a powerful n8n workflow template – “The Recap AI – Dentist Voice Agent” – that uses Google Gemini (PaLM), LangChain-style logic, Google Calendar, and Google Sheets to handle incoming appointment requests for a dental practice. You will see not just how it works, but how it can become a stepping stone toward a more automated, focused, and growth-ready operation.

From Phone Chaos to Calm: Why a Dental Voice Agent Matters

In many practices, front-desk staff are constantly context-switching. One moment they are checking availability, the next they are hunting for an open slot, then typing patient details into a sheet or practice system. It is repetitive work, and it is exactly the kind of work that automation handles beautifully.

A dental voice agent built with n8n can:

  • Check availability in your Google Calendar
  • Suggest alternate appointment times
  • Create one-hour appointments
  • Log call and patient details in Google Sheets

All of this can be triggered from a webhook fed by your phone system or chat tool, following clear, repeatable rules. The result is a smoother experience for patients and far less manual busywork for your team.

Think of this workflow as your first big step toward a more automated, resilient front office. Once you see it in action, it becomes easier to imagine what else you can automate next.

Shifting Your Mindset: Automation as a Partner, Not a Threat

Before we dive into the architecture, it helps to frame automation the right way. This n8n template is not here to replace your team. It is here to protect their time and free their attention for the human moments that matter most.

When a voice agent handles structured tasks, your staff can:

  • Spend more time helping anxious patients
  • Focus on complex insurance or treatment questions
  • Support clinicians more effectively
  • Invest energy into growth projects instead of repetitive calls

Adopting an automation-first mindset is about asking: What can a workflow do for us so we can do more of the work only humans can do? This dentist voice agent is a concrete, practical answer to that question.

Inside the Workflow: How the n8n Dental Voice Agent Is Structured

The template is built with a modular architecture that is easy to understand, audit, and extend. Each part has a clear purpose, so you can confidently tweak or expand it later.

Core Components of the Template

  • Webhook trigger: Receives POST requests from your telephony or chat system.
  • Agent (LangChain-like): Central decision logic that orchestrates tools and enforces rules.
  • LLM (Google Gemini / PaLM): Interprets natural language and generates structured responses.
  • Think tool: An internal reasoning step that the agent must use before calling any external tool.
  • Google Calendar tools:
    • get_availability – checks for open appointment slots
    • create_appointment – creates a one-hour appointment
  • Google Sheets logging: Appends patient and call details to a sheet.
  • Memory buffer: Maintains short-term context across interactions via a session key.
  • Respond to webhook: Returns structured JSON back to your caller or telephony system.

This architecture is intentionally transparent. You can see exactly which node does what, which makes it easier to extend the template with your own logic, additional tools, or integrations later.

Rules That Keep Your Automation Safe, Consistent, and Auditable

Powerful automation is not just about what it can do. It is about what it should do, every time. This template includes explicit constraints that keep behavior predictable and easy to review.

  • Always use the think tool first The agent must call the think tool before using any external tool. This internal reasoning step:
    • Improves decision consistency
    • Makes the workflow easier to audit
    • Reduces random or unsafe tool calls
  • get_availability behavior
    • Can be called multiple times
    • Should try to return at least two available time slots when possible
    • Search pattern: around the requested time in 30-minute or 1-hour increments
    • Prioritize slots between 8:00 AM and 5:00 PM CST
  • create_appointment constraint
    • May be called at most once per request
    • Creates a one-hour event in Google Calendar
  • log_patient_details constraint
    • Should be called only once
    • Only used when patient name, insurance provider, and any questions or concerns are available

These rules are built into the agent instructions, so the workflow behaves like a reliable teammate, not a black box.

Your Automation Journey: Step-by-Step Implementation in n8n

Now let us walk through how you actually bring this template to life. Treat each step as a building block. Once you understand them, you can adapt, extend, and refine the workflow to fit your practice perfectly.

1. Configure the Webhook Trigger

First, connect your communication channel to n8n.

Point your telephony or chat system to the Webhook node URL. Each incoming POST request should include structured data such as:

  • request_type (for example: check_availability or book_appointment)
  • patient_name
  • requested_time
  • insurance_provider (optional)
  • questions_or_concerns (optional)

This payload becomes the starting point for your agent to interpret the patient request and decide what to do next.

2. Set Up Google Gemini and the Agent Logic

Next, you bring intelligence into the workflow.

  • Connect Google Gemini (PaLM) as your LLM in n8n.
  • Create an Agent node that receives the webhook payload.
  • Define a clear system prompt that:
    • Explains the agent’s role as a dental appointment assistant
    • Lists the tools it can use (think tool, get_availability, create_appointment, log_patient_details)
    • Describes the constraints and rules mentioned above
    • Specifies the required output format so the response to the webhook is structured and predictable
  • Make it explicit that the agent’s first step must always be to call the think tool.

This is where you can infuse your own office style. Adjust the prompt to match your tone, your policies, and the way you want the agent to talk about scheduling and insurance.

3. Implement Availability Checking with Google Calendar

With the agent in place, you can empower it to look up real availability.

Use the get_availability tool to query your Google Calendar. The agent should follow a structured search pattern around the requested time, for example:

  • Start at the requested time
  • Then check 30 minutes earlier
  • Then 30 minutes later
  • Then 60 minutes earlier
  • Then 60 minutes later

The goal is to return two available time slots in ISO format (CST) whenever possible. If only one slot is available, the agent should return that single option.

This structured approach keeps patient conversations efficient and makes the scheduling logic transparent and debuggable.

4. Create the Appointment in Google Calendar

Once the patient (or your telephony flow) confirms a time, the agent should call create_appointment exactly once.

Key points to follow:

  • Create a one-hour event for the confirmed time.
  • Use a clear and consistent event summary format, for example:
    Dental Appointment | {patient_name}

This small detail helps your team quickly scan the calendar and know who is coming in and why the slot was booked.

5. Log Patient Details in Google Sheets

After the appointment is booked, or whenever sufficient patient information is available, the agent should call log_patient_details to append a new row to your Google Sheet.

Include fields such as:

  • Call timestamp
  • Patient name
  • Insurance provider
  • Questions or concerns
  • Appointment timestamp (if booked)

This simple spreadsheet log becomes a lightweight audit trail that you can later turn into dashboards, reports, or import into other systems.

Testing, Edge Cases, and Best Practices for a Reliable Agent

Automation becomes truly powerful when it behaves well in real-world scenarios, not just ideal ones. Use these practices to strengthen your workflow and build confidence before going live.

  • Testing Simulate webhook payloads in n8n to test:
    • Different request types
    • Times around lunch breaks
    • Requests outside business hours

    This helps you refine how the agent suggests alternatives and handles rejections.

  • Concurrency Two patients might try to book the same time. To avoid double-booking:
    • Perform a final availability check right before calling create_appointment
    • If the slot is taken, the agent should gracefully suggest new options
  • Partial data Respect patient preferences and data quality:
    • Do not call log_patient_details unless required information is available
    • If a patient declines to share details, the agent can still suggest time slots but should skip logging
  • Timezone handling This workflow assumes Central Time (CST). Always:
    • Convert incoming timestamps to CST before checking availability
    • Return times clearly labeled so staff and patients stay aligned

Security, Privacy, and Compliance You Can Trust

Appointment conversations may include Protected Health Information (PHI), so your automation must be handled with care.

  • Use HTTPS for webhooks and secure OAuth credentials for Google APIs.
  • Limit logging in Google Sheets to essential fields only. Avoid storing sensitive or clinical notes in general-purpose logs.
  • If you are a HIPAA-covered practice:
    • Ensure your Google Workspace is configured with a Business Associate Agreement (BAA)
    • Confirm that any telephony providers also support BAAs and compliant storage

Building privacy and security into your workflow from day one means you can scale automation without compromising trust.

Growing With Automation: Scaling and Future Enhancements

This n8n template is not just a finished tool. It is a foundation you can build on as your practice and automation skills grow.

Once you are comfortable with the basic voice agent, consider extending it with:

  • Speech-to-text integration Connect services like Twilio + Google Speech-to-Text so actual phone calls are converted into webhook payloads for the agent.
  • Patient verification Add optional identity checks before booking, especially for new patients or high-value procedures.
  • Multilingual support Adjust LLM settings and prompts to support multiple languages and better serve diverse patient communities.
  • Analytics dashboard Use your Google Sheets logs as a data source for dashboards that track:
    • Average time to book
    • No-show patterns
    • Common questions or concerns

    This insight can drive better staffing decisions and patient communication strategies.

Each enhancement is another step toward a more automated, insight-driven practice that adapts quickly and serves patients with less friction.

Taking the Next Step: Start Small, Learn Fast, Automate More

Automating appointment booking with a rule-driven voice agent is a practical way to reclaim time, reduce stress, and offer a consistently high-quality patient experience. The n8n template “The Recap AI – Dentist Voice Agent” brings together:

  • Agent-based logic powered by Google Gemini (PaLM)
  • Reliable scheduling through Google Calendar
  • Structured record-keeping with Google Sheets
  • Clear rules that keep behavior safe and auditable

Your journey does not have to be complicated. Start with this template, run a few tests, and iterate. Each improvement you make will sharpen both the workflow and your own automation skills.

Ready to automate your dental front desk? Download or import the template into your n8n instance, send a few simulated webhook payloads, and watch the agent handle requests end to end. Then refine the prompts, tune the rules, and shape the conversation so it perfectly matches your practice.

As you gain confidence, you will see more and more opportunities to automate, integrate, and grow. This dental voice agent can be the first of many workflows that help your team do less manual work and more meaningful work.

Keywords: dental voice agent, n8n workflow, appointment booking automation, Google Gemini, Google Calendar integration, Google Sheets logging, dentist appointment automation template.

n8n Email Scraper with Firecrawl & Instantly

n8n Email Scraper with Firecrawl & Instantly

This guide shows you how to use an n8n workflow template to automatically scrape websites for email addresses and send those leads straight into Instantly. You will learn how each node works, how Firecrawl powers the scraping, and how to keep your automation reliable, ethical, and ready for production.

What you will learn

  • How to trigger an n8n workflow with a simple form that accepts a website URL and scrape limit
  • How to use Firecrawl to map a website and batch scrape pages for email addresses
  • How to normalize obfuscated email formats and remove duplicates
  • How to loop until a Firecrawl batch job is finished without hitting rate limits
  • How to send each unique email to Instantly as a lead
  • Best practices for compliance, security, and scaling your email scraping automation

Use case: Why this n8n workflow is useful

This n8n template is designed for teams that need a repeatable, no-code way to collect contact emails from websites. It works especially well for:

  • Marketers and growth teams who want to feed new leads into Instantly campaigns
  • Automation engineers who need a controlled, rate-limited scraping pipeline
  • Anyone who wants to map a site, find contact pages, extract emails, and avoid manual copy-paste

The workflow:

  • Maps a website to find relevant contact pages
  • Scrapes those pages for email addresses using Firecrawl
  • Normalizes obfuscated email formats (for example, user(at)example(dot)com)
  • Deduplicates results
  • Sends each unique email to Instantly as a lead

High-level workflow overview

Before we go node by node, here is the full automation at a glance:

  1. Form trigger – User submits a website URL and a scrape limit.
  2. Website mapping – Firecrawl /v1/map finds likely contact pages.
  3. Batch scrape – Firecrawl /v1/batch/scrape scrapes those URLs for emails.
  4. Polling loop – The workflow waits, then checks if the batch job is completed.
  5. Result processing – Extract and normalize email addresses, then deduplicate.
  6. Split emails – Turn the array of emails into one item per email.
  7. Instantly integration – Create a lead in Instantly for every unique email.

Step-by-step: How the n8n template works

Step 1 – Collect input with form_trigger

The workflow starts with a form trigger node in n8n. This node presents a simple form that asks for:

  • Website Url – The root URL of the site you want to scrape.
  • Scrape Limit – How many pages Firecrawl should map and scrape.

You can use this form for ad-hoc runs, or embed it into an internal tool so non-technical users can start a scrape without touching the workflow itself.

Step 2 – Map the website with Firecrawl (map_website)

Next, the map_website node calls Firecrawl’s POST /v1/map endpoint. The goal is to discover pages that are likely to contain email addresses, such as contact or about pages.

The JSON body looks like this:

{  "url": "{{ $json['Website Url'] }}",  "search": "about contact company authors team",  "limit": {{ $json['Scrape Limit'] }}
}

Key points:

  • url uses the value from the form.
  • search provides hints like about, contact, company, authors, team so Firecrawl prioritizes pages that commonly list emails.
  • limit controls how many pages are mapped and later scraped, which helps manage cost and runtime.

The response contains a list of links that will be passed into the batch scrape step.

Step 3 – Start a batch scrape with Firecrawl (start_batch_scrape)

Once the relevant URLs are mapped, the start_batch_scrape node calls Firecrawl’s POST /v1/batch/scrape endpoint to process them in bulk.

Important options in the request body:

  • urls – The list of URLs from the map step.
  • formats – Set to ["markdown","json"] so you have both readable content and structured data.
  • proxy – Set to "stealth" to reduce the chance of being blocked as a bot.
  • jsonOptions.prompt – A carefully written prompt that tells Firecrawl how to extract and normalize email addresses.

Example JSON:

{  "urls": {{ JSON.stringify($json.links) }},  "formats": ["markdown","json"],  "proxy": "stealth",  "jsonOptions": {  "prompt": "Extract every unique, fully-qualified email address found in the supplied web page. Normalize common obfuscations where “@” appears as “(at)”, “[at]”, “{at}”, “ at ”, “@” and “.” appears as “(dot)”, “[dot]”, “{dot}”, “ dot ”, “.”. Convert variants such as “user(at)example(dot)com” or “user at example dot com” to “user@example.com”. Ignore addresses hidden inside HTML comments, <script>, or <style> blocks. Deduplicate case-insensitively."  }
}

The normalization prompt is critical. It instructs Firecrawl to:

  • Recognize obfuscated patterns like user(at)example(dot)com or user at example dot com.
  • Convert them into valid addresses like user@example.com.
  • Ignore emails in HTML comments, <script>, and <style> blocks.
  • Deduplicate emails without case sensitivity.

This ensures that the output is usable in downstream tools such as Instantly without additional heavy cleaning.

Step 4 – Respect rate limits with rate_limit_wait

After starting the batch scrape, Firecrawl needs some time to process all URLs. Instead of hammering the API with constant polling, the workflow uses a wait node (often called rate_limit_wait).

This node:

  • Pauses the workflow for a set duration.
  • Prevents excessive API requests and reduces the risk of being throttled.
  • Gives Firecrawl time to complete the batch job.

Step 5 – Poll results with fetch_scrape_results

Once the wait is over, the workflow uses the fetch_scrape_results node to retrieve the current state of the batch job. It calls Firecrawl with the job ID returned from the start_batch_scrape node.

The URL typically looks like:

=https://api.firecrawl.dev/v1/batch/scrape/{{ $('start_batch_scrape').item.json.id }}

This endpoint returns the job status and, once completed, the scraped data including any extracted email addresses.

Step 6 – Check if the scrape is completed (check_scrape_completed)

The next node is an If node, often called check_scrape_completed. It inspects the response from Firecrawl to see whether the batch job’s status is completed.

  • If status is completed – The workflow moves forward to process the results.
  • If status is not completed – The workflow loops back into the waiting and retry logic.

This creates a controlled polling loop instead of a tight, resource-heavy cycle.

Step 7 – Limit retries with check_retry_count and too_many_attempts_error

To avoid an infinite loop or excessive API calls, the workflow includes a retry counter. This is typically implemented with:

  • check_retry_count – Checks how many times the workflow has already polled Firecrawl.
  • too_many_attempts_error – If the retry count exceeds a threshold (for example 12 attempts), the workflow stops and surfaces a clear error.

This protects you from runaway executions, unexpected costs, and hitting hard rate limits.

Step 8 – Consolidate results with set_result

Once the Firecrawl job is completed, the workflow needs to gather all extracted email addresses into a single array. The set_result node does this using a JavaScript expression.

Example expression:

($node["fetch_scrape_results"].json.data || [])  .flatMap(item => item?.json?.email_addresses || [])  .filter(email => typeof email === 'string' && email.trim())

This logic:

  • Looks at fetch_scrape_results output, specifically the data array.
  • For each item, pulls out the json.email_addresses array if it exists.
  • Flattens all these arrays into one combined list.
  • Filters out any non-string or empty entries.

After this node, you should have a single field, often named something like scraped_email_addresses, that contains a clean array of all emails found across the scraped pages.

Step 9 – Emit one item per email with split_emails

Most downstream API nodes in n8n work best when each item represents a single logical record. To achieve this, the workflow uses a SplitOut (or similar) node named split_emails.

This node:

  • Takes the scraped_email_addresses array.
  • Emits one new n8n item for each email address.

After this step, the workflow will have one item per email, which makes it easy to send each one to Instantly or any other service.

Step 10 – Create leads in Instantly (create_lead)

The final main step is to send each email into Instantly as a new lead. This is handled by an HTTP Request node often called create_lead.

Typical configuration:

  • Authentication – Use HTTP header auth with your Instantly API key stored as n8n credentials.
  • MethodPOST.
  • Endpoint – Instantly’s leads endpoint.
  • Body – Contains the email address and a campaign identifier.

Example request body:

{  "email": "={{ $json.scraped_email_addresses }},  "campaign": "4d1d4037-a7e0-4ee2-96c2-de223241a83c"
}

Each item coming from split_emails will trigger one call to Instantly, creating a lead and associating it with the specified campaign.


Best practices for using this n8n email scraper

Compliance and responsible scraping

  • Check robots.txt and terms of service – Some websites explicitly disallow scraping or automated email harvesting.
  • Follow privacy regulations – Comply with laws like GDPR and CAN-SPAM. Only use collected emails for lawful purposes and obtain consent where required.
  • Prefer opt-in outreach – Use automation to support, not replace, ethical contact collection and communication.

Data quality and sender reputation

  • Validate emails – Before pushing leads to a live campaign, run an email verification step (for example SMTP check or a service like ZeroBounce or Hunter) to reduce bounces.
  • Deduplicate aggressively – The workflow already deduplicates at the scraping stage, but you can add extra checks before creating Instantly leads.

Performance and reliability

  • Throttle and back off – The template includes a wait node and retry limits. For large jobs, consider implementing exponential backoff or per-domain throttling.
  • Logging and monitoring – Store raw Firecrawl responses and n8n logs so you can debug data quality issues and API errors.

Troubleshooting and improvements

Common issues and how to fix them

  • Problem: Empty or very few results
    • Increase the limit parameter in the map step so more pages are crawled.
    • Broaden the search keywords if the site uses unusual naming for contact pages.
    • Inspect the mapped links from Firecrawl to confirm that the expected pages are being scraped.
  • Problem: Job stuck in pending
    • Check that your Firecrawl API key is valid and has remaining quota.
    • Verify network and proxy settings if you are using custom infrastructure.
    • Review the retry loop configuration to ensure it is not exiting too early.
  • Problem: Duplicate leads in Instantly
    • Add a dedicated deduplication step before the create_lead node.
    • Check Instantly campaign settings that control how duplicates are handled.

Suggested enhancements to the template

  • Add email validation – Insert a node for a verification service (for example ZeroBounce, Hunter) between split_emails and create_lead.
  • Persist results – Save scraped emails and source URLs to a database (MySQL, PostgreSQL) or Google Sheets for auditing, export, and later analysis.
  • Filter by domain or role – Add logic to ignore addresses like info@ or non-corporate domains if you want only specific types of leads.
  • Add notifications – Integrate Slack or email nodes to alert your team on errors or when a certain number of new leads are found.
  • Advanced rate limiting – Implement exponential backoff, per-domain queues, or concurrency limits for very large scraping jobs.

Security and credential management in n8n

API keys are sensitive and should never be hard-coded in your workflow JSON.

  • Use n8n’s credential system (for example HTTP Header Auth) to store Firecrawl and Instantly keys.
  • Separate credentials by environment (staging vs production) so you can test safely.
  • Restrict access to the n8n instance and credential store to authorized team members only.

Ethics and legal considerations

Automated email extraction can be a sensitive activity. To stay on the right side of both law and ethics:

  • Always respect site owners’ preferences and legal notices.

Super Assistants — MCP Servers for Multichannel Automation

Super Assistants – How MCP Servers Unlock Multichannel Automation In Your Workflow

Every day, messages, meetings, and leads flow through tools like Slack, Gmail, Google Calendar, Airtable, LinkedIn, and WhatsApp. When these channels are disconnected, you spend your time copying data, chasing updates, and reacting to notifications instead of focusing on meaningful work.

The Super Assistants MCP Server template for n8n turns that chaos into a coordinated, automated system. It connects your core tools into a single orchestration layer so outreach, CRM updates, scheduling, and messaging can run in the background while you stay focused on the work that truly moves your business forward.

Think of this template as a starting point for building your own network of “super assistants” that never forget a follow-up, never miss a lead, and always keep your systems in sync.

The Shift: From Manual Busywork To Confident Automation

Most teams feel the friction of multichannel work:

  • Messages in Slack that never make it into the CRM
  • Leads sitting in Airtable without a scheduled meeting
  • LinkedIn outreach that is hard to track or report on
  • Emails that require manual triage and follow-up

It is easy to assume that fully automating all of this requires custom code, weeks of integration work, and a dedicated engineering team. In reality, with the right structure and a reusable template, you can start small, automate one flow, and expand from there.

The Super Assistants template is designed exactly for that journey. It gives you a clear, opinionated architecture that you can adopt in minutes, then gradually adapt to your exact use cases.

Mindset First: Build A System That Works While You Don’t

Automation is not just about saving clicks. It is about building a system that:

  • Captures every opportunity automatically
  • Keeps your CRM, inbox, and calendars aligned
  • Supports your team with consistent, repeatable processes

With n8n and MCP Servers, you are not just wiring tools together, you are creating a reliable automation layer that can grow with your business. The Super Assistants template shows you how to structure that layer around a powerful concept: the MCP Server.

What Is An MCP Server In n8n?

An MCP (Multi-Channel Pipeline) Server is a centralized orchestration node that exposes a set of connectors, or tools, for a specific platform. Instead of building one-off integrations, you treat each platform as a single “server” with clearly defined operations.

In the Super Assistants template, each MCP Server is the gateway for a channel:

  • Slack MCP Server for internal communication
  • Gmail MCP Server for email workflows
  • Google Calendar MCP Server for scheduling
  • Airtable MCP Server for CRM and data storage
  • Unipile MCP Servers for LinkedIn and WhatsApp messaging

The result is a consistent API surface that your assistants and workflows can rely on. You get reusable operations, predictable behavior, and a structure that makes it easy to extend automation across multiple channels.

Inside The Super Assistants Template: Your Automation Building Blocks

The template ships with a set of carefully designed MCP Servers. Each one gives you a focused toolkit for a specific platform, so you can compose powerful workflows without reinventing the basics.

Slack MCP Server (BenAI-content)

The Slack MCP Server turns Slack into both a command center and a notification hub.

Connectors included:

  • Send messages to channels
  • Send direct messages (DMs)
  • List workspace users
  • Search messages

Use it to:

  • Distribute automated status updates or alerts
  • Trigger workflows from Slack commands or channel mentions
  • Send async notifications when CRM records change

CRM MCP Server (Airtable)

The Airtable MCP Server becomes your central CRM brain. It ensures your assistants always work with accurate, structured data.

Capabilities:

  • Get a single record
  • Search records with formula filters
  • Retrieve base schema
  • Create and update records with typecasting

Typical uses:

  • Store contacts, deals, and opportunities for your assistants
  • Search and enrich CRM records before doing outreach
  • Ensure reliable data writes with typecasted create/update operations

Google Calendar MCP Server (Ben)

The Google Calendar MCP Server handles scheduling so you no longer need to manually coordinate meeting times.

Supported operations:

  • Create events
  • Delete events
  • Update events
  • Retrieve events
  • Check availability

Great for:

  • Automated meeting scheduling and calendar invitations
  • Checking attendee availability before proposing times
  • Syncing event details after changes in the CRM

Email MCP Server (Gmail)

The Gmail MCP Server lets you design email flows that are both scalable and personalized.

Common operations:

  • Send emails
  • Create drafts
  • Reply to threads
  • Add labels
  • Fetch messages

Use it to:

  • Run outreach sequences that use CRM data to personalize messages
  • Build draft review flows with human-in-the-loop approvals
  • Automate categorization and routing in your inbox

Unipile Messaging & LinkedIn MCP Servers

The Unipile MCP Servers are designed for managing LinkedIn and WhatsApp conversations at scale.

Key features:

  • Retrieve LinkedIn profile details
  • Search LinkedIn and publish posts
  • Send invitations and messages through the Unipile messaging API

These capabilities are essential for building consistent, trackable social outreach flows that feed directly into your CRM and reporting.

How The Architecture Fits Together In n8n

The Super Assistants template is more than a collection of nodes. It is a visual architecture that shows you how to organize multichannel automation in a clean, scalable way.

In the n8n editor, the template is grouped into six panels:

  • Slack
  • Airtable
  • Google Calendar
  • Gmail
  • Unipile Messaging
  • Unipile LinkedIn

At the center is an MCP trigger. This trigger listens for events on specific webhook paths, such as n8nMCP-Slack or n8nMCP-Gmail, then routes each request to the correct tool node.

Each tool node encapsulates a single operation, for example:

  • getRecord for Airtable
  • createEvent for Google Calendar
  • sendMessage for Slack or Unipile

This modular structure makes your workflows easier to test, debug, and extend. You can improve one operation without breaking the rest of the system.

The Core Flow Pattern

Most automations in this template follow a simple, powerful pattern:

  1. A trigger event occurs, such as a Slack command, an incoming email, or a scheduled job.
  2. The MCP trigger receives the event, normalizes the payload, and forwards it to the relevant tool node.
  3. The tool node performs read or write operations in Airtable, Gmail, Google Calendar, Slack, or Unipile.
  4. The results are used to post updates to Slack, update CRM records, or start or continue message threads via Unipile.

Once you understand this pattern, you can start designing your own automations using the same structure.

Real-World Journeys You Can Automate Today

The Super Assistants template is not theoretical. It is built for real use cases that teams run every day. Here are three journeys you can automate and then adapt to your own workflow.

1. Automated Meeting Booking From Your CRM

Starting from a lead record in Airtable, your assistant can:

  • Check calendar availability using the Google Calendar MCP Server
  • Propose meeting times in Slack or via email with the Gmail MCP Server
  • Create a calendar event after the time is confirmed
  • Update the CRM record in Airtable with meeting details automatically

This flow turns a manual back-and-forth into a smooth, automated experience that respects everyone’s time.

2. Personalized LinkedIn Outreach At Scale

With the Unipile LinkedIn MCP Server, you can:

  • Search targeted prospects via the Unipile LinkedIn API
  • Pull profile metadata to understand each contact better
  • Draft a tailored invite under 300 characters
  • Send the invitation through the Unipile messaging API
  • Log every outreach touchpoint in Airtable for reporting and follow-up

This gives you a repeatable outreach system that stays consistent while still feeling personal.

3. Inbox Triage And Follow-up Without The Overwhelm

Using the Gmail MCP Server, you can create a smarter inbox:

  • Fetch new emails and label or thread them automatically
  • Create follow-up tasks in Airtable when action is required
  • Detect messages that signal a sales opportunity
  • Notify a Slack channel and assign an owner in the CRM when a hot lead appears

Instead of living in your inbox, you get a system that highlights what matters and routes it to the right person.

Getting Started: Setup Checklist For Your Super Assistants

Deploying the Super Assistants template is straightforward. Treat this as your launch checklist:

  • Provision an n8n instance and import the Super Assistants template.
  • Configure API credentials:
    • Slack Bot token
    • Gmail OAuth2 credentials
    • Google Calendar OAuth2 credentials
    • Airtable API token
    • Unipile HTTP headers for LinkedIn and messaging
  • Verify base IDs and table IDs for Airtable operations.
  • Test each MCP trigger path such as n8nMCP-Slack and n8nMCP-Gmail with sample payloads.
  • Set environment variables for account IDs used by Unipile LinkedIn and WhatsApp.

Once these are in place, you have a fully functioning multichannel automation framework ready to customize.

Best Practices For Reliable, Scalable Automation

To keep your Super Assistants robust as you grow, follow these best practices:

  • Use granular, permissioned API keys instead of broad-scoped tokens.
  • Typecast Airtable writes to avoid schema errors when field types change.
  • Implement retry and backoff strategies for network calls to external APIs.
  • Centralize logging and error notifications, for example by posting errors to a Slack operations channel.
  • Keep human-in-the-loop review for outbound messages to sensitive or high-value targets.

Security & Compliance: Building Trust Into Your Automations

As your assistants handle more personal and business-critical data, security and compliance become non-negotiable. Make sure you:

  • Store least-privilege keys and rotate them on a regular schedule.
  • Encrypt secrets and use the n8n credentials vault or environment-managed secrets.
  • Log access and changes to CRM records for auditability.
  • Respect LinkedIn and WhatsApp platform policies to avoid account flags or restrictions.

Troubleshooting: Turning Errors Into Learning

Even well-designed workflows can fail occasionally. When a node fails in n8n, use it as an opportunity to strengthen your system:

  • Inspect the raw error payload in the n8n execution details.
  • Check for rate limits and apply throttling if necessary.
  • Validate that OAuth tokens have not expired, and configure refresh flows if required.
  • Re-run failed workflows after addressing transient network issues.

Over time, these small improvements make your Super Assistants more resilient and trustworthy.

Extending The Template: From First Wins To A Full Automation Ecosystem

The real power of the Super Assistants MCP Server template is its extensibility. Once you have your first flows running, you can gradually expand and experiment.

Ideas to extend your automation system:

  • Add SMS or Twilio nodes to reach users on mobile.
  • Integrate analytics platforms, such as Google Analytics or Mixpanel, to track engagement and conversion.
  • Use language models to auto-generate message drafts and A/B test outreach copy.

Each new node or integration becomes another building block in your automation stack, helping your team reclaim time and focus for higher-value work.

Your Next Step: Turn This Template Into Your Own Super Assistant

The Super Assistants MCP Server template gives you a ready-made, modular framework for orchestrating multichannel workflows across Slack, Gmail, Google Calendar, Airtable, and Unipile. It reduces integration complexity, standardizes operations, and accelerates the deployment of intelligent assistants that handle outreach, scheduling, CRM updates, and messaging for you.

You do not need to automate everything at once. Start with a single flow, test it, refine it, and then build from there. Each improvement compounds, freeing your team from repetitive tasks and creating a more focused, proactive way of working.

Ready to begin? Import the Super Assistants template into your n8n instance, configure your credentials, and run the included test payloads. From there, iterate. Adapt the flows to your team, add new channels, and watch your automation ecosystem grow.

If you would like support tailoring the template to your environment, you can reach out for a walkthrough or request a template audit to unlock even more potential from your n8n setup.

Call to action: