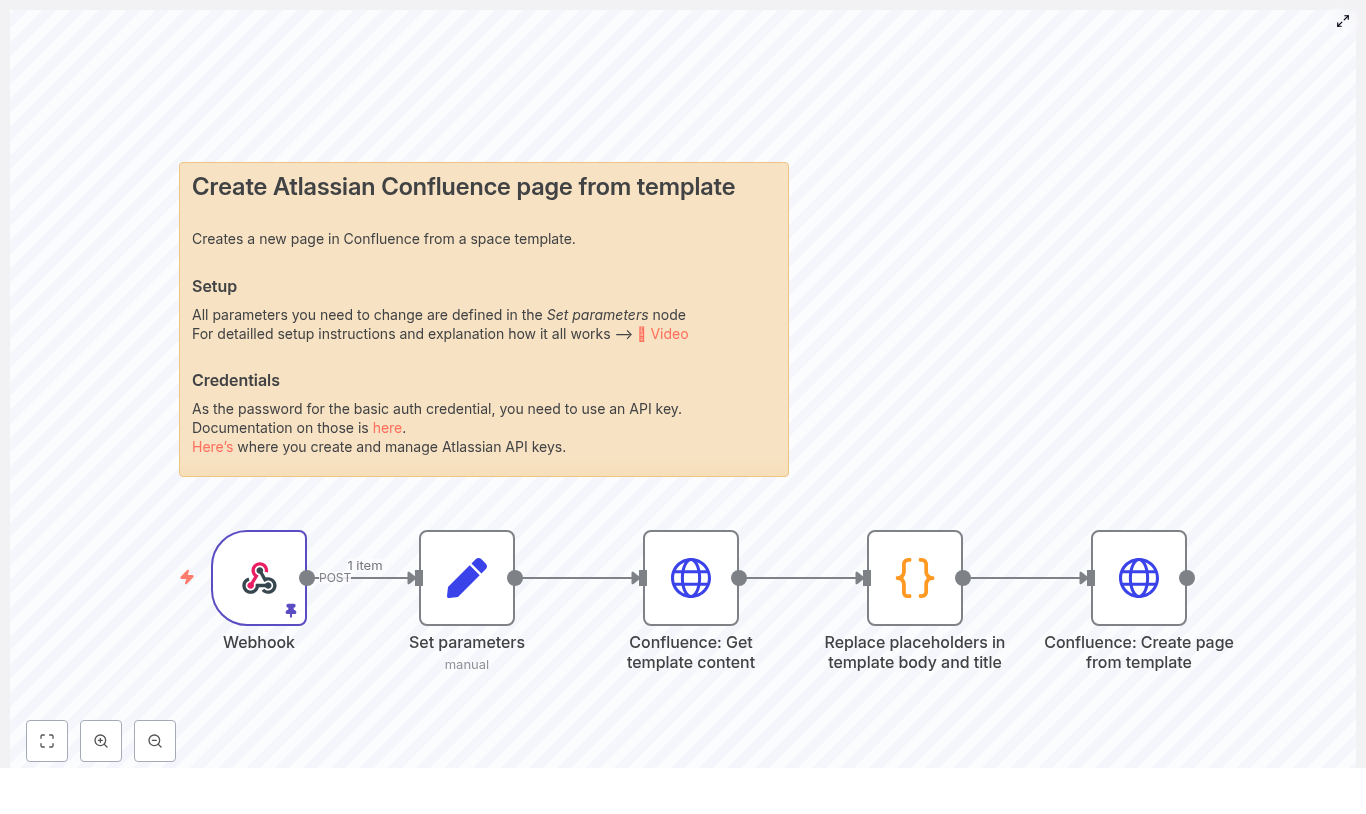
Sync Discord Events to Google Calendar with n8n
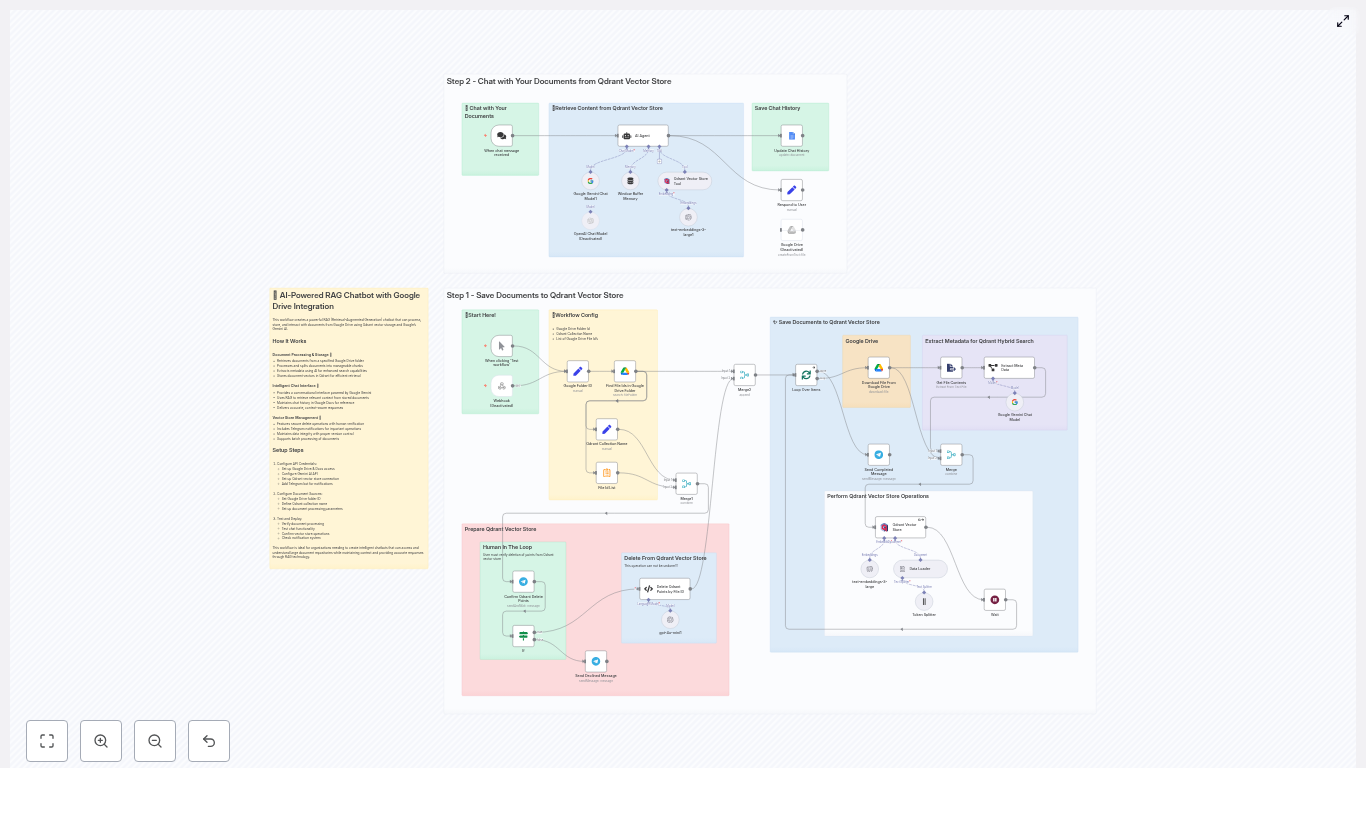
Ever said “yes” to a Discord event, only to forget about it because it never made it onto your Google Calendar? If you live in your calendar but your community lives in Discord, that gets old fast.
In this guide, we’ll walk through a ready-to-use n8n workflow template that quietly keeps your Discord scheduled events and Google Calendar in sync. No more copy-pasting, no more “What time was that again?” Just one source of truth in your calendar.
We’ll cover what the template does, when you’d want to use it, and exactly how to set it up step by step. Grab a coffee and let’s get your automation running.
What this n8n workflow template actually does
At a high level, this workflow acts like a bridge between your Discord server and a Google Calendar. On a schedule that you choose, it:
- Calls the Discord API to list all scheduled events in a specific server
- Checks Google Calendar to see if each Discord event already exists there (using the Discord event
id) - Creates new Google Calendar events when needed
- Updates existing Google Calendar events if any details have changed
The end result: every scheduled event on your Discord server appears in your Google Calendar with matching details, and stays updated over time.
When to use this Discord-to-Google Calendar sync
This template is perfect if you:
- Run a community, guild, or server that schedules events in Discord
- Rely on Google Calendar to plan your day or share availability
- Want your team or community to see Discord events in a shared calendar
- Are tired of manually recreating every Discord event in Google Calendar
In other words, if Discord is where you organize events but Google Calendar is where you actually look, this workflow saves you from juggling both.
Why this approach works so reliably
The magic here is in how we match Discord events to Google Calendar events. Discord gives each scheduled event a stable id. Instead of trying to match on names or times (which can change), we simply reuse that id as the Google Calendar eventId.
That means:
- Each Discord event maps to exactly one Google Calendar event
- The workflow can easily tell if an event already exists in Calendar
- We avoid duplicates and weird mismatches when details are edited
The logic stays simple: if an event with this ID exists, update it. If not, create it.
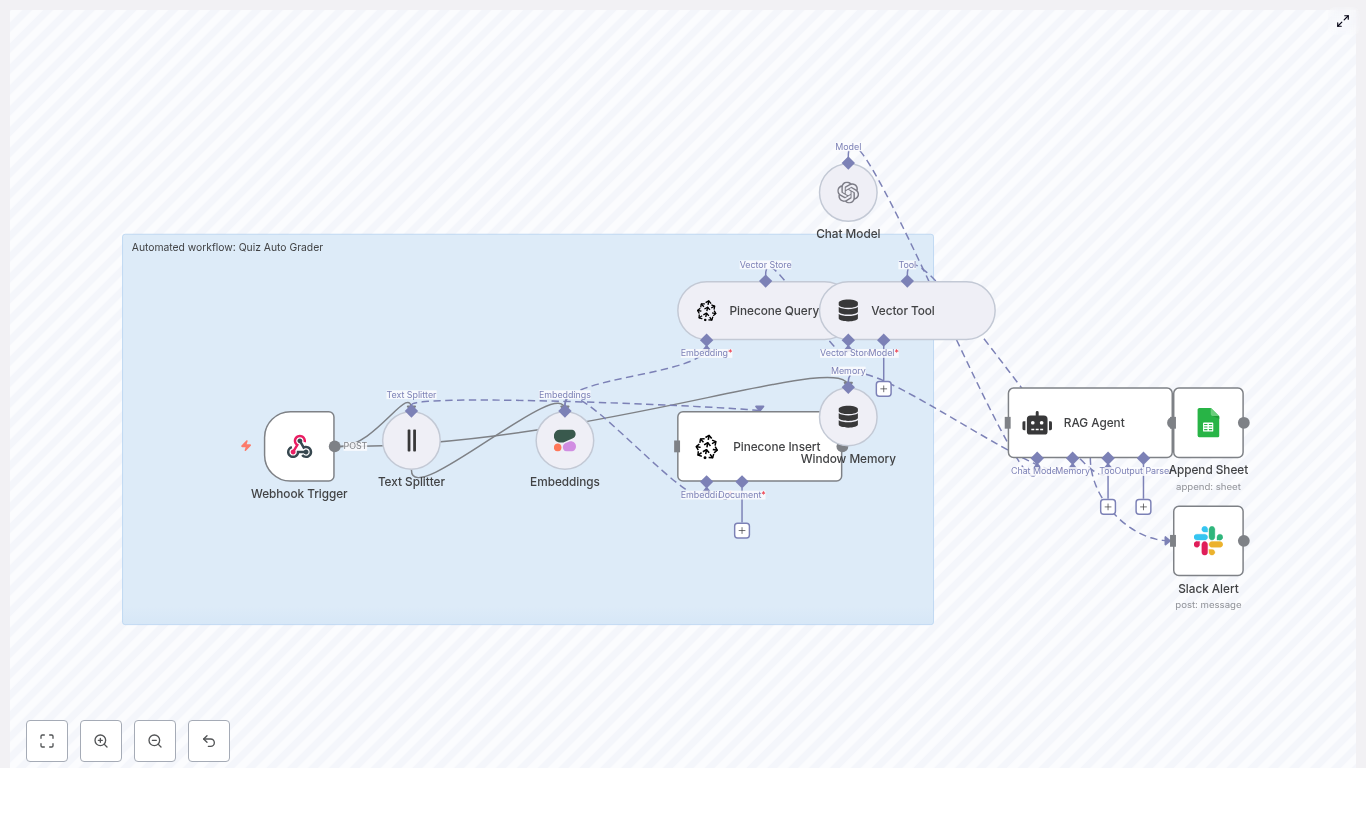
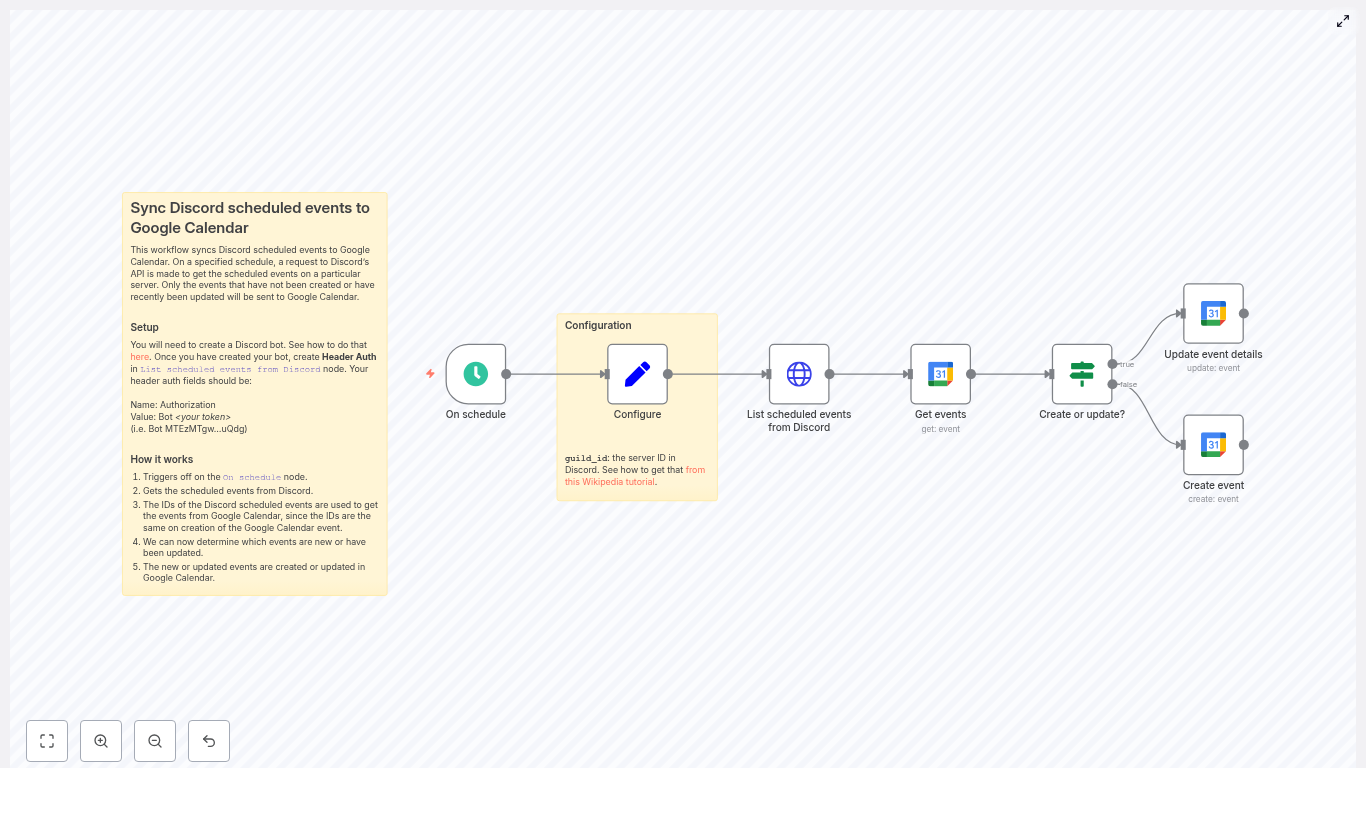
What you’ll build in n8n
Here is the core node flow you’ll end up with:
- On schedule – Triggers the sync every X minutes
- Set / Configure – Stores your Discord
guild_id(server ID) - HTTP Request – Lists scheduled events from Discord
- Google Calendar (Get events) – Tries to fetch a matching event using the Discord event
id - If – Decides whether to create or update in Google Calendar
- Google Calendar (Create event) – Creates a new calendar event when needed
- Google Calendar (Update event) – Updates an existing calendar event if it already exists
Let’s go through how to set this up from start to finish.
Before you start: prerequisites
You’ll need a few things ready to go:
- An n8n instance, either cloud or self-hosted
- A Discord bot token with permission to read guild scheduled events
- A Google account with OAuth credentials that allow access to Google Calendar
- The Google Calendar you want to sync events into, plus its Calendar ID (you’ll select it inside n8n)
Once you have these, you’re ready to wire everything together.
Step 1 – Create and configure your Discord bot
First, you need a Discord bot that can see scheduled events in your server.
- Create a bot in the Discord Developer Portal.
- Invite the bot to your server with permissions to view scheduled events.
- Copy the bot token. You’ll use this in n8n to authenticate API calls.
In n8n, open the HTTP Request node that lists scheduled Discord events and set up authentication:
- Use Header Auth
- Add a header:
Authorizationwith valueBot YOUR_BOT_TOKEN
In production, you’ll want to store that token in n8n credentials, not directly in the node. We’ll touch on security best practices later.
Step 2 – Configure the schedule trigger
Next up is deciding how often you want the sync to run.
In the On schedule node, choose a cadence that fits your use case, for example:
- Every 5 minutes if you want near real-time sync
- Every 15 or 30 minutes if you prefer lighter API usage
More frequent runs give faster updates, but also mean more calls to both Discord and Google APIs. Pick a balance that feels right for your server size and activity.
Step 3 – Add your Discord server ID (guild_id)
The workflow needs to know which Discord server to pull events from. That’s where the guild_id comes in.
In n8n:
- Add a Set node (you might name it “Configure”).
- Create a field called
guild_id. - Paste in your Discord server ID.
Not sure where to find the server ID? In Discord:
- Go to User Settings > Advanced.
- Enable Developer Mode.
- Right click your server name and select Copy ID.
Step 4 – List scheduled events from Discord
Now we’ll fetch the actual events from your server using the Discord API.
In your HTTP Request node, configure it to call:
GET https://discord.com/api/guilds/{{guild_id}}/scheduled-events?with_user_count=trueKey details:
- Method:
GET - URL: use the URL above, with
{{guild_id}}coming from your Set node - Headers:
Authorization: Bot <your_token>Content-Type: application/json(n8n usually adds this automatically when needed)
- Query parameter: set
with_user_count=trueif you want attendee counts in the response
This node will output an array of Discord scheduled event objects, each with fields like id, name, scheduled_start_time, scheduled_end_time, and so on.
Step 5 – Check Google Calendar for each Discord event
With the Discord events in hand, the next step is to see if each one already exists in your Google Calendar.
In n8n, add a Google Calendar node and use the Get operation. For each incoming Discord event, map:
- eventId to
{{ $json.id }}(the Discord eventid)
If the Get operation finds a matching event, you’ll get the event data back. If it fails or returns nothing, that means this Discord event has not been synced to Google Calendar yet.
Step 6 – Decide: create or update the event?
Now we need to branch the workflow based on whether the Google Calendar event already exists.
Add an If node and point it at the output of the Google Calendar Get node. A common condition is to check whether the result has an id value, for example:
{{ $json.id }} isNotEmptyInterpretation:
- If that condition is true, the event exists in Google Calendar, so you’ll update it.
- If it’s false, no event was found, so you’ll create a new one.
This simple check keeps the logic clean and avoids messy duplicate handling.
Step 7 – Create new Google Calendar events
On the “create” branch of the If node, add a Google Calendar node with the Create operation. This is where you map Discord fields to Google Calendar fields.
Typical mappings:
- Start:
{{ $json.scheduled_start_time }} - End:
{{ $json.scheduled_end_time }}(or calculate a duration if end time is missing) - Summary (title):
{{ $json.name }} - Location:
{{ $json.entity_metadata.location }} - Description:
{{ $json.description }} - ID / eventId: explicitly set to
{{ $json.id }}
That last step is crucial. By assigning the Google Calendar event ID to the Discord event id, future runs of the workflow will always be able to find and update the same event.
Step 8 – Update existing Google Calendar events
On the “update” branch of the If node, add another Google Calendar node, this time using the Update operation.
You’ll again map the Discord event fields to the Google Calendar ones, similar to the Create operation:
- eventId: use the existing ID from the Get node (which matches the Discord
id) - Start:
{{ $json.scheduled_start_time }} - End:
{{ $json.scheduled_end_time }} - Summary:
{{ $json.name }} - Location:
{{ $json.entity_metadata.location }} - Description:
{{ $json.description }}
This way, if you edit the time, title, description, or location in Discord, the corresponding Google Calendar event will be updated on the next run.
Tips, gotchas, and troubleshooting
Once the core sync is working, a few details are worth paying attention to.
Time zones
- Discord scheduled times are ISO8601 strings.
- Google Calendar also expects proper date-time formats with timezone info.
- If you see events at the wrong time, normalize times in n8n with a Date/Time node or a small Function node to adjust timezones.
Event IDs
- Reusing the Discord
idas the Google CalendareventIdkeeps matching simple. - Some Google Calendar accounts may limit custom IDs, so test this with your account to be sure.
Permissions
- Make sure your Discord bot has permission to view guild scheduled events and is actually in the server.
- For Google, your OAuth credentials must include the proper Calendar scopes.
Rate limits
- Discord and Google both enforce rate limits.
- If you have a large number of events or a very frequent schedule, consider backing off a bit.
- You can add retry or backoff logic in n8n if you start hitting rate limit errors.
Edge cases
- Deleted or canceled Discord events are not automatically removed from Google Calendar in the basic flow.
- If you want strict one-way or two-way sync, add extra logic to handle deletions or cancellations, such as:
- Periodically checking for events that no longer exist in Discord
- Marking or deleting the matching Google Calendar event
Security best practices
You’re dealing with tokens and credentials here, so a few precautions help keep things safe.
- Store the Discord bot token and Google OAuth credentials in n8n credentials, not as plain text in nodes.
- Give your Discord bot only the permissions it actually needs.
- Enable OAuth refresh token handling in n8n so your Google credentials stay valid over time.
How to test your workflow
Before you let the schedule run on its own, it’s worth testing the setup end to end.
- In n8n, run the workflow manually or trigger the On schedule node once.
- Create a scheduled event in Discord and wait for the workflow to run.
- Check your Google Calendar and confirm:
- The event appears
- The details match (title, time, description, location)
- The event ID is the same as the Discord event
id
- Edit the event in Discord (for example, change the time or name) and run the workflow again.
- Verify that the Google Calendar event updates accordingly.
- If something fails, inspect the n8n execution logs and API responses to fix any field mappings or permission issues.
Ideas for advanced enhancements
Once the basic sync is humming along, you can add extra logic to make it even smarter.
- Change detection: Compare “last modified” timestamps to avoid unnecessary updates when nothing has changed.
- Notifications: Send a Slack message or email whenever a new event is created or an existing one is updated.
- Cancellation handling: Detect deleted or canceled Discord events and either remove or mark the corresponding Google Calendar events.
Wrapping up
Using n8n to sync Discord scheduled events to Google Calendar is a simple way to keep your community events visible where you actually plan your life. The core pattern is straightforward: list Discord events, look them up in Google Calendar by ID, then create or update as needed.
You can start with the template as-is, then tweak field mappings, time handling, or notification logic to match how your server runs events.
If you’d like to go further, for example handling cancellations or adding reminders, you can extend the same workflow with a few extra nodes.
Call to action: Clone the template into your n8n instance, create a test scheduled event in Discord, and watch it appear in your Google Calendar automatically. Once you see it working, you’ll never want to do this manually again.
Sync Discord Events to Google Calendar with n8n

Sync Discord scheduled events to Google Calendar with n8n
If you live in Discord all day but still rely on Google Calendar to keep your life organized, you’ve probably felt that annoying gap between the two. Events get scheduled in Discord, but your calendar stays clueless. This n8n workflow template fixes exactly that problem by automatically syncing Discord scheduled events to Google Calendar, so everything ends up in one clean, central place.
In this guide, we’ll walk through what the workflow does, when you’d want to use it, how to set it up, and what to watch out for. Think of it as having a friend show you around n8n while you sip your coffee, rather than a dry technical manual.
What this n8n workflow actually does
At a high level, this workflow acts like a bridge between your Discord server and your Google Calendar. On a schedule you choose, it:
- Calls the Discord API to fetch all scheduled events in a specific server (guild).
- Looks in Google Calendar to see if each Discord event already has a matching calendar event.
- Creates a new Google Calendar event if it doesn’t exist yet.
- Updates the existing Google Calendar event if details have changed in Discord.
The clever trick behind all this is that the workflow uses the Discord event ID as the Google Calendar event ID. That way, n8n can instantly tell whether an event is new or already synced.
Why bother syncing Discord events to Google Calendar?
If your community, team, or audience hangs out in Discord, you’re probably using Discord scheduled events to promote:
- Community calls or town halls
- Streams, live sessions, or watch parties
- Workshops, office hours, or recurring meetups
The problem is, many people still rely on Google Calendar for their day-to-day planning. By syncing Discord events to Google Calendar, you:
- Centralize your schedule in one place.
- Make it easy for teammates or community members to see events on their phones, tablets, and desktop calendar apps.
- Reduce “I forgot” moments because events show up alongside everything else in their calendar.
So if you’ve ever had to manually copy event details from Discord into Google Calendar, this workflow is about to save you a lot of repetitive clicking.
What you’ll need before you start
Before you import the template or build the workflow, make sure you have:
- An n8n instance You can use n8n Cloud or a self-hosted setup.
- A Discord bot token Create a bot in the Discord Developer Portal, and keep the token handy.
- A Google account with Calendar access You’ll need OAuth2 credentials set up in n8n so it can read and write events.
- The n8n workflow template You can import the template from the example or from the link at the end of this article.
How the workflow is structured
Let’s quickly outline the main pieces of the workflow so the setup steps make more sense:
- On schedule – runs the workflow at a fixed interval, like every 5 minutes or once an hour.
- Configure (Set) – stores your
guild_idso the workflow knows which Discord server to query. - List scheduled events from Discord (HTTP Request) – calls the Discord API to fetch all scheduled events from that server.
- Get events (Google Calendar – get) – tries to find a Google Calendar event whose ID matches the Discord event ID.
- Create or update? (If) – checks if the Google event exists and decides whether to create or update.
- Create event (Google Calendar – create) – creates a brand new event in Google Calendar using data from Discord.
- Update event details (Google Calendar – update) – updates an existing Google Calendar event when something changes in Discord.
With that mental map in place, let’s walk through the setup step by step.
Step-by-step setup in n8n
1. Create and configure your Discord bot
Head over to the Discord Developer Portal and create a new application, then add a bot to it. Once the bot exists:
- Copy the bot token and store it somewhere safe. You’ll need it for the n8n HTTP Request node.
- Invite the bot to your Discord server with permissions that allow it to read scheduled events. The bot must actually be in the guild you want to sync.
- Grab your server (guild) ID: Enable Developer Mode in Discord, right-click your server name, and choose Copy ID. This is the
guild_idyou’ll use in the workflow.
2. Set up header authentication for Discord in n8n
In the HTTP Request node that calls the Discord API, you’ll configure header-based authentication so Discord knows your bot is allowed to make the request.
Add this header:
Authorization: Bot <your_token> Replace <your_token> with your actual bot token. This value is sent in the Authorization header every time the workflow fetches scheduled events from Discord.
3. Connect Google Calendar with OAuth2
Next, in n8n, create or select your Google Calendar OAuth2 credentials:
- Use the standard OAuth2 flow in n8n to connect your Google account.
- Make sure the account has access to the calendar where you want the events to appear.
- Confirm that the scopes allow both reading and writing events.
Once this is set, the Google Calendar nodes in the workflow can create and update events without you needing to touch anything.
4. Import or build the workflow
You can either import the ready-made template or recreate it manually. Either way, here’s how the key nodes fit together:
- On schedule Configure this node to run on a sensible interval, like every 5, 15, or 60 minutes. Running it too frequently can hit rate limits, so start conservatively unless you really need near real-time updates.
- Configure (Set) Use a Set node to store your
guild_id. This keeps things flexible if you want to switch servers later without touching the HTTP Request URL. - List scheduled events from Discord (HTTP Request) Point this node to:
GET https://discord.com/api/guilds/{guild_id}/scheduled-events?with_user_count=trueReplace
{guild_id}with the value from your Set node. Thewith_user_count=trueparameter includes user counts if you want that data. - Get events (Google Calendar – get) For each Discord event, this node tries to fetch a Google Calendar event by ID. The ID used here is the Discord event ID, which is what makes the whole create-or-update logic work so smoothly.
- Create or update? (If) This If node checks whether the Google Calendar get operation found a matching event. If it did, the workflow follows the update path. If not, it goes down the create path.
- Create event (Google Calendar – create) When no event exists yet, this node creates a fresh calendar entry. It sets key fields like start, end, summary, location, and description, and most importantly, it explicitly sets the Google event ID to the Discord event ID.
- Update event details (Google Calendar – update) If the Google event already exists, this node updates it based on any changes in Discord, such as a new time, title, or description.
How to map Discord fields to Google Calendar
The magic of the sync comes from good field mapping. Here’s the typical mapping used in the example workflow:
- summary <= Discord
name - start <= Discord
scheduled_start_time(ISO 8601) - end <= Discord
scheduled_end_time(ISO 8601) - location <= Discord
entity_metadata.location - description <= Discord
description - id <= Discord
id
That last one is especially important. Using the Discord event ID as the Google Calendar event ID keeps everything aligned and makes updates painless.
Why use the Discord event ID as the Google event ID?
You could try to match events by name or time, but that gets messy fast. Titles change, times shift, and you can easily end up with duplicates.
By reusing the Discord event ID as the Google Calendar event ID:
- The workflow can reliably check if an event already exists in Google Calendar.
- The get operation becomes a simple yes-or-no check based on ID.
- Updates become straightforward, since each event has a unique, stable identifier.
In practice, this means:
- If the Google Calendar
getnode finds an event with that ID, the workflow knows it should update it. - If no event is found, the workflow knows it needs to create a new one.
Handling time zones and date formats
Time zones can be sneaky. Discord sends scheduled event times in ISO 8601 format, which is great, because Google Calendar also accepts ISO 8601.
Still, you should:
- Check that the times show up correctly in your Google Calendar client.
- Verify the calendar’s default time zone matches what you expect.
- Optionally transform the timestamps in n8n if you need to convert between time zones.
It is worth creating a couple of test events in Discord and confirming that they appear at the correct time in Google Calendar before you rely on this workflow for important events.
Staying within rate limits and keeping things reliable
Both Discord and Google Calendar APIs have rate limits, so it is a good idea to design your workflow with that in mind.
- Choose a reasonable schedule Running the workflow every few seconds is usually unnecessary and can hit limits quickly. Every 5 to 60 minutes works well for most communities.
- Use n8n error handling Configure retries or error workflows for transient API issues, so a temporary blip does not break your sync.
- Respect Discord rate limit headers If you manage multiple guilds or a large number of events, consider adding throttling or delays to avoid hitting Discord’s limits.
Troubleshooting common issues
1. Discord returns an empty list of events
If the HTTP Request node comes back with no events when you know there should be some:
- Confirm that your bot is actually in the correct Discord server.
- Make sure the bot has permission to read scheduled events.
- Double-check the
guild_idyou set in the workflow. - Verify the
Authorizationheader is exactlyBot <token>with your real token.
2. Google Calendar “get” does not find an event
In this workflow, a missing event is not necessarily a problem. It is what triggers the “create” path. However, if you expected an existing event to be found:
- Check that your Google Calendar credentials are correct and authorized.
- Ensure the OAuth token has the right scopes for reading and writing events.
- Confirm that the Google Calendar event ID is actually set to the Discord event ID.
3. Times look wrong or show up in the wrong time zone
If events appear at unexpected times in Google Calendar:
- Check the time zone settings for both your Discord server and your Google Calendar.
- Verify that the
scheduled_start_timeandscheduled_end_timefrom Discord are correctly passed through. - If needed, add a transformation step in n8n to adjust the timestamps into the desired time zone before sending them to Google.
Security and privacy best practices
Since this workflow deals with API tokens and credentials, it is worth taking a moment to lock things down:
- Never hard-code your Discord bot token or Google secrets directly in your workflow JSON.
- Use n8n’s built-in credential store to keep tokens and OAuth details secure.
- Do not commit tokens or credentials to source control or share them in screenshots.
- Restrict access to your n8n instance to trusted users only.
Ideas for next steps and improvements
Once the basic sync is working, you can start tailoring it to your specific use case. For example, you might:
- Filter events by type or name so only certain Discord events are synced.
- Add logging or alerts (via Slack, email, or another channel) whenever a sync fails.
- Experiment with a two-way sync, where changes in Google Calendar can update Discord events. This usually requires webhooks or more frequent polling and some careful conflict handling.
Wrapping up
This n8n workflow template gives you a simple, reliable way to sync Discord scheduled events into Google Calendar. It:
- Runs on a schedule you control.
- Fetches events from your Discord server.
- Uses the Discord event ID as the Google Calendar event ID.
- Creates new events or updates existing ones automatically.
Ready to try it out? Import the template into your n8n instance, plug in your Discord bot token and Google OAuth credentials, set your guild_id, and run a quick test with a sample event.
If this workflow helps simplify your event management, feel free to share it with your community or teammates, and keep an eye out for more n8n automation ideas to streamline the rest of your stack.
Call to action: Grab the template below, connect your accounts, and let n8n handle the busywork so you can focus on running
Sync Discord Scheduled Events to Google Calendar with n8n

Sync Discord Scheduled Events to Google Calendar with n8n
Ever told your friends, “Yeah, I’ll be there!” to a Discord event, then completely forgot because it never made it into your calendar? If your life is run by Google Calendar but your community lives on Discord, manually copying events back and forth gets old fast.
Good news: n8n can do that boring copy-paste work for you, quietly in the background, without complaining or getting distracted by memes.
What this n8n workflow actually does (in plain English)
This workflow connects your Discord server and Google Calendar so scheduled events in Discord automatically appear (and stay updated) in your calendar.
Here is the basic idea:
- On a schedule, n8n asks Discord, “Hey, got any scheduled events for this server?”
- For each event it finds, it checks Google Calendar to see if that event already exists.
- If the event is new, n8n creates it in Google Calendar.
- If the event already exists, n8n updates it so time, title, or description changes stay in sync.
- The Discord event ID is used as the Google Calendar event ID so matching them later is simple and reliable.
Result: no more double entry, no more “Wait, what time is that event again?” and a lot fewer calendar-related facepalms.
Why bother syncing Discord events to Google Calendar?
Discord’s Scheduled Events feature is great for visibility inside a server, but most people still live inside their calendar when it comes to planning their day.
Automating the sync:
- Prevents you from manually retyping event details like a spreadsheet goblin
- Makes sure people see Discord events alongside work, personal, and other commitments
- Keeps updates consistent so nobody shows up at the wrong time because only Discord got updated
- Eliminates duplicate data entry, which everybody hates but pretends is “fine for now”
What you will build with this template
You will create an n8n workflow that:
- Periodically fetches all scheduled events from a specific Discord server (guild).
- For each event, calls Google Calendar and tries to get an event with the same ID.
- Updates the event in Google Calendar if it already exists.
- Creates a new event in Google Calendar if it does not exist.
- Stores the Discord event ID as the Google Calendar event ID, so future updates are easy and consistent.
It is a lightweight, reliable sync that you can schedule to run as often as you like, as long as you respect Discord’s rate limits.
What you need before you start
Before diving into n8n, make sure you have:
- An n8n instance (cloud or self-hosted).
- A Discord bot token with permission to list scheduled events in the target server.
- A Google account with a calendar and Google Calendar OAuth2 credentials configured in n8n.
- The Discord server ID (
guild_id) for the server whose events you want to sync.
Once those are ready, the rest is mostly clicking, mapping, and feeling smug about your new automated life.
Workflow overview: the n8n nodes involved
The template workflow is built from a simple left-to-right chain of nodes:
- On schedule – triggers the workflow at a set interval.
- Set (Configure) – stores the target Discord
guild_id. - HTTP Request – lists scheduled events from Discord.
- Google Calendar (Get events) – checks if an event with that ID exists in your calendar.
- If – decides whether to create or update the event.
- Google Calendar (Create event) – creates a new event when needed.
- Google Calendar (Update event details) – updates existing events when they change on Discord.
Let us walk through how to configure each part without losing our sanity.
Step-by-step setup in n8n
1. Set up the schedule trigger
Start with the On schedule node.
- Choose how often you want n8n to poll Discord, for example every 15 minutes.
- Pick a frequency that balances freshness with Discord rate limits. For many servers, 10 to 30 minutes is a good starting point.
2. Store the Discord server ID
Add a Set node, usually named something like Configure.
- Create a field called
guild_id. - Set its value to the Discord server (guild) ID you want to sync.
This way you only have to change the server ID in one place instead of hunting through multiple nodes later.
3. Pull scheduled events from Discord
Next, add an HTTP Request node to fetch events from Discord’s API. This is where your bot actually does some work.
Use this URL expression:
=https://discord.com/api/guilds/{{ $('Configure').first().json.guild_id }}/scheduled-eventsIf you want attendee counts included, add this query parameter:
with_user_count=true
For authentication, create a generic Header Auth credential in n8n:
- Header name:
Authorization - Header value:
Bot <your token>
Example:Bot MTEzMTgw...uQdg
This tells Discord, “Hi, I am a bot, please let me see the scheduled events.”
4. Check for an existing Google Calendar event
Now add a Google Calendar node configured with the Get operation.
- Set the Calendar field to the calendar where you want events to appear.
- For eventId, use the Discord event ID:
eventId: ={{ $json.id }}
This step tries to find a Google Calendar event whose ID matches the Discord event ID. If it exists, great. If not, we will create one.
5. Decide whether to create or update
Add an If node to determine which path to follow.
You want to check whether the Google Calendar Get operation succeeded or not. A simple approach is to:
- Use Continue On Fail on the Google Calendar Get node if you expect 404s when events are missing.
- In the If node, test whether
{{ $json.id }}is present or not, and use that to route to either Create or Update branches.
This is the logic that prevents duplicate events and keeps everything neatly aligned.
6. Create a new Google Calendar event
On the “create” branch, add a Google Calendar node with the Create operation.
Map the Discord fields to Google Calendar fields using n8n expressions. For example:
- Start:
{{ $('List scheduled events from Discord').item.json.scheduled_start_time }} - End:
{{ $('List scheduled events from Discord').item.json.scheduled_end_time }} - Summary (event title):
{{ $('List scheduled events from Discord').item.json.name }} - Location:
{{ $('List scheduled events from Discord').item.json.entity_metadata.location }} - Description:
{{ $('List scheduled events from Discord').item.json.description }} - Id (under additionalFields → id):
{{ $('List scheduled events from Discord').item.json.id }}This sets the Google Calendar event ID to the Discord event ID.
That final mapping is the secret sauce that makes future updates easy, instead of forcing you to do fuzzy matching on titles or times.
7. Update existing Google Calendar events
On the “update” branch, add another Google Calendar node, this time using the Update operation.
- Use the same eventId logic so you are updating the correct event.
- Map the same fields as in the create node:
- Start
- End
- Summary
- Location
- Description
Now, whenever you change the time, title, or details of a Discord scheduled event, the Google Calendar event will follow along on the next run. No more “Wait, which version is the right one?” confusion.
Key implementation details to get right
Using Discord event IDs as Google event IDs
By setting the Google Calendar event ID to the Discord scheduled event ID during creation, you give the workflow a stable way to find the same event later.
Google Calendar accepts custom event IDs as long as they are globally unique within that calendar, which makes Discord IDs a perfect match. It also keeps your logic clean and avoids messy lookups.
Handling timezones like a pro
Discord stores scheduled times in ISO format. That is good news, but you still need to make sure Google Calendar gets properly formatted timestamps with timezone information.
- If Discord times are already in the correct timezone, you can map them directly.
- If you need to normalize to a specific timezone, use a Function node or a Date/Format node in n8n to convert the times before sending them to Google Calendar.
Getting this right avoids the classic “Why is this event at 3 a.m.?” problem.
Respecting rate limits and choosing a polling interval
Discord has rate limits, and it is not shy about enforcing them. To stay on its good side:
- Start with a conservative polling interval, such as every 10 to 30 minutes.
- Monitor your n8n execution logs for any rate limit responses.
- Only increase frequency if your server really needs it.
Your workflow will be happier, and so will Discord.
Error handling so you do not miss failures
- Set the Google Calendar Get events node to Continue On Fail if you expect 404s when events do not exist yet.
- Log or notify errors with an Email or Slack node if a particular request keeps failing.
- Consider adding a retry or backoff pattern for transient errors so your workflow can recover gracefully.
That way, you find out about real problems instead of quietly losing events.
Testing your Discord to Google Calendar sync
Before trusting automation with your entire event schedule, give it a quick test run:
- Deploy your Discord bot and confirm it:
- Is a member of the target server.
- Has permission to view scheduled events.
- In n8n, configure:
- The Header Auth credential with your Discord bot token.
- Your Google Calendar OAuth2 credentials with the right scopes.
- Create a test scheduled event in Discord, then run the workflow manually.
- Check that a new event appears in your chosen Google Calendar.
- Confirm that the event ID in Google Calendar matches the Discord event ID.
- Edit the Discord event (change time, title, or description) and run the workflow again.
- Confirm the Google Calendar event updates with the new details.
Once that works, you are ready to let the schedule trigger take over.
Advanced ideas for power users
When the basic sync is running smoothly, you can start getting fancy.
- Two-way sync: Want changes in Google Calendar to flow back into Discord events? You can build a second workflow that:
- Watches Google Calendar for changes.
- Uses the Discord API to update scheduled events.
You will need a bot with the correct permissions and the relevant Discord endpoints.
- Filtering events: Only want certain events, like “community” events or those with a specific keyword?
- Add filters before the Create/Update nodes.
- Filter by event type, name, or description so only relevant events sync.
- Richer event details: Pull extra data such as
entity_metadataor other fields from Discord.- Include images or metadata in the event description.
- Add more context so your calendar events look less bare and more informative.
Troubleshooting common issues
If your events are not showing up in Google Calendar, do a quick sanity check:
- Confirm your Header Auth is correctly set:
Authorization: Bot <token>
- Verify the
guild_idis correct and that the bot is actually in the server. - Check your Google Calendar OAuth credentials:
- Make sure the scopes allow creating and updating events.
- Confirm you selected the correct calendar in the node.
- Inspect n8n execution logs:
- Look at HTTP status codes from Discord and Google.
- Check response bodies for helpful error messages.
Most problems come down to permissions, credentials, or a tiny typo in an ID.
Wrapping it up
This n8n workflow gives you a dependable way to sync Discord scheduled events into Google Calendar without manual effort. It is a great fit for communities, event organizers, and anyone who lives in Discord but plans their life in Google Calendar.
Start with the setup above, then:
- Tune the polling interval based on your server size and activity.
- Adjust field mappings to match how you want events to appear.
- Add error handling and logging for production-grade reliability.
Ready to build? Import the template into your n8n instance, plug in your Discord bot header auth and Google Calendar OAuth credentials, and run a test. If you want to go further with filters, two-way sync, or timezone fine tuning, you can extend this workflow using the n8n docs and Discord API documentation.
Happy automating, and enjoy never having to copy event details by hand again.
Posted in CommunicationLeave a Comment on Sync Discord Scheduled Events to Google Calendar with n8n
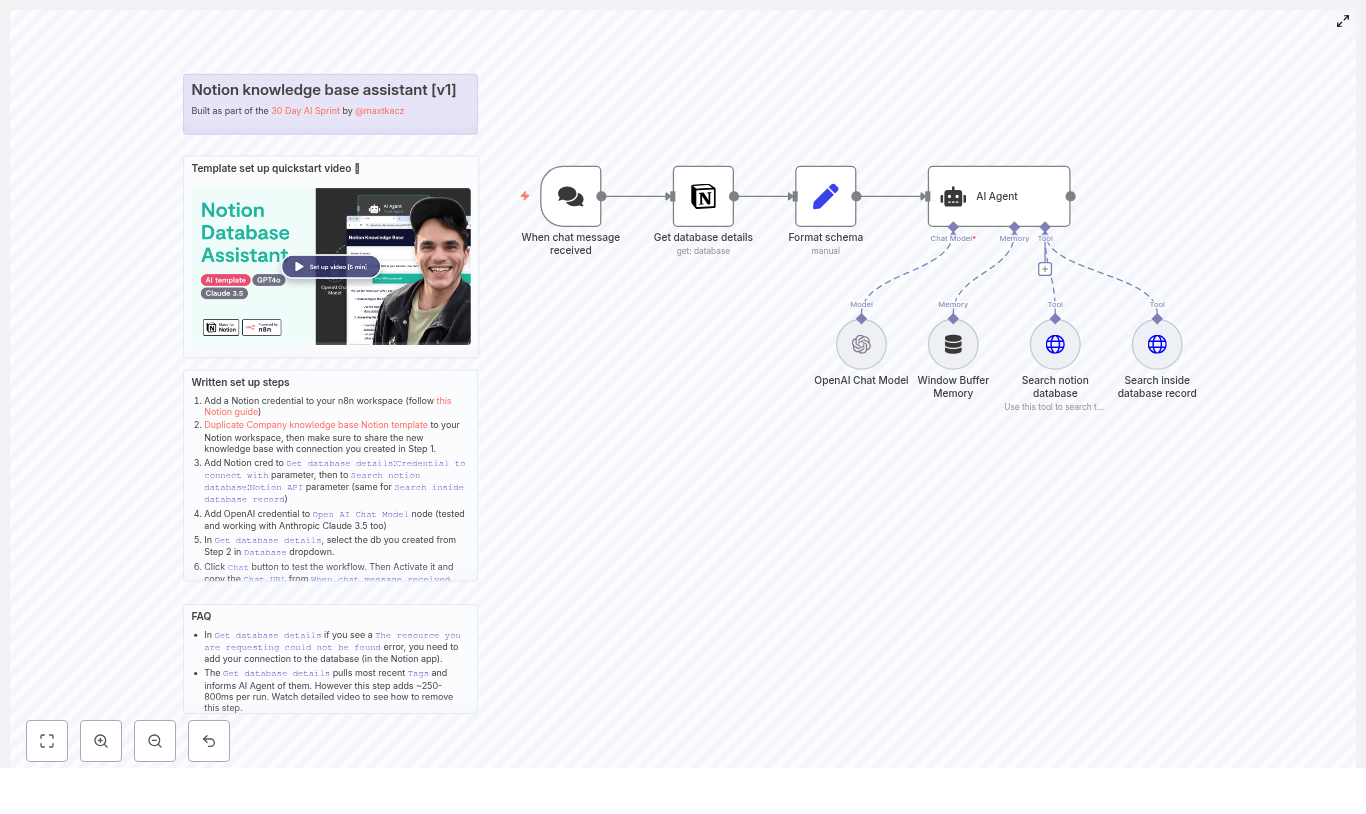
On a rainy Tuesday afternoon, Mia stared at yet another Slack message blinking at the bottom of her screen. “Hey, do you know where the latest onboarding checklist is?” She sighed, opened Notion, and started typing into the search bar for what felt like the hundredth time that week. As the operations lead at a fast-growing startup, Mia had spent months organizing everything in Notion – product specs, onboarding docs, internal how-tos, HR policies, and meeting notes. The information was there, but finding it quickly had become a daily bottleneck. New hires could not remember which space held which document. Managers asked the same questions about time off, billing, and product features. Even Mia, the person who built the knowledge base, sometimes struggled to track down the right page. That afternoon, after answering the same “How do I request time off?” question for the third time, she decided something had to change. Mia did a quick audit of their internal communication channels. The pattern was obvious: Notion was a great place to store knowledge, but it was not acting like an assistant. People did not want to “go search a database.” They wanted to ask a question and get a short, accurate answer with a link if they needed more detail. That night, while searching for “Notion AI assistant” ideas, Mia discovered something that caught her eye: an n8n workflow template that turned a Notion knowledge base into a chat assistant using GPT. It promised to do exactly what she needed: It sounded like magic. But it was not magic. It was just smart automation. Mia sketched the idea on a notepad first. She wanted an assistant that could sit behind a chat interface, listen for questions, and then quietly do the heavy lifting: In n8n terms, this translated into a set of specific building blocks: If she could wire all of this together, her team could simply ask: “How do I request time off?” and get a concise answer plus links to the exact Notion pages, instead of a vague “search for it in Notion.” Before touching n8n, Mia opened Notion and looked at her existing knowledge base. To make it AI friendly, she created a dedicated database structured for question and answer pairs. She made sure each entry had: To make the future search more precise, she standardized the tags. No more “hr” in one place and “human resources” in another. She settled on a clear set of tags and stuck to them. Then she created a Notion integration at developers.notion.com and shared the database with that integration. She knew that just creating an integration was not enough. It had to be explicitly granted read access to the specific database she wanted to search. With Notion ready, Mia logged into her n8n instance. She could have run it self-hosted or in the cloud, but her company already had an n8n cloud workspace, so she opened a new workflow and started dropping in nodes, following the architecture she had in mind. Her workflow slowly took shape: It was starting to look like a real assistant. But a few critical steps still stood between Mia and a working system. The first time Mia ran the workflow, it failed almost instantly. The Notion node complained that it could not find the resource she was requesting. The OpenAI node refused to respond. She realized she had skipped the boring but essential part: credentials. She made a mental note not to ever paste API keys into workflow JSON or share them in public repos. n8n credentials and environment variables were the right place for secrets. Once credentials were in place, the workflow started to move. The webhook received a test message, the Notion node fetched database details, and the AI agent came to life. Next, Mia had to decide how the assistant should search the Notion database. She knew that a naive search could either miss relevant answers or flood the AI model with too much information. So she defined a clear search strategy inside the tools the agent could call: To keep costs and hallucinations down, she configured the search to return only the top 3 results to the LLM. There was no need to send the entire knowledge base to the model for every question. Now the agent could: Even with search working, Mia knew that the AI needed guardrails. She did not want it to invent answers or send people to the wrong policy page. So she crafted a concise system prompt for the AI Agent node. Its job was very specific: Her final system message looked something like this: She attached this prompt to the AI Agent node so every conversation started from the same set of instructions. To test her new Notion knowledge-base assistant, Mia used the most common question her team asked. She opened the chat interface connected to the webhook and typed: “How do I request time off?” Behind the scenes, the workflow sprang into action: The response that came back to the chat interface was exactly what Mia had always wanted: No one had to search through Notion manually. No one had to ping Mia in Slack. The assistant handled it. At one point, another team created a second knowledge base database and asked Mia to plug it into the assistant. Suddenly, she started seeing this error again: “The resource you are requesting could not be found” She quickly remembered the cause. The Notion integration had to be explicitly shared with the new database page inside Notion. Creating the integration alone was not enough. Once she granted access in the Notion UI, the error disappeared. As the assistant grew more popular, some users noticed occasional delays. Mia traced them back to a few specific behaviors: To speed things up, she: On a few occasions, the assistant returned empty or unhelpful answers for questions Mia knew were covered in the knowledge base. She tracked the issue to two common mistakes: Once she corrected the property names and ensured that the schema mapping matched her Notion fields, the answers became reliable again. As more teams started using the assistant, Mia stepped back to think about security, costs, and best practices. The assistant was no longer just a prototype. It was a production tool used daily by the entire company. Once the core Notion knowledge-base assistant worked smoothly, Mia started to think bigger. What started as a way to stop answering the same questions turned into a central knowledge layer for the company, powered by Notion, n8n, and OpenAI. A few weeks after launch, Mia checked Slack. The flood of repetitive questions had slowed to a trickle. New hires were getting up to speed faster. Managers knew they could rely on the assistant for up-to-date answers with direct links to the underlying Notion pages. The company’s knowledge had not changed. It was still stored in the same Notion database. What changed was how accessible it had become. By combining: Every time you copy a Zendesk ticket into Jira by hand, you lose a little bit of focus. You jump tools, retype details, paste links, and hope nothing gets missed. Over a day or a week, that context switching adds up. It slows your team down and pulls attention away from the work that really matters: helping customers and shipping improvements. Automation with n8n can turn that friction into flow. By connecting Zendesk and Jira with a simple, reliable workflow, you create a system that quietly does the busywork for you. New tickets are picked up, checked, synced, and updated without you lifting a finger. Your support and engineering teams stay aligned, your incidents move faster, and you reclaim time and mental space. This guide walks you through an n8n workflow template that does exactly that. You will see how to listen for new Zendesk tickets, detect whether a related Jira issue already exists, then either add a comment or create a new Jira issue and store its key back in Zendesk. Along the way, you will also see how this template can be a stepping stone toward a more automated, focused way of working. When Zendesk and Jira are not connected, every cross-team ticket becomes a mini-project: Over time, this creates hidden costs: It does not have to stay this way. A small amount of automation can unlock a big shift in how your teams collaborate. Automation is not just about saving a few clicks. It is about creating space for deeper work. When you let n8n handle the predictable steps, you: Think of this Zendesk to Jira workflow as your first building block. Once you have it in place, you can extend it with richer data mapping, smarter routing, and even two-way syncing. Each improvement compounds the time you gain back. The n8n workflow you are about to set up listens for new Zendesk tickets, checks for an existing Jira issue key in a custom field, and then: Technically, the workflow uses: The result is a lightweight, maintainable automation that quietly keeps both tools aligned. Once it is running, every new ticket becomes an opportunity to save a few more minutes and a bit more mental energy. To follow along and use the n8n Zendesk to Jira automation template, make sure you have: If you are new to n8n, do not worry. This workflow is a friendly starting point. You will see how each node works, and you can build on it as your confidence grows. Here is the high-level sequence the template uses to automate Zendesk to Jira: Next, you will configure each node. As you do, notice how simple the logic really is. This is the kind of automation you can understand at a glance, yet it can save hours over time. Start with the trigger that will kick off your automation. In n8n, add a Webhook node and set a path, for example: This path becomes part of the URL that Zendesk will call. In your Zendesk account: Once this is connected, every new ticket event will reach your n8n workflow automatically. The webhook payload is useful, but you usually want the complete ticket record. That is where the Zendesk node comes in. Add a Zendesk node and select the get operation. For the ID field, reference the ticket ID from the webhook payload, for example: (Adjust the node name if your Webhook node uses a different label.) This retrieves the full ticket object, including: At this point, your workflow has everything it needs to decide whether to create a new Jira issue or update an existing one. Next, you will inspect a specific Zendesk custom field that stores the Jira issue key. This decision is the heart of the workflow: it determines whether you add a comment or create a new issue. Add a Function node and connect it after the Zendesk Get node. Use the following example code, and update the field ID to match your Zendesk configuration: Important details: This output makes the next step easy: you simply check whether that value is empty or not. Now you will tell n8n how to behave in each scenario. Add an IF node and connect it after the Determine node. Set the condition to check whether the This creates two clear paths: From here, your Zendesk to Jira sync becomes fully automatic. Each ticket is handled appropriately without anyone having to think about it. When the IF node finds an existing Jira key, you can keep Jira updated with the latest Zendesk activity. On the true branch of the IF node, add a Jira node and choose the issueComment operation. Configure it to: An example expression for the comment body could be: You can adjust this to include more context, such as ticket ID, requester, or a direct link to Zendesk. Every new Zendesk update can now appear in Jira automatically, keeping engineers in the loop without manual effort. When no Jira issue exists yet, the workflow will create one for you on the false branch of the IF node. Add another Jira node and select the create issue operation. Typical settings include: For example, you might use this description template: Make sure you also: From now on, new Zendesk tickets that require engineering attention will automatically become Jira issues, complete with a reference back to the original ticket. To close the loop, you want Zendesk to know which Jira issue is associated with each ticket. That way, future updates can reuse the same Jira issue instead of creating duplicates. After the Jira Create issue node, add a Zendesk Update node. Configure it to: You can capture the Jira key from the create issue node, for example: Once this is stored in the custom field, the next time the ticket changes, the workflow will recognize the key and route to the “existing issue” path. Your systems stay in sync without extra effort. Before you rely on this workflow in production, take a moment to test and validate it. This is where you turn a good idea into a dependable part of your process. Once these checks pass, you have a working bridge between Zendesk and Jira that runs on its own. With the core automation in place, you can start refining it. This is where you turn a working flow into a robust system that your team can trust at scale. Imagine opening your inbox every morning to a clean, up-to-date summary of your investments, without copying numbers from websites or spreadsheets ever again. That is exactly what this n8n workflow template gives you. In this guide, we will walk through how the workflow works, when it is useful, and how each n8n node fits together. You will see how it pulls stock data from Tradegate, enriches it with your Baserow holdings, calculates values and changes, then wraps everything into a polished HTML email sent via SendGrid. At a high level, this automation: The result is a daily (or on-demand) stock report that looks professional, runs automatically, and is easy to adjust as your portfolio or tooling evolves. If you are still checking quotes manually, you already know the pain. Opening multiple tabs, copying values into a spreadsheet, doing the same calculations again and again… it adds up quickly and mistakes are almost guaranteed. With n8n handling the work for you, you can: In short, you trade repetitive manual work for a single, maintainable workflow. The template follows a clean, linear pipeline. Each node has a narrow job, which makes the whole thing easier to understand and tweak later. Let us go through these pieces in a slightly different order so you can see the story behind the automation. Start by adding two trigger nodes: Both triggers can feed into the same chain of nodes, so you do not need to duplicate any logic. Next, the workflow needs to know what you actually own. That is where Baserow comes in. Set up a Baserow table with at least these columns: Use the Baserow (getAll:row) node in n8n to read all rows from this table. Each row becomes an item that flows through the workflow, and each item carries the data needed to look up the corresponding Tradegate page and to calculate your current position. For each row from Baserow, the workflow calls Tradegate. You do this with an HTTP Request node configured to send a GET request to the Tradegate order book URL. Pass the ISIN from Baserow as a query parameter so the right page is requested for each holding. In practice, you will use an expression like: Set the response format to string. That way, the raw HTML comes through untouched, which is exactly what you want for the next step where you parse it. Once the HTML from Tradegate is available, the HTML Extract node takes over. This node lets you define CSS selectors to pick out exactly the pieces of data you need, such as: In the example template, selectors look like: and similar patterns for other table cells. These may need updating if Tradegate changes its HTML structure, so it is worth checking them from time to time. Now that you have both Baserow data and scraped Tradegate values in each item, you can start calculating. Use a Set node to normalize and compute a Current Value for each holding. One example expression looks like this: A couple of important details here: Next, add another Set node to derive: The percentage change can be computed like this: By the time items leave this step, each one carries all the fields you need for a clear portfolio snapshot. Now for the fun part: turning these rows into an HTML report that you actually want to read. Add a Function node that: The example uses n8n’s All the HTML is typically stored in a single variable, for example The last step is to send that HTML to your inbox. Use the SendGrid node (or a similar transactional email provider) and configure it to: Once this is in place, every scheduled run of the workflow will produce and send a fresh report automatically. Tradegate, like many exchanges, may have rate limits or specific rules about scraping. To stay on the safe side: Clean data means more reliable reports. A few best practices: Things will break occasionally, especially if Tradegate changes its HTML. To make this less painful: Because this workflow touches credentials and possibly sensitive data, keep security in mind: Once the basic version is running smoothly, you can extend it in a few directions: Before you fully trust the automation, run through this quick checklist: This n8n workflow template gives you a repeatable, low-maintenance way to generate daily stock reports. It combines: Because the workflow is modular, you can easily switch data sources, extend the calculations, or plug in a different email provider without rewriting everything. Ready to stop doing portfolio updates by hand? Import or recreate the nodes described here, adjust the CSS selectors for your specific Tradegate pages, and put the Cron node on a schedule that suits you. If you want the example workflow JSON or help tailoring it to your setup, feel free to reach out. Call to action: Try this workflow in your n8n instance today, or message me for a customized version, troubleshooting support, or a live walkthrough. Subscribe if you would like more automation recipes like this in your inbox. On a rainy Tuesday afternoon, Maya stared at yet another Slack message from sales: “Hey, do we have the latest onboarding process for enterprise customers? The PDF in Drive looks outdated.” She sighed. Somewhere in their sprawling Google Drive were dozens of PDFs, slide decks, and Google Docs that all seemed to describe slightly different versions of the same process. As head of marketing operations, Maya was supposed to be the person who knew where everything lived. Instead, she was spending her days hunting through folders and answering the same questions over and over. That was the moment she decided something had to change. The company had grown fast. Teams were diligent about documenting things, but that only made the problem worse. There were: People were not short on documentation. They were short on answers. Maya wanted a way for anyone in the company to simply ask a question in plain language and get a reliable, context-aware response, grounded in their existing docs. Not a generic chatbot, but one that actually understood their internal knowledge base. That search led her to the concept of Retrieval-Augmented Generation (RAG), and eventually to an n8n workflow template that promised exactly what she needed: a production-ready RAG chatbot that could index documents from Google Drive, store embeddings in Qdrant, and serve conversational answers using Google Gemini. As Maya dug deeper, she realized why a RAG chatbot was different from the generic AI bots she had tried before. Instead of relying only on a language model’s training data, RAG combines: In practical terms, that meant: For a team like hers, this was ideal. Their internal docs, knowledge bases, and customer files could finally become a living, searchable knowledge layer behind a simple conversational interface. Maya decided to try the n8n template. Before touching anything, she sketched the architecture on a whiteboard so the rest of the team could understand what she was about to build. At a high level, the system looked like this: It sounded complex, but the n8n template broke it into manageable pieces. Each part of the story was actually an n8n node, wired together into a repeatable workflow. To get from chaos to chatbot, Maya had to wire up a few critical components inside n8n. The template already had them in place, but understanding each one helped her customize and trust the system. The first challenge was obvious: how do you reliably pull all relevant files from Google Drive without melting APIs or memory? The workflow started with the Google Drive node, configured to: n8n’s Once files were downloaded, the next step was to turn them into something the AI could actually work with. The workflow included a text extraction step that pulled the raw content from PDFs, DOCX files, and other formats. Then came a crucial part: an information-extractor stage that generated structured metadata, such as: Maya quickly realized this metadata would become her secret weapon. By attaching it to each vector, she could later: Some of their onboarding guides ran to dozens of pages. Sending them as a single block to an embedding model was not an option. The template used a token-based splitter to break long documents into smaller chunks, typically: This struck the right balance: chunks were large enough to preserve context, but small enough to avoid truncation and respect embedding model limits. Maya learned that going too small could hurt answer quality, since the model would lose important surrounding context. With chunks ready, the workflow called the embedding model, using: Each chunk became a vector, enriched with metadata like: These vectors were then upserted into a Qdrant collection. Maya followed a consistent naming scheme, such as: That design would later make it easy to enforce data boundaries and control quotas. After a week of tinkering, Maya was ready to move from ingestion to interaction. This was the part her colleagues actually cared about: could they ask a question and get a useful answer? The template exposed a chat trigger inside n8n. When someone sent a query, the workflow did three things in quick succession: Gemini then generated a response that was not just plausible, but grounded in their actual documents. By default, Maya started with a topK value between 5 and 10, then adjusted based on answer quality. On the first real test, a sales rep asked: “What are the key steps in onboarding a new enterprise customer using SSO?” The chatbot responded with a clear, step-by-step explanation, pulled from their latest onboarding guide and support documentation, complete with references to API keys and setup steps. For the first time, Maya saw their scattered docs behave like a single, coherent source of truth. To make conversations feel natural, the template also included a short-term memory system. It kept a rolling window of about 40 messages, so the chatbot could maintain context across multiple turns. At the same time, the workflow persisted chat history to Google Docs. This served several purposes: The chatbot was no longer a black box. It was a transparent system that the team could inspect and refine. With power came a new concern. What happened if they needed to remove outdated or sensitive content from the vector store? The template had anticipated this with a human-in-the-loop flow for destructive operations. When Maya wanted to remove content related to a specific file, the workflow would: This approach made accidental data loss far less likely. No one could wipe out large portions of the knowledge base with a single misclick. Looking back, the setup itself followed a clear sequence. Here is how she put the n8n RAG chatbot into production. First, she ensured all underlying services were ready: Next, she imported the provided workflow template into n8n and added credentials for: In a couple of Set nodes, she defined the key variables: Before going all in, Maya pointed the workflow at a small folder of representative documents and ran a test ingest. She verified that: Finally, she tested the chat trigger with real questions from sales and support. When answers were too shallow or missed context, she experimented with: Within a few iterations, the chatbot felt reliable enough to introduce to the rest of the company. As the system moved from experiment to daily tool, several best practices emerged. As more teams started relying on the chatbot, security moved from an afterthought to a central requirement. Maya worked with IT to ensure the system aligned with their data governance rules. They implemented policies to: The combination of Telegram approvals, metadata-based deletes, and detailed chat logs gave leadership confidence that the system was not just powerful, but also controlled. Not everything worked perfectly on day one. Along the way, Maya hit a few common pitfalls and learned how to fix them. As usage grew, so did costs. Maya tracked where the money was going and adjusted accordingly. She found that the main cost drivers were: To keep things efficient, she: This guide describes how to implement a production-ready Quiz Auto Grader in n8n using Retrieval-Augmented Generation (RAG). The solution combines: The workflow is designed for educators and technical teams who need scalable, consistent quiz grading for short-answer and open-ended questions. The automated quiz grading workflow is intended to: At a high level, the n8n workflow: The webhook typically receives a JSON payload with fields such as: These identifiers are reused as metadata in Pinecone and as columns in Google Sheets, making it easier to trace individual grading decisions. The workflow starts with an n8n Webhook node configured to accept Ensure the webhook URL is secured via HTTPS and optionally protected behind an authentication mechanism if required by your environment. The Text Splitter node processes the This chunking: For very short answers, the splitter may produce a single chunk. For longer answers, overlapping segments preserve context across chunk boundaries. Each chunk from the Text Splitter is passed into a Cohere Embeddings node. This node: These embeddings are later used for similarity search against: The Pinecone Insert node writes embeddings into a Pinecone index, such as: For each embedding, the workflow typically stores metadata including: This index acts as a searchable knowledge base of grading-relevant content, allowing the RAG agent to ground its decisions in prior examples and rubrics. When grading a specific answer, the workflow uses a Pinecone Query node to retrieve context. The node: The retrieved documents are then attached as context to the RAG agent, typically passed via a Vector Tool configured in the LangChain integration. A Window Memory node is used to maintain short-term conversational context for the RAG agent. This is particularly useful if: Window Memory stores the most recent messages up to a configurable limit, preventing the context window from growing indefinitely. The core grading logic is implemented using a RAG Agent based on LangChain within n8n. The agent: The system message is typically configured along the lines of: “You are an assistant for Quiz Auto Grader” The agent outputs: The OpenAI Chat node provides the underlying language model for the RAG agent. It: Model selection, temperature, and other generation parameters can be tuned based on how deterministic you want the grading to be. After the grade is produced, a Google Sheets Append node logs the result. Typical columns include: This sheet functions as an audit log and makes it easy to review or export grading results for further analysis. For reliability, the workflow includes a Slack node that sends alerts when errors occur. If any step, such as: throws an error, the workflow sends a message to an This allows quick triage and manual intervention when needed. Configure the following credentials in n8n: It is recommended to run n8n in a managed environment or containerized setup and provide these keys via environment variables, not hard-coded in the workflow. When working with student data: To improve grading consistency, store: in the same Pinecone index as vectors. Label them appropriately in metadata so that the RAG agent can retrieve them alongside live student answers. This makes the grading process more transparent and aligned with instructor expectations. The default template uses: Adjust these values based on: Very small chunks may lose context, while very large chunks may reduce retrieval precision. Clear and constrained prompts are essential. Define: A typical system and user prompt combination looks like: By enforcing a structured JSON output, the Google Sheets node can reliably map fields to columns without additional parsing complexity. Common error cases include: The template is designed to detect such failures at each step and trigger the Slack alert path. When an error is detected, the Slack node: You can then: For additional robustness, consider enabling retries on transient network errors and defining a dead-letter queue or dedicated sheet for failed items that require manual attention. The RAG agent can output a Ever find yourself copying an old Confluence page, tweaking a few fields, and thinking, “There has to be a better way”? If you are doing release notes, onboarding docs, or incident reports over and over, you are not alone. In this guide, we will walk through an n8n workflow template that automatically creates new Confluence pages from an existing space template. We will chat about what the workflow does, when it is worth using, and how to set it up step by step so you can stop doing the boring stuff by hand. At a high level, this automation takes a Confluence template, fills in placeholders with real data from a webhook, then creates a brand new page for you. No more copying and pasting, no more “did I forget a field this time?” worries. Here is the basic flow: The result: consistent, standardized pages created on demand, directly from your tools or pipelines. This workflow is perfect any time you need repeatable documentation with a similar structure every time. For example: If you are already using Confluence templates and you find yourself creating almost identical pages again and again, this n8n template will probably save you a lot of clicks and reduce human error along the way. Before you plug in the workflow, make sure you have: Once you have those in place, you are ready to wire everything together. The workflow is built around five main nodes that work together: Let us go through each of these so you know exactly what to configure. The Webhook node is how your other tools talk to n8n. You can send it data from CI/CD systems, forms, Zapier, custom apps, or anything else that can make an HTTP request. Configure the Webhook node to: The payload should contain all the values you want to plug into the Confluence template. For example: Later on, the Code node will read this JSON, match it with placeholders in the template, and swap everything in. Next up is a Set node that acts like a small config file inside your workflow. These are values that rarely change, so it is easier to define them once and reuse them everywhere. In the Set node, define fields such as: Keeping these in one node makes it much easier to update later, especially if you move to a different space or change templates. Now n8n needs the actual template from Confluence so it can work with the title and body. Use an HTTP Request node configured as a GET request to the Confluence REST API: In the response, you will get: Those two pieces are what you will transform in the next step. This is where the magic happens. A Code node scans the template title and body for placeholders and replaces them with values from the webhook payload. The placeholders follow a pattern like Here is a sample JavaScript snippet that does the heavy lifting: A couple of handy details here: Once the template is filled in, the final step is to send it back to Confluence as a new page. Use another HTTP Request node configured as a POST to the Confluence content endpoint: A few important notes: To keep things safe and maintainable, it helps to follow a few simple habits: If you get a 401, double-check your authentication details. Make sure you are: If some placeholders are still visible in the final page, it usually means the payload structure does not match the placeholder path. For example, the placeholder If the JSON keys or nesting differ, the Code node will not find the value and will leave the placeholder unchanged. Confluence uses a specific storage format that expects valid HTML and properly formatted Atlassian macros. If you are dynamically generating HTML in the Code node: Because this workflow touches your documentation system, it is worth tightening security a bit: Once this workflow is in place, you are no longer manually creating Confluence pages for every release or incident. Instead, your tools send a webhook, n8n fills in the template, and the new page appears right where it should be, with the right structure and data every time. That means: Ready to give it a spin? Start in a sandbox space, tweak your placeholders and formatting, and iterate until the generated pages look exactly how you want. If you need more advanced replacement logic for lists or conditional sections, you can extend the Code node to handle those patterns too. Next step: import the template, run a test, and share it with your team once it is dialed in. If this kind of automation is helpful, keep exploring more n8n workflows to connect your tools and clean up other repetitive tasks. Imagine never having to copy a Confluence template, tweak fields, and double check formatting again. Instead, every new onboarding doc, release note, or meeting summary appears in the right space, with the right title, already filled with the right details. That is the kind of small but powerful transformation that n8n can unlock for your workday. In this guide, you will walk through an n8n workflow that automatically creates a new Atlassian Confluence page from a space template. The workflow listens to a webhook, fills in placeholders in the template, then publishes a fully formatted page using the Confluence REST API. Along the way, you will see how this template can be a first step toward a more automated, focused workflow where repetitive tasks run in the background and you stay focused on higher value work. Confluence templates are incredibly useful, but creating pages from them can become a grind. Every time you prepare onboarding docs, release notes, meeting notes, or internal documentation, you repeat the same steps: create a page, select a template, fill in fields, and make sure everything is consistent. Over time, this manual work leads to: It is not that these tasks are hard. They just add up and distract you from the work that really moves your team or business forward. Automation in n8n is not just about saving a few clicks. It is about turning fragile, human dependent steps into reliable systems that run the same way every time. When you automate Confluence page creation, you: Think of this workflow as your starting point. Once you have one automated Confluence process, it becomes much easier to imagine and build the next one. The sample n8n workflow is designed to be both simple and powerful. You can import it, plug in your Confluence details, and start creating pages in minutes. From there, you can customize and grow it to fit your exact use case. The workflow is built from five core n8n nodes that work together to turn incoming data into a published Confluence page: Once this is in place, your role shifts from “doing the work” to “designing the process.” You decide what data comes in through the webhook, how the template is structured, and how the final page should look, then let n8n handle the rest. Before you can let your workflow publish pages on your behalf, you need to connect n8n to Atlassian in a secure way. In n8n, use Atlassian basic authentication with: You can create an API token at id.atlassian.com. Once generated, store this token in n8n credentials so it is never hard coded in individual nodes or shared workflows. With authentication in place, your workflow can safely call the Confluence REST API and act with the permissions you have granted. Instead of scattering configuration across multiple nodes, this workflow uses a Set parameters node as a central place for values you might want to change over time. This makes your automation much easier to maintain and scale. Typical keys you will define include: By adjusting these values, you can quickly point the same workflow to a different space, template, or parent page without rewriting any logic. Next, the workflow needs to know what your Confluence template looks like. The Confluence: Get template content node calls the REST API to fetch it. The request looks like this: The response includes: These values become the source content that your JavaScript node will later customize with real data from the webhook. This is where your workflow becomes truly dynamic. Instead of static text, your template can contain placeholders like The Replace placeholders node uses a small JavaScript function to do this mapping. It supports dot notation for nested JSON values and wraps placeholders with a character such as Here is what is happening in this step: This is where your automation becomes uniquely yours. By changing the placeholders in your Confluence template and the structure of your webhook payload, you can adapt this approach to almost any documentation pattern. With a fully prepared title and body, the workflow is ready to create the page. The Confluence: Create page from template step uses the content API: An example JSON request body looks like this: In the actual workflow, you will: Once this node runs successfully, your new Confluence page appears exactly where you want it, already filled with the right information. To make this concrete, here is a sample webhook payload that could trigger the workflow: If your Confluence template includes placeholders like: then the workflow will automatically fill in those values, giving you a complete, customized page for each new release, project, or onboarding flow. As you experiment and refine the workflow, you may run into a few common issues. Use these checks to keep things running smoothly: As your automation becomes more powerful, security becomes more important. Keep these guidelines in mind: Once your first automated Confluence page is working, you have a powerful base to build on. Here are a few ways to grow this into a richer system: Each improvement brings you closer to a documentation process that runs itself, while you focus on strategy, communication, and product work. Automating Confluence page creation with n8n is a small project with an outsized impact. You define your template once, wire up a webhook, and let the workflow handle the rest. The result is faster documentation, fewer mistakes, and consistent structure across every space. The sample workflow you have just explored covers everything you need to get started: From here, you can extend it with approvals, notifications, scheduling, or integrations with other tools in your stack. Each iteration is another step toward a more automated, intentional way of working. Ready to build your own automated documentation flow? Import the n8n workflow, update the Set parameters node with your Confluence base URL, space, template ID, and credentials, then send a test webhook. Use the result as your foundation, tweak it, and keep improving until it perfectly matches how your team works. Download workflow JSON Want more step by step automation tutorials like this? Subscribe to get new n8n and Atlassian automation recipes delivered directly to your inbox, and keep building a workflow that works for you, not the other way around.Build a Notion Knowledge-Base Assistant with n8n
Build a Notion Knowledge-Base Assistant with n8n
The moment Mia realized search was not enough
What Mia decided to build
Rising action: turning a Notion database into a real assistant
Mia starts with the Notion knowledge base
Bringing n8n into the story
/v1/databases/{id}/query with filters/v1/blocks/{page_id}/children to fetch page blocks if the record needed deeper inspectionThe turning point: making the AI agent actually useful
Credential setup, or why nothing worked at first
Teaching the assistant how to search
question rich_text field
Giving the AI a clear role
Role: You are an assistant that answers questions using only the provided Notion records.
If a record contains the answer, include the page URL.
If no records match, explain that no direct match was found and offer to broaden the search.A real example: “How do I request time off?”
question field for “time off.”
When things go wrong: Mia hits a few bumps
Notion resource not found
Slow responses
Incorrect or empty answers
/query request had filters that referenced a property name that did not exist in the databaseKeeping things safe, fast, and sustainable
How Mia extended the assistant beyond the basics
From chaos to clarity: Mia’s outcome
Automate Zendesk → Jira with n8n: Step-by-Step
Automate Zendesk to Jira with n8n: Turn Support Handoffs Into a Seamless Flow
The problem: Manual Zendesk to Jira handoffs drain your time
The mindset shift: Let automation carry the routine work
The solution: An n8n template that keeps Zendesk and Jira in sync
What you need before you start
How the n8n workflow is structured
Step 1: Webhook – listen for new Zendesk tickets
Configure the Webhook node
/zendesk-new-ticket-123
Step 2: Get the full Zendesk ticket
Configure the Zendesk “Get ticket” node
{{$node["On new Zendesk ticket"].json["body"]["id"]}}
custom_fields such as your Jira issue key field.Step 3: Decide if a Jira issue already exists
Configure the “Determine” Function node
/* Zendesk field ID which represents the "Jira Issue Key" field. */
const ISSUE_KEY_FIELD_ID = 6689934837021;

new_items = [];
for (item of $items("Get ticket")) {  var custom_fields = item.json["custom_fields"];  var jira_issue_key = "";  for (var i = 0; i < custom_fields.length; i++) {  if (custom_fields[i].id == ISSUE_KEY_FIELD_ID) {  jira_issue_key = custom_fields[i].value;  break;  }  }  new_items.push({  "Jira issue key": jira_issue_key  });
}
return new_items;
ISSUE_KEY_FIELD_ID with the ID of your Zendesk custom field. You can find this in Zendesk admin > Ticket Fields.Jira issue key.Step 4: Branch the workflow with an IF node
Configure the IF node
Jira issue key is present, for example:{{$node["Determine"].json["Jira issue key"]}} isNotEmpty
Step 5: Add a comment to an existing Jira issue
Configure the Jira issueComment node
issueKey from the Determine node output.{{$node["On new Zendesk ticket"].json["body"]["comment"]}}Step 6: Create a new Jira issue when needed
Configure the Jira “Create issue” node
See Zendesk issue at: https://your-domain.zendesk.com/agent/tickets/{{$node["Get ticket"].json["id"]}}
Step 7: Write the Jira key back into Zendesk
Configure the Zendesk “Update ticket” node
{{$node["Create issue"].json["key"]}}Testing your Zendesk to Jira automation
custom_fields.
Make your workflow more resilient and polished
Error handling and reliability
Advanced enhancements for deeper integration
Automate Stock Reports with n8n, Baserow & SendGrid
Automate Stock Reports with n8n, Baserow & SendGrid
What this n8n workflow actually does
Why bother automating stock reports?
How the workflow is structured
Step 1: Decide when the report should run
Cron and Manual triggers in n8n
Step 2: Store and fetch your portfolio from Baserow
Baserow node – your holdings as structured data
Step 3: Pull Tradegate data for every ISIN
HTTP Request node – grabbing the order book page
isin = ={{$json["ISIN"]}}Step 4: Scrape the key values from Tradegate
HTML Extract node – parsing the HTML
<h2>#col1_content > table > tbody > tr:nth-child(2) > td:nth-child(1)Step 5: Clean up the data and calculate portfolio metrics
First Set node – computing current value
Current Value = {{ (parseFloat($json["Bid"].replace(',', '.')) * parseFloat($node["Baserow"].json["Count"])) .toFixed(2) }}
Second Set node – calculating change and percentage change
Change (%) = {{(((parseFloat($json["Current Value"]) - parseFloat($json["Purchase Price"])) / parseFloat($json["Purchase Price"])) * 100).toFixed(2)}}Step 6: Turn the data into a readable HTML report
Function node – building the email HTML
$now helper to include a timestamp in the report, with timezone and locale formatting. For example:${'$now'}.setZone("Europe/Dublin").setLocale('ie').toFormat('fff')email_html, and returned as part of the item JSON. Keep the layout simple: a basic table, some light inline styles, and a short summary paragraph so it works well in most email clients.Step 7: Email the report with SendGrid
SendGrid node – delivering the final result
text/html$json["html"], into the email bodyPractical tips to keep your workflow stable
Respect rate limits and site policies
Data hygiene and robustness
parseFloatError handling and retries
Security best practices
Ideas to enhance the workflow
Testing checklist before you rely on it
Wrapping up
Build a RAG Chatbot with Google Drive & Qdrant
From Document Chaos to Smart Answers: How One Marketer Built a RAG Chatbot with Google Drive & Qdrant
The problem: Knowledge everywhere, answers nowhere
Discovering RAG: Why this chatbot is different
The architecture that changed everything
text-embedding-3-large (or equivalent) to turn chunks into vectorsRising action: Turning messy Drive folders into structured knowledge
Finding and downloading the right files
splitInBatches node helped here. Instead of trying to download hundreds of files at once, the workflow processed them in small, controlled chunks, which protected both Google APIs and her n8n instance from spikes.Extracting text and rich metadata
titleauthoroverarching_themerecurring_topicspain_pointskeywords
Splitting long documents into smart chunks
Generating embeddings and upserting into Qdrant
text-embedding-3-large (or a compatible provider)
file_idtitlekeywords
project-<project_name> for per-project isolationtenant-<tenant_id> for multi-tenant setupsThe turning point: When the chatbot finally spoke
Wiring up chat and retrieval with Google Gemini
Adding memory and chat history
Keeping control: Safe deletes and human approvals
file_id values targeted for deletionmetadata.file_idHow Maya set everything up in practice
1. Provisioning the core services
2. Importing and configuring the n8n template
3. Running a small test ingest
4. Testing chat and tuning retrieval
Best practices Maya learned along the way
Designing chunks and metadata
file_id, title, keywords, and extracted themes. This makes filtered search and safe deletes possible.Collection and retrieval strategy
topK=5-10 and adjust based on how relevant the answers feel in practice.Scaling without breaking APIs
splitInBatches and add retry or backoff logic to handle throttling gracefully.Security, compliance, and peace of mind
When things go wrong: Troubleshooting in the real world
metadata.file_id.Cost and performance: Keeping the chatbot sustainable
Build a Quiz Auto Grader with n8n & RAG
Build a Quiz Auto Grader with n8n & RAG
1. Solution Overview
1.1 Objectives
1.2 High-level Flow
2. Architecture & Data Flow
2.1 Core Components
2.2 Typical Payload & Metadata
submission_idstudent_idquestion_idquestion_text (optional but recommended)student_answer3. Node-by-Node Breakdown
3.1 Webhook Trigger
POST requests over HTTPS. This node:
3.2 Text Splitter
student_answer (or combined question + answer text) and splits it into smaller segments. In the template, the typical configuration is:
chunkSize = 400 characterschunkOverlap = 40 characters
3.3 Cohere Embeddings Node
3.4 Pinecone Insert
index name: quiz_auto_grader
student_idquestion_idsubmission_idtimestamp3.5 Pinecone Query
quiz_auto_grader index for top-k similar vectors3.6 Window Memory
3.7 RAG Agent (LangChain Agent in n8n)
3.8 OpenAI Chat Model
3.9 Google Sheets Append
submission_idstudent_idquestion_idgradefeedbackconfidence (if available)grader_notes or raw model outputtimestamp3.10 Slack Error Alert
#alerts channel with:
submission_id or related identifiers to locate the failed item4. Configuration & Integration Notes
4.1 Credentials & Environment
4.2 Data Privacy & Security
4.3 Rubric & Example Storage Strategy
4.4 Chunk Size & Overlap Tuning
chunkSize = 400chunkOverlap = 40
4.5 Prompt Engineering for the RAG Agent
<system>
You are an assistant for Quiz Auto Grader. Given a question, rubric, and a student's answer, return a JSON object with keys: grade (0-100), feedback (short text), confidence (0-1).
</system>

<user>
Question: ...
Rubric: ...
Student answer: ...
</user>
5. Error Handling & Reliability
5.1 Error Scenarios
5.2 Slack Alerts & Manual Review
#alerts channelsubmission_id)
6. Monitoring, Evaluation & Iteration
6.1 Tracking Model Confidence
Automate Confluence Page Creation with n8n
What this n8n – Confluence workflow actually does
When to use this Confluence automation
What you need before you start
How the n8n workflow is structured
Step 1 – Webhook: trigger the workflow with data
{  "user": { "name": "Alice", "email": "alice@example.com" },  "release": { "version": "1.4.2", "notes": "Bug fixes and improvements" },  "ticket": { "id": "PROJ-123", "url": "https://jira.example/browse/PROJ-123" }
}
Step 2 – Set parameters: keep your config in one place
confluence_base_url – for example https://your-domain.atlassian.nettemplate_id – the ID of the Confluence template you want to usetarget_space_key – the space key where the new page should livetarget_parent_page_id – the ID of the parent page to nest underStep 3 – Fetch your Confluence template content
GET https://your-domain.atlassian.net/wiki/rest/api/template/{template_id}
name.storage format at body.storage.value.Step 4 – Replace placeholders in the template
$some.field.path$. That path lines up with the JSON structure in your webhook data. For example:
$user.name$ looks for {"user": {"name": "..."}}$release.version$ looks for {"release": {"version": "..."}}function replacePlaceholders(template, values) { const placeholderPattern = /\$(.*?)\$/g; return template.replace(placeholderPattern, (match, p1) => { const keys = p1.split('.'); let value = values; for (const key of keys) { if (value && key in value) { value = value[key]; } else { return match; // fallback to original placeholder } } return value; });
}
const templateTitle = $('Confluence: Get template content').item.json.name;
const templateBody = $('Confluence: Get template content').item.json.body.storage.value;
const values = $('Webhook').item.json;
const pageTitle = replacePlaceholders(templateTitle, values);
const pageBody = replacePlaceholders(templateBody, values);
return { "page_title": pageTitle, "page_body": pageBody };
Step 5 – Create the new Confluence page
POST https://your-domain.atlassian.net/wiki/rest/api/content/
Content-Type: application/json
Authorization: Basic base64(email:api_token)

{  "type": "page",  "title": "2025-09-12-14-30 - Release notes 1.4.2",  "space": { "key": "TARGET_SPACE" },  "ancestors": [{ "type": "page", "id": "PARENT_PAGE_ID" }],  "body": {  "storage": {  "value": "<p>Your rendered storage HTML here</p>",  "representation": "storage"  }  }
}
page.Best practices for smooth Confluence automation
Troubleshooting common issues
401 Unauthorized
Template placeholders are not replaced
$release.version$ expects a payload like:{ "release": { "version": "1.4.2" }
}
Malformed storage HTML
Security tips for using n8n with Confluence
Why this n8n template makes your life easier
Try the template and customize it to your needs
Automate Confluence Page Creation with n8n
Automate Confluence Page Creation with n8n
From repetitive tasks to reliable systems
The problem: manual Confluence pages slow you down
The mindset shift: treat documentation as a workflow, not a chore
The n8n Confluence template: your practical starting point
Workflow overview: how the automation flows
$user.name$ with real values from the webhookStep 1: Connect n8n securely to Atlassian
Authentication with Atlassian
Step 2: Centralize your Confluence settings
The Set parameters node as your control panel
confluence_base_url – for example https://your-domain.atlassian.nettemplate_id – the numeric ID of the Confluence template you want to usetarget_space_key – the space key or personal space identifier where pages should be createdtarget_parent_page_id – the ID of the parent page if you want new pages nested under a specific parentStep 3: Pull the Confluence template content
Fetching the template via REST API
GET {confluence_base_url}/wiki/rest/api/template/{template_id}
Step 4: Turn raw data into a polished page
Placeholder replacement with a JavaScript node
$user.name$ or $project.name$ that are automatically replaced with values from the webhook payload.$.function replacePlaceholders(template, values) { const placeholderPattern = /\$(.*?)\$/g; return template.replace(placeholderPattern, (match, p1) => { const keys = p1.split('.'); let value = values; for (const key of keys) { if (value && key in value) { value = value[key]; } else { return match; // keep original if not found } } return value; });
}
const templateTitle = $('Confluence: Get template content').item.json.name;
const templateBody = $('Confluence: Get template content').item.json.body.storage.value;
const values = $('Webhook').item.json;
const pageTitle = replacePlaceholders(templateTitle, values);
const pageBody = replacePlaceholders(templateBody, values);
return { "page_title": pageTitle, "page_body": pageBody };
$ with the matching value from the JSONpage_title and page_body that will be sent to ConfluenceStep 5: Create the Confluence page automatically
Publishing via the Confluence content API
POST {confluence_base_url}/wiki/rest/api/content/{ "type": "page", "title": "{{timestamp}}-{{page_title}}", "space": { "key": "TARGET_SPACE_KEY" }, "ancestors": [{ "id": TARGET_PARENT_PAGE_ID }], "body": { "storage": { "value": "<h1>Final HTML content here</h1>", "representation": "storage" } }
}
{{ $json["page_title"] }} and {{ $json["page_body"] }} from the JavaScript nodestorage representation for the body, since the template is already in Confluence storage formatExample: what the incoming data can look like
{  "user": { "name": "Alice", "email": "alice@example.com" },  "project": { "key": "PROJ", "name": "Example Project" },  "release": { "version": "1.2.3", "date": "2025-09-12" }
}
$user.name$$project.name$$release.version$Growing your automation: tips, fixes, and safeguards
Troubleshooting common issues
storage representation and that the template body has not been HTML escaped twice.Security best practices as you scale
Take it further: extend and personalize the workflow
Bringing it all together
Get support