n8n Soil Nutrient Analysis Workflow Guide

Automating soil nutrient analysis with n8n creates a robust bridge between agronomy workflows and modern data tooling. This guide presents a complete, production-ready n8n workflow template that ingests soil lab reports or raw test results, performs semantic text processing, stores vector embeddings in Weaviate, and uses an LLM-based agent to generate agronomic insights that are then logged to Google Sheets.

Use case overview: automated soil nutrient intelligence

Soil test reports are often lengthy, heterogeneous in structure, and challenging to query at scale. By orchestrating ingestion, semantic indexing, retrieval, and language model reasoning in a single n8n workflow, agronomists, consultants, and farm managers can:

  • Search past soil tests by nutrient levels, locations, or time periods
  • Maintain a centralized and searchable vector database of historical analyses
  • Automatically generate and archive summaries, recommendations, and action plans
  • Standardize reporting across labs, formats, and regions

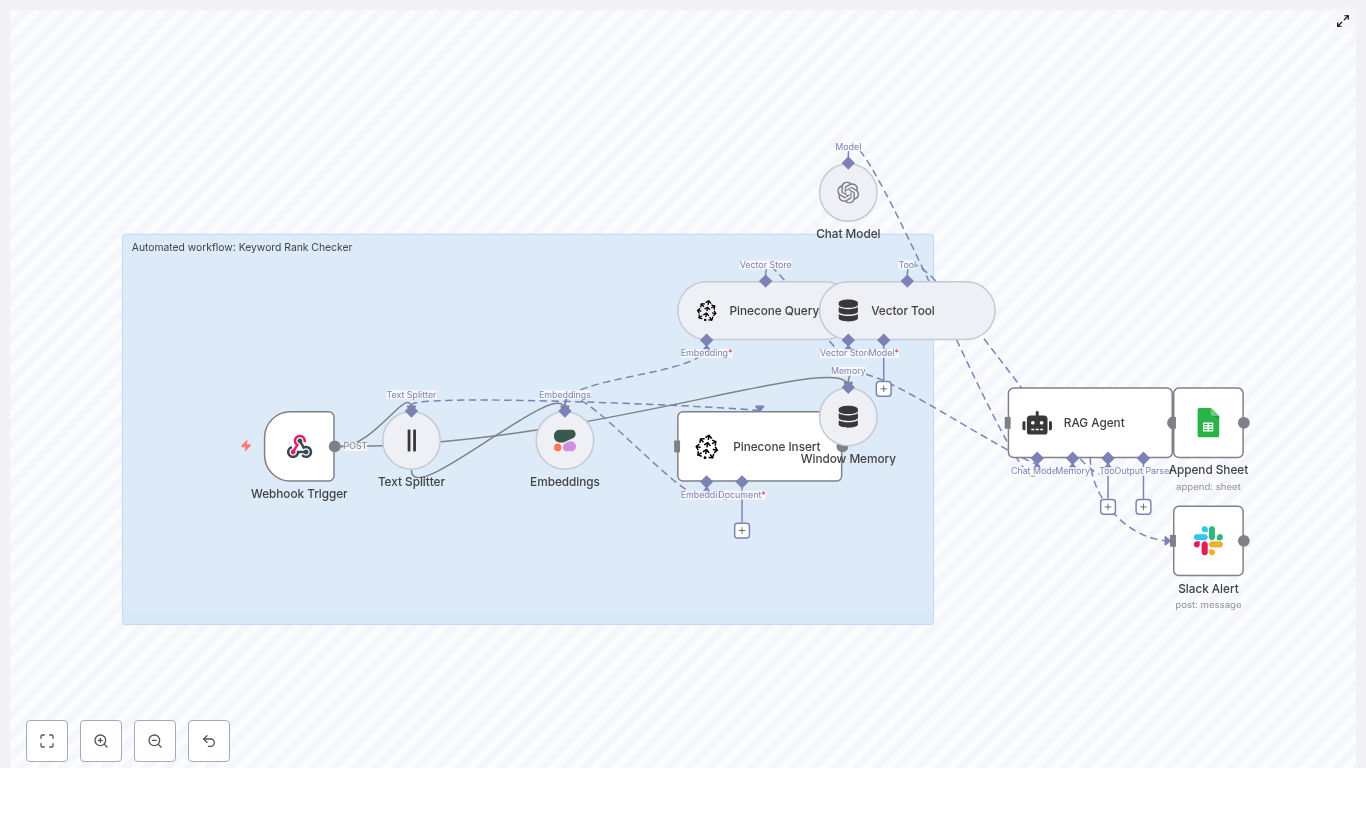
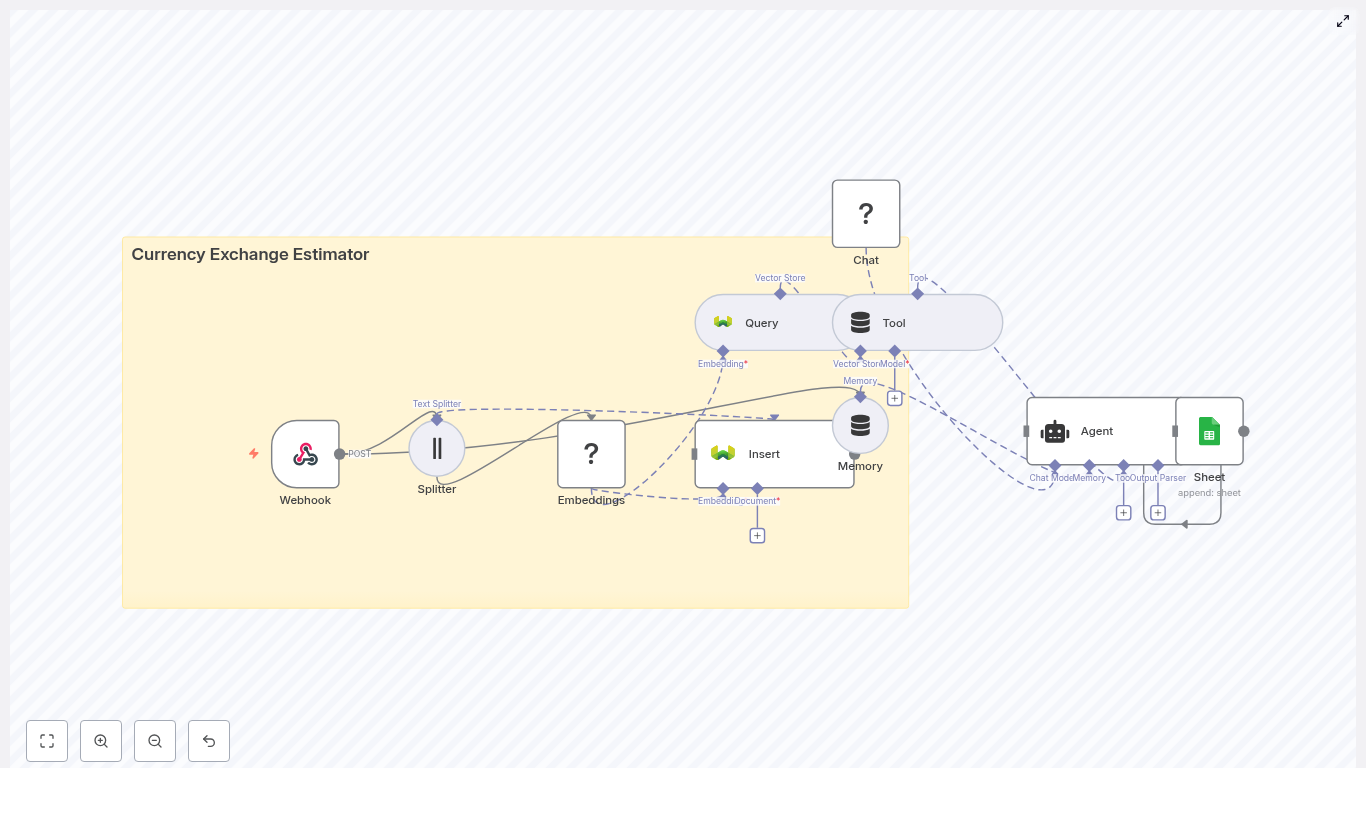
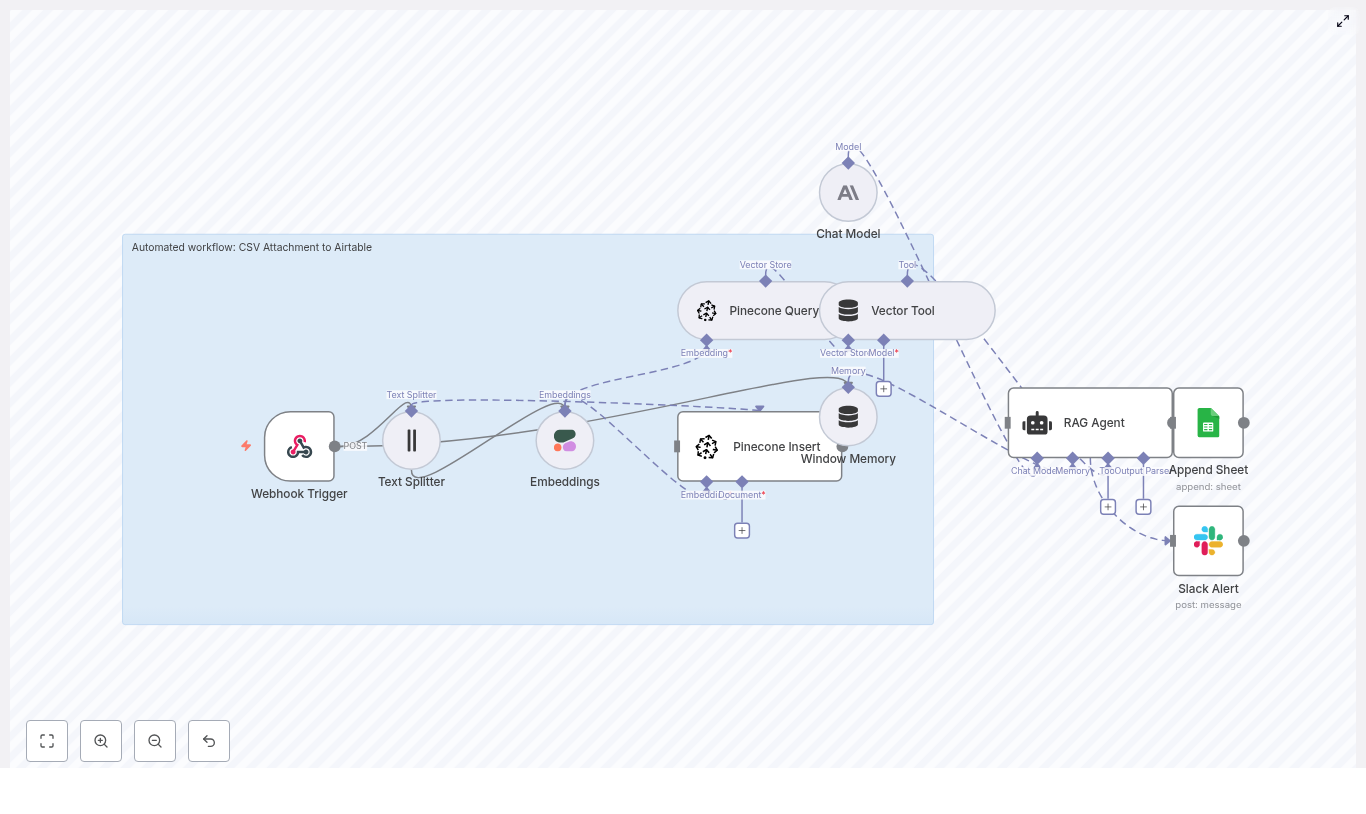
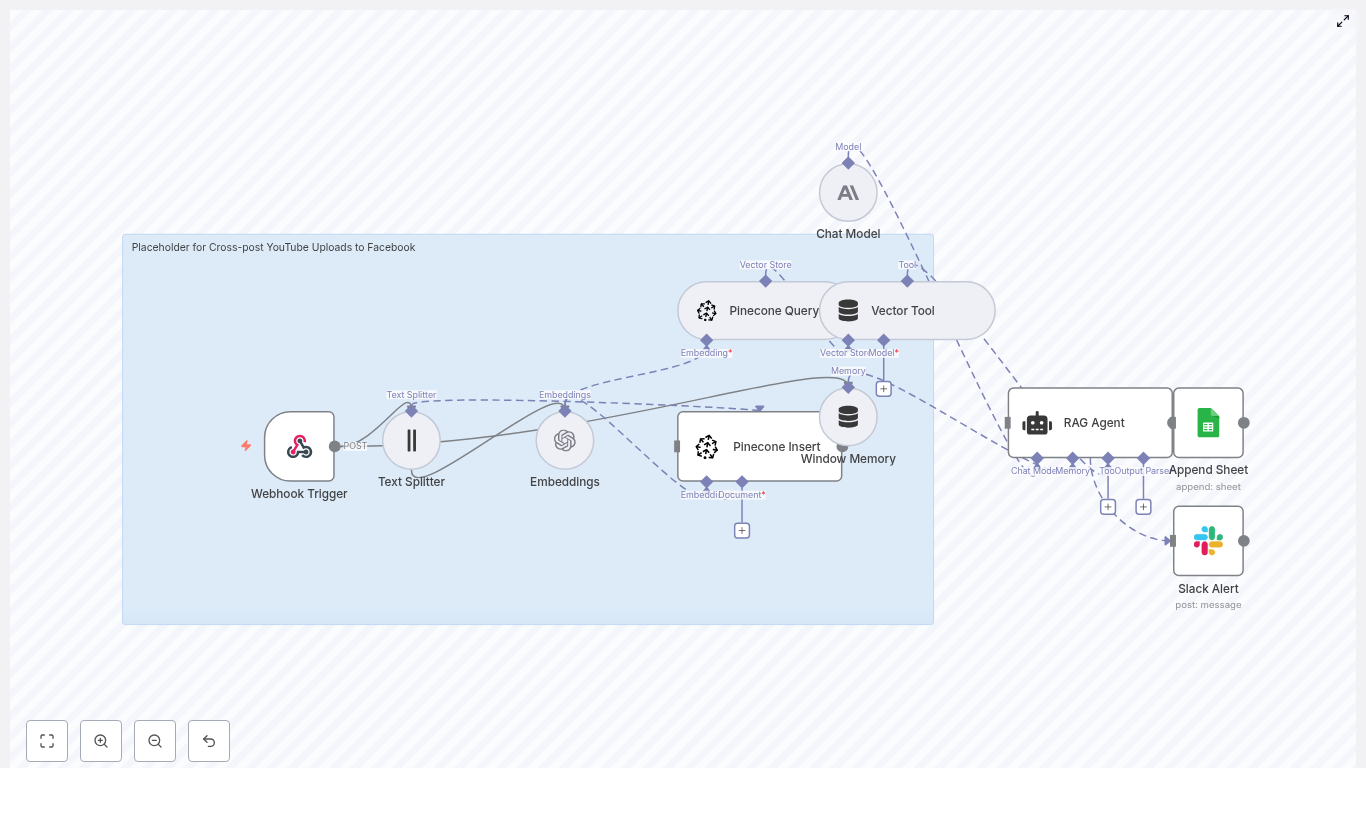
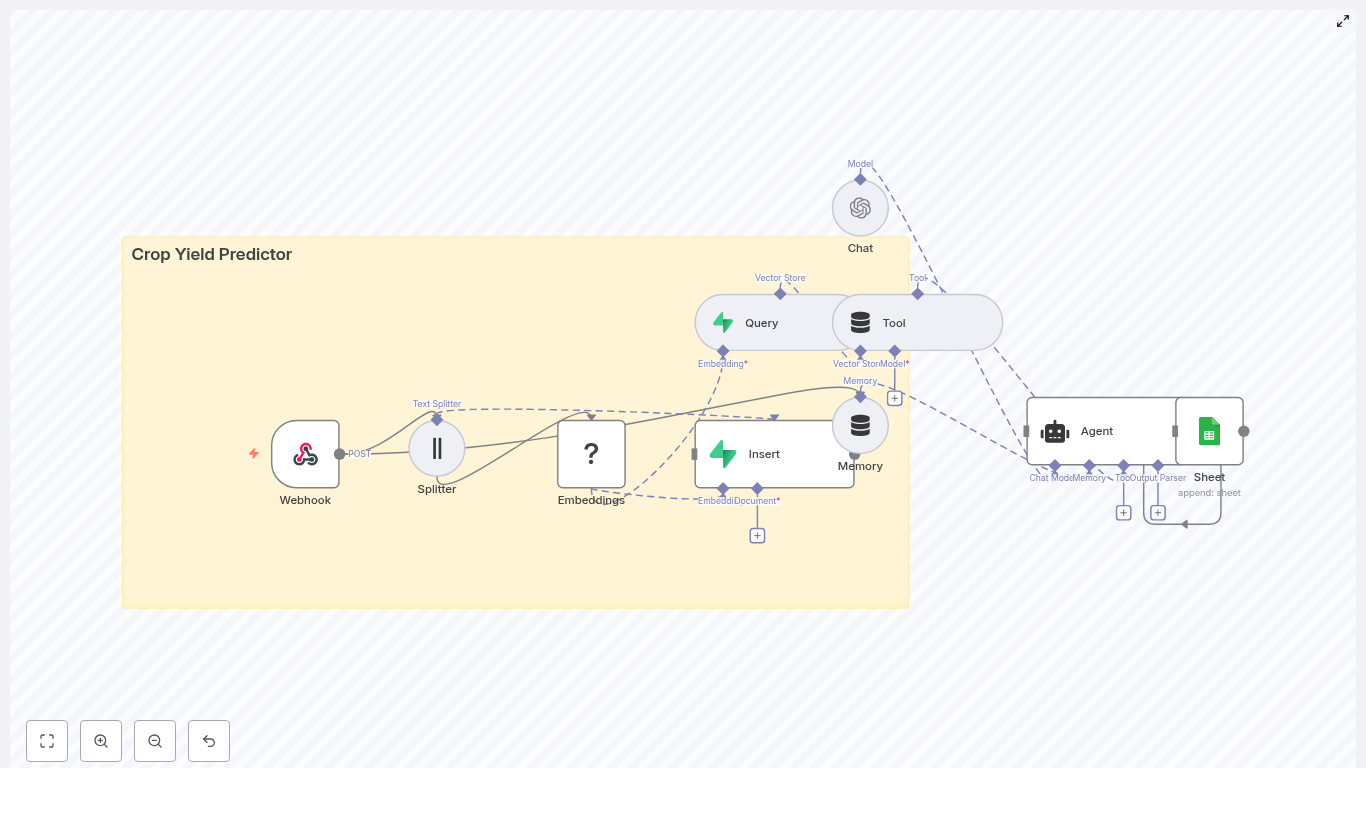
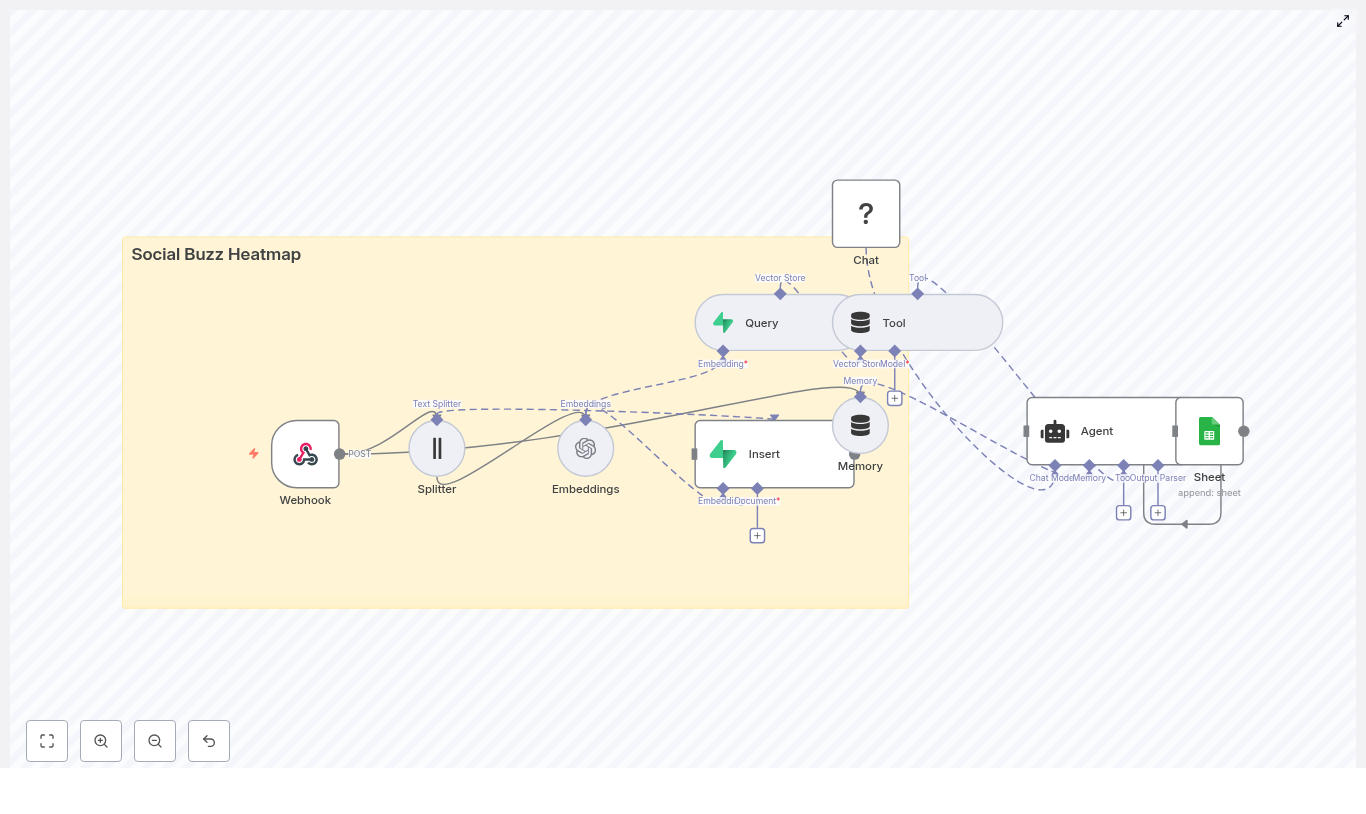
Architecture of the n8n soil nutrient workflow

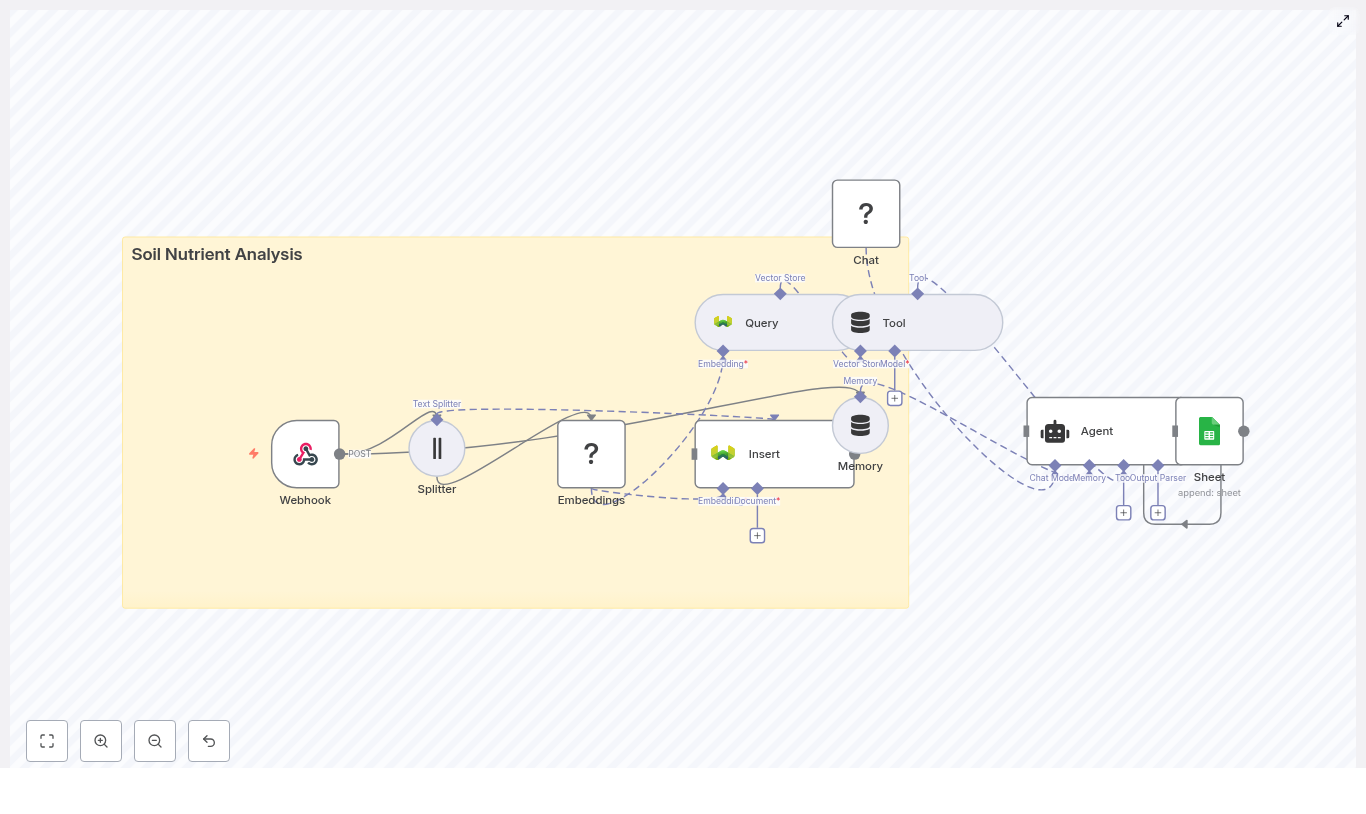
The template is built as a modular pipeline that can be adapted to different lab formats and organizational requirements. At a high level, the workflow covers:

  • Ingestion via a secure Webhook node
  • Pre-processing with a text splitter for long reports
  • Vectorization using HuggingFace embeddings
  • Storage and retrieval in a Weaviate vector index
  • Retrieval-augmented generation with an LLM agent that uses tools and memory
  • Operational logging in Google Sheets for tracking and reporting

This architecture aligns with best practices for retrieval augmented generation (RAG) and provides a repeatable pattern for other agronomic or scientific document workflows.

Workflow components and data flow

1. Data ingestion with Webhook

The entry point is an n8n Webhook node configured with the POST method and a dedicated path, for example /soil_nutrient_analysis. This endpoint can receive JSON payloads from lab information systems, mobile sampling apps, or custom upload tools.

Example payload:

{  "sample_id": "FIELD-2025-001",  "location": "Field A",  "date": "2025-08-31",  "report_text": "pH: 6.5\nN: 12 mg/kg\nP: 8 mg/kg\nK: 150 mg/kg\n…"
}

The report_text field can contain raw lab output, free text notes, or combined narrative and tabular content. Downstream nodes assume this field is the primary text for embedding and retrieval.

2. Text splitting for long soil reports

Soil reports can be several pages long, which is not optimal for embedding directly. The workflow uses a character text splitter node to break the report into smaller, semantically meaningful chunks. Recommended configuration:

  • Chunk size: 400 characters
  • Overlap: 40 characters

This configuration preserves context between chunks while controlling vector storage and retrieval costs. The output of the splitter is a list of text segments, each associated with the original sample metadata.

3. Embeddings with HuggingFace

The next stage uses a HuggingFace Embeddings node to convert each chunk into a numerical vector representation. Key configuration points:

  • Select a sentence or semantic embedding model suitable for technical text
  • Store the HuggingFace API key in n8n credentials for secure access
  • Ensure the node is configured to process all chunks produced by the splitter

Each output item from this node contains both the original text chunk and its corresponding embedding vector, ready for insertion into Weaviate.

4. Vector storage in Weaviate

The workflow then uses a Weaviate node in insert mode to persist embeddings and associated metadata. The index (class) name is soil_nutrient_analysis, which should be preconfigured in your Weaviate instance.

A recommended Weaviate schema for this use case includes:

  • sample_id (keyword)
  • location (text)
  • text_chunk (text)
  • date (date)

Weaviate stores both the vector and these structured fields, enabling hybrid search, filtering by metadata, and efficient semantic queries across large collections of soil reports.

5. Retrieval and tool integration for the agent

To support retrieval augmented generation, the workflow defines a Query node against the soil_nutrient_analysis index. This node performs semantic search over the stored vectors and can be configured to:

  • Limit the number of results returned
  • Apply filters on sample_id, location, or date
  • Use similarity thresholds to maintain relevance

The Query node is then connected to a Tool node. This exposes the Weaviate search capability as a callable tool to the agent, following a LangChain-style pattern. During execution, the agent can dynamically invoke this tool to retrieve the most relevant chunks for a given analytical question, for example:

“Show fields with low phosphorus levels in the last season.”

6. Memory management for multi-step analysis

To support conversational workflows and multi-step reasoning, the template includes a Memory buffer node. This node stores recent exchanges and intermediate results, which are then fed back into the agent as context.

Best practice is to keep the memory window relatively small to control token usage and maintain clear, focused prompts. This is particularly important when running frequent or batch analyses.

7. Agent configuration with HuggingFace LLM

At the core of the workflow is an Agent (Chat) node that uses a HuggingFace-supported LLM or another compatible chat model. The agent is configured with:

  • The Weaviate Query tool for retrieval
  • The Memory node for conversational state
  • A carefully designed system prompt that describes the agronomic role and expected outputs

With this setup, the agent can synthesize information from retrieved chunks and generate:

  • Concise, human-readable summaries of soil test results
  • Prioritized nutrient deficiency or surplus assessments
  • Specific recommendations, such as fertilizer types, approximate application rates, and sampling intervals

8. Logging outputs to Google Sheets

To close the loop and provide auditability, the workflow ends with a Google Sheets node that appends the agent output to a log sheet. Typical columns include:

  • timestamp
  • sample_id
  • location
  • summary
  • recommended_action

This creates a structured, chronological record of automated insights that can feed into dashboards, reporting tools, or downstream decision support systems.

Security and configuration best practices

Securing the webhook endpoint

For production deployments, the ingestion endpoint must not be exposed without protection. Recommended controls include:

  • A shared secret header with validation logic inside n8n
  • IP allowlists to restrict which systems can call the webhook
  • Short-lived signed URLs for manual or ad hoc uploads

Combine multiple mechanisms where possible to reduce the risk of unauthorized data submission.

Choosing an embedding model

Model selection has a direct impact on the quality of semantic search. When configuring the HuggingFace embeddings node:

  • Balance cost and latency against recall and precision
  • Consider multilingual or domain-adapted models if you work across languages or have very specific agronomic terminology
  • Validate performance with a representative set of soil reports and typical user queries

Optimizing the chunking strategy

The default configuration of 400 characters with 40 characters overlap works well for narrative reports and mixed text. For highly structured numeric tables or CSV-style outputs:

  • Consider a pre-processing step that converts tabular data into explicit key-value JSON fields
  • Use embeddings primarily for narrative interpretation or notes, while numeric fields are handled as structured attributes

This approach helps embeddings capture relationships more reliably and improves downstream reasoning.

Designing an effective Weaviate schema

A well designed schema is critical for fast, relevant retrieval. For the soil_nutrient_analysis class:

  • Index sample_id, date, and location for efficient filtering
  • Use hybrid search that combines keyword filters with semantic similarity
  • Plan for future attributes, such as crop type or management zone, if your use case will expand

Prompt engineering for the agent

To avoid generic outputs and ensure actionable recommendations, define clear instructions in the agent prompt. For example:

“Use the retrieved soil report chunks to produce a 3 line summary and 2 specific fertilizer recommendations with target rates. Reference any chunk IDs or sample identifiers used in your reasoning.”

Such constraints improve transparency, reproducibility, and user trust in the generated recommendations.

Testing, validation, and troubleshooting

Before moving to production, validate each component of the workflow independently and then as an integrated system.

  • Embedding quality issues: If retrieval results appear weak or irrelevant, inspect input text cleanliness, verify chunk boundaries, and experiment with alternative embedding models.
  • Weaviate insertion errors: Check schema definitions, authentication credentials, and network access rules, including CORS or private network settings.
  • Unhelpful or generic agent responses: Refine the system prompt, adjust the number of retrieved chunks, or configure a higher relevance threshold for retrieval.

Practical scenarios and extensions

  • Historical analysis: Batch ingest legacy lab PDFs converted to text, then run semantic queries across multiple seasons to identify long term nutrient trends.
  • Field technician support: Allow field staff to query, for example, “Which fields require phosphorus in the next month?” and receive ranked, actionable lists derived from recent tests.
  • Automated reporting: Schedule monthly runs that generate fertilizer recommendations and automatically append them to management spreadsheets for review.

Deployment strategy and next steps

Once the workflow performs as expected in a development environment, promote it to production with the following practices:

  1. Use environment specific credentials for HuggingFace embeddings, Weaviate, and Google Sheets.
  2. Enable logging and retry strategies in n8n to handle transient failures gracefully.
  3. Set up monitoring and alerts for Weaviate cluster health and embedding API usage.

For more advanced setups, you can enrich context before embedding by joining additional data sources, such as satellite NDVI indices or weather datasets. This can significantly improve the relevance and robustness of agronomic recommendations.

Getting started with the n8n template

To evaluate this approach in your own environment, import the soil nutrient analysis workflow template into an n8n instance and perform a controlled test:

  • Secure the webhook endpoint using your preferred authentication method
  • Adjust the splitter configuration and embedding model to match your report formats
  • Send a sample payload and verify that the Google Sheet log captures the expected summary and recommendations

If you require assistance tailoring the workflow to specific lab formats, integrating with existing farm management systems, or deploying at scale, reach out to your automation team or solution provider for support.

Automated Keyword Rank Checker with n8n

Automated Keyword Rank Checker with n8n

Tracking keyword rankings at scale does not have to be a manual, copy-and-paste task. In this guide you will learn, step by step, how to use an n8n workflow template to build an automated Keyword Rank Checker.

This workflow combines text splitting, Cohere embeddings, Pinecone as a vector database, a retrieval-augmented generation (RAG) agent, and Google Sheets logging. It is designed for SEO teams, product managers, and developers who want a repeatable, auditable automation for keyword context, ranking signals, and historical records.


Learning goals

By the end of this tutorial, you will understand how to:

  • Use an n8n Webhook Trigger to receive keyword and SERP data
  • Split page content into chunks and generate Cohere embeddings
  • Store and query vectors in Pinecone for RAG-based analysis
  • Configure a RAG Agent with an OpenAI chat model in n8n
  • Log results in Google Sheets and send Slack alerts on errors
  • Use and extend the workflow for ongoing keyword rank tracking

Why automate keyword rank checking with n8n?

n8n is a low-code automation platform that integrates naturally with modern AI services. Using n8n as the backbone of your keyword rank checker gives you:

  • Automated ingestion via webhooks, schedulers, or scrapers
  • Context-aware ranking insights using vector embeddings and RAG
  • Scalable storage and retrieval through Pinecone
  • Human-readable summaries powered by an OpenAI chat model
  • Audit trails and alerts using Google Sheets and Slack

Instead of just logging a rank number, this setup helps you understand why rankings change and what to do next.


Concept overview: how the workflow works

The template implements a full pipeline from incoming SERP data to actionable recommendations. At a high level, the workflow:

  1. Receives a POST request at a webhook endpoint with keyword and SERP data
  2. Splits the target page HTML into smaller text chunks
  3. Generates embeddings for each chunk using Cohere
  4. Stores embeddings in a Pinecone index and queries them for context
  5. Feeds the retrieved context and payload into a RAG Agent with an OpenAI chat model
  6. Writes the resulting status or recommendation to a Google Sheet
  7. Sends a Slack alert if something fails

Below we unpack each part in more detail, then walk through the configuration step by step.


Step-by-step: building the n8n Keyword Rank Checker

Step 1 – Webhook Trigger: accept keyword data

The entry point of the workflow is a Webhook Trigger node.

  • Method: POST
  • Path: /keyword-rank-checker

Configure the Webhook Trigger so external tools can send a JSON payload containing:

  • query – the search keyword (for example, “best running shoes”)
  • target_url – the URL you are tracking
  • rank – the current position in the SERP
  • timestamp – when the rank was recorded
  • page_html – the HTML of the target page
  • serp_snapshot – an array of top result objects for context
  • Optional: previous rank, CPC, impressions, clicks, or other SEO metrics

You can send this data from a crawler, a scheduled SERP scraper, or a custom script.


Step 2 – Text Splitter: prepare content for embeddings

Embedding entire HTML pages at once is inefficient and can lose context. Instead, the workflow uses a Text Splitter node to break the page content into smaller chunks.

Configuration used in the template:

  • Splitter type: Character-based
  • Chunk size: 400 characters
  • Chunk overlap: 40 characters

This chunking strategy:

  • Preserves enough surrounding context for each chunk
  • Prevents the embeddings from becoming too large or expensive
  • Improves retrieval quality when you later query the vector store

Step 3 – Embeddings (Cohere): turn text into vectors

After splitting the content, the workflow uses a Cohere Embeddings node to transform each chunk into a numerical vector.

Key details:

  • Model: embed-english-v3.0

Cohere embeddings are well suited for semantic similarity tasks, such as:

  • Comparing your page content to competitor pages in the SERP
  • Tracking how your content changes over time at the vector level
  • Feeding meaningful context into a RAG Agent for analysis

Step 4 – Pinecone: insert and query vectors

The next step is to store and query the embeddings in a Pinecone index.

The template uses:

  • Index name: keyword_rank_checker

Two operations are involved:

  1. Insert – All generated embeddings for the current page snapshot are stored in the index. This builds up a historical vector record of your page content and related signals.
  2. Query – When you need context (for example, to explain a rank drop), the workflow queries the same index for similar vectors. Pinecone returns the most relevant chunks that can be passed to the RAG Agent.

Pinecone is optimized for fast similarity search and can scale horizontally, which is useful if you are tracking many keywords or large sites.


Step 5 – Vector Tool and Window Memory: provide context to the agent

To make the Pinecone results usable by the RAG Agent, the workflow uses two important n8n components:

  • Vector Tool – Wraps Pinecone queries as a tool that the RAG Agent can call to retrieve relevant context.
  • Window Memory – Stores short-term interaction state so the agent can reference previous steps or signals during a single run.

Together, these let the RAG Agent work with both:

  • Fresh data from the current webhook payload
  • Historical or related content stored in Pinecone

Step 6 – Chat Model and RAG Agent: generate insights

The reasoning and explanation part of the workflow is handled by a Chat Model node and a RAG Agent node.

  • Chat Model: Connects to OpenAI and provides natural language generation.
  • RAG Agent: Orchestrates retrieval (via the Vector Tool) and generation.

Key configuration details:

  • System message: You are an assistant for Keyword Rank Checker
  • Prompt: Instructs the agent to process the incoming JSON payload, use retrieved vector context, and output a concise status or recommendation for the keyword.

Example type of output you might generate:

Rank dropped from 5 to 12, content similarity to top results is low, recommend updating on-page SEO and aligning headings with high intent queries.

This is where the workflow converts raw SERP and content data into actionable guidance.


Step 7 – Append Sheet: log results in Google Sheets

To keep an auditable history, the workflow writes each result to a Google Sheets document using an Append Sheet node.

Configuration details:

  • Sheet ID: SHEET_ID (replace with your actual document ID)
  • Sheet name: Log
  • Column example: store the agent output in a Status column

Over time this gives you a time series of:

  • Keyword
  • Rank and date
  • Key metrics (CPC, impressions, clicks, etc.)
  • Agent recommendations or status messages

You can then use this sheet for reporting, dashboards, or export to BI tools.


Step 8 – Slack Alert: handle errors quickly

Reliability is important when you automate monitoring. The template includes a Slack Alert node that is triggered by the RAG Agent’s onError connection.

If any node in the workflow throws an error, the Slack node posts a message to:

  • Channel: #alerts
  • Content: includes the error message and basic details

This helps you detect failures early and debug issues before they affect your reporting.


How to use this workflow for keyword rank tracking

Once the template is configured, you can plug it into your SEO process.

Recommended usage pattern

  1. Set up a SERP scraper that runs on a schedule and:
    • Fetches SERP results for your target keywords
    • Captures the HTML of your target page
    • Optionally collects metrics like previous rank, CPC, impressions, and clicks
  2. POST the data to the n8n webhook at /keyword-rank-checker with a JSON payload that includes:
    • query, target_url, rank, timestamp
    • page_html and serp_snapshot
    • Any additional SEO metrics you want to log
  3. Let the workflow run:
    • Content is embedded and stored in Pinecone
    • Relevant context is retrieved with the Vector Tool
    • The RAG Agent generates a human-readable status or recommendation
    • The result is appended to your Google Sheet
  4. Review outputs in Google Sheets and:
    • Identify rank drops or improvements
    • Act on the suggested SEO changes
    • Monitor alerts in Slack when something breaks

Over time, this gives you both quantitative rank data and qualitative explanations in a single place.


Example webhook payload

Here is a sample JSON payload you might send to the webhook:

{  "query": "best running shoes",  "target_url": "https://example.com/article",  "rank": 8,  "timestamp": "2025-08-31T12:00:00Z",  "page_html": "<html>...article content...</html>",  "serp_snapshot": [ /* array of top result objects */ ]
}

You can extend this payload with additional fields like previous rank, impressions, or click-through rate, then adapt the RAG Agent prompt so it uses these signals.


Extensions and best practices

1. Add scheduled checks

Use n8n’s Cron or scheduling features to trigger regular SERP scrapes and POST requests to the webhook. This builds a consistent time series of ranks and embeddings that you can analyze for trends.

2. Store raw SERP snapshots

In addition to embeddings, consider storing:

  • Raw SERP HTML or JSON
  • Screenshots or links to screenshots (for example, S3 URLs)

These can be referenced later for deep-dive investigations or richer context in your RAG prompts.

3. Improve prompt engineering

Fine tune the RAG Agent’s system message and prompt to focus on the signals that matter most to you, such as:

  • Click-through rate (CTR)
  • Backlink profile or authority
  • Keyword usage in titles, headers, and body content

Include examples of desired output and a clear structure. For example, ask the agent to always return:

  • A short summary
  • Key reasons for the rank change
  • Specific recommended actions

4. Monitor costs and scale

Embedding and LLM calls have associated costs. To keep them under control:

  • Batch operations where possible
  • Keep chunk sizes sensible (like the 400 / 40 configuration)
  • Consider lower cost embedding models for very large-scale indexing
  • Track usage across Cohere, Pinecone, and OpenAI and adjust frequency or volume

5. Security and data privacy

Be careful with the data you send to third-party services. If your payload includes any user or customer information:

  • Filter out personally identifiable information (PII) before embedding
  • Consider self-hosted models or private deployments if required by compliance
  • Review the data retention policies of Cohere, Pinecone, and OpenAI

Troubleshooting guide

  • Pinecone inserts fail:
    • Check that your Pinecone API key is correct
    • Verify the index name is exactly keyword_rank_checker
  • Embedding errors with Cohere:
    • Confirm your Cohere API key and permissions
    • Ensure the model embed-english-v3.0 is available on your account
  • RAG Agent output is poor or off-topic:
    • Add more detail to the system prompt and instructions
    • Increase the number of retrieved vectors from Pinecone
    • Include more structured fields in the payload (for example previous rank, CTR)
  • Workflow fails silently:
    • Use the Slack Alert node to capture runtime exceptions
    • Check n8n execution logs for error messages and stack traces

Recap: what this n8n template gives you

This Keyword Rank Checker template turns n8n into an automated SEO monitoring system that:

  • Ingests keyword, SERP, and page data via a webhook
  • Uses Cohere embeddings and Pinecone to build a vector-based history of your content
  • Applies a RAG Agent with OpenAI to explain ranking changes and recommend actions
  • Logs every result in Google Sheets for analysis and reporting
  • Alerts you in Slack when something goes wrong

Instead of manually checking rankings and guessing at

Currency Exchange Estimator with n8n & LangChain

Build a Currency Exchange Estimator with n8n & LangChain

Imagine having a smart little assistant that can estimate currency exchange for you, remembers past requests, uses historical context, and neatly logs everything in a Google Sheet. That is exactly what this n8n workflow template does.

In this guide, we will walk through how the Currency Exchange Estimator works, what each part of the n8n workflow does, and how to get it ready for production using:

  • n8n for workflow automation
  • LangChain-style agents
  • Weaviate as a vector database
  • Hugging Face embeddings and language model
  • Google Sheets for logging and analytics

By the end, you will know exactly how this template fits into your stack, when to use it, and how it can save you from manual calculations and messy spreadsheets.

Why use an automated Currency Exchange Estimator?

If you work with money across borders, you know the pain: rates, fees, dates, policies, and customer preferences all pile up quickly. A simple “amount * rate” calculator is rarely enough.

This n8n-based Currency Exchange Estimator is great for:

  • Fintech products that need consistent, auditable FX estimates
  • Travel agencies and booking platforms
  • Marketplaces and international e-commerce
  • Internal tools for finance or operations teams

Instead of just returning a raw number, the workflow uses embeddings and vector search to pull in relevant context like historical notes, policy rules, or previous transfers. A conversational agent then uses that context to generate a human-friendly explanation and an estimated converted amount.

The result: smarter, more consistent estimates with a clear audit trail, all handled automatically by n8n.

What this n8n template actually does

At a high level, the workflow:

  1. Receives a request through a webhook
  2. Splits and embeds any long text into vectors
  3. Stores those vectors in a Weaviate index
  4. Queries Weaviate for related context
  5. Uses a LangChain-style agent with memory and tools to generate an estimate
  6. Logs the whole interaction in Google Sheets

So every time a client or internal system hits the webhook, the workflow not only returns an estimate, it also learns from that interaction for future queries.

Architecture at a glance

Here is how the main pieces of the workflow fit together:

  • Webhook – Receives POST requests at /currency_exchange_estimator
  • Splitter – Breaks long text into smaller chunks
  • Embeddings (Hugging Face) – Turns text chunks into vectors
  • Insert (Weaviate) – Stores vectors and metadata in the currency_exchange_estimator index
  • Query (Weaviate) – Finds similar past data using semantic search
  • Tool (Vector Store) – Exposes Weaviate as a tool for the agent
  • Memory (Buffer Window) – Keeps recent conversation or transaction context
  • Chat (Hugging Face LM) – Generates human-readable responses
  • Agent – Coordinates tools, memory, and the language model
  • Sheet (Google Sheets) – Logs each request and response

It is modular, so you can swap out components later, like using another vector store or language model without redesigning the whole flow.

Step-by-step: How the workflow runs

1. Webhook receives and validates the request

The journey starts with the Webhook node, which listens for POST requests at /currency_exchange_estimator. A typical payload looks like this:

{  "source_currency": "USD",  "target_currency": "EUR",  "amount": 1500,  "date": "2025-08-01",  "notes": "customer prefers mid-market rate"
}

Right after the request hits the webhook, you should normalize and validate the data. That can happen in the Webhook node itself or in an initial Function node, for example:

  • Check that source_currency and target_currency are valid currency codes
  • Verify that amount is a positive number
  • Ensure the date is in a valid format

Cleaning this up early avoids confusing downstream errors.

2. Split long text into manageable chunks

Sometimes the notes field or attached content can be long. The Splitter node helps by breaking that text into smaller chunks, for example 400 characters with a 40 character overlap.

Why bother? Because embeddings work better when they capture local context instead of trying to represent a huge block of text. Consistent chunk sizes also improve the quality of similarity search in Weaviate.

3. Turn text into embeddings with Hugging Face

Next, the Embeddings node uses a Hugging Face model to convert each chunk into a vector representation. These vectors are what the vector database uses to understand “semantic similarity.”

When picking a model:

  • Smaller models are cheaper and faster
  • Larger models usually give better semantic accuracy

For most currency exchange estimator use cases, a mid-sized semantic search model is a good balance between cost, speed, and relevance. It is worth benchmarking a couple of options before going to production.

4. Store vectors and metadata in Weaviate

The Insert node writes the embeddings into a Weaviate index named currency_exchange_estimator. Alongside each vector, you store structured metadata so you can filter and search more precisely later.

Typical metadata fields include:

  • source_currency
  • target_currency
  • amount
  • date or timestamp
  • original_text or notes
  • Source (for example “manual note” or “external API”)
  • Optional confidence score

This combination of vectors plus metadata lets you do things like “find similar transfers in USD to EUR from the last 30 days” or “retrieve only notes that mention fees.”

5. Retrieve relevant context with Weaviate queries

When a new request comes in, you want the agent to reason using past knowledge. That is where the Query node comes in. It performs a semantic search against Weaviate based on the current request or a derived prompt.

The query returns the most relevant chunks and their metadata, such as:

  • Recent exchange estimates for the same currency pair
  • Historical notes about fee preferences or rate policies
  • Internal rules or documentation embedded as text

All of this becomes “context” the agent can use to generate a better estimate.

6. Let the agent combine tools, memory, and the language model

Here is where it gets fun. The Agent node acts like the conductor of an orchestra, coordinating:

  • Tool node (Vector Store) – wraps the Weaviate query so the agent can call it as needed
  • Memory (Buffer Window) – keeps a window of recent conversation or transaction history
  • Chat (Hugging Face LM) – the language model that turns all of this into a natural language response

The agent uses a prompt that:

  • Instructs it to use the retrieved context from Weaviate
  • Applies your explicit conversion rules (fees, rounding, policies)
  • Refers to current or recent market rates if you provide them

A good pattern is to keep a stable, deterministic instruction block at the top of the prompt and then append variable context and user input below it. That helps keep behavior consistent even as the data changes.

7. Log everything to Google Sheets

Once the agent produces an estimate and explanation, the workflow appends a row to a Google Sheet. This gives you an easy audit trail and analytics source.

You can log fields like:

  • Original request payload
  • Rate used and estimated converted amount
  • Any fees applied
  • Timestamp
  • Agent notes or reasoning summary

Over time, that sheet becomes a goldmine for QA, compliance, or optimization.

Sample request and response

Here is an example of what an incoming request might look like and what the agent could return.

Sample webhook payload

Input (POST /currency_exchange_estimator):

{  "source_currency": "GBP",  "target_currency": "USD",  "amount": 1000,  "date": "2025-08-01",  "notes": "urgent transfer, prefer lowest fee option"
}

Example agent output

Expected agent output (JSON-friendly):

{  "estimate": 1250.45,  "rate_used": 1.25045,  "fees": 2.50,  "confidence": 0.92,  "notes": "Mid-market rate used; fees estimated per policy. See log row ID 4321."
}

Your implementation can shape the response structure, but keeping it machine-readable like this makes it easy to plug into other systems.

Implementation tips and best practices

Use rich metadata for smarter filtering

When inserting embeddings into Weaviate, do not just store raw text. Include:

  • source_currency and target_currency
  • Timestamp or date fields
  • Source of the data (manual vs external API)
  • Optional confidence or quality indicators

This lets you run temporal queries, restrict by currency pairs, or prioritize certain data sources when computing estimates.

Choosing the right embedding model

Embedding models are a tradeoff between cost, speed, and quality. For this workflow:

  • Start with a mid-sized semantic search model from Hugging Face
  • Evaluate relevance on a sample of your own data
  • Only upgrade to a larger model if you truly need better recall or precision

Also keep an eye on latency. If your workflow is user-facing, slow embeddings can quickly hurt the experience.

Designing robust prompts for the agent

Prompt design matters a lot. A solid prompt for this use case should:

  • Explicitly tell the agent to rely on retrieved context from Weaviate
  • Spell out conversion rules, such as:
    • How to apply fees
    • Rounding behavior
    • Fallback behavior when data is missing
  • Instruct the agent to avoid making up values and to express uncertainty via a confidence score when appropriate

Keeping the rules consistent and deterministic at the top of the prompt helps reduce “hallucinations” and keeps your estimator predictable.

Security and rate limiting

Since the workflow exposes a webhook, you should secure it before going live:

  • Protect the webhook using an API key, HMAC signature, or OAuth
  • Implement rate limiting or throttling to prevent abuse
  • If you call external FX rate APIs, cache the responses and throttle requests to stay within provider limits

Getting these basics right early saves a lot of headaches later.

Data retention and privacy

Because you are storing logs and embeddings, think carefully about retention and privacy:

  • Decide how long you really need to keep logs and vector data
  • Avoid storing personally identifiable information unless it is absolutely necessary
  • If you must store sensitive data, encrypt it
  • Make sure your setup aligns with GDPR and other regional regulations if you have EU users

Testing, monitoring, and scaling

Testing the workflow

Before you trust this estimator in production, give it a proper test run:

  • Write unit tests for payload validation logic
  • Run integration tests that cover the full flow:
    • Webhook → Embeddings → Weaviate insert/query → Agent → Google Sheets

Feed it both “happy path” inputs and edge cases, such as missing notes, unknown currencies, or unexpected dates.

Monitoring performance and reliability

Once it is running, keep an eye on:

  • Latency between nodes, especially:
    • Webhook to embedding
    • Embedding to Weaviate insert/query
    • Weaviate to agent
    • Agent to Google Sheets
  • Failures when inserting or querying Weaviate
  • Token usage and cost from the language model provider

Set up alerts so you know if inserts start failing or token usage suddenly spikes.

Scaling the workflow

As usage grows, you may want to tune for performance. Some options:

  • Batch inserts – Group chunks into batch writes to Weaviate to boost throughput
  • Asynchronous processing – Use background queues for large uploads or bulk operations
  • Sharding and index tuning – For very high volume, tune Weaviate indexes and consider sharding by currency pair or region

Because the architecture is modular, you can scale individual parts without rewriting everything.

Troubleshooting common issues

Things not working quite as expected? Here are some typical problems and what to check.

  • Missing or malformed embeddings
    Make sure the Splitter and Embeddings nodes handle edge cases correctly, such as:
    • Empty strings
    • Very short texts
    • Special characters or unusual encodings
  • Poor search relevance
    Try:
    • Adjusting chunk size and overlap
    • Experimenting with different Hugging Face embedding models
    • Improving metadata filters in your Weaviate queries
  • Agent hallucinations or inconsistent answers
    Consider:
    • Tightening your prompt with explicit rules and constraints
    • Emphasizing retrieved context and discouraging guessing
    • Using citation-style prompts so the agent “refers” to retrieved chunks

Ideas for next steps and enhancements

Once the core estimator is working, you can extend it in a few useful directions:

  • Integrate live FX rates
    Connect a real-time FX rate API, cache the responses, and let the agent combine live rates with historical vector context.
  • Add authentication and roles
    Limit who can send requests or view Google Sheets logs. Role-based access can help with compliance and internal controls.
  • Expose a friendly interface
    Wrap the webhook with a simple web frontend, internal dashboard, or

CSV Attachment to Airtable: n8n RAG Workflow

CSV Attachment to Airtable: n8n RAG Workflow

Ever opened yet another CSV report and thought, “Cool, can someone else deal with this?” If your life involves downloading CSVs, copy-pasting into spreadsheets, doing the same filters and summaries, and then telling your team what you just did, this workflow is your new favorite coworker.

This n8n template takes CSV attachments, turns them into searchable vectorized data, runs a RAG workflow for context-aware summaries, logs everything in Google Sheets, and pings your team on Slack if something breaks. In other words, it handles the boring parts so you can stop being a human CSV parser.

What this n8n CSV-to-Airtable workflow actually does

At a high level, this workflow automates the journey from “raw CSV attachment” to “searchable, summarized, logged, and notified.” It is ideal if you regularly receive CSV reports, exports, or data dumps via HTTP or email and you want:

  • Automated CSV ingestion without manual downloads
  • Semantic search and retrieval using vector embeddings
  • Context-aware summaries powered by a RAG agent
  • Logging in Google Sheets so non-technical teammates can see what is going on
  • Slack alerts when things break so you are not silently losing data

Here is the full cast of characters in this template:

  • Webhook Trigger – Receives the CSV via HTTP POST
  • Text Splitter – Breaks your CSV content into smaller chunks
  • Cohere Embeddings – Turns those chunks into vectors
  • Pinecone – Stores and retrieves the embeddings
  • Vector Tool + RAG Agent (Anthropic) – Uses the vectors to answer questions and summarize
  • Google Sheets – Logs results in a “Log” sheet
  • Slack – Sends alerts if something fails

You get a reusable, low-code n8n automation that plugs into your existing stack, saves time, and reduces the number of times you say “I’ll just quickly do it by hand.”

How the workflow flows: from CSV to vectors to summaries

1. Webhook Trigger – your CSV entry gate

The workflow starts with an n8n Webhook Trigger that listens for POST requests at a path like /csv-attachment-to-airtable. This is where your CSV file or CSV link arrives.

You can send data from an email parser, another app, or any tool that can POST to a URL. Just make sure you:

  • Use authentication or signed payloads
  • Restrict who can hit the webhook endpoint
  • Avoid letting random strangers upload mystery CSVs into your system

2. Text Splitter – breaking the CSV into bite-sized pieces

Large CSV files are not fun to handle as one giant blob of text. The Text Splitter node slices the CSV content into smaller chunks, for example:

  • chunkSize = 400
  • chunkOverlap = 40

This keeps each chunk small enough for embedding models and RAG operations, while preserving enough overlap so the context does not get lost between splits.

3. Cohere Embeddings – turning text into vectors

Each chunk is sent to a Cohere embedding model, such as embed-english-v3.0. Cohere returns a vector for each chunk, which is later stored in Pinecone.

To keep things efficient and cost-friendly:

  • Batch multiple chunks in a single embeddings request
  • Watch your rate limits so you do not get throttled mid-ingestion
  • Confirm that the payload format matches what the Cohere node expects

4. Pinecone Insert – parking embeddings for later retrieval

Those fresh embeddings are then inserted into a Pinecone index. In the template, the default index name is csv_attachment_to_airtable, but you can change it if needed.

Alongside each vector, the workflow stores useful metadata, for example:

  • Original filename
  • Row range or offset
  • Source URL or attachment reference

This metadata makes it much easier to trace where a specific piece of context came from when you later query the index.

5. Pinecone Query and Vector Tool – finding the right chunks

When a query comes in, the Pinecone Query node fetches the nearest neighbor vectors. These are the chunks most relevant to the question or task.

The Vector Tool wraps those Pinecone results so the RAG Agent can use them as contextual tools. This gives your language model real data to work with, instead of asking it to “just guess nicely.”

6. Window Memory and RAG Agent (Anthropic) – brains with context

The Window Memory node keeps a rolling context of the recent conversation or tasks. This is particularly useful if you are running multiple queries or iterative analyses on the same CSV.

The RAG Agent uses an Anthropic chat model as the core language model. It combines:

  • The retrieved vectors from Pinecone
  • The system instructions you define
  • Any recent memory from the Window Memory node

Configure the system message to match your use case, for example:

You are an assistant for CSV Attachment to Airtable. Summarize CSV contents and highlight key insights.

The result is a summary or actionable output that is grounded in the CSV data, not just generic text.

7. Append Sheet (Google Sheets) – logging what happened

Once the RAG Agent has done its job, the workflow uses the Append Sheet node to write a new row to a Google Sheets “Log” sheet.

You can map columns to include:

  • Summary or key findings
  • Processing status
  • Source filename
  • Ingestion timestamp
  • Links to the original attachment or source

This gives you an auditable history of what was ingested and how it was summarized, in a place your team already knows how to use.

8. Slack Alert on error – when things go sideways

If something fails, the workflow triggers a dedicated Slack Alert node in an onError branch. It sends a message to a channel like #alerts with:

  • The error message
  • Relevant context from the failed run

So instead of silently losing data, your team gets a clear “hey, something broke” notification and can fix it quickly.

Quick setup guide: from zero to working template

  1. Get n8n running
    Install n8n locally or use n8n.cloud, then import the template JSON file into your instance.
  2. Add all required credentials
    In n8n, configure:
    • Cohere API key
    • Pinecone API key and environment
    • Anthropic API key
    • Google Sheets OAuth2 credentials
    • Slack token with permission to post to your chosen channel
  3. Set up your Pinecone index
    Create or reuse a Pinecone index named csv_attachment_to_airtable, or update the Pinecone nodes in the workflow to match your own index name. Make sure the index dimensions match the embedding model output.
  4. Secure the webhook
    Use a secret header, IP allowlist, or other security controls so only trusted sources can send CSVs.
    If your CSVs arrive by email, connect a mail parser or automation tool that forwards attachments to the webhook via POST.
  5. Tune the Text Splitter
    Adjust the chunking settings to match your data:
    • Increase chunkSize for dense, table-like CSVs
    • Decrease it for CSVs with long narrative text fields
  6. Run an end-to-end test
    Use a small CSV sample and confirm:
    • Chunks are created and sent to Cohere
    • Embeddings are inserted into Pinecone
    • The RAG Agent returns a sensible summary
    • A new row appears in your Google Sheet
    • No Slack errors, or if there are, they are descriptive

Why this workflow is worth your time

Key benefits

  • Automated CSV ingestion and vectorization for semantic search and retrieval, so you can ask questions about your CSVs instead of scrolling through them.
  • Fast, context-aware answers using Pinecone plus a RAG agent, ideal for summaries, insights, and follow-up questions.
  • Low-code orchestration with n8n, which makes the workflow portable, customizable, and easy to extend.
  • Built-in logging and notifications with Google Sheets and Slack, so you keep visibility into what has been processed and what has failed.

Best practices and optimization tips

To keep your setup efficient, affordable, and maintainable, consider the following:

  • Enrich Pinecone metadata
    Include fields like filename, row offset, and column hints. This improves retrieval relevance and lets you trace exactly where a piece of information came from.
  • Batch operations
    Batch embedding requests and Pinecone inserts to reduce API calls, lower cost, and improve throughput.
  • Control storage growth
    Use TTL or periodic pruning of old vectors if you are dealing with short-lived or ephemeral data, so Pinecone costs do not creep up silently.
  • Use typed columns in Google Sheets
    Define consistent types for timestamps, status values, and URLs. This makes filtering, reporting, and downstream automation much easier.
  • Add retries with backoff
    Configure graceful retries and exponential backoff for calls to Cohere and Pinecone, so temporary network or rate limit issues do not break the whole pipeline.

Troubleshooting: when the robots misbehave

If something is not working as expected, start with these common issues:

  • No embeddings inserted
    Check that:
    • Your Cohere API key is valid
    • You are not hitting rate limits
    • Chunk sizes and payload formats match what the embeddings node expects
  • Pinecone errors
    Verify:
    • The index name matches exactly
    • The environment is correct
    • The vector dimension matches the Cohere embedding model output
  • Webhook not triggering
    Make sure:
    • The webhook URL path in your external tool matches the n8n Webhook node
    • The workflow is active and n8n is running
  • RAG outputs are low quality
    Improve:
    • The system message with more domain-specific instructions
    • The number of retrieved contexts from Pinecone
    • The quality and structure of the input CSV, if possible

Security and cost considerations

Even though automation is fun, you still want to keep things safe and sane:

  • Protect your API keys and never expose them in client-side code or public repos.
  • Restrict webhook access to trusted IPs, services, or signed requests.
  • Monitor usage for Cohere, Pinecone, and Anthropic so you understand your monthly cost profile.
  • Handle sensitive data carefully. For sensitive CSVs, consider encrypting certain metadata and limiting how long vectors are retained.

Extending the template: beyond Airtable and CSVs

This n8n template is intentionally modular, so you can remix it as your stack evolves:

  • Swap Cohere embeddings for OpenAI or another provider if your preferences change.
  • Replace the Anthropic model with a different LLM that you prefer.
  • Change the final destination from Google Sheets to Airtable, or use the Airtable API directly for richer record management.

Because the template already stores detailed metadata in Pinecone, connecting Airtable as the final home for full records is straightforward. You can keep the same vector store and simply adjust the “logging” layer to target Airtable instead of or in addition to Google Sheets.

Wrapping up: from manual CSV grind to automated RAG magic

The CSV Attachment to Airtable n8n workflow turns repetitive CSV handling into a smooth, automated pipeline. It ingests CSV attachments, splits and embeds the content, stores vectors in Pinecone, runs a RAG agent for context-aware summaries, logs results in Google Sheets, and alerts your team in Slack if anything fails.

If you are tired of manually wrestling CSV files, this template gives you a reusable, low-code solution you can adapt to many different use cases.

Ready to try it? Import the template into n8n, plug in your API keys, send a sample CSV through the webhook, and watch the workflow do the tedious parts for you. If this kind of automation saves you time, keep an eye out for more templates and walkthroughs, or reach out if you need a custom integration.

Call to action: Try this n8n template today, automate CSV ingestion, enable semantic search over your data, and keep your team in the loop with Google Sheets logs and Slack alerts.

Cross-Post YouTube Uploads to Facebook with n8n

Cross-Post YouTube Uploads to Facebook with n8n (So You Never Copy-Paste Again)

If you have ever copied a YouTube title, description, and link into Facebook for the 47th time and thought, “There has to be a better way,” you are in the right place.

This guide walks you through an n8n workflow template that automatically cross-posts new YouTube uploads to Facebook. Under the hood it uses webhooks, LangChain tools, embeddings, Pinecone, and a RAG agent to make smart, context-aware decisions. It also logs everything to Google Sheets and pings Slack if something breaks, so you do not have to babysit it.

In other words, you get to stop doing repetitive admin work and let your automation take the night shift.


What This n8n Workflow Actually Does

Here is the big picture: whenever a new YouTube video goes live, this workflow:

  • Receives a notification via a Webhook Trigger with the video details
  • Breaks up long descriptions using a Text Splitter
  • Generates embeddings with OpenAI and stores them in Pinecone
  • Uses a Vector Tool and RAG Agent to generate smart, Facebook-ready copy
  • Logs what happened in Google Sheets
  • Sends a Slack alert if anything fails

You can then plug in your Facebook posting logic on top, either fully automated or with a human review step.


Why Automate YouTube to Facebook Cross-Posting?

Copying content between platforms sounds easy until you realize you are doing it for every single upload, across multiple channels, on multiple days, forever. Automation politely steps in and says, “I got this.”

By using n8n to automate YouTube to Facebook cross-posting you:

  • Eliminate manual copy-paste of titles, descriptions, and links
  • Reduce human error like broken links or missing hashtags
  • Add logic, such as:
    • Post only videos that match certain keywords
    • Auto-summarize long descriptions for Facebook
    • Keep messaging consistent across platforms

By layering in vector embeddings and RAG, you also get smarter decisions. The workflow can:

  • Pull semantic context from similar videos
  • Choose the best excerpt or angle for the Facebook post
  • Stay aligned with previous captions and brand style

So instead of a dull copy of your YouTube description, you get an informed, context-aware Facebook post that actually makes sense for that platform.


How the Architecture Fits Together

At a high level, the workflow looks like this:

  • Webhook Trigger – Listens for new YouTube uploads and receives a JSON payload
  • Text Splitter – Splits long descriptions into smaller chunks
  • Embeddings (OpenAI text-embedding-3-small) – Turns text chunks into vectors
  • Pinecone Insert – Stores vectors plus metadata in a Pinecone index
  • Pinecone Query + Vector Tool – Retrieves relevant chunks for context
  • Window Memory + Chat Model – Maintains context and generates copy
  • RAG Agent – Orchestrates tools and writes the final Facebook caption
  • Append Sheet – Logs the result in Google Sheets
  • Slack Alert – Notifies you on errors so silent failures do not pile up

The result is a small but mighty cross-posting pipeline that is both auditable and intelligent.


The Incoming Data: Sample Webhook Payload

Your journey starts with a webhook that receives data about each new YouTube upload. It typically looks like this:

{  "videoId": "abc123",  "title": "My New Video",  "description": "Long video description...",  "url": "https://youtube.com/watch?v=abc123",  "publishedAt": "2025-08-01T12:00:00Z"
}

This payload gives the workflow everything it needs to generate a Facebook-ready post and log the outcome.


Step-by-Step: Setting Up the n8n Workflow

Let us walk through the setup in a simple, no-drama sequence.

1. Create the n8n workflow and add the nodes

In n8n, create a new workflow and add the following nodes in roughly this order:

  • Webhook Trigger
  • Text Splitter
  • Embeddings
  • Pinecone Insert
  • Pinecone Query
  • Vector Tool
  • Window Memory
  • Chat Model
  • RAG Agent
  • Google Sheets (Append Sheet)
  • Slack (for alerts)

Do not worry if the canvas looks busy. Each node has a clear job and they play nicely together.

2. Configure your credentials

In the n8n credentials section, add and configure:

  • OpenAI (for embeddings) and optionally Anthropic or another LLM for the chat model
  • Pinecone (for vector storage and retrieval)
  • Google Sheets OAuth (for logging)
  • Slack (for alerts)

Keep API keys in n8n credentials, not in plain text in nodes. Your future self will thank you.

3. Webhook Trigger configuration

Set up the Webhook Trigger node:

  • Method: POST
  • Path: /cross-post-youtube-uploads-to-facebook

This webhook will receive the payload with videoId, title, description, url, and publishedAt. Make sure your n8n instance is reachable from the outside world, either via a public URL or a tunnel.

4. Split the text like a pro: Text Splitter

Long YouTube descriptions are great for SEO, not so great for token limits. Use the Text Splitter node with:

  • chunkSize: 400
  • chunkOverlap: 40

This keeps chunks manageable for embedding, while overlapping enough to preserve context between them.

5. Generate embeddings

Use the Embeddings node with the OpenAI text-embedding-3-small model. For each chunk of text, the node:

  • Sends the chunk to the OpenAI API
  • Receives a dense vector representation

You can embed not only the description chunks but also additional metadata if needed.

6. Store vectors in Pinecone

Next, use the Pinecone Insert node to write embeddings into your index, for example:

  • Index name: cross-post_youtube_uploads_to_facebook

Along with each vector, store useful metadata such as:

  • videoId
  • title
  • chunkIndex
  • timestamp

This metadata lets your RAG agent later pull relevant context or check for similar past content.

7. Query Pinecone and expose it as a tool

When the agent needs context, you use:

  • Pinecone Query to fetch semantically similar chunks
  • Vector Tool to wrap that query so the agent can call it as a tool

This lets your agent do things like:

  • Find the best excerpt for a Facebook caption
  • See if similar videos were already posted
  • Stay consistent with previous messaging

8. Window Memory and Chat Model

Add a Window Memory node so the agent can keep track of recent context, especially if you are iteratively refining captions or doing follow-up enrichment.

Then configure your Chat Model node, typically with Anthropic or another LLM, which the RAG agent will use to actually write the Facebook post. This is where the magic “turn description into social caption” happens.

9. Configure the RAG Agent

Set up your RAG Agent with a system message such as:

“You are an assistant for Cross-post YouTube Uploads to Facebook.”

Connect the agent to:

  • The Vector Tool for context retrieval
  • The Chat Model for generation
  • Window Memory for recent history

The agent should output a Facebook-ready caption that can include:

  • A short description or summary
  • A clear call to action (CTA)
  • Relevant hashtags
  • Shortened or formatted links

This is the content you will later send to Facebook or a review queue.

10. Log everything with Google Sheets

Use the Google Sheets node in Append mode to keep an easy audit trail. Typical columns include:

  • timestamp
  • videoId
  • title
  • generatedPost
  • status
  • postUrl (if you auto-post to Facebook)

This sheet can double as a manual review queue if you prefer humans to approve posts before they go live.

11. Add Slack alerts for when things go wrong

Because something will go wrong at 2 am at some point, connect Slack to the onError path of the RAG Agent or other critical nodes.

Configure it to send messages to an #alerts channel with:

  • The error message
  • The relevant videoId

This makes triage much easier than “something broke somewhere at some time.”

12. Test the webhook end-to-end

Before wiring up Facebook, test the workflow with a manual request using curl, Postman, or your favorite tool. Use the sample payload above and confirm that:

  • The webhook receives the request
  • Text chunks are created
  • Embeddings are generated and stored in Pinecone
  • The RAG Agent produces a Facebook post
  • A new row appears in Google Sheets

Once all that works, you are ready for the final step.

13. Connect your Facebook posting logic

The template focuses on the intelligence and logging side. To actually post to Facebook, you can:

  • Call the Facebook Graph API directly from n8n, using page access tokens and required permissions
  • Send the final post content to a human review queue (for example, Google Sheets or a separate approval workflow) and let a human click “post”

If you automate posting, handle tokens and permissions carefully. Facebook is not fond of misconfigured apps spraying content everywhere.


Best Practices for a Smooth Cross-Posting Workflow

To keep your automation reliable and friendly, follow these tips.

Security

  • Store all API keys as n8n credentials, not hard coded in nodes
  • Use least privilege access for OpenAI, Pinecone, and other services

Rate limits and performance

  • Batch embedding calls when possible to stay within OpenAI and Pinecone limits
  • Use retry logic in n8n node settings for temporary failures
  • If semantics feel “off,” adjust chunkSize and chunkOverlap instead of just throwing more tokens at the problem

Content moderation and brand safety

  • Optionally run a moderation check before posting, using a moderation endpoint or classifier
  • If brand voice is sacred, keep a human-in-the-loop review step via Google Sheets or another approval system

Monitoring and visibility

  • Use Slack alerts for fast visibility into errors
  • Review Google Sheets logs for repeated failures or odd patterns, such as the same video ID failing multiple times

Troubleshooting: When Automation Gets Moody

Webhook not firing

If the workflow does not trigger:

  • Check that the webhook URL is publicly accessible
  • If you are running n8n locally, use a tunnel service like ngrok for testing

Embeddings failing or taking too long

If embedding calls fail or feel sluggish:

  • Verify your API keys and network connectivity
  • Check whether you are hitting rate limits
  • Reduce concurrency or tweak chunkOverlap and chunkSize if context quality drops

Pinecone index errors

If Pinecone complains:

  • Confirm the index exists and is correctly named
  • Ensure the vector dimension matches the text-embedding-3-small model output
  • Validate the upsert payload format and metadata fields

Why Use RAG for Cross-Posting?

Retrieval-Augmented Generation (RAG) gives your agent a memory of past content, instead of relying on the model’s general knowledge alone.

By storing embeddings in Pinecone and querying them at generation time, the agent can:

  • Consult previous descriptions, brand guidelines, or past captions
  • Stay consistent with your existing messaging and style
  • Reduce hallucinations and random phrasing

So your Facebook captions feel like they came from your brand, not from a model that just woke up and decided to improvise.


Scaling Up: Where to Go Next

Once your core YouTube to Facebook workflow is stable, you can extend it in several directions:

  • Auto-scheduling for timezone-aware posting, so content goes live when your audience is awake
  • Multi-channel expansion

Build a Crop Yield Predictor with n8n & LangChain

Build a Crop Yield Predictor with n8n & LangChain

In this guide, you will learn how to design a scalable and explainable crop yield prediction workflow using n8n, LangChain, Supabase as a vector store, Hugging Face embeddings, and Google Sheets. The article walks through the end-to-end architecture, key n8n nodes, configuration recommendations, and automation best practices for agricultural prediction and logging.

Use case overview: automated crop yield prediction

Modern agricultural operations generate large volumes of data, from soil sensors and weather feeds to field notes and historical yield records. Turning this data into consistent, auditable yield predictions requires a repeatable pipeline that can ingest, enrich, and reason over both structured and unstructured information.

By combining n8n for workflow orchestration with LangChain for LLM-based reasoning, you can implement a crop yield predictor that:

  • Automates the ingestion of field data from webhooks or CSV exports
  • Transforms notes and telemetry into embeddings using Hugging Face models
  • Stores contextual vectors in Supabase for semantic retrieval
  • Uses a LangChain agent to generate yield predictions with explanations
  • Logs outputs into Google Sheets for traceability and downstream analytics

The result is a robust, explainable prediction pipeline that can be extended, audited, and integrated with broader agritech workflows.

Solution architecture

The n8n workflow for this crop yield predictor is built around a sequence of specialized nodes and external services that work together to ingest, index, retrieve, and reason over data.

Core building blocks

  • Webhook – Ingests field data, telemetry, or batch payloads via HTTP POST.
  • Text Splitter – Splits long text into manageable chunks for embedding.
  • Embeddings (Hugging Face) – Converts text chunks into numerical vector representations.
  • Vector Store (Supabase) – Persists embeddings and metadata for later retrieval.
  • Query & Tool – Performs semantic search on the vector store and exposes it as a tool to the agent.
  • Memory & Agent (LangChain / OpenAI) – Uses context, tools, and conversation memory to generate predictions.
  • Google Sheets – Records predictions, explanations, and metadata for monitoring and auditing.

This architecture is modular, so you can later swap components such as the embedding model or LLM without redesigning the entire pipeline.

Detailed workflow in n8n

1. Webhook: ingesting field data

The entry point to the system is an n8n Webhook node configured to accept HTTP POST requests. It should receive structured JSON data that captures all relevant agronomic context, for example:

  • field_id
  • soil_moisture
  • rainfall_past_30d
  • temperature_avg
  • planting_date
  • variety
  • historical_yields (optional)
  • notes (free-text observations)

This webhook can be connected to sensor platforms, mobile data collection apps, or scheduled exports from farm management systems. Standardizing the payload structure at this stage greatly simplifies downstream automation.

2. Text preparation and splitting

Many field reports contain unstructured notes, observations, or historical comments. Before generating embeddings, the workflow uses a Text Splitter node to segment these long texts into smaller chunks.

Recommended configuration:

  • Type: character-based splitter
  • chunkSize: typically 350-500 characters
  • chunkOverlap: typically 30-80 characters

These ranges help preserve local context while avoiding overly long sequences that can degrade embedding quality. For numeric or structured telemetry, you can convert values into short labeled sentences (for example, “Average soil moisture is 18 percent”) before splitting, which often improves semantic representation.

3. Generating embeddings with Hugging Face

Once the text is split, an Embeddings node configured with a Hugging Face model generates vector embeddings for each chunk. Hugging Face provides a wide range of models suitable for general semantic tasks and domain-specific contexts.

Best practices:

  • Store the Hugging Face API key in n8n credentials, not inline in the node.
  • Evaluate different embedding models if you require higher domain sensitivity.
  • Balance latency and accuracy by choosing smaller models for high-throughput ingestion and larger models for more precise semantic understanding.

4. Persisting vectors in Supabase

The resulting embeddings are written to a Supabase vector table using a Vector Store integration. Configure the table and index for this use case, for example:

  • indexName: crop_yield_predictor

Alongside each embedding, store rich metadata such as:

  • field_id
  • timestamp
  • season
  • crop_type
  • geolocation
  • source (for example, “sensor”, “manual_note”)

This metadata enables filtered semantic queries, such as restricting retrieval to a specific field, season, or geographic region. It also improves traceability and supports more targeted predictions.

5. Query & Tool: semantic retrieval for predictions

When a new prediction is requested, the workflow issues a semantic search against the Supabase vector store. In n8n, this is typically modeled as a Query node whose output is wrapped as a tool for the LangChain agent.

Configuration recommendations:

  • top_k: for example, 5 closest vectors
  • Return similarity scores alongside the text chunks
  • Apply metadata filters, such as metadata.field_id, when available

The retrieved chunks provide the agent with relevant historical notes, comparable conditions, and recent telemetry. Similarity scores can be used by the agent to weigh evidence when forming the final yield estimate.

6. Memory and LangChain agent orchestration

The reasoning layer is implemented through a LangChain Agent node integrated with a large language model such as OpenAI Chat. The agent is configured with:

  • The LLM model to use for prediction
  • The vector store query as a tool
  • A memory buffer that retains a sliding window of recent interactions

A typical memory configuration is a sliding window that stores the last 5 interactions. This allows the agent to maintain context across multiple requests for the same field or during iterative analysis.

Prompt engineering and agent behavior

Designing the prediction prompt

The agent prompt should clearly instruct the model on how to use retrieved evidence, how to combine numeric telemetry with textual notes, and how to format its output. A conceptual example:

You are an agronomy assistant. Based on the retrieved field notes and telemetry, provide a predicted yield (tons/ha), a confidence score (0-100%), and 2 concise recommendations to improve yield. Cite the most relevant evidence snippets.

Key design guidelines:

  • Ask for a point estimate and a confidence score to make outputs easier to compare over time.
  • Require short, actionable recommendations instead of generic advice.
  • Explicitly request citations or references to retrieved snippets to keep the model grounded in data.

Example n8n parameters

For a starting configuration, the following settings are commonly effective:

  • Text Splitter: chunkSize=400, chunkOverlap=40
  • Embeddings node: a compatible Hugging Face embedding model set via n8n credentials
  • Supabase Insert: indexName=crop_yield_predictor
  • Query: top_k=5, filter by metadata.field_id where applicable
  • Memory: sliding window buffer of the last 5 interactions

Logging and observability with Google Sheets

To ensure traceability and support evaluation, the final step in the workflow appends predictions to a Google Sheets document. Each row can include:

  • field_id
  • predicted_yield
  • confidence
  • notes or explanation from the model
  • timestamp
  • Links or identifiers for the underlying source vectors or records

This sheet serves as an audit log and a simple analytics layer, enabling quick performance checks and downstream integration with BI tools or additional workflows.

Implementation best practices

Credential management and security

  • Store Hugging Face, Supabase, and OpenAI keys in n8n credentials rather than hard-coding them in nodes.
  • Use separate credentials for development and production environments.
  • Apply the principle of least privilege when configuring API keys and database access.

Metadata and indexing strategy

Careful metadata design significantly improves the usefulness of your vector store. Consider indexing:

  • Season and crop type
  • Field or farm identifiers
  • Geolocation or region
  • Data source and quality indicators

This enables more precise retrieval, for example querying only similar fields in the same climate zone or variety when generating a prediction.

Retrieval configuration

  • Start with top_k=5 and adjust based on observed model performance.
  • Inspect similarity scores and retrieved snippets during early testing to ensure relevance.
  • Refine filters and metadata if the agent frequently receives irrelevant or noisy context.

Monitoring, evaluation, and iteration

To ensure the crop yield predictor improves over time, use the Google Sheets log to compare predicted yields with actual outcomes. You can compute metrics such as:

  • Mean Absolute Error (MAE)
  • Root Mean Squared Error (RMSE)

Based on these metrics, iterate on the following aspects:

  • Prompt design and output format
  • Chunking strategy in the Text Splitter
  • Choice of embedding model and LLM
  • Metadata filters and retrieval parameters

The agent’s cited evidence is particularly useful for diagnosing where the model is relying on incomplete, outdated, or misleading data.

Security, privacy, and compliance considerations

Farm and field data may be subject to privacy or data residency requirements. When using Supabase and external LLM providers:

  • Leverage Supabase features such as row-level security and encrypted storage.
  • Restrict access to vector tables via scoped API keys.
  • Mask or remove personally identifiable information before generating embeddings when required.
  • Review provider terms for data retention and model training on your inputs.

Design your workflow so that sensitive attributes are either excluded from embeddings or handled using anonymization techniques where appropriate.

Scaling and cost optimization

Both embedding generation and LLM calls contribute to operational costs. To scale efficiently:

  • Batch webhook payloads for scheduled embedding jobs instead of embedding each record individually in real time when latency is not critical.
  • Cache embeddings for documents that do not change to avoid reprocessing.
  • Use smaller embedding and LLM models for bulk preprocessing, reserving larger models for high-value or final predictions.

Monitoring request volumes and response times will help you tune the balance between performance, accuracy, and cost.

End-to-end value and extensibility

With this n8n and LangChain workflow, you obtain a reproducible pipeline for crop yield prediction that is:

  • Explainable – predictions are backed by retrieved context and logged explanations.
  • Searchable – Supabase vector storage keeps historical knowledge accessible for future queries.
  • Auditable – Google Sheets provides a human-readable record aligned with machine reasoning.

From here, you can extend the solution by:

  • Adding dashboards for agronomy teams
  • Triggering alerts via SMS or email when predicted yields fall below thresholds
  • Integrating predictions with irrigation scheduling, input ordering, or other operational systems

Next steps

Deploy this crop yield prediction workflow in your n8n instance, configure secure credentials, and start logging predictions in Google Sheets. As you collect more data, refine prompts, models, and retrieval strategies to improve accuracy and reliability. If you need to adapt the workflow to your specific data sources or agronomic practices, treat this implementation as a reference architecture that can be customized to your environment.

Automate Daily Podcast Summaries with n8n, Whisper & OpenAI

Automate Daily Podcast Summaries with n8n, Whisper & OpenAI

Imagine starting your day already briefed on the most important podcast episodes in your favorite genre, without spending hours listening. This guide shows you how to turn that vision into reality with a ready-made n8n workflow that finds top podcasts, trims the audio, transcribes it with Whisper, summarizes it with OpenAI, and sends you a clean daily digest by email.

This is more than a technical walkthrough. Think of it as a small but powerful step toward a more focused, automated workday, where routine information gathering runs in the background and you stay free to do your best thinking.

The problem: too many great podcasts, not enough time

Podcasts are packed with insights, trends, and expert opinions, but they come with a cost: time. A single episode can run for an hour or more. Multiply that by several shows and you quickly hit a wall. You either fall behind or sacrifice deep work to keep up.

Automation offers another path. Instead of choosing between “listen to everything” and “miss out,” you can capture the essence of top episodes in minutes. With the right workflow, you can:

  • Stay on top of your industry or interests without constant listening
  • Turn long-form audio into short, scannable summaries
  • Free up time for strategy, creativity, and execution

This is where n8n, Taddy, Whisper, and OpenAI come together to transform how you consume audio content.

Shifting your mindset: from manual catching up to automated insight

Before we dive into nodes and APIs, it helps to adopt a different mindset. Instead of seeing podcasts as something you must personally monitor in real time, start to treat them as a data source that can be processed, summarized, and delivered to you in the format you prefer.

With n8n, you are not just building a one-off automation. You are building a system that:

  • Runs reliably on a schedule, even while you sleep
  • Surfaces only what matters, instead of flooding you with noise
  • Can be extended, customized, and improved as your needs grow

The workflow below is a practical template, but it is also a starting point. Once it is running, you can iterate, tweak prompts, change genres, store summaries, and integrate them into your broader knowledge stack. Each improvement compounds your time savings and clarity.

The workflow at a glance: your daily podcast digest engine

Here is what the n8n workflow accomplishes from end to end:

  • Runs automatically at a time you choose (for example, every morning at 08:00)
  • Uses the Taddy API to fetch the top podcast episodes for a selected genre
  • Downloads each episode and requests a cropped audio segment to keep things fast and cost effective
  • Polls the audio cutter until the trimmed file is ready, then downloads it
  • Sends the cropped audio to OpenAI Whisper for transcription
  • Passes the transcript to an OpenAI chat model for a concise 3-4 paragraph summary
  • Combines all summaries into an HTML table and emails the digest to you via Gmail

Once configured, this becomes your personal “podcast research assistant” that quietly works in the background and delivers insights on autopilot.

Step-by-step journey through the n8n workflow

1. Schedule your daily digest

The journey starts with timing. Using the Schedule Trigger node in n8n, you decide when your digest should arrive. Set it to run daily at a specific hour, for example 08:00, so your summaries are ready when you start your day.

2. Choose your podcast genre

Next, you define your focus. A Set node called Genre holds a static value like TECHNOLOGY, NEWS, ARTS, COMEDY, SPORTS, or FICTION. This value becomes the filter that tells Taddy which genre charts to pull.

By being intentional about your genre, you turn an overwhelming content universe into a curated stream aligned with your goals.

3. Fetch top podcasts from Taddy (TaddyTopDaily)

With timing and genre set, the workflow reaches out to Taddy. An HTTP Request node called TaddyTopDaily calls the Taddy API to retrieve the top podcast episodes for your chosen category.

To authenticate, you add your X-USER-ID and X-API-KEY headers, which you can obtain by creating a free developer key at taddy.org. Once configured, this node becomes your automated “chart watcher.”

4. Split episodes into individual items

The Taddy response includes multiple episodes. A Split Out node breaks this response into separate items so each episode can travel through the rest of the workflow independently. This parallel processing is what allows the workflow to scale as you handle multiple shows at once.

5. Download each podcast episode

For every episode, a Download Podcast node retrieves the audio file using the URL returned by Taddy. That file is then prepared for cropping, which is key for controlling cost and speed in the next steps.

6. Request an audio crop (Aspose audio cutter)

Instead of sending an entire episode to Whisper, you can focus on the most representative segment. A Request Audio Crop node posts the downloaded audio to an audio cutter API (such as Aspose) with your chosen start and end times.

By cropping, you:

  • Reduce transcription length and OpenAI costs
  • Speed up the entire pipeline
  • Target the “core” of the conversation, for example from 00:08:00-00:24:00

You can later adjust this window or even switch to full-episode transcription if your use case demands it.

7. Wait for the processed audio and check readiness

After requesting the crop, the workflow needs to know when the processed file is ready. A combination of Get Download Link and If Downloads Ready logic polls the cutter API.

If the file is not available yet, the flow can move to a Wait node, pause for a configured interval, and then re-check. This pattern ensures you do not overload the API and that the automation behaves gracefully even when processing takes longer.

8. Download the cropped MP3

Once the audio cutter reports success, a Download Cut MP3 node fetches the trimmed file. This is the audio that will be transcribed by Whisper, keeping your workflow efficient and focused on the most valuable part of each episode.

9. Transcribe with OpenAI Whisper

Now the audio turns into text. A Whisper Transcribe Audio node (configured via an HTTP Request) sends the cropped file to the OpenAI /v1/audio/transcriptions endpoint.

The request uses multipart/form-data and specifies model=whisper-1 along with the audio file. Whisper handles the heavy lifting, turning spoken content into a transcript that you can later search, summarize, and reuse.

10. Summarize the podcast with an OpenAI chat model

With a transcript in hand, the workflow moves into synthesis. A Summarize Podcast node uses an OpenAI chat model such as gpt-4o-mini to create a clear, focused summary.

The prompt is designed to request a concise 3-4 paragraph overview that starts with phrases like “This episode focuses on…” and highlights only the key points, not every minor detail. You can tune this prompt or adjust parameters like maxTokens to control length and style.

11. Merge results and build the HTML digest

Once each episode has a summary, the workflow collects everything. A Code node gathers fields such as podcast name, episode title, audio URL, and the generated summary, then merges them into a single list.

An HTML node then formats this list into a neat HTML table. This step turns raw data into a digest that is easy to scan, compare, and revisit directly from your inbox.

12. Email the digest with Gmail

The final step is delivery. A Gmail node sends the generated HTML as the message body. You configure Gmail OAuth2 credentials in n8n, then map the HTML output into the message content field.

The result: a daily email that gives you a curated overview of the top episodes in your chosen genre, ready whenever you are.

Setup checklist: get everything connected

To bring this workflow to life, walk through these setup steps:

  1. Create a free developer key at Taddy: https://taddy.org/signup/developers. Add your X-USER-ID and X-API-KEY values to the TaddyTopDaily HTTP Request node headers.
  2. Create OpenAI API credentials and add them to the Whisper transcription and OpenAI chat nodes in n8n. Whisper uses the /v1/audio/transcriptions endpoint with model=whisper-1.
  3. Set up Gmail OAuth2 credentials, download your client_secret.json, and upload it into n8n credentials as described in the Google Workspace documentation.
  4. In the Genre node, choose a valid genre value such as TECHNOLOGY, NEWS, ARTS, COMEDY, SPORTS, or FICTION. Taddy uses enums like PODCASTSERIES_TECHNOLOGY in their docs, so make sure your choice aligns with their allowed values.
  5. Adjust the crop start and end times in the Request Audio Crop node to capture a representative excerpt, for example 00:08:00-00:24:00, or change it to cover the full episode if that better fits your use case.

Troubleshooting and practical tips

Improving transcription accuracy

Whisper is robust, but its output still depends on audio quality. For best results:

  • Use segments with clear speech and minimal background noise
  • Avoid sections with heavy music or overlapping voices when possible
  • Consider speaker diarization strategies if you need to distinguish between multiple speakers

Managing costs wisely

Both audio transcription and chat completions in OpenAI incur usage-based costs. Cropping episodes is an effective way to reduce total minutes processed, which directly lowers cost and improves speed.

Monitor your usage in the OpenAI dashboard and adjust:

  • Crop duration
  • Summary length (via prompt or maxTokens)
  • Schedule frequency (for example, weekdays only instead of every day)

Handling rate limits and polling

Audio processing services can sometimes take longer than expected. To keep your workflow resilient:

  • Use a Wait node with backoff polling intervals, such as 30-60 seconds
  • Implement conditional checks to detect when the audio is ready
  • Add retry or skip logic for failed downloads, so one problematic episode does not block the entire digest

Keeping credentials secure

Security is a crucial part of any automation. In n8n:

  • Store API keys and OAuth credentials in the built-in credentials store
  • Avoid hard-coding secrets directly into nodes
  • Do not share workflow JSON exports with keys or tokens included

Best practices and powerful customizations

Once your base workflow is running, you can evolve it into a more advanced podcast intelligence system. Here are some ideas:

  • Control summary length and style: Adjust the OpenAI prompt or maxTokens to get shorter bullet-style recaps or more narrative overviews.
  • Prioritize high-value episodes: Use advanced split or filter logic to keep only episodes with top rankings or specific metadata.
  • Handle multiple languages: Add language detection and route episodes to Whisper with the appropriate language parameter for multilingual content.
  • Archive for long-term value: Save transcripts and summaries to a database, Google Drive, or another storage system so you can search and reference them later.

Each small tweak makes your automation more aligned with how you work and learn.

Inspiring use cases for this n8n podcast template

This workflow can support different roles and goals:

  • Busy professionals who want a daily inbox briefing on key episodes without losing hours to listening
  • Newsletter curators who aggregate spoken-word content and want a steady stream of summarized material to feature
  • Product teams and researchers tracking industry podcasts for competitor moves, emerging trends, and customer insights

As you experiment, you will likely find new ways to adapt the template, such as feeding summaries into internal dashboards, knowledge bases, or Slack channels.

From template to your own automation system

You do not need to build everything from scratch. You can start by importing the existing n8n workflow JSON or using the prebuilt template, then simply connect your credentials and test.

Recommended next steps:

  • Import the workflow into n8n or use the template link below
  • Connect Taddy, OpenAI, and Gmail credentials
  • Test with a single genre and a Test Workflow run before enabling the schedule
  • Refine prompts, crop times, and genres as you see what works best

Take the next step: automate your listening and reclaim your focus

This workflow is a practical example of what is possible when you combine n8n, Whisper, OpenAI, and a clear intention to save time. It turns long-form audio into actionable insight and gives you back hours each week.

If you are ready to move from manual catching up to automated summaries:

  • Import the workflow into n8n
  • Add your Taddy, OpenAI, and Gmail credentials
  • Schedule your first daily digest and let it run

From there, treat this template as a foundation. Experiment with different genres, longer or shorter summaries, additional storage, or integrations with your existing tools. Each iteration will bring you closer to a personalized, automated research assistant that works exactly the way you do.

If you would like help tailoring the workflow to your needs, think about your preferred genre and cadence, then adapt the template accordingly. This is your chance to design an automation that supports your growth, reduces friction, and keeps you informed without burning you out.

Build an n8n YouTube Transcript Summarizer

Build an n8n YouTube Transcript Summarizer

Ever opened a YouTube video “just to get the gist” and suddenly it is 45 minutes later, your coffee is cold, and you still do not remember the key points? This workflow exists to stop that from happening.

In this guide, you will build an n8n automation that takes a YouTube URL via webhook, grabs the video details and transcript, sends the text to a language model (like GPT-4o-mini via LangChain), and returns a clean, structured summary. As a bonus, it can also ping you on Telegram so you do not even have to refresh a page to see the results.

We will walk through what the workflow does, how the nodes connect, and how to keep things stable and cost effective in production. All the key n8n steps and technical details are preserved, just with fewer yawns and more automation joy.

Why bother summarizing YouTube with n8n?

Manually skimming through video transcripts is the productivity equivalent of watching paint dry. Automating YouTube transcript summarization with n8n fixes that in a few ways:

  • Massive time savings – Get the main ideas in a few paragraphs instead of watching entire videos.
  • Better accessibility – Summaries help teams quickly scan content, share insights, and support people who prefer text.
  • Scalable research – Process playlists, channels, or incoming links automatically instead of doing copy-paste gymnastics.
  • LLM-powered insights – A modern language model via LangChain can extract structure, key terms, and action items, not just a wall of text.

In short, you get the value of the video without sacrificing your afternoon.

What this n8n YouTube transcript summarizer actually does

Here is the big picture of the workflow, from “someone sends a URL” to “you get a neat summary and a notification”:

  • Webhook – Receives an HTTP POST with a JSON body that includes a YouTube URL.
  • Get YouTube URL – Maps the incoming field to a clean youtubeUrl variable.
  • YouTube Video ID – Runs a Code node to extract the 11-character video ID from almost any YouTube link format.
  • Get YouTube Video – Uses the YouTube node to fetch metadata like title, description, and thumbnails.
  • YouTube Transcript – Pulls the transcript via a transcription node, YouTube API, or third-party service.
  • Split Out & Concatenate – Normalizes transcript segments and merges them into a single text blob.
  • Summarize & Analyze (LangChain + GPT) – Sends the full transcript to an LLM using LangChain and gets a structured markdown summary.
  • Response Object – Packages the title, summary, video ID, and URL into a tidy JSON response.
  • Respond to Webhook & Telegram – Returns the result to the caller and optionally drops a Telegram notification.

So each time you hit the webhook with a YouTube link, you get an instant “executive summary” of the video instead of another tab to babysit.

What you need before you start

Before wiring everything together in n8n, make sure you have these pieces ready:

  • An n8n instance (cloud or self-hosted)
  • YouTube API credentials or access to a YouTube transcription node
  • An OpenAI API key (or another LLM provider) that you can use via the LangChain node
  • A Telegram bot token if you want notifications (optional but very satisfying)
  • Basic familiarity with webhooks and JSON so you know what is hitting your workflow

Quick setup walkthrough: from webhook to summary

Let us break the workflow into simple steps you can follow in n8n. This is the same logic as the original template, just rearranged and explained with fewer headaches.

Step 1 – Create the Webhook trigger

Start with a Webhook node and configure it to accept an HTTP POST request with JSON. Your incoming payload should include a field like:

{  "youtubeUrl": "https://www.youtube.com/watch?v=XXXXXXXXXXX"
}

Once this is set, you can trigger the workflow from any script, tool, or service that can send POST requests.

Step 2 – Normalize the URL with a Set node

Add a Set node (often named something like Get YouTube URL). Map the incoming field to a stable property called youtubeUrl. For example, if your webhook payload is messy or nested, this node cleans it up so all later nodes can just rely on json.youtubeUrl.

Step 3 – Extract the YouTube video ID with a Code node

Next, add a Code node to parse the 11-character video ID from the URL. This snippet handles common YouTube formats, including full links, short youtu.be links, and embed URLs:

const extractYoutubeId = (url) => {  const pattern = /(?:youtube\.com\/(?:[^\/]+\/.+\/|(?:v|e(?:mbed)?)\/|.*[?&]v=)|youtu\.be\/)([^"&?\/\s]{11})/;  const match = url.match(pattern);  return match ? match[1] : null;
};

const youtubeUrl = items[0].json.youtubeUrl;
return [{ json: { videoId: extractYoutubeId(youtubeUrl) } }];

Tip: Add validation here. If videoId is null, branch to an error path, send a helpful error message, or log the problem instead of confusing your future self.

Step 4 – Get YouTube video metadata

Now use the YouTube node to fetch information about the video. With the video ID from the previous step, request metadata like:

  • Title
  • Description
  • Thumbnails

This metadata is useful for two things: giving the LLM more context in the prompt and making your final response object or Telegram message more readable.

Step 5 – Fetch the YouTube transcript

Next up is the YouTube Transcript step. Depending on your stack, you can:

  • Use a dedicated transcription node that reads captions directly.
  • Call the YouTube API if captions are available for the video.
  • Use a third-party transcription service if you need extra coverage.

Typically, the transcript arrives as an array of timestamped segments, not one big text block. That is great for machines, slightly annoying for humans, and exactly what we will fix next.

Step 6 – Split and concatenate the transcript text

Use a combination of a Split Out node and a concatenation step to:

  • Normalize the array of transcript segments.
  • Combine all segments into one continuous text blob.

This gives you a single long string that is easy to send to the LLM. It also keeps the prompt logic simple and avoids weird gaps or out-of-order fragments in the summary.

Step 7 – Summarize & analyze with LangChain and GPT

Now for the fun part. Add a LangChain node configured with your preferred LLM, such as gpt-4o-mini, gpt-4, or another compatible model. The input should be your concatenated transcript text.

In your prompt, you can ask the model for a structured summary in markdown. For example, you might:

  • Ask it to break content into main topics with headers.
  • Request bullet points for key ideas.
  • Highlight important terms.
  • Limit the summary to a certain length, for example 200 to 400 words, to keep token usage under control.

Here is a sample prompt snippet similar to what you might use in the workflow:

=Please analyze the given text and create a structured summary following these guidelines:

1. Break down the content into main topics using Level 2 headers (##)
2. Under each header: list essential concepts as bullets, keep concise, preserve accuracy
3. Sequence: Definition, characteristics, implementation, pros/cons
4. Use markdown formatting and simple bullets

Here is the text: {{ $json.concatenated_text }}

You can tweak this prompt to match your use case, for example more action items, more technical detail, or a shorter summary.

Step 8 – Build a clean response object

Once the LLM responds, collect all the important pieces into a single JSON object. A typical Response Object node might include:

  • title – from the YouTube metadata
  • youtubeUrl – the original URL that was sent to the webhook
  • videoId – the parsed video ID
  • summary – the structured summary from the LLM
  • rawTranscript or a link to it (optional) – for deeper research or debugging

This is what you will return to the caller and use in your notifications or storage integrations.

Step 9 – Respond to the webhook and ping Telegram

Finally, add two output paths:

  • Respond to Webhook – Return the full JSON response to whoever called the webhook. This usually includes the summary, title, URL, and any other fields you want to expose.
  • Telegram notification (optional) – Use the Telegram node to send a short message, such as the video title and a link to the summary or the original video.

Keep the Telegram message concise so it is easy to skim on mobile. The full summary can stay in the webhook response or in a linked document or app.

Testing your n8n YouTube summarizer

Before you trust this workflow with your entire “Watch Later” list, give it a proper workout:

  • Test with different link styles: standard watch?v=, short youtu.be, and embed links.
  • Try videos with captions in different languages to be sure transcripts are handled correctly.
  • Verify that the video ID extraction works and is never empty for valid URLs.
  • Check that the transcript is not empty before sending it to the LLM to avoid wasting tokens.
  • For long videos, make sure you are not hitting token limits. If you are, consider batching or trimming the text.

A bit of testing here saves a lot of “why is this empty?” debugging later.

Error handling and rate limiting

APIs sometimes misbehave, and rate limits are the universe’s way of telling you to slow down. Protect your workflow with a few safeguards:

  • Add retry logic around YouTube and LLM calls for transient errors.
  • Use a fallback model or a shortened transcript if your primary model hits token limits.
  • Log errors to a database or log management tool so you can diagnose issues later.
  • Send Telegram alerts to an admin or channel when items fail so you do not miss problems.

With good error handling, your workflow feels more like a reliable assistant and less like a moody script.

Managing cost, performance, and tokens

Long transcripts plus powerful models can get expensive quickly. A few strategies help keep costs sane:

  • Pre-trim transcripts to the most relevant sections, for example the first 20 minutes or known highlight segments.
  • Use a two-pass approach: first ask the LLM to identify key timestamps or sections, then summarize only those parts.
  • Pick a model with a good cost-quality tradeoff. For many use cases, gpt-4o-mini is a solid, cheaper option for concise summaries.

Optimizing this part keeps your automation from turning into a surprise line item on your cloud bill.

Best practices and upgrade ideas

Once the basic workflow is working, there are plenty of ways to make it more powerful and more pleasant to use:

  • Cache by video ID so you do not reprocess the same video every time someone sends the URL again.
  • Detect and translate languages before summarization so non-English videos are still useful to your team.
  • Build a simple UI that shows processed videos, their summaries, and current status.
  • Store results in a database like Postgres or Airtable to enable search, analytics, or later reuse.

These enhancements turn a handy script into a small internal product for your team.

Security considerations for your webhook and keys

Since this workflow is triggered over HTTP and uses API keys, a bit of security hygiene goes a long way:

  • Protect the webhook endpoint with a secret token or HMAC validation so only trusted callers can use it.
  • Encrypt API keys and store them in n8n credentials or a dedicated secrets manager, not in plain text nodes.
  • Limit webhook access to trusted systems, VPNs, or IP ranges where possible.

This keeps your summarizer helpful for you and not for random internet strangers.

Wrap-up: from endless videos to quick insights

This n8n workflow gives you a repeatable pattern for automating YouTube content extraction and summarization. It is ideal for research teams, content marketers, and anyone who needs fast video insights without watching every second.

Once it is in place, you can feed it URLs from internal tools, Slack bots, CRM systems, or browser extensions and get consistent, structured summaries every time.

Next steps you can take

  1. Add translation so multilingual transcripts get summarized in your preferred language.
  2. Integrate with Notion, Confluence, or Google Drive to automatically store summaries in your knowledge base.
  3. Build a small frontend that lists processed videos, shows summaries, and links back to the original YouTube content.

Call to action: Spin this workflow up on your n8n instance, tweak the LLM prompt to match your style, and iterate from there. If you want help refining the prompt or troubleshooting, you can paste your webhook payload and workflow details and we can adjust it together.

Want the downloadable workflow JSON or a ready-to-import n8n template? Reply and I will send over the file and a quick setup checklist so you can skip the boring parts and jump straight to automation.

Social Buzz Heatmap with n8n & Embeddings

Social Buzz Heatmap with n8n & Embeddings

Imagine this: your team manually scrolling through social feeds…

Someone is refreshing Twitter/X, another person has ten Reddit tabs open, and someone else is copy-pasting spicy comments into a spreadsheet. Nobody remembers what the original goal was, but everyone has eye strain. Sound familiar?

This is exactly the kind of repetitive, soul-draining work that automation is born to destroy. Instead of doom-scrolling for insights, you can let an n8n Social Buzz Heatmap workflow quietly collect, analyze, and summarize social chatter for you in real time.

In this guide, you will see how to set up a social listening pipeline using n8n, OpenAI embeddings, Supabase as a vector store, and a lightweight agent that logs insights to Google Sheets. The workflow ingests posts, slices them into chunks, turns them into vectors, stores them, then queries them semantically so you can spot trends, spikes, and topics without lifting more than a finger or two.

What is a Social Buzz Heatmap and why should you care?

A Social Buzz Heatmap is basically your brand’s social radar. It shows:

  • What people are talking about (topics)
  • How loud they are talking (intensity)
  • How they feel about it (sentiment)

For marketing teams, product managers, and community managers, this means you can:

  • Prioritize which conversations to jump into
  • Catch product issues before they blow up
  • Track campaign impact in something close to real time

By using embeddings and a vector store, you are not just doing keyword search. You get semantic search, so you can find related posts even when people phrase things differently. For example, “login is broken”, “can’t sign in”, and “auth is busted” will all live happily together in your search results.

How the n8n Social Buzz Heatmap workflow works

The n8n template wires together several tools into a single pipeline that looks roughly like this:

  • Webhook – receives social post payloads via POST
  • Splitter – breaks long posts into smaller text chunks using chunkSize and chunkOverlap
  • Embeddings (OpenAI) – converts each chunk into a vector embedding
  • Insert (Supabase vector store) – stores vectors and metadata in Supabase
  • Query (Supabase) + Tool – runs semantic searches against the vector index
  • Memory (Buffer window) – keeps short-term conversational context
  • Chat (LM) + Agent – turns raw results into human-friendly insights and decides what to log
  • Google Sheets – appends heatmap summaries and logs to a sheet

The end result is a near real-time, searchable, filterable view of what people are saying about your brand or product, without anyone manually copy-pasting posts at 11 p.m.

Quick setup guide: from social chaos to structured heatmap

Below is a simplified walkthrough of each part of the n8n workflow template and how to configure it. You get all the original technical details, just with fewer yawns.

1. Webhook: catch social data before it scrolls away

First, configure the Webhook node in n8n to accept POST requests from your social ingestion source. This could be:

  • Zapier or Make (formerly Integromat)
  • Native platform APIs
  • Any custom service that forwards social posts

Typical payload fields you want to include:

  • id – original post id
  • source – platform name, for example twitter, reddit, instagram
  • author – username or author id
  • text – full post text
  • timestamp – when the post was published
  • metadata – likes, retweets, sentiment, or other optional stats

Example JSON payload:

{  "id": "123",  "source": "twitter",  "text": "I love the new product feature!",  "timestamp": "2025-08-15T12:34:00Z"
}

Once this is wired in, your workflow now has a front door for social content.

2. Splitter: slice long posts into embedding-friendly chunks

Not all posts are short and sweet. Threads, long comments, or combined content can exceed practical token limits for embeddings. To keep things efficient, use a character-based text splitter in the workflow.

Configure it with something like:

  • chunkSize – for example 400 characters
  • chunkOverlap – for example 40 characters

This overlap helps preserve context across chunks so you do not end up with half a sentence in one vector and the punchline in another. Each chunk then goes through the embedding model cleanly.

3. Embeddings: turn text into vectors

Next, the Embeddings node calls OpenAI (or another embeddings provider) to convert each text chunk into a vector representation.

Key points for this step:

  • Use a model tuned for semantic similarity, not just generic embeddings.
  • Batch embedding calls where possible to lower latency and cost.
  • Make sure your API credentials are correctly configured in n8n.

At this stage, your raw social text is now machine-friendly vectors, ready to be stored and searched.

4. Supabase vector store: save embeddings with rich metadata

The Insert node writes each embedding into a Supabase vector store, along with useful metadata that will make your life easier later.

Typical metadata fields to store:

  • Original post id
  • source platform
  • author
  • timestamp
  • sentiment score (if you have it)
  • The full chunk text

Use a clear index name such as social_buzz_heatmap so you know what you are querying later. Good metadata lets you:

  • Filter by platform or time range
  • Build time-based heatmaps
  • Slice data for more advanced analytics

5. Query & Tool: semantic search that actually understands meaning

Once your data is in Supabase, the Query node becomes your search engine. Instead of searching for exact words, you search by vector similarity.

This lets you run queries like:

  • “posts about login errors”
  • “brand mentions about pricing”

The Query node returns the most relevant chunks based on semantic similarity. The Tool node wraps this vector search so that the agent can easily call it as part of its reasoning process.

6. Memory, Chat, and Agent: context-aware insights instead of raw noise

Now for the part that makes this feel smart rather than just technical.

  • A buffer window memory node keeps recent interactions or summarized context handy.
  • The Chat node (a language model) processes query results and context.
  • The Agent node orchestrates tools, interprets results, and outputs insights.

Together, they generate human-friendly summaries such as:

  • Trending topics and themes
  • Key phrases or recurring complaints
  • Representative example posts
  • Suggested actions for your team

The agent also decides which insights are worth logging. No more manually deciding which angry tweet deserves a row in your spreadsheet.

7. Google Sheets logging: your living Social Buzz Heatmap log

Finally, the workflow uses a Google Sheets node to append a row for each insight. A typical row might include:

  • Timestamp
  • Topic tag
  • Heat level (for example low, medium, high)
  • Representative post URL
  • Notes or short summary

Because the data lives in a sheet, you can easily:

  • Share it with stakeholders
  • Feed it into dashboards or BI tools
  • Build visual heatmaps over time

Sample queries to try with your n8n Social Buzz Heatmap

Once the pipeline is running, you can run semantic queries combined with metadata filters to answer questions like:

  • “Show me posts about outage or downtime in the last 4 hours.”
  • “Identify spikes mentioning ‘pricing’ and return top 10 examples.”
  • “Group posts by sentiment and return the top negative clusters.”

By combining vector similarity with filters like source and time ranges, you can focus your heatmap on exactly the conversations that matter.

Best practices for tuning your social listening workflow

To keep your Social Buzz Heatmap efficient and useful, keep these tips in mind:

  • Chunk sizing: 300-500 characters with about 10%-15% overlap works well for most social text.
  • Metadata hygiene: always include timestamps and platform identifiers to enable time-based and platform-based heatmaps.
  • Indexing strategy: periodically re-index or prune old vectors if storage costs start to creep up.
  • Rate limits and batching: batch embedding calls to reduce API overhead and keep costs predictable.
  • Security: secure your webhook endpoint with signed requests or secret tokens, and keep your Supabase keys protected.

Turning logs into visuals: heatmap visualization ideas

Once your insights are streaming into Google Sheets or a warehouse like BigQuery, you can turn them into actual heatmaps instead of just rows and columns.

Tools you can use include:

  • Google Data Studio
  • Looker Studio
  • A custom d3.js heatmap

Useful dimensions for your visualizations:

  • Time (hour, day, week)
  • Topic cluster
  • Intensity (volume or engagement-weighted volume)
  • Sentiment breakdown

This is where your spreadsheet of insights turns into a colorful, at-a-glance view of what is heating up across social platforms.

Costs and performance: where the money goes

Most of the ongoing cost in this n8n social listening pipeline comes from:

  • Embedding API usage and tokens per call
  • Supabase storage and vector query performance
  • Language model calls from the Chat and Agent nodes for summarization

To keep your bill under control, you can:

  • Sample posts during low-importance windows instead of ingesting everything
  • Prioritize high-engagement posts and skip obvious low-signal noise
  • Pre-filter by keywords before you send content to the embedding model

That way you get the important signals without paying to embed every single “first!” reply.

How to extend your n8n Social Buzz Heatmap pipeline

Once the core workflow is running smoothly, you can build on it with extra automation superpowers:

  • Real-time visualization: push “heat events” to a live dashboard via WebSocket.
  • Alerting: trigger Slack or PagerDuty alerts when negative sentiment spikes above a threshold.
  • Clustering: run periodic clustering jobs to automatically group posts into topic clusters for your heatmap.
  • Feedback loop: let analysts tag results, then feed those tags back into metadata or a classifier to improve future insights.

This is how you move from “we have a dashboard” to “our dashboard tells us what to fix next.”

Quick checklist to launch your Social Buzz Heatmap

  1. Deploy the n8n template and configure credentials for OpenAI, Supabase, and Google Sheets.
  2. Secure your webhook endpoint and test it with a few sample POST payloads.
  3. Tune chunkSize and chunkOverlap and select an embeddings model optimized for semantic similarity.
  4. Set up a Google Sheet or connect to a BI tool for visualization.
  5. Run a pilot for 48-72 hours and adjust filters, thresholds, and alerts based on what you see.

Wrapping up: from social noise to actionable insight

With n8n, OpenAI embeddings, and Supabase, you can build a Social Buzz Heatmap that keeps an eye on social conversations for you. Instead of drowning in noise, you get:

  • Semantic search across platforms
  • Structured logs in tools you already use, like Google Sheets
  • Actionable summaries that help you respond faster and smarter

All without anyone manually screenshotting tweets.

Ready to deploy? Import the template into your n8n instance, plug in your OpenAI and Supabase credentials, and send a few sample social payloads to the webhook. Watch as the heatmap data starts flowing into your sheet. If you want to customize the flow further, you can connect with a consultant or drop a question in the n8n community forums for best-practice tips.

Automate JSON to Google Sheets with n8n & Pinecone

Automate JSON to Google Sheets with n8n & Pinecone

On a rainy Thursday afternoon, Maya stared at yet another raw JSON payload on her screen. She was a product operations lead at a fast-growing SaaS startup, and her life had quietly turned into a parade of curly braces and nested fields.

Every system in the company – marketing tools, billing platform, monitoring services, internal APIs – kept firing JSON events at her team. The data was valuable, but nobody outside engineering could read it comfortably. Leadership wanted clean, human-friendly logs in Google Sheets. Maya wanted her evenings back.

This is the story of how Maya solved that problem with an n8n workflow template that transforms incoming JSON into structured Google Sheets rows, enriches each event with OpenAI embeddings, stores context in Pinecone, and uses a RAG agent to generate readable summaries automatically.

The problem: JSON everywhere, insight nowhere

At first, Maya tried the obvious solution. She asked a developer to export logs periodically and paste them into a spreadsheet. That lasted about a week. Then the volume grew, new event types appeared, and people started asking for smarter summaries like:

  • “Which signups came from referrals and what did they ask for?”
  • “Can we see a one-line status for each important event?”
  • “Can we quickly search past events by meaning, not just exact text?”

Dumping raw JSON into Sheets was not enough. Building a custom backend felt like overkill. She needed something flexible, production-ready, and fast to deploy.

That was when a colleague mentioned an n8n template that could take JSON from a webhook, process it with OpenAI, store semantic context in Pinecone, then append a clean, summarized line into Google Sheets. No custom backend required.

Discovering the n8n JSON to Sheet workflow

Maya opened the template and saw an architecture that finally made sense of her chaos. The workflow used:

  • An n8n Webhook Trigger to receive JSON via HTTP POST
  • A Text Splitter to handle long text fields
  • OpenAI embeddings with text-embedding-3-small
  • Pinecone for vector insert and query in a json_to_sheet index
  • A Vector Tool and Window Memory for the RAG agent
  • An OpenAI Chat Model powered RAG agent to interpret the JSON
  • A Google Sheets Append node targeting a Log sheet
  • A Slack node to alert the team if anything failed

Instead of manually wrangling raw data, Maya could build an intelligent “JSON to Sheet” pipeline that enriched, summarized, and logged events in a format anyone could read.

Setting the stage: prerequisites for Maya’s setup

Before she could hit Run, Maya gathered what she needed:

  • An n8n instance, either self-hosted or via n8n cloud
  • An OpenAI API key for both embeddings and the chat model
  • A Pinecone account with a vector index named json_to_sheet
  • A Google account with Sheets API enabled and a SHEET_ID for the log spreadsheet
  • A Slack API token for optional error alerts

With credentials in place, she started walking through the workflow, node by node, watching how each piece would transform her incoming JSON into something the team could actually use.

Rising action: how the workflow processes each JSON event

Webhook Trigger – the front door to the system

Maya began with the entrypoint. She configured an HTTP POST webhook in n8n at a path similar to /json-to-sheet. This would be the URL all her systems could call when they wanted to log an event.

To keep things safe, she planned to protect the webhook with a secret and an IP allowlist. This trigger would receive every JSON payload, from user signups to error logs, and pass them into the rest of the automation.

Text Splitter – preparing long content for embeddings

Some events had long notes or descriptions. Maya knew that language models and embeddings work best with well sized chunks, so the template included a Text Splitter node.

In the workflow, this splitter used:

  • Chunk size: 400 characters
  • Overlap: 40 characters

This configuration let her break long text into manageable sections while preserving enough overlap so the semantic meaning stayed intact. It also helped avoid hitting token limits for downstream processing.

OpenAI embeddings – turning text into vectors

Next, each chunk flowed into an Embeddings node using OpenAI’s text-embedding-3-small model. The node converted the text into numerical vectors that captured its semantic meaning.

Maya made a note to watch rate limits and to batch requests when dealing with many chunks at once. These embeddings would become the backbone of semantic search and contextual retrieval later in the pipeline.

Pinecone Insert and Query – building a semantic memory

Once the embeddings were generated, the workflow inserted them into Pinecone, into an index named json_to_sheet. Each vector stored metadata such as:

  • Source event ID
  • Timestamp
  • Original JSON path or field

That way, if she ever needed to reconstruct or audit past events, the context would still be there. Alongside insertions, the template also included a Pinecone Query node. When the RAG agent needed context, it could search for semantically similar vectors and pull relevant snippets back into the conversation.

Vector Tool and Window Memory – giving the agent tools and short-term recall

To make the RAG agent truly useful, the workflow wired Pinecone Query into a Vector Tool. This tool was exposed to the agent so it could perform retrieval on demand instead of being limited to whatever data was directly in the prompt.

On top of that, a Window Memory buffer in n8n gave the agent a short-term memory window. That allowed it to keep track of recent events or previous steps, which improved consistency for follow-up requests and multi-step processing.

Chat Model and RAG Agent – where raw JSON becomes human language

Now came the heart of the transformation. The workflow used an OpenAI chat model configured as a RAG agent. Its job was to take:

  • The raw JSON payload
  • Any relevant context retrieved from Pinecone
  • The short-term memory window

and turn that into a concise, human-readable status line.

The system message in the template told the model exactly what it was doing:

"You are an assistant for JSON to Sheet"

Each time a new event arrived, the agent received the entire JSON payload. It could then use the Vector Tool to retrieve related context from Pinecone, and finally produce a clear summary tailored for a Google Sheet log.

Append Sheet – writing the story into Google Sheets

Once the RAG agent produced its output, Maya mapped that result into the Google Sheets Append node.

In the sample workflow, the node targeted a sheet named Log. One of the key mappings looked like this:

Status = {{$json["RAG Agent"].text}}

She could easily extend this mapping to include columns for:

  • Timestamp
  • Original payload ID
  • User email or ID
  • Event type
  • Short summary or notes

With every new webhook call, a fresh, readable row would appear in the sheet, ready for dashboards, audits, or quick reviews by non-technical teammates.

Slack Error Alerts – handling failures gracefully

Maya knew that no production workflow is complete without error handling. The template wired the RAG agent’s onError path to a Slack node. If the agent failed or an exception occurred, the team would receive an immediate message.

Those Slack alerts included the original webhook payload so they could quickly diagnose what went wrong, whether it was a malformed JSON, a temporary API issue, or a configuration problem.

A concrete example: from raw JSON to a clean status line

To test the workflow, Maya sent a sample JSON payload to the webhook:

{  "id": "evt_12345",  "timestamp": "2025-08-31T12:34:56Z",  "type": "user.signup",  "payload": {  "email": "user@example.com",  "name": "Jane Doe",  "notes": "User signed up via referral. Wants weekly updates."  }
}

The RAG agent processed it, used any relevant context if needed, and returned a compact status like:

user.signup - user@example.com - Referred - Wants weekly updates

That line landed neatly in the Status column of the Log sheet. No one had to open a JSON viewer to understand what happened. For Maya, this was the turning point. She could finally see a future where her team managed events at scale without drowning in raw data.

Best practices Maya adopted as she went to production

As the workflow moved from experiment to daily use, Maya refined it with a few important best practices.

Security and data hygiene

  • Protected the webhook with authentication and an IP allowlist
  • Validated incoming JSON and sanitized content before writing to Sheets
  • Avoided storing unnecessary personally identifiable information in embeddings or vector metadata

Idempotency and metadata

  • Used a unique event ID for each payload
  • Checked the sheet or vector store when needed to avoid duplicate inserts
  • Stored metadata in Pinecone, such as event ID, timestamp, and original JSON path, so any result could be traced back

Performance, cost, and token management

  • Tuned Text Splitter chunk size and overlap based on real payload sizes
  • Bathed embedding requests to reduce overhead
  • Chose text-embedding-3-small as a cost effective model that still offered solid semantic accuracy

Error handling and resilience

  • Used Slack alerts on the RAG agent’s onError path
  • Added retry and backoff logic in n8n for transient failures in external APIs

Monitoring and scaling as event volume grew

Within weeks, more teams started sending events to Maya’s webhook. To keep things smooth, she monitored:

  • Webhook request rate
  • Embedding API usage and latency
  • Pinecone index size and query latency
  • Google Sheets append rate

When traffic spiked, she considered adding a queue such as Redis or RabbitMQ between the webhook and the embedding steps, so bursts could be buffered without overloading OpenAI or Pinecone.

Since retrieval became more important over time, she also looked at pruning strategies in Pinecone, using TTL based cleanup or namespaces to keep the index manageable and queries fast.

Troubleshooting: how Maya handled common issues

Not everything worked perfectly on the first try. Here are the checks that saved her time:

  • Missing rows in Sheets: She verified the SHEET_ID, confirmed the sheet name (such as Log), and checked that the OAuth scopes for the Sheets API were correct.
  • Embeddings failing: She double checked her OpenAI API key, confirmed she was using a valid model name like text-embedding-3-small, and watched for rate limit errors.
  • Pinecone errors: She ensured the json_to_sheet index existed and that the vector dimensions matched the embedding model.
  • Agent errors: She reviewed the system prompt, memory configuration, and tool outputs, then added debug logging around the RAG agent’s inputs and outputs inside n8n.

Resolution: from manual chaos to reliable automation

By the end of the quarter, Maya’s “JSON to Sheet” workflow had become an invisible backbone for operational visibility. Every important event flowed through a secure webhook, was semantically indexed with OpenAI embeddings and Pinecone, interpreted by a RAG agent, and logged as a clear, concise row in Google Sheets.

Audit logs, operational tracking, lightweight dashboards, and ad hoc investigations all became easier. Her non-technical colleagues could filter and search the sheet instead of pinging engineering for help. The company gained better insight, and Maya reclaimed her time.

Ready to follow Maya’s path?

If you are facing the same flood of JSON events and need a human friendly, automation first way to manage them, this n8n template gives you a strong starting point.

To get started:

  1. Import the template into your n8n instance.
  2. Configure your OpenAI and Pinecone credentials.
  3. Set your Google Sheets SHEET_ID and confirm the target sheet name (for example, Log).
  4. Optionally connect Slack for error alerts.
  5. Send a sample webhook payload to the endpoint and watch your first JSON event appear as a clean row in Google Sheets.

You can clone the workflow, adjust chunk sizes, switch embedding models, or refine your Pinecone index configuration to match your data characteristics and budget. If you need deeper customization, such as advanced schema mapping or hardened security, you can also work with a consultant to tailor the setup to your environment.

Start now: import the template, plug in your SHEET_ID, connect OpenAI and Pinecone, and hit the webhook endpoint. Your JSON events will begin telling their story in Google Sheets instead of hiding in logs.


Author’s note: This narrative highlights a practical, production ready approach to turning raw JSON into structured, enriched logs. Feel free to adapt the chunk sizes, embedding models, and Pinecone index strategy so the workflow fits both your data and your cost constraints.