Automate X Video Posts with AI Captions & Google Sheets

Automate X Video Posts With AI Captions & Google Sheets

Imagine waking up to find your X (formerly Twitter) account already sharing fresh video content with thoughtful, on-brand captions you didn’t have to write yourself. Sounds nice, right?

That is exactly what this n8n workflow template is built to do. It pulls recent videos from a specific X user, lets AI write engaging captions in Japanese, posts them for you, and quietly keeps track of everything in Google Sheets so you never double post the same video.

In this guide, we will walk through what the template does, when you might want to use it, and how to get it running with your own accounts. Think of it as your personal social media assistant that never gets tired.

What This n8n Workflow Actually Does

At a high level, this automation connects four main pieces:

  • Your X account (for fetching and posting videos)
  • AI via OpenRouter (for generating captions in Japanese)
  • Google Sheets (for logging, deduplication, and analytics)
  • n8n (for scheduling and tying everything together)

Here is the basic idea: on a schedule you choose, n8n checks a specific X user, finds their latest tweets that include videos, makes sure you have not posted them before, asks AI to write a catchy Japanese caption, then posts that caption plus the video link to your own X account. Every step is logged in a Google Sheet so you can see what was posted and when, and so the workflow does not repost the same video later.

When You Should Use This Template

This workflow is a great fit if you:

  • Regularly share video content from a particular X creator or brand account
  • Want consistent posting without manual copy-pasting and caption writing
  • Prefer AI-generated Japanese captions with hashtags and calls to action
  • Need a clear audit trail of what was posted and want to avoid duplicates

It is especially handy for content curators, social media managers, or anyone repurposing videos from a main brand account to multiple regional or personal accounts.

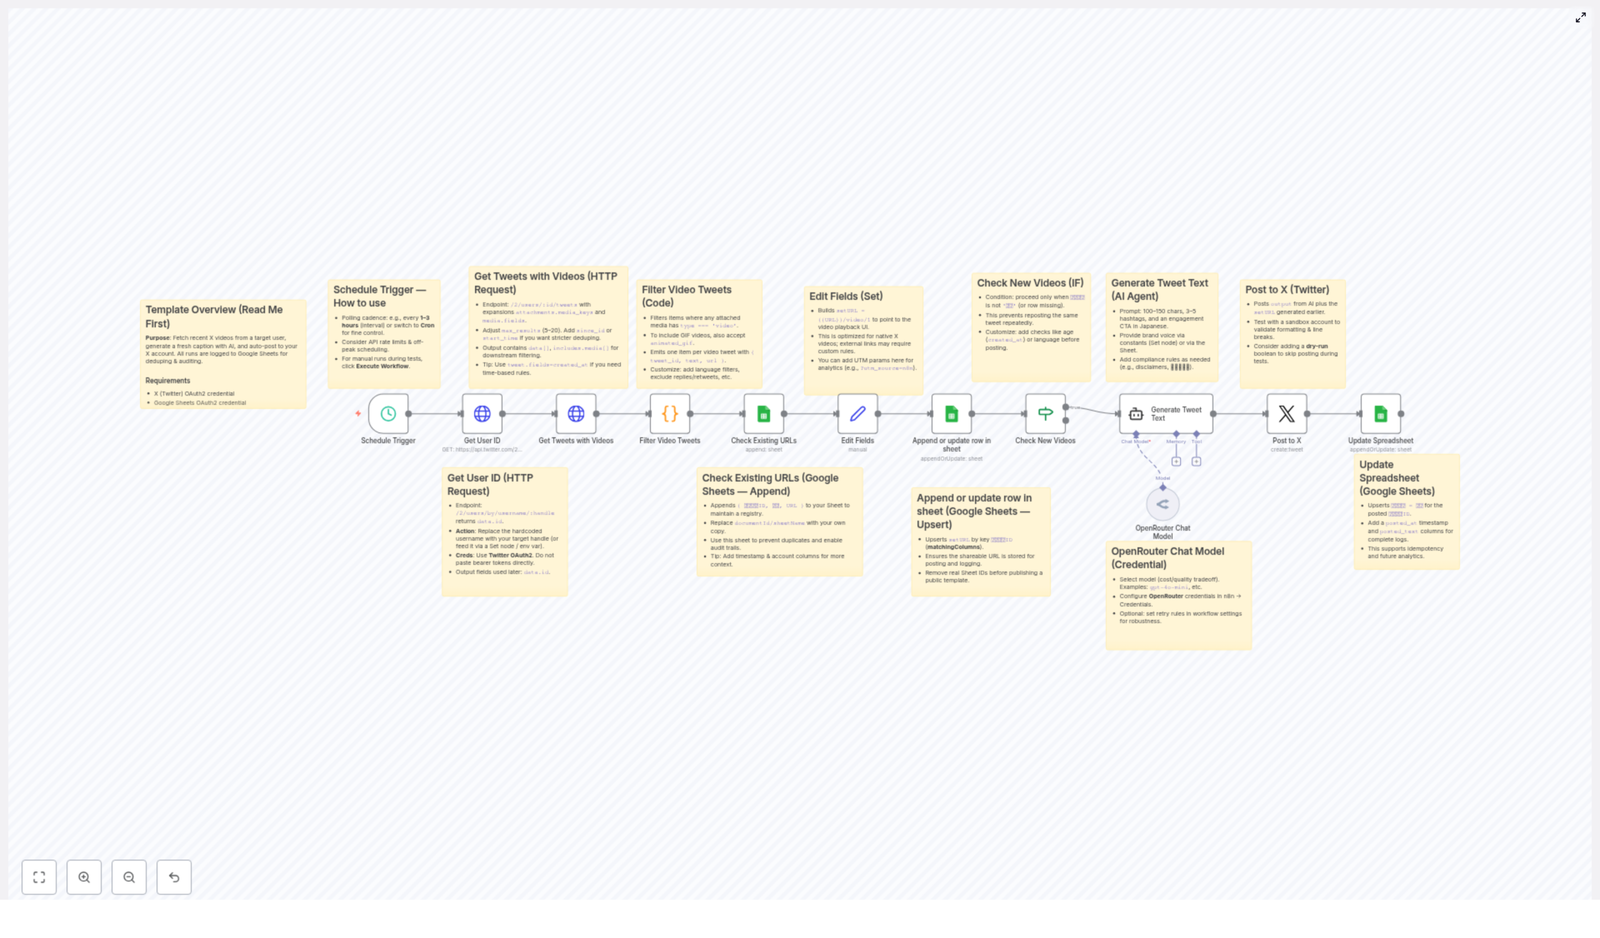
Step-by-Step: How the Workflow Runs

Let us break down the workflow into simple, understandable steps so you know exactly what is happening behind the scenes.

1. The Schedule Trigger: When Everything Starts

The workflow begins with a Schedule Trigger. You can configure this in n8n to run as often as you like, for example every 1 to 3 hours.

Each time the schedule fires, n8n starts a new run of the workflow, checks for fresh videos, and decides what to post. Adjusting the interval helps you balance between staying up to date and staying within X API rate limits.

2. Getting the X User ID From a Username

Next, the workflow uses the Get User ID step. Instead of hardcoding an ID, you simply provide a username (the X handle) that you want to pull videos from.

Behind the scenes, the workflow calls the X (Twitter) API to convert that username into a user ID. This ID is then used in the following steps to fetch that user’s tweets.

3. Fetching Tweets That Contain Videos

Once the user ID is ready, the workflow moves to Get Tweets with Videos. This step asks the X API for recent tweets from that user, including any media attachments.

Since we care about video content, the workflow then runs a Filter Video Tweets step. Only tweets that actually contain video media move forward. Everything else is ignored.

4. Creating Clean Video URLs

For each tweet that passes the filter, the workflow uses an Edit Fields & Create Video URLs step.

This part is all about formatting. It takes the raw data from X and builds proper URLs that point directly to the native X video playback page. That way, when your post goes out, followers can click straight through to watch the video on X without confusion.

5. Logging Everything in Google Sheets

Now comes the tracking side. The workflow uses Google Sheets as a simple but powerful database.

  • Check Existing URLs: The workflow checks your Google Sheet to see if the tweet or video URL has been logged before.
  • Append or Update Rows in Google Sheets: It then upserts (inserts or updates) rows with the latest tweet information.

Your sheet will store things like tweet IDs, URLs, AI-generated captions, and posting status. This is what lets the workflow stay idempotent, which is a fancy way of saying it will not post the same video twice.

6. Filtering Out Videos You Already Posted

Once the sheet is updated, the workflow runs a Check New Videos step. Here it filters out any videos that are already marked as completed or posted.

Only videos that are new and not yet posted move on to the AI caption stage. This keeps your feed clean and avoids awkward duplicate posts.

7. Letting AI Write Japanese Captions

This is where the fun part happens. For each new video, the workflow calls an LLM via OpenRouter in the Generate Tweet Text with AI step.

The AI receives context about the video and is instructed to generate an engaging caption in Japanese, complete with:

  • Relevant hashtags
  • Calls to action
  • Text tailored for X posts

You can customize the AI prompt to better fit your brand voice, tone, or style. Want more playful language, or more formal? You are in full control of that prompt.

8. Posting to X Automatically

With the caption ready and the video URL formatted, the workflow moves to the Post to X step.

Here, it uses your X OAuth2 credentials to publish a new tweet that includes the AI-generated Japanese text plus a link to the video. No manual intervention needed. Once the workflow is live, it just keeps posting new content as it finds it.

9. Updating the Spreadsheet for Analytics and Safety

After a successful post, the final step is Update Spreadsheet. The workflow goes back to your Google Sheet and marks that specific video as posted.

This updated status is what prevents future runs from reposting the same content. It also gives you a simple analytics log so you can see:

  • Which videos were posted
  • What captions were used
  • When each post went out

How to Set It Up in Your Own n8n Instance

Ready to try it yourself? Here is what you need to configure before going live.

1. Connect Your Credentials

You will need three sets of credentials in n8n:

  • X OAuth2: For reading tweets and posting to your X account.
  • Google Sheets OAuth2: For reading and writing to your log sheet.
  • OpenRouter API key: For accessing the AI model that generates captions.

Set these up using n8n’s built-in credential management. Avoid hardcoding any tokens directly in the workflow.

2. Replace the Hardcoded Username

In the workflow, there is a username that tells X which account to pull videos from. Swap this out for your target X handle. That might be your main brand account, a content partner, or any user whose video tweets you want to repost.

3. Configure the Schedule

Adjust the schedule trigger interval so it matches your posting strategy and respects API limits. For many use cases, every 1 to 3 hours is a good starting point.

4. Set Up Your Google Sheet

Before going public with the workflow, make sure you:

  • Create your own Google Sheets document
  • Update the document ID in the workflow
  • Confirm the sheet names match what the workflow expects

The sheet will be your central log, storing tweet IDs, URLs, AI captions, and posting status. Double check that the columns and names are consistent so the upsert and update steps work correctly.

Customization Ideas To Make It Truly Yours

Once the basic setup is running, you can tweak the workflow to better match your brand and strategy. Here are some ideas:

  • Filter by language or age: Only include tweets in a certain language or within a specific time range.
  • Exclude replies and retweets: Focus purely on original video content by filtering out replies and RTs.
  • Refine the AI prompt: Adjust tone, add brand guidelines, or include disclaimers in every caption.
  • Add UTM parameters: Enhance your URLs with UTM tags for more detailed analytics in your tracking tools.
  • Change posting cadence: Modify how often you post or add a manual approval step before publishing.

Because it is all in n8n, you can mix in additional nodes, connect other tools, or chain this workflow with others as your automation stack grows.

Security & Testing: A Quick Checklist

Automation is powerful, so a few safety habits go a long way:

  • Use n8n credentials: Never hardcode API tokens or secrets in nodes. Store them in n8n’s credential manager.
  • Keep logs: The Google Sheets log already helps with auditing and deduplication. Do not skip it.
  • Test with a sandbox account: Before connecting your main brand profile, run the workflow against a test X account to make sure everything behaves as expected.

Why This Workflow Makes Your Life Easier

Instead of spending time hunting for new videos, writing captions by hand, and tracking everything in separate tools, this template lets you:

  • Automate discovery of new video tweets from a chosen X account
  • Generate consistent, Japanese AI captions with minimal effort
  • Post regularly without babysitting your social feeds
  • Keep a clean, auditable record in Google Sheets for every post

If you are serious about keeping your X presence active without burning out, this workflow can quietly handle a big chunk of the repetitive work for you.

Try the Template & Start Automating

Ready to let an automation handle your X video posting while you focus on strategy and creativity? Give this n8n workflow a spin, connect your accounts, and watch your feed update itself with AI-powered captions and clean logging in Google Sheets.

Powered by n8n, OpenRouter, X (Twitter), and Google Sheets.

Automate YouTube Video Transcription with N8N Workflow

From Manual Grind to Automated Growth

Every YouTube video you publish, watch, or research is packed with insight. Yet if you have ever tried to manually transcribe videos, you know how quickly that work becomes a time sink. Copying text, cleaning it up, organizing it in a spreadsheet or database – it all eats into the time you could spend creating, strategizing, or growing your business.

This is where automation becomes more than a convenience. It becomes a multiplier. By letting a workflow handle repetitive tasks like YouTube transcription, you free yourself to focus on higher value work: planning content, serving clients, or analyzing data instead of manually collecting it.

In this article, you will walk through a practical n8n workflow template that does exactly that. It automatically fetches recent videos from your chosen YouTube channels, pulls transcripts using an external API, and stores everything in a structured database. Along the way, you will see how this template can be a stepping stone toward a more automated, focused, and scalable workflow.

Shifting Your Mindset: Let Automation Do the Heavy Lifting

Before diving into the technical steps, it helps to shift how you think about your work. Instead of asking, “How can I get this done today?” start asking, “How can I set this up so it runs for me every day?”

That is what this n8n workflow offers. Once configured, it keeps an eye on your favorite YouTube channels, grabs new videos, requests transcripts, and saves them in a central place. You no longer need to remember to download captions or copy text manually. Your system simply keeps running in the background.

Think of this template as your starting point. You can use it as-is or expand it into a more advanced content engine that powers blogs, newsletters, research, and social posts, all from your YouTube videos.

The Big Picture: What This n8n Template Does

This workflow template in n8n follows a clear path:

  • Track multiple YouTube channels using their Channel IDs
  • Fetch the latest videos from each channel via RSS feeds
  • Extract clean YouTube video IDs and filter out Shorts if desired
  • Call the youtube-transcript.io API to retrieve transcripts
  • Combine transcripts with video metadata
  • Store the results in a Supabase table (or another database of your choice)

Once you understand this flow, you can customize it, chain it with other automations, and gradually build a powerful content and research system around your YouTube activity.

Step 1 – Tracking Your YouTube Channels Efficiently

Your journey starts with deciding which YouTube channels matter most to you. These might be your own channels, competitors, thought leaders, or niche experts. The workflow uses their Channel IDs to stay updated on new uploads.

Defining the channels you want to follow

  • Channels To Track: In this node, you list the YouTube Channel IDs you want the workflow to monitor. This is your core input. You can easily grow or refine this list over time as your interests or strategy change.

Processing each channel one by one

To keep everything organized and efficient, the workflow separates the channels so each one is handled individually.

  • Split Out: This node breaks the list of channels into individual items and loops through each channel separately. That way, each channel is processed cleanly, which helps with performance and clarity.

Verifying channel IDs and building RSS links

To reliably pull recent videos, the workflow validates each Channel ID and creates a corresponding RSS feed URL.

  • Verify Channel ID + Create RSS Link: This step checks that the Channel ID follows the expected format (typically starting with UC) and then constructs the RSS feed URL for that channel. This guards against invalid input and ensures that only proper channels move forward.
  • Channel Info + Channel ID: The generated RSS URL is passed along so the feed can be read and processed in the next step.

Finding and looping through channel videos

Once the RSS link is ready, the workflow pulls the latest videos for each channel.

  • Find Channel’s Videos: This node reads the RSS feed and extracts recent video entries, including titles, URLs, and other metadata.
  • Loop Over Each Channel & Loop Over New Videos: These looping nodes batch and sequence the processing of channels and videos. They help keep your workflow stable, respect rate limits, and ensure that even as your list of channels grows, the automation continues to run smoothly.

At this point, you already have a powerful system in place: n8n is automatically collecting new videos from multiple YouTube channels for you. The next step is to turn those videos into usable text.

Step 2 – Turning Video URLs Into Clean, Transcribed Content

With your videos in hand, the workflow now focuses on extracting the right video IDs, filtering out unwanted content, and requesting transcripts from an external API. This is where raw video data becomes structured, searchable text.

Choosing whether to include YouTube Shorts

Not every video format will be useful for your goals. For many use cases, Shorts are too short or not relevant for detailed analysis or content repurposing. The workflow gives you control over this.

  • Filter Out YouTube Shorts: By default, this node removes Shorts from the processing pipeline. If you decide you want to analyze or repurpose Shorts as well, you can adjust or disable this filter and bring them back into the flow.

Extracting and validating the video ID

To talk to the transcript API, you need a clean, valid YouTube video ID. The workflow handles this automatically.

  • Find Video ID: This node uses a regular expression to extract the 11-character video ID from the YouTube URL. It strips away any extra parameters so you get a consistent identifier.
  • Validate & Clean URL: Once the ID is extracted, this step checks that it is valid and then builds a clean watch URL. This ensures all downstream steps receive a standardized, reliable link.
  • Merge Video Data and Video ID: The workflow then combines the video metadata (such as title, channel, publish date, and RSS data) with the extracted video ID. You end up with a single, rich data object for each video.

Calling the youtube-transcript.io API

Now that each video is clearly defined, the workflow reaches out to the transcription service.

  • Get Transcript From API: This HTTP Request node calls the youtube-transcript.io API using the video ID. The API returns the captions or transcript for the video in JSON format.

Handling success or failure gracefully

Not every video will always return a transcript. Some may have disabled captions or be restricted. The workflow is designed to handle that gracefully so your automation remains stable.

  • Transcript Worked? This conditional node checks the response from the API. If the transcription was successful, the workflow continues. If it fails, the workflow stops processing that particular video, which prevents errors and keeps your data clean.
  • Parse Transcript from API Response: When the API call succeeds, this node extracts the transcript text from the JSON response. It converts the structured data into a more readable and usable text format, ready to be stored or repurposed.

By the end of this step, you have transformed a list of YouTube URLs into rich, structured video records, each paired with its transcript. The final step is to put that information somewhere you can use it repeatedly.

Step 3 – Storing Transcripts So Your Work Compounds Over Time

Automation becomes truly powerful when your data is not just processed, but also preserved and organized. With this workflow, your transcripts are automatically saved so they can fuel long term projects, research, and content strategies.

Combining transcripts with video metadata

  • Add Transcript to Video Data: This node attaches the cleaned transcript text to the existing video metadata. You now have a single, unified record for each video that includes its URL, title, channel, and full transcript.

Saving everything to Supabase or your preferred database

Once the data is complete, it is ready to be stored in a database of your choice. The template uses Supabase by default, but you can adapt it to almost any storage platform.

  • Save Data to Supabase: This node writes all relevant information, including transcript text and metadata, into a Supabase table named content_queue_1. If you prefer, you can reconfigure this step to send data to Google Sheets, Airtable, your own SQL database, or any other storage solution supported by n8n.

Respecting limits and keeping the workflow stable

  • Wait Node: To avoid hitting API rate limits and to keep your workflow running smoothly, this node adds a short delay between saving items. It is a small but important step that helps your automation scale without interruptions.

At this stage, you have a growing library of transcripts that updates itself as new videos are published. Your manual workload shrinks, while your searchable content database grows.

Leveling Up: Enhancements That Turn a Template Into a System

Once the core workflow is running, you can start thinking bigger. Small improvements can turn this template into the backbone of a powerful content or research system.

Let the workflow run on autopilot

  • Automate Your Runs: Instead of manually triggering the workflow, replace the manual trigger with a Schedule node. Set it to run at regular intervals, such as every hour, day, or week. Your transcripts will update automatically without you lifting a finger.

Curate and refine your channel list

  • Customize Channel List: As your interests and strategy evolve, you can easily tweak the channel list in the “Channels To Track” node. Add new creators, remove outdated sources, or create separate workflows for different niches or clients.
  • Get Channel IDs: If you do not already have the Channel IDs, you can find them for free with tools like TunePocket’s YouTube Channel ID Finder. Paste those IDs into the workflow and you are ready to go.

Control how Shorts are handled

  • Shorts Handling: By default, the workflow filters out YouTube Shorts so you can focus on longer, more detailed content. If Shorts matter for your strategy, simply adjust or disable the filter node to include them in the transcription process.

Keep your API keys secure and organized

  • API Key Setup: For the youtube-transcript.io integration, store your API key securely in n8n credentials. Assign it to the HTTP Request node so your workflow can authenticate safely without exposing sensitive information in plain text.

Using This Template as a Launchpad for Bigger Ideas

Once you have automated YouTube transcription with this n8n template, you are not just saving time. You are building a foundation. From here, you can:

  • Feed transcripts into AI tools for summarization, topic extraction, or content generation
  • Turn long form videos into blog posts, email sequences, or social content
  • Build a searchable research database of everything your favorite experts publish
  • Monitor competitors or industry leaders and quickly spot trends in what they talk about

The key is to start with a working system, then iterate. This template gives you that starting point so you can experiment, improve, and layer on more automations over time.

Take the Next Step: Put Your Transcription on Autopilot

This n8n workflow template is more than a technical setup. It is a practical way to reclaim your time, scale your content efforts, and turn YouTube videos into a consistent source of structured, usable information.

If you are ready to streamline your YouTube content transcription, set up this workflow, plug in your favorite channels, and let n8n handle the repetitive work in the background. The sooner you start, the sooner your automated content library begins to grow.

If you would like help implementing or customizing this workflow for your specific stack or use case, we are here to support you. Contact us for professional assistance and tailored automation solutions.

Automate YouTube Video Transcription with n8n Workflow

Automate YouTube Video Transcription with n8n Workflow

From Manual Grind to Automated Flow

Manually transcribing YouTube videos can drain your time and energy. Copying text, pausing and rewinding, and managing scattered notes all pull you away from the deep work that actually grows your projects or business.

Automation gives you a different path. With n8n, you can build a workflow that quietly runs in the background, fetches new videos from your favorite YouTube channels, sends them to a transcription API, and stores clean transcripts in your database or content system of choice.

This guide walks you through a ready-to-use n8n workflow template that automates YouTube video transcription from end to end. Think of it as a starting point for a more focused, more scalable way of working. You set it up once, then let it work for you every day.

Shifting Your Mindset: Automation as a Growth Lever

Before we dive into the technical steps, it is worth pausing for a mindset shift. Automation is not just about saving a few minutes here and there. It is about:

  • Freeing your attention from repetitive tasks
  • Creating systems that work while you are offline
  • Building an infrastructure that scales as your content library grows

By automating YouTube transcriptions with n8n, you are doing more than processing videos. You are building a reusable workflow that can feed your research, content creation, SEO efforts, and knowledge base with almost no manual intervention.

The workflow template you are about to explore is a practical example of that mindset. You can use it as-is, or treat it as a foundation to experiment, extend, and customize for your own goals.

The Journey: From YouTube Channel To Structured Transcript

This n8n workflow follows a clear path:

  1. Track selected YouTube channels and fetch their latest videos
  2. Extract video IDs and request transcripts using an external API
  3. Combine transcripts with metadata and save them to your database

Let us walk through each part of the journey so you can understand how it works and how to adapt it to your own automation stack.

Step 1 – Tracking YouTube Channels Automatically

The workflow begins by defining which YouTube channels you want to monitor. Instead of checking channels manually, you give n8n a list of channel IDs and let it do the work for you.

Channels To Track Node

Inside the workflow, you will find a node called Channels To Track. This node stores the YouTube channel IDs you want to follow. Each channel ID is processed separately so that the workflow can handle multiple channels in a clean and scalable way.

Validating Channel IDs With a Code Node

A custom JavaScript Code node takes over to validate these channel IDs. It checks two important conditions:

  • The ID starts with UC
  • The ID is exactly 24 characters long

Once an ID passes validation, the node generates a valid RSS feed URL for that channel, for example:

https://www.youtube.com/feeds/videos.xml?channel_id=CHANNEL_ID

Finding Recent Videos With the RSS Feed Reader

The generated RSS URL is then passed into the Find Channel’s Videos RSS feed reader node. This node fetches the most recent videos from each tracked channel, turning your channel list into a stream of fresh content ready to be transcribed.

Automation Tip: Keep It Running On Autopilot

  • Use a Schedule node instead of a manual trigger so this workflow runs periodically without your input.
  • If you do not know a channel ID, you can quickly look it up using free YouTube channel ID finder tools.

At this stage, you have already moved from “checking channels manually” to “n8n keeps an eye on everything for me.” That is the first big mindset shift: let the system watch, so you can focus on what to do with the information.

Step 2 – Extracting Video IDs and Transcribing Content

Once the workflow has collected recent videos, the next step is to turn those video links into usable text. This is where the real time savings start to show.

Filtering and Preparing Video Data

The workflow first splits the list of videos into individual items. It then filters out YouTube Shorts, unless you intentionally want to include them. This helps you focus on longer form content that usually carries more depth and value.

A combination of Set and Code nodes then processes each video URL. Using a regular expression (regex), the workflow extracts a clean YouTube video ID from every URL. This ID is what you need to request a transcript from the transcription API.

Requesting Transcripts From youtube-transcript.io

For each valid video ID, the workflow sends a POST request to the youtube-transcript.io API. The API responds with the transcript in JSON format.

The workflow then parses this JSON response and combines the segments into a clean transcript text that you can index, analyze, or repurpose.

Handling Errors Gracefully

Not every video will have captions available. When transcription fails, for example because captions are missing, the workflow stops processing that specific item. This prevents broken or incomplete data from entering your system and keeps your database clean.

Important Notes For This Step

  • You need an API key from youtube-transcript.io. The service currently offers 25 free transcripts per month.
  • Only videos with available captions can be transcribed. If there are no captions, the API cannot return a transcript.
  • If you want to transcribe YouTube Shorts as well, you can adjust the filter condition in the workflow to include them.

By this point, you have turned a manual, video-by-video process into an automated pipeline that can handle dozens or hundreds of videos without extra effort. That is the kind of leverage that compounds over time.

Step 3 – Storing Transcripts Where You Need Them

Transcripts are only truly powerful when they are easy to find and use. The final part of the workflow focuses on saving the data in a structured and searchable way.

Combining Transcript and Video Metadata

After a transcript is successfully retrieved, the workflow enriches it with key video metadata, such as:

  • Video title
  • Channel or author name
  • Publication date
  • Source URL to the original YouTube video

This combination creates a complete record that is perfect for content analysis, research, SEO planning, or feeding into other tools like AI summarizers and search systems.

Saving To Your Database Or Content System

In the example workflow, this data is saved to a Supabase table named content_queue_1. Supabase acts as a central store where all transcripts and related metadata are collected.

You are not locked into Supabase though. You can easily swap this node out and connect to:

  • Google Sheets
  • Airtable
  • Another SQL or NoSQL database
  • Any other app supported by n8n

This flexibility allows you to integrate the workflow into your existing content operations or data stack instead of building everything from scratch.

Pro Tip: Protect Against Rate Limits

  • Add a short Wait node between save operations to reduce the risk of hitting rate limits on your database or external tools.
  • Align your saving destination with your broader content workflow. For example, send transcripts to a “content queue” table that your team reviews and turns into articles, newsletters, or social posts.

Turning This Template Into Your Own Automation System

This n8n workflow template already automates the full loop:

  • Fetching new videos from chosen YouTube channels
  • Extracting video IDs and requesting transcripts
  • Cleaning and saving transcript data with metadata

Yet the real power is what you do next. You can:

  • Connect the transcripts to a search interface or knowledge base
  • Trigger follow-up workflows, like summarizing each transcript or sending highlights to your team
  • Use the stored data for SEO research, content planning, or training materials

Each small automation like this becomes a building block. Over time, those blocks form a complete, automated workflow ecosystem that supports your growth instead of holding it back.

Your Next Step: Start, Experiment, Improve

You do not need to automate everything at once. Start with this YouTube transcription template, get it running, and then tweak it as your needs evolve. Every improvement you make, every node you adjust, is an investment in a more focused and efficient future.

Ready to reclaim your time and turn YouTube videos into structured, searchable insight? Import this n8n workflow template into your instance, connect your accounts, and let it run. As it quietly handles the repetitive work, you can focus on strategy, creativity, and growth.

If you would like a custom guide or support adapting this workflow to your stack, feel free to reach out and build on this foundation.

Happy automating, and here is to more time for the work that truly matters.

Automated Lead Management: Google Sheets + Instantly + n8n

Automated Lead Management with Google Sheets, Instantly, and n8n

Picture this: you are copying leads from a spreadsheet into your email tool for what feels like the 400th time, promising yourself that this is the last time you do it manually. Then you spot a duplicate and realize you have already emailed this person. Twice.

If that scenario feels a little too familiar, this n8n workflow template is about to become your new favorite coworker. It connects Google Sheets, Instantly, and n8n Data Tables so your leads move themselves where they need to go, in safe, API-friendly batches, without you babysitting every step.

Below is a friendly walkthrough of what this automation does, how it works, and how to set it up without losing your sanity (or your leads).


What This n8n Workflow Actually Does

High-level overview

This automated lead management workflow:

  • Pulls lead data from a Google Sheet
  • Saves and enriches that data in an n8n Data Table
  • Pushes those leads into an Instantly campaign
  • Prevents duplicates so you do not email the same person five times by accident
  • Processes everything in batches so you stay within API rate limits

In practice, the automation runs in two main flows:

  1. Flow 1 – Data Transfer: Sync and organize leads from Google Sheets into an n8n Data Table.
  2. Flow 2 – Instantly Sync: Take leads marked as ready and add them to your Instantly campaign, safely and one by one.

The result is a scalable lead management system that handles hundreds of contacts, keeps your data clean, and lets you focus on closing deals instead of wrestling with CSV files.


Step 1 – Prepare Your Google Sheet

Everything starts in a simple Google Sheet. You can use test data or real leads, but the structure is important so the workflow knows what to do.

Your sheet needs these columns:

  • Firstname
  • Email
  • Website
  • Company
  • Title

If you would like to skip the formatting drama, grab this ready-made template:

Google Sheets Template

Once your sheet is filled in, the workflow will read from it and start moving leads into your n8n Data Table in neat batches.


Step 2 – Set Up Your n8n Data Table

Next, you will create a Data Table in n8n that acts as your central lead database. Think of it as the organized, calm version of your spreadsheet.

Create a Data Table named Leads with the following columns:

  • Firstname (string)
  • Lastname (string)
  • email (string)
  • website (string)
  • company (string)
  • title (string)
  • campaign (string)
  • focusarea (string)

During the workflow, the job title from your sheet will be stored as focusarea in this Data Table. This makes it easier to categorize and filter leads later, especially when you want to target specific roles or industries.


Step 3 – Connect Your Tools to n8n

Before the automation can do its magic, n8n needs permission to talk to Google Sheets and Instantly. This part is mostly clicking buttons, not solving puzzles.

Connect Google Sheets

  1. Add Google Sheets OAuth2 credentials in n8n.
  2. Authorize n8n to access your spreadsheet.

Once connected, the workflow can read your lead data directly from the Google Sheet you prepared earlier.

Connect Instantly

  1. Log in to Instantly.ai and grab your API key.
  2. Add your Instantly API credentials in n8n.
  3. Specify the Instantly campaign ID you want to send leads to, for example "Launchday 1".

That is it. Once both tools are connected, the workflow can move leads from Google Sheets into n8n Data Tables, then into your Instantly campaign, all without manual copy-paste.


How the Workflow Runs Behind the Scenes

Flow 1 – From Google Sheets to n8n Data Table

This first flow is all about getting your lead data out of Google Sheets and into a structured, automation-friendly format.

  1. You manually trigger the workflow to start the sync.
  2. The workflow retrieves leads from your Google Sheet.
  3. Leads are processed in batches of 30 so you respect API rate limits and avoid angry error messages.
  4. The job title from the sheet is extracted and stored as focusarea in the Data Table.
  5. Lead records are created or updated in the n8n Data Table.
  6. The process repeats until all leads from the sheet are processed.

By the end of Flow 1, your Data Table contains a clean, organized list of leads ready to be synced to Instantly.

Flow 2 – From n8n Data Table to Instantly

Once your Data Table is filled, Flow 2 takes over and handles the Instantly sync. This is where duplicate prevention and careful rate limiting keep everything running smoothly.

  1. On a schedule or manual trigger, the workflow fetches leads where campaign = "start".
  2. Each lead is processed individually so a single failure does not break the entire batch and API limits are respected.
  3. The workflow creates a lead in your Instantly campaign, for example "Launchday 1".
  4. After a lead is successfully added, its campaign status in the Data Table is updated to added to instantly.
  5. This status update prevents the same lead from being added multiple times, even if the workflow runs again.
  6. The loop continues until all qualifying leads have been synced to Instantly.

The result is a reliable, repeatable pipeline from spreadsheet to email campaign, without the dreaded double-send.


Why This Automated Setup Is Worth It

Key benefits

  • Scales effortlessly: Batching lets you handle hundreds of leads without hitting rate limits or constantly watching the workflow run.
  • Prevents duplicates: The campaign status and added to instantly flag make sure leads are not added twice to the same Instantly campaign.
  • Centralized tracking: n8n Data Tables act as your single source of truth, which makes monitoring and debugging a lot easier than juggling spreadsheets.
  • API-friendly: Batch sizes are set to 30 by default, keeping your workflow polite with external APIs.

Pro tips to keep things smooth

  • Start with a tiny test: Run the workflow with 5 to 10 leads first to confirm everything works as expected before you unleash it on your full list.
  • Tune the batch size: The default batch size is 30, but you can adjust it based on Instantly and Google Sheets API limits or your own comfort level.
  • Keep your Data Table tidy: Regularly clean and archive old or processed leads to keep performance snappy and your data easy to understand.
  • Add error alerts: Integrate Slack or email notifications so you know immediately if something fails instead of discovering it three days later.

With these tweaks, your automated lead management workflow becomes low-maintenance and highly reliable, which is exactly what you want from automation.


Need a Hand or Want to Go Advanced?

If you are ready to go beyond the basics, this setup can be extended with:

  • Advanced filtering and segmentation
  • Multi-campaign routing
  • Webhook-based triggers
  • Custom field mapping between Google Sheets, n8n Data Tables, and Instantly

Custom support is available if you want help tailoring this workflow to your exact lead generation process.

Reach out at david@daexai.com or watch the step-by-step setup here: Tutorial Video.


Wrapping Up – From Manual Chaos to Automated Calm

By connecting Google Sheets with Instantly through n8n, you get a streamlined, automated, and scalable lead management system that:

  • Moves leads from sheet to campaign without manual work
  • Respects API limits and avoids bulk failures
  • Keeps your data clean and free from duplicate outreach
  • Helps you nurture leads faster and grow your sales pipeline with less effort

Ready to retire your copy-paste routine and let automation handle your lead management? Set up this workflow, run your first test batch, and enjoy the feeling of your leads managing themselves.

Create HTML Table from Google Sheets Data

Create an HTML Table from Google Sheets Data with n8n

What You Will Learn

In this guide you will learn, step by step, how to use an n8n workflow template to:

  • Trigger a workflow with a webhook using an HTTP GET request
  • Read live data from a Google Sheets document using the Google Sheets node
  • Convert that data into a dynamic HTML table
  • Apply Bootstrap 5 styling to make the table responsive and clean
  • Return the generated HTML as the response to the webhook request

By the end, you will understand how each n8n node in the workflow contributes to the final result and how to adapt it to your own spreadsheets.


Concept Overview

What This n8n Workflow Does

This n8n workflow template turns a Google Sheets spreadsheet into a ready-to-use HTML page that contains a styled table. The process looks like this:

  1. You send an HTTP GET request to a webhook URL.
  2. n8n reads data from a specific sheet in your Google Sheets document.
  3. A Function node builds an HTML string that includes a Bootstrap 5 table.
  4. The workflow returns the HTML as the response, which can be viewed directly in a browser or consumed by another system.

Key Nodes in the Workflow

  • Webhook – Starts the workflow when it receives an HTTP GET request.
  • Read from Google Sheets – Connects to Google Sheets using OAuth2 and fetches the sheet data.
  • Build HTML (Function node) – Converts the sheet data into a Bootstrap-styled HTML table.
  • Respond to Webhook – Sends the generated HTML back to the caller with the correct content type.

Why Use This Approach

  • Dynamic columns – The workflow automatically detects column names from the first row of your data and uses them as table headers.
  • Responsive layout – Bootstrap 5 ensures the table looks good on desktop and mobile devices.
  • Live data – Every time you call the webhook, it fetches the latest values from Google Sheets.
  • Simple access – You only need the webhook URL to get an HTML view of your spreadsheet.

How the Workflow Works in Detail

1. Webhook Trigger

The workflow starts with a Webhook node configured to accept an HTTP GET request. When someone visits the webhook URL in a browser or sends a GET request from an HTTP client, this node triggers the rest of the workflow.

2. Reading Data from Google Sheets

The Read from Google Sheets node is responsible for pulling data from your spreadsheet. It uses your Google OAuth2 credentials to authorize access to the Google Sheets API.

In this node you configure:

  • Spreadsheet ID (or Sheet ID) for the document you want to read
  • The specific sheet or range you want to fetch data from

The node outputs the sheet data as an array of items, where each item represents a row and each field represents a column.

3. Building the HTML Table

The Build HTML node is a Function node that receives the data from Google Sheets. It uses JavaScript to:

  • Identify the column names
  • Create table headers (<th>) for each column
  • Create table rows (<tr>) and cells (<td>) for each item
  • Wrap everything inside a complete HTML document structure

The node also includes a link to the Bootstrap 5 CSS so the table is styled and responsive.

4. Responding to the Webhook

Finally, the Respond to Webhook node sends the generated HTML back to the client that made the request. It sets the response body to the HTML string and uses the correct content type so that browsers render the page as HTML.

This means that when you open the webhook URL in a browser, you will see your Google Sheets data displayed as a nicely formatted Bootstrap table.


Step-by-Step Setup Guide

Step 1 – Prepare Google Sheets Access

  1. In n8n, make sure you have valid Google Sheets OAuth2 credentials set up.
  2. Test the credentials in any Google Sheets node to confirm that authorization works.

Step 2 – Configure the Google Sheets Node

  1. Open the Read from Google Sheets node in the template.
  2. Replace the existing Sheet ID or Spreadsheet ID with the ID of your own Google Sheet if you want to use your data.
  3. Check the sheet or range configuration to ensure it points to the correct tab and data range.

Step 3 – Review the HTML Builder Logic

The Build HTML node contains JavaScript that generates the HTML. You can keep it as is or adjust the title, heading, or Bootstrap classes to match your needs. Here is the example code used in the node:

const columns = Object.keys(items[0].json);

const html = `
<!doctype html>
<html lang="en">  <head>  <meta charset="utf-8">  <meta name="viewport" content="width=device-width, initial-scale=1">  <title>HTML Table Example</title>  <link href="https://cdn.jsdelivr.net/npm/bootstrap@5.2.0/dist/css/bootstrap.min.css" rel="stylesheet">  </head>  <body>  <div class="container">  <h1>HTML Table Example</h1>  <table class="table">  <thead>  <tr>  ${columns.map(e => '<th scope="col">' + e + '</th>').join('\n')}  </tr>  </thead>  <tbody>  ${items.map(e => '<tr>' + columns.map(ee => '<td>' + e.json[ee] + '</td>').join('\n') + '</tr>').join('\n')}  </tbody>  </table>  </div>  </body>
</html>
`;

return [{ json: { html: html } }];

Key points in this code:

  • const columns = Object.keys(items[0].json); gets the list of column names from the first row.
  • ${columns.map(...) builds the table header cells using those column names.
  • ${items.map(...) loops over each row from Google Sheets and creates a table row with cells for each column.
  • The final result is stored in json.html, which is then used by the response node.

Step 4 – Configure the Webhook and Response

  1. In the Webhook node, check that the HTTP method is set to GET.
  2. In the Respond to Webhook node, ensure it uses the HTML string from the html field as the response body and that the content type is set to HTML or text/html.

Step 5 – Trigger the Workflow

  1. Copy the Webhook URL from the Webhook node.
  2. Paste it into your browser address bar or call it using an HTTP client as a GET request.
  3. When the request runs, n8n will:
    • Read your Google Sheets data
    • Generate the HTML table with Bootstrap styling
    • Return the HTML page
  4. View the resulting HTML table in your browser.

Recap

This n8n workflow template gives you a quick way to transform Google Sheets data into a fully formatted HTML table:

  • The Webhook node listens for GET requests.
  • The Read from Google Sheets node fetches live spreadsheet data using OAuth2.
  • The Build HTML node dynamically creates a Bootstrap 5 table with automatic column headers.
  • The Respond to Webhook node returns the HTML so it can be displayed directly in a browser or embedded in other applications.

You can reuse this pattern for reporting dashboards, internal tools, or any automation where you want a quick HTML view of spreadsheet data.


Frequently Asked Questions

Can I change the table styling?

Yes. You can modify the classes in the <table class="table"> tag or add additional Bootstrap classes such as table-striped or table-hover. You can also add custom CSS if needed.

How are the column headers determined?

The workflow uses Object.keys(items[0].json) to get the keys from the first row of data returned by the Google Sheets node. These keys become the column headers in the HTML table.

Do I need to change the HTML code?

You can use the provided HTML code as is. However, you are free to change the page title, heading text, Bootstrap version, or layout to better fit your use case.

Can I use a different HTTP method?

This template is designed for an HTTP GET request, which is convenient for viewing in a browser. If you need POST or another method, you can adjust the Webhook node configuration accordingly.


Try the Template

Use this n8n workflow to instantly convert your Google Sheets data into a responsive HTML table that you can open in any browser or integrate into your web applications.

Start exploring more powerful automations with n8n and Google Sheets today.

Automated Lead Follow-Up System with Email, SMS & WhatsApp

Automated Lead Follow-Up System – Validate, Email & Message New Leads from Follow Up Boss

This n8n workflow template delivers a fully automated, multi-channel lead follow-up system that integrates Follow Up Boss (FUB), Gmail, and Twilio (SMS and WhatsApp). It is designed for automation professionals and sales operations teams who require reliable, scalable, and auditable lead engagement across channels.

Overview of the Workflow Architecture

The workflow implements a scheduled polling pattern against Follow Up Boss, validates contact data, then orchestrates conditional messaging via email, SMS, and WhatsApp. It also maintains state by tracking the last successful run, which ensures only newly created leads are processed in each cycle.

The core building blocks are:

  • Trigger & data retrieval using a Schedule Trigger and Follow Up Boss API access
  • State management via a “last run” timestamp
  • Lead validation and filtering for both email and phone numbers
  • Smart branching logic based on available and valid contact data
  • Multi-channel messaging using Gmail and Twilio (SMS/WhatsApp)
  • Logging and run timestamp updates for observability and reliability

Triggering & Lead Retrieval from Follow Up Boss

Scheduled Trigger

The workflow is initiated by an n8n Schedule Trigger node that runs at a defined interval. This can be configured to match your operational cadence, for example every few minutes for high-volume inbound leads or hourly for lower traffic environments.

Last Run Timestamp Management

To avoid reprocessing historical leads, the workflow uses a Get Last Time Run step that retrieves the timestamp of the previous successful execution. This value is used as a boundary for incremental data fetches.

Incremental Lead Fetch from FUB

Using the stored timestamp, the Get Last Lead (FUB) node queries Follow Up Boss for all leads created after the last run. Only these new records are pulled into the workflow. This approach:

  • Prevents duplicate follow-ups
  • Improves performance by reducing unnecessary API calls
  • Ensures deterministic, incremental processing

A Wait node is included to introduce a brief pause where needed for smooth data handling or to respect rate limits, depending on your environment and API constraints.

Itemization of Leads

Once leads are retrieved, the workflow uses a Divide Each Lead step to split the collection into individual items. Each lead is then processed independently, which simplifies downstream validation and routing logic and aligns with n8n best practices for item-based processing.

Lead Validation & Data Quality Control

Before any communication is sent, each lead is subjected to validation checks to ensure that only contacts with usable data are messaged. This quality control step helps maintain sender reputation and reduces wasted communication attempts.

Email and Phone Validation Logic

  • The workflow checks whether the email status is marked as “Valid”.
  • It also checks whether the phone status is marked as “Valid”.
  • Leads that do not meet these criteria are routed down alternative paths, preventing email bounces and undeliverable SMS or WhatsApp messages.

Only leads that pass the relevant validation checks are allowed to proceed to the messaging stage. This filtering step is critical for maintaining high deliverability rates and improving engagement metrics.

Conditional Routing & Smart Follow-Up Logic

After validation, the workflow applies a structured decision tree that determines which communication channels to use for each lead. The branching logic is based on the presence and validity of email and phone data.

Branching Scenarios

  • Valid email and valid phone
    The lead receives both an email and an SMS or WhatsApp message. This dual-channel approach increases the likelihood of contact and is often ideal for high-intent leads.
  • Valid email, missing or invalid phone
    The workflow sends an email only. SMS and WhatsApp are skipped to avoid failed or misdirected messages.
  • Valid phone, missing or invalid email
    The workflow sends an SMS or WhatsApp message only. This ensures that leads who primarily use mobile channels are still reached.

This conditional routing ensures that every lead is contacted via the most appropriate and technically viable channel set, while minimizing errors and noise.

Personalized Messaging via Gmail & Twilio

Data-Driven Personalization

For each lead, the workflow extracts relevant fields from the Follow Up Boss record and injects them into message templates. Typical personalization includes:

  • Lead name and other contact attributes
  • Contextual information based on how or where the lead was captured

This personalization is applied consistently across email, SMS, and WhatsApp messages, which improves response rates and creates a more tailored experience for each prospect.

Email Delivery with Gmail

All email communication is handled through a Gmail integration. The workflow uses predefined templates that can be customized to match your brand tone, signature, and messaging strategy. Key advantages include:

  • Centralized control over email content
  • Use of existing Gmail infrastructure and authentication
  • Ability to track and audit outbound communication from a single system

SMS & WhatsApp Delivery with Twilio

For mobile messaging, the workflow integrates with Twilio to send both SMS and WhatsApp messages. This enables:

  • Fast, direct communication with leads on their preferred devices
  • Support for international messaging (subject to your Twilio configuration)
  • Consistent templates across SMS and WhatsApp channels

By relying on Twilio, the workflow leverages a robust and widely adopted messaging platform that fits seamlessly into enterprise automation stacks.

Logging, Observability & Run State Updates

Every outbound message and decision path is logged to provide transparency and traceability. This is essential for teams that require clear audit trails and the ability to troubleshoot or refine their follow-up strategy.

At the end of each successful cycle, the workflow updates the latest run timestamp. This value is then used in the next scheduled execution to ensure that only new leads are processed. The result is a self-maintaining loop that:

  • Prevents reprocessing of leads already contacted
  • Keeps the workflow aligned with real-time lead generation activity
  • Supports continuous, uninterrupted operation

Key Benefits for Sales and Marketing Operations

  • Complete coverage of new leads
    Every new lead from Follow Up Boss is evaluated and contacted via the most appropriate channel or combination of channels.
  • Improved data quality and deliverability
    Validation steps reduce bounces, invalid numbers, and failed delivery attempts.
  • Personalized communication at scale
    Dynamic templates allow for tailored messages without manual intervention, even across thousands of leads.
  • Scalable and resilient design
    The workflow can handle anything from low-volume pipelines to high-throughput environments with frequent scheduled runs.
  • Consistent, always-on follow-up
    Automation ensures that no hot lead is missed due to human error or workload constraints.

Ideal Use Cases

This workflow template is particularly suited for:

  • Sales agents and account executives who need systematic, timely follow-ups
  • Marketing teams running inbound or lead generation campaigns integrated with Follow Up Boss
  • Organizations standardizing on Gmail for email and Twilio for SMS/WhatsApp messaging
  • CRM administrators and automation specialists looking to operationalize lead nurturing without custom code

Implementation Guidelines & Setup Steps

To deploy this template in your own n8n environment, follow these steps:

  • Configure credentials
    Replace the placeholder credentials with your own:
    • Follow Up Boss API key
    • Gmail account or OAuth configuration
    • Twilio credentials for SMS and WhatsApp
  • Customize message templates
    Edit the email and SMS/WhatsApp content to reflect your brand voice, compliance requirements, and call-to-action language.
  • Set the schedule interval
    Define how frequently the Schedule Trigger should run, for example every 3 minutes for fast lead response or hourly for lower volume scenarios.
  • Run controlled tests
    Test the workflow with a small batch of leads to verify:
    • Correct retrieval from Follow Up Boss
    • Accurate validation logic
    • Proper branching between email, SMS, and WhatsApp
    • Correct logging and timestamp updates
  • Monitor and iterate
    Review logs, monitor deliverability and engagement metrics, then refine templates or logic as your processes evolve.

Start Automating Your Lead Follow-Up

By combining Follow Up Boss, Gmail, Twilio, and n8n, this workflow template delivers a robust, production-ready framework for automated lead follow-up across email, SMS, and WhatsApp. It aligns with automation best practices, provides clear observability, and scales with your lead volume.

Implement this n8n template to operationalize consistent, multi-channel lead engagement and ensure that no high-intent prospect slips through the cracks.

Automated Lead Follow-Up System with Email, SMS & WhatsApp

Automated Lead Follow-Up System with Email, SMS & WhatsApp

Imagine a lead follow-up system that quietly works in the background while you focus on strategy, relationships, and growth. No more manual chasing, no more scattered notes, no more wondering who slipped through the cracks. That is exactly what this n8n workflow template helps you build: an automated, reliable, and scalable follow-up engine across email, SMS, and WhatsApp.

This workflow uses FollowUpBoss (FUB) as the source of truth for your leads, then activates the right communication channel based on each lead’s available and validated contact details. The result is a smoother process, more consistent outreach, and more time back in your day to do the work that truly moves your business forward.

From Overwhelm to Opportunity: The Follow-Up Problem

Leads are valuable, but without a strong follow-up system they easily go cold. Manually tracking who to contact, on which channel, and when to send the next message can quickly become overwhelming. As your list grows, so does the risk of:

  • Missing hot leads because they arrived at the wrong time
  • Sending messages to invalid emails or phone numbers
  • Duplicating outreach and confusing potential clients
  • Losing precious hours on repetitive tasks that could be automated

Automation with n8n turns this chaos into clarity. Instead of reacting to every new lead, you can design a system once and let it run reliably, day after day. This template is a practical starting point that you can adopt, adapt, and expand as your business grows.

Adopting an Automation Mindset

Every automated workflow is more than a technical setup. It is a mindset shift. When you automate your lead follow-up, you are choosing to:

  • Protect your time and attention for higher value work
  • Build predictable, repeatable systems that scale with your business
  • Offer a consistent, professional experience to every new lead

This n8n template is designed to be that first or next step in your automation journey. It covers real-world needs like validation, personalization, and multi-channel communication, while still being flexible enough for you to tweak, experiment, and improve over time.

How the Workflow Works: A High-Level Journey

At its core, this workflow follows a simple but powerful path:

  1. Regularly check FollowUpBoss for new leads
  2. Validate emails and phone numbers to protect your reputation
  3. Decide which channels to use based on available data
  4. Send personalized messages via email, SMS, and WhatsApp
  5. Log the run so the system is ready for the next cycle

Each step is handled automatically by n8n, integrated with FollowUpBoss, Gmail, Twilio, WhatsApp, and your own logic. You set it up once, then let the system take care of the routine work while you focus on closing deals and serving clients.

Step 1: Scheduled Trigger and Lead Retrieval

The workflow begins with a scheduled trigger in n8n. You decide how often it runs, for example every few minutes or every hour, depending on your lead volume and response expectations.

On each run, the workflow:

  • Connects to FollowUpBoss (FUB)
  • Fetches only the newest leads since the last execution
  • Uses a stored “last run” timestamp so no lead is processed twice

This approach keeps the workflow efficient, reduces unnecessary API calls, and ensures you respond to new leads in a timely and consistent way.

Step 2: Lead Validation and Filtering

Once the fresh leads are pulled in, the workflow shifts into quality control. Not every email or phone number is usable, and sending to bad contacts wastes resources and can damage your sender reputation.

To prevent that, each lead is checked for authenticity and completeness. The workflow evaluates both email and phone fields and filters out anything that does not pass the rules.

Key Validation Rules

  • Emails must have a “Valid” status before they are used
  • Phone numbers must also be verified as “Valid”

Leads that fail these checks are excluded from messaging. This ensures you are only reaching out to high quality, contactable leads, which improves deliverability and keeps your communication clean and professional.

Step 3: Smart Follow-Up Logic by Channel

Not every lead has the same data. Some provide both email and phone, others only one. Instead of treating everyone the same, this workflow uses smart branching logic to adapt the follow-up strategy to each lead’s available contact details.

Based on the validation step, the system chooses one of three paths:

  • Valid email and phone present: The workflow sends both a personalized email and an SMS or WhatsApp message. This multi-channel approach increases the chance of a quick response.
  • Missing or invalid phone: Only a personalized email is sent. This ensures you still connect with the lead through the best available channel.
  • Missing or invalid email: The workflow sends an SMS or WhatsApp message only. You still reach out promptly, even if email is not an option.

This flexible logic means you never have to manually decide how to contact each new lead. n8n and this template handle that decision-making for you, automatically and consistently.

Step 4: Personalized Messaging and Logging

Automation does not have to feel robotic. This workflow uses lead-specific data from FollowUpBoss to keep your communication human and relevant.

Each message can be customized using fields such as:

  • First name
  • Last name
  • Lead source
  • Lead stage

By weaving these details into your email, SMS, and WhatsApp templates, you create a personal touch that helps increase response rates and build trust from the very first interaction.

After sending the messages, the workflow updates the “last run” timestamp. This small but crucial step ensures the next scheduled execution only processes new leads and that no one receives duplicate outreach.

Why This Workflow Matters: Key Benefits

When you put all of these steps together, you get more than just a technical setup. You get a system that supports your growth and protects your time.

  • Automated multi-channel follow-up: Email, SMS, and WhatsApp are handled without manual intervention, which minimizes errors and delays.
  • Lead validation by default: Only valid emails and phone numbers are used, which helps maintain a strong sender reputation and avoids wasted messages.
  • Personalized outreach at scale: Use names, sources, and stages to make every message feel tailored, even when you are communicating with hundreds or thousands of leads.
  • Scalable performance: Whether you handle a handful of leads or a large pipeline, the workflow is designed to scale without performance issues.
  • Seamless integration: Works smoothly with FollowUpBoss, Gmail, Twilio, WhatsApp, and the n8n automation platform so you can build on tools you already use.

This is the kind of foundation that lets you grow without burning out on repetitive tasks. As your business expands, your automated system simply runs more often and handles more leads, all without requiring more of your time.

Getting Started With the n8n Template

Putting this workflow into action is straightforward, and it can be a powerful first step toward a more automated, focused operation.

Before You Run the Workflow

To deploy this system in your own environment, you will need to:

  • Insert your FollowUpBoss API credentials where required
  • Add your Gmail credentials so n8n can send emails on your behalf
  • Configure Twilio and WhatsApp settings for SMS and WhatsApp messaging
  • Adjust the schedule of the trigger node to match how often you want to check for new leads

Next, customize the content of your messages so they reflect your brand voice and campaign goals. You can edit subject lines, body text, and SMS or WhatsApp copy, while still using the dynamic fields that pull in each lead’s personal details.

Use This Template as a Foundation

Once you have the basic setup running, you are free to experiment and extend the workflow. Some ideas you might explore over time include:

  • Adding follow-up sequences that send additional messages after a delay
  • Triggering internal notifications when high-value leads respond
  • Tagging or updating lead stages in FollowUpBoss based on replies
  • Branching logic for different lead sources or campaigns

Think of this template as a starting point, not a finished product. As you gain confidence with n8n, you can keep refining and improving your automation so it matches your unique process and growth plans.

Take the Next Step in Your Automation Journey

Every automated workflow you build frees up a little more time, reduces a little more friction, and moves you closer to a business that runs smoothly even when you are not watching every detail.

This automated lead follow-up system is a practical way to start. It helps you:

  • Respond faster to every new lead
  • Stay consistent across email, SMS, and WhatsApp
  • Protect your reputation with built-in validation
  • Focus your energy on conversations, not busywork

You do not have to automate everything at once. Implement this workflow, see the impact, then keep building. Step by step, you can create an ecosystem of automations that support your goals and give you more space to think, create, and lead.

Start automating your lead follow-up now and turn every new contact into a real opportunity.

How to Set Up an Automated Error Notifier in Workflows

How to Set Up an Automated Error Notifier in n8n Workflows

What You Will Learn

In this guide, you will learn how to:

  • Understand what the Error Notifier workflow in n8n does and when to use it
  • Set up a central error notification workflow in n8n
  • Connect popular channels like Telegram, WhatsApp, Gmail, Discord, and Slack for alerts
  • See how each node in the template works, from error detection to message delivery
  • Customize and extend the template for your own automation projects

Why Automated Error Notifications Matter

In business automation and software development, small issues in workflows can quickly turn into major problems if they go unnoticed. A failed n8n workflow might mean:

  • Missed customer messages
  • Unsent reports or invoices
  • Data not being synced between tools

An automated error notification system solves this by alerting you the moment a workflow fails. This reduces downtime, improves reliability, and saves you from manually hunting for errors in the execution logs.

Overview of the Error Notifier Workflow Template

This n8n template acts as a central Error Notifier for your entire system. Instead of checking each workflow manually, you configure this one workflow to listen for failures in other workflows and send alerts through your preferred communication channels.

Key Features

  • Automatic monitoring of other workflows
  • Real-time notifications when a workflow fails
  • Multi-channel support for Telegram, WhatsApp, Gmail, Discord, and Slack
  • Structured error details, including workflow name, node, error message, timestamp, and execution link

How It Fits Into Your n8n Setup

The template is designed to be your central error handler. You create one main workflow, often named ERROR NOTIFIER, then connect other workflows to it using a special node, sometimes referred to as the ERROR ALERTER node. Whenever one of those workflows fails, the Error Notifier workflow is triggered and sends you a detailed alert.


Concepts You Need to Know Before Setup

1. The “ERROR NOTIFIER” Workflow

This is the main workflow that you will create in n8n. Its role is to:

  • Listen for errors from other workflows
  • Format the error information in a readable way
  • Send notifications through your selected channels

2. The “ERROR ALERTER” Node

The ERROR ALERTER node is a piece of logic that you copy into any workflow you want to monitor. It connects that workflow to your central Error Notifier. When the monitored workflow fails, this node helps trigger the Error Notifier workflow.

Typical usage:

  • Open a workflow you want to monitor
  • Paste the ERROR ALERTER node into it
  • Configure it to call the ERROR NOTIFIER workflow when an error occurs

3. Communication Credentials

To send alerts through channels like Telegram or Slack, n8n needs credentials for each service. In this template you can use:

  • WhatsApp (OAuth & API)
  • Telegram
  • Gmail
  • Discord
  • Slack

Once credentials are added, you can decide which channels are active and which remain disabled.


Step-by-Step Setup Guide

Step 1 – Create the ERROR NOTIFIER Workflow

  1. Open your n8n instance.
  2. Create a new workflow.
  3. Name it something clear, for example ERROR NOTIFIER.

This workflow will become the central place where all error notifications are processed and sent.

Step 2 – Import or Build the Template Structure

Use the provided template (see link at the end of this article) or recreate its structure in your workflow. The core components you need are:

  • Error Trigger node
  • Execute Bag Alert Workflow or equivalent execution node
  • Prepare Messages For Notify (a Code node)
  • Notification nodes for:
    • Telegram
    • WhatsApp
    • Gmail
    • Discord
    • Slack

Step 3 – Add and Configure Credentials

Before notifications can be sent, you must add credentials for your preferred channels in n8n:

  • WhatsApp (OAuth & API) – for sending WhatsApp messages via an API provider
  • Telegram – using a Telegram bot token
  • Gmail – via OAuth for sending emails
  • Discord – using a webhook or bot configuration
  • Slack – via OAuth or webhook URL

After adding credentials in n8n’s Credentials section, return to the Error Notifier workflow and assign the correct credential to each notification node.

Step 4 – Connect Other Workflows Using the ERROR ALERTER Node

  1. Go to a workflow that you want to monitor for failures.
  2. Copy the ERROR ALERTER node from the template.
  3. Paste it into the target workflow.
  4. Configure the node so that when an error occurs, it triggers the ERROR NOTIFIER workflow.
  5. Activate the workflow.

Repeat this process for every workflow you want to monitor. This way, a single Error Notifier workflow can handle alerts from multiple workflows.

Step 5 – Enable Your Preferred Notification Channels

In the template, some notification nodes are active by default, while others are disabled. The typical default configuration is:

  • Telegram – active
  • WhatsApp – disabled by default
  • Gmail – disabled by default
  • Discord – disabled by default
  • Slack – disabled by default

To enable additional channels:

  1. Open the node for the channel you want to use.
  2. Activate the node in the workflow.
  3. Assign the correct credential.
  4. Optionally, customize the message format for that channel.

How the Template Works Inside n8n

1. Error Trigger Node

The Error Trigger node is responsible for listening to errors from other workflows. When a monitored workflow fails, this node is triggered in the ERROR NOTIFIER workflow.

It captures useful context, such as:

  • Which workflow failed
  • Which node caused the error
  • The technical error message

2. Execute Bag Alert Workflow

After an error is detected, the workflow uses a node (commonly named Execute Bag Alert Workflow or similar) to run the main alert logic. This step ensures that all the data from the error trigger is passed into the part of the workflow that prepares and sends notifications.

3. Prepare Messages For Notify (Code Node)

The Prepare Messages For Notify node is a Code node that formats the raw error data into a human-readable message. It typically collects and structures:

  • Workflow name – so you know which automation broke
  • Node name – the specific step where the error occurred
  • Error message and description – technical details that help debug
  • Timestamp – when the error happened
  • Execution link and ID – a direct link to the failed execution in n8n

The result is a clear and structured message that can be reused across all notification channels. For example, a Telegram alert might look like:

  • Workflow: Customer Onboarding
  • Node: Send Welcome Email
  • Error: SMTP connection failed
  • Time: 2025-12-08 10:15 UTC
  • Execution: Link to failed run

4. Notification Nodes (Telegram, WhatsApp, Gmail, Discord, Slack)

Once the message is prepared, it is sent to one or more notification nodes. Each node is configured to deliver the same core message through a different platform:

  • Telegram – sends a message to a chat or channel (typically active by default)
  • WhatsApp – sends a WhatsApp message via an API (usually disabled until configured)
  • Gmail – sends an email with the error details
  • Discord – posts to a Discord channel, often via webhook
  • Slack – posts a message to a Slack channel

You can use any combination of these channels. For example, you might:

  • Send quick alerts to Telegram for on-call team members
  • Send a summary email via Gmail to a support inbox
  • Post to a Slack or Discord channel for your engineering team

Benefits of Using This n8n Error Notifier Template

  • Instant alerts – You are notified as soon as a workflow fails, so problems do not sit unnoticed.
  • Multi-channel support – Choose one or multiple platforms that best fit your team communication.
  • Easy setup – Copy-pasting the ERROR ALERTER node and adding credentials is usually all you need.
  • Centralized error handling – Manage all workflow failures from one dedicated notifier workflow.
  • Faster troubleshooting – Detailed, structured messages with execution links make it easy to jump straight into debugging.

Quick Recap

  • Create a dedicated ERROR NOTIFIER workflow in n8n.
  • Use the Error Trigger and Execute Bag Alert Workflow nodes to listen for and process errors.
  • Use the Prepare Messages For Notify Code node to format detailed error information.
  • Configure notification nodes for Telegram, WhatsApp, Gmail, Discord, and Slack.
  • Copy the ERROR ALERTER node into workflows you want to monitor and activate them.

Once this is set up, your automations will be safer, easier to maintain, and much quicker to debug.


FAQ

Do I need to use all notification channels?

No. You can use only one channel or any combination. By default, Telegram is usually active and the others are disabled. You can enable additional nodes as needed.

Can I customize the error message format?

Yes. The Prepare Messages For Notify Code node is where the message is built. You can edit this node to change the text, add extra fields, or adjust formatting for each platform.

What if I add new workflows later?

Simply copy the ERROR ALERTER node into the new workflow, configure it to use the same Error Notifier, and activate the workflow. It will then be monitored like the others.

Will this affect performance?

The notifier workflow only runs when an error occurs, so it does not significantly impact normal execution. It helps you react quickly without constantly checking logs.


Next Steps

If you want to streamline your error management and make sure no workflow failure goes unnoticed, set up this n8n Error Notifier workflow today. It is a simple way to add reliability and visibility to your automations.

For more automation templates, examples, and advanced n8n workflows, visit Boanse’s Gumroad page.

Error Notifier Workflow Guide for Automated Alerts

Error Notifier Workflow Guide for Automated Alerts

Overview

Reliable error visibility is a critical requirement in any production-grade automation environment. When workflows fail silently, incident response is delayed and root-cause analysis becomes more difficult. The Error Notifier pattern for n8n addresses this by centralizing error handling and distributing structured alerts to your preferred communication channels.

This guide explains how to implement a reusable Error Notifier workflow in n8n, how to connect it with an Error Alerter workflow in your existing automations, and how to configure multi-channel notifications through Telegram, WhatsApp, Gmail, Discord, and Slack.

Architecture and Core Concept

The solution is built around two cooperating workflows:

  • ERROR NOTIFIER – a central workflow responsible for formatting and sending error notifications.
  • ERROR ALERTER – a small workflow fragment that you embed into other workflows to detect failures and call the notifier.

With this architecture you maintain a single, standardized error handling and notification layer, while each operational workflow only needs to include the lightweight Error Alerter component.

High-Level Flow

  1. You create and configure a dedicated workflow named ERROR NOTIFIER.
  2. In each workflow where you want monitoring, you include the ERROR ALERTER segment and activate it.
  3. Whenever a monitored workflow fails, the Error Alerter captures the error context and triggers the Error Notifier workflow.
  4. The Error Notifier formats a detailed message and sends alerts to your configured channels.

This pattern ensures that any failure in your n8n environment results in a consistent, automated alert with the information needed to troubleshoot quickly.

Prerequisites and Credential Setup

Before wiring the workflows together, configure the credentials for the notification channels you plan to use. The Error Notifier template supports several providers out of the box.

Supported Notification Channels

  • WhatsApp (OAuth and API)
  • Telegram
  • Gmail
  • Discord
  • Slack

Credential Configuration

In your n8n instance:

  1. Open the Credentials section.
  2. Create or update credentials for each platform you intend to use (for example, Telegram or Slack).
  3. Ensure that the credentials are correctly authorized and tested.

These credentials will later be assigned to the corresponding notification nodes in the Error Notifier workflow.

Error Alerter Workflow Design

The Error Alerter workflow is intended to be embedded or copied into any workflow that you want to monitor. It has two main responsibilities: listening for execution failures and delegating the error to the central notifier.

Key Nodes in the Error Alerter

  • Error Trigger (initially deactivated)
    This node listens for workflow execution errors. When an error occurs in the parent workflow, the Error Trigger captures the relevant execution context, such as the failing node, error message, and timestamp. It is kept deactivated by default in the template so that you can enable it only where appropriate.
  • Execute Bag Alert Workflow
    Once an error is detected, this node calls the central Error Notifier workflow. It passes the error data as input so the notifier can construct a rich, context-aware message.

To use the Error Alerter, copy this workflow segment into your target workflows, activate it, and ensure that it correctly references the Error Notifier workflow.

Error Notifier Workflow Design

The Error Notifier workflow is the core component that standardizes how errors are processed and communicated. It is responsible for transforming raw error data into human-readable alerts and distributing them across multiple channels.

Key Components

  • When Executed by Another Workflow
    This trigger node starts the Error Notifier workflow whenever it is called from the Error Alerter (or any other workflow). It receives the error payload and execution context as input.
  • Prepare Messages For Notify (Code node)
    This node processes the incoming error data and constructs a structured notification message. It typically includes:
    • Workflow name
    • Node where the error occurred
    • Error level or severity
    • Error message and description
    • Timestamp of the failure
    • Execution URL for direct access to logs and debugging

    The Code node ensures consistent formatting across all channels and prepares channel-ready text or markup.

  • Notification Channel Nodes (Send Notify)
    A set of nodes, one per provider, that send the prepared message to:
    • Telegram
    • WhatsApp
    • Gmail
    • Discord
    • Slack

    By default, only the Telegram notification node is active in the template. Other channels can be enabled by activating their nodes and assigning the corresponding credentials.

Message Structure and Formatting

The notification message is optimized to give operators all relevant diagnostic information at a glance. An example template is shown below:

🚨 <b>WORKFLOW ERROR (<a href="${executionUrl}">${executionId}</a>)</b>

Workflow: <code>${workflowName}</code>
Node: <code>${nodeName}</code>

<b>${errorLevel}:</b>
${errorMessage}
${errorDescription}

${timestamp}

Key design considerations for the message format:

  • Direct link to execution so engineers can jump straight to the failing run.
  • Explicit workflow and node names to quickly identify the impacted component.
  • Separation of error level, message, and description to distinguish severity from context.
  • Timestamp to correlate the incident with other system events and logs.

You can adapt this template in the Prepare Messages For Notify Code node to align with your internal incident management standards.

Implementation Steps

1. Create the Error Notifier Workflow

  1. Create a new workflow in n8n and name it ERROR NOTIFIER.
  2. Add the When Executed by Another Workflow trigger.
  3. Insert the Prepare Messages For Notify Code node and implement the message formatting logic.
  4. Add one notification node for each channel you plan to use and connect them to the Code node output.
  5. Assign the appropriate credentials to each channel node and activate the workflow.

2. Integrate the Error Alerter into Target Workflows

  1. Copy the ERROR ALERTER workflow segment into each workflow that requires monitoring.
  2. Ensure the Error Trigger node is configured to listen for the correct error events.
  3. Configure the Execute Bag Alert Workflow node to call the ERROR NOTIFIER workflow and pass through the required error data.
  4. Activate the Error Alerter within each monitored workflow.

3. Enable and Test Notification Channels

  1. Activate the Telegram node first, since it is enabled by default in the template.
  2. Trigger a controlled error in a test workflow to verify that:
    • The Error Trigger fires correctly.
    • The Error Notifier is executed.
    • The message content and formatting meet your expectations.
  3. Once validated, activate additional channels such as WhatsApp, Gmail, Discord, or Slack and repeat the test.

Operational Benefits and Best Practices

  • Immediate visibility: Receive real-time alerts as soon as a workflow fails, reducing mean time to detect (MTTD).
  • Multi-channel coverage: Route alerts to the channels your team already uses, such as Slack or Telegram, without duplicating logic in each workflow.
  • Centralized error handling: Maintain a single Error Notifier workflow that can be improved over time without editing every monitored workflow.
  • Consistent formatting: Standardized message structure simplifies triage and helps on-call engineers quickly interpret alerts.
  • Easy reuse: Integrate the Error Alerter block into any new workflow to automatically inherit your established alerting standards.

Next Steps

Integrate this Error Notifier pattern into your n8n environment to enhance observability, reduce time-to-resolution, and enforce consistent operational practices across all workflows. Ensure that the appropriate credentials are configured, enable the desired notification nodes, and validate the full error path with controlled tests before relying on it in production.

For additional automation templates and advanced workflow patterns, explore more resources on gumroad.

How to Save Your n8n Workflows into a GitHub Repository

How to Automatically Back Up n8n Workflows to a GitHub Repository

Why Automate n8n Workflow Backups

For teams that rely on n8n in production, treating workflows as versioned, auditable assets is essential. Automated backups protect against accidental deletions, configuration drift, and infrastructure failures, while also enabling proper change tracking and collaboration.

This article presents an n8n workflow template that periodically exports all workflows from an n8n instance and commits them as JSON files to a GitHub repository. By default, the workflow runs every 24 hours, compares the current state of each workflow with what is stored in GitHub, and then creates, updates, or skips files as appropriate. The result is a lightweight, fully automated version control layer for your automation environment.

High-Level Architecture of the Backup Workflow

The workflow is designed around a few core principles: scheduled execution, incremental backup, efficient comparison, and safe interaction with GitHub. At a high level it performs the following actions:

  • Triggers on a fixed schedule to initiate the backup run.
  • Retrieves workflows from the n8n instance, with an optimization to focus on recent updates.
  • Loops through workflows one by one to control memory usage and error handling.
  • Checks whether a corresponding JSON file exists in GitHub.
  • Compares existing and current workflow definitions to detect changes.
  • Creates or updates JSON files in a specified repository path.
  • Optionally sends a Slack notification when the backup process completes.

Key Components and Nodes

1. Schedule Trigger – Automated Backup Cadence

The workflow begins with a Schedule Trigger node configured to run every 24 hours. This ensures that backups happen consistently without requiring manual intervention. The schedule can be adjusted to match your operational needs, for example to run more frequently in highly dynamic environments.

2. Centralized Configuration via Config Node

To make the template portable and easy to maintain, a dedicated Config node stores the core parameters used throughout the workflow:

  • repo_owner – GitHub user or organization that owns the repository.
  • repo_name – Name of the GitHub repository where backups are stored.
  • repo_path and sub_path – Directory structure within the repository that will contain the workflow JSON files.

These configuration values are referenced by multiple GitHub nodes, which keeps the workflow flexible and reduces the risk of inconsistent settings.

3. Workflow Retrieval and Filtering

The Get Workflows node queries the n8n instance for all available workflows. To avoid unnecessary processing and API calls, the result is passed to a Filter node that narrows the list to workflows updated within the last 24 hours. This incremental backup strategy is particularly useful in large installations where hundreds or thousands of workflows may exist.

4. Loop Over Items for Controlled Processing

After filtering, each workflow is processed individually using a Loop Over Items node. This pattern offers several operational benefits:

  • Improved reliability, since failures in one item do not affect the others.
  • Reduced memory footprint, because only a single workflow payload is handled at a time.
  • Clearer logging and troubleshooting, as each iteration corresponds to a specific workflow.

5. GitHub File Existence and Size Checks

Within the loop, the workflow first checks whether a corresponding JSON file already exists in the GitHub repository. This is handled by the GitHub Get a file node, which attempts to read the existing file based on the naming convention and repository path defined in the Config node.

If the file does not exist, or if GitHub reports that the file is too large to be retrieved directly, the workflow routes the item through additional logic:

  • Is File Too Large? – A check that evaluates whether the file exceeds GitHub’s size limits.
  • Get File – A node used to download and handle large files in a controlled way when necessary.

This pre-validation step prevents common API errors and ensures that large workflow definitions are handled gracefully.

6. Determining Whether a Workflow Has Changed

The comparison logic is encapsulated in an isDiffOrNew code node. Its purpose is to accurately determine whether the current workflow from n8n is:

  • Identical to the version already stored in GitHub.
  • Modified compared to the stored version.
  • Completely new and not yet present in the repository.

To achieve a reliable comparison, the code node parses the JSON content of both versions and normalizes them by ordering the keys. This avoids false positives due to differences in key ordering and focuses solely on the actual configuration changes. The node then assigns a status flag for each item:

  • same – No differences detected.
  • different – The workflow has changed and requires an update in GitHub.
  • new – No corresponding file exists, so a new JSON file must be created.

7. Routing Logic with Switch Node

The status flag produced by the comparison node is evaluated by a Switch node. This branching logic ensures that each workflow takes the appropriate path:

  • If the status is same, the workflow item is effectively skipped, since no commit is required.
  • If the status is different, the item is sent to the update path.
  • If the status is new, the item is routed to the file creation path.

This conditional routing avoids unnecessary commits and keeps the Git history clean and meaningful.

8. Creating and Updating Files in GitHub

Two dedicated GitHub nodes handle file operations based on the routing result:

  • Create new file – Used when a workflow is detected as new. It creates a new JSON file in the target repository and directory.
  • Edit existing file – Used when a workflow is different. It updates the existing JSON file with the latest workflow definition.

Both nodes use the shared configuration values repo_owner, repo_name, and sub_path to construct the correct file path. Commit messages are typically structured to include the workflow name and its status, which provides clear context in the Git history and helps with later auditing.

9. Completion Handling and Optional Slack Notification

After each workflow has been processed, a Return node marks the end of the loop for that item. Once all items have passed through the loop, the workflow can optionally send a summary notification to Slack.

This optional Slack integration is useful for operations teams that want visibility into backup runs. It can be configured to post a confirmation of success, or extended to include counts of created, updated, or unchanged workflows.

Performance and Reliability Considerations

File Size Management

GitHub imposes limits on file size and API payloads. The template includes logic to detect and handle large files via the Is File Too Large? and Get File nodes. This prevents failures when interacting with large workflow definitions and ensures that even substantial automation setups can be backed up reliably.

Memory Optimization Through Batch Processing

To maintain stability in environments with a large number of workflows, the template makes use of a pattern where the workflow can call itself and process items in batches. This approach helps control memory usage and avoids loading the full set of workflows into memory at once. It is a best practice for large-scale n8n deployments that need to balance reliability with throughput.

Embedded Documentation

The template includes sticky notes and inline documentation directly in the n8n canvas. These annotations contain usage guidance and helpful links, which makes onboarding easier for new team members and simplifies ongoing maintenance.

Customizing the Backup Workflow for Your Environment

Before running the template in your own environment, you should adapt the configuration to match your GitHub setup and organizational standards.

Repository Configuration

Update the Config node with your own repository details:

  • repo_owner – Your GitHub username or the name of your organization.
  • repo_name – The repository that will store the n8n workflow backups.
  • repo_path and sub_path – The directory path where the JSON workflow files should be written, for example workflows/ or a structured folder hierarchy by environment.

GitHub Credentials and Access

Ensure that the GitHub credentials configured in the GitHub nodes have appropriate permissions to read and write files in the target repository. Typically this is done through a personal access token or GitHub App credentials with at least repo scope for private repositories.

Schedule and Notification Policies

  • Adjust the Schedule Trigger interval based on how frequently your workflows change and how up to date your backups need to be.
  • Configure the Slack node only if you require notifications. You can customize the message content to include environment labels, timestamps, or counts of processed workflows.

Benefits of Using GitHub for n8n Workflow Backups

Automating backups of n8n workflows into GitHub provides several advantages for engineering and operations teams:

  • Version control – Every change to a workflow is captured as a Git commit, which allows you to review history, compare versions, and roll back if needed.
  • Disaster recovery – If your n8n instance is lost or corrupted, you can restore workflows directly from the repository.
  • Collaboration – Teams can use standard Git workflows such as pull requests and code reviews for changes to automation logic.
  • Auditability – A clear history of who changed what and when, which is valuable for compliance and operational governance.

Next Steps

By implementing this n8n-to-GitHub backup workflow, you gain a robust, automated safety net for your automation assets. The design is scalable, configurable, and aligned with best practices for version control and operational resilience.

Ready to secure your n8n workflows? Configure the template with your GitHub repository details, set your preferred schedule, and start maintaining a reliable versioned backup of every workflow in your instance.

If you require more advanced customization or integration with additional tooling, you can extend this template further, for example by adding environment tagging, multi-repository support, or enhanced reporting.