Create an RSS Feed from Baserow Blog Releases

Create an RSS Feed from Baserow Blog Releases With n8n: Turn Updates Into Automation

From Constant Checking To Calm Control

If you are regularly watching Baserow release notes or blog updates, you probably know the feeling. You open the site again and again, scan for new posts, copy links, share them with your team, and try not to miss anything important. It works, but it quietly steals your time and attention.

Automation offers a different path. Instead of chasing updates, you can let updates come to you. An RSS feed is still one of the simplest and most reliable ways to stay in the loop, and with n8n you can generate that feed yourself, on your own terms.

This workflow template turns the Baserow blog releases page into a structured RSS feed that you can plug into any RSS reader or downstream automation. More importantly, it shows how you can start reclaiming your focus by automating repetitive monitoring tasks.

Shifting Your Mindset: Automation As A Growth Tool

Think of this workflow as more than a technical recipe. It is a small but powerful example of how you can:

  • Transform scattered web content into structured, reusable data
  • Replace manual checks with predictable, automated flows
  • Free up mental space for deeper work and strategic decisions
  • Build a reusable pattern you can adapt to other blogs, tools, or internal sites

Once you create your own RSS feed from Baserow releases, you will see how easily this approach extends to other sources. The same pattern can be applied to product changelogs, competitor news, or any public web page you want to track.

What This n8n Workflow Template Does

At a high level, the workflow takes the HTML from the Baserow blog releases page and carefully turns it into a clean RSS feed. Each n8n node has a clear responsibility, so you can understand, adjust, and expand the flow as your needs grow.

The core idea is simple:

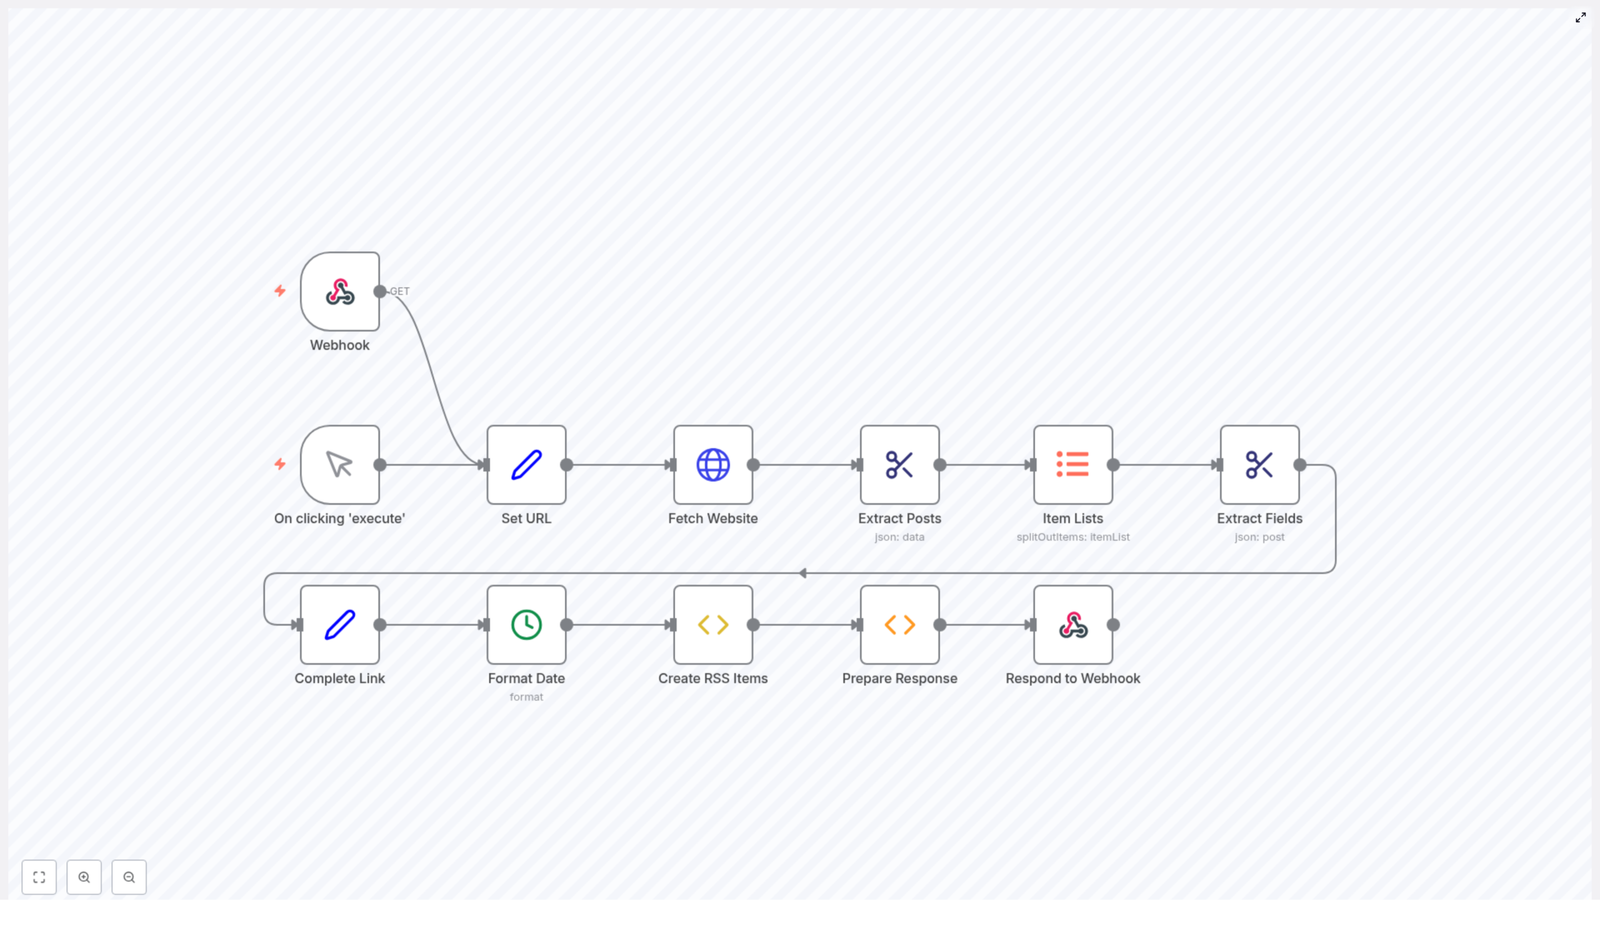
  1. Receive a request through a webhook
  2. Fetch the Baserow releases blog page
  3. Extract each blog post from the HTML
  4. Pull out the date, title, link, and description for every post
  5. Normalize the data, format it, and assemble valid RSS XML
  6. Return that XML as the webhook response

Let us walk through the journey node by node so you can see exactly how it works and how you might customize it for your own use cases.

Step 1 – Triggers That Start The Journey

Every workflow needs a starting point. In this template, you have two ways to kick things off:

Webhook Trigger

The main trigger is a Webhook node. It listens for incoming HTTP GET requests on the endpoint:

/baserow-releases

Whenever this endpoint is called, n8n runs the entire workflow and responds with the latest RSS feed. This makes it easy to connect RSS readers or other tools that can fetch a URL at regular intervals.

Manual Execution For Testing

There is also a manual trigger, activated when you click Execute inside n8n. This is perfect for testing, debugging, and iterating on your automation without needing an external call every time.

Step 2 – Defining The Blog Source URL

The next part of the journey is telling the workflow where to look.

A Set node stores the base URL of the Baserow releases section:

https://baserow.io/blog/category/release

By centralizing the URL in this node, you make your workflow easier to maintain and extend. If the blog structure changes or you want to reuse this flow for a different category or site, you only need to adjust this one place. It is a small design choice that supports long term scalability.

Step 3 – Fetching The Website Content

With the URL ready, an HTTP Request node retrieves the page content.

This node performs an HTTP GET request to the specified URL and returns the raw HTML of the Baserow releases page. At this stage, you have all the information, but it is still unstructured. The next steps will carefully extract only what you need.

Step 4 – Turning Raw HTML Into Individual Posts

Extracting Posts With HTML Extract

The HTML Extract node is where the transformation really begins. Using the CSS selector:

.blog-listing__post-content

it selects the main container for each blog post. The node returns an array, where each item is the HTML snippet for one post.

At this point, you have a collection of posts in a structured array, which is much easier to handle than one long block of HTML.

Splitting Posts Into Individual Items

Next, an Item Lists node breaks the array into separate items so that each blog post can be processed independently. This step is key for scalability. As new posts are added to the Baserow blog, your workflow will automatically handle them one by one, without any extra work from you.

Step 5 – Extracting The Key Fields For Each Post

Now that each post is its own item, the workflow focuses on pulling out the details that matter for an RSS feed. Using selectors inside the HTML, the workflow extracts four main fields from each post:

  • Date using:
    .blog-listing__post-info > strong
  • Title using:
    .blog-listing__post-title
  • Link from the href attribute of:
    .blog-listing__post-title > a
  • Description using:
    .blog-listing__post-description

This step turns messy HTML into structured data you can trust. Once you see how clean this output is, it becomes much easier to imagine connecting it to other automations, dashboards, or notifications.

Step 6 – Completing Links And Formatting Dates

Building Full URLs

Some blog links are relative, which is not ideal for RSS readers. A dedicated node completes each URL by appending the base domain to any relative path. That way, every item in your RSS feed has a fully qualified, clickable link that works anywhere.

Normalizing Dates

Consistency is essential for feeds and downstream tools. A date formatting step converts the extracted dates into a uniform format, typically:

YYYY-MM-DD

This makes your RSS feed predictable, easier to sort, and more compatible with other services that might consume it later.

Step 7 – Creating RSS Items And The Final Feed

Generating RSS Item XML

With all fields extracted and cleaned, each post is transformed into a valid RSS item. The workflow constructs an XML string that includes:

  • <title> – the post title
  • <link> – the full URL
  • <description> – the summary text
  • <pubDate> – the formatted publication date

Every blog post becomes a self contained RSS item ready to be consumed by readers or other automation tools.

Wrapping Everything In An RSS Feed

Once all items are generated, a final preparation step wraps them into a complete RSS XML structure. This includes the root <rss> element and a <channel> section that holds metadata such as:

  • Feed title
  • Feed link
  • Feed description

The result is a fully formed RSS feed that looks and behaves like any standard feed you would subscribe to in your favorite reader.

Step 8 – Returning The RSS Feed Through The Webhook

The final step is where your automation meets the outside world.

The workflow sends the complete RSS XML back as the response to the webhook request. It sets the content type to:

application/xml

so that any RSS reader or HTTP client knows exactly how to interpret the response.

From now on, any time the webhook URL is called, n8n will fetch the latest Baserow releases, rebuild the RSS feed, and return fresh XML. No manual updates, no missed posts, just a reliable, automated stream of information.

Why This Workflow Matters For Your Productivity

This template is more than a convenience. It is a small but meaningful shift in how you work:

  • Automation instead of repetition – You no longer need to manually check for updates or copy links.
  • Scalable by design – As new posts appear, they are automatically included in the feed.
  • Clean separation of responsibilities – Each node has a focused task, which keeps the workflow understandable and easy to maintain.
  • Ready for integration – The resulting RSS feed can be consumed by RSS readers, notification systems, internal dashboards, or other n8n workflows.

Once you experience this kind of automation, it becomes natural to look for the next repetitive task you can transform. This is how a single workflow can spark a broader culture of automation in your personal work or across your team.

Building On This Template For Your Own Growth

This n8n template is a starting point, not a limit. You can:

  • Swap the URL and selectors to create RSS feeds from other blogs or documentation sites
  • Add filters so only certain types of posts are included
  • Trigger notifications in Slack, email, or other tools whenever a new item appears
  • Store posts in a database for internal reporting or analytics

Each small improvement you make will deepen your understanding of n8n and open up new ideas for automating more of your workflow.

Take The Next Step: Try The Template

You now have a clear picture of how this workflow turns the Baserow releases page into a living RSS feed. The most valuable step is the one you take next: try it, tweak it, and make it your own.

Start by importing the template, run it with the manual trigger, then connect it to your favorite RSS reader or another n8n workflow. As you experiment, you will see how quickly automation can shift your daily work from reactive to intentional.

If you want to adapt this to your own blog, simply update the URL in the Set node and adjust the CSS selectors to match your site structure. The pattern stays the same, the destination becomes yours.

Have questions or want help customizing this automation for your specific setup? Ask, explore, and keep iterating. Every workflow you build is another step toward a more focused, automated, and impactful way of working.

Automated LinkedIn Posts with Google Gemini & DALL-E

Automated LinkedIn Posts with Google Gemini & DALL-E

Imagine Never Having to Say “I’ll Post on LinkedIn Tomorrow” Again

You know that moment when you promise yourself you will finally post something valuable on LinkedIn, then six days later you are still “thinking about ideas”? If you are a busy engineering leader, CTO, VP, or founder, LinkedIn can easily slip from “strategic channel” to “guilt-inducing tab you avoid opening.”

Now imagine your LinkedIn posts quietly writing themselves in the background, complete with smart topics, polished copy, eye-catching visuals, and SEO-friendly hashtags. All on autopilot. No more staring at a blinking cursor, no more scrambling for last-minute ideas.

That is exactly what this n8n workflow template does by combining Google Gemini, DALL-E, and LinkedIn publishing into one smooth automation. You set it up once, then let your content machine run on its own schedule.

What This n8n Workflow Actually Does

This workflow is basically your AI-powered LinkedIn content team, packed into an n8n template. It runs on a schedule, generates fresh topics, writes posts, creates images, adds hashtags, and publishes everything directly to LinkedIn.

Here is the big picture of what the automation handles for you:

  • Triggers itself every few hours (or whenever you like)
  • Uses Google Gemini to brainstorm strategic content topics
  • Writes complete LinkedIn posts tailored for engineering leaders
  • Generates matching visuals using DALL-E or another AI image tool
  • Builds SEO-friendly hashtag sets for better reach
  • Publishes the post to LinkedIn via OAuth, no manual clicking needed

So instead of juggling 6 different tools and 12 open tabs, you get one automated pipeline that quietly keeps your LinkedIn presence active and professional.

Inside the Workflow: Step-by-Step Automation Tour

Let us walk through the main nodes so you know exactly what happens behind the scenes when this workflow runs.

1. Scheduled Trigger – Your “Set It and Forget It” Engine

The whole thing starts with a simple timer. The workflow uses a schedule trigger that fires every 6 hours by default. You can tweak this to match your preferred posting rhythm, whether that is a few times a day or a few times a week.

Once the timer hits, n8n wakes up the workflow and kicks off the rest of the automation, no manual nudging required.

2. Content Topic Generator – Gemini as Your Strategy Partner

Next, the Content Topic Generator node calls Google Gemini to come up with a fresh, relevant topic for your audience. This is not random fluff. The prompts are tailored to engineering leadership themes like:

  • MLOps
  • Cloud Engineering
  • DevOps

The node outputs a structured result that typically includes:

  • A clear topic idea
  • A short rationale explaining why it matters
  • A hook that makes the post scroll-stopping for CTOs, VPs, and founders

So instead of thinking “What should I talk about today?”, you get a ready-to-use, strategically aligned topic every time the workflow runs.

3. Content Creator – Fully Written LinkedIn Posts on Autopilot

Once the topic is ready, another Google Gemini-powered node, the Content Creator, takes over. This node turns the topic into a complete LinkedIn post crafted specifically for engineering leaders.

It is configured to:

  • Use a conversational yet professional tone
  • Avoid forbidden phrases or problematic wording
  • Vary emotional tone and structure so posts do not feel repetitive
  • Keep each post unique, even across similar themes

The result is a fully formed post that sounds like a thoughtful human wrote it, not a robot that just discovered buzzwords.

4. Image Generation with DALL-E – Visuals That Match the Message

In parallel, the workflow triggers AI image creation based on the topic or post theme. Using DALL-E, or any other configured AI image generation service, it produces realistic, LinkedIn-ready graphics that align with the content.

No more digging through stock photo sites or reusing the same three images from last year. Each post gets a tailored visual that helps it stand out in the feed.

5. Hashtag Generator – Built-in SEO for LinkedIn

To boost discoverability, the Hashtag Generator node analyzes the post content and creates a strategic mix of hashtags. These include:

  • Broad industry hashtags
  • Specific niche or topic tags
  • Audience-focused tags for roles like CTOs or founders
  • Branded tags, for example #Intuz

This means you get SEO-minded, engagement-friendly hashtags without having to manually research them every time.

6. Merging Everything and Publishing to LinkedIn

Finally, all the pieces come together. The workflow merges:

  • The LinkedIn post text
  • The generated image
  • The hashtag set

That combined payload is then passed to the “Create a Post” node. This node connects to your LinkedIn account via OAuth and publishes the post automatically.

From trigger to live post, the process is completely hands-free. You get a consistent LinkedIn presence while you focus on actual engineering problems instead of battling content calendars.

Why This Automated LinkedIn Workflow Is Worth Setting Up

Beyond “it saves my sanity,” here are the concrete benefits you get when you plug this n8n template into your stack.

  • Consistent Posting: Scheduled triggers keep your profile active, so you do not disappear from your network for weeks at a time.
  • High-Quality, Unique Content: Google Gemini generates thoughtful topics and posts tailored for engineering leaders, not generic motivational quotes.
  • Professional Visuals: AI-generated images give your feed a polished, modern look that stands out in a text-heavy timeline.
  • SEO and Visibility Optimization: Smart hashtag generation helps your posts reach the right audience segments and boosts engagement potential.
  • Serious Time Savings: From ideation to publishing, the workflow automates the entire chain, so your team can focus on high-value work instead of copy-paste tasks.

How to Get Started with This n8n Workflow Template

Ready to let automation handle the repetitive bits? Here is how to set everything up in n8n.

  1. Install and open n8n. Make sure your n8n instance is up and running, then import the workflow JSON file for this template (as shown in the template image or download).
  2. Configure your AI API keys. Add your credentials for Google Gemini and your chosen AI image generation service, such as DALL-E, in the appropriate nodes.
  3. Connect LinkedIn via OAuth. In the “Create a Post” node, authenticate your LinkedIn account using OAuth so the workflow can publish on your behalf.
  4. Adjust the schedule. Open the schedule trigger node and set the frequency that works for you, for example every 6 hours or once per day.
  5. Tune the prompts to your brand. In the Content Topic Generator and Content Creator nodes, you can adjust prompts, tone, or specialization to match your brand voice and target audience.

Once this is done, activate the workflow and let it run. You can always monitor executions inside n8n, tweak prompts, or adjust timing as you learn what works best for your audience.

Next Steps, Tips, and Ideas

  • Review the first few automated posts to fine-tune tone, length, and style.
  • Customize prompts to emphasize specific domains like MLOps, Cloud Engineering, or DevOps if you want to niche down.
  • Add extra nodes in n8n if you want to log posts to a Google Sheet or Notion before publishing.
  • Experiment with different hashtag strategies in the Hashtag Generator node to see what drives better reach.

Wrapping Up: Let AI Handle the Routine, You Handle the Strategy

This n8n workflow brings together Google Gemini, AI image generation with tools like DALL-E, and hashtag-driven SEO to automate LinkedIn posts from start to finish. You get consistency, quality, and efficiency without manually crafting every single update.

If you are tired of repetitive content creation tasks and want your LinkedIn feed to look like you have a full-time social media team, this workflow is a powerful solution you can deploy today.

Ready to automate your LinkedIn content strategy? Plug in this n8n template, connect your tools, and let the workflow handle the heavy lifting.

How often are you currently posting on LinkedIn, and what usually stops you from posting more? Share your experience in the comments, you are not alone in the “I’ll post tomorrow” club.

How to Automate Daily Email Digests with AI Summarization

How to Automate Daily Email Digests with AI Summarization Using n8n

Picture this: you open your inbox in the morning and it looks like it has been busy networking all night. Newsletters, updates, long threads, “quick questions” that are never quick. You want the useful bits, not a full-time job in scrolling.

That is where this n8n workflow template comes in. With a little help from OpenAI and a simple Gmail label, you can turn that daily chaos into a clean, AI-generated email digest that lands in your inbox at a set time. No more hunting through 50 emails to find 3 important ones. Automation does the boring part, you keep your sanity.

What This n8n Email Digest Workflow Actually Does

This workflow runs on autopilot to create a daily, AI-summarized email digest from Gmail. Under the hood, it:

  • Runs every day at a scheduled time (for example, 9 AM)
  • Grabs all Gmail messages from the last 24 hours with a specific label
  • Feeds those emails into OpenAI using the LangChain Summarization node
  • Generates short, HTML-formatted summaries that keep links and key info
  • Combines everything into one nicely structured digest email
  • Sends that digest to the email address you choose

End result: one tidy summary email instead of a scattered inbox full of half-read messages.

Why Bother With AI-Powered Email Digests?

If your inbox is your main source of news, updates, or industry info, it can also be your main source of distraction. AI summarization helps you skim the signal without drowning in the noise. With this workflow you can:

  • Save Time by reading short summaries instead of full email novels
  • Stay Informed with a structured digest that covers multiple conversations and topics in one place
  • Reduce Overload by filtering to only labeled emails and highlighting the important bits

Instead of checking your inbox all day, you get one curated update that you can read in a few minutes.

How the Workflow Works Behind the Scenes

The n8n template breaks the whole process into three main stages. Each part tackles one annoying piece of email management so you never have to think about it again.

1. Scheduled Email Retrieval from Gmail

First, the workflow needs to know when to run and which emails to care about.

  • A Schedule Trigger node kicks things off every day at a specific time, such as 9 AM.
  • The workflow then uses the Gmail node to fetch messages from the last 24 hours.
  • Only emails with a particular Gmail label are included, for example a label you apply to newsletters, updates, or anything you want in your digest.

This label-based approach lets you decide what gets summarized without changing your entire email setup.

2. AI Summarization with LangChain and OpenAI

Next comes the fun part: turning long emails into short, readable summaries.

Each fetched email is processed by OpenAI through the LangChain Summarization node. The workflow:

  • Loads the email content into a document processor
  • Splits longer text into chunks for more efficient AI processing
  • Uses a custom prompt to create clean, HTML-formatted summaries with bullet points
  • Keeps external links intact inside the summary so you can still click through to original content

The result is a set of AI-generated summaries that are short, scannable, and still contain all the important references.

3. Formatting the Digest and Sending the Final Email

Once everything is summarized, n8n assembles it into one polished digest email.

  • An Edit Fields step pulls out useful metadata like subject, sender, and the generated summary.
  • A Combine Subject and Body step merges each summary with a header that includes the original email subject and who it came from.
  • Finally, the Send Digested mail step sends a single HTML-formatted digest to your chosen email address.

Instead of 10 or 30 individual emails, you get one neatly formatted message that is easy to read and quick to skim.

Quick Setup Guide: From Zero to Daily Digest

You do not need to be a developer to use this n8n template, but you will need a few pieces in place. Here is the simplified setup flow:

  1. Create a Gmail label Decide what you want summarized, for example “Daily Digest”, “Newsletters”, or “Industry Updates”, and create a label in Gmail. Apply it to any emails you want to include.
  2. Configure the Gmail node in n8n In the workflow, set the Gmail node to use that label by updating the label ID in its configuration so it only pulls those tagged messages.
  3. Set up OpenAI credentials In n8n, configure your OpenAI API credentials for the LangChain nodes so the workflow can call the AI model for summarization.
  4. Choose where the digest goes In the email sending step, set the target email address that should receive the final digest.
  5. Adjust the schedule If 9 AM is not your thing, tweak the Schedule Trigger node to whatever time fits your routine.

Once you save and activate the workflow, it will quietly run in the background and deliver your daily digest automatically.

Advanced Tips and Easy Customizations

After you have the basic version running, you can tune the workflow so it fits your habits perfectly.

  • Customize the AI prompt Adjust the summarization prompt in the LangChain node to change the tone, level of detail, or structure of your summaries. Want more bullet points or shorter paragraphs? This is where you tweak it.
  • Change the email retrieval rules Modify the time range or filters in the Gmail node if you want more than 24 hours of content or a narrower slice of your inbox.
  • Personalize the digest layout Edit the combined digest template to include your own branding, a short intro, or extra sections such as “Top 3 highlights”.
  • Add extra filtering logic Insert additional n8n nodes to skip certain senders, filter by subject keywords, or route specific summaries to different digests.

Think of the template as a starting point that you can gradually shape into your ideal inbox assistant.

Who Gets the Most Value From This Workflow?

This setup is especially useful if your job or interests depend on staying informed but you do not want to live in your inbox.

  • Content creators who subscribe to multiple newsletters and need quick overviews for research or inspiration.
  • Busy professionals who want fast industry updates without reading every single announcement or product email.
  • Anyone dealing with email overload who prefers bite-sized, AI-summarized information instead of endless scrolling.

If your inbox feels like a firehose, this workflow turns it into a manageable daily summary.

Next Steps: Try the Template and Tame Your Inbox

Automating daily email digests with AI summarization is one of those small changes that quietly saves you a lot of time and attention. With n8n handling the scheduling, Gmail pulling the right messages, and OpenAI summarizing them, you get a powerful, low-maintenance system that keeps you informed without constant inbox checking.

Set up the workflow once, tweak it to match your preferences, and let it run. Your future self, sipping coffee while reading a single tidy digest instead of 40 separate emails, will be very pleased.

Need help? You are not alone in your quest for inbox sanity. Join the n8n Discord or post your questions in the n8n Community Forum to get support, ideas, and workflow tips.

Generate Cheaper AI Videos with Google Veo3 Fast & Upload

How a Solo Marketer Turned Simple Prompts Into a Full AI Video Machine

Introduction: When Video Becomes a Full-Time Job

By the time Emma opened her laptop on Monday morning, she already felt behind.

As a solo marketer for a fast-growing startup, she had one clear directive from her founder: “We need more short-form video. YouTube, TikTok, all of it. Every day.”

She tried everything. Editing tools. Stock footage. AI video generators. But each new platform came with the same problem: it still took too long, it cost too much, and she had to manually juggle files, titles, uploads, and spreadsheets. Her calendar was full of “video tasks” and her actual strategy work kept slipping to the bottom of the list.

One evening, after exporting the same 30-second clip for the third time, she wrote in her notes app:

“There has to be a way to go from a simple idea in a spreadsheet to a finished video on YouTube and TikTok without me touching every step.”

That search led her to an n8n workflow template built around Google’s Veo3 Fast model, Fal AI, Upload-Post.com, and a simple Google Sheet. It promised something bold: cheaper AI video generation, automated uploads, and SEO-friendly titles, all triggered from a spreadsheet row.

Emma decided to test it. What followed turned her scattered video process into a fully automated AI video machine.

Rising Action: From Chaos To a Single Spreadsheet

The Moment Emma Realized the Spreadsheet Was the “Control Room”

The first surprise was how simple the control center of the whole system was. Not a complex dashboard. Not a custom app. Just a Google Sheet.

The template suggested setting it up in a very specific way, so Emma opened the example Google Sheet and duplicated it.

Each row would become a video. Each column had a job:

  • PROMPT – where she would type the video description or idea. This text would feed directly into the AI model to generate the actual video content.
  • DURATION – the target video length, so the Veo3 Fast model knew how long the final clip should be.
  • VIDEO – initially left empty. The workflow would automatically fill this in later with the generated video link.

Emma realized something important here. She did not need to open any video tool to start creating content. All she had to do was add rows to this sheet, and the n8n workflow would handle the rest.

Her “content backlog” was now just a list of prompts and durations.

The Technical Turning Point: Connecting the AI Brains

Step 1 – Giving Veo3 Fast Access Through Fal AI

The next hurdle was the technical part that had always intimidated her: APIs and authentication. The template instructions were clear, though, so she followed them step by step.

To use Google’s Veo3 Fast model for cheaper AI video generation, the workflow relied on Fal AI. Emma created an account and grabbed her API key.

Inside n8n, the template used HTTP Request nodes to talk to Fal AI. Each of those needed the same header so the video generation requests would be authenticated correctly:

  • Name: Authorization
  • Value: Key YOURAPIKEY

She replaced YOURAPIKEY with her real key, saved the workflow, and felt that tiny rush of satisfaction that comes from wiring two tools together successfully.

Now, when the workflow ran, it would send the prompt and duration from her Google Sheet straight to the Veo3 Fast API via Fal AI, and the model would generate the video in the background.

Step 2 – Automating Uploads To YouTube And TikTok

Previously, Emma would export a video, upload it to Google Drive, then to YouTube, then to TikTok, then copy links back into her tracking sheet. It was repetitive and easy to mess up.

The n8n template solved that with a single service: Upload-Post.com.

She signed up for a free account. The free plan gave her up to 10 uploads per month, which was enough for testing. Once inside, she generated an upload API key that the workflow would use for publishing videos to her social profiles.

In n8n, the HTTP Request nodes that handled uploads needed another Authorization header:

  • Name: Authorization
  • Value: Apikey YOUR_API_KEY_HERE

She pasted in her Upload-Post.com key and then created profiles for her social accounts. Each profile had a username that the workflow would reference to decide where to upload the finished video.

There was one catch. The free plan supported multiple platforms but did not include TikTok. To push directly to TikTok, she would need to upgrade. For now, she started with YouTube and kept TikTok in mind for later.

Still, the idea of a single workflow that could publish to multiple platforms felt like a huge step up from her old copy-paste routine.

How the n8n Workflow Actually Runs Behind the Scenes

The Schedule That Quietly Does the Work

With the connections in place, Emma turned to the heart of the n8n template: the main flow.

Instead of clicking a “run” button every time she added a new prompt, she set up a Schedule Trigger node. The recommendation was simple and practical: run the workflow every 5 minutes.

That way, Emma could keep adding ideas to the Google Sheet throughout the day, and the workflow would quietly check for new rows and start generating videos without her intervention.

What Happens on Each Run

Every 5 minutes, the workflow followed a predictable sequence. Understanding this made Emma feel more in control of her automation:

  • First, it checked her Google Sheet for new rows where the VIDEO column was still empty. Those were the prompts that had not yet been turned into videos.
  • For each of those rows, it sent the PROMPT and DURATION to the Veo3 Fast API through Fal AI, asking the model to generate a video.
  • Since video generation is not instant, the workflow did not just wait blindly. It polled the job status every 60 seconds, checking whether the video was done.
  • Once the job was complete, it retrieved the final video URL and the video file itself.
  • Next, it called GPT-4o to generate an optimized YouTube title based on the original prompt. Instead of Emma brainstorming titles, GPT-4o created SEO-friendly, engaging options automatically.
  • The workflow then uploaded the video to Google Drive for storage and backup, and also sent it to Upload-Post.com to publish on YouTube and, if enabled on her plan, TikTok.
  • Finally, it went back to the same row in the Google Sheet and updated it with the video file link and the published URLs. Her spreadsheet became both input form and performance log.

What used to be a messy trail of files, tabs, and notes was now a single, clean loop: prompt in, video out, links recorded.

Resolution: From Overwhelmed To Always Publishing

The First Time Emma Did Nothing And Videos Still Went Live

A week later, Emma opened her YouTube channel and saw something unfamiliar: a consistent stream of new videos, all with coherent, click-worthy titles.

She checked her Google Sheet. Each row that once contained only a prompt and duration was now filled with links to the generated video file and the published URLs. She could sort, filter, and track everything from one place.

For the first time, she was not spending her afternoons exporting, uploading, and copy pasting. She was planning campaigns, analyzing results, and refining prompts.

Why This n8n Template Changed Her Workflow

The benefits were not abstract. They showed up in Emma’s calendar, budget, and sanity.

  • Cost-efficient video creation – By leveraging Google Veo3 Fast through Fal AI, she could generate AI videos at a lower cost than many other tools she had tried.
  • End-to-end automation – From the moment she typed into the PROMPT column to the moment a video appeared on YouTube or TikTok, the workflow handled creation, storage, publishing, and tracking.
  • SEO-optimized titles – GPT-4o generated YouTube friendly titles automatically. Instead of guessing what might work, she started from strong, search-aware headlines.
  • Multi-platform reach – With Upload-Post.com profiles, she could distribute videos to YouTube and, on a paid plan, TikTok without logging into each platform manually.
  • Simple management in Google Sheets – The sheet acted as a lightweight content management system. Her team could collaborate in a tool they already knew, without needing to learn n8n.

In other words, the n8n workflow template turned her AI video process from a scattered set of tools into a single, reliable system.

Where You Come In: Turning Your Prompts Into a Video Engine

If you recognize yourself in Emma’s story – juggling tools, fighting upload fatigue, and trying to keep up with video demand – this template gives you a clear path forward.

You can:

  • Use a simple Google Sheet as your content command center.
  • Connect Fal AI to access the Veo3 Fast model for cheaper AI video generation.
  • Let GPT-4o handle YouTube title optimization.
  • Automate uploads to YouTube and, with the right plan, TikTok via Upload-Post.com.
  • Run everything on a schedule with n8n so you are always publishing, even when you are not at your desk.

Instead of manually pushing every video live, you design the system once, then focus on the ideas that go into it.

Ready to turn your prompts into a fully automated AI video workflow? Set up this n8n template, plug in your API keys, and start watching your Google Sheet quietly transform into a steady stream of published videos.

If you need help along the way, you can always tap into AI automation communities or work with professional service providers who specialize in building and customizing n8n workflows for content teams.

Automate Instagram Carousel Posts with Google Sheets & Cloudinary

Automate Instagram Carousel Posts with Google Sheets & Cloudinary

Imagine Never Copy-Pasting Captions Again

You know that moment when you are juggling 12 tabs, 4 folders, and 1 rapidly cooling coffee, just to post a single Instagram carousel? First you open Google Drive, then you grab the images, then you copy the caption from a spreadsheet, then you upload everything manually to Instagram. Repeat for every post. Forever.

Or you could let an n8n workflow do all that for you while you focus on the fun stuff, like actually creating content.

This guide walks you through an automated n8n workflow template that connects Google Sheets, Google Drive, Cloudinary, and the Instagram Graph API to publish Instagram carousel posts on autopilot. No more repetitive clicking, no more “did I already post this?” panic.

What This n8n Workflow Actually Does

At a high level, this automation is your personal posting assistant. Here is the basic idea:

  • You keep a Google Sheet where each row represents a scheduled Instagram carousel post.
  • Images for each post live in a specific Google Drive folder.
  • The workflow uses Cloudinary to host the images so they are ready for Instagram.
  • Using the Instagram Graph API, the workflow creates and publishes a carousel post with your caption and all the images.
  • When it is done, it updates the Google Sheet so you know that post is taken care of.

In practice, this means you can plan content in Sheets, drop images in Drive, and let n8n quietly handle the “boring but important” part: actually publishing the carousel to Instagram.

Before You Start: One-Time Setup Checklist

There are a few things to prepare so the template can work smoothly. Think of this as setting the stage so your automation can perform its magic.

1. Build Your Master Google Sheet

Create a Google Sheet that acts as your master content schedule. Each row is one Instagram carousel post. Make sure you have columns like:

  • ExecuteId – a unique identifier for each post.
  • Folder – the Google Drive folder URL that contains the images for that carousel.
  • Expected content – your Instagram caption.
  • Status – use values like ToDo and Processed so the workflow knows what to publish.
  • Type – set this to Carousel for posts that should be published as carousels.

The workflow will only pick up rows where Status = “ToDo” and Type = “Carousel”, so those two are important.

2. Organize Images in Google Drive

For each planned carousel:

  • Create or use a dedicated Google Drive folder.
  • Upload all the images that should appear in that carousel.
  • Make sure the folder is shared with the correct public permissions so n8n can access the files using the link in your sheet.

Each row in your sheet points to one of these folders through the Folder column.

3. Prepare Your Cloudinary Account

Cloudinary acts as the middleman that hosts your images in a format Instagram is happy with. You will need to:

  • Create a Cloudinary account if you do not already have one.
  • Optionally create a specific folder in Cloudinary to keep your Instagram assets organized.
  • Note down your cloud name and upload preset. You will plug these into the relevant n8n node so the workflow can upload images automatically.

4. Get Your Instagram API Credentials Ready

Since this uses the Instagram Graph API, you will need:

  • Your Instagram access token.
  • Your Instagram business or user ID.

These are used to authenticate API calls so the workflow can create media containers and publish carousel posts on your behalf. Keep these credentials secure and follow Instagram’s token refresh guidelines.

How the n8n Workflow Runs Behind the Scenes

Now for the fun part: what actually happens when the workflow runs. Here is the full flow, step by step, with all the important technical details kept intact.

1. Scheduled Trigger Checks Your Sheet

The workflow starts with an n8n Schedule Trigger node that runs at a regular interval, for example every 5 minutes (you can adjust this). Each time it runs, it checks your Google Sheet for rows where:

  • Status is set to ToDo
  • Type is set to Carousel

Those rows represent carousel posts that are ready to be processed and published.

2. Retrieve Post Data from Google Sheets

A Google Sheets node reads the rows that match the criteria. From each row, the workflow extracts:

  • The folder link pointing to the Google Drive folder with the images.
  • The caption from the Expected content column.
  • The ExecuteId and other useful metadata.

This gives the workflow everything it needs to know which images to fetch and what text to publish with the post.

3. Collect All Images from the Google Drive Folder

Next, the workflow uses a Google Drive node to grab all the image files from the folder URL provided in the sheet. For this to work correctly, the folder must be publicly accessible with the appropriate sharing settings.

Every image in that folder is treated as part of the carousel, so what you put in the folder is what gets published.

4. Download Images from Drive

Each image is then downloaded from Google Drive using a direct download URL. This step prepares the files so they can be uploaded to Cloudinary. Think of it as n8n grabbing the raw ingredients before sending them off to the hosting kitchen.

5. Upload Images to Cloudinary

Once the images are downloaded, the workflow sends them to Cloudinary using the Cloudinary API. For each image:

  • The node uploads the file with your configured cloud name and upload preset.
  • Cloudinary returns a hosted image URL, which is what Instagram will ultimately use.

Make sure the Cloudinary node in n8n is configured with the correct credentials so the uploads succeed.

6. Set Up Instagram Parameters

With the image URLs ready, the workflow prepares the parameters needed for the Instagram Graph API. This includes:

  • Your Instagram access token.
  • Your Instagram business or user ID.
  • The image URLs from Cloudinary.
  • The caption pulled from the Google Sheet.

These values are passed into the nodes that will create media containers and, eventually, the carousel itself.

7. Create Media Containers for Each Image

Using the Instagram Graph API, the workflow creates a media container for each image. Each container points to one Cloudinary URL and includes the caption.

At this stage, you have multiple individual media containers, one per image, all ready to be stitched together into a carousel.

8. Gather All Media Container IDs

Instagram needs all the media container IDs in one place to build a carousel. The workflow:

  • Collects the IDs from every media container it just created.
  • Combines them into an array that will be referenced when creating the carousel media container.

9. Create the Carousel Media Container

Next, the workflow creates a special carousel media container that references the array of image container IDs. This tells Instagram: “These images belong together, show them as a carousel.”

10. Publish the Carousel Post to Instagram

With the carousel media container ready, the workflow sends the final publish call to the Instagram Graph API. Instagram then posts the carousel to your account using the caption and images you prepared.

This is the moment where your content appears on your feed without you touching the Instagram app. Very satisfying.

11. Update the Google Sheet Status

To avoid accidental duplicates, the workflow finishes by updating the original row in your Google Sheet. It sets the Status column to Processed.

That way, the next time the schedule trigger runs, it skips posts that already went live and only processes new rows still marked as ToDo.

Tips, Best Practices, and “Please Do This So It Works” Notes

  • Check Drive permissions carefully Make sure your Google Drive folders are shared with the right public access so n8n can read the images. If the workflow cannot see the files, nothing gets posted.
  • Keep Instagram tokens safe and fresh Store your access token securely and follow Instagram’s guidelines for refreshing tokens so the automation does not suddenly stop working.
  • Test with a sample post first Before you hand over your entire content calendar, run the workflow with a test carousel. Confirm that images are in the right order, the caption looks good, and the status updates correctly in your sheet.
  • Use Cloudinary’s image optimizations Cloudinary offers image transformation features that can help optimize sizes and quality. Using these can speed up uploads and keep your posts looking sharp.

Why This Workflow Is Worth Setting Up

By connecting Google Sheets for scheduling, Google Drive for asset storage, Cloudinary for hosting, and the Instagram Graph API for publishing, this n8n workflow removes a huge chunk of manual work from your social media process.

No more repeating the same 10 clicks for every carousel. No more wondering which posts are already published. You plan once, drop images in the right folders, and let automation quietly handle the rest.

Ready to automate your Instagram Carousel posts and reclaim some brain space? Set up this workflow, connect your accounts, and let n8n take over the repetitive parts of your content publishing.

Automated B2B AI Lead Qualification & Outreach Workflow

Automated B2B AI Lead Qualification & Outreach Workflow

Overview: AI-driven B2B Lead Qualification in n8n

In high-velocity B2B environments, manual lead qualification and outreach are rarely sustainable. This n8n workflow template operationalizes an end-to-end process that captures inbound leads, enriches them with third-party data, evaluates their quality with AI, and automatically sends tailored outreach messages. The result is a repeatable, scalable system that helps sales teams focus on the most relevant opportunities.

The workflow combines form or spreadsheet inputs, the Apollo API for enrichment, Groq-powered AI agents for lead scoring and email drafting, and Gmail for outbound communication, all orchestrated within n8n.

End-to-End Workflow Architecture

The automation is structured around five core stages, each implemented with specific n8n nodes and integrations:

  • Lead ingestion from forms or Google Sheets
  • Data enrichment via Apollo API
  • AI-based lead scoring
  • AI-generated outreach content and email delivery
  • Centralized logging and performance tracking

Lead Ingestion: Forms and Google Sheets as Entry Points

Flexible Triggers for Lead Capture

The workflow starts when a new lead record is created. n8n can be configured with one of two typical triggers:

  • Form submission trigger – A web form submits lead information such as name, email, phone number, and LinkedIn URL directly into n8n.
  • Google Sheets trigger – A new row added to a designated Google Sheet acts as the starting point, enabling teams that already manage leads in spreadsheets to connect seamlessly.

This dual-input design ensures that marketing, SDR, and operations teams can feed leads into a single automated pipeline without changing their existing capture tools.

Lead Enrichment with Apollo API

HTTP Request Node for External Data Enrichment

Once a raw lead is captured, the workflow calls the Apollo API using an HTTP Request node in n8n. The request typically uses an HTTP POST operation and passes available identifiers such as email and LinkedIn URL.

Apollo enriches the contact and company profile with additional attributes, for example:

  • Job title and seniority
  • Company name and size
  • Industry and related firmographic data

This enrichment step provides the structured context required for more accurate AI-based scoring and personalization later in the workflow.

AI-driven Lead Scoring with Groq Chat

Configuring the AI Agent for Qualification

The next phase uses an AI Agent node powered by a Groq Chat model. This node evaluates each enriched lead and assigns a numeric score from 1 to 10. The scoring logic is designed to prioritize leads that are more likely to be decision-makers or strong influencers in AI-related domains.

Typical factors considered by the AI Agent include:

  • Relevance of the lead’s industry to AI products or services
  • Appropriateness of the job title for purchase decisions or influence
  • Alignment with the ideal customer profile configured for the workflow

Within n8n, a conditional step then filters leads based on this AI-generated score. Only contacts with a score of 6 or higher proceed to the outreach stage. This threshold ensures that sales resources are directed toward higher quality prospects while lower-scoring leads can be handled differently or revisited later.

Automated AI Outreach: Personalized Email Generation

Second AI Agent for Email Drafting

For leads that pass the scoring criteria, the workflow invokes a second AI Agent node. This agent is responsible for generating a concise, professional outreach email tailored to the specific contact and company.

The AI Agent uses the enriched data fields, such as job title, company name, and industry, to construct a message that:

  • Introduces your AI solution or offering in a relevant context
  • References the lead’s role and potential challenges
  • Highlights potential collaboration or value propositions
  • Maintains a clear, action-oriented call to action

Gmail Integration for Automated Sending

Once the email content is generated, the workflow passes it to a Gmail node. This integration automatically sends the email to the lead’s address without manual intervention. You can configure:

  • The sender account and display information
  • Subject line patterns or dynamic subject lines based on lead data
  • Optional CC or BCC rules for internal visibility

This combination of AI-generated content and Gmail delivery enables consistent, scalable outreach that still feels personalized to each recipient.

Data Logging and Performance Tracking in Google Sheets

Maintaining a Centralized Lead Database

To close the loop, the workflow writes back the results into Google Sheets. For each qualified lead, n8n appends a new row or updates the existing one with:

  • Core contact details (name, email, phone, LinkedIn URL)
  • Enriched company and role information from Apollo
  • The AI-generated lead score
  • Outreach status and, optionally, timestamp of the email sent

This creates a single source of truth that sales, marketing, and operations teams can use to monitor pipeline quality, track follow-ups, and analyze performance over time.

Key Benefits and Best Practices

Operational Advantages

  • Efficiency – Automating enrichment, scoring, and outreach removes hours of manual research and cold email drafting.
  • Precision – AI-powered lead scoring helps prioritize high-potential contacts so teams focus on the most promising opportunities.
  • Personalization at scale – AI-generated emails leverage enriched data, which improves relevance and response rates compared to generic outreach.
  • Integrated stack – Native connections to Apollo, Gmail, and Google Sheets provide a cohesive workflow without custom glue code.

Implementation Best Practices

  • Regularly review and refine the AI scoring prompt so the 1 to 10 scale reflects your current ideal customer profile.
  • Adjust the qualification threshold (for example, score 6 or higher) based on lead volume and team capacity.
  • Periodically test and iterate on the outreach email template generated by the AI Agent to align with your brand voice and conversion goals.
  • Use the Google Sheets log to analyze which segments and scores correlate with the highest reply and meeting rates.

Conclusion: Scaling B2B Sales with n8n and AI

By orchestrating AI agents, enrichment services, and communication channels within n8n, B2B sales teams can build a robust, repeatable system for lead qualification and outreach. This workflow template demonstrates how to combine lead capture, Apollo enrichment, Groq-based scoring, AI-generated messaging, Gmail delivery, and Google Sheets tracking into a single automated pipeline.

Adopting this type of AI-driven automation allows teams to maintain personalized engagement while significantly improving throughput and consistency across the sales funnel.

If you are ready to modernize your lead generation and outreach operations, implement this n8n workflow and start scaling your B2B pipeline with AI-powered automation.

Automated Intercom Conversation QA Review with AI

Automated QA Review for Intercom Conversations Using AI & n8n

Every customer conversation is a chance to build trust, strengthen your brand, and create loyal fans. Yet when your inbox is full and your team is busy, it is easy for quality checks to slip through the cracks. Manual QA reviews take time, they can feel inconsistent, and they often happen too late to really help your team grow.

That is where automation becomes a powerful ally. By combining n8n, Intercom, and AI, you can transform routine support interactions into a steady stream of insights, coaching moments, and measurable improvements. Instead of spending hours reviewing chats, you can focus on leading your team, improving processes, and designing a support experience you are proud of.

This article walks you through an n8n workflow template that automatically performs QA reviews on Intercom conversations using AI. Think of it as a practical first step toward a more automated, focused, and scalable support operation.

The Problem: Manual QA Slows You Down

Support leaders often know exactly what “good” looks like, yet they struggle to review conversations at scale. Common challenges include:

  • Endless copy-pasting of chat logs into documents or spreadsheets
  • Inconsistent scoring between different reviewers
  • Little time left for meaningful coaching and training
  • Difficulty spotting long term trends in support quality

As your team grows, this manual approach simply does not scale. The more conversations you have, the harder it becomes to keep quality high without burning out your managers.

The Shift: From Manual Checks To Automated Insight

Automating QA is not about replacing human judgment. It is about giving your team a reliable system that:

  • Reviews every closed Intercom conversation consistently
  • Highlights where agents excel and where they need support
  • Delivers clear, structured feedback directly from your existing data
  • Frees your time for strategic work instead of repetitive review tasks

With the right mindset, this n8n workflow is more than a technical setup. It becomes a foundation for a culture of continuous improvement, where data and AI support your people instead of overwhelming them.

The Goal: Automated QA for Intercom Conversations

The core objective of this automation is simple and powerful. Whenever an Intercom conversation is closed, the workflow automatically:

  • Evaluates the conversation using AI, focusing on response time, clarity, tone, urgency handling, ownership, and problem solving
  • Logs structured scores and metadata for every conversation in a Google Sheet
  • Generates personalized coaching feedback for low scoring interactions
  • Builds a long term data set so you can track support quality trends over time

Once this is in place, every closed conversation turns into a tiny feedback loop, helping your team get better with almost no extra effort.

How the n8n Workflow Works, Step by Step

Let us walk through how the template operates, from the moment a conversation closes in Intercom to the moment the insights land in your Google Sheet.

1. Webhook Trigger: Start When Intercom Says “Done”

The journey begins with a Webhook node in n8n. This webhook listens for conversation.admin.closed events sent by Intercom. Each time a conversation is closed by an admin, Intercom notifies this webhook.

That notification includes the conversation ID, which becomes the key used throughout the rest of the workflow. You no longer need to check which conversations to review, because the system starts the analysis automatically at the perfect moment.

2. Fetch Conversation Details from Intercom

Next, the workflow uses the Intercom API to fetch the full conversation details based on that ID. This step gathers:

  • All messages exchanged in the conversation
  • The role of each sender (User, Bot, Admin)
  • Author names
  • Accurate timestamps and metadata

Instead of scanning through messy chat logs, the workflow pulls everything into one clean, machine readable structure that AI can understand and evaluate.

3. Filter Out Irrelevant Conversations

Not every closed conversation deserves a full QA review. To keep your data focused, the workflow automatically filters out:

  • Conversations marked as “Spam/Promotional”
  • Conversations categorized as “Other” types that you do not want to analyze

Only relevant support conversations move forward, which protects your time and keeps your QA metrics meaningful.

4. Turn Raw Messages Into a Structured Transcript

Now it is time to prepare the conversation for AI evaluation. The workflow processes the raw Intercom data and creates a structured transcript that includes:

  • Message body content with HTML tags removed, so the text is clean and readable
  • The role of each sender, such as User, Bot, or Admin
  • The author name for each message
  • Timestamps formatted in a human friendly way

This step transforms a messy sequence of events into a clear narrative that an AI model can interpret just like a human reviewer would.

5. AI Evaluation in Parallel: Performance and Message Analytics

With the transcript ready, the workflow launches two AI powered analyses in parallel. Running them side by side keeps the process fast and efficient.

A. Performance Scoring with GPT-4o

First, the conversation is sent to GPT-4o for a detailed quality assessment. The model evaluates several key attributes, such as:

  • Response time and how quickly the agent replied
  • Clarity and politeness of the messages
  • How well urgency was recognized and handled
  • Ownership of the issue and willingness to help
  • Effectiveness of problem solving and resolution

The output is structured and consistent. GPT-4o returns:

  • Individual attribute scores
  • The conversation start and end dates
  • An overall score on a scale from 1 to 5

This gives you a quick, objective snapshot of how the conversation went, without reading every line yourself.

B. Message Analytics: Who Said What, and How Often

In parallel, another branch of the workflow focuses on message analytics. It counts how many messages were sent by each role:

  • Number of Bot messages
  • Number of User messages
  • Number of Admin messages

It also identifies the last admin who responded. This is especially useful when multiple agents collaborate on the same conversation or when you want to track performance by individual team member.

6. Merge Results and Log Everything in Google Sheets

Once both analyses are complete, the workflow merges the results into a single dataset that includes:

  • All performance scores from GPT-4o
  • Message counts and the last responding admin
  • Conversation timing and other key metadata

This combined record is then appended to a Google Sheet. Over time, this sheet becomes your lightweight QA database, where you can:

  • Review individual conversations and scores
  • Track quality trends week by week or month by month
  • Export data for reporting or further analysis

No more scattered notes or ad hoc spreadsheets. You get a single, growing source of truth for support quality.

7. Optional Coaching Feedback for Low Scores

Numbers are useful, but they are not enough on their own. To truly help your team grow, you also need clear, constructive guidance.

That is why the workflow includes an optional coaching step. If the overall score for a conversation is 3 or less, an additional AI evaluation is triggered. This AI pass generates friendly, direct coaching feedback that covers:

  • What the agent did well, so strengths are recognized
  • Specific areas to improve, with exact quotes from the conversation
  • Examples of better replies the agent could have used
  • How the customer likely felt during the interaction
  • Practical advice for handling similar situations in the future

This turns low scoring conversations into valuable learning opportunities instead of silent failures. Your team receives actionable tips that they can apply immediately, and you get a scalable way to support their development.

Why This n8n Automation Matters for Your Growth

Implementing this workflow is not just a technical upgrade. It is a strategic move that reshapes how you invest your time and energy as a support leader or business owner.

  • Save time and gain consistency by removing manual, repetitive QA work and letting the automation review every closed conversation with the same criteria.
  • Turn unstructured chat logs into insights that you can act on, instead of letting conversations disappear into the archive.
  • Boost accountability and customer experience by making quality visible and measurable for every agent.
  • Enable data driven coaching with clear scores, rich context, and AI generated guidance that helps your team grow faster.

Most importantly, this template is a gateway to a more automated way of working. Once you experience what one well designed workflow can do, it becomes easier to imagine and build the next one.

Using This Template as Your First Step to Deeper Automation

This n8n workflow template gives you a ready made foundation. You can use it as is, or customize it to fit your processes, your scoring model, or your data stack. A few ideas to extend it over time:

  • Send low scoring conversation summaries to a private Slack channel for team leads
  • Trigger follow up tasks in your project management tool when certain issues appear
  • Segment QA results by product line, language, or customer type

Automation is a journey, not a single project. Start simple, let the data guide you, and refine as you go. With each improvement, you reclaim more time and create more space for deep work, coaching, and strategy.

Take Action: Turn Your Intercom Conversations Into Coaching Fuel

If you are ready to move beyond manual QA and let automation handle the heavy lifting, this template is a powerful place to begin. It combines Intercom, n8n, GPT-4o, and Google Sheets into a practical system that works quietly in the background while you focus on what matters most.

Build on the template, learn from it, and make it your own. Each conversation your team has can become a chance to learn, improve, and deliver a better customer experience.

Start today, experiment boldly, and let automation support the next stage of your personal and business growth.

Automate Lead Routing with AI and Calendly Integration

Automate Lead Routing with AI and Calendly Integration

Picture This: Your Inbox vs. 200 New Leads

You open your laptop on Monday morning, full of optimism and caffeine. Then you see it: a wall of Calendly notifications, form responses, and “quick questions” from leads who may or may not be a good fit. You start copying data into sheets, checking if people actually booked a meeting, and manually deciding who should get which follow-up sequence.

Ten minutes later, your optimism is gone. Forty minutes later, your coffee is cold. Two hours later, you are sorting email domains like a very overqualified spam filter.

That is exactly the kind of repetitive chaos this n8n workflow template is built to destroy, in a nice, automated way. Using Calendly, OpenAI, Saleshandy, and Google Sheets, you can score, route, and log leads automatically, so your sales team spends less time clicking and more time closing.

What This n8n Workflow Actually Does

This workflow connects your Calendly form submissions with an AI lead scoring system, then routes each lead into the right Saleshandy sequence and Google Sheet based on how promising they are.

Here is the high-level flow, without the technical jargon headache:

  • Calendly sends a webhook when someone fills out your form.
  • An AI agent (OpenAI) reviews the lead details and gives them a score from -1 to 10.
  • Based on that score, the lead is classified as Qualified, Semiqualified, or Unqualified.
  • The workflow checks if the person actually booked a Calendly meeting or just flirted with the idea.
  • Qualified and semiqualified leads go into different Saleshandy sequences for targeted outreach.
  • All leads are logged into separate Google Sheets tabs for full visibility by your GTM and RevOps teams.

The result is a smart, scalable lead routing system that runs quietly in the background while you pretend you did it all manually.

How the Workflow Thinks About Your Leads

AI Lead Scoring: From -1 to 10

At the heart of this setup is an AI lead scoring agent powered by OpenAI. It evaluates each lead using details pulled from your Calendly form, such as:

  • Email domain (business domain vs free email provider)
  • Phone country code
  • Product interest or use case
  • Company size
  • Monthly budget

The AI assigns a numeric score between -1 and 10. A score of -1 is the “hard no” category, usually for invalid or disqualified leads, like unsupported phone country codes or clearly useless data. Everything else falls on a scale that you can tune through the AI prompt.

Lead Categories Based on Score

Once the score is in, the workflow uses a switch node in n8n to put each lead into one of three buckets:

  • Qualified – score 7 or higher
  • Semiqualified – scores 5 to 6
  • Unqualified – scores 4 or less

These categories drive everything that happens next: which Saleshandy sequence they enter, which spreadsheet tab they land in, and how your team prioritizes them.

Did They Actually Book a Meeting?

Not everyone who fills out a Calendly form finishes the job. Some people get distracted, some ghost, some just like your calendar UI.

To separate the serious from the curious, the workflow calls the Calendly API to verify whether a meeting was actually booked. That booking status is then used to:

  • Tailor the follow-up sequence
  • Filter out no-shows or non-bookers from certain campaigns
  • Log accurate event details for reporting

The Main Building Blocks of the Workflow

1. Calendly Webhook Trigger

Everything starts when Calendly sends a webhook after a form submission. This trigger node in n8n captures the raw submission data, including all the fields you care about for scoring and routing.

2. AI Lead Scoring Agent (OpenAI)

The captured data is passed to an AI agent configured with your scoring logic. You control the logic through the system prompt, so you can define what a “good” lead looks like for your business. The agent:

  • Reads data like email domain, phone country code, company size, and budget
  • Evaluates whether the lead fits your target profile
  • Outputs a score from -1 to 10 that the rest of the workflow uses

3. Score-Based Routing with a Switch Node

Next, a switch node in n8n routes leads based on that score. It sends them into one of three branches:

  • Qualified branch
  • Semiqualified branch
  • Unqualified branch

Each branch has its own logic for Saleshandy sequences and Google Sheets logging, so you can treat each group differently.

4. Calendly API Meeting Check

Before any outreach is triggered, the workflow calls the Calendly API to verify if the lead actually booked a meeting. This step helps you:

  • Distinguish booked vs unbooked leads
  • Adjust messaging for people who already have a call scheduled
  • Avoid bothering people who never confirmed a slot

5. Saleshandy Sequence Integration

For leads that are worth nurturing, the workflow connects directly to Saleshandy via API. It automatically:

  • Enrolls qualified leads into a dedicated high-priority Saleshandy sequence
  • Enrolls semiqualified leads into a different, more exploratory sequence
  • Leaves unqualified leads out of campaigns while still logging them for reference

No more CSV exports, manual imports, or “Did we add this lead yet?” messages in Slack.

6. Google Sheets Logging for Visibility

Finally, every lead is logged in Google Sheets. The workflow appends or updates rows in different tabs based on qualification level, so you end up with:

  • Separate tabs for Qualified, Semiqualified, and Unqualified leads
  • Columns for lead data, AI score, Calendly event details, and meeting status
  • A live, filterable view for GTM and RevOps teams without needing to open n8n

Why This Setup Is Worth the 20 Minutes to Configure

  • Automation – No more manual lead sorting or copy-pasting into spreadsheets. Your SDRs will thank you, and so will their wrists.
  • Precision – AI-driven scoring helps you prioritize high-value prospects and cut down on noise.
  • Visibility – Google Sheets act like a real-time dashboard for segmented leads, easy to share and analyze.
  • Customizable – You can tweak AI prompts, score thresholds, and routing rules to match your own sales playbook.

Step-by-Step: How to Set Up the Workflow in n8n

Here is a simplified setup guide to get the template running without needing a full-time automation engineer.

1. Connect Calendly and Set Up the Webhook

  • Create or identify the Calendly form you want to use for lead capture.
  • Set up a Calendly webhook that sends form submission data to your n8n instance.
  • Use the Calendly Webhook Trigger node in n8n to receive that data.

2. Configure the AI Lead Scoring Agent

  • Add the OpenAI node or AI Agent node in n8n.
  • Provide your OpenAI API key and select the model you want to use.
  • Edit the system prompt to define your scoring criteria, for example how to treat different email domains, budgets, or company sizes.
  • Make sure the node outputs a numeric score between -1 and 10.

3. Build Score-Based Routing Logic

  • Add a Switch node after the AI scoring step.
  • Configure branches for:
    • Score 7 and above – Qualified
    • Scores 5 to 6 – Semiqualified
    • Scores 4 or below – Unqualified
  • Connect each branch to its own follow-up logic.

4. Verify Meeting Booking Status via Calendly API

  • Add a node that calls the Calendly API for each lead.
  • Use the lead’s event or invitee data to check if a meeting was actually booked.
  • Store the booking status and event details for use in your routing and logging.

5. Integrate Saleshandy Sequences

  • Connect the Saleshandy API to n8n using your credentials.
  • For Qualified leads, map the contact data and enroll them into your primary Saleshandy sequence.
  • For Semiqualified leads, map the same data but enroll them into a different, more nurturing sequence.
  • For Unqualified leads, skip sequence enrollment but keep logging them for future analysis.

6. Log Data in Google Sheets

  • Connect your Google account to n8n.
  • Set up Google Sheets nodes to append or update rows in specific tabs for each lead category.
  • Map all relevant fields: contact info, AI score, meeting status, and any Calendly event details.

7. Document the Workflow with Sticky Notes

  • Use sticky notes inside the n8n editor to label key sections:
    • AI scoring logic
    • Routing rules
    • Saleshandy integration
    • Google Sheets logging
  • This helps future you (or your teammates) understand what each part of the workflow is doing without reverse engineering it.

Tips to Keep Your Automation Smart, Not Messy

  • Refine your AI prompt regularly – As your ideal customer profile evolves, update the scoring rules so the AI keeps matching your real-world criteria.
  • Secure your credentials – Store API keys for Calendly, Saleshandy, OpenAI, and Google securely, not in random text files or screenshots.
  • Test with sample leads – Run test data through the workflow to confirm that routing, scoring, and logging behave exactly as expected.
  • Watch for duplicates – Keep an eye on your Google Sheets for duplicate rows or inconsistent formatting, especially after making changes to the workflow.
  • Use booking status wisely – Personalize follow-ups based on whether a meeting is booked. It can help reduce no-shows and avoid awkward “Did you book?” messages.

Wrapping Up: Let the Robots Sort Your Leads

By combining Calendly form data with AI-powered lead scoring, meeting verification, targeted Saleshandy sequences, and clean Google Sheets logging, you get a lean, smart lead routing machine that runs with minimal manual effort.

Your sales team can finally focus on conversations, not spreadsheets. Your RevOps team gets clear visibility into lead quality and funnel performance. And you get to retire at least three repetitive tasks from your daily routine.

Start designing your smart lead routing workflow today and see how much smoother your sales process feels when automation handles the busywork.

Try the n8n Workflow Template

Ready to automate your lead management and routing instead of wrestling with it every week? Connect your Calendly account, plug in AI scoring, and integrate Saleshandy plus Google Sheets using this streamlined n8n workflow template.

Get started now and transform your sales process with automated lead routing, AI scoring, and clean data in one place.

JSON Architect: Dynamic JSON Output for AI Agents

JSON Architect: Dynamic JSON Output for AI Agents

Overview

JSON Architect is an advanced n8n workflow template designed to generate, validate, and refine structured JSON output formats based on any AI agent’s input context. It automates the full lifecycle of JSON schema creation, from initial design through validation and real-world testing, so that downstream AI agents receive predictable, machine-consumable data with minimal manual intervention.

This template is particularly suited for automation professionals, solution architects, and AI engineers who need robust, context-aware JSON structures for complex AI workflows, tools, and agents.

Primary Objective and Use Case

The core goal of JSON Architect is to produce reliable JSON schemas that align precisely with a given scenario or prompt, then verify that those schemas are usable in practice. Rather than manually designing formats for every new AI task, this workflow dynamically derives the appropriate structure and validates it in an automated loop.

For instance, consider an AI use case in which two characters are speaking at night about their magical capabilities. One character can foresee the future, while the other practices alchemy. JSON Architect can automatically construct a JSON schema that captures:

  • Contextual metadata such as time of day and location
  • Character profiles, including magical abilities and attributes
  • Dialogue structure and exchanges between the characters

The resulting JSON is shaped specifically for AI consumption, so that agents can reliably parse, analyze, or extend the scene without ambiguity or ad hoc parsing logic.

Architecture and Workflow Design

The JSON Architect template is built as a multi-stage workflow in n8n. Each stage focuses on a single responsibility and feeds into the next, forming a controlled feedback loop that ensures JSON quality and applicability.

1. Prepare Input

In the initial stage, the workflow defines the context or scenario that requires JSON structuring. This can include:

  • High-level task description or AI prompt
  • Domain-specific constraints or required fields
  • Any metadata that should be represented in the final JSON

Clear, well-scoped input at this step significantly improves the quality of the generated schema and is considered an automation best practice.

2. Guarantee Input

Before schema generation begins, the workflow validates the incoming data. The Guarantee Input phase ensures that:

  • Required fields are present and properly formatted
  • Input values fall within expected ranges or types
  • Critical context is not missing or ambiguous

This pre-validation reduces failure rates in later stages and avoids propagating malformed context into the JSON generation logic.

3. JSON Generator

Once the context is validated, the JSON Generator node (or group of nodes) creates an initial JSON format. This stage:

  • Interprets the input scenario and requirements
  • Proposes a JSON schema or structured output format
  • Defines keys, nested objects, and arrays aligned with the AI use case

For the earlier example of two characters discussing magic at night, this step would define objects for characters, dialogue turns, setting details, and any additional attributes that should be machine-readable.

4. JSON Validator

The JSON Validator stage examines the generated schema to confirm that it is structurally sound and suitable for the intended purpose. Typical checks include:

  • JSON syntax correctness
  • Consistency in field naming and nesting
  • Alignment with required constraints or schema patterns

If the JSON fails validation, the workflow does not proceed to real-data testing. Instead, it feeds back into refinement logic.

5. JSON Reviewer and Practical Testing

Validation alone is not sufficient for production-grade AI workflows. The JSON Reviewer stage tests the JSON format by attempting to fit actual input data into the schema. This is where practical applicability is verified:

  • Sample or real data is mapped into the generated structure
  • Incompatibilities, missing fields, or impractical constraints are detected
  • The schema is assessed for real-world usability, not just syntactic validity

This step effectively closes the gap between theoretical schema design and operational usage in AI agents.

6. Iterative Improvement: Loop Until It Works

A key feature of JSON Architect is its iterative validation loop. If either the JSON Validator or JSON Reviewer stages detect issues, the workflow:

  • Enters an improvement loop that adjusts the schema
  • Repeats validation and review steps
  • Continues until a valid, usable schema is achieved or a configured maximum number of rounds is reached

This controlled iteration is essential for complex or ambiguous contexts, where a single-pass generation is often insufficient. It also incorporates safety and retry mechanisms to prevent infinite loops and to handle invalid outputs gracefully.

7. Prepare Output

Once the JSON format has passed both structural validation and practical testing, the workflow enters the Prepare Output phase. This final stage:

  • Outputs the approved JSON structure
  • Includes metadata describing how and when to use the schema
  • Documents the validation status and any relevant constraints

The result is a ready-to-use JSON format that can be integrated directly into AI pipelines, tools, or agents with confidence.

Key Technical Elements

JSON Architect leverages several advanced techniques and nodes to deliver robust, context-aware JSON outputs.

Iterative Validation Loops

The architecture is built around iterative validation loops that ensure accuracy and reliability. Instead of assuming the first generated schema is correct, the workflow:

  • Continuously evaluates the JSON against structural and practical criteria
  • Refines the schema until it meets predefined quality thresholds
  • Prevents deployment of partially valid or brittle formats

Advanced JSON Parsing

To handle complex and dynamic structures, the workflow utilizes custom components such as the Advanced JSON Output Parser. This node extends beyond typical parsers by:

  • Supporting more flexible and nuanced JSON patterns
  • Handling edge cases that arise from AI-generated content
  • Providing better error reporting for debugging and refinement

Safety, Error Handling, and Retries

Automation reliability is a central design principle. JSON Architect includes:

  • Safety mechanisms to catch invalid JSON outputs early
  • Retry logic for transient failures or inconsistent AI responses
  • Guardrails to stop processing when a maximum iteration count is reached

These measures ensure that the workflow degrades gracefully, preserving system stability even when upstream inputs are noisy or unpredictable.

Benefits for AI and Automation Workflows

Adopting JSON Architect in your n8n environment provides several strategic advantages.

  • Automated schema generation: Eliminate manual design of JSON structures for each new AI scenario by letting the workflow derive schemas from context.
  • Reduced human error: Rigorous validation and testing stages minimize the risk of malformed or incomplete JSON formats entering production.
  • High adaptability: The iterative design and advanced parsing allow the template to support a wide variety of AI workflows, from conversational agents to complex data pipelines.
  • Standardized outputs: Consistent, well-documented JSON formats improve interoperability between different AI agents, tools, and services.
  • Improved maintainability: Centralizing schema generation logic in a reusable n8n template simplifies long-term maintenance and evolution of your automation stack.

Strategic Impact and Best Practices

By integrating JSON Architect into your AI infrastructure, you move from ad hoc JSON handling to a disciplined, automated approach. This shift:

  • Streamlines data interchange between AI components
  • Improves reliability of model interactions and tool calls
  • Supports configuration management through predictable, versionable JSON formats

For best results, automation professionals should:

  • Provide clear, detailed input contexts during the Prepare Input phase
  • Define explicit validation rules and quality thresholds
  • Monitor iteration counts and error logs to refine prompts or constraints over time

Conclusion

JSON Architect closes the feedback loop between JSON generation and real-world applicability in AI workflows. By combining context-aware schema creation, iterative validation, and advanced parsing, it enables developers, data engineers, and automation experts to deliver robust, standardized JSON outputs at scale.

If you are building or maintaining AI-driven systems in n8n, this template provides a strong foundation for reliable data exchange and agent interoperability.

Get Started

Integrate JSON Architect into your n8n environment to accelerate schema design, reduce manual work, and increase the robustness of your AI data handling pipelines.

Automate Image Labeling to Google Sheets with n8n

Automate Image Labeling to Google Sheets with n8n

Why bother automating image labeling?

Imagine this: you need to search for a bunch of images online, figure out what’s in each one, then log all that info into a spreadsheet. Doing that manually gets old really fast, right?

That’s exactly where this n8n workflow template comes in. It automatically:

  • Searches for images using Google Custom Search
  • Analyzes what’s in those images with AWS Rekognition
  • Logs the image title, URL, and detected labels into Google Sheets

You end up with a neat, searchable sheet full of labeled images, without all the copy-paste chaos.

What this n8n template actually does

This workflow connects three main services in one smooth automation:

  • Google Custom Search – finds images based on your search query
  • AWS Rekognition – detects labels like objects, scenes, or activities in each image
  • Google Sheets – stores the results so you can review, filter, and share them

Once you set it up, you can run it whenever you want to pull in fresh images and label them automatically.

When should you use this workflow?

This template is perfect if you:

  • Work with image datasets and need quick labeling for research or prototyping
  • Are testing or training computer vision models and want a fast way to explore image content
  • Need a simple, shareable log of images and their tags for your team or clients
  • Just want to experiment with n8n, APIs, and image recognition without writing a lot of code

If you find yourself repeatedly searching images and manually tracking what’s in them, this workflow will save you a lot of time and mental energy.

What you need before you start

To get this n8n template up and running, you’ll need:

  • Google Custom Search API access (API key and search engine context)
  • AWS Rekognition credentials
  • Google Sheets OAuth2 credentials

In the workflow, you’ll replace placeholder values like API keys, search queries, and sheet IDs with your own real credentials and settings.

Quick reminder: make sure you respect both Google API usage policies and AWS Rekognition limits while using this setup.

How the workflow is structured in n8n

Let’s walk through the main steps so you know exactly what’s happening under the hood.

Step 1 – Fetch images with the HTTP Request node

The workflow kicks off with an HTTP Request node that talks to the Google Custom Search API. Here’s what it typically sends:

  • Your search query (for example, street)
  • Parameters that specify you want image results
  • Your API key
  • Your search engine context (CX)

Google Custom Search responds with a JSON object that includes:

  • A list of image URLs
  • Titles or descriptions for each image

This gives the workflow everything it needs to start analyzing those images.

Step 2 – Analyze image content with AWS Rekognition

Next, the workflow passes each image into an AWS Rekognition node. This is where the magic of label detection happens.

AWS Rekognition looks at the binary image data and returns labels that describe what it sees, such as:

  • Objects (for example, car, person, tree)
  • Scenes (for example, city, street, beach)
  • Activities or contexts, depending on the image

The result is a structured set of labels and confidence scores that tell you what’s likely in each image.

Step 3 – Prepare the data with the Set node

Once the labels are available, the workflow uses a Set node to tidy everything up. Think of this as the “organize before saving” step.

In this node, the workflow maps out:

  • The image title from Google Custom Search
  • The direct image URL
  • The labels returned by AWS Rekognition

All of that is combined into a clean, structured format that fits nicely into rows and columns in Google Sheets.

Step 4 – Append everything to Google Sheets

Finally, the Google Sheets node takes the structured data and appends it as new rows in your chosen spreadsheet.

Each row might include fields like:

  • Image title
  • Image URL
  • Detected labels

You end up with a growing, dynamic database of images and their analyzed labels, all stored in a place that’s easy to view, filter, share, or plug into other tools.

Why this n8n workflow makes life easier

So what do you actually gain from setting this up?

  • Time-saving automation
    No more manual image searches, copy-pasting URLs, or typing labels into spreadsheets. The workflow handles fetching, analyzing, and logging for you.
  • Scalability
    Need more images or different topics? Just tweak the search query or extend the workflow with extra nodes for more processing or filtering.
  • Accessible, shareable data
    Because everything lands in Google Sheets, your results are easy to browse, share with teammates, or connect to dashboards and reports.

Getting started with the template

Once you have your API keys and credentials, you can plug them into the template and customize things like:

  • Your search query (for example, street, nature, cars)
  • The Google Sheet ID and target tab
  • Any extra fields you want to store alongside the labels

After that, run the workflow and watch your spreadsheet fill up with labeled image data automatically.

Ready to streamline your image labeling process and free up your brain for more interesting work? Give this automation a try and see how quickly it boosts your productivity.

Try the n8n image labeling template

If you want to skip the setup from scratch and jump straight into using a ready-made workflow, you can start from this template:

Want more n8n automation ideas?

If this kind of workflow gets you excited about what else you can automate, you’re not alone. There are plenty of ways to connect n8n with your favorite tools and build automations that quietly handle the boring parts of your day.

Subscribe to our blog to get more n8n tutorials, workflow templates, and practical automation tips delivered regularly.