n8n + TheHive: Create, Update & Get a Case

Automating TheHive Case Workflow with n8n: Create, Update & Get (So You Click Less and Chill More)

Imagine this: you are in the middle of something important, coffee in one hand, and suddenly you are stuck creating the same type of incident in TheHive for the 37th time this week. Click, type, tag, set severity, repeat. At some point, you start questioning your life choices.

Good news, your keyboard can retire from this repetitive torture. With an n8n workflow, you can automatically create a case in TheHive, update it with new details, then fetch it again to verify everything worked as expected. No more manual copy-paste marathons.

This guide walks you through a simple but powerful n8n + TheHive workflow pattern: create a case, update the case, then get the case. It is especially handy for security operations centers (SOCs) that want to automate incident ingestion, enrichment, and verification.


Why n8n + TheHive is such a good combo

Before we dive into the step-by-step setup, let us quickly look at what each tool brings to the party:

  • n8n is an open-source workflow automation tool that lets you connect APIs and services with minimal pain and zero glue code. Drag, drop, configure, done.
  • TheHive is an open-source security incident response platform (SIRP) that handles case management, collaboration, and investigation workflows.

When you connect them, you get a flexible automation pipeline that can:

  • Create incidents programmatically, instead of someone manually typing forms all day.
  • Enrich cases using external services like threat intel, WHOIS, or malware scanning.
  • Verify and post-process results, then trigger follow-up actions like notifications or additional tasks.

In other words, you let automation handle the boring bits so humans can focus on the interesting security problems.


The workflow in plain English

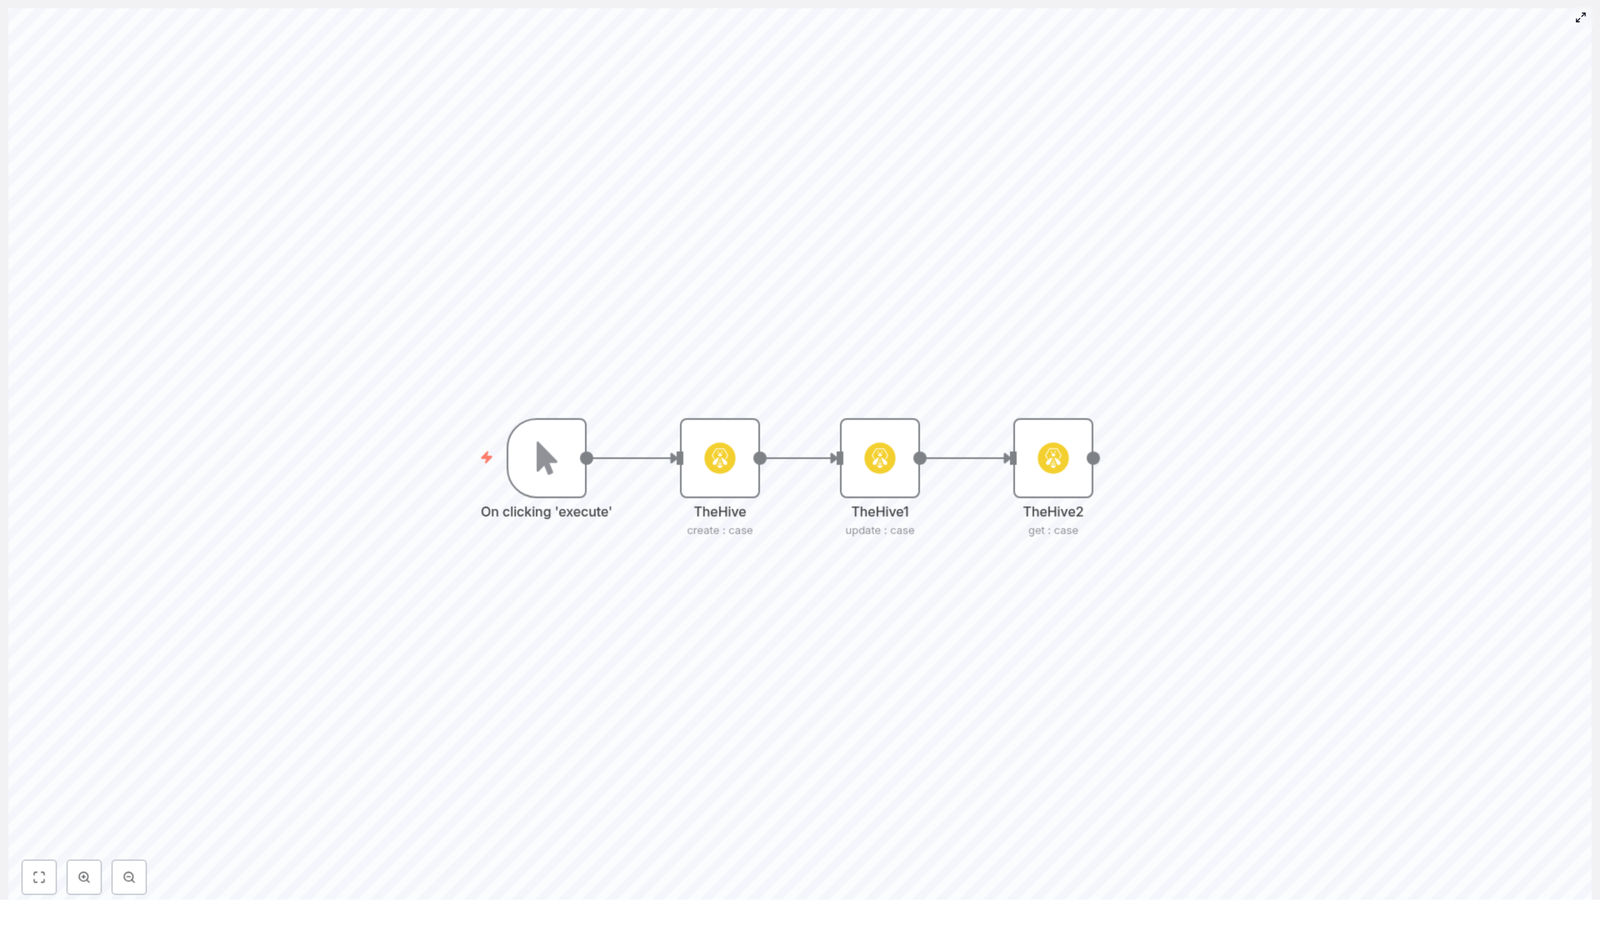
The example workflow consists of four nodes in n8n, wired up in a straight line:

  1. Manual Trigger – you click “Execute” to run the workflow while testing.
  2. TheHive (create : case) – creates a new case in TheHive.
  3. TheHive1 (update : case) – updates that same case, for example changing severity.
  4. TheHive2 (get : case) – retrieves the final state of the case.

Flow: Manual Trigger → Create Case → Update Case → Get Case.

The important bit: the create node returns the new case ID, and that ID is reused in the update and get nodes using n8n expressions. That is how n8n knows which exact case to touch, instead of just yelling into the void.


Quick setup guide: from zero to automated case in minutes

Step 1: Start with a Manual Trigger

To keep things simple while testing, begin with n8n’s Manual Trigger node. This lets you run the workflow on demand by clicking “Execute”.

Later, when you are confident it works and you are ready to go full automation, you can replace this with:

  • An HTTP/Webhook trigger to ingest alerts from other systems.
  • A Schedule trigger to run the workflow at regular intervals.

Step 2: Create a case in TheHive

Next, add a TheHive node and set the operation to create : case. This is where you define what your new incident looks like.

Key fields to configure:

  • title – a short, descriptive title, for example Suspicious login detected.
  • owner – the owner or team in TheHive that should handle the case.
  • severity – severity level, often 1 to 3, depending on your TheHive setup.
  • tags – useful labels for search and automation, for example n8n, theHive.
  • startDate – an ISO timestamp for when the incident started.
  • description – human-readable details about what is going on.

Example parameters inside the node might look like this:

{  "title": "n8n",  "owner": "Harshil",  "tags": "n8n, theHive",  "severity": 1,  "startDate": "2020-12-03T10:08:14.000Z",  "description": "Creating a case from n8n"
}

Make sure your TheHive credentials are set up in n8n, for example a credential named hive. The TheHive node uses those credentials to talk to TheHive’s API securely, so you do not have to paste tokens all over the place.

Step 3: Update the case you just created

Now add another TheHive node, often labeled something like TheHive1, and set the operation to update : case.

You need to tell this node which case to update. Instead of manually typing an ID, you use an expression that grabs the ID from the previous node’s output:

id: ={{$node["TheHive"].json["id"]}}

This expression says: “Look at the node named TheHive, grab its JSON output, and use the id field.” That is the case ID returned by the create operation.

Then define what you want to change. For example, you might increase the severity to 3:

{  "updateFields": {  "severity": 3  }
}

This pattern keeps your workflow predictable and repeatable: you create a case with some initial details, then immediately update it with enriched or adjusted information.

Step 4: Get the case and confirm everything worked

Finally, add a third TheHive node, often called TheHive2, and set its operation to get : case.

Again, use the same expression to reference the case ID from the original create node:

id: ={{$node["TheHive"].json["id"]}}

This node fetches the latest version of that case from TheHive. At this point you can:

  • Verify that the severity and other fields were updated correctly.
  • Branch the workflow to send notifications to Slack or Microsoft Teams.
  • Create tasks, launch enrichment jobs, or push data into other systems.

How n8n expressions keep the data flowing

One of the reasons this workflow works so smoothly is n8n’s expressions. They are the glue that passes data from one node to another without you manually copying IDs or fields.

When the TheHive create node runs, it returns a JSON object that includes the new case and its id. You can reference any field from that JSON using a pattern like:

{{$node["NodeName"].json["fieldName"]}}

In this workflow, you use the case ID twice:

  • Update node ID: ={{$node["TheHive"].json["id"]}}
  • Get node ID: ={{$node["TheHive"].json["id"]}}

If the response includes arrays or nested objects, you can use dot notation or indexes, for example:

{{$node["TheHive"].json["artifacts"][0]["data"]}}

Once you get comfortable with expressions, you will start wiring up much more complex logic without writing full scripts.


Make it safer: guard the update with an IF node

APIs occasionally have bad days. To avoid trying to update a case that never got created, you can insert an IF node right after the create step.

The IF node checks if the returned case ID actually exists before moving on:

// Pseudocode for IF condition
{{$node["TheHive"].json["id"]}} exists → true branch → Update node
else → false branch → send alert or stop

If the ID is missing, you can send an alert, log the failure, or simply stop the workflow gracefully instead of throwing an error. Your future self will thank you when debugging at 2 a.m.


Best practices so your automation behaves nicely

Once the basic workflow is running, you can make it more robust and production ready with a few tweaks.

  • Credentials – store TheHive API credentials securely in n8n. Avoid hardcoding secrets in expressions or node parameters.
  • Validation – use Function or IF nodes to confirm that required fields like id are present before calling update or get.
  • Retries – configure n8n’s retry options or build a retry pattern if TheHive is temporarily unavailable.
  • Rate limits – respect TheHive’s API limits. Add small delays if you are ingesting high volumes of incidents.
  • Error handling – use a Catch node to handle failed API calls and route them to logs, email alerts, or Slack notifications.
  • Enrichment – after creating a case, call external services like threat intel, WHOIS, or VirusTotal, then update the case with the results.
  • Auditability – add tags or custom fields to mark which workflow created or modified a case. This makes audits and troubleshooting much easier.

When this create → update → get pattern shines

This simple pattern might look basic, but it is surprisingly versatile. It is ideal when you want to:

  • Ingest incidents from emails, SOAR detections, or webhook alerts into TheHive.
  • Enrich incidents asynchronously before letting teammates know about them.
  • Automate repetitive triage tasks like assigning owners, setting severity, or adding tags.

In other words, anytime you find yourself doing the same case creation and follow-up steps over and over, this workflow can probably take that job off your plate.


Security and governance: automation with guardrails

Since this workflow can create and modify cases automatically, it is worth thinking about access control and governance.

  • Use a dedicated API account for n8n with scoped permissions in TheHive.
  • Enable logging so you know which workflow changed what and when.
  • Document which workflows are allowed to change severity, ownership, or other sensitive fields.

That way, you get the benefits of automation without losing visibility or control over your incident lifecycle.


Next steps: leveling up your n8n + TheHive automation

Once the basic create-update-get flow is working, you can expand it into a more complete automation pipeline.

  • Add enrichment – branch the flow to call external APIs, attach artifacts to the case, and then update the case with new data.
  • Notify your team – send a summary of the final case to Slack or Microsoft Teams using the data from the get node.
  • Use HTTP Request for advanced features – if the TheHive node does not expose a specific option, call TheHive’s API directly using n8n’s HTTP Request node.
  • Store the case ID – save the case ID in a database so you can correlate it later with logs, tickets, or other systems.

Each of these additions turns your simple workflow into a more complete SOC automation playbook.


Wrapping up: a small template with big impact

Connecting n8n and TheHive gives you a lightweight but powerful way to automate your incident lifecycle. The pattern is simple:

  • Create a case in TheHive.
  • Update it with new or enriched information.
  • Get the final version and use it to drive the rest of your workflow.

By using expressions to pass the case ID between nodes, adding some basic error handling, and extending the flow with enrichment or notifications, you can turn repetitive triage work into an automated pipeline that just quietly does its job in the background.


Try the n8n + TheHive workflow template now

Ready to give your mouse and keyboard a break?

  1. Recreate the flow in your own n8n instance.
  2. Configure your TheHive credentials.
  3. Replace the sample values like title and owner with your own.
  4. Run it using the Manual Trigger to confirm everything works.

If you prefer to start from something already built, you can clone the sample workflow template and tweak it for your environment instead of building from scratch.

Call to action: Test this workflow in n8n with your TheHive instance today and start automating those routine triage tasks. If you need help adapting it to your specific use case, just share your workflow goals and I will suggest improvements.

Nano Banana Influencer Ad Creative Generator

Nano Banana Influencer Ad Creative Generator

Use n8n, Google Drive, and Google Gemini to automatically generate influencer-style ad creatives at scale. This instructional guide walks you through what the Nano Banana workflow does, how each node works, how to set it up, and how to write strong prompts for consistent influencer ad images.


What you will learn

By the end of this guide, you will be able to:

  • Explain why automating influencer-style ad creative is useful for marketing and testing.
  • Understand the core components of the Nano Banana n8n workflow template.
  • Configure Google Drive and Google Gemini for image generation in n8n.
  • Follow the workflow node-by-node to see how product and influencer images are combined.
  • Write effective prompts for influencer-style ad images.
  • Troubleshoot common issues and optimize the workflow for performance.

Why automate influencer ad creative?

Influencer-style content tends to convert well because it looks personal, relatable, and less like a traditional ad. The challenge is scale. Creating many variations of influencer photos with your product usually requires:

  • Coordinating with multiple creators.
  • Organizing photo shoots.
  • Editing and resizing images for each channel.

This is time-consuming and expensive, especially if you want to A/B test different angles, backgrounds, and styles.

With an n8n workflow and an image generation model like Google Gemini, you can:

  • Automatically combine a single product image with many influencer reference images.
  • Generate consistent, on-brand ad creatives faster.
  • Maintain control over style, pose, and overall composition through prompts.
  • Support use cases such as social media posts, paid ads, and creative testing.

Core components of the Nano Banana workflow

The Nano Banana Influencer Ad Creative Generator is built around a simple idea: take one product image, combine it with multiple influencer reference images, and generate new influencer-style ads automatically.

Key tools and technologies

  • Platform: n8n workflow automation
  • Storage: Google Drive (one folder for source influencer images, one for generated images)
  • Model: Google Gemini image generation endpoint
  • Image handling: base64 encoding and binary conversions
  • Primary use cases: influencer ad creative, social content, A/B creative testing

How the workflow works in n8n

At a high level, the workflow:

  1. Receives a product image (for example via a form).
  2. Converts the product image to base64.
  3. Fetches a list of influencer reference images from Google Drive.
  4. Loops through each influencer image, converts it to base64, and sends both images to Google Gemini.
  5. Receives the generated influencer-style ad image, converts it back to a file, and uploads it to a destination Drive folder.

Below is a node-by-node explanation so you can follow the data flow clearly.

1. form_trigger – capture the product image

The workflow typically starts when a user uploads a product image through a form. In n8n, this is handled by a node such as form_trigger (or any other trigger node you prefer).

This node:

  • Accepts a single file upload (your product image).
  • Stores the file as binary data in the workflow.
  • Makes this product image available to all following nodes.

The uploaded product image is the central element that will appear in every generated influencer-style image.

2. product_image_to_base64 – convert product image

Most image generation APIs expect image data in base64 format. The product_image_to_base64 node converts the binary product image from the trigger into a base64 string.

Key points:

  • Ensure the binary property name in this node matches the file key from form_trigger.
  • The resulting base64 string will be passed to the Gemini request as inline image data.

3. list_influencer_images – get reference images from Google Drive

Next, the workflow needs influencer reference images. These are photos of people who will appear to be holding or interacting with your product in the final generated images.

The list_influencer_images node:

  • Connects to Google Drive.
  • Lists all files in a specific source folder that you configure.
  • Returns a collection of influencer image file IDs and metadata.

Set the folderId in this node to the Google Drive folder where you store your influencer reference images.

4. iterate_influencer_images and download_influencer_image – loop and convert

Now the workflow needs to process each influencer image one by one. This is typically done with:

  • A loop or splitInBatches configuration (often referred to as iterate_influencer_images).
  • A download_influencer_image node that fetches each image from Drive.

Within this loop:

  1. The workflow takes one influencer image ID from list_influencer_images.
  2. download_influencer_image downloads that file as binary.
  3. A conversion step (for example an influencer_image_to_base_64-style node) turns the binary into base64, just like the product image.

Batching is important. By using splitInBatches or similar logic, you can:

  • Control how many images are processed at once.
  • Avoid overwhelming the Gemini API.
  • Stay within Google Drive API rate limits.

5. generate_image – call Google Gemini

Once you have:

  • The product image in base64.
  • The current influencer image in base64.

you are ready to call the Google Gemini image generation endpoint.

The generate_image node is typically an HTTP Request node configured to:

  • Send a POST request to the Gemini image generation endpoint.
  • Include authentication with an API key or OAuth, depending on your Gemini setup.
  • Pass both base64 images as inline data in the request body.
  • Include a well-structured prompt that describes how the product and influencer should be combined (pose, background, style, etc.).

The node returns a response that includes the generated image in base64 format. Usually, you generate one final image per influencer reference.

6. set_result, get_image, and upload_image – save the generated output

After Gemini returns the generated image, you need to convert and store it.

  • set_result: Extract the base64 image from the Gemini response and map it into a property such as image_result.
  • get_image (convertToFile): Convert the base64 string back into binary file data so it can be uploaded to Google Drive.
  • upload_image: Upload the binary file to your destination Google Drive folder.

In upload_image, set a consistent naming convention to keep outputs organized. For example:

Influencer Image #{{ $runIndex + 1 }}

This makes it easier to review, compare, and use the generated creatives in your campaigns.


Step-by-step setup guide

Use this section as a checklist to get the Nano Banana workflow running in your own n8n instance.

Step 1 – Prepare Google Drive folders

  • Create a source folder in Google Drive for your influencer reference images.
  • Create a destination folder where all generated influencer-style images will be stored.
  • Ensure your service account or OAuth user has the correct permissions for both folders (read for source, write for destination).

Step 2 – Configure n8n nodes

In your n8n workflow, configure the main nodes as follows:

  • form_trigger:
    • Set it up to accept a single file upload for the product image.
    • Note the binary property name used for this file.
  • product_image_to_base64:
    • Use the same binary property name as in form_trigger.
    • Output a base64 string property for the product image.
  • influencer_image_to_base_64 (or equivalent):
    • After downloading each influencer image, convert its binary data to base64.
    • Make sure the binary property name matches the output of download_influencer_image.
  • list_influencer_images:
    • Set folderId to the ID of your source influencer images folder.
  • download_influencer_image:
    • Use the file id from list_influencer_images as the input.
    • Output the file as binary.

Step 3 – Add Gemini / API credentials

To call Google Gemini from n8n:

  • Use an HTTP Request node for generate_image.
  • Configure the request URL to point to the appropriate Google Gemini image generation endpoint.
  • Add authentication headers, such as:
    • An API key header, or
    • OAuth credentials, depending on your Gemini account setup.
  • Include the product and influencer base64 images and your prompt in the request body.

Before scaling, test with a single product and influencer image pair to:

  • Verify that authentication works.
  • Check that the response format matches what your next nodes expect.
  • Refine your prompt until the generated image looks correct.

Step 4 – Set file conversion and upload logic

Finally, configure the nodes that handle the Gemini response and upload the final images.

  • set_result:
    • Extract the base64 image string from the Gemini response JSON.
    • Store it in a property, for example image_result.
  • get_image (convertToFile):
    • Convert the image_result base64 string to a binary file.
    • Set the correct file type (for example image/png or image/jpeg).
  • upload_image:
    • Point this node to your destination Google Drive folder.
    • Use a clear naming pattern, such as:
      Influencer Image #{{ $runIndex + 1 }}
    • Optionally add metadata for campaign, variant, or test group.

Prompt tips for better influencer-style ad images

The quality of your prompt has a major impact on the output. You are not just describing the scene, you are guiding the model on how to combine two specific images.

What to include in your prompt

  • Pose and interaction:
    • Describe exactly how the person interacts with the product.
    • Example: “The person holds the tumbler to their lips as if about to take a sip.”
  • Style and mood:
    • Set the emotional tone and visual style.
    • Example: “Natural, candid, warm lighting, smiling, friend-taken photo.”
  • Camera angle and framing:
    • Specify where the camera is and what is visible.
    • Example: “Slightly angled from the side, 3/4 view, visible table and cafe background.”
  • Clarity and brevity:
    • Keep prompts concise but descriptive.
    • Use clear constraints and avoid conflicting instructions.
    • Finish with a direct instruction like “Only return the final generated image.”
  • Source image quality:
    • Use product and influencer images with decent resolution.
    • Sharp, well-lit input images help the model create cleaner composites.

Example prompt snippet

"Create an image where the cup from image 1 is held by the person in image 2. The person sits at a cafe table, smiling warmly at the camera. Natural, friend-taken photo style, slight side angle. Only return the final generated image."

Legal and ethical considerations

When you generate influencer-style images using real people as references, you are still dealing with real identities and potential brand impact. Keep these points in mind:

  • Consent: Only use reference photos of people who have explicitly agreed to this type of use.
  • Disclosure: Follow local advertising rules about sponsored content and influencer disclosures in the markets where your ads will run.
  • Intellectual property: Make sure you have the rights to use both the product images and the influencer reference images, and check that your usage complies with the model provider’s policies.
  • Privacy and reputation: Avoid generating images that misrepresent, defame, or otherwise harm the person in the reference photo.

Troubleshooting and optimization

Common issues and fixes

  • Low-quality or unrealistic outputs:
    • Increase the resolution of your source product and influencer images.
    • Refine your prompt with more detail about lighting, angle, and style.
  • API errors or rate limits:
    • Implement retry logic in your HTTP Request node.
    • Use splitInBatches to process images in smaller groups.
    • Respect both Gemini and Google Drive provider quotas.
  • Mismatched background or composition:
    • Be explicit about the setting, for example “indoor cafe, shallow depth of field, blurred background.”
    • Specify how prominent the product should be in the frame.

Performance tips for scaling

  • Batch processing:
    • Use splitInBatches or similar logic to throttle calls to Gemini.
    • Adjust batch size based on your API limits and desired throughput.
  • Naming and metadata:
    • Add campaign names, variants, or test IDs to file names or metadata.
    • This makes A/B testing and performance analysis much easier later.

Automate Google Trends to Sheets with n8n & Jina.ai

Automate Google Trends to Google Sheets with n8n & Jina.ai

This reference-style guide documents an n8n workflow that turns Google Trends RSS topics into a structured editorial backlog in Google Sheets. The automation retrieves Google Trends RSS items, converts the XML feed to JSON, normalizes and filters the data in a Code node, scrapes the related news URLs through Jina.ai, deduplicates against an existing Google Sheet, and finally appends only vetted, non-duplicate entries to your editorial sheet.

The content below explains the overall architecture, each node’s role, configuration parameters, and practical considerations for running this workflow in production.

1. Workflow overview

1.1 Purpose and use cases

The workflow is designed for content teams, newsrooms, and growth marketers who want to:

  • Continuously monitor Google Trends topics without manual RSS checks
  • Automatically extract and summarize related news content from trend items
  • Filter topics by estimated search interest using approx_traffic
  • Prevent duplicate topics in an existing editorial Google Sheet
  • Maintain a structured, always-on editorial idea pipeline

1.2 High-level data flow

At a high level, the workflow executes the following pipeline on a schedule or manual trigger:

  • Trigger: Cron-based schedule or manual trigger for testing
  • Configuration: A Set node that stores min_traffic, max_results, and the Jina.ai API key
  • Existing data: Google Sheets Read node that fetches existing editorial entries and their trending_keyword values
  • Source feed: HTTP Request node that retrieves the Google Trends RSS feed, followed by an XML node that converts it to JSON
  • Normalization & filtering: Code node that flattens the RSS feed, parses approx_traffic, filters by traffic and duplicates, and limits results
  • Per-item processing: SplitInBatches (or equivalent) to iterate over each new trending keyword individually
  • Scraping: Up to three HTTP calls to r.jina.ai for each item’s related news URLs, collecting plain text content
  • Validation: If node that checks whether enough content was scraped to justify saving
  • Persistence: Google Sheets Append node that writes curated items to the editorial sheet

2. Architecture & node sequence

2.1 Trigger layer

  • scheduleTrigger: Cron-based execution (e.g. every hour at minute 11)
  • manualTrigger: Optional node used for ad-hoc runs and debugging

The cron schedule should be configured with awareness of Google Trends update frequency (roughly every 10 minutes) and external API rate limits. Hourly or less frequent runs are typically sufficient.

2.2 Configuration layer

  • CONFIG (Set node): Central place to store runtime constants:
    • min_traffic – minimum approx_traffic value required for a trend to be considered (for example 500)
    • max_results – maximum number of trends to process and save per run
    • jina_key – API key for the Jina.ai r.jina.ai endpoint

Keeping these values in a Set node (or environment variables) allows non-technical users to adjust thresholds without editing the Code node.

2.3 Existing data layer (Google Sheets read)

  • Get saved keywords (Google Sheets):
    • Reads the editorial Google Sheet that stores existing trend-derived ideas
    • Extracts the trending_keyword column
    • Provides a reference list for deduplication in the Code node

If a trend’s keyword is already present in this sheet, the workflow will skip it to avoid repeated ideas.

2.4 Source feed ingestion layer

  • GoogleTrends (HTTP Request):
    • Performs an HTTP GET request to the Google Trends RSS endpoint, for example:
      https://trends.google.it/trending/rss?geo=IT
    • Returns the raw XML RSS feed
  • XML node:
    • Converts the XML RSS response into JSON
    • Makes fields such as title, pubDate, and approx_traffic accessible to downstream nodes

The XML node is essential because the subsequent Code node expects a JSON representation of each RSS item and its nested related news entries.

2.5 Normalization & filtering layer (Code node)

  • New keywords (Code node):
    • Flattens the nested RSS item structure into one object per trending topic
    • Extracts and normalizes key fields:
      • trending_keyword (from RSS item title or equivalent)
      • pubDate
      • approx_traffic parsed as an integer
      • Up to three related news entries per trend:
        • URL
        • Title
        • Picture
        • Source
    • Parses traffic values, for example:
      • Transforms strings like "1,000+" into a numeric value 1000
    • Filters out items that do not meet the configured criteria:
      • Removes items where approx_traffic < min_traffic
      • Removes items whose trending_keyword already exists in the Google Sheet
    • Sorts remaining items by traffic in descending order
    • Applies max_results to limit the number of items that proceed further

Centralizing this logic in a single Code node simplifies maintenance. Adjustments to thresholds, parsing rules, or how related news items are selected can be made in one place.

2.6 Per-item processing and mapping

  • Loop Over Items (splitInBatches & mapping):
    • splitInBatches: Iterates through each filtered trend item one at a time
    • Mapping (Set node):
      • Prepares a structured payload that will eventually be written to Google Sheets
      • Defines the target fields such as:
        • status (e.g. default value "idea")
        • trending_keyword
        • pubDate
        • approx_traffic
        • Slots for up to three URLs, titles, pictures, and sources
        • abstract (to be filled with combined scraped content later)

This layer ensures each item is processed in isolation, which makes debugging and error handling more manageable.

2.7 Scraping & summarization with Jina.ai

  • content1, content2, content3 (HTTP Request nodes):
    • Each node targets one of the up to three related news URLs from the RSS item
    • Uses the Jina.ai r.jina.ai endpoint to:
      • Fetch the article HTML from the source URL
      • Return a cleaned text representation of the page
    • Includes headers that:
      • Pass the jina_key for authentication
      • May specify content preferences, such as removing certain selectors or limiting returned content length

The three scraping nodes are executed in sequence or conditionally depending on which URLs are present. Their outputs are later concatenated into a single summary string. This avoids maintaining a custom HTML parser and leverages Jina.ai’s text extraction capabilities.

2.8 Validation and conditional save

  • If we have scraped min 1 url → Save (If node):
    • Combines the text returned by content1, content2, and content3
    • Performs a length check on the combined summary, for example:
      • Only passes the item forward if the summary length is greater than 100 characters
    • If the condition is not met (no usable content or too short):
      • Routes the item to a no-op branch, effectively skipping the save step

This prevents low-quality or empty summaries from polluting the editorial sheet, especially in cases where scraping fails or the target pages have minimal text.

2.9 Persistence layer (Google Sheets append)

  • Google Sheets (append):
    • Appends validated items as new rows to the configured Google Sheet
    • Typical fields include:
      • status (e.g. "idea")
      • pubDate
      • abstract (combined summary from scraped content)
      • approx_traffic
      • Up to three:
        • URL columns
        • Title columns
        • Picture columns
        • Source columns
      • trending_keyword

From this sheet, you can trigger additional n8n workflows, such as Slack notifications, task creation, or content generation pipelines.

3. Detailed configuration notes

3.1 Credentials and keys

  • Jina.ai API key (jina_key):
    • Store this in n8n’s credential manager whenever possible
    • Alternatively, reference it in the CONFIG node and ensure that workflow exports do not expose the key
    • Pass the key in the headers of the Jina.ai HTTP Request nodes as required by the API
  • Google Sheets credentials:
    • Configure a Google Sheets credential in n8n with appropriate access to the target spreadsheet
    • Use the same credential for both read and append operations

3.2 Traffic thresholds and limits

  • min_traffic:
    • Controls the minimum interest level a trend must have to be considered
    • Google Trends uses approximate bands such as 100, 200, 500, 1000+
    • Choose a value that fits your market or niche. For example:
      • Smaller markets: min_traffic might be 100 or 200
      • Larger markets: start at 500 or 1000
  • max_results:
    • Limits how many new trends are processed and appended per run
    • Helps control editorial workload and API usage

3.3 Scheduling strategy

  • Google Trends updates frequently, but not necessarily every minute
  • Hourly schedules are a good starting point to balance freshness and API consumption
  • Adjust frequency based on:
    • Available Jina.ai quota and rate limits
    • Google Sheets write limits
    • Your editorial team’s capacity to handle new ideas

3.4 Sheet structure expectations

The workflow assumes a Google Sheet with columns that can store at least:

  • status
  • trending_keyword
  • pubDate
  • approx_traffic
  • abstract
  • Columns for up to three:
    • URL fields
    • Title fields
    • Picture fields
    • Source fields

The exact column order and naming must match the configuration of your Google Sheets Append node. The deduplication logic relies on a consistent trending_keyword column.

4. Edge cases, error handling & best practices

4.1 Rate limits and quotas

  • Jina.ai:
    • Each run can trigger up to three scraping requests per trend item
    • Use max_results and scheduling to keep total requests within your plan limits
  • Google APIs:
    • Google Sheets Read and Append operations count against API quotas
    • Batch runs and moderate scheduling reduce the risk of hitting limits

4.2 Handling empty or low-quality scraping results

  • Some URLs may:
    • Block scraping
    • Return very short content
    • Use heavy client-side rendering that yields little text
  • The If node’s length check (e.g. summary length > 100 characters) helps:
    • Skip items where no meaningful content was returned
    • Avoid cluttering the sheet with empty abstracts
  • If you consistently see empty results for certain domains, consider:
    • Adjusting Jina.ai parameters (such as selectors) if applicable
    • Using a different scraping approach for those domains in a separate branch

4.3 Data validation enhancements

Beyond the built-in traffic and length checks, you can add extra validation steps, for example:

  • Language detection to keep only content in your target language
  • Additional duplicate checks, such as:
    • Recent time window deduplication
    • Comparisons on URL rather than only on trending_keyword
  • Minimum number of distinct URLs successfully scraped

4.4 n8n error handling patterns

  • Enable retryOnFail where appropriate for transient HTTP failures

n8n RSS to Telegram: Automated, Filtered Alerts

n8n RSS to Telegram Workflow Template: Automated, Filtered Alerts

Use this n8n workflow template to continuously monitor multiple RSS feeds and push only relevant, non-duplicate items into specific Telegram channels. The workflow implements scheduled polling, item-level deduplication, URL-based routing, and keyword-based classification so that IT and security teams receive focused alerts instead of noisy, redundant updates.

1. Technical Overview

This n8n automation is designed for teams that consume updates from several technology and security RSS feeds and want to:

  • Poll multiple RSS feeds at a fixed interval
  • Process each feed sequentially to avoid concurrency issues
  • Filter out already-processed items using a persistent deduplication store
  • Route alerts to different Telegram channels based on:
    • Patterns in the item URL (for example, specific hostnames)
    • Security-related keywords in the item title

The workflow uses n8n’s built-in scheduling, RSS reading, conditional routing, and Telegram integration. Static workflow data is used as a simple, persistent cache for deduplication across runs.

2. Workflow Architecture

The workflow is organized as a linear pipeline with branching for routing and an optional maintenance utility. At a high level, the node sequence is:

  1. Cron – Scheduled trigger (for example, every 10 minutes)
  2. RSS Source (Function) – Defines the list of RSS feed URLs to poll
  3. SplitInBatches – Iterates through feeds one at a time
  4. RSS Feed Read – Fetches and parses items from the current feed
  5. only get new RSS (Function) – Deduplicates items using workflow static data
  6. IF-1 – URL-based routing (for example, Microsoft Tech Community)
  7. IF-2 – Title keyword-based routing (security vs general IT)
  8. Telegram_* nodes – Sends formatted messages into specific Telegram chats
  9. Clear Function – Optional utility to reset the deduplication cache

The main processing path is:

Cron  → RSS Source (Function)  → SplitInBatches  → RSS Feed Read  → only get new RSS (Function)  → IF-1 (URL-based)  → Telegram_M365 (if URL match)  → IF-2 (if no URL match)  → Telegram_Security (if keyword match)  → Telegram_IT (if no keyword match)

The Clear Function node is not part of the regular run path. It is used manually when you need to clear the stored IDs (for testing or when changing the deduplication strategy).

3. Node-by-Node Breakdown

3.1 Cron (Schedule Trigger)

Purpose: Start the workflow periodically.

  • Trigger type: Cron
  • Typical configuration: Every 10 minutes

Set the execution interval based on:

  • How often the monitored RSS feeds are updated
  • Telegram API rate limits and your expected message volume

For higher-volume feeds, you may want a shorter interval. For low-frequency feeds, you can reduce the schedule to every 30 or 60 minutes to reduce load.

3.2 RSS Source (Function)

Purpose: Provide the list of RSS feed URLs that the workflow should poll.

This is a JavaScript Function node that outputs one item per RSS feed URL. Example implementation from the template:

return [  { json: { url: 'https://feeds.feedburner.com/UnikosHardware' } },  { json: { url: 'http://www.ithome.com.tw/rss.php' } },  { json: { url: 'http://feeds.feedburner.com/playpc' } },  { json: { url: 'https://lab.ocf.tw/feed/' } },  { json: { url: 'https://techcommunity.microsoft.com/plugins/custom/...'} }
];

Key points:

  • Each item in the returned array is a separate feed, with the URL stored under json.url.
  • You can add or remove feeds by editing this array.
  • Keep the structure consistent so downstream nodes can always read url from item.json.url.

3.3 SplitInBatches

Purpose: Process one feed URL at a time.

  • Batch size: 1

By setting batchSize: 1, the workflow ensures that each feed is processed sequentially. This has two benefits:

  • Reduces the chance of hitting multiple remote RSS endpoints concurrently, which can be helpful if certain feeds are rate-limited or slow.
  • Makes the deduplication logic easier to reason about, since each batch corresponds to a single feed URL.

Downstream, the RSS Feed Read node obtains the current feed URL from this node’s output.

3.4 RSS Feed Read

Purpose: Fetch and parse RSS items from the current feed.

This is the n8n RSS Feed Read node. It is configured to read the URL dynamically from the previous node:

url = {{$node["SplitInBatches"].json["url"]}}

Typical output fields per item include:

  • title – RSS item title
  • link – URL of the item
  • isoDate – Published date in ISO format (used by default for deduplication)

These fields are used later for deduplication, routing, and message formatting.

3.5 only get new RSS (Function) – Deduplication

Purpose: Filter out items that have already been processed in previous workflow runs.

This Function node uses n8n’s workflow static data in global scope to maintain a list of previously seen IDs across executions. The core logic from the template is:

const staticData = getWorkflowStaticData('global');
const newRSSIds = items.map(item => item.json['isoDate']);
const oldRSSIds = staticData.oldRSSIds;

if (!oldRSSIds) {  staticData.oldRSSIds = newRSSIds;  return items;
}

const actualNewRSSIds = newRSSIds.filter(id => !oldRSSIds.includes(id));
const actualNewRSS = items.filter(data => actualNewRSSIds.includes(data.json['isoDate']));
staticData.oldRSSIds = [...actualNewRSSIds, ...oldRSSIds];

return actualNewRSS;

How it works:

  1. Reads the global static data object via getWorkflowStaticData('global').
  2. Builds an array of IDs from the current batch using item.json["isoDate"].
  3. On the first run (no oldRSSIds yet), it:
    • Initializes staticData.oldRSSIds with the current IDs
    • Returns all items as “new”
  4. On subsequent runs:
    • Compares the current IDs against oldRSSIds
    • Filters out items whose IDs are already stored
    • Updates staticData.oldRSSIds with the union of:
      • actualNewRSSIds (the IDs just seen for the first time)
      • Existing oldRSSIds
    • Returns only the subset of items with new IDs

Important notes:

  • Dedupe key: The template uses isoDate as the identifier. This is simple, but:
    • Different feeds can have items with the same isoDate.
    • Some feeds may not provide a stable isoDate for updates.

    Prefer guid or link if available and unique.

  • Persistence: Global static data is persisted across workflow runs on the same n8n instance, so deduplication continues to work between scheduled executions.
  • Growth: staticData.oldRSSIds will grow over time unless you implement a trimming strategy.

3.6 IF-1 – URL-Based Routing

Purpose: Route items to a dedicated Telegram channel if the URL matches a specific host or pattern.

This is an IF node that checks whether the RSS item’s link contains a certain hostname, for example:

  • techcommunity.microsoft.com

Behavior:

  • True branch: Items whose link contains the specified host are routed directly to a dedicated Microsoft 365 Telegram node, for example Telegram_M365.
  • False branch: All other items are passed to IF-2 for further classification based on title keywords.

You can adjust the URL condition to route other vendors or domains to their own Telegram channels.

3.7 IF-2 – Title Keyword Filter

Purpose: Classify items by scanning the title for security-related keywords using a regular expression.

This second IF node runs only for items that did not match the URL-based rule in IF-1. It uses a regex condition on title to look for security terms. Example keywords include:

  • 資安
  • 資訊安全
  • 外洩
  • 監控
  • 威脅
  • 漏洞
  • 攻擊
  • 入侵
  • 隱私
  • phishing
  • security
  • Secure

Behavior:

  • True branch: If the title matches the regex (contains any of the security-related keywords), the item is routed to Telegram_Security.
  • False branch: If there is no keyword match, the item is treated as general IT content and routed to Telegram_IT.

You can refine the regex for language coverage, case-insensitivity, or more granular topic routing.

3.8 Telegram Nodes (Telegram_M365, Telegram_Security, Telegram_IT)

Purpose: Deliver formatted messages to the appropriate Telegram channels or groups.

Each Telegram node is configured with its own credentials and target chat. The basic message template used in the workflow is:

{{$json["title"]}}
{{$json["link"]}}

Configuration notes:

  • Credentials:
    • Store your Telegram bot token in n8n’s credentials manager.
    • Do not hardcode tokens in node parameters or Function nodes.
  • Chat IDs:
    • Use separate bots or separate chat IDs for different channels (for example, M365, security, general IT).
    • Make sure the bot has permission to post in the target group or channel.
  • Message formatting:
    • You can switch to Markdown or HTML mode in the Telegram node if you want richer formatting.
    • Extend the template to include additional fields such as description, author, or publication date.

3.9 Clear Function (Optional Utility)

Purpose: Reset the deduplication state by clearing staticData.oldRSSIds.

This is a utility Function node that you run manually when needed. It removes the stored IDs so that the workflow can treat all items as new again.

Typical use cases:

  • Testing the workflow from scratch
  • Changing the deduplication key (for example, from isoDate to link or guid)
  • Backfilling older items intentionally

4. Configuration Notes and Best Practices

4.1 Choosing a Robust Deduplication Key

Using isoDate is convenient, but it is not always unique or stable across feeds. For more reliable deduplication:

  • Prefer guid if the feed provides a stable GUID per item.
  • Use link as a fallback, assuming each item URL is unique.

Example adjustment for link-based dedupe (see also section 7):

const newRSSIds = items.map(item => item.json['link']);
// The rest of the logic stays the same, using 'link' instead of 'isoDate'

4.2 Controlling Static Data Growth

The oldRSSIds array in global static data grows on every new item. For long-running workflows, consider:

  • Storing only the last N IDs (for example, last 1000 or 5000) to limit memory usage
  • Implementing a simple trimming step after updating staticData.oldRSSIds

If you need very long-term or shared deduplication state, you can move this to an external database or cache instead of static data.

4.3 Telegram Rate Limiting and Message Volume

If your feeds are very active, you may send many messages per run. To avoid problems:

  • Reduce the Cron frequency or add a delay between messages.
  • Optionally batch multiple items into a single Telegram message (for example, a daily digest) instead of one message per item.

4.4 Credential Security

  • Always store Telegram bot tokens in n8n Credentials, not in plain Function code.
  • Use environment variables for chat IDs or other sensitive configuration if needed.
  • Review Telegram bot privacy settings to ensure it can post in the intended chats.

4.5 Keyword and Language Tuning

The security keyword list in IF-2 is tailored for a mixed-language audience. You can adjust it to better match your context:

  • Add or remove terms for your language or domain.
  • Use case-insensitive regex flags to avoid missing matches due to capitalization.
  • Consider multiple IF nodes or a Switch node if you want separate channels per topic, severity, or language.

4.6 Error Handling and Monitoring

To harden the workflow for production:

  • Add a global error workflow or a Catch node to capture failures from:
    • RSS feed read errors (network issues, invalid feeds)
    • Telegram API errors (invalid token, blocked bot, wrong chat ID)
  • Send error notifications to an admin Telegram channel or log them to

Automate RSS to Telegram with n8n

Automate RSS to Telegram with n8n

Delivering RSS updates directly into Telegram is a powerful way to keep IT teams, security operations, and online communities informed in real time. Instead of manually checking dozens of feeds, you can use n8n to pull in multiple RSS sources, remove duplicates, classify content by topic or source, and send each update to the right Telegram channel.

This guide teaches you how the provided n8n workflow template works and how to adapt it for your own feeds and Telegram channels.

What you will learn

By the end of this tutorial, you will be able to:

  • Explain why automating RSS to Telegram is useful for IT and security teams
  • Understand each node in the n8n workflow and what it does
  • Configure multiple RSS feeds in a single workflow
  • Use workflow static data to deduplicate RSS items
  • Route items based on source URLs and security-related keywords
  • Connect and configure Telegram bots and channels in n8n
  • Troubleshoot common issues and extend the workflow with best practices

Why automate RSS to Telegram?

Monitoring blogs, vendor advisories, and security news by hand is error-prone and time-consuming. Automation with n8n helps you:

  • Poll RSS feeds automatically using a Cron trigger
  • Read and parse feed items with the RSS Feed Read node
  • Filter out previously sent items using deduplication logic
  • Route messages to different Telegram channels based on:
    • Source URL (for example Microsoft TechCommunity)
    • Keywords that indicate security-related content

The result is an automated RSS-to-Telegram pipeline that keeps your channels updated with only the latest, most relevant posts.


Concepts and building blocks in this n8n workflow

Before you follow the step-by-step setup, it helps to understand the main nodes and concepts used in the template.

1. Workflow trigger and feed list

  • Cron
    This node starts the workflow on a schedule. In the template, it runs every 10 minutes, but you can adjust the frequency to match your needs or rate limits.
  • RSS Source (Function node)
    This function node outputs an array of JSON objects, each containing an RSS feed URL. It centralizes your feed list so you can easily add or remove feeds without changing the rest of the workflow.

2. Handling multiple feeds safely

  • SplitInBatches
    This node processes one RSS feed at a time. It takes the list of URLs from the RSS Source node and iterates through them in batches. This helps:
    • Reduce the number of simultaneous HTTP requests
    • Avoid rate or concurrency issues with RSS providers
    • Make debugging easier, since you deal with one feed per batch
  • RSS Feed Read
    For each batch (each feed URL), this node fetches and parses the RSS feed items.

3. Deduplication with workflow static data

To avoid sending the same RSS item repeatedly, the workflow uses a Function node called only get new RSS. This node uses n8n’s getWorkflowStaticData('global') to store IDs of items that have already been processed.

Here is the exact code used in the template:

// only get new RSS
const staticData = getWorkflowStaticData('global');
const newRSSIds = items.map(item => item.json["isoDate"]);
const oldRSSIds = staticData.oldRSSIds;  if (!oldRSSIds) {  staticData.oldRSSIds = newRSSIds;  return items;
}

const actualNewRSSIds = newRSSIds.filter((id) => !oldRSSIds.includes(id));
const actualNewRSS = items.filter((data) => actualNewRSSIds.includes(data.json['isoDate']));
staticData.oldRSSIds = [...actualNewRSSIds, ...oldRSSIds];

return actualNewRSS;

How this logic works in practice:

  • First run: If there is no stored list yet, the node:
    • Stores all current isoDate values in staticData.oldRSSIds
    • Returns all items (you can later modify this if you want to skip historical posts)
  • Later runs: On each subsequent execution, it:
    • Collects the current isoDate values
    • Compares them with the stored oldRSSIds
    • Filters out any item whose isoDate has already been seen
  • Updating memory: After finding the new items, it prepends their IDs to the stored list:
    • This keeps a growing memory of processed items
    • You can later add a size limit or use a different ID strategy if needed

4. Routing based on source URL (IF-1)

The first IF node, often named IF-1, checks where the RSS item comes from. In this template:

  • It tests if the item’s link contains techcommunity.microsoft.com
  • If the condition is true, the item is routed directly to a dedicated M365 Telegram channel
  • If the condition is false, the item continues to the next routing step based on keywords

5. Routing based on security keywords (IF-2)

The second IF node, IF-2, uses a regular expression to detect security-related terms in the item title. In the template, this regex includes terms in both English and Chinese.

  • If the regex matches the title:
    • The item is sent to a Security Telegram channel
  • If the regex does not match:
    • The item is sent to a more general IT Telegram channel

6. Sending messages to Telegram

  • Telegram_* nodes
    These are sendMessage nodes configured for each target Telegram channel. Each node:
    • Uses Telegram bot credentials configured in n8n
    • Sends a formatted message (for example title, link, date) to a specific chatId
  • Clear Function node
    This is an optional utility node that you can use during testing to reset workflow static data. It clears stored IDs so you can simulate a fresh start.

Step-by-step: set up the RSS to Telegram workflow in n8n

Use the following steps to get the template running in your own n8n instance.

Step 1: Import or recreate the workflow

  1. Download or copy the workflow JSON from the template page.
  2. In n8n, go to Workflows and choose Import from file or Import from clipboard.
  3. Alternatively, recreate the nodes manually following the described structure:
    • Cron → RSS Source → SplitInBatches → RSS Feed Read → only get new RSS → IF-1 → IF-2 → Telegram_* nodes

Step 2: Configure Telegram credentials

  1. In Telegram, open @BotFather and create a new bot.
    • Follow the prompts and copy the bot token that BotFather returns.
  2. In n8n, open Credentials and create a new Telegram credential.
    • Paste the bot token into the appropriate field.
  3. In each Telegram sendMessage node in the workflow:
    • Select the Telegram credential you just created
    • Set the correct chatId for each channel or group (remember that some channel or group IDs can be negative numbers)

Step 3: Add your RSS feeds

  1. Open the RSS Source Function node.
  2. Locate the array of feed URLs in the node’s code or JSON.
  3. Replace the example URLs with the RSS feeds you want to monitor.
    • You can add as many feeds as you like
    • Each feed URL will be processed one at a time by the SplitInBatches node

Step 4: Adjust the schedule

  1. Open the Cron node.
  2. In the configuration, set how often the workflow should run.
    • The template uses every 10 minutes as a starting point
    • If your feeds update slowly, you can run less frequently
    • If your feeds are heavy or you face rate limits, consider longer intervals

Step 5: Review and customize deduplication

  1. Open the only get new RSS Function node.
  2. Read through the code to understand how it uses isoDate and static data.
  3. Decide how you want to handle the first run:
    • Default behavior: all existing items are treated as new and sent once
    • If you prefer not to post historical items:
      • Change the branch inside if (!oldRSSIds) so it returns an empty array instead of items

Step 6: Adapt routing rules (IF-1 and IF-2)

  1. Source-based routing (IF-1):
    • Open the IF-1 node.
    • Check the condition that looks for techcommunity.microsoft.com in the link.
    • Update this condition if you want to:
      • Route other domains to special channels
      • Support additional vendor or product-specific feeds
  2. Keyword-based routing (IF-2):
    • Open the IF-2 node.
    • Locate the regular expression used to match security-related terms in the title.
    • Modify or extend the regex to reflect your topics:
      • Security, vulnerability, CVE, patch Tuesday, etc.
      • Include terms in the languages your team uses (for example English and Chinese)

Step 7: Test the workflow end to end

  1. In n8n, click Execute Workflow to run it manually.
  2. Watch the execution:
    • Confirm that the RSS Feed Read node retrieves items
    • Check that the only get new RSS node returns some items on first run
    • Verify that items are correctly routed through IF-1 and IF-2
  3. Open your Telegram channels:
    • Confirm that messages appear in the expected M365, Security, or IT channels

Troubleshooting common issues

Telegram messages not delivered

  • Double-check the bot token in your Telegram credential.
  • Verify the chatId values for each Telegram node.
    • Some group or channel IDs are negative numbers, make sure they are copied correctly.
  • Ensure the bot has permission to post in the target channel or group.

RSS feed returns no items or errors

  • Open the RSS Feed Read node output in the execution view.
  • Inspect the raw response to see if:
    • The feed is empty
    • There are encoding or parsing issues
  • Some feeds may require:
    • Custom headers
    • A specific user-agent string

Duplicate messages still appear

  • Insert a temporary debug or Function node to log staticData.oldRSSIds.
  • Check if the list is being updated with new IDs on each run.
  • If the array grows very large over time:
    • Consider adding a size limit and trimming older entries
    • Or switch to a more robust ID strategy, for example using GUID or a hash

Rate limits or many items at once

  • The SplitInBatches node already helps by processing feeds one by one.
  • If a feed publishes many items at once:
    • Consider adding a Delay node between Telegram sendMessage nodes
    • Adjust the Cron frequency to reduce how often you poll

Enhancements and best practices

Once the basic RSS to Telegram automation is running, you can refine it using these ideas.

  • Use more robust item identifiers Instead of using isoDate alone for deduplication, consider:
    • GUID or unique ID provided by the feed
    • The link URL
    • A hash of title + link + isoDate for extra safety
  • Persist state externally If you run multiple instances of n8n or need high reliability across restarts:
    • Store processed IDs in Redis, a database, or another external system
    • Read and write that state from within your function nodes
  • Add error handling and backoff For unstable feeds or Telegram API issues:
    • Wrap HTTP calls with retry logic
    • Implement exponential backoff for repeated failures
  • Enrich Telegram messages Make messages more informative by:
    • Including the feed name or creator
    • Adding a short snippet or summary
    • Parsing HTML content to extract thumbnails or key details
  • Rate limiting and batching If your Telegram usage grows:
    • Group multiple updates into a single message when appropriate
    • Add rate limiting nodes to avoid hitting Telegram API quotas

Update Crypto Values in Airtable with n8n

Tracking your crypto portfolio by hand gets old pretty fast, right? Prices move all the time, spreadsheets get messy, and before you know it, your “quick check” turns into a 30-minute chore.

If you are using Airtable to track your coins, there is a much easier way. With n8n, the CoinGecko API, and a simple workflow template, you can have your portfolio prices update automatically every hour and keep a running history of your total portfolio value.

Let’s walk through how this n8n workflow template works, when to use it, and how to set it up, step by step, without any drama.

What this n8n workflow does for you

At a high level, this workflow connects three things you probably already use or at least know about:

  • n8n – your automation engine
  • Airtable – where your portfolio lives
  • CoinGecko – where you get live crypto prices

Every hour, the workflow quietly runs in the background and:

  • Reads your list of coins from an Airtable Portfolio table
  • Fetches the latest prices from CoinGecko
  • Updates each coin row in Airtable with the current price
  • Calculates the total value of your portfolio
  • Stores that total in a separate Portfolio Value table so you build a history over time

So instead of manually refreshing prices or copying data from websites, you open Airtable and everything is already up to date. Simple.

When this template is a perfect fit

This workflow is ideal if:

  • You track your crypto holdings in Airtable already, or you are happy to move them there
  • You want hourly price updates without touching anything manually
  • You care about historical portfolio values for charts, analytics, or just curiosity
  • You are comfortable with basic n8n concepts like nodes and credentials

It is not trying to be a full-blown trading bot. It is a clean, reliable way to keep your portfolio data fresh and ready for reporting, dashboards, or deeper analysis.

What you need before you start

To use this n8n crypto portfolio template, make sure you have these basics covered:

  • n8n instance
    Either self-hosted or an n8n.cloud account.
  • Airtable setup
    An Airtable base with two tables:
    • Portfolio – one row per coin
    • Portfolio Value – where total portfolio values will be logged over time
  • CoinGecko access
    You will use the CoinGecko node in n8n. For public endpoints, you do not need an API key.
  • Basic n8n familiarity
    Comfortable with nodes like:
    • Cron
    • Airtable
    • HTTP / CoinGecko
    • Set
    • Function
    • SplitInBatches (optional but recommended for larger portfolios)

How the workflow is structured

Let us break down the main building blocks so you know exactly what is happening under the hood.

1. Cron – run every hour on the hour

Node: Run Top of Hour (Cron)

This node is the trigger. It schedules the workflow to run every hour. You can adjust the schedule if you prefer a different frequency, but hourly is a nice balance between freshness and API limits.

2. Get your portfolio from Airtable

Node: Get Portfolio (Airtable – list)

This node reads all rows from your Portfolio table in Airtable. Each row should represent one coin that you hold. Make sure each record includes:

  • Symbol – matches the CoinGecko coinId (for example bitcoin, ethereum)
  • A field for quantity or a pre-calculated present value

These fields are what the rest of the workflow uses to look up prices and calculate your totals.

3. Handle large portfolios with batches (optional but important)

If you only have a few coins, you can technically call CoinGecko directly for each one. But if your portfolio is bigger, it is safer to process records in chunks so you do not hit API rate limits.

This is where the SplitInBatches node comes in.

  1. Get Portfolio (list) – fetch all records
  2. SplitInBatches – process, for example, 10 records at a time
  3. CoinGecko – get prices for the current batch item
  4. Update Values (Airtable – update) – update that item in Airtable
  5. Loop back to SplitInBatches until all items are processed

The provided workflow template assumes you are using SplitInBatches, since the Update Values node references $node["SplitInBatches"].json["id"]. If you skip batching, you will want to adjust that reference to match the actual node that outputs the Airtable record ID (often the Set node described below).

4. Fetch live prices from CoinGecko

Node: CoinGecko (get)

For each coin, the CoinGecko node looks up market data by coinId. Here is how to configure it correctly:

  • Set coinId to use the Symbol field from Airtable
  • Enable market_data
  • Disable localization so you get a clean market_data.current_price.usd value

This gives you the current USD price for each coin, which you will then write back into Airtable.

5. Map the data with a Set node

Node: Set

The Set node acts like a little adapter. It takes the data from CoinGecko and from Airtable, and picks out exactly what the next node needs:

  • The Airtable record id
  • The current USD price from market_data.current_price.usd

You will use these values to update the right record in Airtable with the right price.

6. Update each coin row in Airtable

Node: Update Values (Airtable – update)

This node writes the latest price back into your Portfolio table. It updates the Present Price field for the correct record using the ID passed from the previous node.

Once this runs for each coin, your Portfolio table will always show the current price per coin.

7. Read all present values from Airtable

Node: Get Portfolio Values (Airtable – list)

After individual prices are updated, the workflow needs to know the total portfolio value. To do that, it reads all rows again and pulls the Present Value field from each record.

The Present Value field should represent the current value of your position in each coin, usually:

quantity * Present Price

You can calculate this in Airtable itself (for example with a formula field), or pre-populate the values through another process. The workflow just reads whatever is in that field.

8. Sum the portfolio value with a Function node

Node: Determine Total Value (Function)

This node takes all the rows returned by Get Portfolio Values and adds up the Present Value field to get your total portfolio value in USD.

Here is a safe JavaScript snippet you can paste directly into that Function node:

const rows = items;
let total = 0;

for (const row of rows) {  const value = row.json.fields && row.json.fields['Present Value'];  const num = Number(value) || 0;  total += num;
}

return [{ json: { 'Portfolio Value (US$)': total } }];

This code:

  • Treats missing or non-numeric values as zero
  • Prevents the workflow from failing if one row is messy
  • Outputs a single item with a field called Portfolio Value (US$)

9. Append the total to a historical table

Node: Append Portfolio Value (Airtable – append)

Finally, the workflow writes the computed total into your Portfolio Value table in Airtable. Each run creates a new record, typically with:

  • The total Portfolio Value (US$)
  • Any timestamp field you add on the Airtable side (highly recommended)

Over time, this builds a neat history of your portfolio value that you can chart, analyze, or send to other tools.

How to structure your Airtable fields

For everything to connect smoothly, field names in Airtable matter. In your Portfolio table, create at least these fields with exactly these names:

  • Symbol
    Short text, matching the CoinGecko coinId, for example:
    • bitcoin
    • ethereum
  • Present Price
    Number field that n8n updates with the live price.
  • Present Value
    Number field that holds quantity * Present Price. This can be:
    • A formula field in Airtable, or
    • A value you fill in via another workflow or manually

In your Portfolio Value table, you will at least want a field to store Portfolio Value (US$), plus any timestamp or metadata fields you find useful.

Staying within CoinGecko and Airtable limits

APIs are powerful, but they also have limits. To keep your workflow healthy:

  • Use SplitInBatches if you have many coins, so you do not hammer CoinGecko with too many requests at once.
  • Respect CoinGecko rate limits. If multiple rows share the same symbol, you can even cache or reuse results within a run instead of calling the API repeatedly.
  • Remember Airtable limits. Airtable also has API rate limits, so batching or pacing updates is a good idea.
  • Store credentials securely. Keep your Airtable API key inside n8n Credentials, not in plain text fields in the workflow.

Error handling and retries that save you headaches

Things go wrong sometimes: network blips, API hiccups, temporary rate limits. You can make your workflow much more robust with a bit of error handling:

  • Enable retries on nodes that call external services, especially CoinGecko and Airtable.
  • Add error branches in the n8n canvas to catch failures and handle them gracefully.
  • Log errors to a dedicated Airtable table, or send alerts to Slack or email when something breaks.

That way, you do not silently lose data if one run fails. You will know about it and can fix things quickly.

Test the workflow before turning on Cron

Before you let this run every hour, it is worth doing a quick sanity check with a small sample of your portfolio. Manually trigger the workflow and verify that:

  • The CoinGecko node returns a valid market_data.current_price.usd value for each symbol.
  • Airtable rows in the Portfolio table get updated with the correct Present Price.
  • Your Present Value column reflects the correct numbers after the price update.
  • The Determine Total Value Function node outputs the right sum.
  • The Append Portfolio Value node writes a new record into your Portfolio Value table.

Once everything looks good, enable the Cron node and let it run on its own.

Ideas to extend and improve the workflow

Once you have the basics working, it is very easy to level this up. A few ideas:

  • Multi-currency support
    Pull additional data from CoinGecko or use a currency conversion API so you can track values in multiple fiat currencies or in BTC/ETH terms.
  • Per-coin history
    Log price and timestamp directly on each Portfolio row or in a related table to build a detailed price history for every coin.
  • Alerts for big moves
    Calculate percentage changes and trigger Slack, email, or SMS alerts when a coin moves beyond a certain threshold.
  • Better security
    Use a Workflow Credentials vault and secure tokens for Airtable, especially if you are running n8n self-hosted.

Notes on the sample workflow JSON

If you are starting from an exported workflow JSON, you will probably see all the key building blocks in place already:

  • Cron trigger
  • Airtable list operations
  • CoinGecko lookup
  • Set node to map price and record ID
  • Airtable update node
  • Function node to total values

One important tweak: make sure you have a SplitInBatches node between Get Portfolio and CoinGecko if you expect more than a few records, and confirm that the Update Values Airtable node is using the correct incoming ID field, usually from the Set node or SplitInBatches node, depending on how you wire it.

Why this saves you so much time

Once this is in place, you do not have to:

  • Manually check prices on websites
  • Copy and paste values into Airtable
  • Recalculate totals or track your portfolio history by hand

You just open Airtable and see:

  • Up-to-date prices for each coin
  • Current value of each position
  • A growing history of your portfolio value over time

It is the kind of automation that quietly runs in the background and keeps your data clean, accurate, and ready for whatever you want to build on top of it: dashboards, charts, reports, or further n8n workflows.

Try the template and make it your own

If you like the idea of never manually updating your crypto prices again, this template is a great starting point. You can:

  • Import the workflow JSON and plug in your Airtable base
  • Adjust the Cron schedule if you want more or less frequent updates
  • Add your own logic for alerts, charts, or multi-currency totals

If you want, I can:

  • Provide a ready-to-import n8

Automate Crypto Price Updates with n8n & Airtable

Automate Crypto Price Updates with n8n & Airtable

Imagine opening your crypto portfolio and seeing everything already up to date, every hour, without lifting a finger. No more copy-pasting prices, no more half-finished spreadsheets, no more wondering whether your numbers are still accurate.

This guide shows you how to turn that idea into reality using an n8n workflow template that connects CoinGecko and Airtable. You will learn how to automatically refresh token prices every hour, update each holding in your Airtable portfolio, and log a running history of your total portfolio value. Along the way, you will see how one simple automation can free your time, reduce errors, and become a stepping stone toward a more focused and automated workday.

The problem: manual tracking slows you down

Keeping a crypto portfolio current by hand might work for a while. Then reality hits:

  • You spend time checking prices instead of making decisions.
  • Numbers go out of date quickly, especially in volatile markets.
  • Manual updates invite typos, broken formulas, and missing records.

As your portfolio grows, so does the overhead. The more you track, the more you have to maintain. Eventually, the admin work starts to overshadow the insights you were chasing in the first place.

The shift in mindset: from busywork to leverage

Automation is not just about saving a few clicks. It is about shifting your energy from repetitive, low-value tasks to higher-level thinking and strategy. When your portfolio updates itself:

  • You gain accurate, up-to-date portfolio values without constant checking.
  • You build historical snapshots for analytics and long-term insight.
  • You reclaim time and focus for deeper work, not data maintenance.

This n8n workflow is a concrete, practical way to start that shift. It is simple enough to understand and customize, yet powerful enough to meaningfully reduce your daily friction. Think of it as your first or next automation building block, one that can evolve with your portfolio and your skills.

The journey: from idea to working n8n workflow

The template follows a clear, left-to-right flow in n8n. Every node has a specific role, and together they create a reliable system that runs in the background:

  1. Cron – triggers the workflow every hour.
  2. Get Portfolio (Airtable – List) – reads your holdings from Airtable.
  3. CoinGecko (get coin) – fetches the latest price for each coin.
  4. Set – formats the data to match Airtable fields.
  5. SplitInBatches (optional) – processes updates in small batches to respect rate limits.
  6. Update Values (Airtable – Update) – writes the current price back to each portfolio record.
  7. Get Portfolio Values (Airtable – List) – collects all Present Value fields.
  8. Determine Total Value (Function) – calculates the total portfolio value.
  9. Append Portfolio Value (Airtable – Append) – logs that total into a history table.

Once you activate this workflow, n8n becomes your quiet assistant. Every hour, it reads, updates, calculates, and logs your portfolio, so you can simply open Airtable and see a clean, current picture of your holdings.

Step 1: schedule your automation with Cron

Cron – run at the top of the hour

The Cron node is your starting point. It defines how often your portfolio is refreshed.

  • Set it to everyHour or use a custom schedule that fits your needs.
  • Top of the hour is a good default, but you can slow it down to reduce API usage or speed it up if you need more frequent updates.

Once this is in place, you no longer have to remember to check or refresh prices. n8n will do it for you on autopilot.

Step 2: read your holdings from Airtable

Get Portfolio – Airtable (List)

Next, the workflow needs to know what you hold. The Get Portfolio node reads your records from Airtable.

  • Table: Portfolio
  • Make sure you fetch the essential fields, such as:
    • Symbol
    • Quantity
    • Present Value (if you store it)
    • id (Airtable record id)
  • Example additionalOptions: fields: ["Symbol","Quantity","Present Value"]
  • Ensure your Airtable credential in n8n has read permissions for this base and table.

This node gives the workflow a clear snapshot of your current portfolio, record by record.

Step 3: fetch live prices from CoinGecko

CoinGecko – get (coin)

Now it is time to bring in live market data. The CoinGecko node looks up the latest price for each coin.

  • Use the get (coin) operation.
  • Set options:
    • market_data = true
    • localization = false

One important detail: CoinGecko expects a coin id, not a ticker symbol.

  • Example coin id: bitcoin
  • Example ticker symbol: BTC

If your Airtable table only stores symbols like BTC or ETH, you have two good options:

  • Add a CoinGecko Id column in your Portfolio table and use that directly in the CoinGecko node.
  • Call CoinGecko’s /coins/list once, create a mapping from symbol to id in a Function node, and store that mapping in Airtable or as a local lookup.

Getting this mapping right up front prevents frustrating failed lookups later and makes your workflow smoother and more robust.

Step 4: prepare data for Airtable updates

Set node – format the fields you need

After CoinGecko returns the price data, the Set node shapes it into the exact format Airtable expects. This is where you define which values will be written back.

For example, in the Set node you can configure:

<!-- In Set node values -->
Present Price = {{$json["market_data"]["current_price"]["usd"]}}
Id = {{$node["Get Portfolio"].json["id"]}}

Two key points here:

  • Present Price pulls the latest USD price from CoinGecko.
  • Id keeps the Airtable record id so the next node can update the existing record instead of creating a new one.

This small step is what connects live data to your existing Airtable structure in a clean, controlled way.

Step 5: respect rate limits with SplitInBatches

SplitInBatches – optional but highly recommended

If your portfolio is small, you might not hit any limits. As it grows, rate limits become more important. Airtable enforces API limits, and sending too many updates at once can cause failures.

The SplitInBatches node helps by breaking the updates into smaller chunks:

  • Place it between the Set node and the Update Values node.
  • Choose a batch size, for example 5.

This simple throttling step makes your workflow more reliable and scalable, so you can keep expanding your portfolio without worrying about silent failures.

Step 6: write updated prices back to Airtable

Update Values – Airtable (Update)

Now the workflow has everything it needs to refresh your portfolio records. The Update Values node pushes the new price into Airtable.

  • Operation: update
  • Record ID: use the id from the Set or SplitInBatches node, for example:
    • {{$node["SplitInBatches"].json["id"]}} or
    • {{$json["Id"]}} depending on your exact flow.
  • Fields to update:
    • Present Price with the value from CoinGecko.
    • Optionally recalculate Present Value if you store Quantity separately.

At this point, each row in your Airtable portfolio table reflects the latest price, updated automatically on your schedule.

Step 7: gather values for a portfolio total

Get Portfolio Values – Airtable (List)

Once all records have been updated, the workflow moves into “summary” mode. The Get Portfolio Values node reads the Present Value field across all portfolio records.

  • Target the same Portfolio table.
  • Request at least the Present Value field.

This gives the next node everything it needs to calculate your total portfolio value in one place.

Step 8: calculate your total portfolio value

Determine Total Value – Function node

The Determine Total Value node uses a Function to sum all of the Present Value entries and output a single total. This becomes your hourly snapshot.

Use this safe, resilient function code:

// Function node code to sum Present Value
let totalValues = 0;
for (const item of items) {  const v = Number(item.json.fields?.['Present Value'] || 0);  if (!Number.isNaN(v)) totalValues += v;
}
return [{ json: { 'Portfolio Value (US$)': totalValues } }];

This code:

  • Handles missing or malformed values gracefully.
  • Prevents the entire workflow from breaking due to one bad record.
  • Outputs a single item with Portfolio Value (US$) ready to be appended to your history table.

Step 9: build a history of your portfolio value

Append Portfolio Value – Airtable (Append)

Finally, the workflow records your total value at that specific moment. Over time, this becomes a powerful dataset for tracking performance and spotting trends.

  • Table: Portfolio Value
  • Operation: append a new record using the output from the Function node.

Each run of the workflow adds a new row. Later, you can graph this in Airtable, connect it to visualization tools, or export it for deeper analysis.

Handling coin id vs ticker symbol correctly

One of the most common stumbling blocks is mixing up symbols and ids. CoinGecko requires a coin id, while many portfolios are built around ticker symbols.

To keep your n8n automation reliable:

  • Prefer an explicit CoinGecko Id column in your Airtable Portfolio table and use that value in the CoinGecko node.
  • Alternatively, at the start of the workflow:
    • Call CoinGecko’s /coins/list endpoint once.
    • Convert symbols to ids via a Function node.
    • Cache that mapping in Airtable or a variable so you do not have to look it up every time.

Getting this mapping right turns a fragile integration into a dependable tool you can build on.

Staying within rate limits and handling errors gracefully

As you automate more, stability matters. A few best practices will keep this workflow running smoothly over the long term.

Rate limits & retries

  • Use SplitInBatches to throttle Airtable updates into small groups.
  • Add If nodes or try/catch logic around CoinGecko calls to handle missing or unsupported coins.
  • Use n8n workflow settings to enable retries on failure, or track a manual retry counter in a Set node if you want more control.

Troubleshooting tips

  • No price returned: check that you are passing the correct CoinGecko id, not just the symbol.
  • Update errors: verify that the Airtable record id is passed correctly and that your Airtable API key or credentials are valid.
  • Unexpected totals: confirm that Present Value is numeric and that the Function node is using the right field name.

Security and cost awareness

Good automation also respects security and cost.

  • Store API keys in n8n credentials, not hardcoded in nodes or code.
  • CoinGecko’s free endpoints are generous, but it is still wise to:
    • Cache data where possible.
    • Avoid overly frequent calls if you do not need them.
  • Monitor Airtable usage if you scale this up, since heavy API usage can count toward plan limits.

These small habits keep your workflow safe and sustainable as you expand it.

Ideas to extend and personalize your workflow

Once this core automation is running, you have a strong foundation. From here, you can start to shape it around your own goals and style of working.

  • Add a Slack, Email, or webhook node to notify you when your portfolio value changes by a certain percentage.
  • Fetch more market metrics from CoinGecko, such as:
    • 24 hour price change
    • Market cap
    • Volume or other analytics fields
  • Visualize your Portfolio Value history in:
    • Google Sheets
    • Looker Studio (formerly Data Studio)
    • Or any BI tool that can connect to Airtable or CSV exports

Each small improvement turns your workflow into more than a tracker. It becomes a live, evolving dashboard of your crypto journey.

Pre-flight checklist before you hit “Activate”

Before you let the Cron node run on its own, walk through this quick checklist:

  • Confirm Airtable table and field names:
    • Portfolio table with fields like Present Price, Present Value, Symbol, CoinGecko Id.
    • Portfolio Value table for your history log.
  • Verify that n8n has working Airtable credentials configured.
  • Decide whether you need SplitInBatches based on portfolio size and API usage.
  • Test the

Automate Monthly ProfitWell Reports to Mattermost

Automate Monthly ProfitWell Reports to Mattermost with n8n

Imagine starting each month with your key SaaS metrics already waiting in your team’s Mattermost channel. No manual exports, no screenshots, no “Hey, do we have the latest MRR numbers?” messages.

That is exactly what this n8n workflow template does for you. It pulls core financial metrics from ProfitWell and automatically posts a nicely formatted report to Mattermost on a schedule you choose. In this guide, we will walk through how it works, when to use it, and how to set it up step by step.

What this n8n workflow actually does

At its core, this workflow is a simple but powerful three-step automation:

  • Cron node – decides when the workflow runs, for example once a month at 09:00.
  • ProfitWell node – grabs your key SaaS financial metrics from ProfitWell.
  • Mattermost node – posts those metrics into a Mattermost channel in a clean, readable format.

Once it is set up, you can basically forget about it. Every month your team gets a fresh snapshot of how the business is doing, right where you already talk about work.

Why automate ProfitWell reports to Mattermost?

If you are still pulling ProfitWell reports manually, you know the drill: log in, grab the numbers, format them, paste into Mattermost, hope you did not miss anything. It works, but it is slow and easy to mess up.

Automating this with n8n solves a lot of those headaches:

  • Consistent monthly updates – reports arrive on time, every time, without anyone having to remember.
  • Instant visibility for the whole team – active customers, MRR, churn, and growth are shared in a channel everyone can see.
  • Flexible formatting and timing – you can tweak the message style and schedule as your needs change.
  • Reliable, auditable automation – everything runs on a schedule, so you know exactly when and how data is posted.

In short, you spend less time “doing reporting” and more time actually reacting to the numbers.

What you need before you start

Before you import or build the template, make sure you have a few basics ready:

  • An n8n instance (n8n Cloud or self-hosted).
  • Your ProfitWell API key / credentials.
  • A Mattermost account and:
    • either a channel with an incoming webhook token
    • or a bot account with API credentials
  • Basic familiarity with n8n nodes and expressions so you can adjust message templates if needed.

When this workflow is a great fit

This template is especially handy if:

  • Leadership or product teams want a quick monthly health check in Mattermost.
  • You keep forgetting to share updated metrics or want to reduce manual work.
  • You are already using ProfitWell as your source of truth for SaaS metrics.
  • You want a simple starting point that you can later expand with alerts, charts, or extra logic.

If that sounds like you, let us walk through how to set it up.

Step-by-step: building the workflow in n8n

1. Schedule the workflow with a Cron node

First, add a Cron node. This is what controls when the report is sent.

In the template, the Cron node is configured to run monthly at 09:00. You can keep that or adjust it to match your reporting rhythm.

Key settings:

  • Mode: Every Month
  • Hour: 9 (or your preferred time)
  • Timezone: set this to your team’s primary timezone so the report lands when people are actually online.

2. Pull your metrics with the ProfitWell node

Next, add the ProfitWell node and connect it after the Cron node. This is where n8n calls the ProfitWell API and fetches the numbers you care about.

In the node settings:

  • Set the type to monthly so you get monthly metrics.
  • Configure any other metric options as needed.
  • Under Credentials, select or create your profitWellApi credentials using your ProfitWell API key.

Common metrics that teams usually pull include:

  • active_customers
  • active_trialing_customers
  • new_customers
  • growth_rate
  • recurring_revenue (often used as MRR/ARR)

If you ever need more data than a single call returns, you have two options:

  • Call ProfitWell multiple times with different options.
  • Use an API endpoint that returns a bundle of metrics in one response, if available.

Before moving on, it is worth running this node once manually so you can see the exact JSON output and confirm the field names.

3. Post the report with the Mattermost node

Finally, add the Mattermost node and connect it after the ProfitWell node. This is where you turn the raw metrics into a readable message.

In the Mattermost node:

  • Set the operation to Post Message.
  • Add your Mattermost API credentials (bot token or webhook).
  • Set channelId to the ID of the channel where you want the report posted.

Now comes the fun part: building the message body using n8n expressions to pull values from the ProfitWell node output. Here is a sample message template you can use or adapt:

=**Monthly Financial Metrics**

- Active Customers: {{$node["ProfitWell"].json["active_customers"]}}
- Active Trialing: {{$node["ProfitWell"].json["active_trialing_customers"]}}
- New Customers: {{$node["ProfitWell"].json["new_customers"]}}
- Growth Rate: {{$node["ProfitWell"].json["growth_rate"]}}%
- Recurring Revenue (MRR): ${{$node["ProfitWell"].json["recurring_revenue"]}}

_Date: {{$now.toLocaleString()}}_

Mattermost supports Markdown, so you can:

  • Use bold headings.
  • Format lists for better readability.
  • Add quotes, links, and other styling elements.

Feel free to tweak the wording so it matches your company’s tone. The key is to keep the expressions that pull values from the ProfitWell node.

Workflow JSON template (for quick import)

If you prefer to start from a ready-made structure, here is the JSON skeleton of the n8n workflow. You can import this into n8n and then just plug in your own credentials and channel ID.

{  "nodes": [  {  "name": "Cron",  "type": "n8n-nodes-base.cron",  "parameters": {  "triggerTimes": {  "item": [  {  "hour": 9,  "mode": "everyMonth"  }  ]  }  }  },  {  "name": "ProfitWell",  "type": "n8n-nodes-base.profitWell",  "parameters": {  "type": "monthly",  "options": {}  },  "credentials": {  "profitWellApi": "profitwell"  }  },  {  "name": "Mattermost",  "type": "n8n-nodes-base.mattermost",  "parameters": {  "message": "=Active Customers: {{$node[\"ProfitWell\"].json[\"active_customers\"]}}\nTrailing Customers: {{$node[\"ProfitWell\"].json[\"active_trialing_customers\"]}}\nNew Customers: {{$node[\"ProfitWell\"].json[\"new_customers\"]}}\nGrowth Rate: {{$node[\"ProfitWell\"].json[\"growth_rate\"]}}\nRecurring Revenue: {{$node[\"ProfitWell\"].json[\"recurring_revenue\"]}}",  "channelId": "YOUR_CHANNEL_ID"  },  "credentials": {  "mattermostApi": "mattermost"  }  }  ],  "connections": {  "Cron": {  "main": [  [  {  "node": "ProfitWell"  }  ]  ]  },  "ProfitWell": {  "main": [  [  {  "node": "Mattermost"  }  ]  ]  }  }
}

Once imported, just replace YOUR_CHANNEL_ID and select the right credentials in each node.

Make your reports more readable and engaging

You are not limited to plain text. If you want your Mattermost reports to pop a bit more, you can enhance them with formatting and attachments.

Ideas for richer formatting

  • Use simple emoji indicators to show trends, for example 🔺 for growth and 🔻 for decline.
  • Attach a chart image generated from a chart API and include the image URL in the message.
  • Add a link back to the ProfitWell dashboard so people can dive deeper into the data.

These small touches can make your monthly report feel less like a data dump and more like a quick, visual summary.

Testing the workflow safely

Before you unleash this on your main channel, it is worth doing a quick round of testing.

  1. Test the ProfitWell node alone
    Run it manually and inspect the JSON output. Confirm that fields like recurring_revenue and growth_rate are present and named exactly as your expressions expect.
  2. Temporarily speed up the Cron schedule
    Change the Cron node to run every minute so you can quickly test end-to-end. Once you are happy, switch it back to a monthly schedule.
  3. Use a private test channel
    Point the Mattermost node at a private or test channel so you can experiment with formatting without spamming your main workspace.

Keeping it reliable: error handling tips

Automations are great until something fails silently. To avoid that, you can add a bit of resilience to this workflow.

  • Validate responses with an IF node
    For example, check that recurring_revenue exists before posting. If it does not, you can skip the post or trigger an alert.
  • Use retry logic
    Configure n8n’s built-in retry settings or add a retry pattern for transient API failures.
  • Log results
    Optionally, send a copy of the metrics to Google Sheets or a database so you have a simple history of what was posted.
  • Add an Error Trigger workflow
    Use n8n’s Error Trigger to notify admins (for example, via email or another Mattermost channel) if this workflow fails.

Security best practices for ProfitWell and Mattermost

Since you are working with API keys and financial metrics, it is worth locking things down a bit.

  • Store API keys in n8n credentials, never in plain text fields inside nodes.
  • Use a dedicated Mattermost bot with only the permissions it needs to post messages.
  • Rotate API keys regularly and, if you are self-hosting n8n, use environment variables for secrets.

Common issues and how to fix them quickly

Run into a problem? Here are a few common ones and what to check.

  • 401 / authentication errors
    Double-check your ProfitWell and Mattermost credentials. Make sure tokens are valid and have not expired.
  • Blank or “undefined” values in the message
    Inspect the JSON output of the ProfitWell node and confirm that your expressions match the actual property names.
  • Rate limiting
    If you add more ProfitWell-based workflows, stagger their schedules and consider caching results where it makes sense.

Want to go further? Advanced ideas

Once you have the basic monthly report running, you can build on it quite a bit.

  • Add weekly summaries for more frequent, lightweight updates alongside the deeper monthly report.
  • Customize by audience:
    • High-level KPIs for an executive channel.
    • More detailed metrics for product or growth teams.
  • Trigger follow-up workflows when certain thresholds are hit, for example:
    • Negative growth rate triggers an alert.
    • MRR crossing a target milestone posts a celebration message.

Example of a polished final message

Here is another example of how your final Mattermost message might look once everything is wired up.

=**Monthly Financial Metrics - {{ $now.toLocaleDateString() }}**

- Active Customers: {{$node["ProfitWell"].json["active_customers"]}}
- Active Trialing: {{$node["ProfitWell"].json["active_trialing_customers"]}}
- New Customers: {{$node["ProfitWell"].json["new_customers"]}}
- Growth Rate: {{$node["ProfitWell"].json["growth_rate"]}}%
- Monthly Recurring Revenue: ${{$node["ProfitWell"].json["recurring_revenue"]}}

> View the full dashboard: https://app.profitwell.com

You can use this as a starting point and then adjust the text, add emojis, or rearrange the metrics to match what your team cares about most.

Wrapping up: from manual reports to hands-off automation

Automating ProfitWell reports to Mattermost with n8n is one of those small automations that quietly saves time every single month. You set it up once, and it keeps your team aligned on core financial metrics without any extra effort.

The basic recipe is simple:

  • Cron node to schedule the workflow.
  • ProfitWell node to fetch your monthly metrics.
  • Mattermost node to share the results with your team.

From there, you can iterate: refine the formatting, add alerts, log data, or branch into different channels.

Ready to try it? Import the template into your n8n instance, plug in your ProfitWell and Mattermost credentials, and run the ProfitWell node manually to confirm the data mapping. Then trigger the full workflow once and check your test channel.

If you want a customized version with different metrics, charts, or multi-channel routing, feel free to adapt this template or build on top of it as your automation hub grows.

Automate Monthly Financial Metrics to Mattermost

If you are tired of manually pulling numbers from ProfitWell and pasting them into Mattermost every month, you are absolutely not alone. The good news is that n8n can do that whole routine for you in the background. This workflow template quietly grabs your key financial metrics once a month and drops a clean report into your Mattermost channel, so your team always has the latest numbers without anyone lifting a finger.

Let’s walk through what this n8n template does, when you might want to use it, and how to set it up. Think of this as a friendly setup guide you could skim over a coffee, not a dry technical manual.

What this n8n workflow actually does

At its core, this is a simple automation that runs once a month, fetches metrics from ProfitWell, and posts them into Mattermost. It is built from just three n8n nodes:

  • Cron node – schedules the workflow to run once a month
  • ProfitWell node – pulls your subscription and revenue metrics
  • Mattermost node – sends a nicely formatted message into a channel

The workflow is lightweight, easy to understand, and very easy to customize. You can change the timing, add or remove metrics, tweak the formatting, or even send the same data somewhere else like Slack or email.

When this template is useful

You will probably love this template if:

  • You share monthly revenue or subscription updates with your team.
  • You want leadership, investors, or product teams to see key financial metrics without chasing spreadsheets.
  • You are trying to reduce repetitive reporting work and keep everything in one place, like a Mattermost channel.

It is especially handy for recurring reports such as monthly executive summaries, board updates, or internal dashboards that live in Mattermost.

How the workflow is wired: architecture & JSON

Behind the scenes, the workflow JSON simply connects three nodes in sequence:

  1. Cron node fires on a monthly schedule.
  2. ProfitWell node runs next, using your API key to fetch metrics like:
    • active_customers
    • active_trialing_customers
    • new_customers
    • growth_rate
    • recurring_revenue (MRR)
  3. Mattermost node takes those numbers and posts a message into the channel you choose.

Inside the Mattermost node, the message body uses n8n expressions to pull values directly from the ProfitWell node’s JSON output. Here is the basic template used in the workflow:

=Active Customers: {{$node["ProfitWell"].json["active_customers"]}}
Trailing Customers: {{$node["ProfitWell"].json["active_trialing_customers"]}}
New Customers: {{$node["ProfitWell"].json["new_customers"]}}
Growth Rate: {{$node["ProfitWell"].json["growth_rate"]}}
Recurring Revenue: {{$node["ProfitWell"].json["recurring_revenue"]}}

Those {{$node[...]}} expressions are n8n’s way of saying “go grab this field from that node’s output and drop it right here in the message.” Once you understand that pattern, customizing the message is very straightforward.

Step-by-step: setting up the workflow in n8n

Let us go through the setup once. After that, it just runs on autopilot every month.

1. Get the template into your n8n instance

You have two options here:

  • Import the JSON into n8n using the workflow import feature.
  • Recreate it manually by adding:
    • 1 x Cron node
    • 1 x ProfitWell node
    • 1 x Mattermost node

    and connecting them in that order.

The logic is simple: Cron triggers ProfitWell, ProfitWell passes data to Mattermost.

2. Configure the Cron node (your monthly schedule)

Next, you decide when the workflow should run. In the template, the Cron node is set to trigger once a month at 09:00 (9 a.m.). You can adjust this to whatever day and time makes sense.

One thing to keep in mind: the Cron node uses the server’s local timezone. So if your n8n instance is running in a different timezone than your team, the trigger time might not be what you expect. You can either:

  • Run n8n in the timezone you care about, or
  • Adjust the Cron settings to compensate for the server timezone.

3. Add and connect your ProfitWell credentials

Now it is time to plug in ProfitWell so n8n can fetch your metrics.

  1. Create a ProfitWell API credential in n8n using your ProfitWell API key.
  2. In the ProfitWell node, choose the metric type. The template uses type: monthly so you get monthly data.
  3. Select or confirm the metrics you want, such as:
    • active_customers
    • new_customers
    • recurring_revenue (MRR)
    • growth_rate
    • trial-related metrics like active_trialing_customers

You can always expand this later if you want more data points.

4. Configure Mattermost credentials and target channel

Finally, connect Mattermost so the report has somewhere to go.

  1. In Mattermost, create a personal access token or a bot token.
  2. Store that token in n8n as a Mattermost credential. Avoid hardcoding it in the workflow itself.
  3. Grab the channelId of the channel where you want to post the report. You can:
    • Inspect the channel info in the Mattermost UI, or
    • Use the Mattermost API to look it up.
  4. Paste the message template (from earlier) into the Mattermost node’s message field.

On each monthly run, the node will replace the expressions with the live ProfitWell values and send the final text to that channel.

Testing your workflow before going live

Before you flip the switch and let this run on a schedule, it is worth doing a quick manual test.

  • Trigger the workflow manually using “Execute Workflow” in n8n. This lets you see the entire flow from ProfitWell to Mattermost.
  • Inspect the ProfitWell node output in the n8n editor. Check that the field names match what you are using in the message, for example:
    • active_customers
    • active_trialing_customers
    • recurring_revenue

    If you change endpoints or options in the ProfitWell node, the JSON fields may differ, so update the expressions accordingly.

  • Look at the message in Mattermost. Confirm:
    • The channel is correct.
    • The formatting looks good.
    • Numbers are in the expected units and currency.

Once everything looks right, you can safely enable the Cron schedule.

Making the Mattermost report nicer to read

Plain text works, but you can make the monthly report much more readable with a bit of formatting. Mattermost supports Markdown, so you can add headings, bullets, bold text, and more.

Use Markdown for a clearer snapshot

Here is an example of a more polished message body for the Mattermost node:

**Monthly Financial Snapshot**
- Active Customers: {{$node["ProfitWell"].json["active_customers"]}}
- New Customers: {{$node["ProfitWell"].json["new_customers"]}}
- MRR: ${{$node["ProfitWell"].json["recurring_revenue"]}}
- Growth Rate: {{$node["ProfitWell"].json["growth_rate"]}}%

This version is much easier to scan at a glance, especially for busy stakeholders who just want the highlights.

Add a CSV or simple table as an attachment

If you have teammates who like raw data, you can go a step further:

  • Add a Function or Set node to build a CSV string with your metrics.
  • Attach that CSV in the Mattermost node so it is posted along with the message.

This is great for archiving, quick imports into spreadsheets, or sharing more detailed numbers without cluttering the main message.

Generate visual charts from ProfitWell data

Want something more visual? You can:

  • Use a charting API or custom Node code to generate a small chart image based on the ProfitWell metrics.
  • Store the image temporarily, then upload it via the Mattermost node.

Charts make it much easier to see trends and growth over time, especially for recurring monthly reports.

Send the same report to multiple places

Sometimes you need the same financial snapshot in more than one channel or tool. You can:

  • Use a SplitInBatches node or add multiple Mattermost nodes to send the report to several channels, such as:
    • Leadership channel
    • Revenue or sales channel
    • Product or engineering dashboard channel
  • Forward the metrics to other destinations like:
    • Slack
    • Email
    • A reporting dashboard or BI tool

All of this can come from the same ProfitWell data you are already fetching.

Security tips and best practices

Since you are dealing with financial data and API keys, it is worth keeping things secure from the start.

  • Use scoped API keys in ProfitWell, with only the permissions needed to read metrics.
  • Store secrets in n8n credentials, not hardcoded in nodes or expressions.
  • Limit channel access so financial reports only appear in private or properly permissioned Mattermost channels.
  • Watch ProfitWell API rate limits if you expand the workflow to pull lots of endpoints or run more often.

Troubleshooting common issues

If something does not work right away, here are a few quick checks that usually solve it:

  • No data from ProfitWell
    • Verify the API key is correct and active.
    • Confirm the metric type (for example, monthly) and any date or filter settings.
    • Run the ProfitWell node manually and inspect the JSON output to see what fields are actually present.
  • Message looks broken in Mattermost
    • Double check your n8n expression syntax like {{$node["ProfitWell"].json["field_name"]}}.
    • If you use Markdown, make sure special characters are escaped as needed.
  • Cron triggers at the wrong time
    • Check your n8n server timezone.
    • Adjust the Cron node schedule or change the server timezone to match your expectations.
  • Permission denied when posting to Mattermost
    • Confirm the token has permission to post messages.
    • Make sure the token user or bot has access to the target channelId.

Real-world ways to use this template

This workflow is a great “base layer” for all kinds of recurring financial updates. A few ideas:

  • Send MRR, churn, and growth rate to your revenue team on the first business day of each month.
  • Combine ProfitWell metrics with product usage data from your analytics tool to connect revenue with engagement.
  • Set up a private investor or board channel that receives scheduled financial snapshots automatically.
  • Feed engineering or product dashboards with revenue context so teams can see impact over time.

Wrapping up: set it once, forget the manual reporting

Automating your monthly financial metrics with n8n, ProfitWell, and Mattermost saves you from repetitive reporting work and keeps everyone aligned on the numbers that matter. Once the workflow is live, you get consistent, timely updates without anyone having to remember to run a report.

Here is a simple way to get started:

  1. Import the workflow template into n8n.
  2. Add your ProfitWell and Mattermost credentials.
  3. Run a manual test to confirm metrics and formatting.
  4. Enable the Cron trigger so it runs every month.
  5. Optionally, polish the message with Markdown or add charts and CSV exports.

If you would like help taking it further, you can:

  • Customize the Mattermost message with richer Markdown and chart images.
  • Add a CSV export or connect Google Sheets for long term archiving.
  • Walk through a specific error or edge case and fine tune the node configuration.

Once you have it running, you will probably wonder why you ever did this manually.

Scrape Websites with n8n & Firecrawl: Step-by-Step

Scrape Websites with n8n & Firecrawl: Step-by-Step

If you have ever copied and pasted content from a website into a doc, then done it again for the next page, and again for the next page, you already know what true boredom feels like. Your browser has 27 tabs open, your clipboard is crying, and your patience checked out three pages ago.

Good news: you do not have to live like that. With an n8n workflow template powered by Firecrawl, you can hand that repetitive chaos to a robot, sit back, and let automation do the heavy lifting. This guide walks you through a ready-made n8n template that maps a website, scrapes pages, converts everything to Markdown, and bundles the results into one neat package.

We will cover what the template does, how each node works, how to set it up in n8n, and what to do with your shiny scraped data afterward.

Why n8n + Firecrawl make web scraping less painful

Let us start with the basics so you know what tools you are working with.

n8n is an open-source automation platform where you connect nodes into visual workflows. Think of it as a Lego set for automation. You drag, drop, and wire things together, no full-blown coding required.

Firecrawl is a scraping API that does the hard stuff for you: crawling pages, rendering JavaScript, and extracting page content. It handles the messy details so you do not have to build a custom scraper from scratch.

Put them together and you get:

  • A no-code or low-code workflow that is easy to understand and audit
  • Reliable scraping that can handle modern, JS-heavy sites
  • Structured content in Markdown that you can store, analyze, or feed into other automations

In short, n8n orchestrates the workflow, Firecrawl does the scraping, and you get to stop copying and pasting like it is 2004.

What this n8n + Firecrawl template actually does

This ready-made n8n workflow uses six nodes in a simple sequence to:

  1. Accept a starting website URL
  2. Map the website to discover internal links
  3. Split those links into individual items
  4. Scrape each URL and grab the content as Markdown
  5. Aggregate all scraped pages into one collection
  6. Format everything into a final, joined Markdown result

You end up with a single output field that contains your scraped website content, separated with handy dividers so you can tell which page is which.

The workflow at a glance

Here is the high-level flow of the six nodes used in the template:

  • workflow_trigger – kicks off the workflow and provides the starting website URL.
  • map_website (Firecrawl) – crawls the site and collects links, with a configurable limit.
  • split_urls – turns the array of links into individual items.
  • scrape_url (Firecrawl) – scrapes each URL and returns the content in Markdown.
  • aggregate – combines all scraped results into a single array or field.
  • set_result – joins everything into one final Markdown string for downstream use.

Let us break down what each piece does and how to configure it without losing your sanity.

Node-by-node breakdown (with plain-language explanations)

1. workflow_trigger – where the journey starts

This node is the entry point of the workflow. It provides the initial data, including the URL you want to scrape.

In the template, the pinned input looks like this:

website_url: "http://mikeweed.com"

You can change that to any site you want to scrape. The trigger itself is flexible:

  • Run it manually while testing
  • Trigger via webhook if you want external systems to start a scrape
  • Schedule it to run regularly if you want ongoing monitoring

Think of this as the part where you tell the workflow, “Here is the site, go do your thing.”

2. map_website (Firecrawl – map) – collecting the links

Next up, the map_website node uses Firecrawl to discover internal links from your starting URL. This is your mini crawler.

Key settings in the template:

  • url: ={{ $json.website_url }}
    This tells Firecrawl to use the URL from workflow_trigger as the starting point.
  • limit: 5
    Only discover up to 5 links. Perfect for testing so you do not accidentally crawl an entire 10,000-page site on your first run.
  • timeout: 30000 ms
    Gives Firecrawl up to 30 seconds to do the mapping.

Helpful tips:

  • Increase limit when you are ready for a full crawl.
  • Use allowedDomains or URL patterns to keep the crawl focused on the right site or section.
  • Always respect robots.txt and the site’s terms of service.

This node is your “map the territory” step. Once it finishes, you have a list of links ready to be scraped.

3. split_urls (SplitOut) – one URL at a time

The split_urls node takes the list of links from map_website and breaks them into individual items. That way, each URL can be processed separately by the scraper.

Conceptually, it turns:

links: [url1, url2, url3]

into three separate items, each with a single links value.

This is important because it lets n8n handle each page independently, whether you run them in parallel or sequentially.

4. scrape_url (Firecrawl – scrape) – grabbing the content

Now for the fun part: actually scraping the content.

The scrape_url node uses Firecrawl to fetch each URL and extract the page content. In this template, it targets $json.links from the previous node and is configured to return the content as Markdown.

Key scrape options to consider:

  • Rendering: enable headless rendering if the site relies on JavaScript for content. Without it, you might get empty or partial pages.
  • Headers: set a custom User-Agent or cookies if the site behaves differently for bots or logged-in users.
  • Timeout and retries: increase the timeout for slow sites and add retry logic to handle temporary network hiccups.

The result is structured data, including a Markdown version of the page that is ideal for storage, analysis, or feeding into other automations.

5. aggregate – pulling it all together

After scraping each page, you probably do not want 50 separate results scattered around. That is where the aggregate node comes in.

Its job is to combine all the individual scraped items into a single field. In this template, it aggregates data.markdown into an output field named markdown.

So instead of one Markdown blob per page, you end up with a single collection of Markdown snippets that you can format or export however you like.

6. set_result – final formatting for downstream use

Last step: make the output human and machine friendly.

The set_result node uses a JavaScript expression to join the aggregated Markdown items into a single string and stores it in a field called scraped_website_result:

={{ $json.markdown.map(item => item).join("\n-----\n") }}

This adds a ----- divider between each page’s content. You can:

  • Change the separator to something else
  • Keep it as a list instead of a single string
  • Output JSON if that works better for your next integration

At this point, you have a clean, aggregated result that is ready to be stored, indexed, or processed by other tools.

Quick setup guide: from import to first scrape

Here is how to get the template running without a long setup saga.

  1. Import the template into n8n
    Use the template link and bring the workflow into your n8n instance.
  2. Open the workflow_trigger node
    Replace the sample URL (http://mikeweed.com) with the site you want to scrape:
    website_url: "https://your-target-site.com"
  3. Check the map_website settings
    Keep limit = 5 for your first test run so you do not accidentally go on a full-site rampage.
  4. Verify Firecrawl credentials
    Make sure your Firecrawl credentials are configured correctly for both the map and scrape nodes.
  5. Run the workflow manually
    Execute the workflow from n8n. Once it finishes, inspect the final scraped_website_result field in set_result.
  6. Scale up once it works
    When the test looks good, increase the link limit, tweak timeouts, and wire the result to your preferred storage or downstream system.

Practical configuration tips so you do not annoy servers (or yourself)

Before you turn this into a full-blown scraping machine, a few best practices will keep things smooth and polite.

  • Start small
    Keep the limit low, like 5, while testing. It is faster, safer, and easier to debug.
  • Add delays when needed
    Insert a small delay between requests so you do not hammer the target server. Your future self and the site owner will both be grateful.
  • Use clear User-Agent headers
    Set a User-Agent that identifies your bot or use a realistic browser UA if necessary. Being transparent is usually a good idea.
  • Respect robots and legality
    Always check robots.txt and the site’s Terms of Service. Avoid scraping personal or copyrighted data without permission.
  • Plan for errors
    Add catch nodes or conditionals for HTTP 4xx/5xx responses, and use retries for temporary network issues.
  • Think about pagination and discovery
    For blogs, product lists, or changelogs, extend your mapping logic to follow pagination links so you do not miss half the content.

Scaling and storing your scraped content

Once the basic web scraping pipeline is running smoothly, you can plug the output into other tools or storage systems.

  • File storage
    Save aggregated Markdown to Google Drive, S3, or any object storage for archiving and backup.
  • Databases and spreadsheets
    Insert structured content into Airtable, PostgreSQL, or Google Sheets for analysis, reporting, or dashboards.
  • Downstream processing
    Feed the scraped content into:
    • Summary generators or LLM-based tools
    • Alerting systems
    • Search indexes or internal knowledge bases

The template gives you clean Markdown, which is flexible enough to plug into almost any workflow.

Troubleshooting: when the scraper misbehaves

Even with automation, stuff breaks sometimes. Here is how to handle common issues.

  • Empty links or no results
    Check the map_website settings. Make sure:
    • The domain actually allows crawling
    • Rendering is enabled if the content is loaded via JavaScript
  • Timeouts
    Increase the Firecrawl timeout value or reduce concurrency. Some sites are just slow and need extra patience.
  • 403, Cloudflare, or bot blocks
    Consider:
    • Adding appropriate headers or cookies
    • Using a proxy or VPN, but only if it is allowed by the site’s terms
  • Malformed Markdown
    Inspect the scrape_url response fields. If Firecrawl is returning HTML or JSON instead of Markdown, adjust its configuration or your extraction logic.

Example use cases for this n8n scraping template

Once you have this set up, there are lots of practical ways to use it, as long as you stay within legal and ethical boundaries.

  • Archiving blog posts from a site for internal research or knowledge bases (respect copyright)
  • Monitoring public changelogs and release notes for product intelligence
  • Extracting public event details or press releases to automatically populate a calendar or CRM

If you are repeating the same manual copy-paste task more than twice, this workflow is probably a good candidate.

Security and compliance: scrape responsibly

Automation is powerful, which means it is also easy to misuse. A few non-negotiables:

  • Always check robots.txt and the site’s Terms of Service before scraping.
  • Respect rate limits and avoid aggressive crawling that could overload the website.
  • Do not scrape personal or sensitive data unless you have explicit permission and a valid legal basis.

Responsible scraping keeps you out of trouble and helps maintain a healthier web ecosystem.

Next steps: from test crawl to full workflow

Ready to put this into action?

  1. Import the template into your n8n instance.
  2. Update the workflow_trigger node with your starting URL.
  3. Run a small test with limit = 5 in map_website.
  4. Validate the scraped_website_result output.
  5. Scale up, add error handling, and connect the output to storage or other tools.

If you need something more advanced, like scheduled runs, multi-page pagination logic, or direct integration with Airtable or Google Sheets, you can extend this workflow or ask for a custom build.

Want this exact template configured for your site? Click below to request help or a free review of your scraping setup and use cases.

Request a custom n8n workflow

Happy scraping, and may your days of manual copy-paste be officially behind you.