Automate Your AI Newsletter with n8n (Step-by-Step)

Automate Your AI Newsletter with n8n (Step-by-Step)

What you will learn

In this guide, you will learn how to use an n8n workflow template to automate an AI-focused newsletter from raw content to a ready-to-publish markdown file. By the end, you should understand:

  • Why automating your AI newsletter is useful for teams and solo creators
  • The core building blocks of the n8n workflow (nodes, integrations, and stages)
  • How the workflow ingests markdown and tweets, filters them, and selects top stories with LLMs
  • How each newsletter section is written, assembled, and reviewed before publication
  • How to adapt the template, keep it robust, and extend it with your own tools

Why automate an AI newsletter?

Producing a consistent, high-quality AI newsletter takes time. You need to collect links, read articles, write summaries, and format everything. An automated n8n workflow can handle much of this repetitive work so you can focus on editorial judgment and tone.

Key benefits of newsletter automation include:

  • Faster turnaround – daily or weekly editions can be drafted in minutes instead of hours.
  • Consistent structure – sections like the intro, deep dive, and shortlist follow the same pattern every time.
  • Better signal extraction – LLM-assisted curation helps surface the most relevant AI stories from a larger content pool.

The workflow template described here uses n8n, LLMs via LangChain-style nodes, and S3/R2 cloud storage to build a production-ready pipeline with human review steps.

How the n8n newsletter workflow is structured

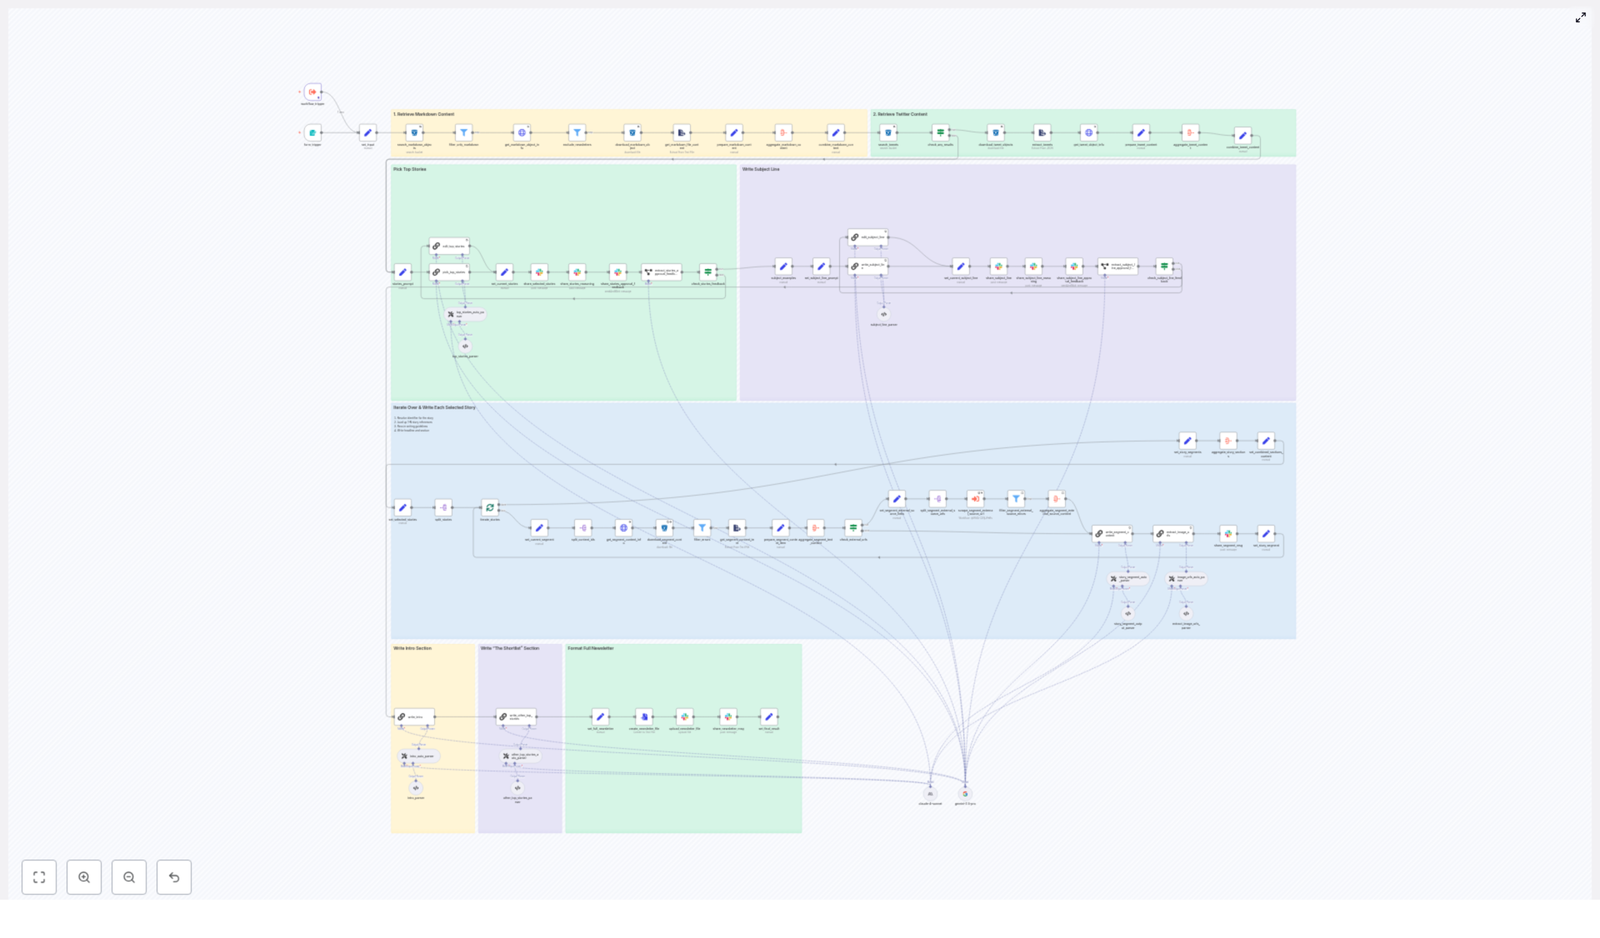
At a high level, the workflow moves through five major stages:

  1. Data ingestion – collect markdown and tweet content from cloud storage.
  2. Pre-filtering – keep only relevant and recent content for the current edition.
  3. Curation with LLMs – select the top stories and propose subject lines.
  4. Content assembly – write each section of the newsletter using LLMs and collected sources.
  5. Review and publishing – send drafts and subject lines to Slack for approval and then output the final markdown file.

The rest of this guide walks through each stage in a teaching-friendly, step-by-step way so you can understand how the template works and how to adapt it.

Step 1 – Ingest content into the workflow

Storage and retrieval in n8n

The workflow starts by gathering all candidate items for the next newsletter edition. It uses storage and HTTP nodes to pull in content:

  • S3/R2 nodes
    • Search for markdown and tweet objects using a date-based prefix (for example, today’s date).
    • Download files that match the pattern so they can be processed further.
  • HTTP Request nodes
    • Fetch extra metadata about files when needed.
    • Call external APIs to retrieve information about sources or linked content.

By the end of this step, the workflow has a collection of markdown documents and tweet data representing potential stories for your AI newsletter.

Step 2 – Filter and prepare the raw content

Parsing and aggregation

Once the files are downloaded, they need to be converted into a format that LLMs and downstream nodes can understand. This is handled through parsing and aggregation nodes:

  • extractFromFile nodes
    • Convert stored files into plain text.
    • Make it possible to parse the content without worrying about file formats.
  • aggregate and split nodes
    • Bundle related pieces of content together, such as multiple tweets or multiple markdown notes on the same topic.
    • Later split these bundles to iterate over individual story identifiers or URLs.

Filtering out noise

Not all content in storage should go into today’s newsletter. This is where workflow control nodes come in:

  • Filter and If nodes
    • Exclude irrelevant file types.
    • Skip newsletters from older dates and keep only content that matches the current edition (for example, today or a small recency window).
    • Gate branches based on conditions like missing fields or invalid formats.
  • SplitInBatches / SplitOut
    • Process large numbers of candidate stories in smaller batches.
    • Prevent memory issues when handling many items at once.

After this step, you have a clean set of potential stories, ready for LLM-based curation.

Step 3 – Curate top stories with LLMs

How the curation stage works

The curation stage is the heart of the workflow. It uses LLM prompts to decide which stories are most important and how they should appear in the newsletter.

The workflow:

  1. Aggregates all candidate items
    • Combines web markdown files and tweet content into a single pool for the current edition.
  2. Runs a story-selection prompt
    • Uses a LangChain-style node (often called chainLlm) to send a carefully written prompt to the LLM.
    • Asks the model to rank and select the top four stories, with the first one designated as the lead story.
  3. Generates structured JSON output
    • The LLM returns a JSON object that contains titles, summaries, identifiers, and external source links for the chosen stories.
    • Structured output parsers validate that each field is present and correctly formatted.
  4. Sends selections to Slack for approval
    • The workflow posts the chosen stories to a Slack channel.
    • Editors can review the picks, provide feedback, or request changes before the writing stage proceeds.

LLM and model configuration

The template supports multiple LLM providers so you can balance cost and quality:

  • LangChain-style nodes (chainLlm)
    • Run prompts for story selection, rewriting, and subject line creation.
  • Multiple model support
    • Nodes are available for models like Gemini, Claude, or other Anthropic models.
    • You can swap models depending on your budget and the level of detail you want.
  • Structured output parsers
    • Force the LLM to return a predictable JSON schema, for example:
      • title
      • summary
      • identifier
      • source_url
    • Downstream nodes can then rely on these fields without fragile text parsing.

Step 4 – Write each newsletter section

Resolving content for each selected story

Once the top four stories are approved in Slack, the workflow moves into a loop that processes each story one by one. For every selected story, n8n does the following:

  • Resolve identifiers to content
    • Use identifiers returned by the LLM to locate the original markdown or tweet content in S3/R2.
    • Download the associated text from storage.
  • Fetch external sources
    • When a story includes an external URL, the workflow may use HTTP nodes or scraping logic to fetch that page’s text.
  • Aggregate references and media
    • Combine all relevant snippets and references for a story.
    • Extract images if they are available and needed for the newsletter format.

Generating the story segments with LLMs

After all references are collected for a single story, the workflow calls the LLM again with a tightly scoped prompt. This prompt is responsible for producing a complete newsletter segment, often structured into parts, such as:

  • The Recap – a concise summary of the story.
  • Unpacked bullets – key insights, implications, or technical details in bullet form.
  • Bottom line – a short editorial takeaway or why this story matters.

The LLM returns the segment in markdown format. The workflow then:

  • Saves the markdown for each story as its own section.
  • Collects all sections into a single structure that will later form the full newsletter.

Step 5 – Intro, subject line, and metadata

Creating the intro and subject lines

With the main story sections drafted, the workflow generates the surrounding editorial elements:

  • Newsletter intro
    • A specialized prompt summarizes the overall theme of the edition.
    • The LLM may reference the selected stories to create a cohesive opening paragraph.
  • Subject line candidates
    • Another prompt focuses only on subject line generation.
    • The LLM must follow strict constraints, such as:
      • Specific word counts
      • Target tone (e.g., informative, slightly playful, or serious)
    • The model can also return its reasoning so editors understand why each subject line might perform well.

Human review in Slack

These generated elements are then sent to Slack, where editors can:

  • Approve or reject subject line options.
  • Request revisions if the intro or tone does not match the brand.
  • Use Slack’s send-and-wait style flows so the workflow pauses until a decision is made.

This keeps humans in control of key editorial decisions while still benefiting from automation.

Step 6 – Final review and publishing

Assembling the final markdown newsletter

Once all sections are approved, the workflow moves into the finalization stage:

  • Aggregate everything
    • Combine the intro, all story sections, and any closing notes into a single markdown document.
  • Create a file from markdown
    • Convert the markdown content into a file object that n8n can upload or pass to other systems.

Publishing and notifications

The final step is to make the newsletter accessible to your team and tools:

  • Upload to Slack
    • Send the markdown file directly to a Slack channel.
    • Include a completion message and a permalink so the team can easily find and distribute it.
  • Optional uploads
    • Instead of or in addition to Slack, you can upload the file to a CMS or a storage bucket like S3/R2.

Best practices for a robust n8n newsletter workflow

1) Keep prompts strict and structured

For any LLM call that feeds into downstream automation, require a JSON schema. This allows you to:

  • Parse outputs reliably using structured output parsers.
  • Validate that required fields are present before moving forward.
  • Avoid brittle text parsing based on headings or bullet patterns.

2) Validate external links and source rules

If your editorial guidelines require exact source URLs, build checks into your workflow to:

  • Copy URLs verbatim from source material.
  • Flag items where links are missing or incomplete.
  • Prevent accidental modification of link parameters that matter for tracking or attribution.

3) Rate limit and handle LLM errors

LLM calls and web scraping can be resource intensive. To keep the workflow stable:

  • Use retriable nodes or custom error handling for transient failures.
  • Enable continue-on-error behavior where a single failed story should not break the entire newsletter.
  • Process heavy tasks, like scraping many external pages, in separate, batched steps with SplitInBatches.

4) Keep humans in the loop

Automation should accelerate, not replace, editorial decision making. Maintain:

  • Slack-based approval steps for story selections.
  • Review gates for subject lines and intros.
  • Clear messaging in Slack so editors know what they are approving and how to give feedback.

5) Avoid duplicates and stale content

To keep your newsletter fresh:

  • Filter out stories that appeared in previous editions.
  • Limit selection to content within a tight recency window, such as the same date or plus/minus one day.
  • Use identifiers or hashes to detect duplicate items even if titles change slightly.

Extending the workflow template

Once you have the basic pipeline running, you can evolve it to match your distribution strategy and analytics stack. Some common extensions include:

  • A/B test subject lines
    • Automatically send different subject lines to small audience segments.
    • Pick the best performer based on opens or clicks for the main send.
  • Publish directly to email providers
    • Use API nodes to send the final markdown to platforms like SendGrid or Mailgun.
    • Convert or map markdown to the email provider’s template format.
  • Add analytics hooks
    • Log story-level data for opens, clicks, and downstream engagement.
    • Feed this performance data back into your selection prompts over time.

Security and compliance considerations

Because this workflow may interact with user data, storage, and external APIs, treat it as part of your production system:

  • Protect credentials in n8n
    • Store API keys and secrets in n8n’s credentials manager, not in plain text fields.
  • Secure S3/R2 access
    • Limit which buckets and prefixes the workflow can access.
    • Use appropriate IAM roles or access policies.
  • Avoid leaking sensitive data to LLMs
    • Do not include unnecessary PII in prompts.
    • If you use personalization

Automate Notion Updates with n8n, RAG & Supabase

Automate Notion Updates with n8n, RAG & Supabase

This guide walks you through a complete n8n workflow template that turns raw content into structured Notion updates. Along the way, it uses embeddings, Supabase as a vector store, Retrieval-Augmented Generation (RAG), Google Sheets logging, and Slack error alerts.

What you will learn

By the end of this tutorial-style walkthrough, you will be able to:

  • Explain how a RAG workflow in n8n works from webhook to Notion update
  • Set up each n8n node involved in the pipeline, including recommended settings
  • Store and query embeddings in Supabase for context-aware automation
  • Use an LLM agent to generate Notion-ready updates from retrieved context
  • Log activity to Google Sheets and send Slack alerts on errors
  • Apply security, cost, and scaling best practices to your automation

Concepts and building blocks

What this workflow does

At a high level, this n8n workflow receives incoming content, breaks it into chunks, generates embeddings, stores them in Supabase, and uses a RAG agent to produce actionable updates for Notion. It also:

  • Logs each result to Google Sheets for monitoring and auditing
  • Notifies a Slack channel if something goes wrong
  • Can be extended to write directly back to Notion using the Notion API

The knowledge-driven automation pattern

This template is a practical example of a knowledge-driven automation pattern. The pattern has several key stages:

  1. Ingest and split text into smaller chunks
  2. Generate embeddings for each chunk
  3. Store vectors and metadata in a vector database (Supabase)
  4. Query the vector store at request time to retrieve relevant context
  5. Feed that context into an LLM (RAG agent) along with instructions
  6. Persist the agent output for observability and downstream use

The benefit is that your automation becomes context-aware. Instead of treating each request in isolation, it can look up related information from previous content and generate smarter, more accurate updates.

Architecture overview

The workflow is organized into two main phases: ingest-time and query-time. Thinking in these phases makes it easier to understand and customize.

Ingest-time phase

Ingest-time steps handle new content as it arrives:

  1. Webhook Trigger – receives incoming POST requests with content.
  2. Text Splitter – breaks long text into smaller chunks.
  3. Embeddings – generates embeddings for each chunk.
  4. Supabase Insert – stores vectors and metadata in Supabase.

Query-time phase

Query-time steps run when you want to generate a response or Notion update:

  1. Supabase Query & Vector Tool – performs similarity search over embeddings.
  2. Window Memory – holds recent conversation or context.
  3. RAG Agent (Chat Model) – uses retrieved context to produce a tailored output.
  4. Append Sheet – logs the final result to Google Sheets.
  5. Slack Alert – sends an error alert if something fails.

In n8n, you connect these nodes in sequence so that data flows from the Webhook Trigger all the way to logging and error handling. Next, we will go through each node and its recommended configuration.

Step-by-step: configuring the n8n workflow

1. Webhook Trigger – entry point for new content

The Webhook node is the starting point of the workflow. It receives POST requests containing the content you want to process, such as meeting notes, documentation, or support tickets.

  • HTTP Method: POST
  • Path: something like /notion-api-update

To secure this endpoint, use a combination of:

  • A secret token included in the request headers and validated in the workflow (for example, a simple IF node that checks the header value)
  • IP whitelisting or firewall rules at your load balancer or API gateway

2. Text Splitter – preparing content for embeddings

Long documents are harder to embed and retrieve effectively. The Text Splitter node breaks incoming text into manageable chunks that maintain semantic coherence.

A good starting configuration is:

  • chunkSize: 400 tokens
  • chunkOverlap: 40 tokens

You can adjust these values based on your embeddings model and use case. Larger chunks capture more context but may be less precise. Smaller chunks can be more specific but may lose some surrounding meaning.

3. Embeddings – turning text into vectors

The Embeddings node converts each text chunk into a vector representation. This is what enables similarity search later in Supabase.

Recommended setup:

  • Use a compact, high-quality embeddings model, for example: OpenAI text-embedding-3-small
  • Provide API credentials via n8n credentials, not hard-coded in the workflow.
  • Alongside each embedding, prepare metadata such as:
    • source (where the content came from)
    • document_id (identifier for the original document)
    • chunk_index (position of the chunk in the document)
    • timestamp (when it was processed)

4. Supabase Insert – storing embeddings and metadata

Next, you persist the vectors and their metadata in a Supabase table backed by a vector column. This enables fast similarity search.

A typical table schema might include:

  • id (uuid)
  • document_id (text)
  • chunk_index (int)
  • content (text)
  • embedding (vector or float[] depending on your pgvector setup)
  • created_at (timestamp)

In the Supabase node, map the fields from the Embeddings node output to these columns. Make sure the embedding field is correctly passed as an array of floats compatible with your vector column type.

5. Supabase Query & Vector Tool – retrieving relevant context

When you want to generate a Notion update or answer a query, you use Supabase to perform a similarity search over the stored embeddings.

Configuration tips:

  • Use an approximate nearest neighbor or similarity search function on the vector column.
  • Set top_k to a value like 5 to 10, depending on how much context you want to retrieve.
  • Optionally apply a similarity threshold to filter out low-relevance results, so the RAG agent receives only useful context.

The result of this node is a set of chunks that are most similar to the incoming query, ready to be passed into the LLM.

6. Window Memory – keeping recent context

The Window Memory node stores a short history of recent messages or context. This is especially useful if:

  • You are running multiple related queries in one run
  • You want the RAG agent to remember previous steps or clarifications

Configure it as a small in-memory buffer so it does not grow unbounded. The memory is then combined with retrieved context when calling the LLM.

7. RAG Agent (Chat Model) – generating Notion updates

The RAG Agent node is where the LLM (such as Anthropic or OpenAI) uses the retrieved context and instructions to produce a final output, for example a Notion-ready update.

Key configuration points:

  • Choose a chat model provider, such as Anthropic or OpenAI, through n8n credentials.
  • Provide a clear system message, for example: “You are an assistant for Notion API Update.”
  • Build a prompt template that combines:
    • The retrieved vector context from Supabase
    • Any recent conversation from Window Memory
    • The user or workflow prompt (for example, “Summarize this meeting”)
  • Specify an output format that downstream nodes can parse easily, such as a JSON structure with keys for title, content, tags, and status.

The better you define the system message and output format, the easier it is to integrate the agent’s response with the Notion API and logging.

8. Append Sheet – logging for observability

The Append Sheet node writes each RAG agent result to Google Sheets. This gives you an audit trail and a simple way to monitor how the automation behaves over time.

Common columns to log include:

  • timestamp – when the run occurred
  • input summary – brief description of the original content
  • RAG output – the agent’s final response or Notion payload
  • status – success, error, or other custom state

9. Slack Alert – catching and reporting errors

Finally, use a Slack node to send alerts if the workflow encounters errors, especially in critical nodes like the RAG Agent, Embeddings, or Supabase operations.

Include in the Slack message:

  • The workflow run ID or execution URL for quick debugging
  • A short description of the error
  • Any key input data that helps reproduce the issue (without leaking sensitive data)

End-to-end example: from webhook to Notion page

To make this more concrete, here is how a typical run might look when processing a new meeting note and updating Notion.

  1. A POST request hits the Webhook Trigger with a JSON payload containing a new meeting note.
  2. The Text Splitter node splits the note into 400-token chunks with a 40-token overlap.
  3. The Embeddings node creates embeddings for each chunk and attaches metadata such as meeting_id, date, and speaker.
  4. The Supabase Insert node stores these embeddings and metadata in your vector table.
  5. When you want to generate a Notion update, the Supabase Query & Vector Tool node retrieves the most relevant chunks for the current query.
  6. The RAG Agent combines the retrieved context, optional Window Memory, and a prompt like “Create a concise summary and action items for this meeting” to generate a Notion-compatible JSON payload, including fields such as title, content, and tags.
  7. An HTTP Request node or the n8n Notion node sends this structured payload to the Notion API to create or update a page.
  8. The Append Sheet node logs the input summary, generated output, and status in Google Sheets. If any step fails, the Slack Alert node posts an error message to your ops channel.

Security and cost considerations

Because this workflow uses external APIs and stores data, it is important to apply good security and cost controls.

  • Protect credentials: Store API keys in n8n credentials or a secrets manager, and rotate them regularly.
  • Control embedding volume: Limit the amount of text you embed by splitting intelligently and deduplicating content before sending it to the Embeddings node.
  • Rate limiting: Apply rate limiting and backoff strategies for LLM and embeddings APIs to avoid throttling and unexpected costs.
  • Secure the webhook: Gate the Webhook Trigger with authentication and validate inputs to reduce the risk of injection attacks or malicious payloads.

Scaling and performance tips

As your dataset and traffic grow, keep these optimizations in mind:

  • Batch embedding calls: Many embedding APIs accept arrays of texts. Batch multiple chunks into one call to improve throughput and reduce cost.
  • Use vector indexing: Enable Supabase vector indexing (such as pgvector with appropriate indexes) or consider a dedicated vector database for very large datasets.
  • Cache hot queries: Use Redis or rely on Window Memory to cache frequent queries and avoid unnecessary vector searches.
  • Monitor performance: Track pipeline latency, error rates, and API usage. Set up alerts for abnormal costs or failure spikes.

Troubleshooting common issues

  • No embeddings saved: Confirm that the Embeddings node returns valid vectors and that Supabase credentials are correct. Check the mapping between embeddings output and the Supabase Insert node fields.
  • Low-quality RAG responses: Try increasing top_k in the Supabase query, providing more detailed instructions in the prompt, or using a stronger embeddings model.
  • Workflow failures: Enable execution logging in n8n, inspect node inputs and outputs, and use Slack alerts to get immediate visibility when something breaks.

Best practices for reliable automations

  • Version prompts and system messages: Keep track of changes to your RAG agent instructions so you can roll back if behavior degrades.
  • Store provenance metadata: Log who submitted content, where it came from, and any relevant links. This improves traceability and trust.
  • Validate outbound data: Sanitize and validate any data you send to Notion or other systems to avoid malformed updates or security issues.

Next steps and customization ideas

You can extend this baseline workflow in several directions:

  • Deeper Notion integration: Automatically create or update Notion pages and databases with the Notion API, using the structured

Automating Job Application Parsing with n8n & Pinecone

Automating Job Application Parsing with n8n & Pinecone

Manually skimming resumes is fun for about 3 minutes, right up until you are reading your 47th cover letter that starts with “To whom it may concern.” If your hiring process involves copy-pasting data into spreadsheets, searching for skills with Ctrl+F, and trying to remember which “John S.” was the distributed systems expert, it is probably time to let automation take over the boring parts.

This guide walks you through an n8n workflow template that does exactly that. It takes incoming job applications, breaks them into chunks, generates OpenAI embeddings, stores everything in Pinecone for semantic search, runs a lightweight RAG agent to make sense of it all, logs results into Google Sheets, and pings Slack if something explodes. In other words, it turns resume chaos into something your team can actually work with.

What this n8n job application parser actually does

At a high level, the workflow handles the full journey of a job application:

  • Receives applications via a secure webhook in n8n
  • Splits long resume text into smaller chunks for better embeddings
  • Uses OpenAI embeddings (text-embedding-3-small) to create semantic vectors
  • Stores those vectors in a Pinecone index for fast vector search
  • Queries Pinecone when context is needed and feeds it into a RAG agent
  • Uses a chat model with windowed memory to generate summaries and insights
  • Logs structured results into a Google Sheet for tracking and review
  • Sends Slack alerts if an error occurs so you do not find out three days later

The end result is a workflow that helps your hiring team search and understand applications semantically instead of relying on brittle keyword matching. A candidate might say “highly available distributed backend” instead of your exact term “distributed systems,” and you will still find them. Your future self will thank you.

Why bother with a job application parser in the first place?

Hiring teams are often drowning in resumes, cover letters, and portfolio links. Traditional approaches lean heavily on keyword filters, which are about as subtle as a sledgehammer. If the candidate does not use your exact phrasing, they can slip through the cracks, even if they are perfect for the role.

By using embeddings and vector search, this workflow lets you:

  • Search applications by meaning, not just exact words
  • Quickly surface relevant candidates for a given role or skillset
  • Automate the first-pass parsing and triage of applicants
  • Generate summaries and matched skills without reading every line manually

In short, it upgrades your hiring process from “scroll and pray” to “structured, searchable, and semi-intelligent.”

How the architecture fits together

The template is built as an n8n workflow that strings several nodes together into a mini application parsing pipeline. Here is the cast of characters you will be working with:

  • Webhook Trigger – Receives new job applications via POST at /new-job-application-parser
  • Text Splitter – Breaks large documents into chunks (chunkSize: 400, chunkOverlap: 40)
  • OpenAI Embeddings – Uses text-embedding-3-small to turn text chunks into vectors
  • Pinecone Insert – Stores vectors in a Pinecone index called new_job_application_parser
  • Pinecone Query + Vector Tool – Retrieves relevant chunks via semantic similarity
  • Window Memory + Chat Model + RAG Agent – Synthesizes context into summaries and structured outputs
  • Append to Google Sheets – Logs final results to a sheet named Log
  • Slack Alert (error path) – Notifies a Slack channel when something goes wrong

Together, these nodes form a retrieval-augmented generation workflow tailored for job applications, with Pinecone acting as your vector database and OpenAI providing the embeddings and chat model.

Quick setup walkthrough: from webhook to Slack alerts

Let us walk through the workflow in the order n8n actually runs it, with just enough detail to get you from “template imported” to “wow, that is in my Google Sheet already.”

1. Accepting applications with the Webhook Trigger

The entry point is a POST webhook configured at the path new-job-application-parser. This is where your job application intake system sends data. You can POST:

  • Raw resume text
  • Text extracted from a PDF
  • Form submissions
  • A JSON payload containing structured candidate fields

Since this endpoint is valuable, you should keep it protected. Use an API key, secret token, n8n credentials, or some other authentication in front of the webhook so random internet strangers are not spamming your index.

2. Chopping resumes into chunks with the Text Splitter

Long documents do not play nicely if you try to embed them as a single block. The Text Splitter node solves this by splitting incoming text into smaller segments.

The template uses:

  • chunkSize = 400
  • chunkOverlap = 40

That overlap keeps some context between chunks so the embeddings still “remember” what came before. You can tweak these values if your resumes are very short or very long, but this configuration is a good starting point for most use cases.

3. Generating embeddings with OpenAI

Once the text is split, each chunk is fed into the OpenAI Embeddings node. The template uses the text-embedding-3-small model, which provides solid performance at a reasonable cost.

Each chunk comes out as a vector that represents the semantic meaning of that piece of text. These vectors are what Pinecone uses later for semantic search. If you have strict accuracy or budget requirements, you can swap in a different embedding model, but keep an eye on both quality and cost.

4. Storing vectors in Pinecone

Next up, the workflow inserts each embedding into a Pinecone index named new_job_application_parser. The node uses the insert mode in the template.

For better filtering and traceability, you can store metadata alongside each vector, such as:

  • Candidate ID
  • Email address
  • Source (e.g. job board, referral)
  • File name or upload ID
  • Timestamp

That metadata makes it easier to connect search results back to specific candidates and to filter by things like role or source later on.

5. Retrieving context with Pinecone Query and Vector Tool

Once your vectors live in Pinecone, you can start asking questions. The workflow includes a Pinecone Query node and a Vector Tool that exposes the vector store as a retrieval tool to the RAG Agent.

When a hiring manager or downstream system asks something like “Who has strong distributed systems experience?” the workflow:

  • Uses semantic similarity search in Pinecone to find the most relevant chunks
  • Passes those retrieved chunks into the RAG Agent as context

This step is what lets you search by meaning instead of exact phrases, which is where the real power of embeddings shows up.

6. Making sense of it all with Window Memory, Chat Model, and RAG Agent

Now that you have relevant chunks, the RAG Agent steps in to turn raw text into something readable and useful. It uses:

  • Windowed memory to keep recent context manageable
  • A chat model from OpenAI to generate responses
  • The vector tool to pull in context from Pinecone as needed

The agent node in the template is configured with a system message:

You are an assistant for New Job Application Parser

It receives the parsed data via {{ $json }} and can produce outputs such as:

  • Short candidate summaries
  • Lists of matched skills
  • Suggested screening questions

This is the point where you stop reading every resume line by line and let the agent give you a condensed view instead.

7. Logging results in Google Sheets

To keep an audit trail and an easy place for your team to review results, the workflow appends the final outputs from the RAG Agent into a Google Sheet.

In the template, it uses:

  • Document ID: SHEET_ID
  • Sheet name: Log

The example maps the agent response into a column called Status, but you can extend this to include other fields like candidate name, role, or a link to the original application. For production setups, you can also export from Sheets into your ATS via API.

8. Getting notified when things break with Slack alerts

No workflow is perfect, and that is why the template includes a Slack Alert node on the error path. If something fails, it sends a message to a channel such as #alerts so your team can investigate quickly.

This beats discovering silently failed runs a week later when someone asks “Hey, why did we get zero applicants for that role?”

Configuration and credential checklist

Before you hit “Activate” in n8n, make sure you have all the required credentials wired up:

  • OpenAI API key configured in n8n for the Embeddings and Chat Model nodes
  • Pinecone API key and environment set up, with an index named new_job_application_parser
  • Google Sheets OAuth credentials with edit access to the target spreadsheet
  • Slack API token with permission to post to your alert channel
  • Secure access to the webhook, for example token checks, firewall rules, or a private tunnel

Once these are in place, your workflow can run end to end without constant babysitting.

Tuning the workflow for better results

Out of the box, the template works well, but a few tweaks can make it even more effective for your specific hiring process.

Chunking and embeddings

  • Chunk size – Increase it for dense paragraphs, decrease it for bullet-heavy resumes. Too large, and embeddings become vague. Too small, and you lose important context.
  • Embedding model – If you need very nuanced skill matching and your budget allows, try a higher quality embedding model. Just monitor the cost impact.

Metadata and retrieval

  • Metadata – Store fields like candidate_id, email, and role in Pinecone metadata. This helps with deterministic filtering, traceability, and compliance.
  • Retrieval parameters – Adjust top-k and similarity thresholds in the Pinecone Query node to control how many chunks are retrieved for the RAG Agent. Too many chunks can overwhelm the model, too few can leave out important context.

Performance and rate limits

  • Keep an eye on OpenAI and Pinecone usage so you do not run into throttling at the worst possible time.
  • Consider adding retries and exponential backoff in your workflow for more robust handling of transient errors.

Security and privacy for candidate data

Resumes are packed with personally identifiable information, so treating this data carefully is not optional.

  • Use HTTPS for all traffic and enable encryption at rest where supported in Pinecone and Google Sheets.
  • Minimize retention and delete vectors and raw application data when it is no longer needed or when candidates request deletion.
  • Restrict access to the webhook and Google Sheet using IAM, service accounts, or token-based controls.
  • Review your privacy policy and ensure compliance with relevant data protection laws such as GDPR or CCPA.

Testing the workflow before going live

Before you trust this workflow with real candidates, run through a quick test checklist:

  1. POST a sample application payload to the webhook and confirm all nodes execute without errors in n8n.
  2. Verify that embeddings are created and vectors appear in the new_job_application_parser index in Pinecone.
  3. Run semantic queries against the index and check that relevant chunks are returned.
  4. Review RAG Agent outputs, such as summaries and matched skills, to ensure they are accurate and not hallucinating details.
  5. Confirm that new rows are appended to the Google Sheet with the expected fields.
  6. Intentionally trigger an error to verify that Slack alerts and onError routing work as expected.

Scaling and preparing for production use

Once the workflow is working well on a handful of applications, you can harden it for higher traffic and real-world usage.

  • Use batching and asynchronous inserts to Pinecone for bulk uploads to improve throughput.
  • Consider sharding your index or using namespaces for multi-tenant or multi-role setups.
  • Monitor embedding and query costs and cache frequent queries where it makes sense.
  • Integrate with a logging and observability stack such as Datadog or Prometheus to track failures, latency, and performance over time.

Common pitfalls to avoid

To save you from a few classic “why is this not working” moments, keep an eye on these:

  • Misconfigured Pinecone index – If the index name is wrong or the index does not exist, the Pinecone Insert node can fail silently. Double check the name new_job_application_parser.
  • Oversized chunks – Very large chunks lead to less reliable embeddings. Tune chunkSize and chunkOverlap instead of just throwing more text at the model.
  • RAG agent hallucinations – Design prompts so the agent cites retrieved chunks and indicate when information is not available. You can also include confidence scores or links to sources.
  • PII exposure in Sheets – Avoid putting sensitive identifiers in any sheet that might be shared broadly. Keep access tightly controlled.

Example RAG Agent prompt you can start with

A clear system message goes a long way in keeping the agent grounded in the retrieved context. Here is a sample prompt pattern:

System: You are an assistant for New Job Application Parser. Only use provided context. If information is not present, say "Not available."
User: Process the following candidate data and produce a 3-sentence summary plus a list of matched skills.

You can extend this prompt to include your own requirements, such as preferred tone, screening criteria, or formatting instructions.

Next steps: deploy, test, and iterate

To get this workflow running with minimal fuss:

  • Import the provided n8n template into your n8n instance
  • Connect your OpenAI and Pinecone credentials
  • Set up Google Sheets and Slack credentials
  • Point the webhook at your job application intake URL

From there, you can refine prompts, adjust chunking and retrieval parameters, and gradually integrate the results into your ATS or internal tools.

Ready to try it? Import the template into n8n, send a test POST to /new-job-application-parser, and watch as structured entries appear in your Google Sheet instead of in your inbox. If you want to go further, you can generate additional prompt templates or example JSON payloads to standardize how applications are sent into the workflow.

Published by: Automation & AI Insights – Practical guides for building production AI workflows.

n8n Developer Agent: Build Workflows with LLMs

n8n Developer Agent: Build Workflows with LLMs

The n8n Developer Agent template connects low-code workflow automation with large language models (LLMs) so you can generate complete, importable n8n workflow JSON from plain language requests. This guide walks you through what the Developer Agent is, how it works inside n8n, how to set it up, and how to use it safely in real projects.

Learning goals

By the end of this tutorial-style article, you will be able to:

  • Explain what the n8n Developer Agent does and how it uses LLMs
  • Understand each component in the template, from chat trigger to n8n API
  • Configure the template step by step in your own n8n instance
  • Write effective prompts that produce useful workflow JSON
  • Test, validate, and safely deploy LLM-generated workflows

Concept overview: What is the n8n Developer Agent?

The n8n Developer Agent is a multi-agent workflow pattern that turns natural language instructions into complete n8n workflow JSON that you can import directly into your instance. Instead of manually adding nodes, wiring connections, and configuring settings, you describe the workflow in plain language and let the LLM handle the technical details.

At a high level, the template combines:

  • A chat trigger that collects your request exactly as you typed it
  • An LLM-powered developer tool that outputs pure workflow JSON
  • Memory to keep short-term context across back-and-forth conversations
  • Supporting integrations such as Google Drive and the n8n API to provide documentation and to create workflows programmatically

Key benefits of using the Developer Agent

  • Rapid prototyping – Turn a simple text request into a working n8n workflow JSON in minutes.
  • Less manual configuration – The LLM creates nodes, connections, and settings for you.
  • Repeatable structure – The JSON is formatted for direct import into n8n, which makes it easy to reuse and adapt.

How the Developer Agent works inside n8n

To understand the template, it helps to walk through the data flow: from your chat message, through the LLM, to a finished workflow in your n8n instance.

1. Chat trigger – capturing user intent

The workflow starts with a chat trigger node. This node receives your natural language description of the workflow you want. For example:

“Create a workflow that reads new Google Drive files and posts them to Slack.”

The important detail is that the chat trigger passes your message to the agent without changing the wording. The LLM developer tool receives your exact instruction, which reduces the chance of misinterpretation.

2. LLM agents and the developer tool

After the chat trigger, the template routes your prompt to the main LLM agent. This agent is configured with a developer tool, powered by an LLM such as OpenRouter or Anthropic, that has one specific job:

Produce a valid JSON object that represents a complete n8n workflow.

The JSON output is expected to include:

  • nodes array
  • connections object
  • workflow settings and metadata
  • sticky notes documenting credentials or configuration steps

The agent uses a strict system message so the LLM knows it must return JSON only, with no extra explanations or commentary. This is critical for reliable import into n8n.

3. Supporting nodes and context

Around the main agent, the template includes several supporting nodes that help the LLM generate better workflows and apply them automatically:

  • Google Drive node – Downloads a reference documentation file that provides internal guidelines or examples for the LLM.
  • Extract-from-File node – Parses content from the downloaded documentation so it can be used as context in the prompt.
  • n8n API node – Uses the generated JSON to create new workflows programmatically in your n8n instance.
  • Memory buffer node – Stores short-term conversational context, which is useful if you refine the workflow over several messages.

These pieces work together so that a single natural language request can move through the system and come out as a ready-to-import workflow, or even a workflow that is already created in your instance.

Step-by-step setup guide

In this section, you will configure the template in your own n8n environment. Follow the steps in order for a smooth setup.

Step 1 – Connect your main LLM provider (OpenRouter or similar)

The core of the Developer Agent is its connection to an LLM. Most commonly, this is done through OpenRouter or another compatible provider.

  1. Obtain an API key from your chosen LLM provider.
  2. In n8n, create a credential for that provider. This is typically done using:
    • An HTTP Request credential configured with your API key, or
    • A dedicated LLM credential type if available in your n8n version.
  3. Link this credential to the nodes that call the LLM so the agent can generate workflow JSON.

Step 2 – (Optional) Add Claude / Anthropic as a secondary model

You can optionally use Claude (Anthropic) as a second model for more complex reasoning or comparison.

  1. Get your Anthropic API key.
  2. Create an Anthropic credential in n8n.
  3. Configure the workflow so that Claude is used for:
    • Intermediate “thinking” steps, or
    • Drafting and comparing potential workflow outputs before finalizing the JSON.

This is optional, but it can improve the quality of generated workflows in complex scenarios.

Step 3 – Configure the Developer Tool

The Developer Tool node (or sub-workflow, depending on your template version) is the component that turns your prompt into JSON.

Make sure it is set up to:

  • Receive the unmodified user prompt directly from the chat trigger or agent
  • Use a strict system message that instructs the LLM to:
    • Return only valid JSON
    • Include all required n8n workflow fields
    • Add sticky notes for any manual configuration or credentials
  • Return a response that is immediately usable as n8n workflow JSON

Step 4 – Add your n8n API credential

To let the template create workflows automatically in your instance, you need an n8n API credential.

  1. In n8n, create an API key or token with permissions to create workflows.
  2. Create an n8n API credential and store the key there.
  3. In the template, connect this credential to the n8n API node that performs a POST request with the generated JSON.

When configured correctly, the workflow can send the JSON to your n8n instance and receive a link to the newly created workflow in return.

Step 5 – Provide reference documentation via Google Drive

The template includes a Google Drive node that downloads an internal documentation file. This document gives the LLM more context about your preferred patterns, naming conventions, or internal rules.

  1. Copy the provided documentation file into your own Google Drive.
  2. In n8n, set up a Google OAuth2 credential that grants read access to that file.
  3. Update the Google Drive node in the template to:
    • Use your OAuth2 credential
    • Point to the correct file or folder ID

The content of this file is then parsed by an Extract-from-File node and used to give the LLM richer context when generating workflows.

Using the Developer Agent effectively

Designing strong prompts

The quality of the generated workflow depends heavily on the prompt you provide. Good prompts are specific and structured.

Include the following in your request:

  • Clear goal – What business outcome or automation do you want? Example: “Monitor a Google Drive folder and post the names of new files to Slack.”
  • Required integrations – Mention tools like Slack, Google Drive, Gmail, GitHub, databases, or APIs.
  • Constraints and behavior – Error handling, retry logic, scheduling, or filtering rules.

The developer tool is configured to output JSON only. If your prompt is vague or contradictory, the LLM is more likely to miss nodes or produce incomplete workflows.

Validating and testing generated workflows

Treat LLM-generated workflows as prototypes that still need validation. Follow this checklist:

  • Test in a safe environment – Use a staging or development n8n instance before production.
  • Inspect the JSON structure – Confirm that the nodes array and connections object are present and consistent.
  • Set credentials manually – The JSON should refer to credential names, not raw keys. Add or map credentials inside n8n as needed.
  • Use sticky notes as a checklist – The template includes sticky notes that highlight remaining manual steps, such as connecting specific OAuth credentials.
  • Run a dry run – Trigger the workflow with test data and verify each node behaves as expected.

Security and credential best practices

When working with LLM-generated automation, keep security in mind:

  • Never hard-code API keys in the generated JSON. Use n8n credential references instead.
  • Document required credentials with sticky notes or node descriptions, not by embedding secrets.
  • Apply least-privilege access to all service accounts and API tokens used by the workflow.
  • Review permission scopes for integrations like Google Drive, Slack, or GitHub.

Common use cases for the n8n Developer Agent

Once the template is set up, you can use it as a kind of “workflow generator” for many scenarios.

  • Integration scaffolding Generate starter workflows that connect services such as Gmail, Google Drive, and Slack. You can then refine the generated workflow manually.
  • Rapid onboarding for business users Give non-technical teammates a chat interface where they can request automations without writing any JSON or touching the editor.
  • Prototyping data pipelines Let the LLM create ETL-like workflows, for example: parse files from Google Drive, transform the data, and send it into a database or external API.
  • Batch automation templates Produce multiple variations of a similar workflow by changing only a few parameters in the prompt, such as the source folder, target channel, or filter conditions.

Troubleshooting guide

Issue: LLM output is not valid JSON

If the response from the developer tool is not clean JSON, check the following:

  • System prompt configuration Make sure the system message for the developer tool clearly requires:
    • JSON only, with no explanations
    • No markdown formatting or backticks
  • Unmodified user prompt Confirm that the chat trigger passes your message directly without adding extra text that might confuse the model.
  • Post-processing step If needed, add a simple parsing or “output cleaning” step to extract the JSON block if the model still adds surrounding text.

Issue: Workflow imports fail in n8n

If n8n rejects the JSON during import or when using the n8n API:

  • Check node types Make sure each node type exists in your version of n8n. Newer node types might not be available in older instances.
  • Verify required fields Confirm that node IDs, parameters, and the connections structure are present and consistent.
  • Review API logs If you are importing via the n8n API node, inspect the response and logs to see which element is causing the failure.
  • Use the n8n import UI Try importing the JSON manually through the n8n interface to get more detailed error messages.

Real-world governance and review

LLM-driven workflow generation can significantly accelerate development, but it should be integrated into a broader governance process.

  • Human review step Have an engineer or power user review each generated workflow before it is promoted to production.
  • Comprehensive testing Test edge cases, error paths, and integration failures, not just the happy path.
  • Role-based access control Limit who can run, edit, or deploy generated workflows, especially those that touch sensitive data.

Walkthrough example: from prompt to workflow

To tie everything together, here is a simple example you can try once your template is configured:

  1. Open the chat interface connected to the Developer Agent template.
  2. Enter the prompt: “Create a workflow that watches a Google Drive folder and posts new file names to Slack.”
  3. The chat trigger passes your prompt to the LLM developer tool.
  4. The LLM generates workflow JSON with:

Visa Requirement Checker with n8n & Weaviate

Build a Visa Requirement Checker with n8n, Weaviate and Embeddings

Imagine never having to manually dig through visa rules again. With a simple n8n workflow, a vector database, and an LLM, you can turn all those dense policy documents into a friendly, automated visa assistant.

In this guide, we will walk through how the Visa Requirement Checker n8n template works, why it uses vector search and embeddings, and how you can wire up each node step by step. By the end, you will have a clear picture of how to deploy a reliable, privacy-aware visa lookup service that your users can actually trust.

What this Visa Requirement Checker actually does

At a high level, this workflow takes a user question like:

“Does a US passport holder need a visa for Brazil for tourism?”

Then it:

  • Receives the question via a Webhook
  • Searches your visa policy documents using embeddings and Weaviate
  • Uses an LLM Agent to read the relevant snippets and craft a clear answer
  • Optionally logs everything to Google Sheets for analytics or audits

The result is a small, self-contained visa guidance service that you can plug into a website, internal tool, or API.

When should you use this n8n template?

This workflow is a great fit if you:

  • Run a travel platform and want to give users instant visa guidance
  • Work in a corporate mobility or HR team that supports employees who travel a lot
  • Are a travel agent or service provider who needs a consistent, auditable way to answer visa questions

If you are tired of manually checking consulate pages, or you want a system that can scale beyond one or two experts, this template will feel like a huge relief.

Why vector search and embeddings make visa guidance easier

Visa rules are messy. They are long, full of exceptions, and written in language that users do not always copy exactly. Someone might ask about “business travel,” “work trip,” or “attending a conference,” and they all map to similar rules.

Traditional keyword search struggles with this. That is where embeddings and a vector store like Weaviate shine.

Key benefits of using embeddings for visa checks

  • Semantic search over policy documents – find the right passages even if the user does not use the exact same wording as the document.
  • Easy updates – you can add or replace documents in your vector store without retraining a model.
  • Scalable and fast – combine vector search with an LLM chat agent to deliver answers quickly, even as your document set grows.

In short, embeddings help you match “what the user means” rather than just “what they typed.”

How the n8n workflow is structured

The Visa Requirement Checker template is built as a set of connected n8n nodes that each handle a specific part of the flow. Here is the big picture:

  1. Webhook – receives questions from your app or frontend
  2. Text Splitter – breaks long visa documents into smaller pieces
  3. Embeddings – converts each text chunk into a vector
  4. Weaviate Insert & Query – stores and retrieves those vectors
  5. Tool + Agent – lets the LLM use those retrieved snippets as context
  6. Memory – keeps short-term context between related questions
  7. Google Sheets – logs questions, answers, and matched passages

Let us go through each part in a more conversational way so you can see how it all fits together.

Step-by-step: Node-by-node walkthrough

1. Webhook – the front door of your visa checker

Everything starts with a simple HTTP POST request. In the template, you create a Webhook node with an endpoint like:

/visa_requirement_checker

Your UI or API client sends a request there with the user question. For example:

“Does a US passport holder need a visa for Brazil for tourism?”

This node is the entry point, so any app that can make an HTTP POST can use your visa checker.

2. Text Splitter – preparing your policy documents

Visa policy documents are usually long. If you try to embed the entire document as a single chunk, you lose precision and waste tokens. The Text Splitter node solves that.

In this template, the splitter is configured with:

  • chunkSize = 400 characters
  • chunkOverlap = 40 characters

The overlap is important. It keeps some context between chunks so that sentences that span boundaries still make sense to the embedding model.

In practice, you feed your raw visa policy text into this node, and it outputs a list of smaller, overlapping text chunks that are ready for embedding.

3. Embeddings – turning text into vectors

Next, each of those chunks goes through an Embeddings node. The template uses Cohere as the embeddings provider, but you can plug in another provider if you prefer.

The model is set to default in the template. For production, you might choose a specific model that is tuned for semantic retrieval or multilingual support, depending on your use case.

The output of this node is a dense vector for each text chunk, which is exactly what Weaviate needs to store and search your documents efficiently.

4. Insert into Weaviate – building your visa knowledge base

Now that you have vectors, it is time to store them. The Weaviate Insert node takes each embedded chunk and saves it into a vector index, along with helpful metadata.

A typical setup includes:

  • An index or class name such as visa_requirement_checker
  • The embedding vector for each chunk
  • The original text of the chunk
  • Metadata like country, visa type, and timestamps

That metadata is crucial for filtering and auditing later. More on that in a bit.

5. Query + Tool – finding the most relevant policy snippets

When a user asks a question, the workflow embeds the question in a similar way and sends it to Weaviate for a nearest neighbor search.

The Weaviate Query node returns the chunks that are closest in vector space to the user query. In plain language, that means “the pieces of your documents that are most likely to answer the question.”

Those retrieved passages are then passed into a Tool node. The Tool exposes this retrieval function to the Agent so that your LLM can pull in real policy text whenever it needs it, rather than hallucinating an answer from scratch.

6. Memory & Chat – handling follow-up questions

Users rarely ask just one question. They might say:

  • “Do I need a visa for tourism?”
  • Then: “What about for work?”

To make that feel natural, the workflow uses a short-window Memory node that stores recent interactions. This allows the Agent and Chat nodes to keep context across messages so the LLM knows what “what about work visas?” is referring to.

The Chat node itself connects to an LLM provider. In the template, it is configured to use Anthropic, but you can adapt it to another LLM if needed. The LLM takes the retrieved passages plus the conversation history and generates a friendly, grounded answer.

7. Agent & Google Sheets – orchestrating and logging

The Agent node is the conductor of this whole setup. It decides when to call the retrieval Tool, how to use memory, and how to structure the final response.

Once the Agent has produced the answer, the workflow can optionally log everything to Google Sheets. A typical row might include:

  • The original user question
  • The passages that were retrieved from Weaviate
  • The final LLM response
  • A timestamp

This gives you a lightweight audit trail and a simple way to review how well the system is performing.

Designing your metadata for smarter search

Good metadata makes your vector store far more powerful. When you store each vector in Weaviate, add fields that reflect how you think about visa rules in real life.

Useful metadata keys include:

  • country – destination country for the rule
  • visa_type – tourism, business, work, transit, etc.
  • document_url – link to the official source or PDF
  • last_updated – when the policy was last refreshed

With these fields, you can filter queries, for example to only return recent rules or to focus on a specific visa type.

Getting chunking right

Chunking might sound like a small detail, but it has a big impact on quality and cost.

Some practical tips:

  • Keep chunks semantically coherent. Try to split along sentence or paragraph boundaries rather than in the middle of a thought.
  • Use overlap to avoid cutting important context, but do not overdo it. Too much overlap means more storage and higher embedding costs.
  • Group shorter notes or bullet points into a single chunk so each embedding represents a meaningful idea.

The template’s values of 400 characters for chunkSize and 40 for chunkOverlap are a solid starting point, and you can tweak from there based on your documents.

Prompting the LLM so it stays grounded

Even with good retrieval, the LLM needs clear instructions so it does not “make things up.” Prompt engineering here is all about grounding the answer in the actual policy text.

Best practices:

  • Ask the model to cite which passages it used.
  • Have it include a link to the official consulate or government source whenever possible.
  • Encourage it to express uncertainty and ask follow-up questions if the rules are unclear.

A simple prompt pattern that works well looks like this:

Given these policy passages, answer whether a traveler with [passport_country] traveling to [destination_country] for [purpose] needs a visa. Cite the passages used and provide a link to the official source. If unclear, ask a clarifying question.  

This kind of instruction reduces hallucinations and makes your answers more trustworthy.

Privacy, logging, and compliance

Visa questions can sometimes include personal details, so it is worth thinking about privacy from the start.

Guidelines to keep in mind:

  • Avoid storing sensitive personal data in embeddings or logs.
  • Use the Google Sheets log for non-sensitive analytics only, or protect it with proper access control.
  • For GDPR compliance, do not persist user-identifiable PII unless you have a lawful basis and a clear retention policy.

In many cases, you can design the system so that only the question text and high-level context are stored, without names or passport numbers.

Testing your visa checker before going live

Before you roll this out to real users, it is worth spending time on thorough testing. Try to “break” the system with tricky questions.

Test scenarios might include:

  • Ambiguous phrasing or typos in country names
  • Different passport origins for the same destination
  • Multi-leg trips or transit through third countries
  • Special cases like diplomatic passports or visa waiver programs

Each time, check that the retrieved passages actually support the LLM’s answer. If something feels off, adjust your chunking, metadata, or prompts.

Scaling and keeping costs under control

As usage grows, most of your costs will come from embedding new documents and calling the LLM. A few tweaks can help keep things efficient.

  • Reduce the number of chunks where possible by merging small notes into coherent sections.
  • Cache frequent queries, especially common passport-destination-purpose combinations.
  • Limit LLM token usage by using concise prompts and setting reasonable maximum output lengths.

These optimizations let you serve more users without sacrificing quality.

Monitoring and ongoing maintenance

Visa rules change. APIs occasionally fail. To keep your checker reliable, you will want some basic monitoring and a maintenance routine.

Suggestions:

  • Monitor API errors for Weaviate, your embeddings provider, and your LLM.
  • Refresh your vector store whenever official documents change, and keep a simple changelog of updates.
  • Re-embed only the documents that have changed rather than everything at once.

A bit of regular housekeeping goes a long way in keeping your answers accurate.

Ideas for extending the workflow

Once the basic visa checker is running, you can layer on more advanced features without rewriting everything.

  • Multi-language support – embed translated versions of your documents or add a translation step before embedding and answering.
  • Role-based answers – provide a simple explanation for travelers and a more detailed, technical view for internal teams or immigration specialists.
  • Automated updates – scrape official government or consulate pages, detect changes, and re-ingest updated passages automatically.

Because the core is built on n8n, you can add these pieces as new branches in the workflow instead of rebuilding everything from scratch.

Why this template makes your life easier

Manually checking visa rules is tedious, error-prone, and hard to scale. This n8n-based Visa Requirement Checker gives you:

  • A no-code automation backbone that is easy to maintain
  • Semantic search over complex policy documents
  • LLM-powered answers that are grounded in real text, not guesswork
  • An auditable trail of how each answer was generated

It is a practical solution for travel platforms, corporate mobility teams, and travel agents who need accuracy and transparency, without building a whole AI stack from scratch.

Ready to try the Visa Requirement Checker?

If you want to see this in action, you can start right away:

  1. Import the n8n workflow template into your n8n instance.
  2. Connect your Cohere, Weaviate, and Anthropic (or chosen LLM

PR Crisis Detector Workflow with n8n & LangChain

PR Crisis Detector Workflow with n8n & LangChain

From Overwhelm to Control: Turning PR Noise into Actionable Insight

Every brand lives in a constant stream of mentions, comments, and reactions. Somewhere in that flow, a single frustrated post can turn into a full-blown PR crisis. The challenge is not just spotting the danger, it is doing it fast enough to respond with clarity and confidence.

Instead of manually scanning feeds and dashboards, you can design a system that quietly works in the background, flags potential crises in real time, and gives you recommended actions right when you need them. That is exactly what this n8n workflow template helps you do.

In this guide, you will walk through a complete PR Crisis Detector built with n8n, LangChain, Redis, and HuggingFace/OpenAI models, with results logged to Google Sheets for simple auditing. More than a technical tutorial, think of this as a stepping stone toward a more automated and focused way of working, where your time goes into strategic decisions, not constant monitoring.

Why Automating PR Detection Is a Game Changer

Manually tracking every mention is not realistic. Automation turns that impossible task into a reliable, repeatable process that:

  • Catches early warning signs before they explode into a crisis
  • Gives you back time to focus on strategy instead of endless scrolling
  • Creates a consistent response framework so your team knows what to do, fast
  • Builds a historical record of incidents and responses for learning and improvement

The workflow you are about to explore combines several powerful building blocks into one cohesive system:

  • n8n for event-driven automation and orchestration
  • LangChain for embeddings, memory, and an intelligent agent
  • Redis as a high-performance vector store
  • HuggingFace/OpenAI models for language understanding and reasoning
  • Google Sheets as a simple, accessible reporting layer

Once you have this in place, you can keep evolving it, layer by layer, turning a single workflow into the backbone of a more resilient PR and communications operation.

The Vision: A Real-Time PR Crisis Detector You Can Trust

Before we dive into the nodes, imagine the experience from your team’s perspective:

  • Your monitoring tools or scrapers send content into n8n via a webhook.
  • The workflow breaks down the text, embeds it, and stores it in Redis for fast semantic search.
  • Each new event is compared against past signals so you can spot patterns and spikes.
  • A LangChain agent, powered by a chat model and backed by memory, evaluates severity and suggests next steps.
  • Every detection and recommendation is logged to Google Sheets, ready for review, collaboration, and continuous improvement.

This is not just about catching crises. It is about building a feedback loop that helps your team get smarter, faster, and more aligned with every incident.

High-Level Architecture of the n8n Workflow

At the core of this template is a clear, event-driven architecture. Here are the main components and how they connect:

  1. Webhook (n8n) – receives POST events from social platforms, monitoring tools, or email-to-webhook integrations
  2. Splitter – breaks incoming text into manageable chunks using chunkSize and chunkOverlap
  3. Embeddings (OpenAI or alternative) – converts text chunks into vectors for semantic search
  4. Insert (Redis Vector Store) – stores these vectors in a dedicated index, for example pr_crisis_detector
  5. Query (Redis) + Tool – retrieves similar documents to provide context for the agent
  6. Memory (buffer) – keeps recent context so the agent remembers what has been happening
  7. Chat (HuggingFace or other) – the language model that reasons about severity and next actions
  8. Agent (LangChain) – orchestrates tools, memory, and model to produce a recommendation
  9. Sheet (Google Sheets) – appends a new row with detection details and recommended actions

Visual Flow

Conceptually, you can picture the workflow from left to right:

Webhook → Splitter → Embeddings → Insert → Query → Tool → Agent → Sheet

The Memory and Chat nodes plug into the Agent, giving it both historical context and language understanding so it can analyze what is happening, not just react to single posts in isolation.

Step 1: Receiving Events with the n8n Webhook

Every automated journey starts with a trigger. In this workflow, that trigger is an n8n Webhook node configured to accept POST requests.

Typical sources include:

  • Social listening or monitoring platforms
  • Streaming listeners that watch specific hashtags or mentions
  • Scheduled scrapers or crawlers that send summaries

A typical incoming payload might look like this:

{  "source": "twitter",  "timestamp": "2025-10-15T12:34:56Z",  "text": "Company X just released a buggy update - total disaster",  "metadata": { "user": "user123", "location": "US" }
}

Once this is in n8n, you have a consistent entry point to transform raw, noisy content into structured insight.

Step 2: Splitting Text into Meaningful Chunks

Long or complex posts can be difficult for language models to process efficiently. The Splitter node solves this by breaking the text into chunks that are easier to embed and reason about.

Recommended starting configuration:

  • chunkSize = 400
  • chunkOverlap = 40

These values help you stay under typical token limits while preserving enough overlapping context for the embeddings to remain meaningful. You can always adjust these parameters as you experiment with your own data and average message length.

Step 3: Creating Embeddings and Storing Them in Redis

Next, you transform text into a format that machines can search and compare at scale. This is where embeddings and Redis come in.

Embeddings Node

Use OpenAI embeddings or another capable model to convert each chunk into a vector representation. These vectors capture semantic meaning, so similar posts end up close together in vector space, even if they use different wording.

Redis Vector Store

Insert the embeddings into a Redis Vector Store under a dedicated index, for example:

  • indexName = pr_crisis_detector

Attach helpful metadata to each vector, such as:

  • timestamp
  • source
  • URL or identifier
  • Possible severity or sentiment flags, if you compute them earlier

This combination of embeddings and metadata gives you a powerful foundation for fast similarity search and richer analysis later on.

Step 4: Querying Similar Signals and Spotting Patterns

Once your Redis index starts filling up, each new event can be compared against historical data to detect patterns and potential spikes.

The workflow does this by:

  1. Generating an embedding for the incoming event
  2. Querying the Redis Vector Store for similar vectors
  3. Evaluating similarity scores and the density of similar content

You can use this to drive escalation logic. For example, if the number of highly similar negative posts suddenly increases within a short time window, that is a strong signal that something is brewing.

Step 5: Adding Intelligence with Agent, Memory, and Chat

Up to this point, the system is excellent at gathering and organizing signals. The next step is turning those signals into actionable guidance. This is where LangChain’s Agent, Memory, and Chat components come together.

What the Agent Does

The LangChain agent in this workflow can:

  • Use a Tool to read the top-k similar documents from Redis
  • Access Memory that stores recent conversation or incident history
  • Leverage a Chat model (HuggingFace or another provider) to classify severity and propose next steps

Designing the Prompt and Rubric

The quality of the agent’s output depends heavily on your prompt. Provide a clear rubric that covers:

  • What counts as a minor complaint vs. a serious incident vs. a full crisis
  • Recommended human responses for each severity level
  • Escalation contacts and communication channels
  • Expected response times and priorities

As you iterate, you can refine this rubric based on real incidents and feedback from your team. Over time, your agent becomes a living playbook that grows with your brand.

Step 6: Logging Decisions in Google Sheets for Clarity and Alignment

Automation works best when it is transparent. To keep everyone aligned, this workflow logs each detection and recommendation to a Google Sheet.

Configure the Sheet node to append rows with columns such as:

  • timestamp
  • source
  • excerpt or summary of the content
  • similarity_score
  • severity level determined by the agent
  • recommended_action
  • handled_by
  • notes for follow-up

Many teams already live in spreadsheets, so this simple audit trail makes it easy to review, collaborate, and refine your approach without extra tools.

Designing Thresholds, Scoring, and Escalation Logic

To turn raw signals into meaningful alerts, you will want clear, measurable rules. Here is an example strategy you can adapt:

  • Similarity density: If more than 5 similar posts appear within 10 minutes, mark as a potential spike.
  • Sentiment + keywords: If sentiment is strongly negative and the content includes words like lawsuit, fraud, sue, or recall, escalate to crisis review.
  • Influencer factor: Posts from accounts with more than 100k followers increase the severity score multiplier.

You can implement these rules:

  • Inside the agent as a rule-based layer in the prompt
  • Or as pre-processing logic that enriches embedding metadata before it reaches the agent

Start simple, then tune thresholds as you collect real data. Over time, your escalation logic will reflect your brand’s risk tolerance and communication style.

Best Practices to Keep Your Detector Reliable

1. Data Quality Matters

The classic principle applies: garbage in, garbage out. Before you embed and store content, make sure you:

  • Normalize incoming text and remove HTML noise
  • Strip unnecessary links while preserving useful ones
  • Keep valuable metadata such as author, follower count, and source URL

This improves embedding quality and gives your agent richer context for decision making.

2. Privacy and Compliance

Be intentional about what you store. To stay on the safe side:

  • Avoid storing personally identifiable information (PII) in the vector store when possible
  • Encrypt sensitive fields or store only hashed identifiers if you must keep them
  • Respect platform terms of service when ingesting user-generated content

3. Model Selection and Cost Awareness

Different models come with different trade-offs:

  • OpenAI embeddings are powerful but have usage costs
  • HuggingFace chat models vary in latency and pricing
  • Open-source embedding models can reduce cost if you are willing to manage infrastructure

Where possible, batch embeddings to reduce overhead and monitor usage so you can scale sustainably.

4. Monitoring and Observability

To keep your PR Crisis Detector healthy and trustworthy, track metrics such as:

  • Webhook event rate and error rate
  • Embedding latency and associated costs
  • Redis query times and index size growth
  • False positive and false negative rates, based on human review

These insights help you tune performance and improve the balance between sensitivity and noise.

Scaling Your Workflow as Your Brand Grows

As your volume of mentions and incidents grows, the same template can evolve with you. Consider:

  • Sharding or namespacing Redis indexes by region or brand to keep queries fast
  • Rate limiting inbound webhooks and using queues for downstream processing during spikes
  • Caching tokenized results and embeddings for repeated identical content to save on compute

This way, your automated foundation stays stable even as your visibility and reach expand.

Sample n8n Configuration Notes

To help you move quickly from idea to implementation, here are key configuration details from the template:

  • Splitter: chunkSize = 400, chunkOverlap = 40
  • Embeddings node: model set to OpenAI (or your chosen alternative)
  • Redis Insert/Query: indexName = pr_crisis_detector
  • Agent prompt: include severity rubric, action templates, and escalation contact list
  • Google Sheets append: documentId = SHEET_ID, sheetName = Log

These defaults give you a solid starting point that you can adapt to your own environment and tooling.

Ideas for Next-Level Enhancements

Once the core detector is running, you can keep building on it to create an even richer automation ecosystem. For example:

  • Multi-language embeddings to monitor global mentions across regions
  • Image and video analysis to capture signals from multimedia posts
  • Automated response drafts that your team can review and approve, reducing response time without auto-posting
  • Integrations with Slack, PagerDuty, or incident management tools for faster human intervention and collaboration

Each enhancement builds on the same foundation, reinforcing your ability to stay calm, informed, and proactive in the face of public scrutiny.

Your Next Step: Turn This Template into Your Own PR Ally

With n8n and LangChain as your building blocks, you can create a lightweight yet powerful PR Crisis Detector that:

  • Ingests events in real time through webhooks
  • Transforms noisy text into searchable embeddings stored in Redis
  • Uses an agent with memory and a chat model to analyze context and recommend actions
  • Logs every decision to Google Sheets for transparency and continuous improvement

Backup n8n Workflows to Gitea (Automated Guide)

Backup n8n Workflows to Gitea (Automated Guide)

Backing up your n8n workflows to a Gitea repository gives you version control, history, and a safe recovery path for your automations. This guide explains, step by step, how an n8n workflow template can automatically export all workflows, compare them with what is stored in Gitea, and then create or update JSON files using the Gitea API.

What you will learn

By the end of this guide, you will understand how to:

  • Explain why backing up n8n workflows to Gitea is useful for automation and DevOps
  • Configure n8n and Gitea so they can communicate securely
  • Walk through each node in the workflow and understand its role
  • Implement base64 encoding and SHA handling required by the Gitea API
  • Test, troubleshoot, and safely activate the scheduled backup workflow

Why back up n8n workflows to Gitea?

Using Gitea as a remote backup location for your n8n workflows provides several concrete benefits:

  • Versioned backups – Every change to a workflow is stored as a commit, so you can review history, compare versions, and roll back when needed.
  • Centralized collaboration – Teams can access workflow JSON files in a shared repository, review changes, and manage pull requests if you enforce them.
  • Fully automated backups – A scheduled workflow in n8n takes care of exporting and syncing to Gitea without manual steps.

How the n8n – Gitea backup workflow works

At a high level, the automation follows this pattern:

  1. Run on a schedule (for example every 45 minutes).
  2. Fetch all workflows from the n8n instance using the n8n API.
  3. For each workflow, look for a matching JSON file in the Gitea repository.
  4. If the file exists, compare content and update only if there are changes.
  5. If the file does not exist, create a new JSON file in the repository.

The rest of this guide breaks this process into clear configuration steps inside n8n.

Prerequisites

Before building or using the workflow template, make sure you have:

  • An n8n instance with API access enabled so workflows can be listed and exported.
  • A Gitea server and repository, for example a repo named workflows.
  • A Gitea Personal Access Token with read and write permissions on the repository.
  • Credentials configured in n8n:
    • Authentication for the n8n API (API key or Basic Auth).
    • A credential that injects the Gitea token into HTTP requests.

Step-by-step: Building the backup workflow in n8n

This section walks through each node used in the template, in the order that data flows through the workflow. You can follow along in your own n8n instance or simply use it to understand how the template works internally.

1. Schedule Trigger – when backups should run

The Schedule Trigger node starts the backup process automatically.

  • Set the trigger to run at a fixed interval, for example every 45 minutes.
  • Adjust the timing to balance how up to date your backups are versus API usage.

Once active, this node periodically kicks off the entire workflow without manual input.

2. Globals (Set node) – central configuration

The Globals node is a Set node that stores reusable settings as fields. Keeping these values in one place makes the workflow easier to maintain.

Typical fields include:

  • repo.url – your Gitea base URL, for example https://git.example.com
  • repo.owner – the Gitea repository owner (user or organization)
  • repo.name – the repository name, for example workflows

Later HTTP Request nodes reference these fields to build the correct API URLs.

3. n8n API node – fetch all workflows

Next, an n8n API node retrieves the workflows you want to back up.

  • Configure this node to call the n8n endpoint that lists or exports workflows.
  • Use the appropriate authentication method (API key or Basic Auth) and test it.
  • Make sure the node returns the full JSON definition for each workflow.

The output of this node is an array of workflow objects that will be processed one by one.

4. ForEach (splitInBatches) – process workflows individually

The ForEach step is typically implemented using the splitInBatches option or a similar pattern in n8n.

Purpose:

  • Take the list of workflows from the n8n API node.
  • Process each workflow as a separate item so that file paths, comparisons, and updates do not mix data from different workflows.

Inside this loop, the workflow performs all Gitea checks and updates for a single workflow at a time.

5. GetGitea (HTTP Request) – check if the file exists

The GetGitea node is an HTTP Request node that queries the Gitea API to see whether a JSON file already exists for the current workflow.

It calls an endpoint of the form:

/api/v1/repos/:owner/:repo/contents/:path

Using the values from the Globals node, a typical URL looks like:

https://git.example.com/api/v1/repos/<owner>/workflows/<WorkflowName>.json

Key configuration details:

  • Use GET as the HTTP method.
  • Set the Authorization header to:
    Authorization: Bearer YOUR_PERSONAL_ACCESS_TOKEN
  • Make sure there is a space between Bearer and the token value.

If the file exists, Gitea returns metadata, including a sha field and the current base64-encoded content. If it does not exist, you will typically get a 404 response or an error payload.

6. Exist (IF node) – decide create vs update

The Exist node is an IF node that checks the result from GetGitea.

Its job is to route the workflow into one of two paths:

  • Create path – when the file does not exist (for example, response is 404).
  • Update path – when the file exists and you want to compare and possibly update it.

Configuration tips:

  • Inspect the response code or the error field to detect a missing file.
  • Use n8n’s onError: continueRegularOutput behavior for GET calls that may 404 so the workflow can continue and handle the create branch cleanly.

7. SetDataCreateNode / SetDataUpdateNode (Set nodes) – prepare workflow data

Before encoding and sending data to Gitea, the workflow uses two Set nodes:

  • SetDataCreateNode – used when the file will be created for the first time.
  • SetDataUpdateNode – used when an existing file may need to be updated.

Both nodes:

  • Select the relevant workflow JSON from the n8n API response.
  • Prepare a clean object that will later be turned into a JSON string and base64-encoded.

The update path will also keep track of the current file sha from Gitea, which is required for safe updates.

8. Base64EncodeCreate / Base64EncodeUpdate (Code nodes) – encode content

Gitea expects file contents to be provided as base64-encoded strings when creating or updating files. Two Code nodes handle this:

  • Base64EncodeCreate – used in the create path.
  • Base64EncodeUpdate – used in the update path.

Typical logic inside these nodes:

  • Take the workflow data object prepared by the previous Set node.
  • Pretty-print it as JSON so the file in Git is readable.
  • Encode the JSON string as UTF-8 bytes.
  • Convert those bytes into a base64 string.
  • Return the base64 string in a field such as content.

On the update path, the code or surrounding nodes will also carry forward the existing file sha from the GetGitea response. This sha must be included in the update request to avoid conflicts if the file changed remotely.

9. Changed (IF node) – avoid unnecessary commits

The Changed node is another IF node that compares the new base64-encoded content with what is currently stored in Gitea.

Its purpose is to prevent redundant commits:

  • If the new base64 content is identical to the existing content, skip the update.
  • If the content differs, proceed to the update API call.

This keeps your commit history cleaner and avoids unnecessary repository activity when nothing has changed in the workflow.

10. PostGitea (HTTP Request) – create a new file

When the file does not yet exist, the PostGitea node creates it using a POST request.

Endpoint:

POST /api/v1/repos/:owner/:repo/contents/:path

Request body should include:

  • content – the base64-encoded workflow JSON from Base64EncodeCreate.
  • message (optional) – a commit message describing the creation.
  • branch (optional) – the target branch if you do not want to use the default branch.

As with the GET request, use the Gitea token in the Authorization header.

11. PutGitea (HTTP Request) – update an existing file

When the file already exists and the Changed node determines that content is different, the PutGitea node updates the file using a PUT request.

Endpoint:

PUT /api/v1/repos/:owner/:repo/contents/:path

Request body should include:

  • content – the new base64-encoded workflow JSON from Base64EncodeUpdate.
  • sha – the current file SHA returned by GetGitea.
  • Optional fields such as message and branch if you want custom commit messages or branches.

The sha value ensures you are updating exactly the version you fetched. If the SHA no longer matches, Gitea will reject the update to prevent overwriting someone else’s changes.

Configuring Gitea authentication for n8n

Generate a Personal Access Token in Gitea

  1. In Gitea, go to Settings > Applications.
  2. Click Generate Token.
  3. Give the token a descriptive name and grant it repository read/write permissions.
  4. Copy the generated token and store it securely. You will not be able to see it again.

Set up Gitea credentials in n8n

In n8n, create a credential that injects the token into the HTTP headers:

Authorization: Bearer YOUR_PERSONAL_ACCESS_TOKEN

Important details:

  • There must be exactly one space between Bearer and the token.
  • Use this credential in all HTTP Request nodes that call the Gitea API.

Tips and best practices for n8n – Gitea backups

  • Use a service account – Create a dedicated Gitea user or service account whose token is used for automation. This keeps audit logs clear and tokens scoped.
  • Protect branches – Apply branch protection rules if you want manual review or pull requests for changes made by the backup workflow.
  • Test before scheduling – Run the workflow manually in n8n to confirm that a single workflow is exported and committed successfully.
  • Consider a dedicated branch – Store automated backups in a separate branch to keep your main branch history cleaner.
  • Balance frequency and limits – Choose a schedule interval that keeps backups reasonably fresh without hitting API rate limits or overloading your Gitea server.

Troubleshooting common issues

  • Unexpected errors from GetGitea
    Verify that:
    • The repository owner and name in the Globals node are correct.
    • The file path is encoded correctly, especially if workflow names contain spaces or special characters.
    • The token has sufficient permissions on the target repository.
  • Authentication failures
    • Double-check the Authorization header format and spelling.
    • Test the same API call using curl or a tool like Postman to confirm that the issue is in n8n configuration rather than Gitea itself.
  • SHA mismatch on update
    This usually means the file changed in Gitea after you fetched it.
    • Fetch the file again to get the latest sha.
    • Rerun the update path with the new sha.
  • Handling 404 responses
    For GET calls that may legitimately return 404 when a file does not exist:
    • Use n8n’s onError: continueRegularOutput so the workflow does not stop.
    • Use the Exist IF node to branch into the file creation path when no file is found.

Security considerations

Because this workflow uses API tokens and can modify repositories, treat it as part of your security-sensitive infrastructure.

  • Store Gitea tokens in n8n credentials rather than as plain text fields.
  • Avoid logging secrets. Do not print tokens or sensitive headers in logs.
  • Rotate the Gitea token periodically and remove tokens that are no longer needed.
  • Limit the token’s scope to only the repositories and operations required for backups.

Testing and activating the workflow

  1. Configure Globals and credentials
    Set your repo.url, repo.owner, and repo.name

AI Agent to Chat with YouTube (n8n Workflow)

AI Agent to Chat with YouTube: Build This n8n Workflow

Imagine being able to ask questions like “What are people really saying about this channel?” or “Which thumbnails are actually working?” and getting clear, organized answers without manually digging through YouTube. That is exactly what this n8n workflow helps you do.

In this guide, you will learn how to build an AI agent that chats about YouTube videos and channels using n8n, OpenAI, Apify, and the YouTube Data API. It can analyze comments, review thumbnails, transcribe videos, and store insights so you can focus on strategy instead of repetitive research.

We will walk through what the template does, when to use it, and how to set it up step by step. Think of it as your YouTube research assistant that never gets tired.

What this n8n YouTube AI agent actually does

This workflow is built around two main ideas:

  • A conversational AI agent that you can “chat” with about YouTube content
  • A set of tools behind the scenes that handle all the heavy lifting with APIs and processing

When you send a message to the agent, it decides which tools to call. It can:

  • Pull channel and video details from YouTube
  • Search for videos and filter out Shorts if you only want long-form content
  • Grab comments and summarize what viewers are really saying
  • Send thumbnails to OpenAI for design critique and CTR improvement ideas
  • Transcribe videos using Apify or another transcription service
  • Store results in Postgres so you can track trends over time

All of this is orchestrated inside n8n, so you can tweak, extend, or connect it to other tools later.

When should you use this workflow?

This template is ideal if you:

  • Create YouTube content and want deeper insights into what your audience cares about
  • Work in marketing and need quick, structured research from YouTube without hours of manual review
  • Are on a product or growth team and want to mine comments for feature requests, bugs, or feedback

It is especially helpful when you:

  • Need to repurpose video content into blogs, shorts, or social posts
  • Want to test and refine thumbnails with data-backed feedback
  • Have to monitor multiple channels or videos at scale

Instead of juggling tabs and spreadsheets, you get a single AI agent you can ask questions like “Summarize the main complaints in the last 200 comments” or “How could I improve this thumbnail?”

Core tools and services behind the workflow

Here is what powers the AI agent under the hood:

  • n8n – your automation and orchestration layer. It handles the webhook trigger, routing logic, HTTP requests, and data flow.
  • OpenAI – used for natural language processing, comment summarization, insight extraction, and thumbnail analysis through its image endpoint.
  • YouTube Data API (Google Cloud) – provides channel details, video metadata, search results, and comments.
  • Apify – runs a transcription actor to convert video audio into text, which you can then analyze or repurpose.
  • Postgres (optional but recommended) – stores chat memory and historical data so you can run trend analysis later.

Before you start: setup checklist

Before importing the n8n template, make sure you have these pieces ready:

  • A Google Cloud project with the YouTube Data API enabled and an API key
  • An OpenAI API key for GPT models and image analysis
  • An Apify API key for the transcription actor, or another transcription API you prefer
  • An n8n instance where you can import the workflow and add credentials
  • (Optional) A Postgres database if you want persistent chat memory and long-term storage

Once those are in place, you are ready to connect everything inside n8n.

How the YouTube AI agent workflow runs (high-level)

Let us zoom out for a second and look at the full journey of a single chat message:

  1. You send a message to the chat webhook in n8n.
  2. The AI agent, powered by an OpenAI chat model, reads your request and decides which tools it needs.
  3. Based on that plan, n8n routes the request to specific tool workflows, such as channel lookup, video search, comment fetching, thumbnail analysis, or transcription.
  4. HTTP Request nodes call the YouTube Data API to get channel details, video lists, descriptions, statistics, and comments.
  5. If needed, the workflow sends thumbnail URLs to OpenAI for image analysis, and video URLs to Apify for transcription.
  6. All results are combined, summarized, and returned as a structured response to your chat.
  7. Optionally, the workflow saves data to Postgres so you can reuse it or analyze it over time.

The magic is that you interact with it in natural language, while n8n quietly coordinates all the technical steps in the background.

Step-by-step: mapping the n8n nodes

1. Webhook trigger for chat

You start by adding a chat trigger node in n8n. The template uses a “When chat message received” node.

Whatever the user types becomes the instruction for the AI agent. For example, “Find the top 5 videos on this channel and summarize the comments” is passed through this trigger into the workflow.

2. Agent orchestration with OpenAI

Next comes the agent node. This is configured with an OpenAI chat model and a system message that explains the agent’s role.

In that system message, you can tell the agent to:

  • Plan which tools to call based on the user request
  • Use the YouTube tools to fetch channel, video, and comment data
  • Filter out Shorts (anything under 60 seconds) when detailed analysis or transcription is requested
  • Ask clarifying questions if the user’s prompt is vague or missing details

The agent does not call APIs directly. Instead, it emits commands that n8n routes to the right tool workflows.

3. Routing agent commands with a Switch node

To interpret the agent’s tool calls, the workflow uses a Switch node. This node looks at the command name and sends the flow to the correct branch.

Each command corresponds to one of the tools, such as:

  • get_channel_details
  • video_details
  • comments
  • search
  • videos
  • analyze_thumbnail
  • video_transcription

This structure keeps things modular. You can add or adjust tools without breaking the whole agent.

4. Calling the YouTube Data API with HTTP Request nodes

The YouTube-related tools use HTTP Request nodes to talk to the YouTube Data API. Here are the main endpoints you will configure:

  • /channels – retrieves the channel_id, title, and description, usually by channel handle or ID.
  • /search – finds videos for a channel or keyword. You can sort results by date, viewCount, or relevance.
  • /videos – gets full video details such as description, contentDetails (including duration), and statistics like views and likes.
  • /commentThreads – fetches comments and top-level replies for a given video.

These nodes give the agent the raw data it needs to answer your questions. OpenAI then turns that data into human-friendly summaries and insights.

5. Thumbnail analysis with OpenAI image models

For thumbnails, the workflow sends the high-resolution thumbnail URL to OpenAI’s image analysis endpoint.

In your prompt to the image model, you can ask for things like:

  • Design critique and overall first impression
  • Color contrast and text readability
  • What elements draw attention first
  • Specific suggestions to improve click-through rate

The agent can then combine this feedback with performance data to recommend changes like clearer text, stronger contrast, or more focused visuals.

6. Video transcription with Apify (or another service)

To turn video audio into text, the workflow sends the video URL to an Apify transcription actor using an HTTP Request node.

There are a couple of practical things to keep in mind:

  • Long videos can take time to process and may cost more, depending on your provider.
  • You might want to limit transcription to certain durations or sample segments for quick analysis.

Once the transcription is ready, it can be summarized, tagged, or repurposed into other content formats directly inside the workflow.

Making sense of noisy comments: tips for better insights

YouTube comments can be messy, repetitive, or full of spam. The workflow helps you clean this up and extract real insights by combining LLM analysis with good data handling.

Here are some strategies you can use:

  • Aggregate comments across multiple videos, then send them in batches to an LLM for sentiment analysis and topic extraction.
  • Use pagination with the YouTube API to pull as many comments as allowed, then deduplicate and normalize the text before analysis.
  • Separate constructive feedback (feature requests, bug reports, content ideas) from generic praise or clear spam.

The result is a clear picture of what viewers actually want, not just a wall of comments.

Filtering out Shorts and choosing the right videos

By default, the YouTube API returns all kinds of video content, including Shorts. That is not always useful if you want deep analysis or long-form transcriptions.

Inside the video_details step, you can check contentDetails.duration. Use that to:

  • Filter out videos shorter than 60 seconds when you need in-depth insights
  • Focus your analysis on full-length content that has more context and viewer engagement

This simple filter keeps your transcription and analysis budget focused on the videos that matter most.

Storing data and scaling your analysis

If you are just testing, you can run the workflow and read the results directly. But once you start using it regularly, you will probably want a database.

The example workflow uses Postgres for this. You can store:

  • video_id
  • Title and description
  • Publish date
  • View count and other stats
  • Thumbnail URL
  • Transcription text or summary
  • Comment summaries and sentiment tags

With that data in place, you can start doing trend analysis, compare performance across time, or feed it into dashboards and BI tools.

Common pitfalls and how to avoid them

As powerful as this setup is, there are a few gotchas you should watch out for:

  • API quota limits
    Both YouTube Data API and OpenAI have quotas. Use pagination carefully, cache results where it makes sense, and batch requests instead of calling endpoints one by one.
  • Transcription costs
    Long videos add up. Consider sampling, using a cheaper ASR model for first drafts, or only fully transcribing your highest value content.
  • Credential security
    Replace all example keys in the workflow with your own, and store them securely using n8n credentials or environment variables. Never hardcode keys in plain text where they can leak.

Real-world use cases for this YouTube AI agent

So what can you actually do with this workflow once it is running? Here are a few practical examples:

  • Marketing teams can mine top creators’ comments to uncover pain points, objections, and language to use in ad copy and landing pages.
  • Creators can quickly turn long videos into blog posts, shorts, and social snippets using transcriptions and AI-generated topic breakdowns.
  • Product teams can monitor multiple channels for mentions of features, bugs, and common requests, then feed that into product roadmap discussions.

Once you see how flexible the agent is, you will probably think of more use cases tailored to your niche.

Ideas to extend and customize the workflow

The template gives you a solid foundation, but you can absolutely build on top of it. Some ideas:

  • Generate thumbnail A/B test ideas based on historical CTR compared with thumbnail features and styles.
  • Sync insights to tools like Airtable or Notion for content planning, editorial calendars, or publishing pipelines.
  • Connect Postgres to Grafana or your favorite BI tool to visualize sentiment trends, top topics, or performance over time.

Because everything runs in n8n, you can plug this agent into other automations you already use.

Security, privacy, and compliance

Since you are working with user-generated content, it is worth being intentional about privacy and terms of service.

Good practices include:

  • Avoid storing personally identifiable information unless you truly need it.
  • Respect YouTube and API provider terms when collecting and storing data.
  • If you share insights publicly, sanitize comments, remove usernames where appropriate, and attribute quotes carefully.

This keeps your automation useful, sustainable, and respectful of viewers.

Quick start checklist

Ready to get your own YouTube AI agent up and running? Here is a condensed checklist you can follow:

  1. Create and secure your API keys for Google (YouTube Data API), OpenAI, and Apify.
  2. Import the n8n workflow template into your instance.
  3. Replace all placeholder credentials in the relevant nodes with your own secure keys.
  4. Test with a single channel and one or two videos to make sure the data and responses look right.
  5. Tune your prompts for thumbnail and comment analysis so they match your KPIs and style.
  6. Once you are happy, scale up by batching channels and writing results into Postgres for long-term trend analysis.

Wrapping up

With this n8n workflow, you are essentially giving yourself an AI research assistant for YouTube. It handles channel discovery, video details, comment mining, transcription, and thumbnail evaluation, all orchestrated through a single conversational agent.

As you refine prompts, watch costs, and keep your credentials secure, this setup can become a powerful part of your content strategy, marketing research, or product feedback loop.

Try the template

If you are ready to see it in action, import the workflow into your n8n

AI Logo Sheet Extractor to Airtable (n8n Guide)

AI Logo Sheet Extractor to Airtable (n8n Guide)

This guide presents a production-ready n8n workflow template that converts logo sheets or product comparison images into structured, relational data in Airtable. It explains the end-to-end architecture, the key nodes and integrations, and recommended best practices for running the workflow reliably in professional automation environments.

Overview: From logo sheet to structured Airtable records

The AI Logo Sheet Extractor to Airtable workflow accepts an uploaded image that contains multiple logos or product tiles. A vision-enabled language model extracts tool names and contextual information, then n8n orchestrates the creation and linking of corresponding records in Airtable.

At a high level, the workflow:

  • Receives a logo sheet image and an optional user prompt from a public form.
  • Uses an AI agent to detect tools and parse attributes and competitor relationships.
  • Creates or reuses attributes in a dedicated Airtable Attributes table.
  • Upserts tools into a Tools table using deterministic hashing for idempotency.
  • Links tools to their attributes and maps similar or competitor tools as relational references.

The result is a clean, queryable dataset in Airtable that can power product research, competitive analysis, or internal tool directories.

Use case and automation design goals

This workflow is designed for teams that frequently work with:

  • Marketing or analyst-created logo sheets summarizing vendor landscapes.
  • Product comparison collages shared in slides or PDFs.
  • Dense visual overviews of tools where manual data entry would be slow and error-prone.

The automation focuses on:

  • Deterministic behavior, so repeated runs on similar input do not create duplicates.
  • Extensibility, so additional enrichment or validation logic can be added with minimal refactoring.
  • Separation of concerns between visual extraction, data normalization, and persistence in Airtable.

End-to-end workflow architecture

The workflow is organized into four logical stages:

  1. Input and trigger via an n8n Form.
  2. AI-based extraction and normalization into structured JSON.
  3. Attribute creation and mapping to Airtable IDs.
  4. Tool upsert, competitor linking, and optional post-processing.

1. Input: Form-based logo sheet submission

The entry point is an n8n Form Trigger. This node exposes a lightweight web form that allows non-technical users to submit:

  • A logo sheet or product collage image file.
  • An optional free-text prompt that provides context for the AI model.

This pattern keeps your n8n instance secure while enabling broad access to the ingestion interface. The default path is:

/form/logo-sheet-feeder

2. AI retrieve-and-parse agent

After the image is received, the workflow calls a vision-capable language model (for example, OpenAI or another provider that supports image plus text extraction).

The agent is instructed to return a strictly structured JSON payload, typically an array of tools with associated metadata:

[{  "name": "ToolName",  "attributes": ["category", "feature"],  "similar": ["competitor1", "competitor2"]
}]

Each object should include:

  • name – the tool or product name as read from the image.
  • attributes – descriptive tags such as category, capabilities, or features.
  • similar – competitor or closely related tools detected on the sheet.

This structured output becomes the canonical intermediate representation that downstream nodes consume. Keeping this structure consistent is critical for deterministic processing.

3. Attribute creation and mapping to Airtable

Once the AI output is available, the workflow normalizes and persists attributes:

  • Each attribute string is cleaned (for example, trimmed, optionally lowercased) to avoid accidental duplicates.
  • For every unique attribute, the workflow checks whether it already exists in the Airtable Attributes table.
  • If an attribute does not yet exist, a new record is created.

A mapping step then converts attribute names into their corresponding Airtable record IDs. These IDs are used when creating or updating tool records, so the Tools table stores proper multiple-record links rather than raw text.

4. Tools upsert and competitor relationship mapping

For each tool returned by the AI agent, the workflow:

  • Normalizes the tool name and computes a stable hash (MD5-like) used as a unique key.
  • Performs an upsert into the Tools table using the hash as the primary match field.
  • Attaches linked attributes by using the previously generated attribute ID mapping.

This hash-based strategy ensures idempotent behavior. Re-running the workflow with the same or similar logo sheets does not create duplicate tool records as long as the normalized names remain consistent.

After the tool records exist, the workflow processes the similar field:

  • Resolves each listed competitor name to its corresponding Airtable record (creating or upserting as needed).
  • Writes these links back into the Similar field of the Tools table as multiple-record links.

This creates a network of related tools, enabling downstream analysis of competitive clusters or vendor ecosystems.

Required Airtable base and schema

The workflow assumes a minimal Airtable base with two interconnected tables: Tools and Attributes.

Tools table

Recommended fields:

  • Name (single line text) – human-readable tool name.
  • Hash (single line text) – deterministic key used for upserts.
  • Attributes (link to Attributes, multiple) – associated tags or properties.
  • Similar (link to Tools, multiple) – competitor or related tools.
  • Description (optional) – free-text description, can be auto-enriched later.
  • Website (optional) – official URL.
  • Category (optional) – high-level classification.

Attributes table

Recommended fields:

  • Name (single line text) – attribute label such as “AI infrastructure” or “Storage Tool”.
  • Tools (link to Tools, multiple) – reverse relation to tools that carry this attribute.

Configuration checklist in n8n

Before running the workflow in production, complete the following configuration steps:

  1. Form Trigger path
    Ensure the Form Trigger node is enabled and accessible, for example at:
    /form/logo-sheet-feeder
  2. LLM / vision API credentials
    Configure your language model credentials in n8n credentials. Use a provider that supports both image analysis and text generation.
  3. Airtable credentials and base configuration
    Set up an Airtable Personal Access Token in n8n and configure all Airtable nodes with:
    • Correct base ID.
    • Correct table IDs for Tools and Attributes.
    • Field mappings that align with your schema.
  4. System prompt and extraction instructions
    Adjust the system-level message used by the AI node so it reflects your domain, attribute taxonomy, and strict JSON requirements.
  5. End-to-end testing
    Run the workflow with several sample logo sheets and verify:
    • Tools are created or updated as expected.
    • Attributes are deduplicated and correctly linked.
    • Similar / competitor relationships are correctly mapped.

Prompt design for reliable AI extraction

The robustness of the workflow depends heavily on how the AI agent is instructed. Consider the following best practices when crafting your prompt:

  • Specify strict output structure
    Define the exact JSON schema you expect, including field names and types. Instruct the model to output JSON only, without explanatory text.
  • Separate categories from features
    If the sheet includes explicit product categories, for example “Storage Tool”, direct the model to distinguish between categories and functional attributes, or to tag them differently if required by your schema.
  • Use contextual hints
    Leverage the optional prompt field in the form to provide context such as: “Logos are AI tooling for memory and vector DBs.” This reduces ambiguity and improves classification quality.
  • Encourage conservative extraction
    Ask the model to return only tools it can confidently identify. Optionally, include a confidence flag in the JSON or instruct the model to omit uncertain entries for later manual review.

Error handling, validation, and production hardening

For production deployments, add controls around validation, idempotency, and rate management.

Validation strategies

  • Secondary validation agent
    Introduce a second AI or rules-based step that validates tool names against a curated reference list or performs lightweight web checks to confirm existence.
  • Confidence thresholds
    If your model exposes confidence scores or detection probabilities, use them to decide whether to auto-create records or route them to a manual review queue.

Idempotent upserts and data consistency

  • Maintain the hash-based upsert logic to avoid duplicates when users resubmit similar sheets.
  • Avoid matching solely on the tool name, since minor formatting differences can lead to fragmentation.
  • Ensure attribute normalization (trimming, consistent casing) before creating new attribute records.

Rate limits, retries, and resilience

  • Add retry logic on Airtable and AI nodes to handle transient API failures.
  • Throttle form submissions or introduce queueing if you expect high volume, to stay within Airtable and LLM rate limits.
  • Consider alerting on repeated error states so issues are surfaced quickly.

Customization patterns and extensions

The base workflow is intentionally modular so it can be adapted to different data models or enrichment strategies.

Auto-enrichment of tool records

After the initial upsert into Airtable, you can extend the workflow with:

  • Web-scraper nodes to retrieve website metadata, descriptions, or logo URLs.
  • Lookup microservices or APIs that return standardized product information.
  • Additional AI calls that summarize product positioning into a concise description field.

User validation and approval queue

For stricter governance, introduce a review layer:

  • Create an Approval or Review table with a status field such as “unverified”.
  • Route newly extracted tools into this table and send an automated email to a reviewer with the parsed data.
  • Link approval actions back into the workflow so only verified tools are connected to production lists.

Multi-agent extraction for complex sheets

For dense or low-quality images, it can be beneficial to split responsibilities across multiple agents:

  • One agent focused on OCR and visual detection of names and logos.
  • Another agent focused on semantic classification into categories and attributes.
  • A merge step that reconciles their outputs deterministically before writing to Airtable.

Troubleshooting and common issues

AI agent misreads or mislabels tool names

If you see systematic misreads:

  • Improve the quality of the source image, for example by increasing resolution or adjusting contrast.
  • Pre-process the image using n8n or an external service to crop out irrelevant regions.
  • Refine the prompt with explicit guidance on handling partial or blurry text and instruct the model to omit uncertain entries.

Airtable upserts failing or behaving unexpectedly

When upserts fail, check:

  • That Airtable credentials and base IDs are correct and not expired.
  • That the Hash and Name fields are present and mapped correctly in the Airtable node.
  • That the node is explicitly configured to upsert based on the Hash field.

Duplicate attributes or broken attribute links

If you notice multiple records representing the same attribute:

  • Confirm that attribute strings are normalized before the “create if not exists” logic runs.
  • Review the mapping step that converts attribute names to Airtable IDs and ensure it uses the cleaned values.
  • Run a one-time deduplication pass in Airtable if historical data already contains inconsistencies.

Security and privacy considerations

Since images are sent to external AI and vision providers, align the workflow with your organization’s security and compliance policies:

  • Avoid uploading images that contain confidential, proprietary, or personal data unless the provider and processing pipeline are approved for such content.
  • Review the data retention and usage policies of your LLM or vision provider.
  • Restrict access to the form and to the n8n instance as appropriate for your environment.

Sample AI JSON output

The following example illustrates the type of JSON structure the agent should return for optimal compatibility with the workflow:

{  "tools": [  {  "name": "airOps",  "attributes": ["Agentic Application", "AI infrastructure"],  "similar": ["Cognition", "Gradial"]  },  {  "name": "Pinecone",  "attributes": ["Storage Tool", "Memory management"],  "similar": ["Chroma", "Weaviate"]  }  ]
}

Deployment and operational checklist

For a stable production deployment:

  • Run the workflow on an n8n production instance or hosted n8n cloud and secure the form endpoint.
  • Store Airtable and LLM credentials in n8n’s encrypted credential store and rotate keys regularly.
  • Set up monitoring for workflow

Automate Notion Updates with n8n & RAG

How One Marketer Turned Chaotic Notion Updates Into an AI-Powered Workflow With n8n

The problem: Notion was growing faster than Alex could keep up

Alex was the kind of marketer every fast-moving team wants. They lived in Notion, shipped campaigns quickly, and tried to keep documentation clean and searchable. But as the company grew, so did the chaos.

Product specs, launch plans, messaging docs, meeting notes – everything landed in Notion. Pages were constantly edited, new sections appeared overnight, and no one really knew what had changed since last week. Alex started to notice a pattern of painful questions:

  • “What changed in the launch plan since yesterday?”
  • “Can we get a quick summary of the latest product spec edits?”
  • “Why did no one notice that critical update buried in page 12?”

Every time, Alex would open Notion, scroll through long pages, skim for edits, and manually summarize them in Slack or Google Sheets. It was slow, error-prone, and exhausting.

Alex did not just want notifications. They wanted intelligence. Automatic summaries. Smart change logs. A way to search across evolving Notion content using AI, not just keywords.

That was the moment Alex decided to build something better: an automated pipeline that would listen to Notion updates, store them as embeddings in a vector database, run RAG (retrieval-augmented generation) to reason about changes, and log everything in a place the team could trust.

The discovery: an n8n template built for Notion, RAG, and real workflows

While searching for “Notion RAG automation” and “n8n Notion embeddings workflow,” Alex found a template that looked almost too good to be true. It promised to:

  • Accept Notion events via a Webhook
  • Split long page content into chunks ready for embeddings
  • Create embeddings with OpenAI and store them in a Supabase vector table
  • Use a RAG agent to summarize and reason about updates
  • Log outputs to Google Sheets and send Slack alerts on errors

In other words, exactly what Alex needed: a production-ready n8n workflow that turned raw Notion API updates into AI-powered insights.

Instead of starting from a blank canvas, Alex decided to adapt this template and make it the backbone of their Notion automation stack.

Rising action: wiring the pieces together in n8n

Alex opened n8n, imported the workflow JSON, and started walking through the architecture. Instead of a simple “how to,” the workflow felt like a story in itself: Notion events came in, got transformed into embeddings, then passed through an AI brain before being logged and monitored.

The big picture architecture Alex worked with

At a high level, the n8n pipeline looked like this:

  1. Webhook Trigger – Accepts POST requests at /notion-api-update
  2. Text Splitter – Breaks long Notion content into chunks (chunkSize 400, overlap 40)
  3. Embeddings (OpenAI) – Converts each chunk into a vector using text-embedding-3-small
  4. Supabase Insert – Stores embeddings and source text in a Supabase vector table (notion_api_update)
  5. Supabase Query + Vector Tool – Retrieves relevant context at query time
  6. Window Memory + Chat Model + RAG Agent – Combines memory, retrieved documents, and a chat model (Anthropic) to generate outputs
  7. Append Sheet – Logs the RAG output to a Google Sheets “Log” sheet
  8. Slack Alert – Sends alerts to Slack on workflow errors

Each node represented a concrete step in the journey from raw Notion update to intelligent, searchable knowledge.

The turning point: from raw events to meaningful AI summaries

The real turning point for Alex came when the first sample Notion payload ran through the entire system and produced a clean, AI generated summary in Google Sheets. To get there, they had to configure each key component carefully.

Step 1: Giving Notion a place to talk – the Webhook Trigger

Alex started at the entry point. The workflow used an n8n Webhook Trigger node configured to accept HTTP POST requests. The path was set to:

notion-api-update

This meant Notion or any middleware could send page update events to:

https://your-n8n-host/webhook/notion-api-update

Alex planned to forward Notion change events to this URL, making it the single source of truth for incoming page updates.

Step 2: Making long Notion pages embedding-friendly – the Text Splitter

One of Alex’s biggest headaches had been dealing with extremely long Notion pages. The template solved this with a Text Splitter node. It broke the content into overlapping segments optimized for embeddings.

The recommended configuration in the workflow was:

  • chunkSize: 400 characters
  • chunkOverlap: 40 characters

Alex liked this balance. It preserved context between chunks while keeping the number of embeddings, and therefore costs, under control. For future very long pages or domain specific content, Alex noted they could always adjust chunkSize and chunkOverlap.

Step 3: Turning text into vectors – OpenAI embeddings

Next, each chunk needed to become a vector. The workflow used OpenAI’s text-embedding-3-small model for this. In n8n, Alex added their OpenAI credential under the name:

OPENAI_API

With that in place, the Embeddings node took each text chunk and produced a vector representation. These vectors were exactly what Supabase’s pgvector extension needed to power semantic search and retrieval.

Step 4: Building a Notion-aware vector store in Supabase

For storage, the template used Supabase as a vector store. Alex prepared a Supabase project with the following steps:

  • Enabled the pgvector extension
  • Created a table, for example named notion_api_update, with columns for:
    • id
    • content
    • metadata
    • embedding (vector type)
  • Configured the n8n Supabase Insert node to push embeddings and metadata into that table

In the workflow, the Supabase credential was referenced as:

SUPABASE_API

Alex also added metadata fields such as page_id, source_url, and last_updated to make future filtering and cleanup easier.

Step 5: Letting the RAG agent think – vector retrieval and reasoning

Storage alone was not enough. Alex wanted the system to reason about changes, summarize them, and suggest next steps.

The workflow handled this with a combination of:

  • Supabase Query – to retrieve nearest neighbor embeddings for a given query
  • Vector Tool – to expose the retrieved documents to the AI agent
  • Window Memory – to keep recent conversation or event context
  • Chat Model – using Anthropic via an ANTHROPIC_API credential
  • RAG Agent – to combine memory, retrieved context, and the chat model

The agent prompt in the template was simple but powerful:

Process the following data for task 'Notion API Update':

{{ $json }}

Alex customized this prompt slightly to request structured summaries, change logs, and suggested follow up actions tailored to their team.

Step 6: Creating a paper trail – Google Sheets logging

Once the RAG agent produced its output, Alex wanted a place where non technical teammates could easily review what the system had done.

The workflow used a Google Sheets node to append each RAG result to a sheet named Log. In the node, Alex set the:

  • Sheet name: Log
  • SHEET_ID: the ID of their Google Sheet

With OAuth2 credentials configured for Google Sheets, every processed Notion update now left a trace in a simple spreadsheet that anyone could open.

Step 7: Staying safe with Slack alerts on errors

Alex knew that any automation touching critical company knowledge needed good observability. The workflow’s error handling path helped with that.

If the RAG agent or a downstream node failed, the onError path triggered a Slack message using the SLACK_API credential. Errors were posted into the #alerts channel, so the team could react quickly instead of silently losing updates.

Putting it all together: Alex’s setup checklist

After understanding the flow, Alex walked through a final deployment checklist to get everything running:

  1. Installed n8n (self hosted in their case) and imported the workflow JSON template.
  2. Added and configured credentials in n8n for:
    • OpenAI (OPENAI_API)
    • Supabase (SUPABASE_API)
    • Anthropic (ANTHROPIC_API)
    • Google Sheets (OAuth2)
    • Slack (SLACK_API)
  3. Created a Supabase table for embeddings, enabled pgvector, and ensured columns matched the Insert node mapping.
  4. Verified the Webhook node path was set to notion-api-update, adjusting only if necessary.
  5. Confirmed the Text Splitter settings:
    • chunkSize: 400
    • chunkOverlap: 40
  6. Set SHEET_ID in the Google Sheets node and confirmed the sheet name was Log.
  7. Connected Slack to a dedicated #alerts channel for error notifications.

The first test: sending a Notion update through the pipeline

To validate everything, Alex sent a simple test payload to the webhook URL:

{  "page_id": "abc123",  "title": "Project Plan",  "content": "Long Notion page text..."
}

The POST request went to:

https://your-n8n-host/webhook/notion-api-update

Within seconds, the workflow split the content into chunks, generated embeddings, stored them in Supabase, ran the RAG agent, and appended a neat summary into the Google Sheets log. No manual copy paste, no scrolling through endless Notion paragraphs.

Living with the workflow: best practices Alex learned

After running the automation in production, Alex picked up several best practices that kept the system stable and cost effective.

Security and verification

  • Protected the webhook with a secret parameter, or used an intermediate verification step, so only genuine Notion events could trigger the workflow.
  • Limited who could access the n8n instance and Supabase credentials.

Cost and performance tuning

  • Monitored OpenAI embedding usage and Supabase storage size.
  • Adjusted chunkSize and chunkOverlap to reduce token usage without losing important context.

Indexing and data hygiene

  • Stored metadata such as page_id, source_url, and last_updated with each embedding.
  • Implemented logic so that when Notion sent multiple updates for the same page, the Supabase record was updated instead of duplicated.
  • Added a version column in Supabase and used page_id plus last_edited_time to keep the vector index consistent as pages evolved.

Observability and logging

  • Relied on the Google Sheets “Log” sheet as a quick audit trail of RAG outputs.
  • Considered adding a dedicated logging database for more complex analytics later on.
  • Watched the Slack #alerts channel to catch runtime exceptions early.

How the team used it: real Notion automation use cases

Once Alex’s workflow was stable, the rest of the team started to lean on it for several concrete use cases:

  • Automatic summarization of edited Notion pages, so stakeholders could skim key updates instead of reading entire docs.
  • Change logs and release notes generated from structured Notion content, which fed directly into marketing and product updates.
  • Smart Slack notifications when a Notion update looked like it needed human review, such as major changes to a launch plan.
  • Searchable knowledge base built from Notion pages, with RAG powered Q&A that let people ask natural language questions over the content.

What started as a personal pain point for Alex turned into a shared intelligence layer on top of the company’s Notion workspace.

When things go wrong: how Alex troubleshoots

Even with a robust template, issues sometimes appeared. Alex used a simple troubleshooting checklist whenever the workflow misbehaved or returned odd results:

  • Verified all API credentials (OpenAI, Anthropic, Supabase) were valid and not hitting rate limits.
  • Inspected the Text Splitter output to ensure chunks were sensible, since bad chunking could degrade embedding quality.
  • Double checked that pgvector was enabled in Supabase and that the table schema matched the mapping in the Supabase Insert node.
  • Reviewed Slack alerts from the onError path to identify which node failed and why.

Most issues turned out to be configuration mistakes or minor schema mismatches that were easy to fix once surfaced.

The resolution: from manual drudgery to an AI powered Notion pipeline

Within a short time, Alex’s relationship with Notion changed completely. Instead of chasing edits and manually summarizing pages, they had an n8n workflow that:

  • Split incoming Notion content into embedding friendly chunks
  • Generated embeddings with OpenAI and stored them in a Supabase vector store
  • Retrieved relevant context on demand using vector search
  • Used a RAG agent and chat model to summarize, reason, and suggest actions
  • Logged every result in Google Sheets, while sending Slack alerts on errors

The pattern was modular and future proof. Alex could swap models, change the vector store, or route outputs to new destinations such as Notion itself, email, or other internal tools, all without rewriting everything from scratch.

Your next step: make this story yours

If you are facing the same pain that Alex had – drowning in Notion updates, manually summarizing changes, or wishing your documentation was searchable with real AI – this n8n workflow template gives you a clear path forward.

To get started:

  • Import the workflow JSON into your n8n instance.
  • Add your credentials for OpenAI, Supabase, Anthropic, Google Sheets, and Slack.