Automate Google Sheets to Postgres with n8n & LLM

Automate Google Sheets to Postgres with n8n & LLM

Moving structured data from Google Sheets into PostgreSQL is a frequent requirement for analytics, reporting, and machine learning pipelines. This guide documents a production-ready n8n workflow template that:

  • Automatically ingests a Google Sheet into Postgres
  • Infers table schemas and creates tables dynamically
  • Normalizes currency, percentage, date, and boolean values
  • Uses an LLM-based SQL agent to generate safe, schema-aware queries
  • Exposes helper workflows for schema discovery and query execution

The template is named SHEETS RAG in n8n and is designed for users who already understand n8n nodes, credentials, and workflow composition.

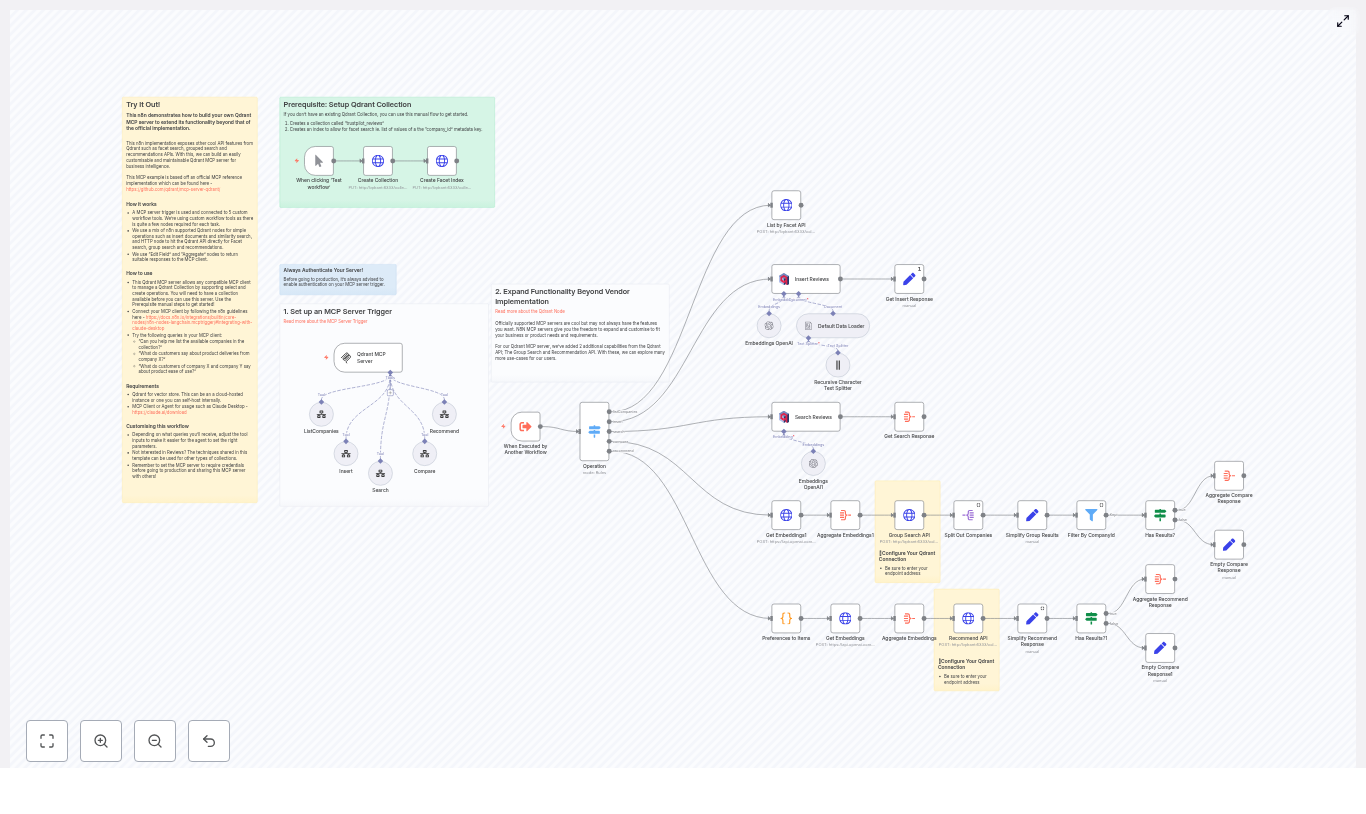
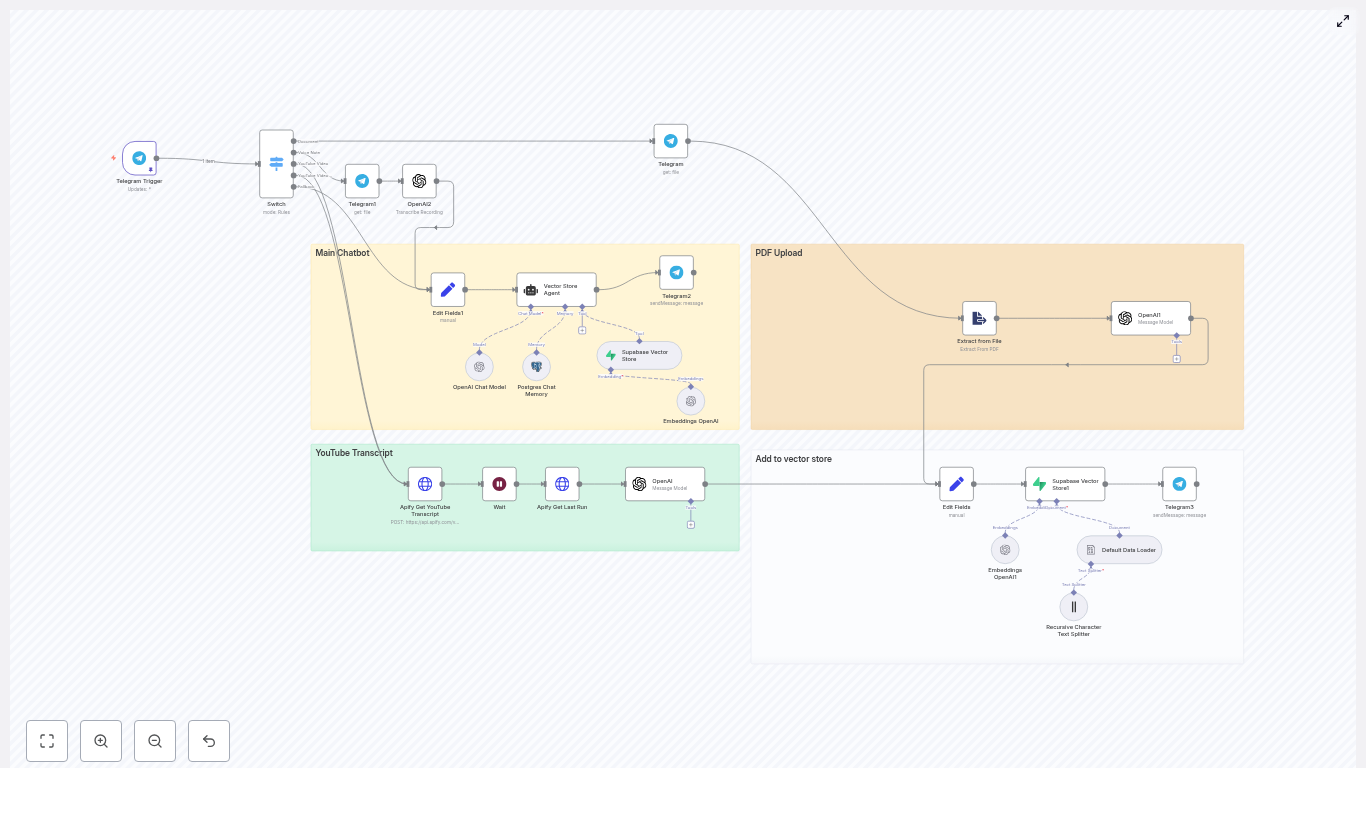
1. Workflow Overview

The automation is split into three cooperating flows to keep responsibilities clear and security boundaries tight:

  1. Sheet ingestion workflow Listens to Google Drive changes, reads a configured sheet, infers a schema, creates a Postgres table, and inserts rows.
  2. Schema and execution helper workflows Provide reusable endpoints for:
    • Retrieving a text representation of the Postgres schema
    • Executing arbitrary SQL queries with controlled permissions
  3. LLM SQL agent workflow Uses an AI agent to translate natural language questions into safe PostgreSQL queries, leveraging the helper workflows as tools.

This separation makes it easier to audit database access, adjust permissions, and evolve the ingestion logic without touching the query assistant.

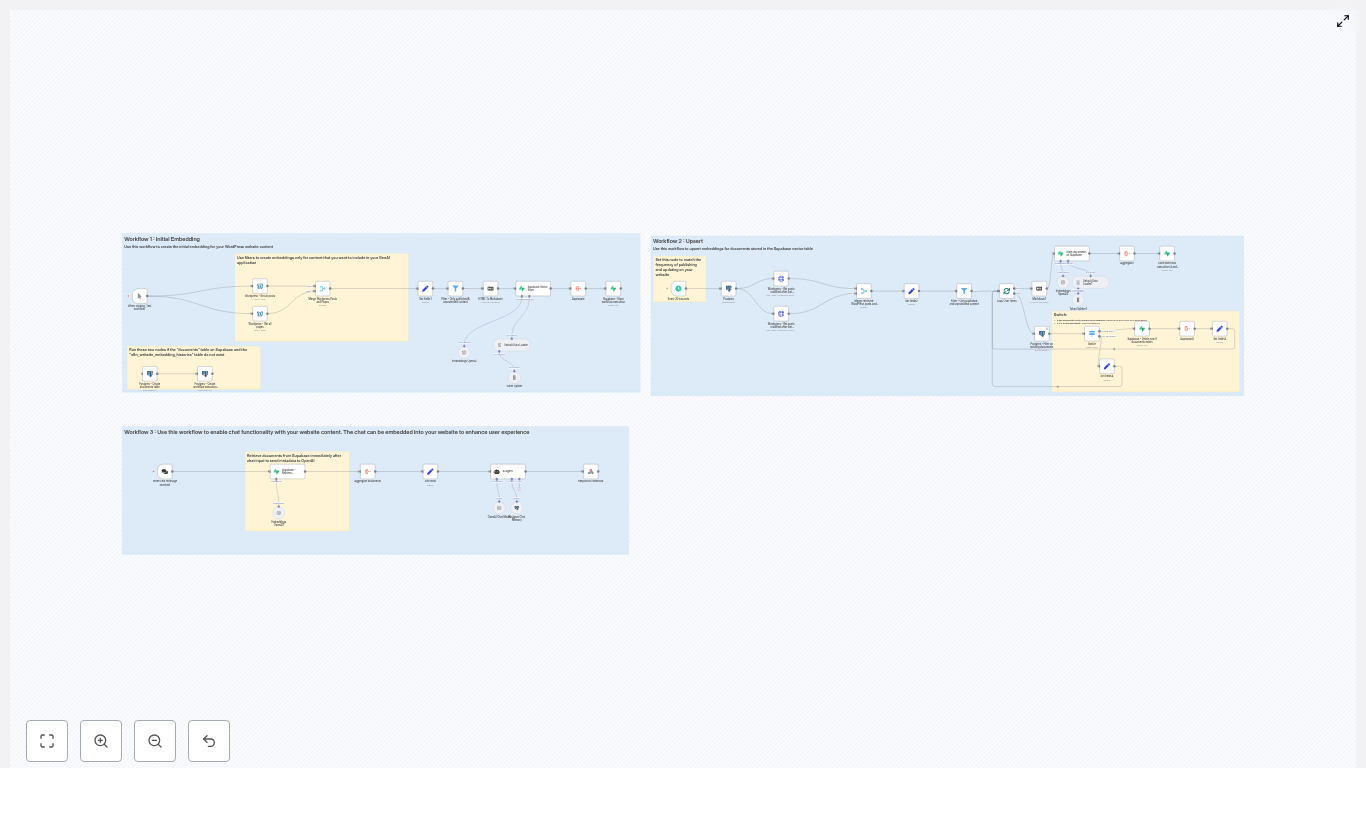
2. Architecture and Data Flow

2.1 High-level data path

  1. Trigger: A Google Drive Trigger node detects a change in a specific spreadsheet file.
  2. Configuration: A Set node (named change_this) provides runtime configuration such as the spreadsheet URL and sheet name.
  3. Table existence check: A Postgres node checks whether a target table (for example, ai_table_{{sheet_name}}) already exists.
  4. Data fetch: A Google Sheets node streams row data from the configured sheet.
  5. Schema inference: A Code node builds a dynamic list of columns, infers types, and generates a CREATE TABLE statement with a UUID primary key.
  6. Insert statement generation: Another Code node constructs a parameterized INSERT statement and normalizes values.
  7. Execution: A Postgres node executes the create and insert queries. An optional Postgres node can DROP TABLE before recreation.

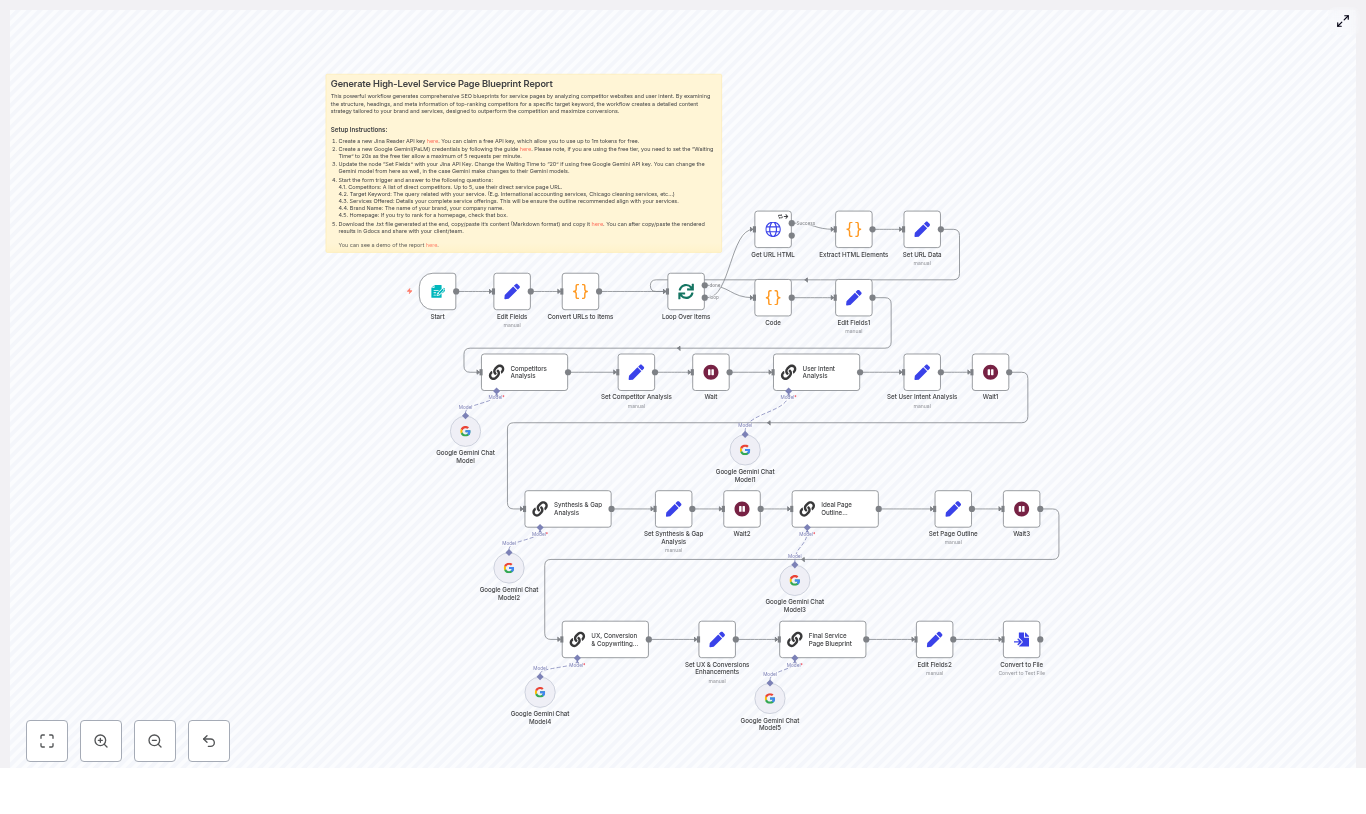
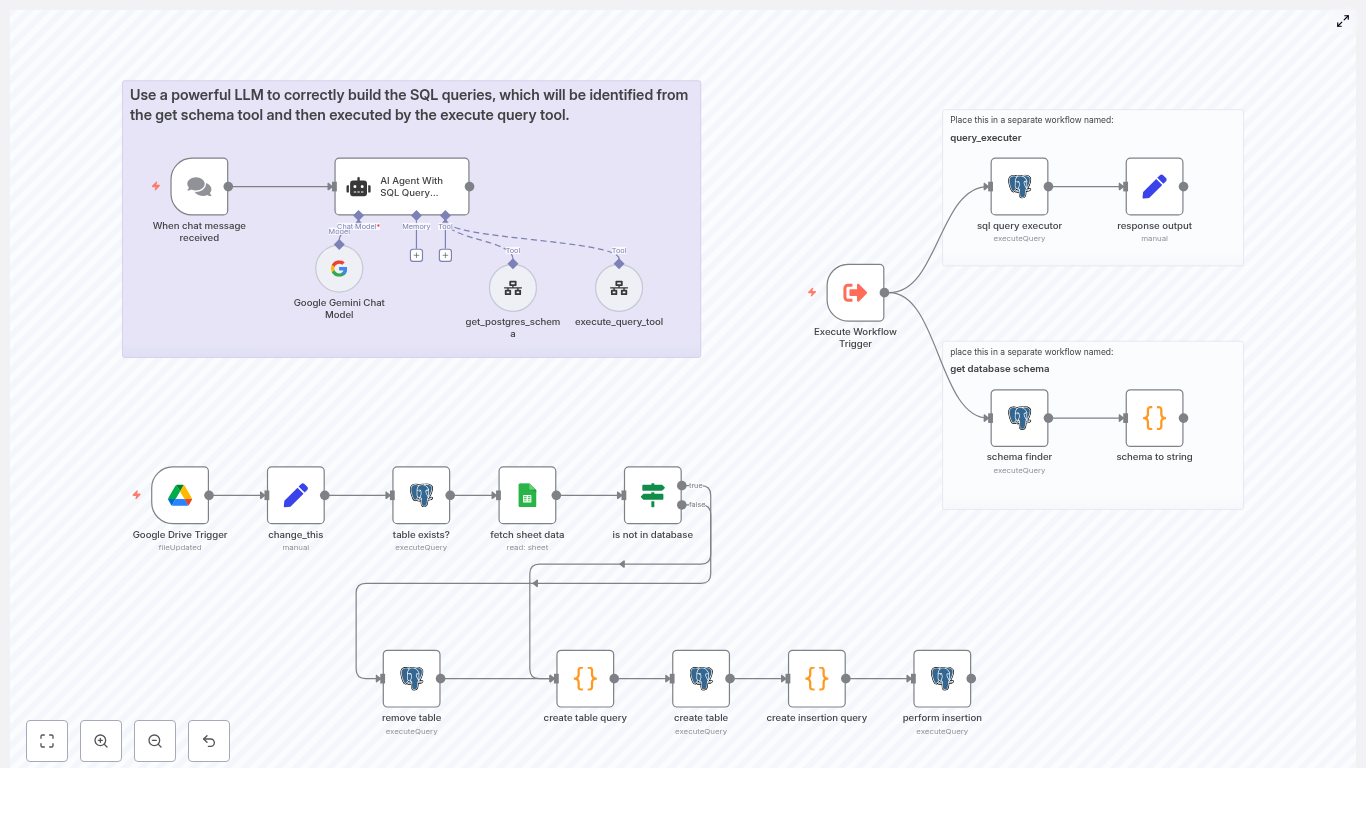
2.2 LLM agent integration

The LLM workflow uses an AI Agent With SQL Query Prompt node configured as a database query assistant. It interacts with two helper workflows:

  • get database schema: Returns a textual representation of the current Postgres schema.
  • query_executer: Executes SQL statements passed in and returns the result set.

The agent calls these helpers as tools to discover schema, build syntactically valid SQL, and then execute selected queries, with safeguards against destructive operations.

3. Node-by-Node Breakdown (Sheet Ingestion)

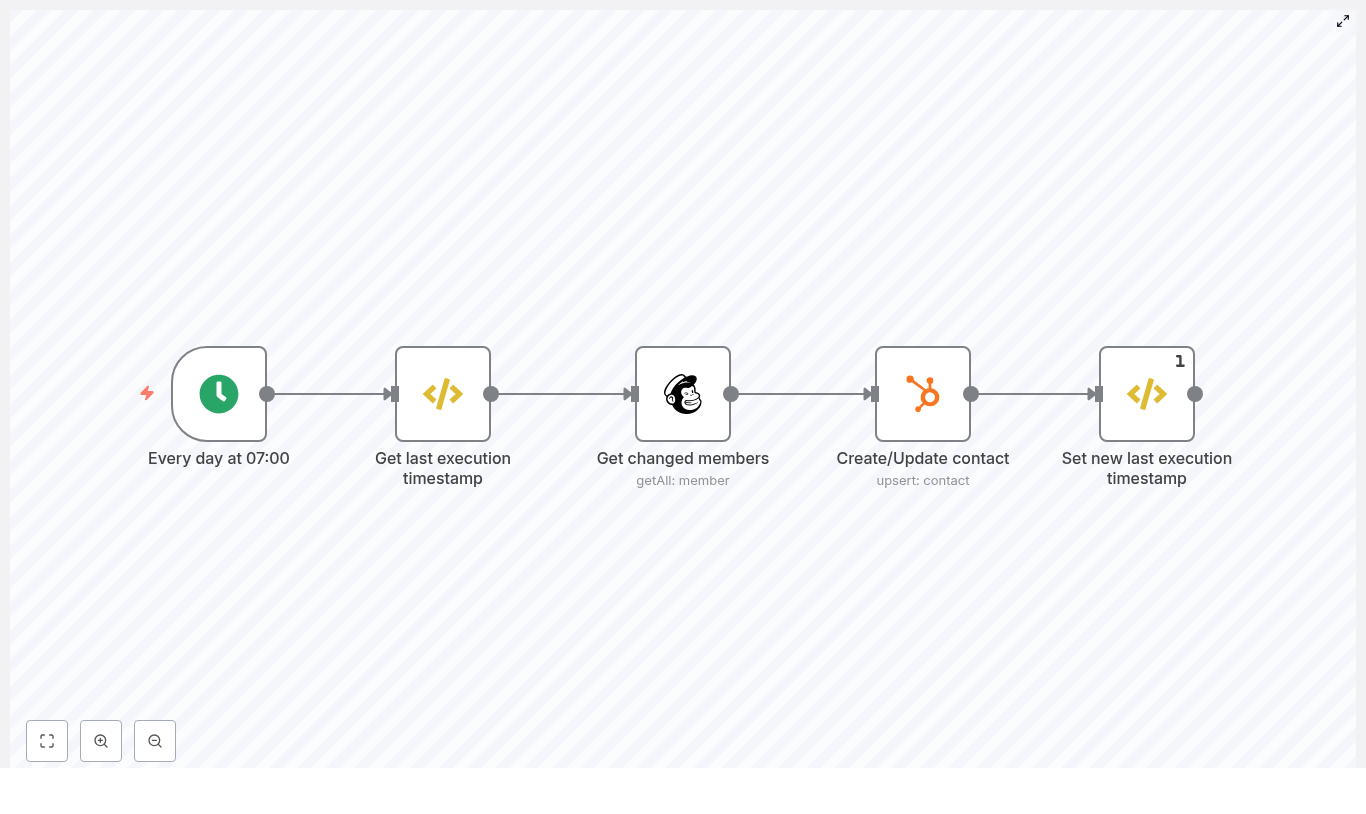
3.1 Google Drive Trigger

Node type: Google Drive Trigger

Role: Entry point for the ingestion workflow.

Behavior:

  • Watches a specific Google Sheets file in Google Drive.
  • Starts the workflow when the file is updated, for example when new rows are added or existing content is modified.

Configuration notes:

  • Use the appropriate Google credentials in n8n with read access to the file.
  • Scope the trigger to a single file to avoid accidental ingestion from unrelated spreadsheets.

3.2 Configuration node: change_this (Set)

Node type: Set

Role: Central configuration for the workflow.

Key fields:

  • sheet_url: Full URL to the Google Sheet.
  • sheet_name: Name of the tab to ingest, for example product_list.

This node keeps environment-specific details in one place so you can clone the template and adapt it to other sheets without editing code nodes.

3.3 Table existence check: table exists? (Postgres)

Node type: Postgres

Role: Determine whether the target table already exists in the database.

Typical table naming convention: ai_table_{{sheet_name}}

Behavior:

  • Runs a query against Postgres system catalogs or information schema to check for an existing table with the derived name.
  • Downstream nodes can branch on this result to:
    • Create a new table if it does not exist.
    • Optionally drop and recreate the table if the schema has changed.
    • Skip table creation when the schema is already correct.

3.4 Data retrieval: fetch sheet data (Google Sheets)

Node type: Google Sheets

Role: Read row data from the configured sheet.

Behavior:

  • Streams rows from the specified tab inside the Google Sheet.
  • Exposes each row as an object where keys correspond to column headers and values are the cell contents.
  • Feeds these row objects into the schema inference and normalization logic in subsequent nodes.

Configuration notes:

  • Make sure the first row of the sheet contains header labels that can be used as column names.
  • Use the same Google credentials as the trigger or a dedicated service account.

3.5 Schema inference: create table query (Code)

Node type: Code (JavaScript)

Role: Generate a CREATE TABLE statement and normalized column definitions.

Main responsibilities:

  • Iterate over all row objects to collect a complete set of column names.
  • Inspect cell values to infer data types, including:
    • Currency values with leading symbols
    • Common date patterns such as MM/DD/YYYY
    • Numeric and boolean-like strings
  • Normalize column names, for example:
    • Append currency codes to currency columns, such as price_usd.
    • Apply safe naming conventions suitable for Postgres identifiers.
  • Construct a CREATE TABLE SQL statement that:
    • Includes a UUID primary key, typically named ai_table_identifier.
    • Defines column types based on inferred types, such as DECIMAL(15,2) or TIMESTAMP.

Output:

  • A complete CREATE TABLE statement for use by a Postgres node.
  • Metadata describing inferred columns and types, which the insertion logic can reuse.

3.6 Insert statement generation: create insertion query (Code)

Node type: Code (JavaScript)

Role: Prepare a parameterized INSERT statement and normalize all values before database insertion.

Transformations implemented:

  • Currency values:
    • Strip leading currency symbols such as $, , , £.
    • Remove thousands separators (commas, spaces) before casting to numeric.
    • Map symbols to ISO codes (for example, USD, INR, EUR, GBP) and align with the normalized column names like price_usd.
  • Percentages:
    • Convert strings such as "12%" to 0.12 as a numeric value.
  • Timestamps and dates:
    • Parse MM/DD/YYYY formatted strings.
    • Convert them to ISO-compatible timestamp strings suitable for Postgres TIMESTAMP columns.
  • Empty strings:
    • Convert empty string values to NULL so they are treated as missing data, not zero-length text.
  • Numeric fields:
    • Strip commas and validate that the remaining characters are numeric before casting.
  • Boolean values:
    • Detect string values such as "true" and "false" and convert them to actual boolean types where appropriate.

Output:

  • A parameterized INSERT SQL statement with placeholders.
  • An aligned array of parameter values for each row.

This design ensures that the subsequent Postgres node can use parameterized queries, which is critical for both safety and reliability.

3.7 Execution: create table & perform insertion (Postgres)

Node type: Postgres

Role: Execute the generated SQL statements.

Behavior:

  • Runs the CREATE TABLE statement produced by the schema inference node, if table creation is required.
  • Executes the parameterized INSERT statement with the parameters array from the insertion query node.
  • Relies on parameter binding to avoid SQL injection and to handle special characters safely.

Credentials:

  • Use a Postgres credential in n8n with permissions to:
    • Create tables in the target schema.
    • Insert data into the generated tables.
    • (Optionally) drop tables if you enable that behavior.

3.8 Optional cleanup: remove table (Postgres)

Node type: Postgres

Role: Conditionally drop the target table before recreating it.

Behavior:

  • Executes a DROP TABLE statement on the target table when explicitly enabled.
  • Useful when the sheet structure changes and you prefer a fresh table over schema migration.

Usage precautions:

  • Use this only when you are comfortable losing existing data in the table.
  • In production, consider gating this behind explicit checks, environment flags, or manual approvals.

4. LLM Agent and Helper Workflows

4.1 Helper workflow: get database schema

Role: Provide schema discovery as a reusable service.

Behavior:

  • Runs a schema discovery query against Postgres (schema finder).
  • Converts the result into a concise, human-readable string (schema to string).
  • Returns this string to callers, primarily the LLM agent.

This representation enables the LLM to understand which tables and columns are available before constructing any SQL.

4.2 Helper workflow: query_executer

Role: Execute arbitrary SQL statements with controlled scope.

Behavior:

  • Accepts a SQL statement as input.
  • Executes the SQL in Postgres and returns the query results.
  • Acts as a dedicated endpoint where you can:
    • Add logging of all executed queries and responses.
    • Implement auditing or access control rules.
    • Introduce rate limiting or environment-specific restrictions.

4.3 LLM node: AI Agent With SQL Query Prompt

Role: Natural language to SQL translation with safety constraints.

Configuration highlights:

  • Configured as a database query assistant.
  • System message instructs the model to:
    • Call the get_postgres_schema tool to retrieve the current schema.
    • Generate Postgres-compatible SQL that respects the discovered schema.
    • Use functions like LOWER(...) for case-insensitive comparisons when appropriate.
    • Apply simple numeric validation and guarded casts to reduce runtime errors.
    • Return the generated SQL and request explicit user confirmation before executing destructive operations such as DROP or DELETE.

Execution of the final query is delegated to the query_executer workflow, which gives you a clear control point for monitoring and hardening.

5. Type Detection and Normalization Logic

Correct type inference is critical for reliable ingestion. The Code nodes implement pragmatic heuristics that work well for heterogeneous business data.

5.1 Currency detection

  • Detects leading symbols such as $, , , £.
  • Maps these symbols to ISO currency codes:
    • $USD
    • INR
    • EUR
    • £GBP
  • Defines currency columns as DECIMAL(15,2) in the generated schema.

Build a Qdrant MCP Server with n8n

Build a Qdrant MCP Server with n8n (Without Writing a Monolith)

Imagine you could plug Qdrant, OpenAI, and your favorite MCP client together without spinning up a big custom backend. That is exactly what this n8n workflow template does.

In this guide, we will walk through an n8n-based Qdrant MCP (Model-Controller-Provider) server that adds some real power on top of Qdrant’s vector search. With this workflow, you can handle:

  • Facet search (like listing companies)
  • Grouped search (great for side-by-side comparisons)
  • Recommendations (based on what users like or dislike)

All of this is wired up using an MCP trigger, OpenAI embeddings, Qdrant’s API, and n8n’s built-in Qdrant nodes. Think of it as a flexible integration layer that you can tweak anytime, without redeploying an entire service.

What this n8n Qdrant MCP template actually does

At a high level, this workflow listens for requests from an MCP client (like Claude Desktop or any MCP-compatible agent), then runs the right “tool” behind the scenes.

Those tools handle operations such as:

  • Insert – Ingest and embed new documents into Qdrant.
  • Search – Run standard similarity search over your collection.
  • Compare – Compare results across companies or groups.
  • Recommend – Suggest similar items based on positive/negative examples.
  • listCompanies – Use Qdrant’s facet API to list available companies.

The workflow uses:

  • MCP Trigger node to accept incoming MCP requests.
  • OpenAI embeddings to convert text into vectors.
  • Qdrant vector store nodes for insert/load operations.
  • HTTP Request nodes to hit Qdrant’s grouped search, facet, and recommend endpoints.
  • Transform nodes like Set, Aggregate, and Split Out to shape clean, predictable responses.

The result is a modular MCP server that sits on top of your Qdrant collection and exposes richer tools than “just search”.

Why build your Qdrant MCP server in n8n?

You could rely on a vendor implementation or write your own service from scratch. So why bother with n8n?

Because n8n gives you a visual, flexible layer where you can:

  • Expose more Qdrant features like facet search, grouped search, and recommendations through your MCP interface.
  • Mix and match APIs such as OpenAI for embeddings and Qdrant for search and recommendations, without building a monolithic backend.
  • Iterate quickly on tools your agents use, so you can tweak behavior, add logging, or change response formats without touching server code.
  • Add business logic like access control, analytics, or notifications right inside the workflow.

If you are experimenting with agent workflows or want tight control over how your MCP tools behave, this pattern is a very practical sweet spot.

What you need before you start

Here is the short checklist to follow along with the template:

  • An n8n instance (cloud or self-hosted).
  • A Qdrant collection set up. The example uses a collection named trustpilot_reviews.
  • An OpenAI API key (or compatible provider) for generating embeddings.
  • Basic familiarity with vector search concepts and how n8n nodes work.

Once those are in place, you are ready to plug in the workflow template.

How the architecture fits together

Let us break down the moving parts so the whole picture feels clear before we dive into each tool.

MCP Trigger as the entry point

Everything starts with the MCP Trigger node. It listens for incoming requests from your MCP client or agent and hands the payload off to the rest of the workflow.

Operation routing with a Switch node

Right after the trigger, a Switch (Operation) node inspects the request and routes it to the correct tool workflow. For example:

  • listCompanies
  • insert
  • search
  • compare
  • recommend

This keeps each operation isolated and easy to test on its own, while still sharing the same MCP entry point.

Embedding and Qdrant access

  • OpenAI Embeddings nodes create vector representations for text queries, documents, and user preferences.
  • Qdrant vector store nodes handle the standard insert and load operations directly from n8n.
  • HTTP Request nodes call Qdrant’s advanced endpoints for grouped search, faceting, and recommendations.

Response shaping

To make sure your MCP client gets neat, predictable responses, the workflow uses:

  • Set nodes to rename and clean up fields.
  • Aggregate nodes to combine embeddings or results.
  • Split Out nodes to break apart arrays into separate items when needed.

The end result is a consistent, client-friendly JSON structure, even when Qdrant returns complex grouped or recommendation data.

Diving into each tool workflow

Insert workflow: getting data into Qdrant

When you insert documents, the template follows a robust ingestion pipeline:

  1. Generate embeddings using OpenAI for your document text.
  2. Split large text into smaller, manageable chunks using the Recursive Character Text Splitter.
  3. Enrich metadata with fields like company_id so you can later filter, facet, and group by company.
  4. Insert vectors into Qdrant using the Qdrant insert vector store node.

The template includes a Default Data Loader and the text splitter to make sure even big documents are chunked and indexed in a way that plays nicely with search and recommendation queries later.

Search and grouped search: from simple queries to comparisons

There are two flavors of search in this setup.

Standard similarity search

For straightforward “find similar documents” queries, the workflow uses an n8n Qdrant load node. It takes your query embedding, hits the collection, and returns the top matches.

Grouped search for side-by-side insights

When you want results grouped by company or another field, the workflow switches to Qdrant’s grouped search endpoint:

  • It calls /points/search/groups via an HTTP Request node.
  • Results are then transformed into easy-to-consume categories and hit lists.

This is especially handy when you want to compare companies side by side. For example, “show me how customers talk about delivery for company A vs company B”. Grouped search does the heavy lifting of organizing results by company for you.

Facet search: listing companies with listCompanies

Sometimes an agent just needs to know what is available. That is where the listCompanies tool comes in.

Under the hood, it uses Qdrant’s facet API:

/collections/<collection>/facet

It is configured to return unique values for metadata.company_id. The workflow wraps this in a tool called listAvailableCompanies so an agent can ask something like:

“Which companies are available in the trustpilot_reviews collection?”

and get back a clean, structured list of companies that exist in the index.

Recommendations: turning preferences into suggestions

The recommendation tool is built to answer questions like “What should I show next if the user liked X and disliked Y?”

Here is how that pipeline works:

  1. Convert user preferences (positive and negative examples) into embeddings using OpenAI.
  2. Aggregate those embeddings into a combined representation that reflects what the user likes and dislikes.
  3. Call Qdrant’s recommendation endpoint:
    /points/recommend
    
  4. Simplify the response so the MCP client receives the most relevant items, including payload and metadata, in a clean JSON structure.

This makes it easy to plug into an agent that wants to suggest similar reviews, products, or any other vectorized content.

Step-by-step: setting up the template

Ready to get it running? Here is the setup flow you can follow:

  1. Create your Qdrant collection if you do not already have one.
    • The example uses trustpilot_reviews.
    • Vector size: 1536.
    • Distance: cosine.
  2. Create a facet index for metadata.company_id so facet queries can quickly list companies.
  3. Configure credentials in n8n:
    • Qdrant API endpoint and API key or auth method.
    • OpenAI API key (or compatible embedding provider).
  4. Import the workflow template into n8n.
    • Set the MCP Trigger path.
    • Secure it with authentication before you use it in production.
  5. Test each tool:
    • Trigger operations from an MCP client.
    • Or execute individual tool workflows directly in n8n to verify behavior.

Example MCP queries you can try

Once everything is wired up, here are some sample queries you can send through your MCP client:

  • “List available companies in the trustpilot_reviews collection.”
  • “Find what customers say about product deliveries from company: example.com”
  • “Compare company-a and company-b on ‘ease of use’”
  • “Recommend positive examples for a user who likes X and dislikes Y”

These map to the different tools in the workflow, so they are a great way to sanity-check that search, grouping, faceting, and recommendations all behave as expected.

Security and production best practices

Since this workflow exposes a powerful interface into your Qdrant data, it is worth taking security seriously from day one.

  • Protect the MCP Trigger
    • Enable authentication on the MCP Trigger node.
    • Do not expose it publicly without proper auth and rate limiting.
  • Lock down network access
    • Use VPCs, firewall rules, or private networking for your Qdrant instance and n8n.
  • Validate user input
    • Sanitize query text and parameters.
    • Enforce reasonable limits like topK or limit to avoid very expensive queries.
  • Monitor costs
    • Keep an eye on embedding API usage.
    • Watch Qdrant compute and storage usage as your collection grows.

Ways to extend the workflow

One of the nicest parts about doing this in n8n is how easy it is to keep evolving it. Once the basics are running, you can:

  • Add more Qdrant API calls, for example:
    • Collection management
    • Snapshots and backups
  • Layer in business logic after search results:
    • Analytics on which companies are trending.
    • Alerting when certain sentiment thresholds are met.
  • Connect downstream systems using n8n nodes:
    • Send summaries to Slack.
    • Email periodic reports.
    • Push data into dashboards or CRMs.

Because it is all visual and modular, you can experiment without risking the core MCP tools.

Troubleshooting common issues

If something feels off, here are a few quick checks that often solve the problem.

  • Grouped search returns empty results?
    • Confirm your embedding pipeline is running and storing vectors correctly.
    • Verify that metadata.company_id is present on stored payloads.
    • Make sure the collection name in your Qdrant nodes matches the actual collection.
  • Facet (listCompanies) not returning values?
    • Check that the facet index for metadata.company_id exists.
    • Verify that documents actually have that metadata field populated.
  • Recommend calls failing or returning odd results?
    • Ensure embeddings for positive and negative examples are generated and aggregated correctly.
    • Confirm that the /points/recommend endpoint is reachable from n8n.

Wrapping up and what to do next

This n8n template gives you a practical way to turn a Qdrant collection into a full MCP server that goes far beyond simple vector search. It works especially well for:

  • Review analytics across multiple companies.
  • Side-by-side company comparisons.
  • Agent-driven workflows that need modular, testable tools.

The path forward is pretty straightforward:

  1. Import the template into your n8n instance.
  2. Hook it up to your Qdrant and OpenAI credentials.
  3. Secure the MCP Trigger with proper authentication.
  4. Iterate on prompts, aggregation settings, and response formats until they fit your agent’s needs.

Call to action: Import this template into n8n and point it at a sample collection. Play with the example queries, then start adapting the tools to match your own data and use cases. If you get stuck or want to go deeper, the Qdrant and n8n docs are great companions for adding features like snapshots, access control, or monitoring.

Helpful references

Build a RAG GenAI App with WordPress & n8n

Build a RAG GenAI App with WordPress & n8n

This guide walks you through turning your WordPress site into a Retrieval-Augmented Generation (RAG) application using n8n, OpenAI embeddings, Supabase or Postgres with pgvector, and a chat interface. You will learn how the three main n8n workflows (initial embedding, upsert, and chat) work together so your static content becomes an interactive, conversational AI experience.

What You Will Learn

By the end of this tutorial, you will be able to:

  • Explain what RAG is and why it is useful for WordPress content.
  • Understand the high-level architecture of the n8n WordPress RAG template.
  • Set up the three core workflows:
    • Workflow 1 – Initial Embedding
    • Workflow 2 – Incremental Upsert
    • Workflow 3 – Chat / Q&A
  • Configure WordPress, vector stores, and OpenAI embeddings inside n8n.
  • Apply best practices for chunking, metadata, security, and cost control.
  • Troubleshoot common issues like missing documents or irrelevant answers.

Concept Overview: Why RAG for WordPress?

Retrieval-Augmented Generation (RAG) combines two ideas:

  • Retrieval – Searching over a vector store of your documents to find the most relevant content for a user query.
  • Generation – Using a large language model (LLM) to generate an answer, guided by the retrieved content.

When applied to a WordPress website, RAG lets you build a chat or search assistant that:

  • Answers questions based on your actual posts, pages, and documentation.
  • Includes links and metadata so users can verify the information.
  • Reduces support load by providing self-service answers.
  • Improves content discovery compared to basic keyword search.

Instead of training a custom model, you reuse your existing WordPress content. n8n orchestrates the flow of content from WordPress into a vector store, then into a chat workflow that uses an LLM like gpt-4o-mini to generate grounded answers.

High-Level Architecture of the n8n Template

The provided n8n template is built around three separate workflows that work together:

  • Workflow 1 – Initial Embedding
    Fetches all WordPress posts and pages, cleans and splits the content into chunks, generates embeddings with OpenAI, and stores them in a vector database (Supabase or Postgres with pgvector).
  • Workflow 2 – Upsert (Incremental Updates)
    Runs on a schedule or after content changes. It detects new or modified posts, regenerates embeddings for those items, and updates the vector store.
  • Workflow 3 – Chat
    Accepts user questions via a webhook or chat interface, retrieves the most relevant chunks from the vector store, and sends them to an LLM agent that composes a final answer with citations.

This separation keeps your system efficient: the heavy embedding work runs periodically, while the chat workflow responds in real time using precomputed vectors.

Key Building Blocks in n8n

1. WordPress Integration

n8n can connect to WordPress in two main ways:

  • WordPress nodes – Use n8n’s built-in WordPress nodes to fetch posts and pages.
  • HTTP Request nodes – Call the WordPress REST API directly if you need custom filtering.

In both cases, you should:

  • Filter to published content only.
  • Exclude password-protected or draft posts.
  • Map important fields like ID, title, URL, content, publication date, and modification date.

This ensures only public, relevant content ends up in your vector store.

2. HTML to Text Conversion and Chunking

WordPress content is usually stored as HTML. Before creating embeddings, the workflow:

  • Converts HTML to markdown or plain text to remove layout markup and shortcodes.
  • Splits the cleaned text into smaller segments using a token-based text splitter.

A common configuration is:

  • Chunk size – Around 300 tokens per chunk.
  • Overlap – Around 30 tokens between chunks.

The overlap helps preserve context that might otherwise be cut off at chunk boundaries. You can adjust these values later to improve retrieval quality.

3. Embeddings with OpenAI

For each chunk of text, n8n calls an OpenAI embedding model, such as text-embedding-3-small. The result is a numeric vector that represents the semantic meaning of the chunk.

Each vector is stored together with structured metadata, for example:

  • url – Link to the original WordPress post or page.
  • title – Title of the source content.
  • content_type – For example, post, page, or documentation.
  • publication_date – Original publish date.
  • modification_date – Last updated date.
  • id – Internal identifier for tracking and upserts.

Rich metadata is essential for transparent answers and for managing updates over time.

4. Vector Store Options: Supabase or Postgres + pgvector

The template supports two main vector storage approaches:

  • Supabase Vector Store
    A managed Postgres service that supports vector columns. It stores embeddings and metadata and exposes a match or similarity query API. This is usually the easiest option to start with.
  • Self-hosted Postgres + pgvector
    If you manage your own database, you can install the pgvector extension. The template includes SQL snippets to:
    • Create a documents table with a vector column.
    • Define a match_documents function to perform similarity search.

5. Chat Flow and AI Agent

In the chat workflow, n8n listens for user questions, retrieves relevant chunks from the vector store, and then calls an LLM agent, such as gpt-4o-mini. The agent receives:

  • The user’s question.
  • The top N most similar document chunks, each with its metadata.

The agent then generates a natural language answer that must include citations, such as URLs and dates, so users can see where the information came from.

Step-by-Step: Workflow 1 – Initial Embedding Pipeline

The first workflow prepares your entire WordPress site for RAG by building the initial vector index.

Step 1: Fetch WordPress Posts and Pages

  • Use the WordPress node or HTTP Request node to retrieve all posts and pages.
  • Filter to:
    • status = published
    • no password protection

Step 2: Filter and Map Metadata

  • Remove any drafts or private content.
  • Map fields like:
    • WordPress ID
    • Title
    • Slug or URL
    • Content (HTML)
    • Publication and modification dates
    • Content type (post, page, etc.)

Step 3: Convert HTML to Text

  • Use an HTML-to-text or HTML-to-markdown node or function in n8n.
  • Strip out layout elements, menus, and other boilerplate where possible to reduce noise.

Step 4: Split Text into Chunks

  • Apply a token-based text splitter:
    • Chunk size: about 300 tokens.
    • Overlap: about 30 tokens.
  • Each chunk should still include a reference to the parent document (for example, the WordPress post ID).

Step 5: Generate Embeddings

  • Call the OpenAI embedding model for each chunk.
  • Batch requests when possible to reduce latency and cost.
  • Attach metadata to each embedding:
    • url, title, content_type
    • publication_date, modification_date
    • internal id (for example, WordPress post ID plus chunk index)

Step 6: Insert into Vector Store

  • Write each embedding and its metadata into:
    • Supabase vector table, or
    • Postgres table with a vector column (via pgvector).

Step 7: Record Workflow Execution Timestamp

  • Store the time of this run in a dedicated table or configuration location.
  • This timestamp is used by the upsert workflow to fetch only changed content later.

Step-by-Step: Workflow 2 – Upsert (Incremental Updates)

The upsert workflow keeps your vector store in sync with your WordPress site without re-embedding everything.

Step 1: Decide How to Trigger Updates

  • Schedule the workflow to run periodically (for example, every hour or once a day), or
  • Trigger it via webhook or event when content is edited or created.

Step 2: Fetch Recently Modified Content

  • Read the last workflow timestamp from storage.
  • Query WordPress for posts and pages where modification_date is greater than this timestamp.

Step 3: Check Existing Records in the Vector Store

  • For each changed WordPress document:
    • Query the vector store by its internal ID or other unique identifier.
    • Determine if it is:
      • New – not present in the vector store.
      • Updated – present but with a newer modification date.

Step 4: Re-embed and Upsert

  • For updated documents:
    • Delete all existing chunks associated with that document from the vector store.
    • Re-run the same steps as in Workflow 1:
      • HTML to text
      • Chunking
      • Embedding
      • Insert new embeddings with metadata
  • For new documents:
    • Run the full embedding pipeline and insert the new chunks.

Step 5: Save New Timestamp

  • After processing all changes, store the current timestamp.
  • This becomes the reference point for the next incremental run.

Step-by-Step: Workflow 3 – Chat Pipeline

The chat workflow answers user questions in real time using the precomputed embeddings.

Step 1: Receive the User Question

  • Expose a webhook trigger in n8n that accepts:
    • sessionId – to track the conversation.
    • chatInput – the user’s question or message.
  • Connect this webhook to your front-end chat widget on WordPress.

Step 2: Retrieve Relevant Document Chunks

  • Compute an embedding for the user’s question, or
  • Use a similarity query that takes the question text directly (depending on your vector store setup).
  • Query the vector store to return the top N most similar chunks (for example, top 5 or top 10).
  • Include both the chunk text and metadata in the result.

Step 3: Call the AI Agent

  • Send to the LLM:
    • The original user question.
    • The retrieved chunks and their metadata.
  • Instruct the agent to:
    • Use only the provided documents as the main source of truth.
    • Include citations in the answer, such as URLs and dates.
    • Indicate when it does not know the answer from the provided context.

Step 4: Return the Answer

  • The agent generates a response that:
    • Answers the question in natural language.
    • References metadata like:
      • URL
      • Content type
      • Publication and modification dates
  • n8n sends this response back through the webhook to your chat interface.

Best Practices for a Reliable WordPress RAG System

1. Metadata and Provenance

Always include metadata in both the vector store and the final answers. At a minimum, track:

  • url
  • title
  • content_type
  • publication_date
  • modification_date

This builds user trust, helps with debugging, and makes it easy to navigate back to the original content.

2. Chunking Strategy

Chunk size and overlap directly affect retrieval quality:

  • Smaller chunks:
    • Higher precision (answers are more focused).
    • Risk of losing broader context.
  • Larger chunks:
    • More context but potentially more noise.

Starting with 300 tokens and 20-50 token overlap is a good balance. Test with real queries and adjust based on answer quality.

3. Cost and Rate Limit Management

  • Use the upsert workflow to avoid re-embedding unchanged content.
  • Batch embedding requests where possible

RAG Workflow vs. RAG Agent: Which to Use?

Retrieval-Augmented Generation (RAG) has become a foundational pattern for building reliable, context-aware applications on top of large language models (LLMs). Within this pattern, teams typically converge on two architectural options: a RAG workflow, which is a modular and deterministic pipeline, or a RAG agent, which is an autonomous, tool-enabled LLM. Both approaches extend LLMs with external knowledge, yet they differ significantly in control, observability, and operational complexity.

This article provides a structured comparison of RAG workflows and RAG agents, explains the trade-offs for production systems, and illustrates both designs through an n8n automation template that integrates Pinecone, OpenAI, LangChain, and common SaaS tools.

RAG Fundamentals

RAG, or Retrieval-Augmented Generation, augments an LLM with external data sources. At query time, the system retrieves semantically relevant documents from a knowledge base or vector database and passes those documents to the LLM as context. The model then generates a response that is grounded in this retrieved information.

By separating knowledge storage from model weights, RAG:

  • Reduces hallucinations and improves factual accuracy
  • Enables access to private, proprietary, or frequently updated content
  • Supports domain-specific use cases without retraining the base model

Two Implementation Patterns for RAG

Although the retrieval-then-generate concept is the same, there are two dominant implementation patterns:

  • RAG workflow – a deterministic, modular pipeline
  • RAG agent – an autonomous LLM with tools and reasoning

Understanding the distinction is critical when designing production-grade automation and knowledge assistants.

RAG Workflow: Modular, Deterministic Pipeline

A RAG workflow breaks the process into explicit, observable stages. Each step is defined in advance and executed in a fixed order. This pattern is ideal for orchestration platforms such as n8n or Apache Airflow, often combined with libraries like LangChain and LLM providers such as OpenAI or Gemini.

Typical Stages in a RAG Workflow

  • Document ingestion and text splitting Source documents are loaded from systems such as Google Drive, internal file stores, or knowledge bases and then split into chunks appropriate for embedding and retrieval.
  • Embedding generation and vectorization Each text chunk is transformed into an embedding vector using an embedding model (for example, an OpenAI embeddings endpoint).
  • Vector database storage and retrieval Vectors are stored in a vector database like Pinecone, where similarity search or other retrieval strategies can be applied.
  • Context assembly and prompt construction At query time, the most relevant passages are retrieved, optionally reranked, and then composed into a structured prompt.
  • LLM generation The prompt is sent to the LLM, which generates the final response grounded in the retrieved context.

In an n8n environment, each of these stages is typically represented as one or more nodes, giving operators fine-grained control over data flow, logging, and error handling.

RAG Agent: Tool-Enabled, Autonomous LLM

A RAG agent wraps an LLM with a set of tools and allows the model to decide which tools to call, in what order, and how many times. Instead of a fixed pipeline, the system operates through iterative reasoning steps: think, select a tool, execute, observe, and repeat.

Common Tools in a RAG Agent Setup

  • Retrieval tools (vector store queries, knowledge base search)
  • External APIs (CRM, ticketing systems, scheduling APIs)
  • Code execution (for example, Python tools for calculations or data transforms)
  • Messaging or email tools for outbound communication

RAG agents are typically built using agent frameworks such as LangChain Agents, the n8n Agent node, or custom agent middleware. They are more flexible, yet also more complex to control and monitor.

Comparing RAG Workflow and RAG Agent

Control and Determinism

RAG workflow The sequence of operations is explicitly defined. Each step is deterministic, which simplifies debugging and compliance. You know exactly when documents are retrieved, how prompts are constructed, and when the LLM is called.

RAG agent The agent dynamically decides which tools to invoke and in what order. While this increases capability, it reduces predictability. The same input may result in different tool call sequences, which can complicate debugging and governance.

Complexity and Development Speed

RAG workflow Workflows are generally faster to design, implement, and test. Teams can iterate on each pipeline stage independently, enforce strict prompt templates, and evolve retrieval strategies in a controlled fashion.

RAG agent Agents require more engineering investment. You must design tool interfaces, define system and agent prompts, implement guardrails, and monitor behavior. Prompt engineering and continuous evaluation are essential to avoid unsafe or suboptimal actions.

Capability and Flexibility

RAG workflow Best suited for well-scoped retrieval-plus-generation tasks such as question answering, summarization, or chat experiences where the relevant context is straightforward and you want explicit control over which documents are provided.

RAG agent Ideal for workflows that require multi-step reasoning, conditional branching, or orchestration of multiple systems. For example, a support assistant that might search a knowledge base, query an internal API for account status, then decide to send an email or create a ticket.

Observability and Compliance

RAG workflow Since each stage is explicit, it is relatively easy to log inputs, outputs, and intermediate artifacts such as embeddings, retrieval scores, prompts, and responses. This is valuable for audits, incident analysis, and regulatory compliance.

RAG agent Agent reasoning can be harder to inspect. To achieve similar observability, teams must instrument tool calls, intermediate messages, and decision traces. Without this, validating behavior and satisfying compliance requirements becomes challenging.

Latency and Cost

RAG workflow With careful design, workflows can be cost-efficient and low latency. Embeddings can be precomputed at ingestion time, retrieval results can be cached, and the number of LLM calls is usually fixed and predictable.

RAG agent Agents may perform multiple tool calls and iterative LLM steps per request. This can increase both latency and cost, especially in complex scenarios where the agent refines queries or chains several tools before producing a final answer.

When a RAG Workflow is the Better Choice

A workflow-centric design is typically preferred when:

  • Predictable outputs and strong observability are required, for example, customer support answers or knowledge base search.
  • Regulations or internal policies demand clear audit trails of inputs, retrieved documents, and generated outputs.
  • The primary task is retrieval plus generation, such as Q&A, document summarization, or standardized responses.
  • You want strict control over prompts, retrieval strategies, similarity thresholds, and vector namespaces.

When a RAG Agent is the Better Choice

An agent-centric design is more appropriate when:

  • Use cases involve multi-step decision-making or orchestration, such as booking meetings, aggregating data from multiple APIs, or choosing between different data sources.
  • You want natural, conversational interaction where the LLM autonomously decides which follow-up actions or tools are required.
  • Your team can invest in guardrails, monitoring, evaluation, and continuous tuning of agent behavior.

Practical n8n Example: Customer Support RAG Template

To illustrate both patterns in a concrete setting, consider an n8n template designed for customer support automation. The template demonstrates how to implement a classic RAG workflow alongside an agent-based approach using the same underlying components.

Core Components and Integrations

  • Trigger Gmail Trigger node that listens for incoming support emails and initiates the workflow.
  • Ingestion Nodes to load and maintain knowledge base documents from sources such as Google Drive or other file repositories.
  • Embeddings An OpenAI Embeddings (or equivalent) node that converts document chunks into vectors for semantic search.
  • Vector store A Pinecone node that stores embeddings and provides similarity search over the knowledge base.
  • LLM An OpenAI or Google Gemini node that generates the final, user-facing response.
  • Agent node An Agent node configured with tools such as the vector store (for example, a knowledge_base tool) and an email reply tool for autonomous search and response.

How the Workflow Mode Operates

In workflow mode, n8n executes a fixed pipeline along the following lines:

  • Receive an email via the Gmail Trigger
  • Extract the relevant text from the email
  • Query the Pinecone vector store using precomputed embeddings
  • Assemble retrieved passages and construct a controlled prompt
  • Call the LLM to generate a grounded answer
  • Send a reply email with the generated response

This path is deterministic and highly observable. Each step can be logged, tested, and tuned independently.

How the Agent Mode Operates

In agent mode, the n8n Agent node orchestrates the process:

  • The agent receives the incoming email content as its initial input.
  • It decides when and how to call the knowledge_base tool backed by Pinecone.
  • It may refine queries, re-query the vector store, or call additional tools based on intermediate reasoning.
  • Once it has sufficient context, it uses an email reply tool to send the final response.

This mode allows the LLM to adapt its behavior dynamically, at the cost of higher complexity and the need for robust monitoring.

Design Patterns and Best Practices for RAG Systems

1. Separate Retrieval from Generation

Even when using an agent, treat retrieval as an independent service that returns scored passages rather than raw, unfiltered text. This separation improves control over context quality and makes it easier to evolve retrieval logic without changing generation prompts.

2. Apply Retrieval Thresholds and Reranking

Configure similarity thresholds in your vector database to filter out low-relevance results. For higher-quality answers, consider reranking candidate passages using an LLM-based relevance scorer or a secondary ranking model to reduce noise and minimize hallucinations.

3. Instrument the Entire Pipeline

For both workflows and agents, comprehensive logging is essential. At a minimum, capture:

  • Embeddings and metadata for ingested documents
  • Retrieval results and scores
  • Selected passages passed to the LLM
  • Prompts and final responses

For agents, extend instrumentation to include tool calls, intermediate messages, and decision rationales wherever possible.

4. Enforce Guardrails

Limit the tools that an agent can access, validate and sanitize inputs and outputs, and use system prompts that define strict behavioral constraints. Examples include instructions such as “never invent company policies” or “always cite the source document when answering policy questions.”

5. Cache and Reuse Embeddings

Generate embeddings at ingestion time and store them in your vector database, rather than recomputing them per query. This approach reduces latency and cost, particularly for high-traffic or frequently queried knowledge bases.

Summary of Trade-offs

RAG workflow

  • Predictable and auditable behavior
  • Cost-effective for standard retrieval-plus-generation tasks
  • Simple to test, maintain, and reason about

RAG agent

  • Highly flexible for complex, multi-step tasks
  • Supports dynamic tool orchestration and decision-making
  • Requires stronger guardrails, monitoring, and operational maturity

How to Choose Between a Workflow and an Agent

For most business applications, it is advisable to start with a RAG workflow. A deterministic pipeline covers the majority of retrieval-plus-generation use cases with lower risk and operational overhead. Once the workflow is stable and retrieval quality is validated, you can introduce an agent-based approach where the product truly requires autonomous decisions, multiple tool integrations, or sophisticated reasoning that a simple pipeline cannot express.

Next Steps and Call to Action

To experiment with both designs in a realistic setting, use an automation platform like n8n in combination with a Pinecone vector store and your preferred embeddings provider. Begin by implementing a straightforward RAG workflow to validate retrieval quality, prompt structure, and cost profile. After that, incrementally introduce an Agent node with a restricted set of tools, monitor tool usage, and refine safety prompts as you expand its capabilities.

If you prefer a faster start, you can use our n8n RAG template to compare a RAG workflow and a RAG agent side by side. The template lets you:

  • Run both approaches against your own knowledge base
  • Tune retrieval thresholds and vector search parameters
  • Evaluate response quality, latency, and cost in a controlled environment

Subscribe for additional templates, implementation guides, and best practices focused on production-grade automation and RAG-based assistants.


Author: AI Automations Lab | Use the RAG workflow template with Pinecone, OpenAI, and n8n to accelerate deployment of production-ready knowledge assistants.

Sync Mailchimp Members to HubSpot Daily with n8n

Sync Mailchimp Members to HubSpot Daily with n8n

Keeping Mailchimp and HubSpot in sync is essential if your marketing and sales teams rely on both tools. In this tutorial, you will learn how to use an n8n workflow template that runs every day, finds Mailchimp members that changed since the last run, and upserts them into HubSpot as contacts.

The workflow uses workflow static data to remember the last time it executed. That way, each new run only processes recently updated Mailchimp members, which keeps the sync fast and efficient.


What you will learn

By the end of this guide, you should be able to:

  • Configure a daily Cron trigger in n8n.
  • Use workflow static data to store a last execution timestamp.
  • Fetch Mailchimp members changed since a given timestamp.
  • Upsert contacts into HubSpot using email, first name, and last name.
  • Harden the workflow with validation, error handling, and rate limit awareness.

How the workflow works at a glance

Here is the overall flow of the n8n template:

  • Trigger: Cron node – runs every day at 07:00.
  • Step 1: FunctionItem node – read or initialize the last execution timestamp from workflow static data.
  • Step 2: Mailchimp node – fetch all members changed since that timestamp.
  • Step 3: HubSpot node – upsert each member as a HubSpot contact using email and name fields.
  • Step 4: FunctionItem node – update the stored timestamp to the current run time.

This pattern minimizes API calls because it only handles records that changed since the previous run. It also avoids the need for an external database by using n8n’s built-in workflow static data.


Key concepts before you build

Workflow static data

n8n provides getWorkflowStaticData('global') so you can store small pieces of data that persist between executions of the same workflow. In this template, static data holds a single value:

  • lastExecution – the timestamp of the last successful run.

On each run, the workflow:

  1. Reads lastExecution from static data, or initializes it if it does not exist.
  2. Uses that timestamp in the Mailchimp query.
  3. Updates lastExecution to the current run’s timestamp after processing.

Incremental sync using timestamps

Mailchimp supports a since_last_changed filter, which you will provide as an ISO timestamp. This lets the workflow fetch only members that were added or updated after a specific moment in time.

Upserting contacts in HubSpot

HubSpot’s upsert behavior lets you create or update a contact in a single operation, typically using the email address as the unique identifier. If the email exists, the contact is updated. If it does not, a new contact is created.


Step-by-step: Build the n8n workflow

Step 1 – Set up the Cron trigger

First, configure when the workflow should run.

  1. Add a Cron node as the starting node.
  2. Set it to run every day at 07:00.
  3. Confirm the timezone in the node or in n8n’s global settings so it matches your region.

This creates a predictable daily sync window where the rest of the workflow will execute.


Step 2 – Get or initialize the last execution timestamp

Next, you need a FunctionItem node to read and manage the timestamp in workflow static data.

  1. Add a FunctionItem node after the Cron node and name it something like Get last execution timestamp.
  2. Use code similar to the following:
// run once per input item
const staticData = getWorkflowStaticData('global');

if (!staticData.lastExecution) {  // Initialize on first run  staticData.lastExecution = new Date();
}

item.executionTimeStamp = new Date();
item.lastExecution = staticData.lastExecution;

return item;

What this code does:

  • staticData.lastExecution is your persistent value. It is shared and retained across workflow runs.
  • item.lastExecution is the value that will be passed to the Mailchimp node.
  • item.executionTimeStamp captures the current run’s time so you can save it back to static data at the end.

Later in the guide, you will see how to serialize this date to ISO format for Mailchimp.


Step 3 – Fetch changed members from Mailchimp

Now you will use the last execution timestamp to retrieve only the changed members.

  1. Add a Mailchimp node after the FunctionItem node.
  2. Configure it to:
operation: getAll
list: "your-list-id"
options: {  sinceLastChanged: ={{ $json["lastExecution"] }}
}

Important details:

  • Mailchimp expects since_last_changed to be an ISO timestamp such as 2024-03-10T07:00:00.000Z. If needed, ensure your stored date is converted with new Date().toISOString() when you save it into static data.
  • The getAll operation automatically handles pagination, which is helpful for large audiences.
  • For big lists, keep Mailchimp’s rate limits in mind. You can combine this with n8n’s SplitInBatches node or delays if required.

At this point, the workflow has a collection of Mailchimp members that changed since the last run.


Step 4 – Upsert contacts into HubSpot

With the changed members available, the next step is to map them to HubSpot contacts.

  1. Add a HubSpot node after the Mailchimp node.
  2. Set the operation to upsert (create or update contact).
  3. Map the fields from Mailchimp to HubSpot, for example:
email: ={{ $json["email_address"] }}
additionalFields: {  firstName: ={{ $json["merge_fields"].FNAME }},  lastName: ={{ $json["merge_fields"].LNAME }}
}

Best practices for this step:

  • Validate that email_address exists before upserting. You can use an IF node or SplitInBatches with checks to skip invalid records.
  • Ensure HubSpot property names like firstName and lastName match your HubSpot account configuration.
  • If you expect a high volume of contacts, consider batching requests with SplitInBatches to avoid hitting HubSpot’s API limits.

Step 5 – Save the new last execution timestamp

After all upserts are done, you need to update the stored timestamp so the next run only picks up later changes.

  1. Add another FunctionItem node at the end of the workflow and name it something like Set new last execution timestamp.
  2. Configure this node to execute once per workflow (use the executeOnce option) so it runs only a single time after all items are processed.
  3. Use code similar to this:
const staticData = getWorkflowStaticData('global');

staticData.lastExecution = $item(0).$node["Get last execution timestamp"].executionTimeStamp;

return item;

Explanation:

  • You read executionTimeStamp from the first item that passed through the earlier FunctionItem node.
  • You store that value as staticData.lastExecution, which will be used in the next workflow run.
  • Because the node runs only once, you avoid overwriting the timestamp multiple times within the same execution.

Hardening the workflow for production

Once the basic flow is working, you can improve reliability and robustness with a few extra steps.

Timezone handling

  • Use ISO timestamps with timezone information such as new Date().toISOString() so Mailchimp interprets dates correctly.
  • Keep your Cron node timezone and your timestamp handling consistent.
  • If you need advanced control, consider using a library like luxon to format timestamps explicitly.

Error handling

  • Configure error workflows in n8n or use the Execute Workflow on Error option.
  • Capture failed records and either retry them later or send a notification to an owner.
  • Consider logging error details such as Mailchimp member ID or HubSpot contact email.

Rate limiting

  • Monitor API usage for both Mailchimp and HubSpot.
  • Use SplitInBatches and optional Wait nodes to control throughput.
  • Batch HubSpot upserts where possible to reduce the number of API calls.

Data validation

  • Filter out records that do not have a valid email address or other required properties before calling HubSpot.
  • Use an IF node to branch invalid items into a separate path for review.

External persistence and audit trails

  • For mission critical setups, you may want to store lastExecution in an external key-value store such as Google Sheets, Redis, or a database if you need cross-workflow access or backup.
  • Maintain an audit log of processed records, including IDs and timestamps, in a file or database for reconciliation and debugging.

Testing and debugging the n8n template

Before letting the workflow run every day, test it with a small subset of data.

  • Run the workflow manually using a test list or use SplitInBatches to limit processing to 1 to 5 items.
  • Use Execute Workflow and inspect each node’s output to confirm:
    • The lastExecution timestamp is correct.
    • The sinceLastChanged value sent to Mailchimp is in ISO format.
    • The HubSpot node receives the expected email and name fields.
  • Enable node-level logging where appropriate.
  • Add Slack or email notifications on errors so you are alerted quickly if something breaks.

Security and credentials

Handle credentials with care:

  • Store all API keys in n8n’s Credentials section, not inside FunctionItem code.
  • For HubSpot, the example uses an App Token credential.
  • For Mailchimp, configure your API key in the Mailchimp node credentials.
  • Never hardcode secrets directly in the workflow code fields.

Example workflow structure

The complete workflow in this tutorial follows this sequence, which matches the provided template:

CronFunctionItem (get last execution) → Mailchimp (get changed members) → HubSpot (create/update contact) → FunctionItem (set new last execution timestamp)

You can import the template JSON or recreate it step by step using the instructions above.


Frequently asked questions

What happens on the first run when there is no timestamp?

On the first run, the FunctionItem node checks if staticData.lastExecution exists. If it does not, it initializes it with the current date. From that point on, each run will update the timestamp at the end of the workflow.

Can I change the daily time or frequency?

Yes. Adjust the Cron node settings to run at a different time or on a different schedule, such as hourly or on specific weekdays. The timestamp logic will still work because it always uses the last stored execution time.

Can I sync additional fields?

Absolutely. In the HubSpot node, map any extra Mailchimp merge fields to HubSpot properties, as long as those properties exist in your HubSpot account. Just extend the additionalFields section with more mappings.

What if I need two-way sync?

This template focuses on one-way sync from Mailchimp to HubSpot. For two-way sync, you would usually create an additional workflow or extend this one with logic that reads from HubSpot and writes back to Mailchimp, while carefully handling conflicts and duplicates.


Conclusion and next steps

By combining Cron, workflow static data, Mailchimp, and HubSpot nodes, you can build a reliable daily sync that only processes changed members. This approach reduces API usage, keeps your contact data aligned, and is easy to extend with validation, error handling, and batching as your audience grows.

Next steps:

  • Import or recreate this workflow in your n8n instance.
  • Update the Mailchimp list ID and HubSpot field mappings to match your accounts.
  • Test with a small subset of contacts, then enable the Cron trigger for daily automation.

If you work with very large audiences or need more advanced features such as two-way sync or external logging, consider consulting an automation specialist or asking for help in the n8n community.

Need a ready to import JSON or help adapting the template? Share your Mailchimp list ID and HubSpot field mappings and you can receive a workflow tailored to your setup.

Service Page SEO Blueprint: Competitor-Driven Workflow

Service Page SEO Blueprint: Competitor-Driven Workflow

Use this n8n workflow template to build a repeatable, analysis-driven SEO blueprint for service pages that align with user intent, mirror competitive patterns, and maximize conversions.

Overview: A Systematic Workflow for Service Page SEO

High-performing service pages rarely succeed by accident. They rank because they accurately reflect search intent, cover the right topics with sufficient depth, and guide visitors toward clear conversion actions. This n8n workflow operationalizes that process.

Instead of relying on intuition, the workflow ingests competitor service pages, performs structured heading and metadata analysis, evaluates user intent for a target keyword, and synthesizes these inputs into a concrete SEO blueprint. The output includes a prioritized outline, topic coverage requirements, and UX plus conversion recommendations that can be handed directly to content, design, and development teams.

What the Workflow Delivers

By the end of a run, this n8n template produces a complete service page blueprint that includes:

  • A hierarchical H1-H4 outline aligned with user intent and search expectations
  • A list of essential topics and sections that must be included to be competitive
  • Identified content and UX gaps that competitors are not addressing
  • Recommendations for CTAs, trust signals, and conversion elements
  • Copy guidance that can be used directly by writers and page builders

The result is a data-backed framework that balances ranking potential with conversion optimization, suitable for teams that want to standardize their service page production process.

Core Analysis Capabilities

The workflow focuses on turning unstructured competitor and keyword data into structured guidance. It analyzes:

  • Top competitor service pages, including headings, meta tags, and schema
  • Heading n-grams that reveal recurring concepts and topic clusters
  • Page layout patterns, trust signals, CTAs, and conversion mechanisms
  • Explicit user intent for the target query, including primary and secondary intent
  • Gaps between user expectations and competitor coverage

Key Benefits for SEO and Automation Teams

  • Evidence-based structure: Page outlines that reflect what searchers and search engines expect to see
  • Table stakes clarity: A definitive list of topics and sections that must be present to be credible in the SERP
  • Differentiation opportunities: Gaps and missed angles that can be used to stand out from competitors
  • Conversion-oriented UX: Specific guidance on CTAs, trust elements, and risk reversal for the chosen query
  • Operational efficiency: Ready-to-implement H1-H4 structure and copy prompts that reduce revision cycles

Prerequisites and Required Tools

To execute this workflow effectively, you will need:

  • An n8n instance (self-hosted or cloud) to orchestrate the automation
  • A web text extraction service such as Jina Reader for parsing competitor pages
  • An LLM provider for analysis, for example Google Gemini or PaLM
  • Up to five competitor service page URLs relevant to your target keyword
  • Your brand name and a concise description of the services you offer

Limiting the input to a maximum of five competitor URLs keeps the analysis focused on the most relevant patterns in your specific niche.

Workflow Architecture in n8n

The template is structured as a series of coordinated nodes that handle data collection, transformation, and analysis. At a high level, the workflow includes:

  • Input and configuration nodes to capture URLs, brand data, and the target keyword
  • HTTP Request or integration nodes to fetch competitor HTML
  • Parsing nodes for extracting headings, metadata, and schema
  • Code or Function nodes to compute heading n-grams and aggregate patterns
  • LLM nodes to run competitor analysis, user intent assessment, synthesis, and outline generation
  • Output nodes to format the final blueprint in a form suitable for documentation or direct use

Step-by-Step Execution Flow

1. Input Collection

The workflow begins with an input step where you define the analysis parameters:

  • Up to five competitor service page URLs
  • The primary target keyword
  • A short list of your core services
  • Your brand name

This information is typically supplied through a manual trigger, form, or n8n UI input node. These variables are stored and passed to subsequent nodes for contextual analysis.

2. Fetching and Parsing Competitor Pages

Next, the workflow retrieves each competitor URL and processes the raw HTML. Using a web text extraction service such as Jina Reader, it isolates the key on-page elements required for SEO analysis:

  • Headings (H1 through H6) in their original order
  • Meta title and meta description tags
  • JSON-LD or other schema markup blocks
  • Other recurring structural elements relevant to service pages

This parsing step transforms unstructured HTML into structured data that can be evaluated programmatically and by the LLM.

3. Heading N-gram Computation

Once headings are extracted, a processing step computes frequent 2-word, 3-word, and 4-word sequences. These heading n-grams highlight:

  • Concepts and phrases that competitors repeatedly emphasize
  • Topical clusters that signal relevance to the target keyword
  • Patterns that can inform your own heading and section naming strategy

This quantitative layer complements the qualitative LLM analysis that follows.

4. Competitor Analysis Report via LLM

The workflow then passes the structured competitor data and n-gram results to an LLM node. The model acts as an automated SEO analyst and produces a structured report covering:

  • Meta title and description patterns, including CTA styles and positioning
  • Common outline sections such as process, pricing, FAQs, and guarantees
  • The most prominent heading concepts derived from the n-gram analysis
  • Typical content depth, structure, and the presence of trust-building elements

This report is formatted so that it can be reused in later synthesis steps and easily interpreted by humans.

5. User Intent Analysis for the Target Keyword

Independently of the competitor review, the workflow prompts the LLM to analyze the target keyword itself. The model is instructed to determine:

  • Primary and secondary search intent types
  • Likely searcher personas and buying stage
  • Information, proof, and UX elements a user expects on a satisfying page

This ensures that the final blueprint is not purely competitor-driven but also grounded in explicit user intent.

6. Synthesis and Gap Analysis

The next node combines the competitor report with the user intent analysis. The LLM is directed to identify and classify:

  • Table stakes: Topics and sections that are both expected by users and consistently covered by competitors
  • Gaps: Clear user needs or questions that competitors do not fully address
  • Priority keywords and semantic themes: Concepts that should be emphasized within headings and body copy

This synthesis step is where the workflow moves from raw data to strategic recommendations.

7. Generation of the Ideal Page Outline

Using the synthesized insights, the LLM generates a complete hierarchical outline for your service page. The output typically includes:

  • A recommended H1 that aligns with the target keyword and user intent
  • H2 sections that map to major user concerns and decision points
  • H3 and H4 subheadings that organize supporting details and proof

The outline is structured to place high-impact information and persuasive elements in an order that supports both SEO and conversion goals.

8. UX, Copy, and Conversion Recommendations

Finally, the workflow produces a set of actionable UX and copy guidelines tailored to the target query, including:

  • CTA messaging, placement, and frequency
  • Trust signals such as testimonials, case studies, certifications, and logos
  • Risk reversal mechanisms, for example guarantees or free consultations
  • Tone of voice guidelines and readability rules
  • Visual or layout suggestions that support clarity and scannability

This output can be exported, documented, or directly shared with stakeholders responsible for implementing the page.

Applying the Blueprint in Practice

Once the workflow has generated your service page blueprint, the implementation process typically follows these steps:

  1. Validate table stakes: Confirm that every essential section identified by the workflow is present in your page plan and covered concisely.
  2. Adopt the outline: Use the suggested H1 and H2 headings where appropriate. They are designed to align with both search intent and competitive norms.
  3. Implement UX guidance: Place primary CTAs above the fold, and introduce secondary CTAs after key proof points, pricing sections, or case studies.
  4. Integrate trust elements: Add case studies, client logos, testimonials, and guarantees in locations where they address the main objections and risks perceived by the user.
  5. Measure and iterate: Monitor traffic, rankings, click-through rate, time on page, and conversion rate. Feed learnings back into the workflow and refine as needed.

Best Practices for Service Page SEO and UX

  • Keep copy clear and scannable with short paragraphs, descriptive headings, and bullet lists.
  • Use keywords naturally in headings without over-optimization. Prioritize clarity and benefits to the user.
  • Implement schema markup such as FAQ, Service, and LocalBusiness where relevant to enhance SERP visibility and eligibility for rich results.
  • Address objections proactively through sections like “Why Choose Us” or “Common Questions” that speak directly to decision friction.
  • Track engagement metrics such as CTR, scroll depth, time on page, and conversion rate to validate improvements and guide further optimization.

Example Scenario: Local Service Optimization

Consider a business targeting the query “commercial cleaning services Chicago”. When you run this workflow with relevant competitor URLs, the analysis may reveal that leading pages consistently highlight:

  • Pricing tiers for different service levels
  • Detailed service area coverage within the Chicago region
  • Health and safety protocols, for example COVID-safe procedures

The synthesis might also uncover gaps such as the absence of transparent pricing calculators or a lack of concise, quantified case studies. The resulting blueprint could therefore recommend:

  • A simple pricing calculator to provide upfront cost expectations
  • A visual map or clear description of neighborhoods and districts served
  • Short case studies with measurable outcomes, such as reduced complaints or improved cleanliness scores
  • A strong satisfaction guarantee or similar risk reversal aimed at price-sensitive commercial buyers

This illustrates how the workflow converts raw competitive and intent data into a differentiated, conversion-focused page plan.

Conclusion and Next Steps

This competitor-driven SEO blueprint workflow for service pages gives teams a structured, repeatable way to design pages that both rank and convert. By combining automated data extraction, n-gram analysis, and LLM-driven synthesis within n8n, it reduces guesswork and provides a single source of truth for strategists, writers, and designers.

If you want to standardize high-performing service page creation, you can deploy this workflow in your n8n environment, adapt it to your stack, and use the outputs as the foundation for every new or redesigned service page.

Get Your Blueprint

Published by a digital marketing strategist and automation practitioner. Follow on LinkedIn for additional n8n workflow templates, SEO audit frameworks, and conversion optimization methodologies.

Build a Second Brain with n8n, Supabase & OpenAI

Build a Second Brain with n8n, Supabase & OpenAI

Imagine never losing a valuable idea, a powerful video insight, or a crucial PDF again. Imagine being able to ask a simple question and instantly get a clear, context-rich answer from your own notes, documents, and saved content. That is what this n8n workflow template helps you create: an automated “second brain” that quietly organizes your knowledge while you focus on the work that really matters.

In this guide, you will walk through the journey from scattered information to a focused, searchable knowledge base powered by n8n, Telegram, Supabase vector store, OpenAI embeddings and models, and Apify for YouTube transcripts. You will see how each node fits together, how to ingest and retrieve data reliably, and how this template can become the foundation for a more automated and intentional workflow.

The Problem: Information Overload, Fragmented Attention

Your ideas, research, and inspirations are probably spread across PDFs, YouTube videos, voice notes, and chat messages. You save links, download files, record quick thoughts, and tell yourself you will “come back later.” But later rarely comes, and even when it does, finding what you need can feel like searching for a needle in a haystack.

This constant fragmentation drains focus. You repeat work, lose context, and spend time hunting for information instead of using it. The more you create and consume, the more overwhelming it can become.

The Possibility: A Second Brain That Works While You Work

A Second Brain is a system that captures, organizes, and makes your knowledge instantly retrievable. With automation, you no longer rely on memory or manual filing. Instead, your tools cooperate in the background.

By combining:

  • n8n for automation and orchestration
  • Supabase as a vector database for long-term storage
  • OpenAI embeddings and chat models for understanding and reasoning
  • Apify and PDF extractors for pulling content from external sources

you can create a personal or team knowledge base that ingests PDFs, YouTube videos, voice notes, and Telegram messages, then answers questions with retrieval-augmented generation (RAG). You are not just storing information, you are building a system that helps you think, remember, and act faster.

The Mindset: Start Small, Automate Boldly, Improve Over Time

You do not need a perfect system to begin. This n8n template is designed as a practical starting point, not a finished product. You can deploy it quickly, test it with a few documents, and then evolve it as your needs grow.

Think of this workflow as a stepping stone:

  • First, capture what already flows through your daily tools, like Telegram.
  • Then, let automation handle the repetitive tasks: extracting, summarizing, chunking, and embedding.
  • Finally, build confidence by asking questions and refining the system as you see how it responds.

Each improvement you make, each small automation you add, frees a bit more of your time and attention. Over weeks and months, that compounds into a powerful advantage.

The Architecture: How Your Automated Second Brain Fits Together

The provided n8n template connects several services into a single coherent workflow:

  • Telegram Trigger – receives messages, documents, voice notes, and links
  • Switch node – routes each input to the right processor (PDF, YouTube, voice, plain text)
  • Apify – extracts YouTube transcripts when a video URL is detected
  • OpenAI (Whisper / Chat) – transcribes audio and summarizes content into articles
  • Text splitter – breaks long text into chunks optimized for embeddings
  • OpenAI Embeddings – converts each chunk into a vector representation
  • Supabase vector store – stores vectors and metadata for fast semantic retrieval
  • Vector Store Agent – uses RAG with Postgres chat memory and OpenAI Chat to answer your questions

Each component plays a specific role, but you do not have to wire it all from scratch. The template gives you a working baseline that you can inspect, adapt, and extend.

The Journey: From Raw Input To Searchable Knowledge

Step 1: Capture Everything With The Telegram Trigger

Your journey starts with the Telegram Trigger node. This is your capture point, the place where you send anything you want your Second Brain to remember.

The Telegram Trigger listens for:

  • Messages and notes you type directly
  • Documents such as PDFs you upload
  • Audio voice notes you record on the go
  • Links, including YouTube URLs you want to process

As soon as something arrives, the workflow passes it to a Switch node that decides how to handle it. You simply keep using Telegram as usual, while the automation quietly does the heavy lifting.

Step 2: Route Each Input With The Switch Node

The Switch node is your intelligent traffic controller. It inspects each incoming message and sends it to the appropriate flow:

  • PDF upload processor when a document is attached
  • Voice note transcription when a voice file is present
  • YouTube transcript flow when a YouTube URL is detected
  • Plain text flow for direct notes and messages

This routing step is what allows one single entry point (Telegram) to feed many different types of content into your Second Brain without manual sorting.

Step 3: Extract The Actual Content

Once the Switch node has routed the input, the workflow focuses on turning each item into usable text.

For PDFs:

  • Use an “Extract from File” node or a dedicated PDF extractor.
  • Pull the raw text from the uploaded PDF.
  • Send that text to an OpenAI model to convert the document into a summarized article or structured content.

For voice notes:

  • Send the audio file to OpenAI Whisper for transcription.
  • Receive clean text that you can store, search, and use in RAG later.

For YouTube videos:

  • Call an Apify actor with the YouTube URL.
  • The workflow waits for Apify to finish extracting the transcript.
  • Retrieve the dataset from the last Apify run.
  • Send the transcript to an OpenAI summarization task to turn it into a more concise article.

At this point, your scattered inputs are transformed into structured text that your Second Brain can understand and work with.

Step 4: Normalize And Enrich With Metadata

Before storing anything, you want a consistent structure. This is where you shape your knowledge so it remains usable months or years from now.

Use an “Edit Fields” or a mapping node to build a standard document format. Typical metadata you might attach includes:

  • title
  • source (YouTube URL, Telegram chat id, filename, etc.)
  • date
  • author or uploader
  • type (pdf, transcript, note)

This metadata is not just “nice to have.” It becomes essential for filtered searches, audits, and trust. When an answer appears, you will want to know where it came from and when it was created.

Step 5: Split, Embed, And Store In Supabase

Large documents are powerful, but they are also hard to search directly. To make them truly useful, the workflow breaks them into overlapping chunks and converts each chunk into a vector embedding.

The process looks like this:

  • Use a recursive character splitter to split long text into manageable pieces.
  • Configure chunk sizes and overlap so that context is preserved across chunks.
  • Send each chunk to OpenAI Embeddings to generate a vector representation.
  • Insert every chunk, along with its embedding and metadata, into a Supabase vector table.

Once stored in Supabase, these chunks can be retrieved by semantic similarity. That means your Second Brain can find relevant information based on meaning, not just exact keyword matches.

Step 6: Confirm That Ingestion Succeeded

To close the loop and keep you confident in the system, the workflow sends a short confirmation back to Telegram, such as:

“Successfully added to Second Brain!”

This small message matters. It reassures you that the content is now indexed, searchable, and ready to support your future questions.

Turning Knowledge Into Answers: Querying With RAG

Once your Second Brain has ingested some content, the real magic begins. You can ask questions in Telegram or another interface, and the workflow will respond using RAG, combining retrieval and generation to give you context-aware answers.

The Vector Store Agent As Your Orchestrator

The Vector Store Agent node coordinates the retrieval-augmented generation process. When you send a query, it:

  • searches the Supabase vector store for the most relevant document chunks
  • retrieves these chunks, along with any necessary metadata
  • optionally uses Postgres chat memory to maintain session context
  • passes both your query and the retrieved chunks to an OpenAI chat model
  • returns a concise, context-aware answer directly in your chat

Instead of manually searching through files, you simply ask questions like “What were the main points from that marketing PDF I uploaded last week?” or “Summarize the key ideas from the last few YouTube videos I saved,” and let the system do the work.

Session Memory For Ongoing Conversations

To make your Second Brain feel more like a real assistant, the workflow uses Postgres chat memory. This memory stores conversational context per session, typically keyed by a sessionKey such as the original prompt or chat id.

With session memory:

  • Follow-up questions can reference earlier answers.
  • Context is preserved across turns, improving coherence.
  • Conversations feel natural instead of fragmented.

This is especially powerful when you are exploring a topic or refining a plan over multiple questions.

Best Practices To Keep Your Second Brain Reliable

Design A Smart Chunking Strategy

Chunking is not just a technical detail. It directly affects how well your system can retrieve and understand information.

A good baseline is to use a recursive text splitter with:

  • Chunk sizes around 200-500 tokens
  • Overlap of about 50-100 tokens

This preserves context across chunks and improves retrieval relevance, especially when answers depend on surrounding sentences or paragraphs.

Treat Metadata As Non-Negotiable

Always store metadata like:

  • source
  • date
  • type
  • URL or file reference

Metadata allows you to:

  • Filter searches by type or timeframe
  • Trace answers back to the original source
  • Audit your system when something looks off

This is crucial for trust, especially when your Second Brain starts influencing decisions.

Choose Models And Embeddings Wisely

Your model choices shape both quality and cost. A few guidelines:

  • Embeddings: Use a high-quality OpenAI embedding model designed for semantic search.
  • Chat model: Choose a model that balances cost and capability, such as gpt-4o-mini or a similar option in the workflow.

You can always start lean and upgrade as your usage and requirements grow.

Manage Cost And Rate Limits Proactively

Automated ingestion of large PDFs and long YouTube transcripts can generate many tokens and embeddings. To keep costs under control:

  • Batch your inserts where possible.
  • Rate-limit API calls in n8n.
  • Track usage and costs over time.
  • Use a “wait” node pattern when waiting for Apify runs or heavy external processing so you do not block the workflow unnecessarily.

These small adjustments help you scale confidently without surprises.

Protect Security And Privacy

Your Second Brain may contain sensitive information, so it deserves serious protection:

  • Encrypt sensitive data at rest (Supabase provides encryption options).
  • Use API keys with restricted scopes and rotate credentials regularly.
  • Define data retention policies for personal data and private chats.

By designing with security in mind from the start, you can safely expand your knowledge base over time.

Ideas To Extend And Evolve Your Workflow

Once the core template is running, you can gradually enhance it to match your unique workflows.

  • Automated metadata enrichment: Use LLMs to extract tags, categories, and summaries during ingestion.
  • Versioning: Keep a history of documents and support rollbacks when content changes.
  • Search UI: Build a lightweight web interface that queries Supabase, shows source links, and displays confidence scores.
  • Active learning loop: Offer a way to flag wrong answers and then retrain or re-annotate problematic documents.

Each of these improvements turns your Second Brain into an even more powerful partner in your work and learning.

Troubleshooting: When Retrieval Is Not Good Enough

If answers feel off or incomplete, treat it as feedback, not failure. You can systematically improve quality by checking a few key areas:

  1. Verify the embedding model and text splitter settings.
  2. Inspect stored metadata for missing or incorrect fields.
  3. Check chunk size and overlap, and increase them if chunks are too short or lack context.
  4. Run direct similarity queries against Supabase vectors to confirm that relevant chunks are being returned.

Each tweak brings your Second Brain closer to how you actually think and search.

From Template To Transformation: Your Next Steps

This n8n workflow template shows a complete, extensible approach to building an automated Second Brain. It captures PDFs, YouTube transcripts, voice notes, and chat messages, then turns them into a searchable knowledge base using OpenAI embeddings and Supabase. The Vector Store Agent ties everything together, enabling RAG-powered Q&A over your personal or business content.

To move from idea to impact:

  • Deploy the workflow in your n8n instance.
  • Connect your Telegram bot and Supabase project.
  • Test with a few small documents and transcripts.
  • Tune chunking and embedding parameters based on your content.
  • Add UI elements or access controls when you are ready to share it with others.

As you use it, you will naturally discover what to automate next. Let that curiosity guide your improvements.

Call To Action: Start Building Your Second Brain Today

You do not need a full-scale knowledge management strategy to begin. You just need one working workflow and the willingness to iterate.

Try this template in n8n, connect your Telegram bot and Supabase instance, and start feeding your knowledge into a searchable system. Let it capture your ideas, transcripts, and documents while you focus on creating, learning, and making decisions.

If you want help customizing the workflow, optimizing costs, or improving retrieval quality, reach out or subscribe for more n8n automation templates and tutorials. Your Second Brain can grow alongside your projects, your business, and your ambitions.

Automate Bigfoot Vlogs with n8n and VEO3

Automate Bigfoot Vlogs with n8n and VEO3

By the time the third Slack notification lit up her screen, Riley knew she was in trouble.

As the lead marketer for a quirky outdoor brand, she had pitched a bold idea: a weekly series of short Bigfoot vlogs starring a lovable character named Sam. The first test episode went viral. The problem was what came next.

Every new episode meant writing scripts, storyboarding scenes, giving notes to freelancers, waiting for renders, and then redoing half of them because Sam’s fur color or camera framing did not match the last video. Each 60-second vlog was taking days of back-and-forth. Her team was exhausted, budgets were creeping up, and the brand wanted more.

One late night, scrolling through automation tools, Riley found something that looked almost too perfect: an n8n workflow template that promised to turn a simple “Bigfoot Video Idea” into a complete, 8-scene vlog using Anthropic Claude for writing and Fal.run’s VEO3 for video generation.

She did not just want another tool. She needed a reliable pipeline. So she opened the template and decided to rebuild her production process around it.

The challenge: character vlogs at scale

Riley’s goal was simple to say and painful to execute: keep Sam the Bigfoot consistent, charming, and on-brand across dozens of short-form vlogs, without burning her team out on repetitive tasks.

Her bottlenecks were clear:

  • Too much time spent on manual storyboarding and copywriting
  • Inconsistent character details from one episode to the next
  • Slow approvals and expensive re-renders
  • No clean way to track and store all the final clips

She realized that the repetitive parts of the process were ideal for automation. What if she could lock in Sam’s personality and visual style, let AI handle the heavy lifting, and keep humans focused on approvals and creative direction?

That is where the n8n workflow template came in: an end-to-end, character-driven video pipeline built around a Bigfoot named Sam.

The blueprint: an automated Bigfoot vlog factory

As Riley explored the template, she saw a clear architecture emerge. It was not just a random collection of nodes. It was a structured production line for short-form character vlogs, all orchestrated in n8n.

High-level workflow architecture

  • Input: a form trigger that captures a single Bigfoot Video Idea
  • Creative: a narrative_writer node using Anthropic Claude to build an 8-scene storyboard
  • Production: a scene_director node that expands each scene into a production-ready prompt
  • Approval: Slack messaging plus a human approval node to control the green light
  • Render: scene prompts split and queued to Fal.run VEO3 to generate 8-second clips
  • Delivery: finished clips downloaded, uploaded to Google Drive, and shared in Slack

In other words, a repeatable system that could take one focused idea and output a polished, multi-scene Bigfoot vlog with minimal human overhead.

Act I: one idea, one form, one Bigfoot

Where it all starts: the form_trigger

Riley’s first step was simple. She customized the form_trigger node so anyone on her team could submit a Bigfoot Video Idea.

The form asked for a short, focused brief, just one or two sentences. Things like:

  • Location (forest trail, snowy mountain, campsite)
  • Emotional tone (hopeful, nervous, excited)
  • Core gag or hook (Sam tries to use human slang, Sam loses his selfie stick, Sam reviews hiking snacks)

She quickly learned that specificity here mattered. The more concrete the prompt, the better the downstream AI output. The form did not try to capture everything. It simply gave the language model the right constraints and creative direction.

Act II: Claude becomes the showrunner

The writer’s room in a single node: narrative_writer (Claude)

Once an idea hit the workflow, the narrative_writer node took over. Under the hood, it invoked Anthropic Claude with a carefully crafted, persona-rich prompt. Instead of a loose script, Riley wanted a structured storyboard.

Claude returned exactly that: an 8-scene storyboard with timestamps and concise narrative paragraphs, each including Sam’s spoken lines. Every scene was designed to last 8 seconds, so the final video would have a predictable rhythm and duration.

To keep things precise, the workflow included a narrative_parser node. This parser enforced the schema and made sure Claude always produced:

  • Exactly 8 scenes
  • Each scene locked at 8 seconds
  • Clearly separated dialogue and description

For Riley, this was the first turning point. She no longer had to manually outline every beat. The storyboard came out structured, consistent, and ready for production.

Breaking it down: split_scenes

The next obstacle was scale. Riley did not want to render one long video in a single fragile step. She wanted granular control, scene by scene.

The split_scenes node solved that. It took the full storyboard and split it into individual scene items. Each scene became its own payload, ready for the next phase.

This design choice unlocked two crucial benefits:

  • Scenes could be rendered in parallel, which sped up production
  • Any failed scene could be re-generated without touching the rest

Suddenly, the workflow was not just automated, it was resilient.

Act III: from creative brief to camera-ready prompt

The bridge between imagination and VEO3: scene_director

Now came the part Riley was most worried about: keeping Sam consistent.

In earlier experiments with other tools, Sam’s fur color drifted, his vibe changed, and sometimes he mysteriously lost the selfie stick that was supposed to define his vlog style. She needed a way to stop that drift.

That is where the scene_director node came in. Each individual scene brief flowed into this node, along with two critical prompt components:

  • A strict Character Bible
  • A detailed Series Style Guide

The scene_director combined the compact scene description with these rules and produced a production-ready prompt for Fal.run’s VEO3. Each output prompt encoded:

  • Shot framing: selfie-stick point-of-view, 16:9 horizontal
  • Technical specs: 4K resolution at 29.97 fps, 24mm lens at f/2.8, 1/60s shutter
  • Character lock: precise fur color, eye catch-lights, hand position, overall silhouette
  • Performance notes: Sam’s exact verbatim lines, a mild “geez” speaking style, and a clear rule of no on-screen captions

By embedding these constraints directly into the prompt, Riley dramatically reduced visual and tonal drift. Every generated clip looked and felt like part of the same series.

The Character Bible that kept Sam real

Before this workflow, Riley’s team kept Sam’s details in scattered docs and Slack threads. Now, they were codified in a single source of truth: the Character Bible that lived inside the prompts.

It covered:

  • Identity and vibe: Sam is a gentle giant, optimistic, a little awkward, always kind
  • Physical details: 8-foot tall male Bigfoot, cedar-brown fur (#6d6048), fluffy cheeks, recognizable silhouette
  • Delivery rules: jolly tone, strictly PG-rated, sometimes misuses human slang in a playful way
  • Hard constraints: absolutely no on-screen text or subtitles allowed

Riley embedded this Character Bible in both the narrative_writer and scene_director prompts. The redundancy was intentional. Repeating critical constraints across multiple nodes reduced the chance of the models drifting away from Sam’s established identity.

Act IV: humans stay in the loop

Before spending money: aggregate_scenes and Slack approval

Riley knew that AI could move fast, but she still wanted a human checkpoint before paying for video renders.

To handle this, the workflow used an aggregate_scenes step that pulled all the scene prompts together into a single package. This package was then sent to Slack using a message node and a send_and_wait approval control.

Her editors received a clear Slack message with all eight scene prompts. From there they could:

  • Approve the full set and let the pipeline continue
  • Deny and send it back for revisions

This human-in-the-loop step became a quiet hero. It prevented off-brand lines, caught occasional tonal mismatches, and protected the rendering budget. It was always cheaper to fix a prompt than re-render multiple 8-second clips.

Act V: the machines take over production

Into the queue: set_current_prompt, queue_create_video, and VEO3

Once the team gave the green light in Slack, n8n iterated through each approved scene prompt.

For every scene, the workflow used a set_current_prompt step to prepare the payload, then called Fal.run’s VEO3 queue API via an HTTP request in the queue_create_video node.

Riley configured the request with:

  • prompt: the full, production-ready scene description
  • aspect_ratio: 16:9
  • duration: 8 seconds
  • generate_audio: true

The VEO3 queue responded with a request_id for each job. The workflow then polled the status endpoint until each job completed, and finally captured the resulting video URL.

What used to be a flurry of manual uploads and waiting on freelancers was now an automated, monitored rendering loop.

From URLs to assets: download_result_video and upload_video

Once VEO3 finished rendering, n8n moved into delivery mode.

The download_result_video node retrieved each clip from its URL. Then the upload_video node sent it to a shared Google Drive folder that Riley’s team used as their central asset library.

They adopted a simple naming convention like scene_1.mp4, scene_2.mp4, and so on, to keep episodes organized and easy to reference.

After all eight scenes were safely stored, the workflow aggregated the results and posted a final Slack message with a Google Drive link. The team could review, assemble, and schedule the episode without hunting for files.

Technical habits that kept the pipeline stable

As Riley iterated on the workflow, a few best practices emerged that made the system far more robust.

  • Fixed scene duration: The entire pipeline assumed 8-second clips. This kept timing consistent across scenes and avoided misalignment issues in downstream editing.
  • Detailed camera specs: Including framing, selfie-stick wobble, lens details, and shutter speed in prompts helped VEO3 match the “found footage” vlog aesthetic.
  • Explicit forbidden items: By clearly stating “no captions” and “no scene titles on screen” in the prompts, Riley reduced the need for follow-up edits.
  • Human approval for brand safety: The Slack approval node caught risky lines or off-tone jokes before any render costs were incurred.
  • Rate limiting and batching: She configured rate limits on rendering calls and batched uploads to stay within API quotas and avoid concurrency issues on the rendering backend.

Testing, monitoring, and scaling up the series

Riley did not flip the switch to full production on day one. She started small.

First, she ran a single storyboard and rendered just one scene to confirm that Sam’s look, tone, and audio matched the brand’s expectations. Once that was stable, she added more checks.

The workflow began to track:

  • Video duration, to ensure each clip really hit 8 seconds
  • File size boundaries, to catch abnormal outputs
  • Basic visual heuristics, like dominant color ranges, to confirm Sam’s fur tone stayed in the expected cedar-brown band

Using n8n’s aggregate nodes, she collected job metadata over time. This gave her a performance and quality history that helped with troubleshooting and optimization.

When the series took off and the team needed more episodes, she scaled by:

  • Sharding scene generation across multiple worker instances
  • Throttling Fal.run requests to respect rate limits and quotas
  • Using cloud storage like Google Drive or S3 for long-term asset storage
  • Experimenting with an automated QA step that used a lightweight vision model to confirm key visual attributes, such as fur color and presence of the selfie stick, before final upload

Security and cost: the unglamorous but vital part

Behind the scenes, Riley tightened security around the tools that powered the workflow.

She stored all API keys, including Anthropic, Fal.run, Google Drive, and Slack, in n8n’s secure credentials system. Workflow access was restricted so only authorized teammates could trigger production runs or modify key nodes.

On the cost side, she monitored VEO3 rendering and audio generation expenses. Because the workflow only rendered approved prompts, there were fewer wasted jobs. In some episodes, she reused cached assets like recurring background plates or sound beds to further reduce compute time.

The resolution: from bottleneck to Bigfoot content engine

A few weeks after adopting the n8n template, Riley’s team looked very different.

They were no longer bogged down in repetitive scripting and asset wrangling. Instead, they focused on what mattered most: crafting better ideas, refining Sam’s personality, and planning distribution strategies for each episode.

The n8n + Claude + VEO3 pipeline had transformed a scattered, manual process into a reliable system:

  • Ideas came in through a simple form
  • Claude handled structured storyboarding
  • The scene_director locked in style and character consistency
  • Slack approvals guarded quality and budget
  • VEO3 handled high-quality rendering
  • Google Drive and Slack closed the loop on delivery

Sam the Bigfoot stayed on-brand, charming, and recognizable, episode after episode. The team finally had a scalable way to produce character-driven short-form vlogs without losing creative control.

Ready to launch your own Bigfoot vlog workflow?

If Riley’s story sounds like the kind of transformation your team needs, you do not have to start from a blank canvas. The exact n8n workflow template she used is available, complete with:

  • The production-ready n8n JSON workflow
  • The Character Bible used to keep Sam consistent
  • The scene director prompt and checklist for reliable VEO3 outputs

You can adapt it for your own character, brand, or series, while keeping all the technical benefits of the original pipeline.

CTA: Want the n8n workflow JSON or the full prompt pack used in this Bigfoot vlog pipeline? Ask to export the template and you will get implementation notes plus recommended credential settings so you can launch your first automated episode quickly.

Automate Crunchbase Fundraises to Google Sheets

Automate Crunchbase Fundraises to Google Sheets with n8n and Piloterr

Imagine waking up, opening a single Google Sheet, and instantly seeing every new Seed, Series A, and Series B round from the last day, complete with company details, LinkedIn links, traffic estimates, and more. No more manual Crunchbase searches, no more copy-paste marathons.

That is exactly what this n8n workflow template does for you. It connects Crunchbase data via the Piloterr API, enriches each company, then neatly logs everything into Google Sheets on a schedule you set. In this guide, we will walk through what the template does, why it is useful, and how to get it running step by step.

Why use this n8n workflow template?

If you work in VC, sales, or market research, you probably spend a lot of time trying to answer questions like:

  • Which companies raised funding in the last 24 hours?
  • Where can I find their website, LinkedIn, and basic company stats?
  • How do I keep a clean, always-updated list for my team?

Instead of manually digging through Crunchbase, this workflow automates the whole process. It pulls fresh fundraising data every day, enriches each company, and updates a structured Google Sheet that you can filter, pivot, or connect to other tools.

So if you want a living, breathing dealflow or prospecting sheet that updates itself, this template is built for you.

What the workflow actually does

Here is the high-level flow, without getting too technical yet:

  • Starts on a schedule using an n8n Schedule Trigger (for example, every morning at 08:00).
  • Calls the Piloterr API, which wraps Crunchbase data, to fetch recent Seed, Series A, and Series B funding rounds.
  • Splits the API response so each funding event becomes its own item in the workflow.
  • Pulls out key funding details like round type, amount, date, and Crunchbase permalinks.
  • Enriches each company via another Piloterr endpoint to get website, LinkedIn, traffic, employees, locations, and total funding.
  • Extracts the LinkedIn URL from the enrichment response using a small Code node.
  • Normalizes and prepares all those fields for a Google Sheet (domain, country, founded date, etc.).
  • Merges everything together and sends it to Google Sheets using appendOrUpdate so you avoid duplicates.

The result is a clean, always-updated spreadsheet of recent fundraises that you can use for deal sourcing, outbound, or analysis.

When this template is a perfect fit

  • VC funds that want a daily feed of new rounds and potential co-investors in a simple spreadsheet.
  • Sales teams who use “recently funded” as a strong buying signal and want a prospect list ready every morning.
  • Market intelligence / strategy teams tracking trends in startup funding and growth across regions or sectors.

If any of these sound like you, this workflow can quietly run in the background and keep your data fresh without you lifting a finger.

What you need before you start

Before importing or configuring the n8n template, make sure you have:

  • n8n set up, either cloud or self-hosted, with access to create and run workflows.
  • Piloterr account and API key, since Piloterr provides the Crunchbase funding and company data.
  • Google account plus a target Google Sheet that already has a header row. The column names should match the fields you plan to map from n8n.
  • Basic comfort with common n8n nodes: HTTP Request, Set, Code, Merge, and Google Sheets.

Once those are ready, you can plug in your credentials and get the workflow running in just a few steps.

Deep dive: how each n8n node works together

1. Schedule Trigger – your daily starter

The workflow begins with a Schedule Trigger node. In the example template, it is configured to run once a day at 08:00, but you can easily change that:

  • Daily at a specific time
  • Hourly
  • Weekly, or any custom cron expression

This is what keeps your Google Sheet updated without you having to remember to run anything manually.

2. Piloterr – Get recent fundraises (three HTTP Request nodes)

Next, the workflow talks to Piloterr’s Crunchbase funding endpoint using three separate HTTP Request nodes, one for each investment type:

  • seed
  • series_a
  • series_b

Each node calls:

https://piloterr.com/api/v2/crunchbase/funding_rounds

with query parameters such as:

  • investment_type (seed, series_a, or series_b)
  • days_since_announcement=1 to grab the last day’s events

You authenticate using your Piloterr HTTP header credential, which stores your API key securely inside n8n.

3. Split results into individual funding events

The Piloterr API returns arrays of funding rounds. To work with each event separately, the template uses an ItemLists / Split Results node:

  • fieldToSplitOut is set to results

This expands the array so each funding round becomes a single item in the workflow, which makes it easy to enrich and map downstream.

4. First Set node – extract key funding fields

After splitting, a Set node pulls out the important pieces of each funding event and gives them clean field names. For example:

  • type from investment_type
  • money_raised from money_raised.value_usd or value_usd
  • announced_on
  • company_name from funded_organization_identifier.value
  • link as the company Crunchbase permalink
  • event_link as the funding round permalink

This step is all about normalizing the raw API response into something that is easier to reuse later.

5. Piloterr company enrichment with batching

Now that you know which companies raised money, it is time to enrich them. The workflow uses another HTTP Request node that calls Piloterr’s company info endpoint, for each company:

https://piloterr.com/api/v2/crunchbase/company/info?query=https://www.crunchbase.com/organization/{{ $json["link"] }}

To stay within rate limits and still move quickly, the node is configured with batching, typically with a batch size of 3. This means n8n processes three companies at a time.

The enrichment response includes helpful fields such as:

  • Company website URL
  • Semrush traffic metrics
  • Total funding raised
  • Employee count
  • Locations (often as an array)
  • Founded date
  • Social networks (including LinkedIn)

6. Code node – extract the LinkedIn URL

The social networks come back as an array of objects. To grab just the LinkedIn profile URL, the workflow uses a simple Code node with JavaScript. Conceptually, it does something like this:

// pseudo-code used in the workflow
let linkedinObject = $json.social_networks.find(e => e.name === 'linkedin');
$input.item.json.linkedin_url = linkedinObject ? linkedinObject.url : null;
return $input.item;

If LinkedIn is missing, it safely sets linkedin_url to null so the workflow does not break.

7. Second Set node – prepare data for Google Sheets

Before sending anything to Google Sheets, another Set node cleans and reshapes the data so it fits nicely into your spreadsheet columns. Typical transformations include:

  • Extracting the domain from the website URL
  • Selecting the most recent Semrush visits metric
  • Formatting the founded date into a consistent format
  • Picking a main country from the locations array
  • Ensuring numeric fields and dates are ready for filtering and charts in Sheets

This step is where you shape the data exactly how you want to see it in your Google Sheet.

8. Merge node and Google Sheets (appendOrUpdate)

Finally, the workflow uses a Merge node to combine:

  • The original funding data (round type, amount, date, event link)
  • The enriched company data (website, LinkedIn, traffic, employees, etc.)

That merged item then goes into the Google Sheets node. The node is configured with:

  • Mode: appendOrUpdate
  • A unique matching column, for example event_link

Using appendOrUpdate means:

  • If a row with the same event_link already exists, it gets updated.
  • If it does not exist, a new row is appended.

This keeps your sheet clean and avoids duplicate rows for the same funding round.

Step-by-step: setting up the workflow in n8n

Here is how to recreate or adjust the template inside your own n8n instance.

  1. Create the workflow and set the schedule
    Start a new workflow in n8n and add a Schedule Trigger. Configure it to run daily at your preferred time, or use a custom interval if you want more frequent updates.
  2. Add three HTTP Request nodes for fundraises
    For each investment type (seed, series_a, series_b):
    • Use an HTTP Request node pointing to https://piloterr.com/api/v2/crunchbase/funding_rounds.
    • Add query parameters like:
      • days_since_announcement=1
      • investment_type set to the specific type
    • Select your Piloterr HTTP Header credential for authentication.
  3. Split the API results
    Add an ItemLists / Split results node and set:
    • fieldToSplitOut = results

    This will turn each funding event into its own item.

  4. Extract core funding fields
    Add a Set node to map and rename fields such as:
    • investment_type
    • money_raised.value_usd
    • announced_on
    • funded_organization_identifier.value as company name
    • Company and event permalinks for link and event_link
  5. Enrich companies with Piloterr
    Add another HTTP Request node for the company info endpoint:
    • URL pattern: https://piloterr.com/api/v2/crunchbase/company/info?query=https://www.crunchbase.com/organization/{{ $json["link"] }}
    • Enable batching and set a batch size, for example 3, to respect rate limits.
  6. Use a Code node to grab LinkedIn
    Insert a Code node that:
    • Looks through social_networks for the object where name === 'linkedin'.
    • Sets linkedin_url if found, or null if not.
  7. Prepare fields for Google Sheets
    Add another Set node to:
    • Extract the domain from the website URL.
    • Pick the right Semrush traffic metric.
    • Map total funding, employee count, and country.
    • Format the founded date and any other fields you want in your sheet.
  8. Merge and send to Google Sheets
    Use a Merge node to combine funding and enrichment data, then connect it to a Google Sheets node:
    • Map each field to a column in your sheet.
    • Choose appendOrUpdate as the operation.
    • Set a unique matching column, such as event_link, to handle deduplication.
  9. Test the workflow
    Run the workflow manually from the trigger:
    • Check each node’s output in n8n to confirm data looks right.
    • Verify that rows appear correctly in your Google Sheet.
    • Adjust field mappings or formats if needed.

Tips, best practices, and common issues

A few small tweaks can make this workflow more robust and scalable.

  • Handle rate limits gracefully
    If Piloterr or Crunchbase rate limits kick in:
    • Lower the batch size in the enrichment node.
    • Optionally insert a short delay node between batches.
  • Error handling strategy
    You can set HTTP nodes to continueOnFail if you are fine with partial data, but for more control:
    • Add a Function or Code node to retry failed requests.
    • Log or alert on failures so you know when something goes wrong.
  • Prevent duplicates
    Always use a unique identifier in appendOrUpdate, typically the event permalink:
    • Map that to a dedicated event_link column in Sheets.
    • Use it as the matching column in the Google Sheets node.

Log n8n Errors to Monday.com Automatically

Log n8n Errors to Monday.com Automatically

Reliable automation requires robust error visibility. Instead of manually checking failed executions in n8n, you can centralize error reporting in Monday.com and treat incidents like any other trackable work item. This guide explains how to implement an n8n workflow template that captures runtime errors, creates a corresponding Monday.com item, and enriches it with the stacktrace, error message, workflow name, and timestamp – fully automated.

Why route n8n errors into Monday.com?

For teams that operate multiple automations, the n8n execution list alone is not sufficient for structured incident management. Logging n8n errors directly into Monday.com allows you to:

  • Use a single board as an error inbox for all workflows
  • Assign incidents to owners and track status through your existing process
  • Maintain a historical record of failures with context and timestamps
  • Collaborate via comments, automations, and notifications already in Monday.com

n8n provides a dedicated Error Trigger node that fires whenever a workflow execution fails. By combining this trigger with Monday.com nodes, you can turn every failure into a structured item on a board with no manual work.

Solution architecture

The automation uses a compact but powerful sequence of nodes in n8n. The workflow listens for errors, creates a Monday.com item, enriches it with contextual data, and formats the stacktrace for reliable storage.

Core nodes and responsibilities

  • Error Trigger – Listens for failed executions and exposes execution metadata and error details.
  • Monday (create item) – Creates a new item on a specified board and group to represent the incident.
  • Date & Time – Generates a human readable timestamp for when the error occurred.
  • Code – Processes the raw error object, extracts the stacktrace, and normalizes it for long text storage.
  • Monday (update) – Updates the previously created item with detailed column values such as workflow name, stacktrace, error message, and timestamp.

The following sections walk through the configuration of each step and highlight automation best practices along the way.

Configuring the n8n workflow

1. Capture failures with the Error Trigger node

Start by adding an Error Trigger node to a new n8n workflow. This node emits data whenever a workflow run fails. You can:

  • Attach it to a specific workflow you want to monitor, or
  • Configure it globally to react to failures across multiple workflows.

The trigger provides access to execution metadata, the error object, and workflow information, which will later be mapped into Monday.com columns.

2. Create a Monday.com item for each error

Next, add a Monday node and configure it to create an item on your chosen error tracking board and group. This item represents a single failed execution.

Use a clear naming convention so the item title is meaningful at a glance. For example, you can use the execution ID, the workflow name, or a combination of both. In the example workflow, the item name is set to the execution ID:

={{ "".concat($('Error Trigger').last().json.execution.id) }}

Ensure that:

  • The board is dedicated to error tracking or clearly labeled.
  • The group is specific to error items so triage is straightforward.

3. Generate a timestamp with the Date & Time node

Add a Date & Time node. Configure it to output the current date and time in your preferred format, such as ISO 8601 or a localized representation. This value will later populate a Monday.com column so that each incident includes an explicit occurrence time.

Having a standardized timestamp greatly simplifies correlation with logs, external monitoring tools, and on-call rotation schedules.

4. Process and normalize the stacktrace using a Code node

Stacktraces can be verbose and may include characters that do not render cleanly in project management tools. To make them safe and readable inside Monday.com long-text fields, insert a Code node (JavaScript) that reads the error object from the Error Trigger and prepares the data.

The following example is robust and handles missing fields gracefully:

// Get the last Error Trigger execution
const execution = $('Error Trigger').last().json.execution || {};
const error = execution.error || {};
const workflowName = execution.workflow ? execution.workflow.name : null;

const stack = error.stack || '';
// Replace newlines with literal \n so they are preserved in Monday long text
const escapedStack = stack.replace(/\r?\n/g, '\\n');

return [{  json: {  stack: escapedStack,  message: error.message || '',  workflowName  }
}];

This node outputs a normalized JSON object containing:

  • stack – the stacktrace with newlines escaped.
  • message – the error message.
  • workflowName – the name of the workflow that failed.

5. Enrich the Monday.com item with detailed column values

Once the item has been created, use another Monday node configured with the changeMultipleColumnValues operation. This node updates the existing item with structured data from the previous nodes.

Monday.com expects the columnValues field as a JSON string. Map your workflow fields into the appropriate column IDs for your board. A typical mapping might look like this (replace the placeholders with your actual column IDs):

={  "column_id_for_workflow_name (text)": "{{ $('Error Trigger').item.json.workflow.name }}",  "column_id_for_error_stack (long text)": "{{ $('Code').last().json.stack }}",  "column_id_for_error_message (text)": "{{ $('Error Trigger').item.json.execution.error.message }}",  "column_id_for_date (text)": "{{ $('Date & Time').last().json.currentDate }}"
}

It is critical to ensure that the update targets the same item that was created in the earlier Monday node. Set the itemId field accordingly:

itemId: ={{ $('Monday').last().json.id }}

At this point, every failed n8n execution produces a Monday.com item that includes the workflow name, error message, timestamp, and a safely formatted stacktrace.

Implementation best practices

Column design and storage strategy

To keep your Monday.com board usable and performant, design columns with error data in mind:

  • Workflow name – Text column.
  • Error message – Text column for quick scanning.
  • Stacktrace – Long text column to store detailed technical information.
  • Timestamp – Date or text column, depending on your formatting needs.

If stacktraces become extremely large, consider truncating them in the Code node and storing the full raw trace in an external system such as S3 or Google Drive, then place a link in Monday.com instead of the full content.

Handling newlines and special characters

Stacktraces often contain newlines and other special characters. Escaping newlines as \n in the Code node, as shown earlier, preserves logical line breaks while avoiding rendering issues in some views.

If you prefer real newlines in the Monday.com UI, test the behavior against your specific board and API version. Validate that the long text field accepts unescaped newlines without corrupting the JSON payload.

Authentication and rate limiting

Use a dedicated Monday.com API credential within n8n, ideally scoped and labeled for error logging. This makes auditing and rotation easier.

In high volume environments, many workflows might fail within a short timeframe. To avoid hitting Monday.com rate limits or cluttering the board:

  • Consider batching or grouping repeated errors by signature.
  • De-duplicate incidents when the same error occurs repeatedly in a short period.
  • Optionally create a single summary item that links to detailed logs stored elsewhere.

Testing and validation

Before relying on the integration in production, perform controlled tests:

  • Use pinData in the Error Trigger to simulate an error payload during design time.
  • Create a small test workflow that throws an error intentionally to validate end-to-end behavior.
  • Verify that each Monday.com column is populated as expected and that the itemId mapping is correct.

Security and data sensitivity

Stacktraces and error messages can reveal sensitive implementation details, such as file paths, environment variables, or even PII. Treat these items as potentially confidential:

  • Restrict access to the Monday.com board to only those who need to triage incidents.
  • Consider redacting or masking known sensitive patterns in the Code node before logging.
  • Align the retention policy of your error board with your compliance requirements.

Advanced enhancements

Once the basic workflow is in place, you can extend it to support more sophisticated incident management patterns:

  • Automatic assignment – Use Monday.com automations or an additional Monday node in n8n to set a person column based on rotation or error type.
  • Error aggregation – Detect repeated errors and increment a counter in a single item instead of creating one item per failure.
  • – Push complete stacktraces to object storage (for example S3) and only store a link in Monday.com to keep items concise.
  • Real time alerts – Combine this workflow with Slack or Microsoft Teams nodes to notify on-call engineers when a new error item is created.

End-to-end workflow summary

The complete n8n workflow follows this sequence:

  1. Error Trigger captures the failed execution and exposes error metadata.
  2. Monday (create item) creates a new item on the designated error board.
  3. Date & Time generates the timestamp for the incident.
  4. Code processes the error object, extracts the stacktrace, and escapes newlines.
  5. Monday (update) populates all relevant columns on the created item.

The diagram referenced in the original template illustrates this exact node order. Using the code snippets and mappings above, you can reproduce the workflow in your own n8n instance and adapt it to your internal standards.

Conclusion and next steps

Integrating n8n error reporting with Monday.com transforms raw failures into actionable work items. By using the Error Trigger, Monday nodes, and a small amount of custom code, you can establish a centralized, auditable error reporting pipeline in minutes and align it with your existing project management practices.

If you would like, I can:

  • Provide a downloadable n8n workflow JSON with placeholder Monday.com column IDs.
  • Adjust the Code node to automatically redact sensitive values from stacktraces.
  • Help you map your specific Monday.com column IDs into the configuration.

Share which option you prefer and, if applicable, your board structure or column IDs, and I will generate an importable workflow JSON tailored to your environment.